应用新功能引导实现案例
介绍
本文介绍如何使用high_light_guide三方库完成应用新版本功能导航。通过高亮区域与蒙版背景的明暗度对比,让用户快速锁定重点功能,了解版本变更和业务入口。
效果图预览
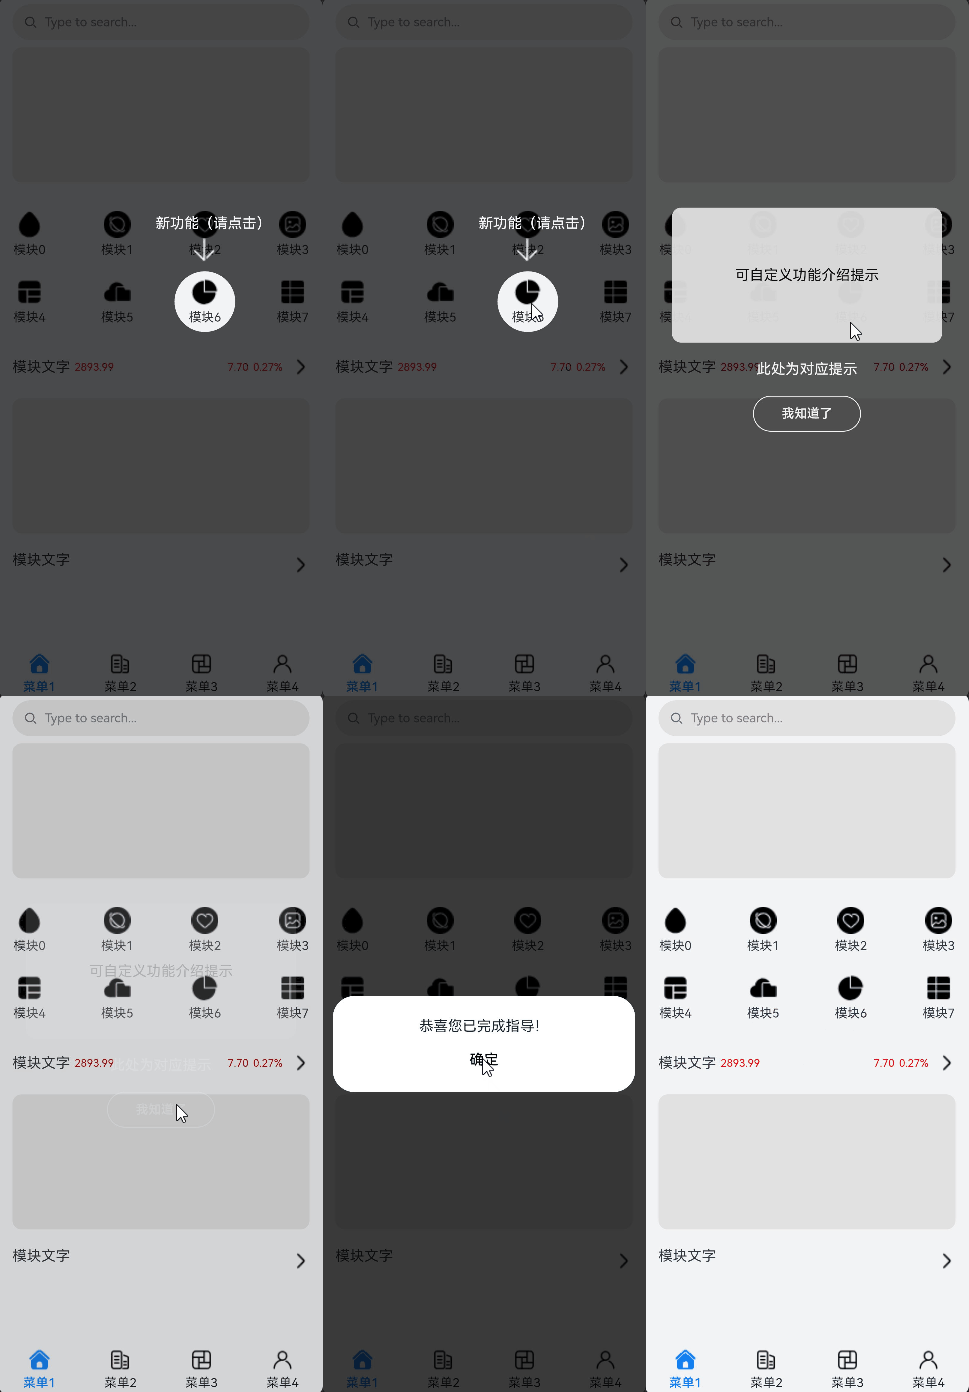
使用说明
- 点击页面上对应按钮或空白区域进入下一个提示,直至提示完成。
实现思路
- 在需要使用的页面引入high_light_guide库中的引导页组件。
typescript
   // 引入引导页组件
import { HighLightGuideBuilder, HighLightGuideComponent, Controller, GuidePage, HighLightShape, RectF } from '@ohos/high_light_guide';- 初始化引导页构建类,通过addHighLight绑定对应id组件的高光。此案例设定3个addGuidePage引导页配置,每个配置里添加引导页组件。
typescript
   // 初始化引导页构建类
   aboutToAppear() {
     this.builder = new HighLightGuideBuilder()
       .alwaysShow(true)
       .addGuidePage(GuidePage.newInstance()// 设定第一处提示
         .setEverywhereCancelable(true)// 允许点击任意处关闭
         .addHighLightWithOptions('test', HighLightShape.CIRCLE, options)// 为id为test的组件绑定特定形状高光
         .setHighLightIndicator(this.firstIndicator.bind(this))
         .setEnterAnimation(this.enterAnimatorParam)
         .setExitAnimation(this.exitAnimatorParam))
       .addGuidePage(GuidePage.newInstance()// 设定第二处提示
         .setHighLightIndicator(this.secondIndicator)
         .setEnterAnimation(this.enterAnimatorParam)
         .setExitAnimation(this.exitAnimatorParam))
       .addGuidePage(GuidePage.newInstance()// 设定第三处提示
         .setEverywhereCancelable(false)
         .setHighLightIndicator(this.thirdIndicator));
}- 设定各setHighLightIndicator里的引导层布局组件
typescript
   @Builder
   private firstIndicator() {
     ... // 引导层内容
}-
计算id为test组件处于页面中的位置,为引导说明组件做位置控制。
使用@Provide装饰器和@Consume装饰器:与后代组件双向同步,将基础页面布局中id为test组件的坐标传递给引导页。
typescript
   @Provide PosX: number = 0;
   @Provide PosY: number = 0;
   @State firstIndicatorHeight: number = 0;

   @Builder
   private firstIndicator() {
     ... // 引导层内容:提示文字等
   }
   .onAreaChange((oldValue: Area, newValue: Area) => {
     this.firstIndicatorHeight = Number(newValue.height);// 获取此引导组件的高度
   })
   // 此案例x坐标为id为test组件宽度的一半
   // y坐标为id为test组件相对于屏幕顶部的距离与自身高度的差值
   .position({ x: this.PosX, y: this.PosY - this.firstIndicatorHeight })
typescript
   @Consume PosX: number;
   @Consume PosY: number;

   GridItem() {
     ...
   }
   .onAreaChange((oldValue: Area, newValue: Area) => {
     this.PosX = Number(newValue.width) / RADIUS;// 此案例需获取此组件宽度的一半,作为演示
     this.PosY = Number(newValue.globalPosition.y);
   })
如果你对这篇鸿蒙开发技术分析感兴趣,还请帮忙来个"素质三连" ,后续带你探索 "→更多←" 鸿蒙开发的技术奥秘!
- 添加引导页布局,通过HighLightGuideComponent的onReady回调参数controller控制引导层初始化显示。
typescript
   build() {
     Stack() {
       ...
       // 添加引导页布局
       HighLightGuideComponent({
         highLightContainer: this.HighLightComponent, // 引导页覆盖时的内容布局插槽
         currentHLIndicator: null, // 引导页的引导层插槽
         builder: this.builder, // 引导页的通用配置构建类
         onReady: (controller: Controller) => { // 引导页准备好的回调,获取引导页控制器
           this.controller = controller;
           this.controller.show();
         }
       })
       ...
     }
}- 自定义Builder,设定底层页面基础布局。
typescript
   @Builder
   private HighLightComponent() {
     Column() {
       ... // 布局内容
     }
     .alignItems(HorizontalAlign.Start)
     .width('100%')
     .height('100%');
}- 通过controller控制引导层跳转和销毁。
typescript
   this.controller.showPage(1);// 跳转第二个引导页
   this.controller.showPage(2);// 跳转第三个引导页
   this.controller.remove();   // 移除引导层
高性能知识点
不涉及
工程结构&模块类型
   highlightguide                               // har类型
   |---src\main\ets\pages
   |   |---Index.ets                            // 功能引导页面