首先是环境:
我是在Anaconda3中的Jupyter Notebook (tensorflow)中进行训练,环境各位自行安装
数据集:
本次数据集五个类型(键盘,椅子,眼镜,水杯,鼠标)我收集了每个接近两千张的图片共11091张
这个可以不用这么多因为cnn模型训练也用不上这么多的图片,可以自行减少,这个是我这边的要求,所以我索性就直接训练了。

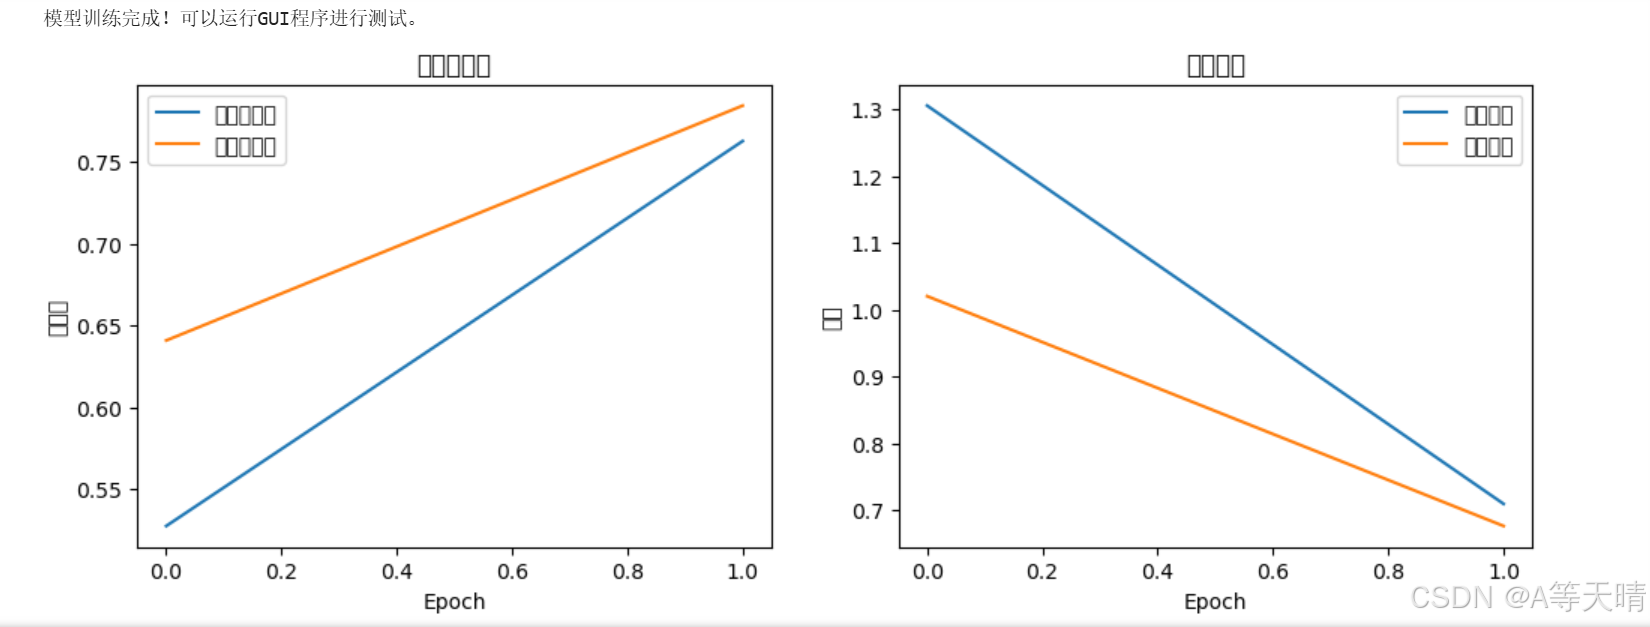
预测结果如下:


代码如下:
相关库:
python
import os
import numpy as np
from PIL import Image
from sklearn.model_selection import train_test_split
import matplotlib.pyplot as plt
import tensorflow as tf
from tensorflow.keras import models, layers
图片数据处理:
python
# 首先导入必要的库并设置PIL的限制
import os
import numpy as np
from PIL import Image
Image.MAX_IMAGE_PIXELS = None  # 解除PIL的图片大小限制
from sklearn.model_selection import train_test_split
import matplotlib.pyplot as plt
import tensorflow as tf
from tensorflow.keras import models, layers
import warnings
warnings.filterwarnings('ignore')  # 忽略警告信息

def load_and_preprocess_data(base_path, img_size=(300, 300), batch_size=32):
    # 初始化列表存储图片路径和标签
    image_paths = []
    labels = []

    # 类别映射
    class_mapping = {
        'jp': 0,  # 键盘
        'yz': 1,  # 椅子
        'yj': 2,  # 眼镜
        'bz': 3,  # 水杯
        'sb': 4   # 鼠标
    }

    # 首先检查并收集有效的图片路径和标签
    print("正在检查图片文件...")
    for filename in os.listdir(base_path):
        if filename.endswith(('.jpg', '.png')):
            prefix = filename[:2]
            if prefix in class_mapping:
                try:
                    img_path = os.path.join(base_path, filename)
                    # 尝试打开图片验证其有效性
                    with Image.open(img_path) as img:
                        image_paths.append(img_path)
                        labels.append(class_mapping[prefix])
                        print(f"成功验证图片: {filename}")
                except Exception as e:
                    print(f"跳过无效图片 {filename}: {str(e)}")
                    continue

    if not image_paths:
        raise ValueError("没有找到有效的图片文件!")

    # 转换标签为numpy数组
    labels = np.array(labels)

    # 创建数据生成器
    class ImageDataGenerator:
        def __init__(self, image_paths, labels, img_size, batch_size):
            self.image_paths = image_paths
            self.labels = labels
            self.img_size = img_size
            self.batch_size = batch_size
            self.n = len(image_paths)
            self.indexes = np.arange(self.n)
            np.random.shuffle(self.indexes)
            self.i = 0

        def __len__(self):
            return (self.n + self.batch_size - 1) // self.batch_size

        def __iter__(self):
            return self

        def __next__(self):
            if self.i >= self.n:
                self.i = 0
                np.random.shuffle(self.indexes)
                raise StopIteration

            batch_indexes = self.indexes[self.i:min(self.i + self.batch_size, self.n)]
            batch_paths = [self.image_paths[i] for i in batch_indexes]
            batch_labels = self.labels[batch_indexes]

            batch_images = []
            valid_labels = []

            for path, label in zip(batch_paths, batch_labels):
                try:
                    with Image.open(path) as img:
                        # 转换为RGB模式
                        if img.mode != 'RGB':
                            img = img.convert('RGB')

                        # 调整图片大小
                        if img.size[0] > 1000 or img.size[1] > 1000:
                            img.thumbnail((1000, 1000), Image.Resampling.LANCZOS)
                        img = img.resize(self.img_size, Image.Resampling.LANCZOS)

                        # 转换为numpy数组
                        img_array = np.array(img, dtype=np.float32) / 255.0
                        batch_images.append(img_array)
                        valid_labels.append(label)
                except Exception as e:
                    print(f"处理图片 {path} 时出错: {str(e)}")
                    continue

            self.i += self.batch_size

            if not batch_images:  # 如果这个批次没有有效图片
                return self.__next__()  # 尝试下一个批次

            return np.array(batch_images), np.array(valid_labels)

    # 打印数据集信息
    print(f"\n总共找到 {len(image_paths)} 张有效图片")
    for label in set(labels):
        count = np.sum(labels == label)
        print(f"类别 {label}: {count} 张图片")

    # 划分训练集和测试集的索引
    n_samples = len(image_paths)
    n_train = int(0.8 * n_samples)
    indices = np.random.permutation(n_samples)
    train_idx, test_idx = indices[:n_train], indices[n_train:]

    # 创建训练集和测试集的生成器
    train_generator = ImageDataGenerator(
        [image_paths[i] for i in train_idx],
        labels[train_idx],
        img_size,
        batch_size
    )

    test_generator = ImageDataGenerator(
        [image_paths[i] for i in test_idx],
        labels[test_idx],
        img_size,
        batch_size
    )

    return train_generator, test_generator

# 修改训练函数中的训练循环
def train_and_save_model(model, train_generator, test_generator, model_name, epochs=10):
    # 编译模型
    model.compile(
        optimizer='adam',
        loss='sparse_categorical_crossentropy',
        metrics=['accuracy']
    )

    # 训练模型
    history = {'accuracy': [], 'val_accuracy': [], 'loss': [], 'val_loss': []}

    for epoch in range(epochs):
        print(f'\nEpoch {epoch+1}/{epochs}')

        # 训练阶段
        train_loss = []
        train_acc = []
        for i, (batch_images, batch_labels) in enumerate(train_generator):
            if len(batch_images) == 0:
                continue
            metrics = model.train_on_batch(batch_images, batch_labels)
            train_loss.append(metrics[0])
            train_acc.append(metrics[1])
            print(f'\rBatch {i+1} - loss: {metrics[0]:.4f} - accuracy: {metrics[1]:.4f}', end='')

        # 验证阶段
        val_loss = []
        val_acc = []
        for batch_images, batch_labels in test_generator:
            if len(batch_images) == 0:
                continue
            metrics = model.test_on_batch(batch_images, batch_labels)
            val_loss.append(metrics[0])
            val_acc.append(metrics[1])

        # 记录历史
        epoch_train_loss = np.mean(train_loss) if train_loss else 0
        epoch_train_acc = np.mean(train_acc) if train_acc else 0
        epoch_val_loss = np.mean(val_loss) if val_loss else 0
        epoch_val_acc = np.mean(val_acc) if val_acc else 0

        history['accuracy'].append(epoch_train_acc)
        history['val_accuracy'].append(epoch_val_acc)
        history['loss'].append(epoch_train_loss)
        history['val_loss'].append(epoch_val_loss)

        print(f'\nEpoch {epoch+1} - loss: {epoch_train_loss:.4f} - accuracy: {epoch_train_acc:.4f} - '
              f'val_loss: {epoch_val_loss:.4f} - val_accuracy: {epoch_val_acc:.4f}')

    # 绘制训练历史
    plt.figure(figsize=(12, 4))

    plt.subplot(1, 2, 1)
    plt.plot(history['accuracy'], label='训练准确率')
    plt.plot(history['val_accuracy'], label='验证准确率')
    plt.title('模型准确率')
    plt.xlabel('Epoch')
    plt.ylabel('准确率')
    plt.legend()

    plt.subplot(1, 2, 2)
    plt.plot(history['loss'], label='训练损失')
    plt.plot(history['val_loss'], label='验证损失')
    plt.title('模型损失')
    plt.xlabel('Epoch')
    plt.ylabel('损失')
    plt.legend()

    plt.savefig(f'{model_name}_training_history.png')

    # 保存模型
    model.save(f'{model_name}.h5')
模型训练:
python
#这里的epochs的数值为2,代表训练2次,各位可以自行更改
def train_and_save_model(model, train_generator, test_generator, model_name, epochs=2):
    # 编译模型
    model.compile(
        optimizer='adam',
        loss='sparse_categorical_crossentropy',
        metrics=['accuracy']
    )

    # 训练模型
    history = {'accuracy': [], 'val_accuracy': [], 'loss': [], 'val_loss': []}

    for epoch in range(epochs):
        print(f'\nEpoch {epoch+1}/{epochs}')

        # 训练阶段
        train_loss = []
        train_acc = []
        for batch_images, batch_labels in train_generator:
            metrics = model.train_on_batch(batch_images, batch_labels)
            train_loss.append(metrics[0])
            train_acc.append(metrics[1])

        # 验证阶段
        val_loss = []
        val_acc = []
        for batch_images, batch_labels in test_generator:
            metrics = model.test_on_batch(batch_images, batch_labels)
            val_loss.append(metrics[0])
            val_acc.append(metrics[1])

        # 记录历史
        history['accuracy'].append(np.mean(train_acc))
        history['val_accuracy'].append(np.mean(val_acc))
        history['loss'].append(np.mean(train_loss))
        history['val_loss'].append(np.mean(val_loss))

        print(f'loss: {np.mean(train_loss):.4f} - accuracy: {np.mean(train_acc):.4f} - '
              f'val_loss: {np.mean(val_loss):.4f} - val_accuracy: {np.mean(val_acc):.4f}')

    # 绘制训练历史
    plt.figure(figsize=(12, 4))

    plt.subplot(1, 2, 1)
    plt.plot(history['accuracy'], label='训练准确率')
    plt.plot(history['val_accuracy'], label='验证准确率')
    plt.title('模型准确率')
    plt.xlabel('Epoch')
    plt.ylabel('准确率')
    plt.legend()

    plt.subplot(1, 2, 2)
    plt.plot(history['loss'], label='训练损失')
    plt.plot(history['val_loss'], label='验证损失')
    plt.title('模型损失')
    plt.xlabel('Epoch')
    plt.ylabel('损失')
    plt.legend()

    plt.savefig(f'{model_name}_training_history.png')

    # 保存模型
    model.save(f'{model_name}.h5')
主程序:
python
# 设置数据集路径
base_path = 'E:/modol'

try:
    # 检查路径是否存在
    if not os.path.exists(base_path):
        raise FileNotFoundError(f"找不到指定路径:{base_path}")

    # 数据预处理
    print("正在加载和预处理数据...")
    train_generator, test_generator = load_and_preprocess_data(base_path, batch_size=32)

    # 训练CNN模型
    print("\n正在训练CNN模型...")
    cnn_model = create_cnn_model()
    train_and_save_model(cnn_model, train_generator, test_generator, 'cnn_model')


    print("\n模型训练完成!可以运行GUI程序进行测试。")

except Exception as e:
    print(f"\n程序出错:{str(e)}")
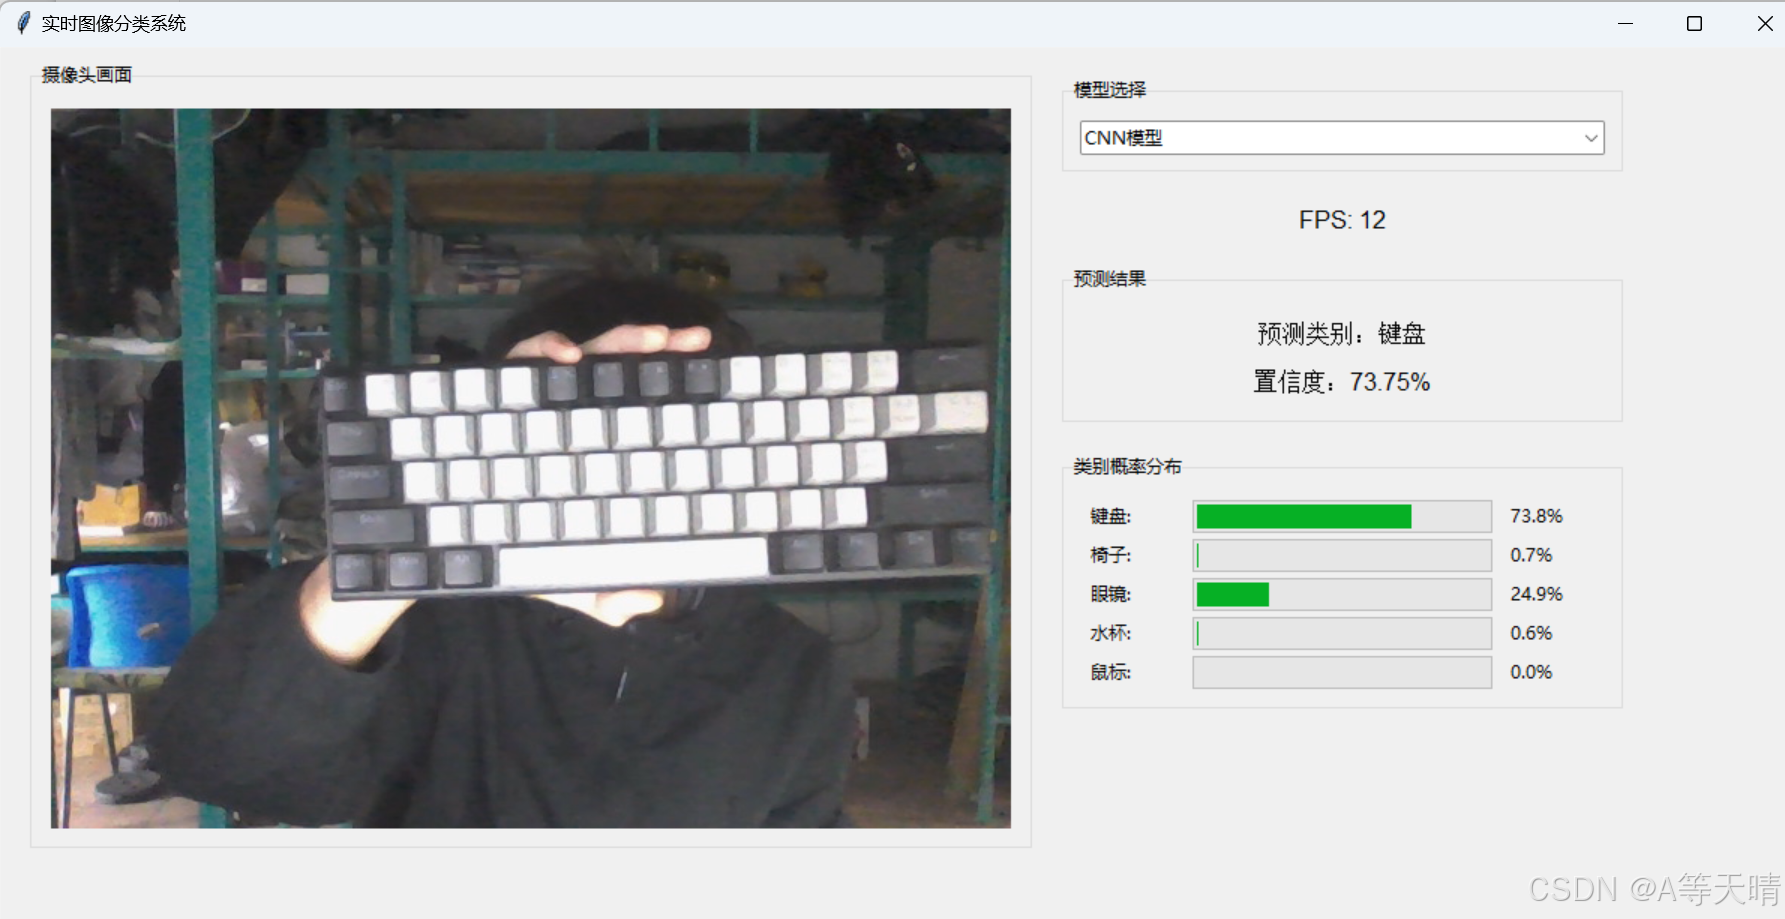
然后是GUI界面:
python
#单cnn模型gui界面
import tkinter as tk
from tkinter import filedialog, ttk
from PIL import Image, ImageTk
import numpy as np
import tensorflow as tf

class ObjectClassifierGUI:
    def __init__(self, root):
        self.root = root
        self.root.title("物体分类器")
        self.root.geometry("800x600")  # 设置窗口大小

        # 加载模型
        self.model = tf.keras.models.load_model('cnn_model.h5')

        # 类别标签
        self.classes = ['键盘', '椅子', '眼镜', '水杯', '鼠标']

        # 创建GUI组件
        self.create_widgets()

    def create_widgets(self):
        # 创建主框架
        main_frame = ttk.Frame(self.root, padding="10")
        main_frame.grid(row=0, column=0, sticky=(tk.W, tk.E, tk.N, tk.S))

        # 创建按钮框架
        button_frame = ttk.Frame(main_frame)
        button_frame.grid(row=0, column=0, columnspan=2, pady=10)

        # 选择图片按钮
        self.select_btn = ttk.Button(
            button_frame,
            text="选择图片",
            command=self.select_image
        )
        self.select_btn.pack(side=tk.LEFT, padx=5)

        # 清除图片按钮
        self.clear_btn = ttk.Button(
            button_frame,
            text="清除图片",
            command=self.clear_image,
            state='disabled'  # 初始状态为禁用
        )
        self.clear_btn.pack(side=tk.LEFT, padx=5)

        # 创建左右分栏
        left_frame = ttk.Frame(main_frame)
        left_frame.grid(row=1, column=0, padx=10)

        right_frame = ttk.Frame(main_frame)
        right_frame.grid(row=1, column=1, padx=10)

        # 图片显示区域(左侧)
        ttk.Label(left_frame, text="选择的图片:").pack(pady=5)
        self.image_label = ttk.Label(left_frame)
        self.image_label.pack(pady=5)

        # 预测结果显示(右侧)
        ttk.Label(right_frame, text="预测结果:").pack(pady=5)
        self.result_frame = ttk.Frame(right_frame)
        self.result_frame.pack(pady=5)

        # 预测结果详细信息
        self.pred_class_label = ttk.Label(
            self.result_frame,
            text="预测类别:-",
            font=('Arial', 12)
        )
        self.pred_class_label.pack(pady=5)

        self.confidence_label = ttk.Label(
            self.result_frame,
            text="置信度:-",
            font=('Arial', 12)
        )
        self.confidence_label.pack(pady=5)

        # 所有类别的概率分布
        self.prob_frame = ttk.Frame(self.result_frame)
        self.prob_frame.pack(pady=10)
        self.prob_bars = []
        for i in range(len(self.classes)):
            ttk.Label(self.prob_frame, text=f"{self.classes[i]}:").grid(row=i, column=0, padx=5)
            prob_bar = ttk.Progressbar(self.prob_frame, length=200, mode='determinate')
            prob_bar.grid(row=i, column=1, padx=5)
            prob_value = ttk.Label(self.prob_frame, text="0%")
            prob_value.grid(row=i, column=2, padx=5)
            self.prob_bars.append((prob_bar, prob_value))

    def select_image(self):
        # 打开文件选择对话框
        file_path = filedialog.askopenfilename()
        if file_path:
            # 处理并显示图片
            image = Image.open(file_path)
            # 保持原始宽高比例缩放图片用于显示
            display_size = (300, 300)
            image.thumbnail(display_size, Image.Resampling.LANCZOS)

            # 显示图片
            photo = ImageTk.PhotoImage(image)
            self.image_label.configure(image=photo)
            self.image_label.image = photo

            # 预处理图片用于预测
            image_for_pred = image.resize((300, 300))
            img_array = np.array(image_for_pred) / 255.0
            self.current_image_array = np.expand_dims(img_array, axis=0)

            # 进行预测
            self.predict_image(self.current_image_array)

            # 启用清除按钮
            self.clear_btn['state'] = 'normal'

    def predict_image(self, img_array):
        # 使用模型预测
        predictions = self.model.predict(img_array)

        # 获取预测结果
        pred_class_idx = np.argmax(predictions[0])
        pred_class = self.classes[pred_class_idx]
        confidence = predictions[0][pred_class_idx] * 100

        # 更新预测类别和置信度
        self.pred_class_label.config(text=f"预测类别:{pred_class}")
        self.confidence_label.config(text=f"置信度:{confidence:.2f}%")

        # 更新所有类别的概率条
        for i, ((bar, value_label), prob) in enumerate(zip(self.prob_bars, predictions[0])):
            percentage = prob * 100
            bar['value'] = percentage
            value_label.config(text=f"{percentage:.1f}%")

    def clear_image(self):
        # 清除图片显示
        self.image_label.configure(image='')
        self.image_label.image = None

        # 重置预测结果
        self.pred_class_label.config(text="预测类别:-")
        self.confidence_label.config(text="置信度:-")

        # 重置概率条
        for bar, value_label in self.prob_bars:
            bar['value'] = 0
            value_label.config(text="0%")

        # 禁用清除按钮
        self.clear_btn['state'] = 'disabled'

        # 清除存储的图像数组
        if hasattr(self, 'current_image_array'):
            del self.current_image_array

# 主程序
if __name__ == "__main__":
    root = tk.Tk()
    app = ObjectClassifierGUI(root)
    root.mainloop()
另外是一个调取摄像头实时识别的页面,但是这个精度不是很高可能是摄像头的画面太杂了就不分享了。