一、什么是
Redis中文网站
Redis(Remote Dictionary Server),即远程字典服务,是一个开源的使用ANSI C语言编写、支持网络、可基于内存亦可持久化的日志型、Key-Value,并提供多种语言的API。Redis开源,遵循BSD基于内存数据存储,被用于作为数据库、缓存、 消息中间件- 总结:
redis是一个内存型的数据库 Redis能干什么?
1、内存存储,持久化,内存存储是断电即失的,所以说持久化很重要(rdb,aof)
2、效率高,用于高速缓存
3、发布订阅系统
4、地图信息分析
5、计时器,浏览器,计数器
二、
Redis特点
- 多样数据类型
- 持久化
- 集群
- 事务
三、
Redis安装
windows安装
- 下载安装包:地址

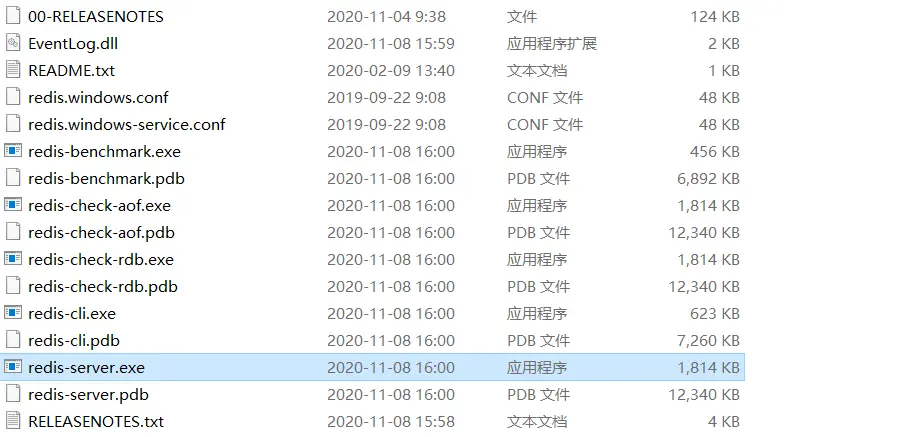
- 将压缩包解压,打开文件夹,内容如下:

- 开启
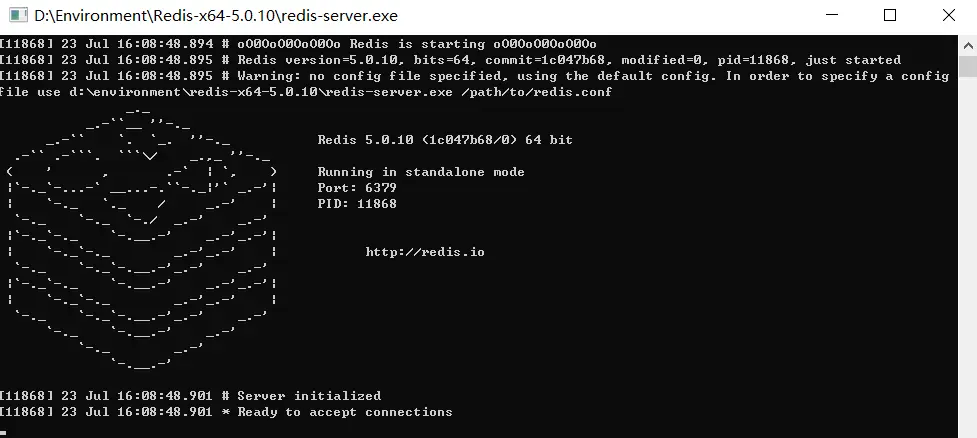
redis,双击运行服务:redis默认服务端口:6379

- 使用
redis客户端连接redis:ping命令,显示PONG,表示连接成功

-
测试:
设置键值对:set myKey abc
取出键值对:get myKey127.0.0.1:6379> ping
PONG # 连接成功
127.0.0.1:6379> set myKey abc # 设置键值对
OK
127.0.0.1:6379> get myKey # 取出键值对
"abc"
redis 推荐在 Linux 下进行开发
-
Linux安装wget https://download.redis.io/releases/redis-6.2.5.tar.gz tar xzf redis-6.2.5.tar.gz
cd redis-6.2.5 make
-
下载安装包:
redis-6.2.5.tar.gz[root@VM-0-6-centos ~]# wget https://download.redis.io/releases/redis-6.2.5.tar.gz
-
解压安装包:一般将下载程序放在
opt目录下[root@VM-0-6-centos ~]# mv redis-6.2.5.tar.gz /opt/
[root@VM-0-6-centos ~]# cd /opt
[root@VM-0-6-centos opt]# ls
containerd redis-6.2.5.tar.gz
[root@VM-0-6-centos opt]# tar xzf redis-6.2.5.tar.gz -
查看
redis文件[root@VM-0-6-centos opt]# cd redis-6.2.5
[root@VM-0-6-centos redis-6.2.5]# ls
00-RELEASENOTES CONDUCT COPYING INSTALL MANIFESTO redis.conf runtest-cluster runtest-sentinel src TLS.md
BUGS CONTRIBUTING deps Makefile README.md runtest runtest-moduleapi sentinel.conf tests utils -
基本的环境安装 :
yum install gcc-c++[root@VM-0-6-centos redis-6.2.5]# yum install gcc-c++
-
查看
gcc版本号:gcc -v[root@VM-0-6-centos redis-6.2.5]# gcc -v
Using built-in specs.
COLLECT_GCC=gcc
COLLECT_LTO_WRAPPER=/usr/libexec/gcc/x86_64-redhat-linux/8/lto-wrapper
OFFLOAD_TARGET_NAMES=nvptx-none
OFFLOAD_TARGET_DEFAULT=1
Target: x86_64-redhat-linux
Configured with: ../configure --enable-bootstrap --enable-languages=c,c++,fortran,lto --prefix=/usr --mandir=/usr/share/man --infodir=/usr/share/info --with-bugurl=http://bugzilla.redhat.com/bugzilla --enable-shared --enable-threads=posix --enable-checking=release --enable-multilib --with-system-zlib --enable-__cxa_atexit --disable-libunwind-exceptions --enable-gnu-unique-object --enable-linker-build-id --with-gcc-major-version-only --with-linker-hash-style=gnu --enable-plugin --enable-initfini-array --with-isl --disable-libmpx --enable-offload-targets=nvptx-none --without-cuda-driver --enable-gnu-indirect-function --enable-cet --with-tune=generic --with-arch_32=x86-64 --build=x86_64-redhat-linux
Thread model: posix
gcc version 8.4.1 20200928 (Red Hat 8.4.1-1) (GCC) -
配置
redis文件:make[root@VM-0-6-centos redis-6.2.5]# make
-
确认是否安装成功:
make install[root@VM-0-6-centos redis-6.2.5]# make install
cd src && make install
make[1]: Entering directory '/opt/redis-6.2.5/src'
CC Makefile.depHint: It's a good idea to run 'make test' ;)
  INSTALL redis-server
  INSTALL redis-benchmark
  INSTALL redis-cli
make[1]: Leaving directory '/opt/redis-6.2.5/src'
-
redis默认安装目录在/usr/local/bin下[root@VM-0-6-centos bin]# ls
chardetect cloud-init-per easy_install jsondiff jsonpointer redis-benchmark redis-check-rdb redis-sentinel
cloud-init docker-compose easy_install-3.6 jsonpatch jsonschema redis-check-aof redis-cli redis-server -
复制
redis配置文件,到安装目录下/usr/local/bin,在这个目录下面,新建个配置目录,使用这个配置文件来启动redis[root@VM-0-6-centos redis-6.2.5]# cp redis.conf /usr/local/bin/config
[root@VM-0-6-centos redis-6.2.5]# cd /usr/local/bin/config
[root@VM-0-6-centos config]# ls
redis.conf -
redis默认不是后台启动的,需要修改配置文件redis.confdaemonize yes # 将配置文件 daemonize no 改为 daemonize yes
-
通过指定的配置文件,启动
redis服务:redis-server config/redis.conf[root@VM-0-6-centos bin]# pwd
/usr/local/bin
[root@VM-0-6-centos bin]# redis-server config/redis.conf # 通过自定义的配置文件启动 -
通过
redis客户端去连接redis服务:redis-cli -p [端口号][root@VM-0-6-centos bin]# redis-cli -p 6379 # 默认端口为 6379
127.0.0.1:6379> -
测试
[root@VM-0-6-centos bin]# redis-cli -p 6379 # 使用 redis 客户端进行连接
127.0.0.1:6379> ping
PONG
127.0.0.1:6379> set key aa # 设置键值对
OK
127.0.0.1:6379> get key # 获取键值对
"aa"
127.0.0.1:6379> set name yy
OK
127.0.0.1:6379> get name
"yy"
127.0.0.1:6379> keys * # 查看所有 key- "name"
- "key"
127.0.0.1:6379>
-
查看
redis的进程是否开启[root@VM-0-6-centos ~]# ps -ef|grep redis # grep redis 获取和 redis 相关的进程
root 1334563 1 0 17:44 ? 00:00:00 redis-server 127.0.0.1:6379
root 1335138 1321154 0 17:47 pts/1 00:00:00 redis-cli -p 6379
root 1336646 1336537 0 17:56 pts/3 00:00:00 grep --color=auto redis -
关闭
redis服务:shutdown127.0.0.1:6379> shutdown
not connected> exit -
再次查看进程是否存在
[root@VM-0-6-centos ~]# ps -ef|grep redis # 进程已经关闭
root 1337290 1336537 0 18:00 pts/3 00:00:00 grep --color=auto redis
四、性能测试
-
redis-benchmark是一个(自带)压力测试工具,命令可选参数:Usage: redis-benchmark [-h <host>] [-p <port>] [-c <clients>] [-n <requests>] [-k <boolean>]
-h <hostname> Server hostname (default 127.0.0.1) # 指定服务器主机名
-p <port> Server port (default 6379) # 指定服务器端口
-s <socket> Server socket (overrides host and port) # 指定服务器
-a <password> Password for Redis Auth
--user <username> Used to send ACL style 'AUTH username pass'. Needs -a.
-c <clients> Number of parallel connections (default 50) # 指定并发连接数
-n <requests> Total number of requests (default 100000) # 指定请求数
-d <size> Data size of SET/GET value in bytes (default 3) # 以字节的形式指定 SET/GET 值的数据大小
--dbnum <db> SELECT the specified db number (default 0)
--threads <num> Enable multi-thread mode.
--cluster Enable cluster mode.
--enable-tracking Send CLIENT TRACKING on before starting benchmark.
-k <boolean> 1=keep alive 0=reconnect (default 1)
-r <keyspacelen> Use random keys for SET/GET/INCR, random values for SADD,
random members and scores for ZADD. # SET/GET/INCR 使用随机 key, SADD 使用随机值
Using this option the benchmark will expand the string rand_int
inside an argument with a 12 digits number in the specified range
from 0 to keyspacelen-1. The substitution changes every time a command
is executed. Default tests use this to hit random keys in the
specified range.
-P <numreq> Pipeline <numreq> requests. Default 1 (no pipeline). # 通过管道传输 <numreq> 请求
-q Quiet. Just show query/sec values # 强制退出 redis。仅显示 query/sec 值
--precision Number of decimal places to display in latency output (default 0)
--csv Output in CSV format # 以 CSV 格式输出
-l Loop. Run the tests forever # 成循环,永久执行测试
-t <tests> Only run the comma separated list of tests. The test
names are the same as the ones produced as output. # 仅运行以逗号分隔的测试命令列表。
-I Idle mode. Just open N idle connections and wait. # Idle 模式。仅打开 N 个 idle 连接并等待
--help Output this help and exit.
--version Output version and exit.
| 序号 | 选项 | 描述 | 默认值 |
|---|---|---|---|
| 1 | -h | 指定服务器主机名 | 127.0.0.1 |
| 2 | -p | 指定服务器端口 | 6379 |
| 3 | -s | 指定服务器 | socket |
| 4 | -c | 指定并发连接数 | 50 |
| 5 | -n | 指定请求数 | 10000 |
| 6 | -d | 以字节的形式指定 SET/GET 值的数据大小 |
3 |
| 7 | -k | 1=keep alive 0=reconnect | 1 |
| 8 | -r | SET/GET/INCR 使用随机 key, SADD 使用随机值 |
|
| 9 | -P | 通过管道传输 <numreq> 请求 |
1 |
| 10 | -q | 强制退出 redis。仅显示 query/sec 值 |
|
| 11 | ---csv | 以 CSV 格式输出 |
|
| 12 | -l | 生成循环,永久执行测试 | |
| 13 | -t | 仅运行以逗号分隔的测试命令列表。 | |
| 14 | -I | Idle 模式。仅打开 N 个 idle 连接并等待。 |
-
示例:测试
100个并发,连接100000请求测试:100个并发连接 100000请求
[root@VM-0-6-centos bin]# redis-benchmark -h localhost -p 6379 -c 100 -n 100000

====== SET ======
  100000 requests completed in 2.60 seconds    # 对100000个测试请求写入测试
  100 parallel clients      # 100个并发客户端
  3 bytes payload      # 每次3字节写入
  keep alive: 1      # 只有一台服务器来处理这些请求,单机性能
  host configuration "save": 3600 1 300 100 60 10000
  host configuration "appendonly": no
  multi-thread: no

Latency by percentile distribution:
0.000% <= 0.623 milliseconds (cumulative count 1)
50.000% <= 1.735 milliseconds (cumulative count 50412)
75.000% <= 2.111 milliseconds (cumulative count 75215)
87.500% <= 2.535 milliseconds (cumulative count 87554)
93.750% <= 2.943 milliseconds (cumulative count 93767)
96.875% <= 3.687 milliseconds (cumulative count 96875)
98.438% <= 4.511 milliseconds (cumulative count 98450)
99.219% <= 5.079 milliseconds (cumulative count 99220)
99.609% <= 5.567 milliseconds (cumulative count 99611)
99.805% <= 6.135 milliseconds (cumulative count 99807)
99.902% <= 7.343 milliseconds (cumulative count 99903)
99.951% <= 21.663 milliseconds (cumulative count 99953)
99.976% <= 21.983 milliseconds (cumulative count 99977)
99.988% <= 22.095 milliseconds (cumulative count 99988)
99.994% <= 22.159 milliseconds (cumulative count 99995)
99.997% <= 22.175 milliseconds (cumulative count 99997)
99.998% <= 22.207 milliseconds (cumulative count 99999)
99.999% <= 22.223 milliseconds (cumulative count 100000)
100.000% <= 22.223 milliseconds (cumulative count 100000)
......
Summary:
  throughput summary: 38402.46 requests per second        # 每秒处理 38402.46 个请求
  latency summary (msec):
          avg       min       p50       p95       p99       max
        1.858     0.616     1.735     3.111     4.911    22.223
© 著作权归作者所有,转载或内容合作请联系作者

喜欢的朋友记得点赞、收藏、关注哦!!!