
🐇明明跟你说过:个人主页
🏅个人专栏:《未来已来:云原生之旅》🏅
🔖行路有良友,便是天堂🔖
目录
一、引言
1、什么是Jenkins
Jenkins 是一个开源的自动化服务器,主要用于支持软件开发中的持续集成(CI)和持续交付(CD)。它最初是作为 Hudson 项目的一部分开发的,后来由于一些原因从 Oracle 分离出来,并成为了一个独立的项目。Jenkins 由云原生计算基金会(CNCF)托管,拥有活跃的社区支持和丰富的插件生态系统。

2、什么是Ansible
Ansible 是一个开源的自动化工具,主要用于配置管理、应用部署、任务执行和编排。它由 Michael DeHaan 创建,并于 2012 年首次发布,后来被 Red Hat 收购。Ansible 的设计理念是简单、易用且无需在目标节点上安装额外的客户端软件(除了 Python),这使得它的部署和维护相对容易。

二、项目背景
1、背景描述
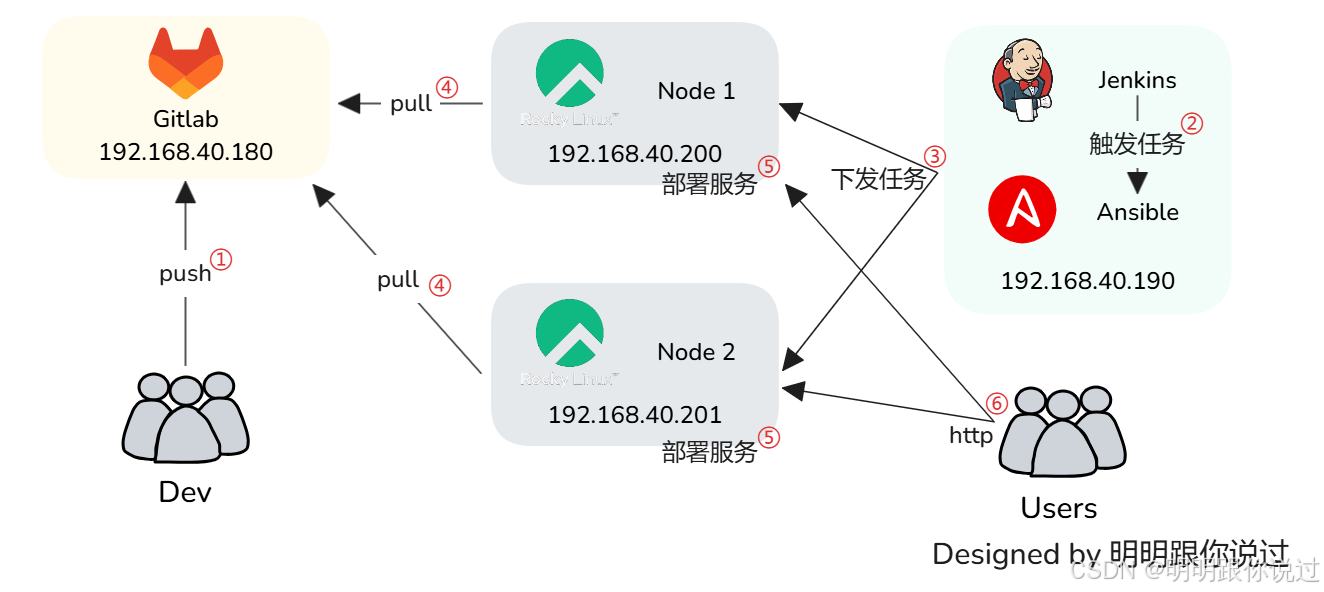
我们要搭建的是一个CD部署的流水线,首先,开发人员将代码(这里使用Go语言示例)推送到 Gitlab 代码仓库,然后由运维人员从 Jenkins 手动触发部署任务,Jenkins使用Ansible操控工作节点,工作节点有两台,一台为测试环境,另一台为生产环境,工作节点会从 Gitlab 拉取代码,并将代码部署到本机,在整个过程中,只需在 Jenkins 触发任务即可完成,无需其他任何的手动操作。整个过程如下图:
2、资源准备
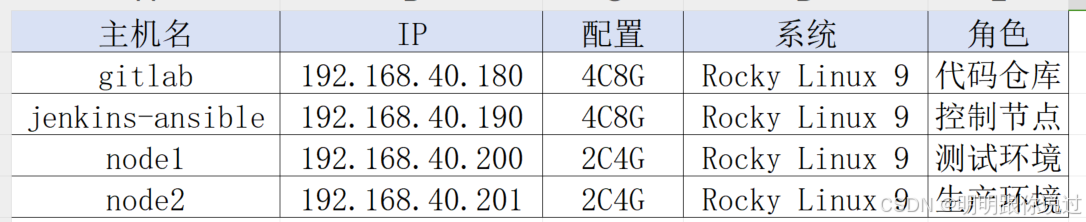
这里我们使用的Linux服务器为Rocky,大家也可以使用其他的Linux发行版本,资源配置如下:
三、安装Gitlab
1、更新系统
登录到Gitlab服务器,执行如下命令:
[root@gitlab ~]# dnf update -y2、安装Gitlab
添加 Gitlab 包仓库
curl https://packages.gitlab.com/install/repositories/gitlab/gitlab-ce/script.rpm.sh | sudo bash安装 Gitlab CE ,这个过程很慢,需要一些时间
sudo dnf install -y gitlab-ce配置 Gitlab
[root@gitlab ~]# sudo gitlab-ctl reconfigure检查服务状态,如果都是run则证明已经启动成功
[root@gitlab ~]# sudo gitlab-ctl status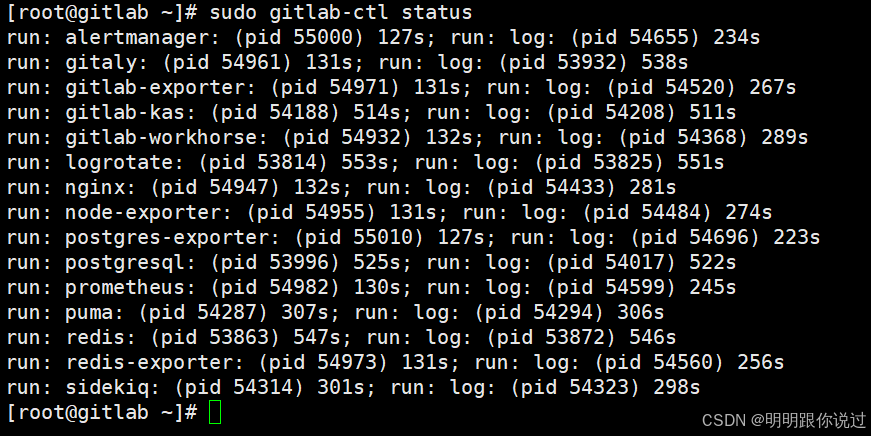
如果已经启动了防火墙,需要放行80端口
sudo firewall-cmd --zone=public --add-port=80/tcp --permanent && sudo firewall-cmd --reload3、访问Gitlab
浏览器中输入http://主机IP
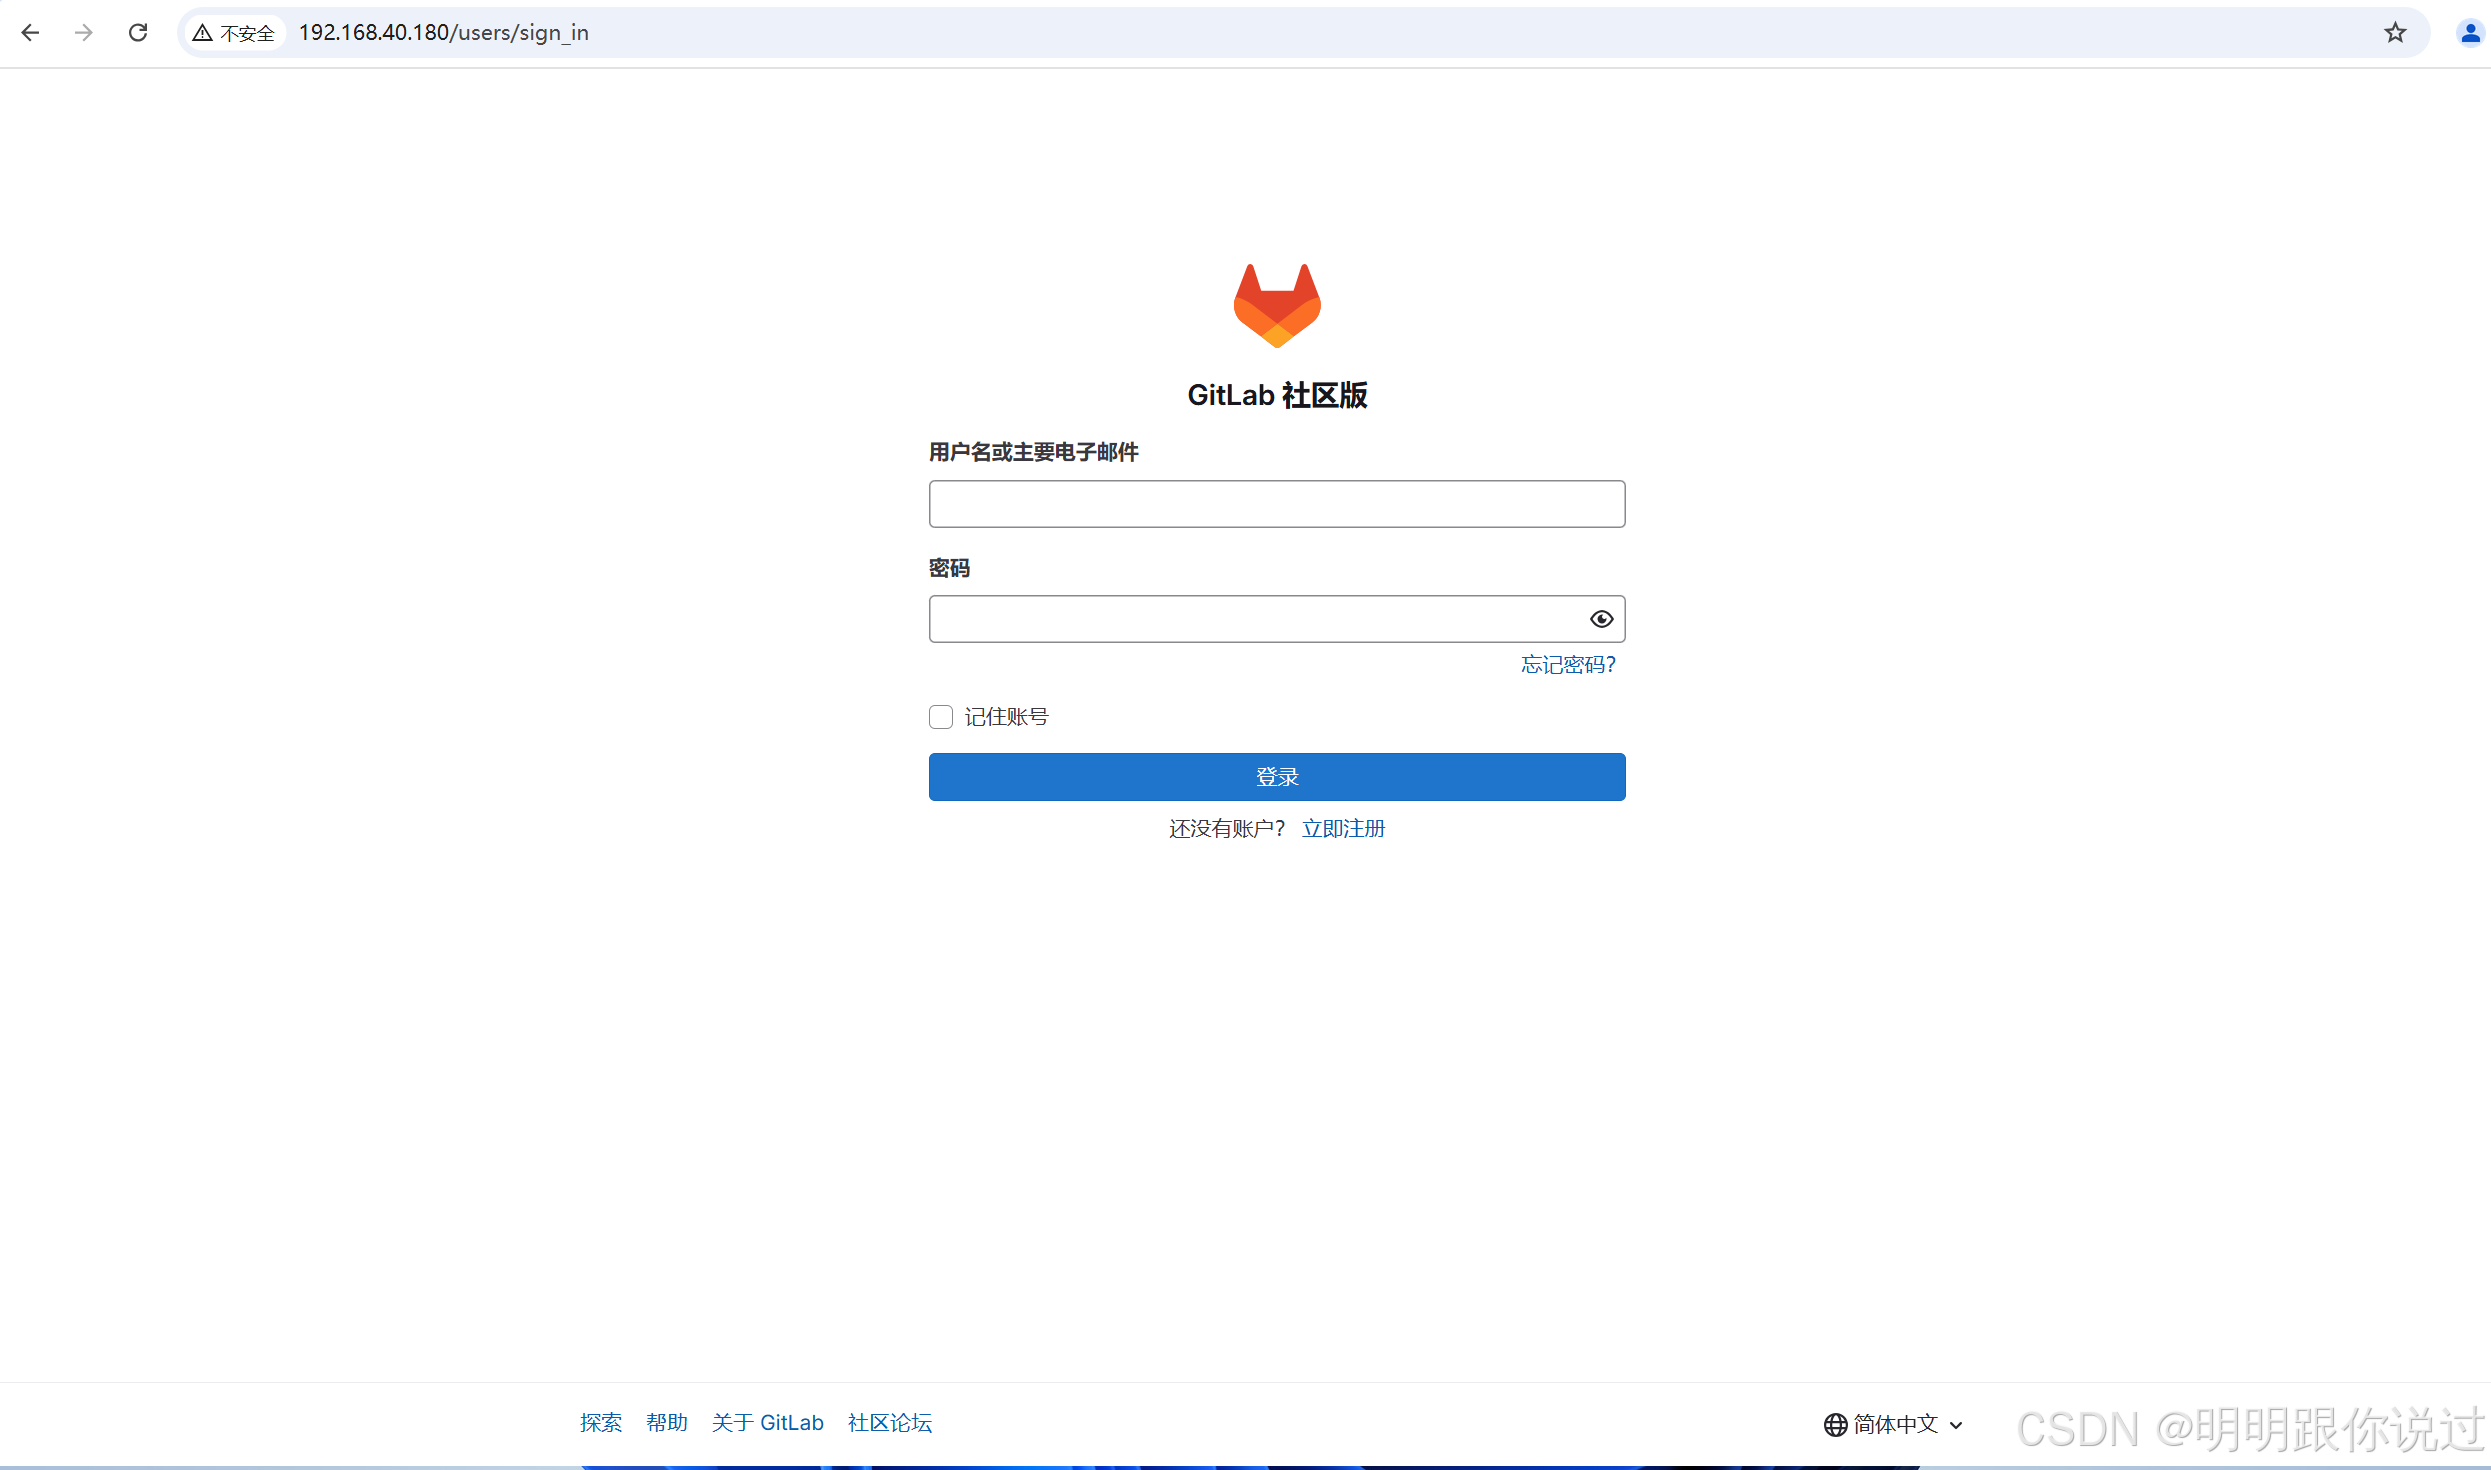
用户名为root,使用以下命令查看密码
cat /etc/gitlab/initial_root_password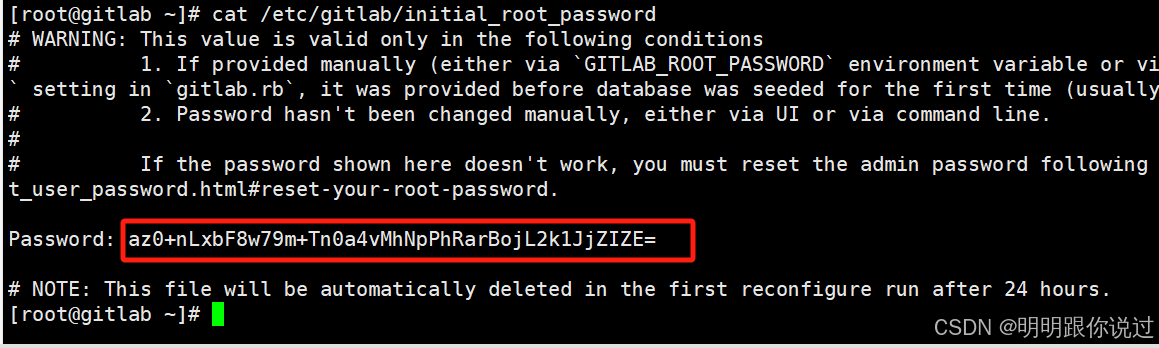
四、安装Jenkins
1、升级系统
确保系统中的所有包都更新到最新版本,以避免由于旧版本软件包引起的潜在问题。
[root@jenkins-ansible ~]# sudo yum upgrade2、安装Jenkins
添加YUM仓库
sudo wget -O /etc/yum.repos.d/jenkins.repo https://pkg.jenkins.io/redhat-stable/jenkins.repo导入 Jenkins 的 GPG 密钥
sudo rpm --import https://pkg.jenkins.io/redhat-stable/jenkins.io-2023.key安装Jenkins所需依赖
sudo yum install fontconfig java-17-openjdk安装Jenkins
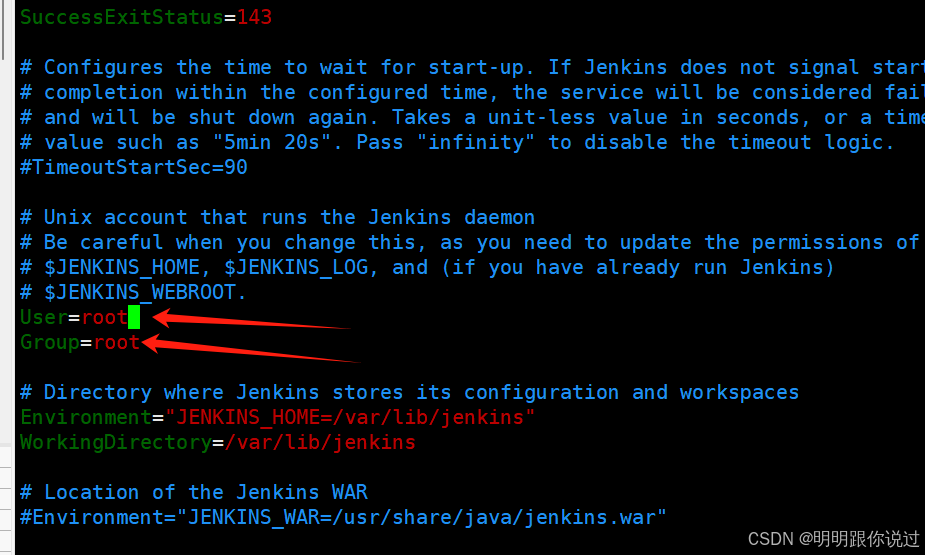
sudo yum install jenkins修改启动用户,Jenkins安装后,会创建一个用户Jenkins,默认使用该用户启动服务器,但是需要将启动用户修改为root,因为Jenkins用户在使用ansible远程时,会出现找不到密钥的问题
vim /usr/lib/systemd/system/jenkins.service将用户和组修改为root
接下来启动Jenkins
systemctl start jenkins防火墙放行8080端口
sudo firewall-cmd --zone=public --add-port=8080/tcp --permanent && sudo firewall-cmd --reload3、访问Jenkins
浏览器输入 http://主机IP+8080端口
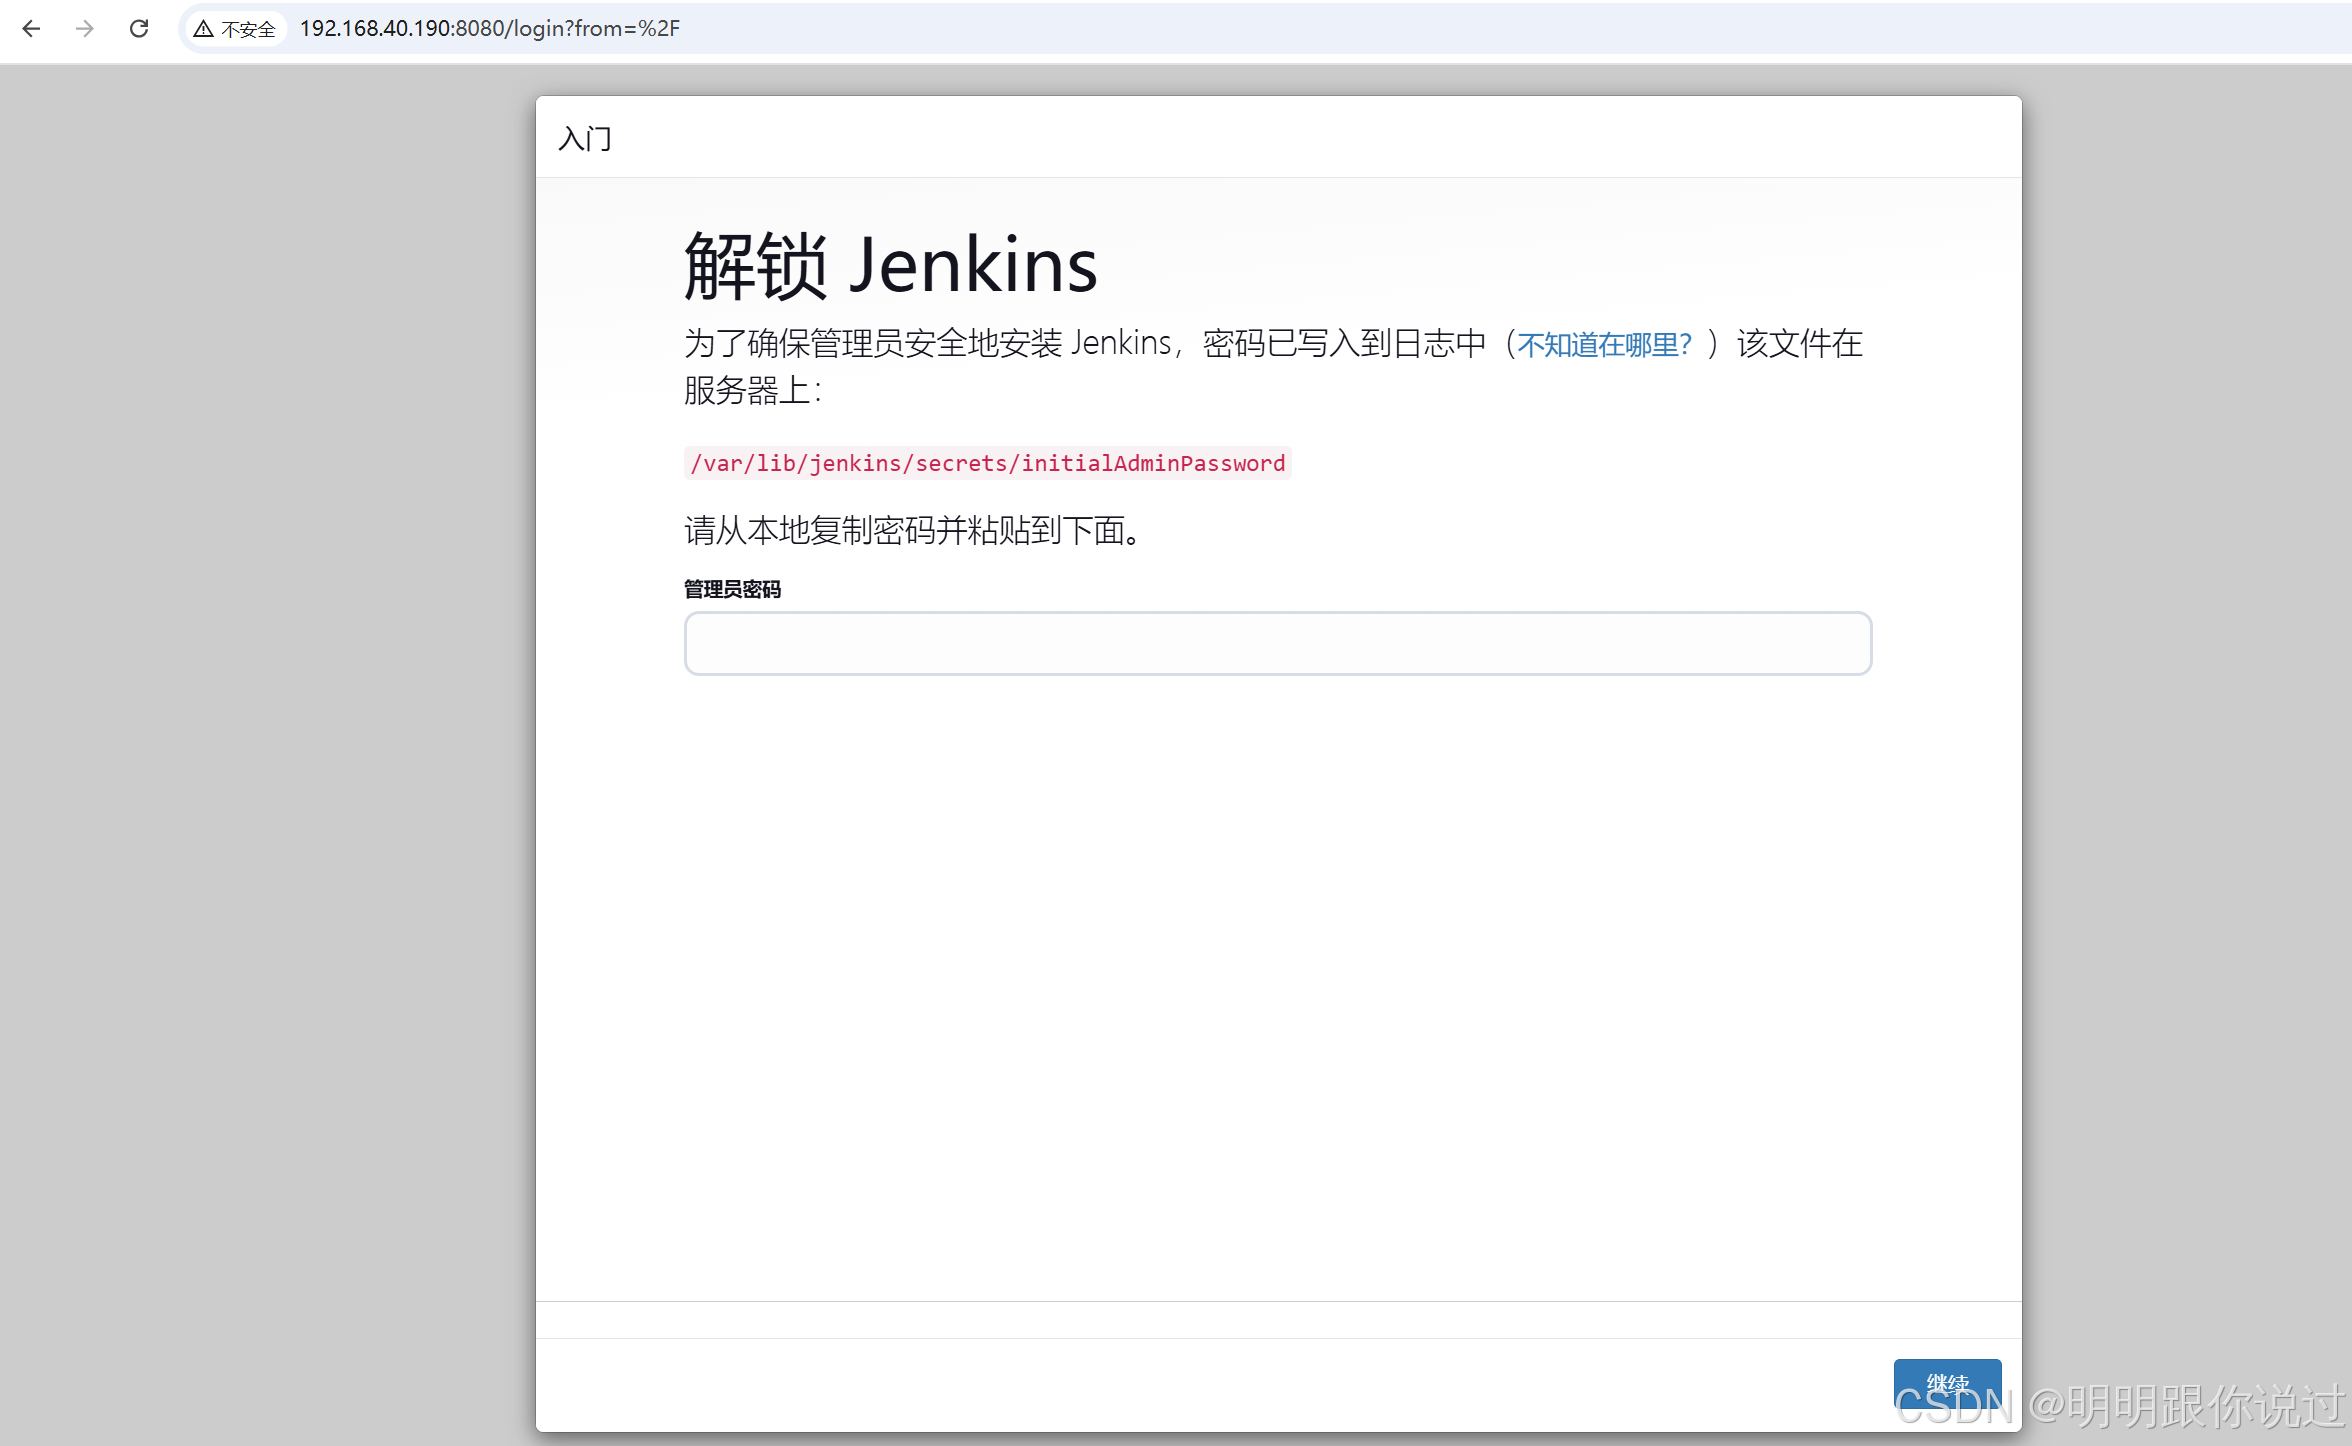
查看密码
cat /var/lib/jenkins/secrets/initialAdminPassword选择安装推荐的插件
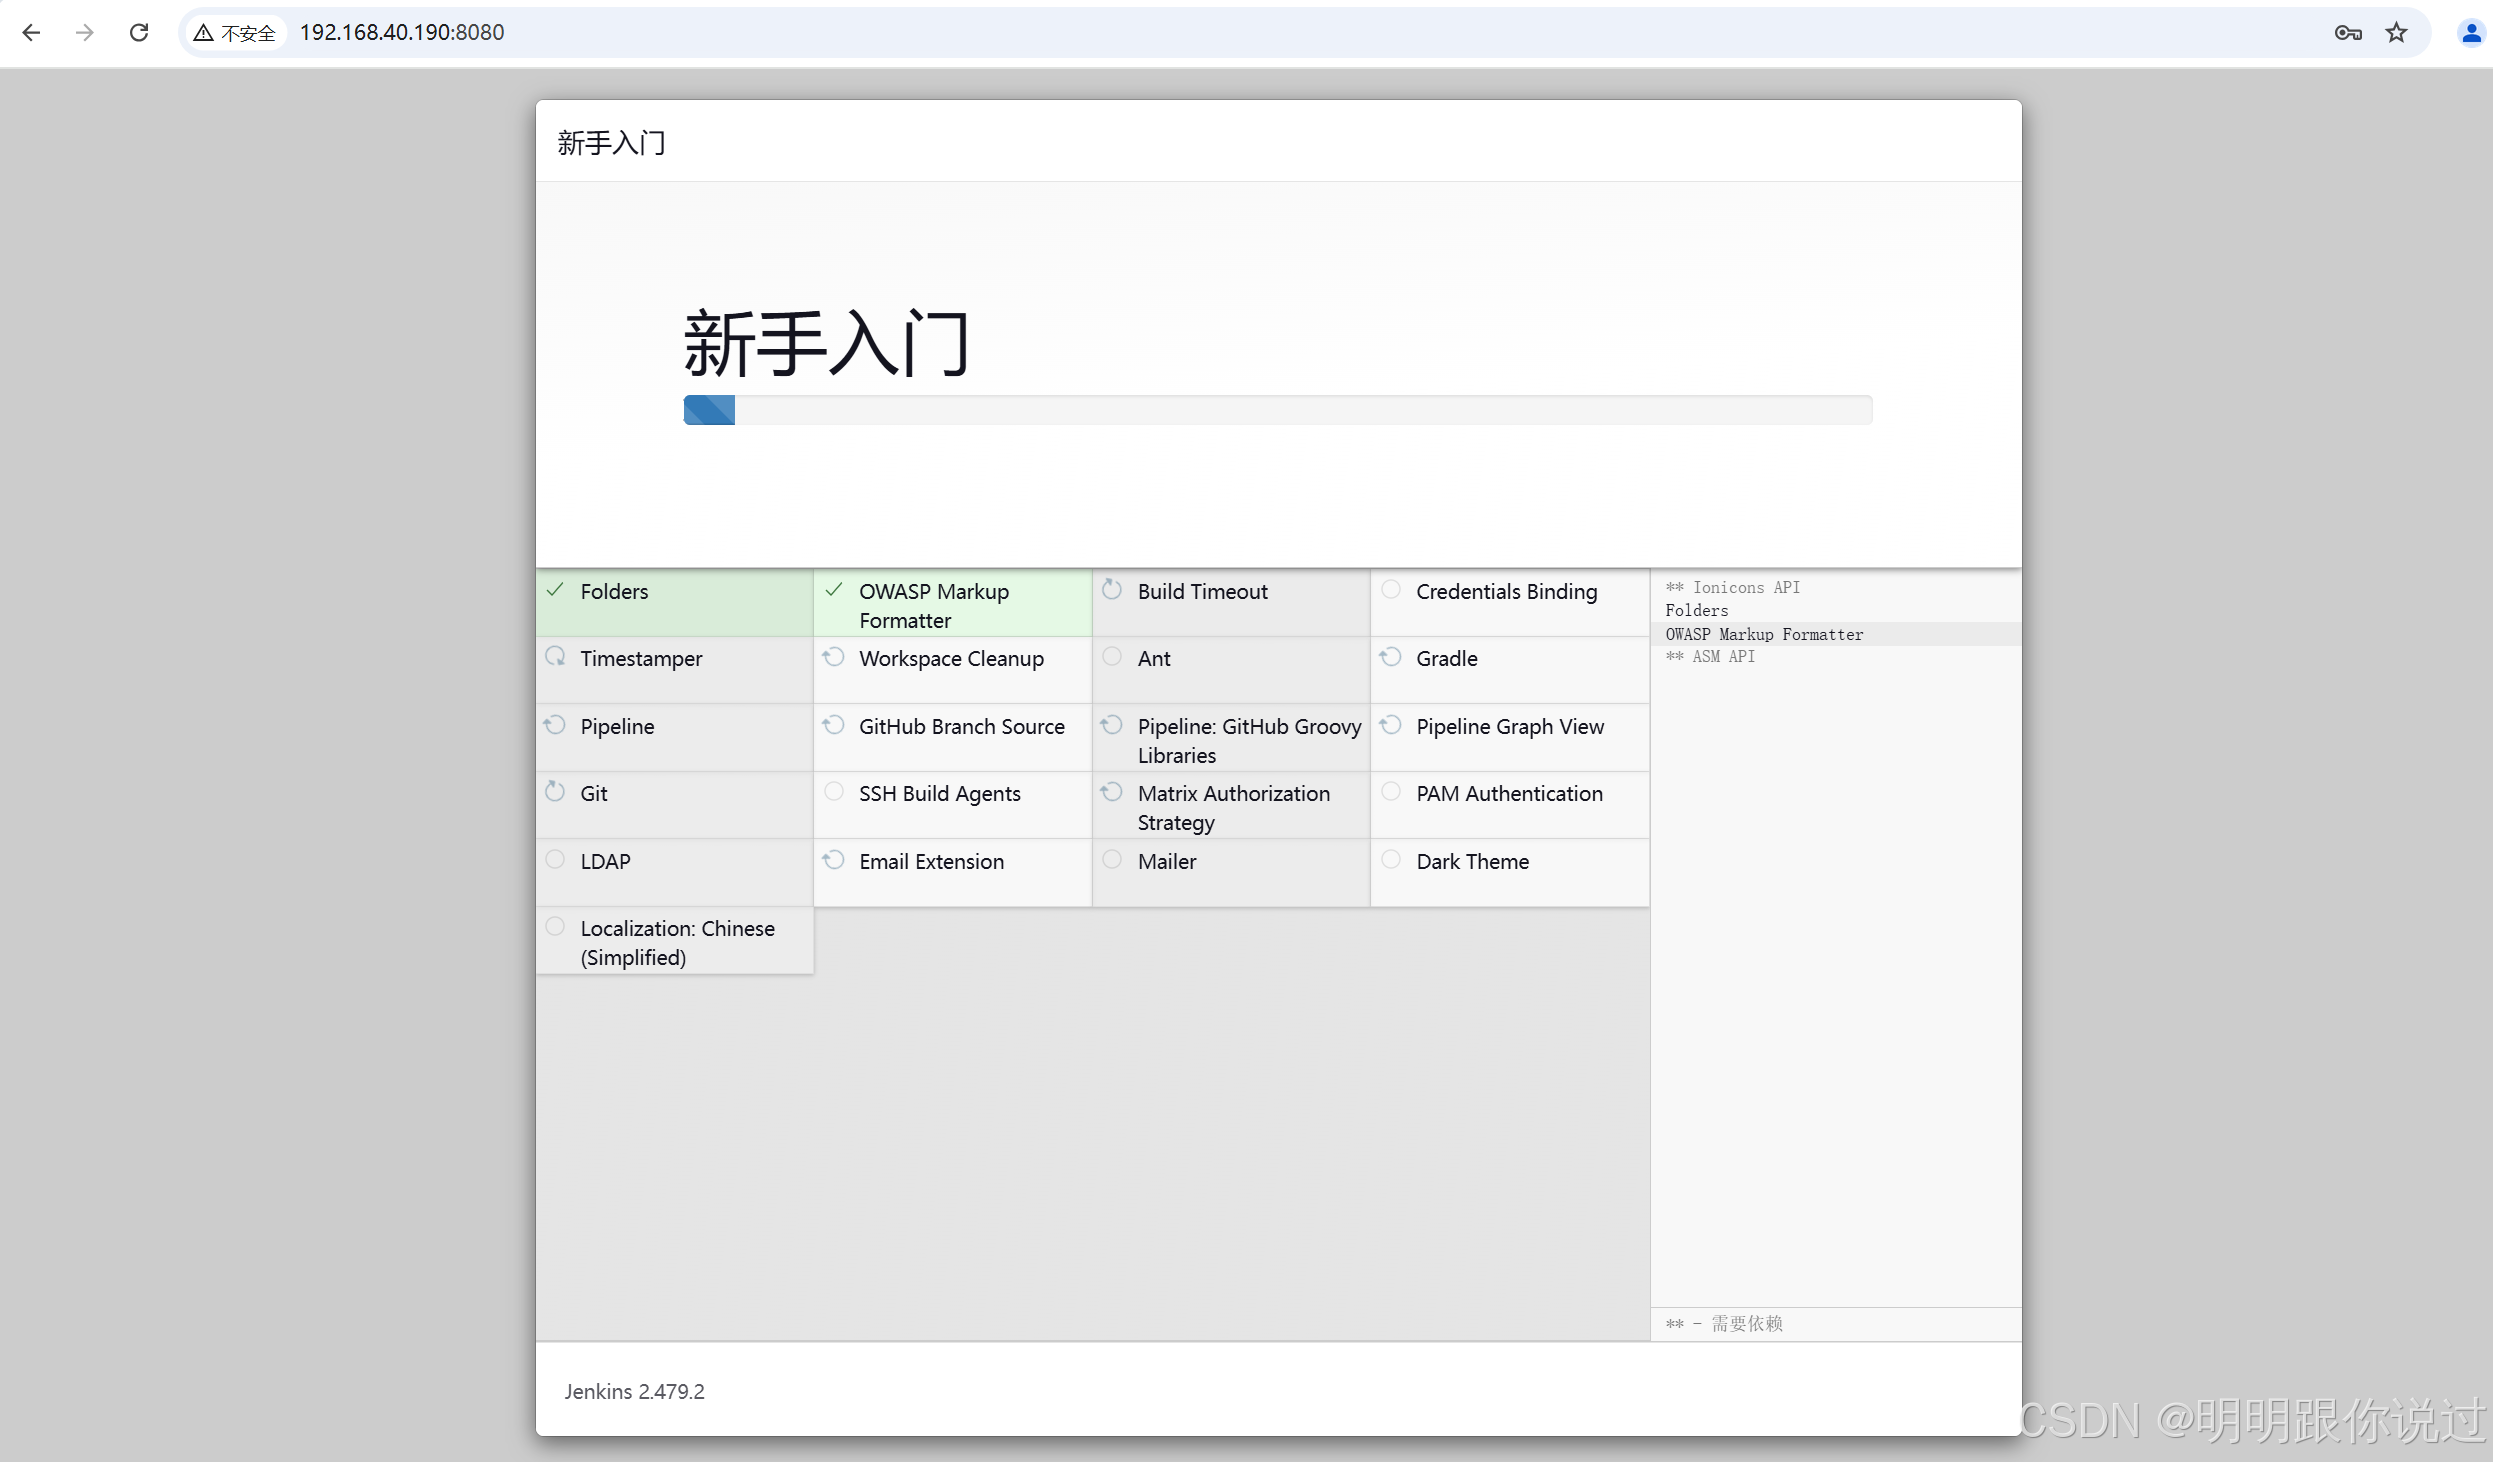
这个安装过程有些慢,需要等一会
五、安装配置Ansible
1、添加EPEL仓库
执行下面的命令
yum install -y epel-release安装Ansible
yum install -y ansible2、配置Ansible
修改Ansible配置文件
[root@jenkins-ansible ~]# vim /etc/ansible/ansible.cfg

#添加如下内容
[defaults]
inventory = /etc/ansible/hosts
remote_user = root
become = yes
become_method = sudo
编辑hosts文件
[root@jenkins-ansible ~]# vim /etc/ansible/hosts

#添加如下内容
[test]
192.168.40.200

[prod]
192.168.40.201
3、添加SSH密码
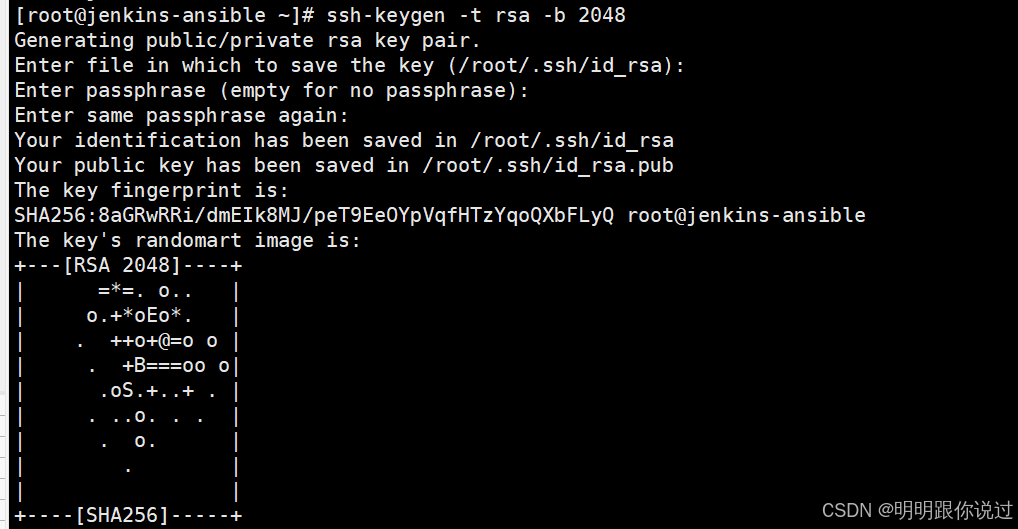
在Ansible机器上执行
ssh-keygen -t rsa -b 2048一路回车即可
将密钥拷贝到工作节点
ssh-copy-id root@192.168.40.200

ssh-copy-id root@192.168.40.200
测试是否成功
ansible all -m ping如果显示以下页面,则搭建成功

六、配置流水线
1、上传代码
登录到Gitlab服务器,执行下面的命令,创建密钥对,一路回车即可
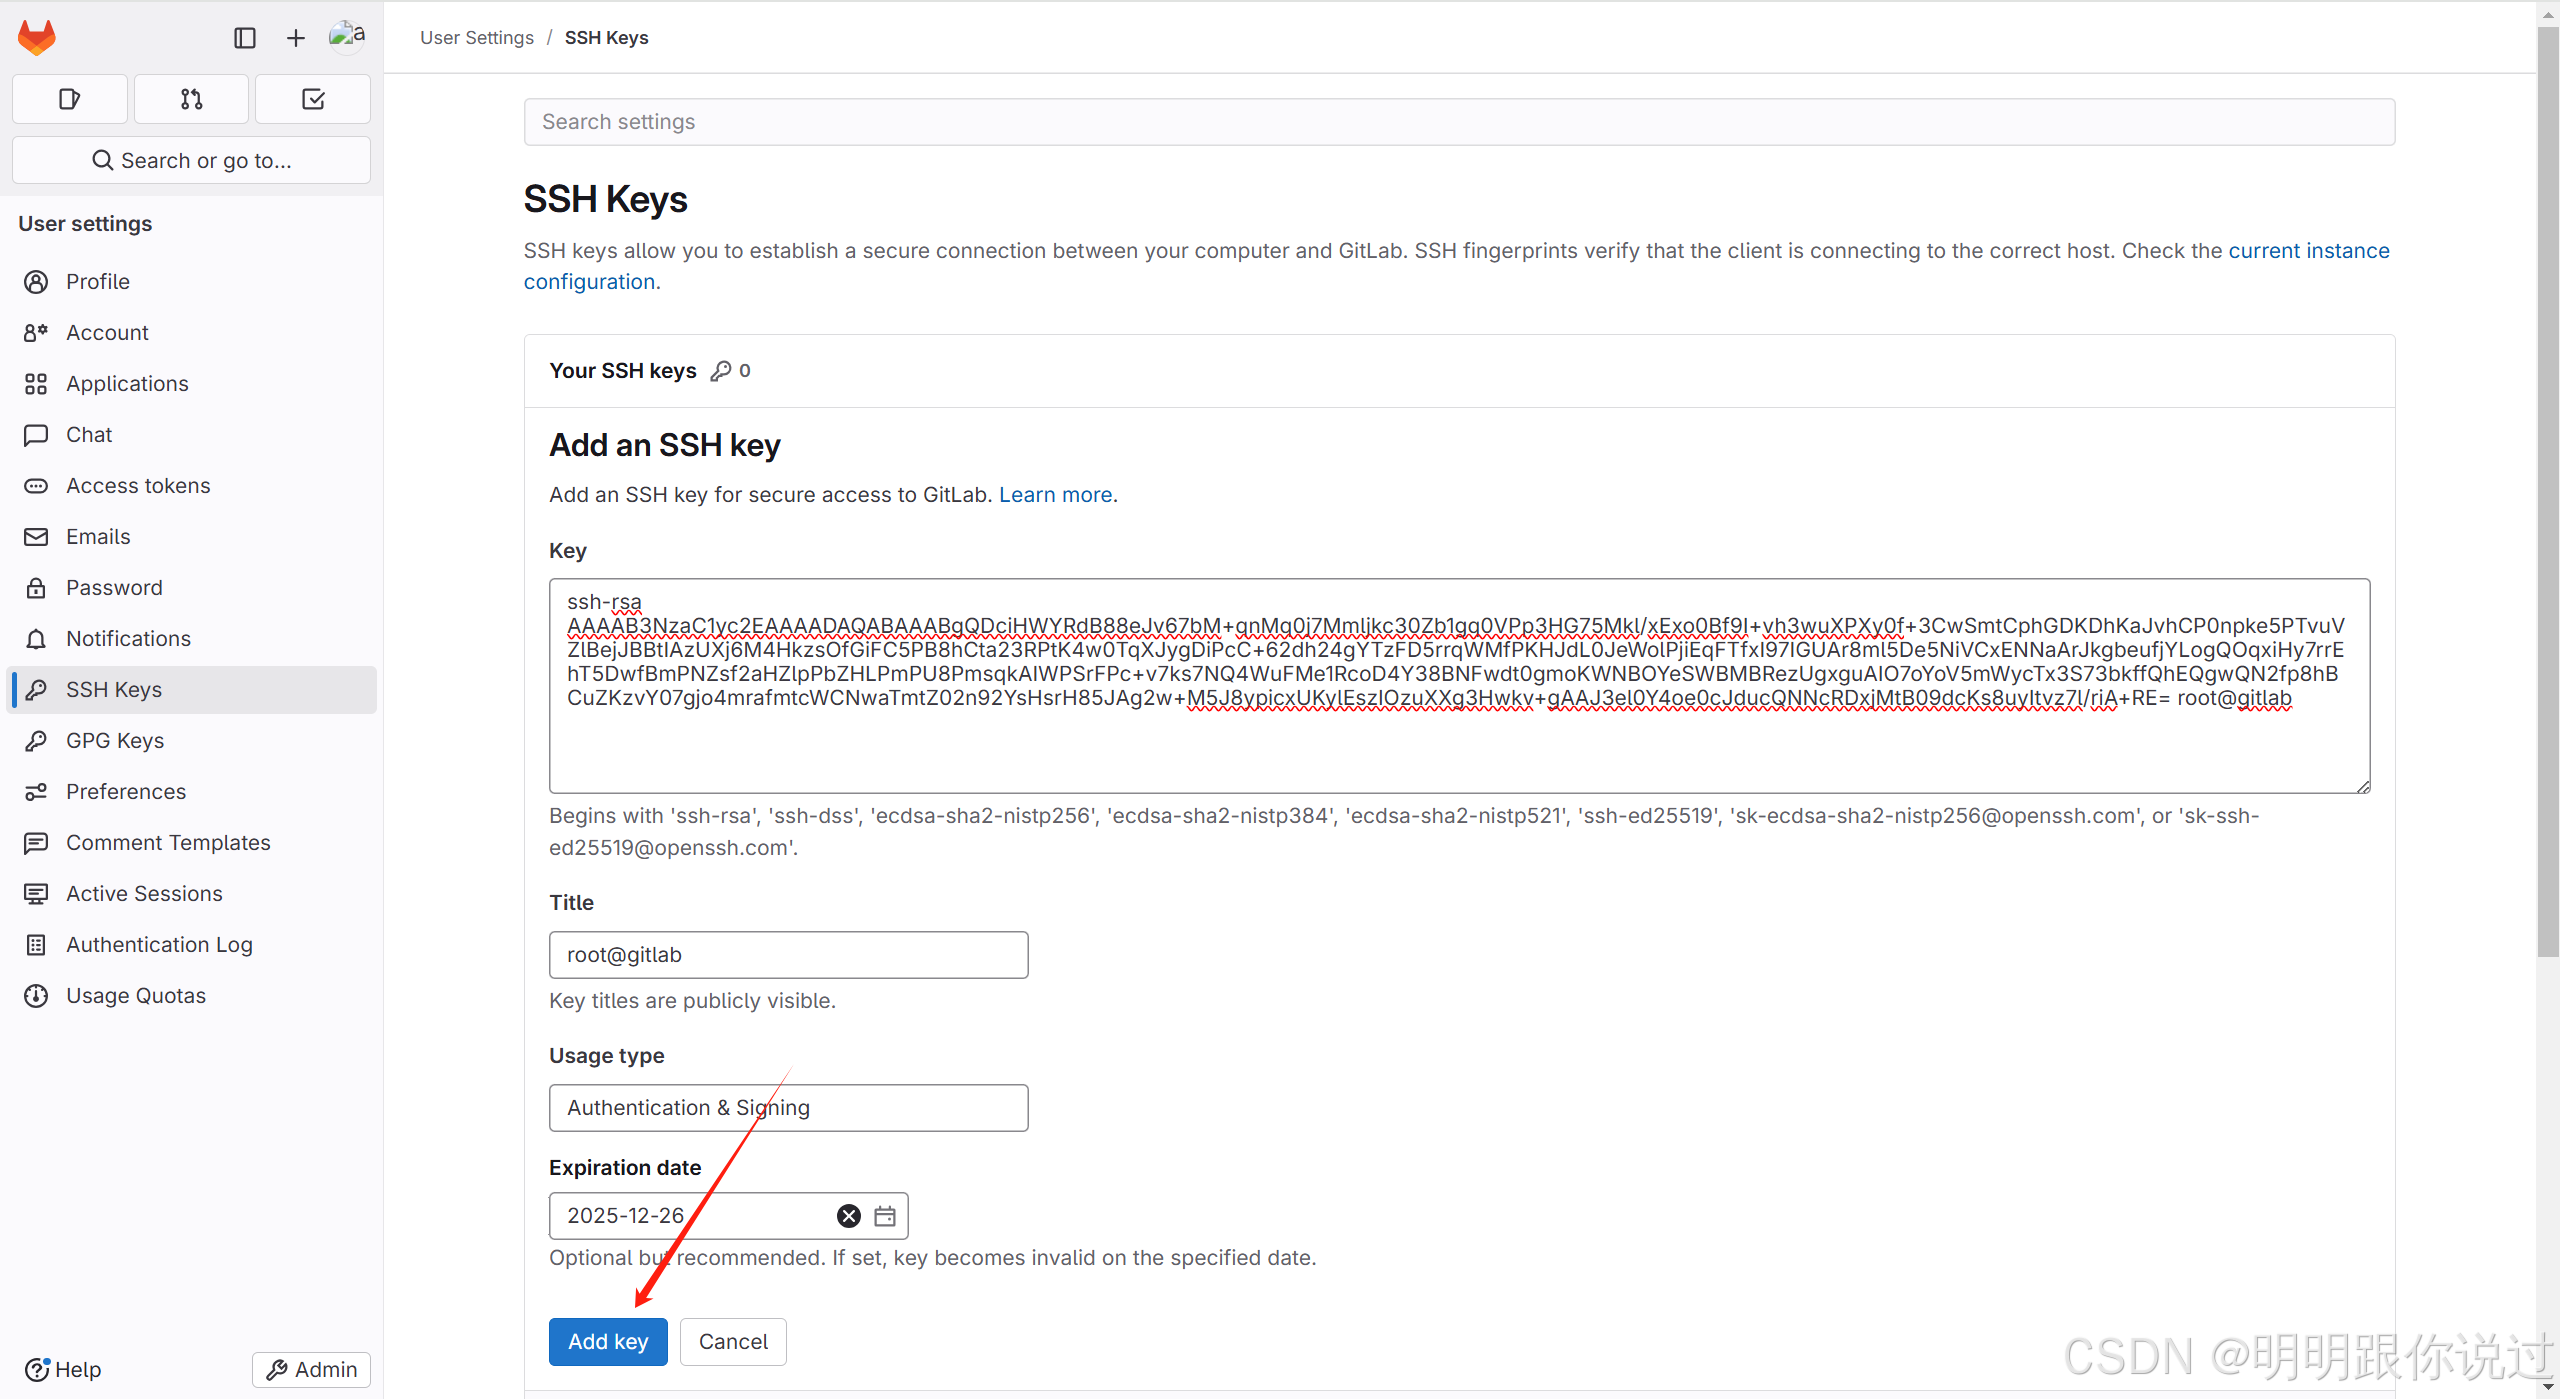
ssh-keygen -t rsa查看公钥
cat ~/.ssh/id_rsa.pub浏览器登录Gitlab,点击 Preferences -> SSH Keys -> Add new key
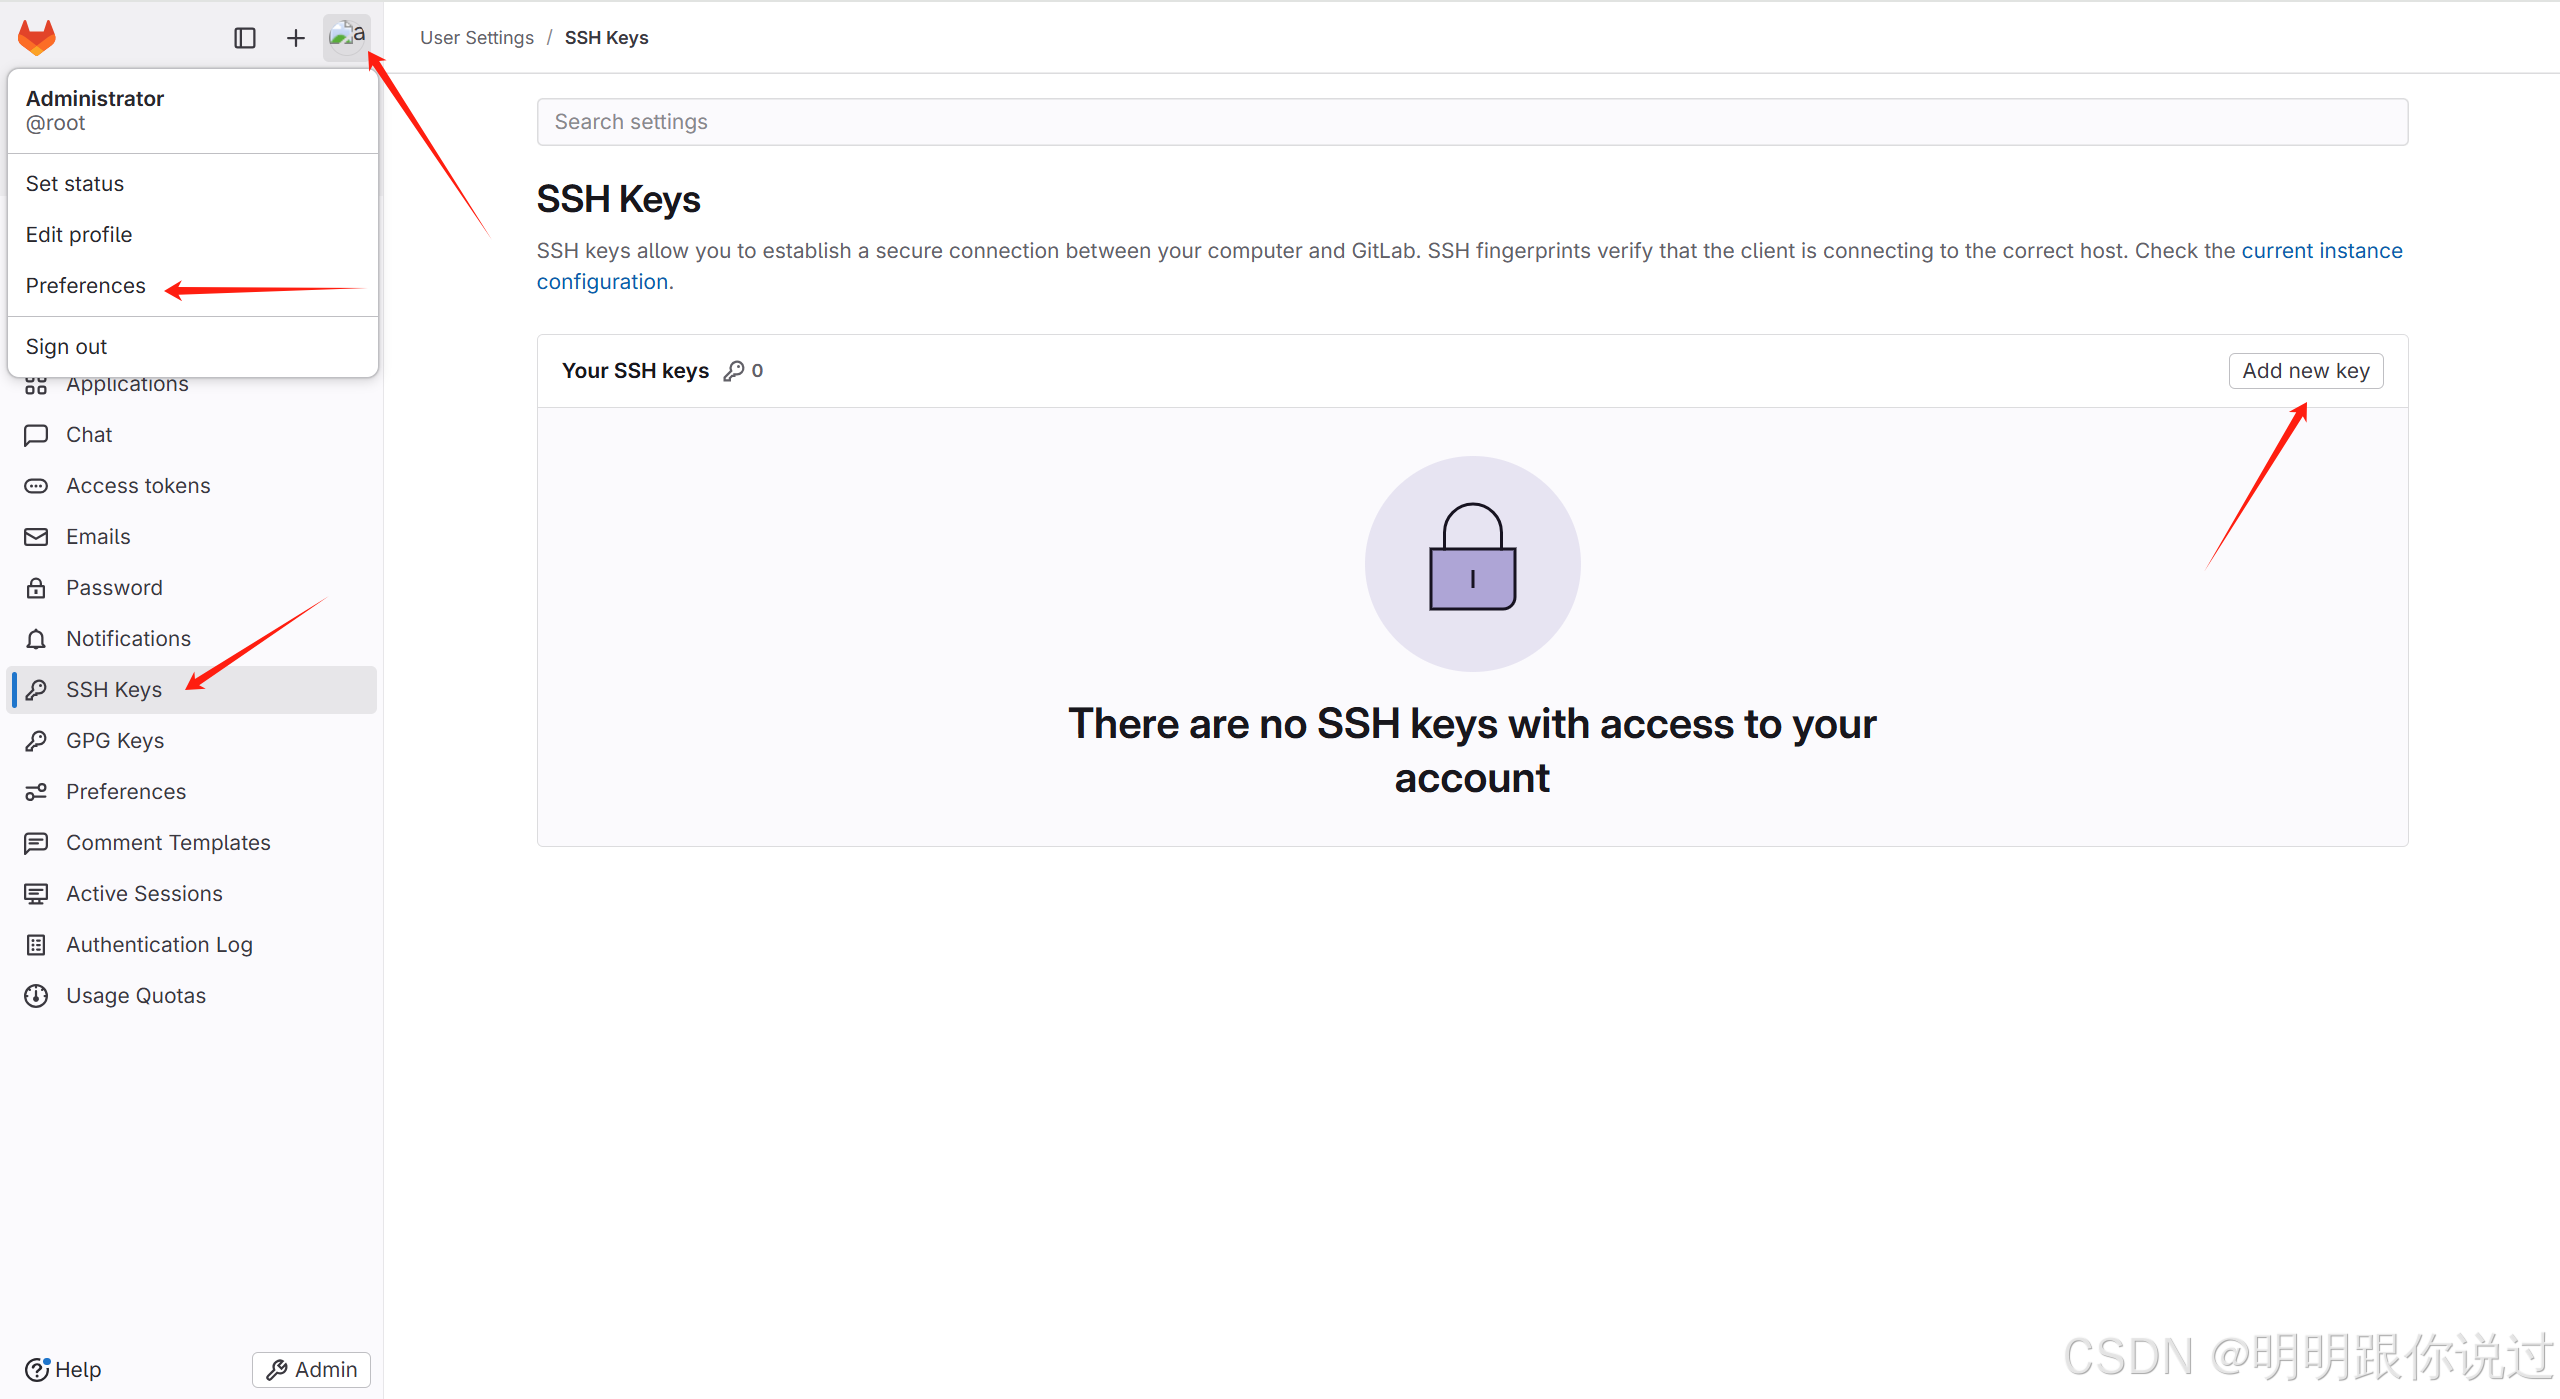
然后把刚刚创建的公钥粘贴进去,之后点击 Addkey
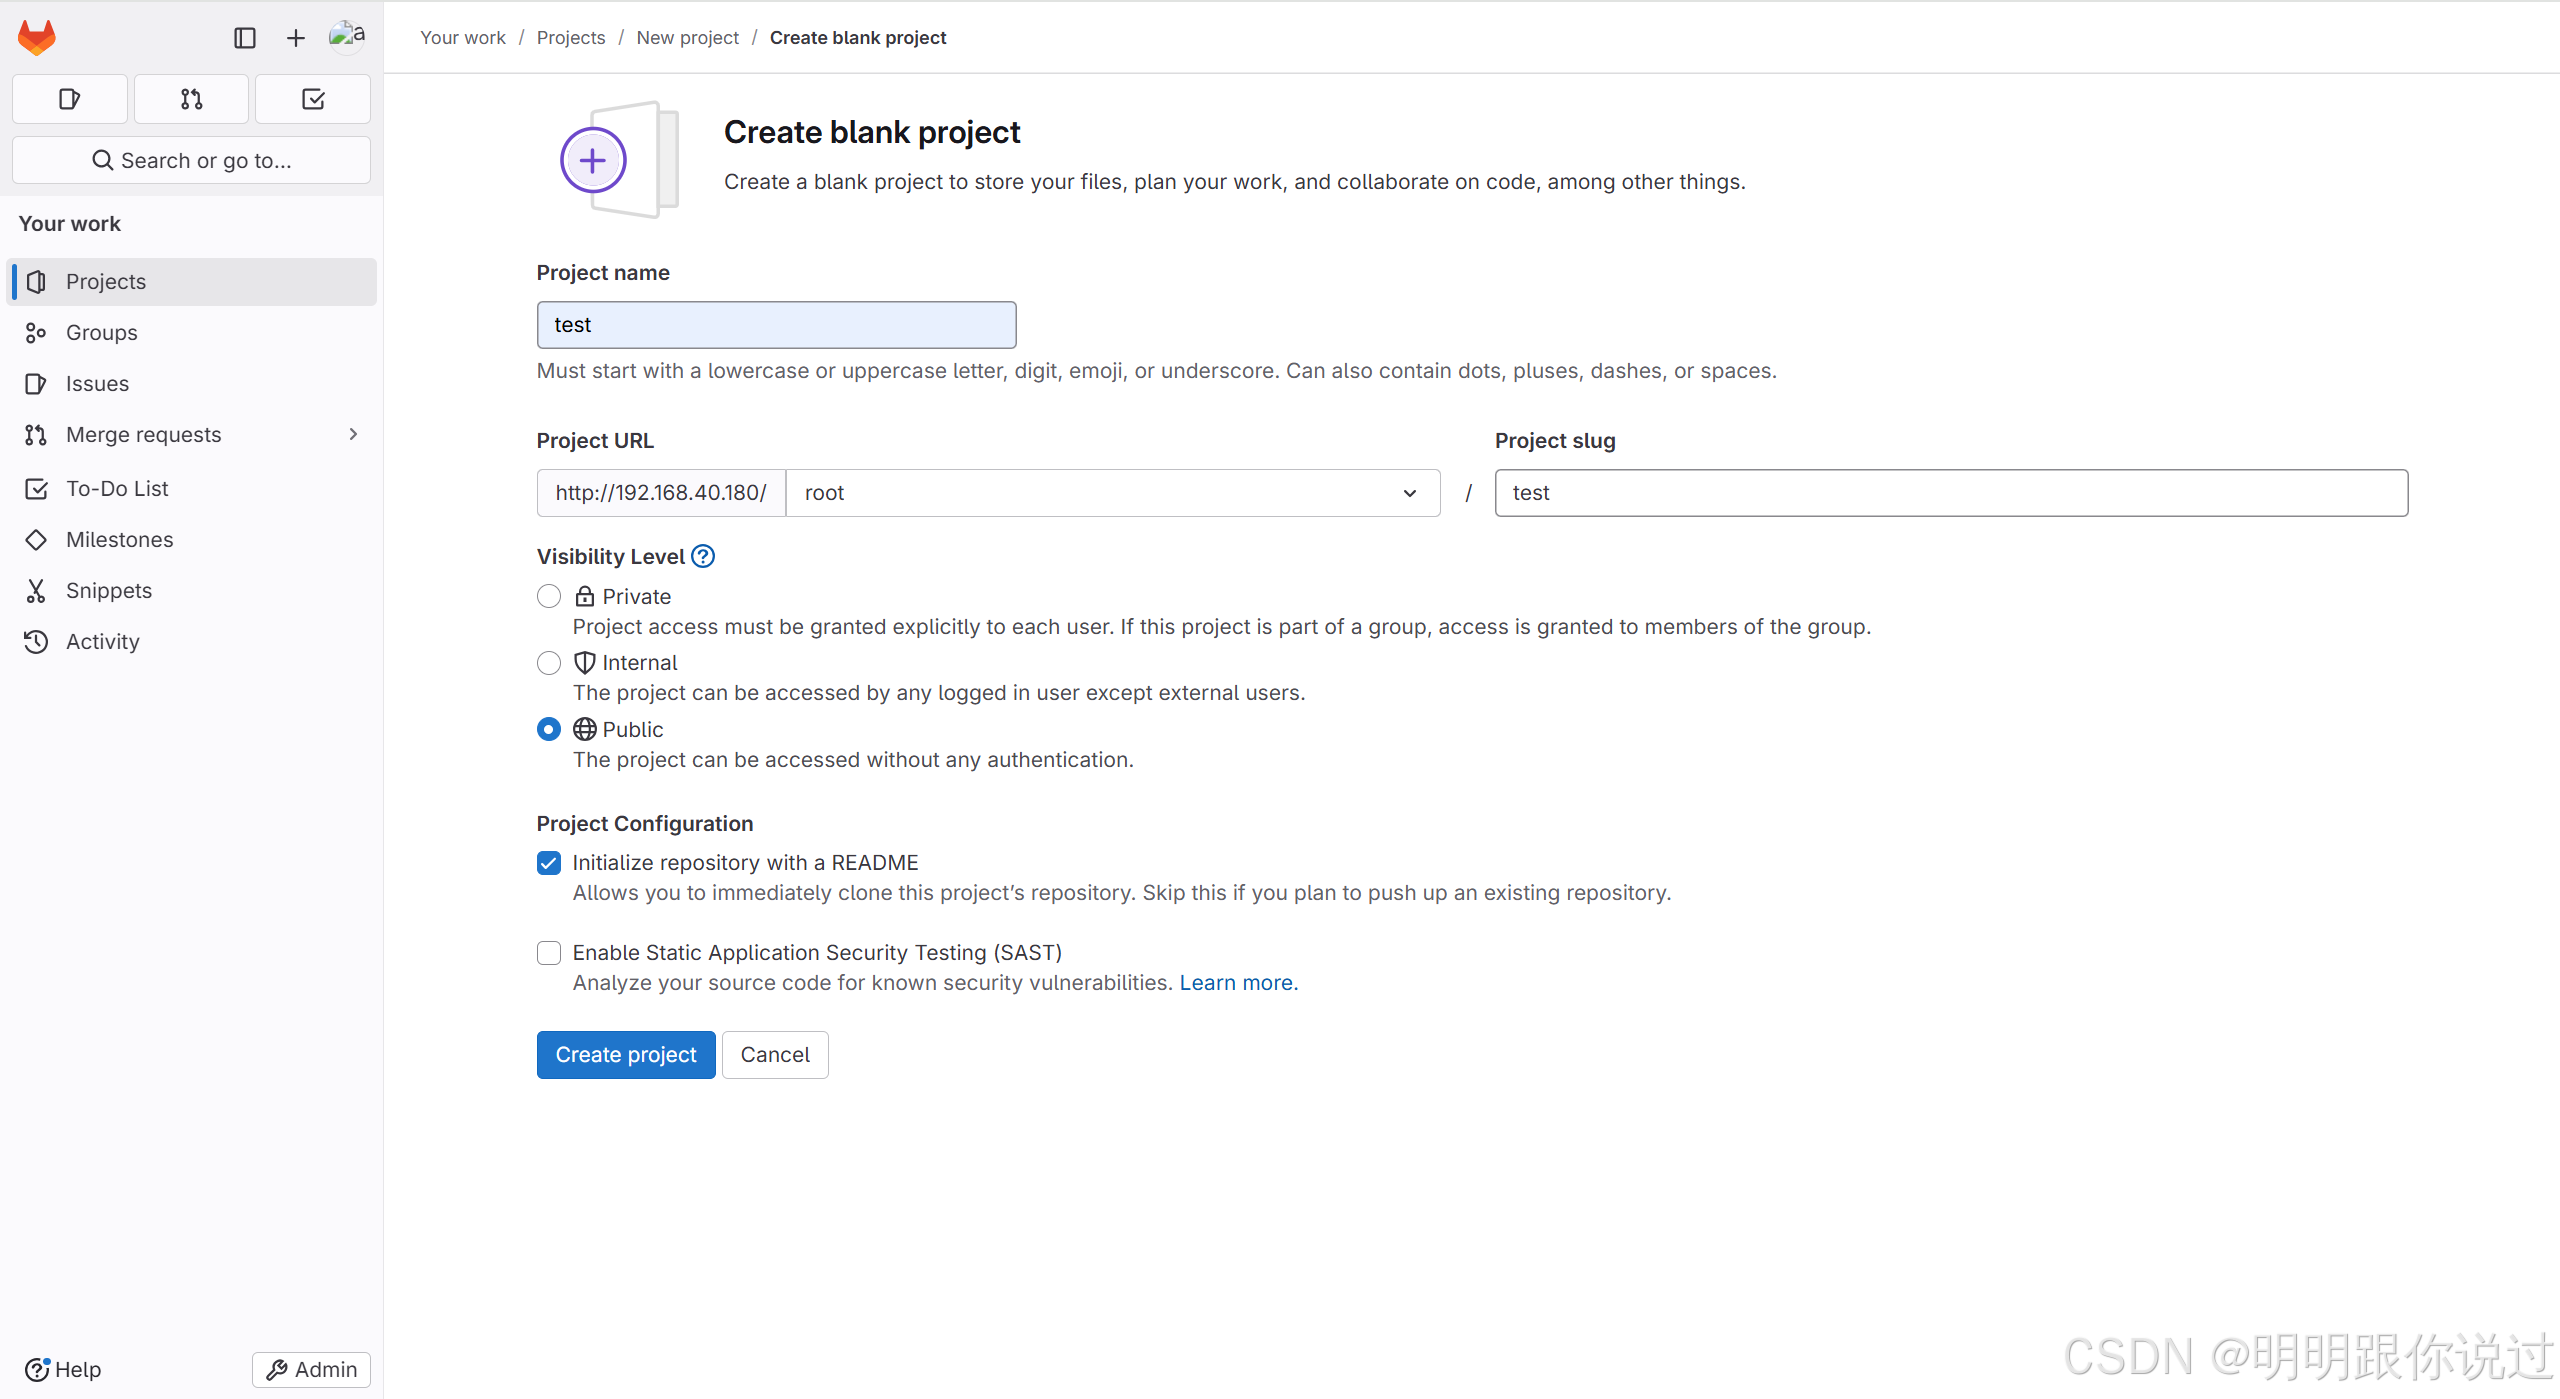
创建项目,点击左上角 + ,点击 New Project -> create blank project
 参考下图。创建项目
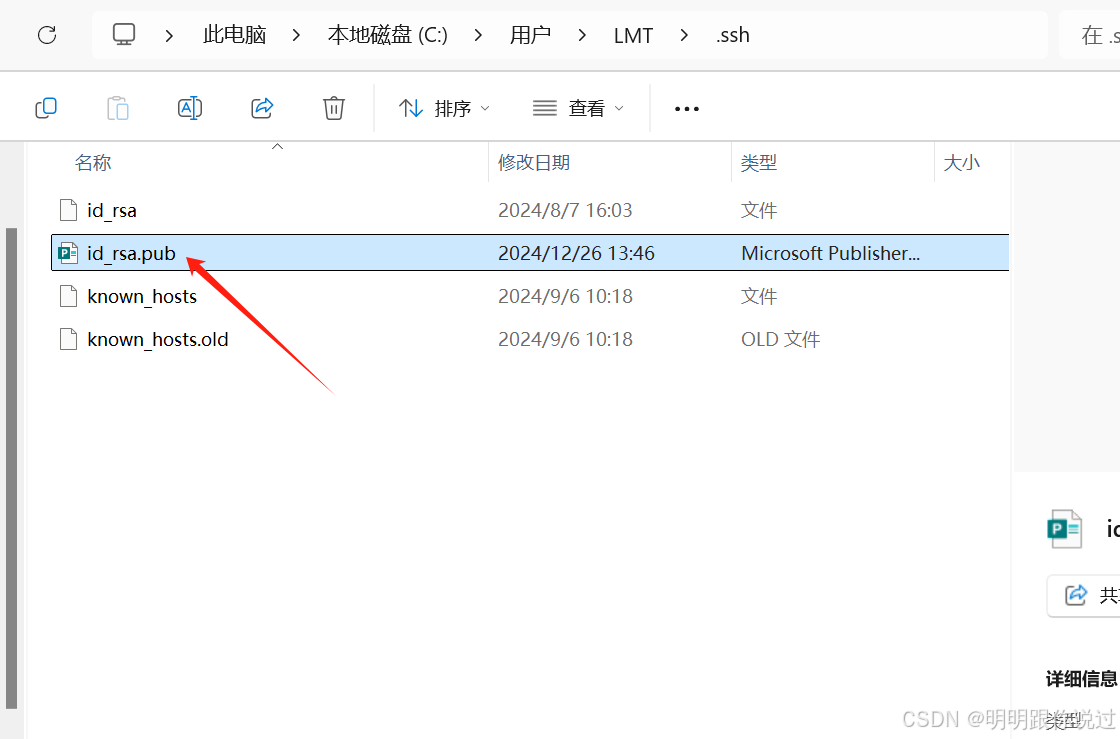
编辑电脑 C:\Users\LMT\.ssh\id_rsa.pub 把刚刚的公钥复制进去
编写一段测试代码,这里的代码我们就以Go语言为例了,大家如果有其他的代码,可以参考下面的方法进行上传
Go
package main

import (
	"fmt"
	"net/http"
)

func welcomeHandler(w http.ResponseWriter, r *http.Request) {
	// 设置响应的内容类型为 HTML
	w.Header().Set("Content-Type", "text/html")
	// 输出 Welcome 网页的 HTML 内容
	fmt.Fprintf(w, "<html><body><h1>Welcome to the Go Web Server!</h1></body></html>")
}

func main() {
	// 注册 welcomeHandler 处理器,绑定到根路径 "/"
	http.HandleFunc("/", welcomeHandler)

	// 在 80 端口启动 HTTP 服务
	fmt.Println("Starting server on port 80...")
	if err := http.ListenAndServe(":80", nil); err != nil {
		fmt.Println("Error starting server:", err)
	}
}
如何电脑上还没有安装 Git bash,可以到官网安装一个,这里不再过多赘述
打开终端,进入到项目的目录下
配置用户信息
Go
git config --global user.name "Your Name"
git config --global user.email "your.email@example.com"
初始化git仓库
Go
git init添加远程仓库
Go
git remote add origin http://192.168.40.180/root/test.git切换分支
Go
git branch master添加所有文件到暂存区
Go
git add .提交更改,附带描述性的信息
Go
git commit -m "initial commit"推送代码
Go
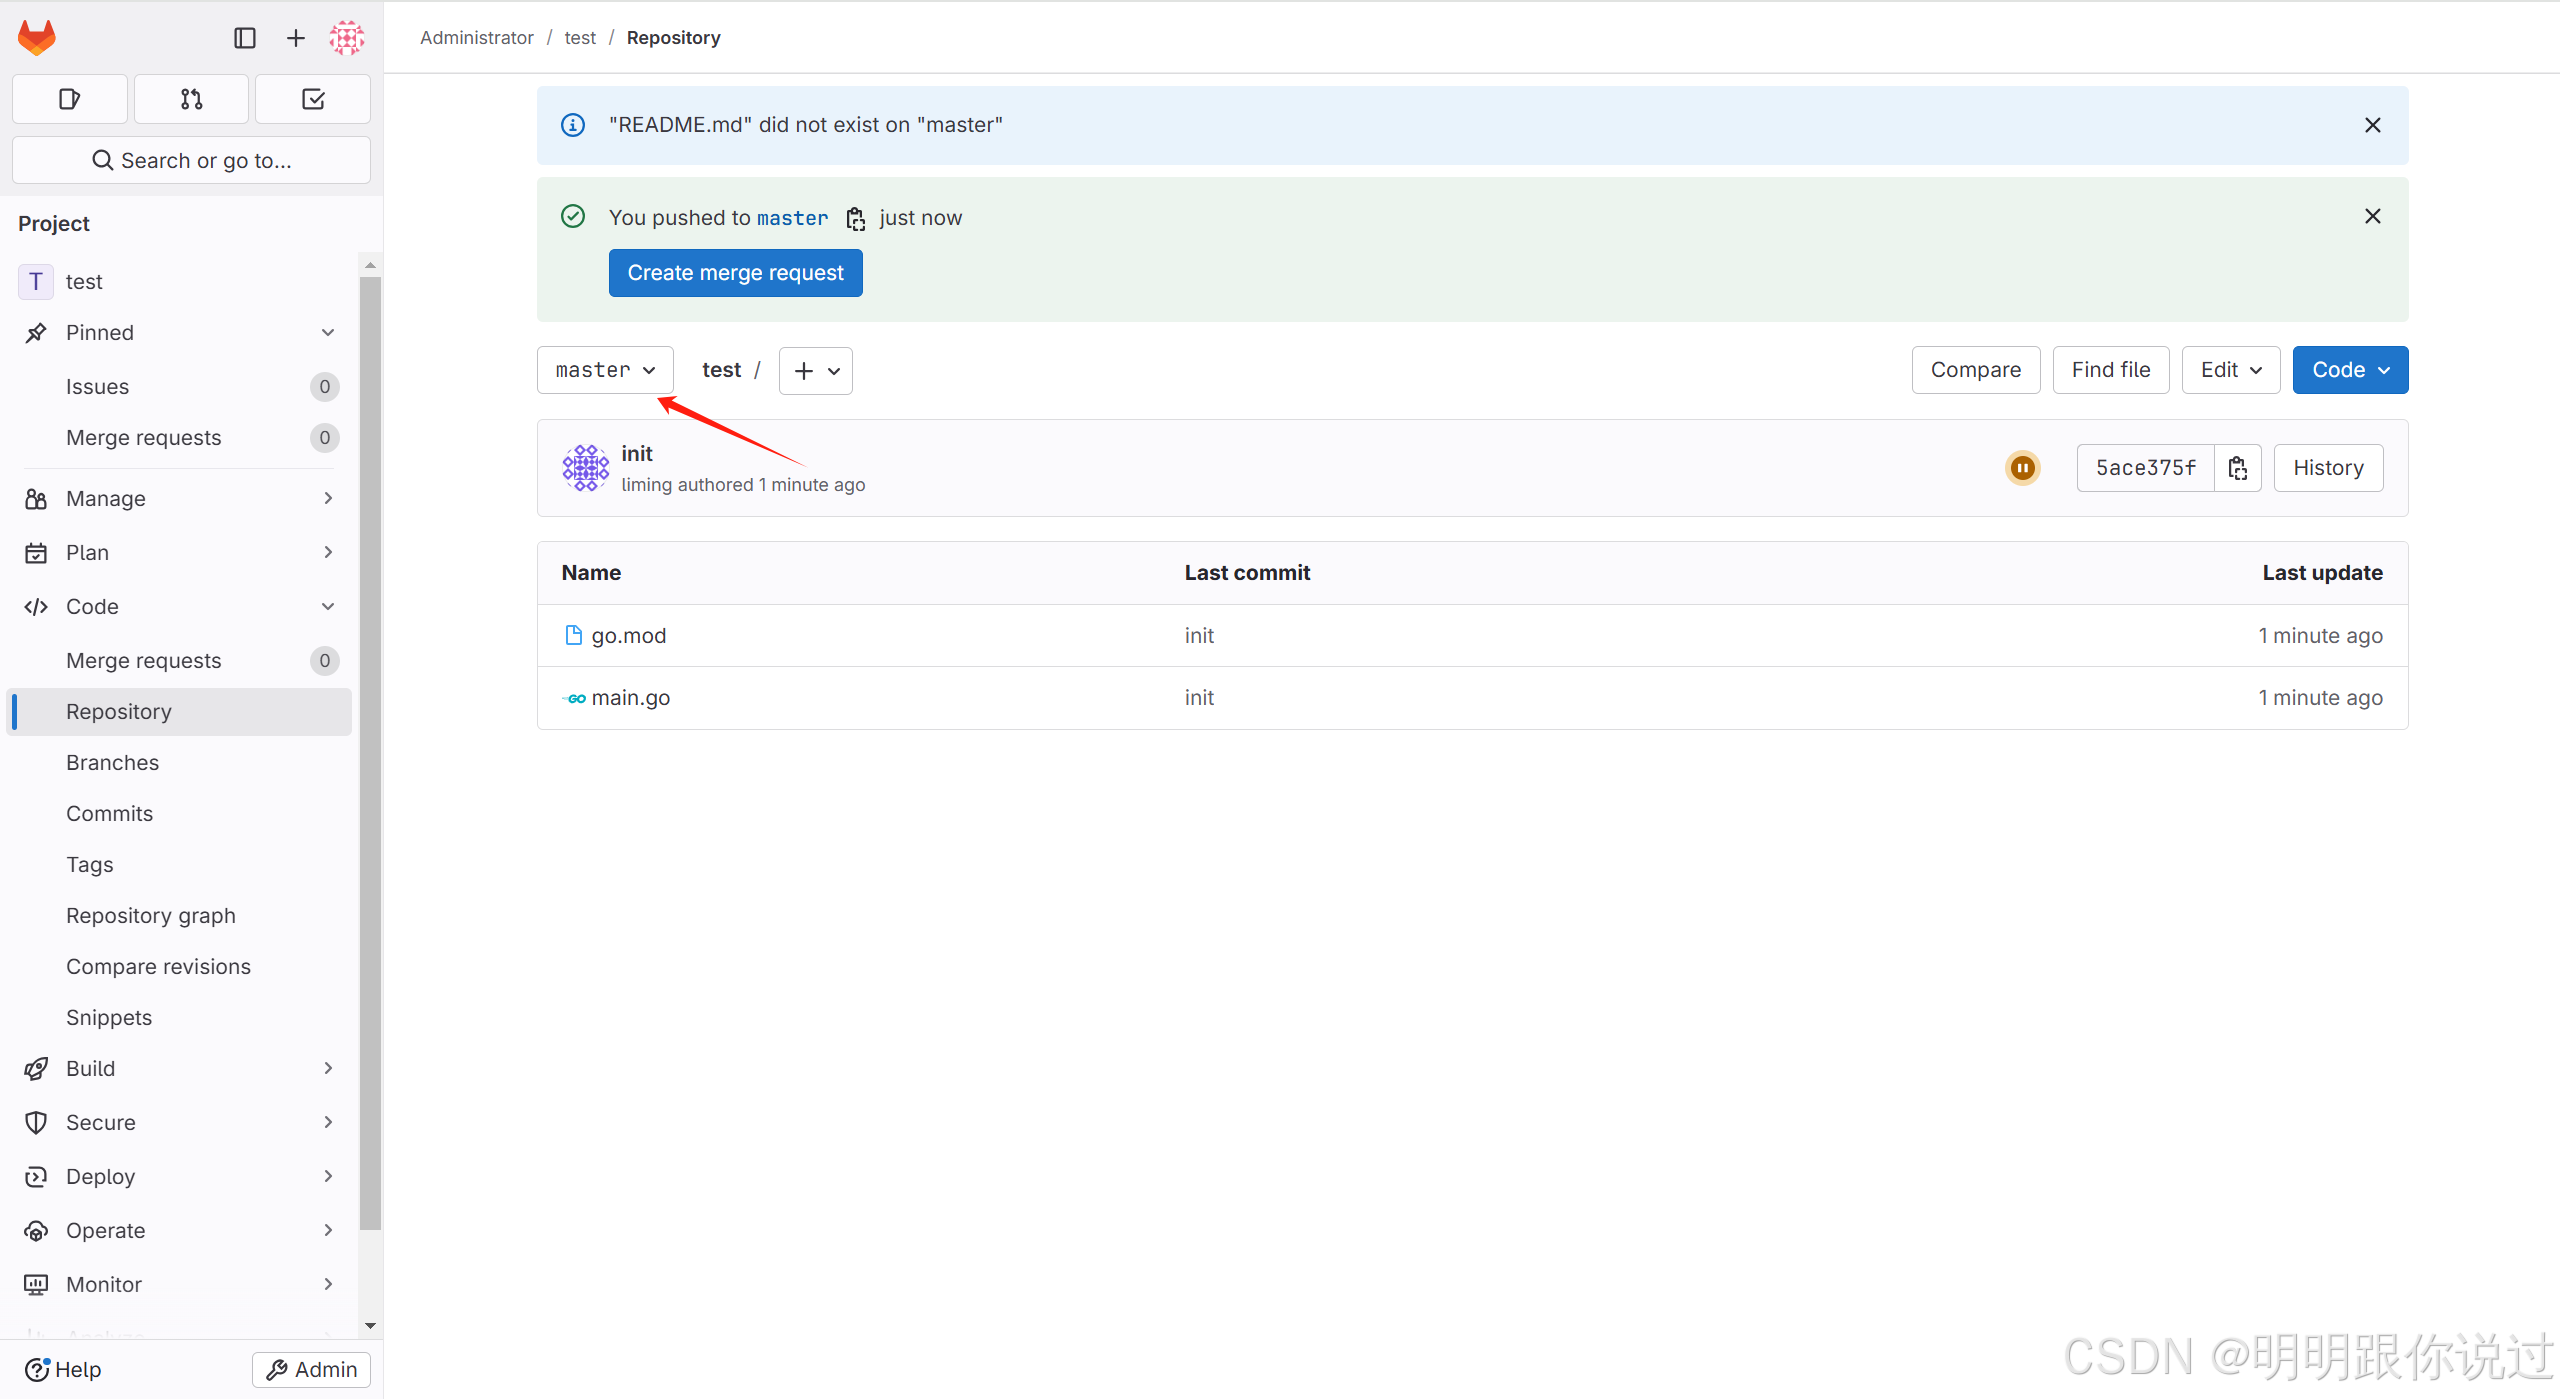
git push -fu origin master在Gitlab上,切换到master分支,就可以看到刚刚上传的代码了
2、安装插件
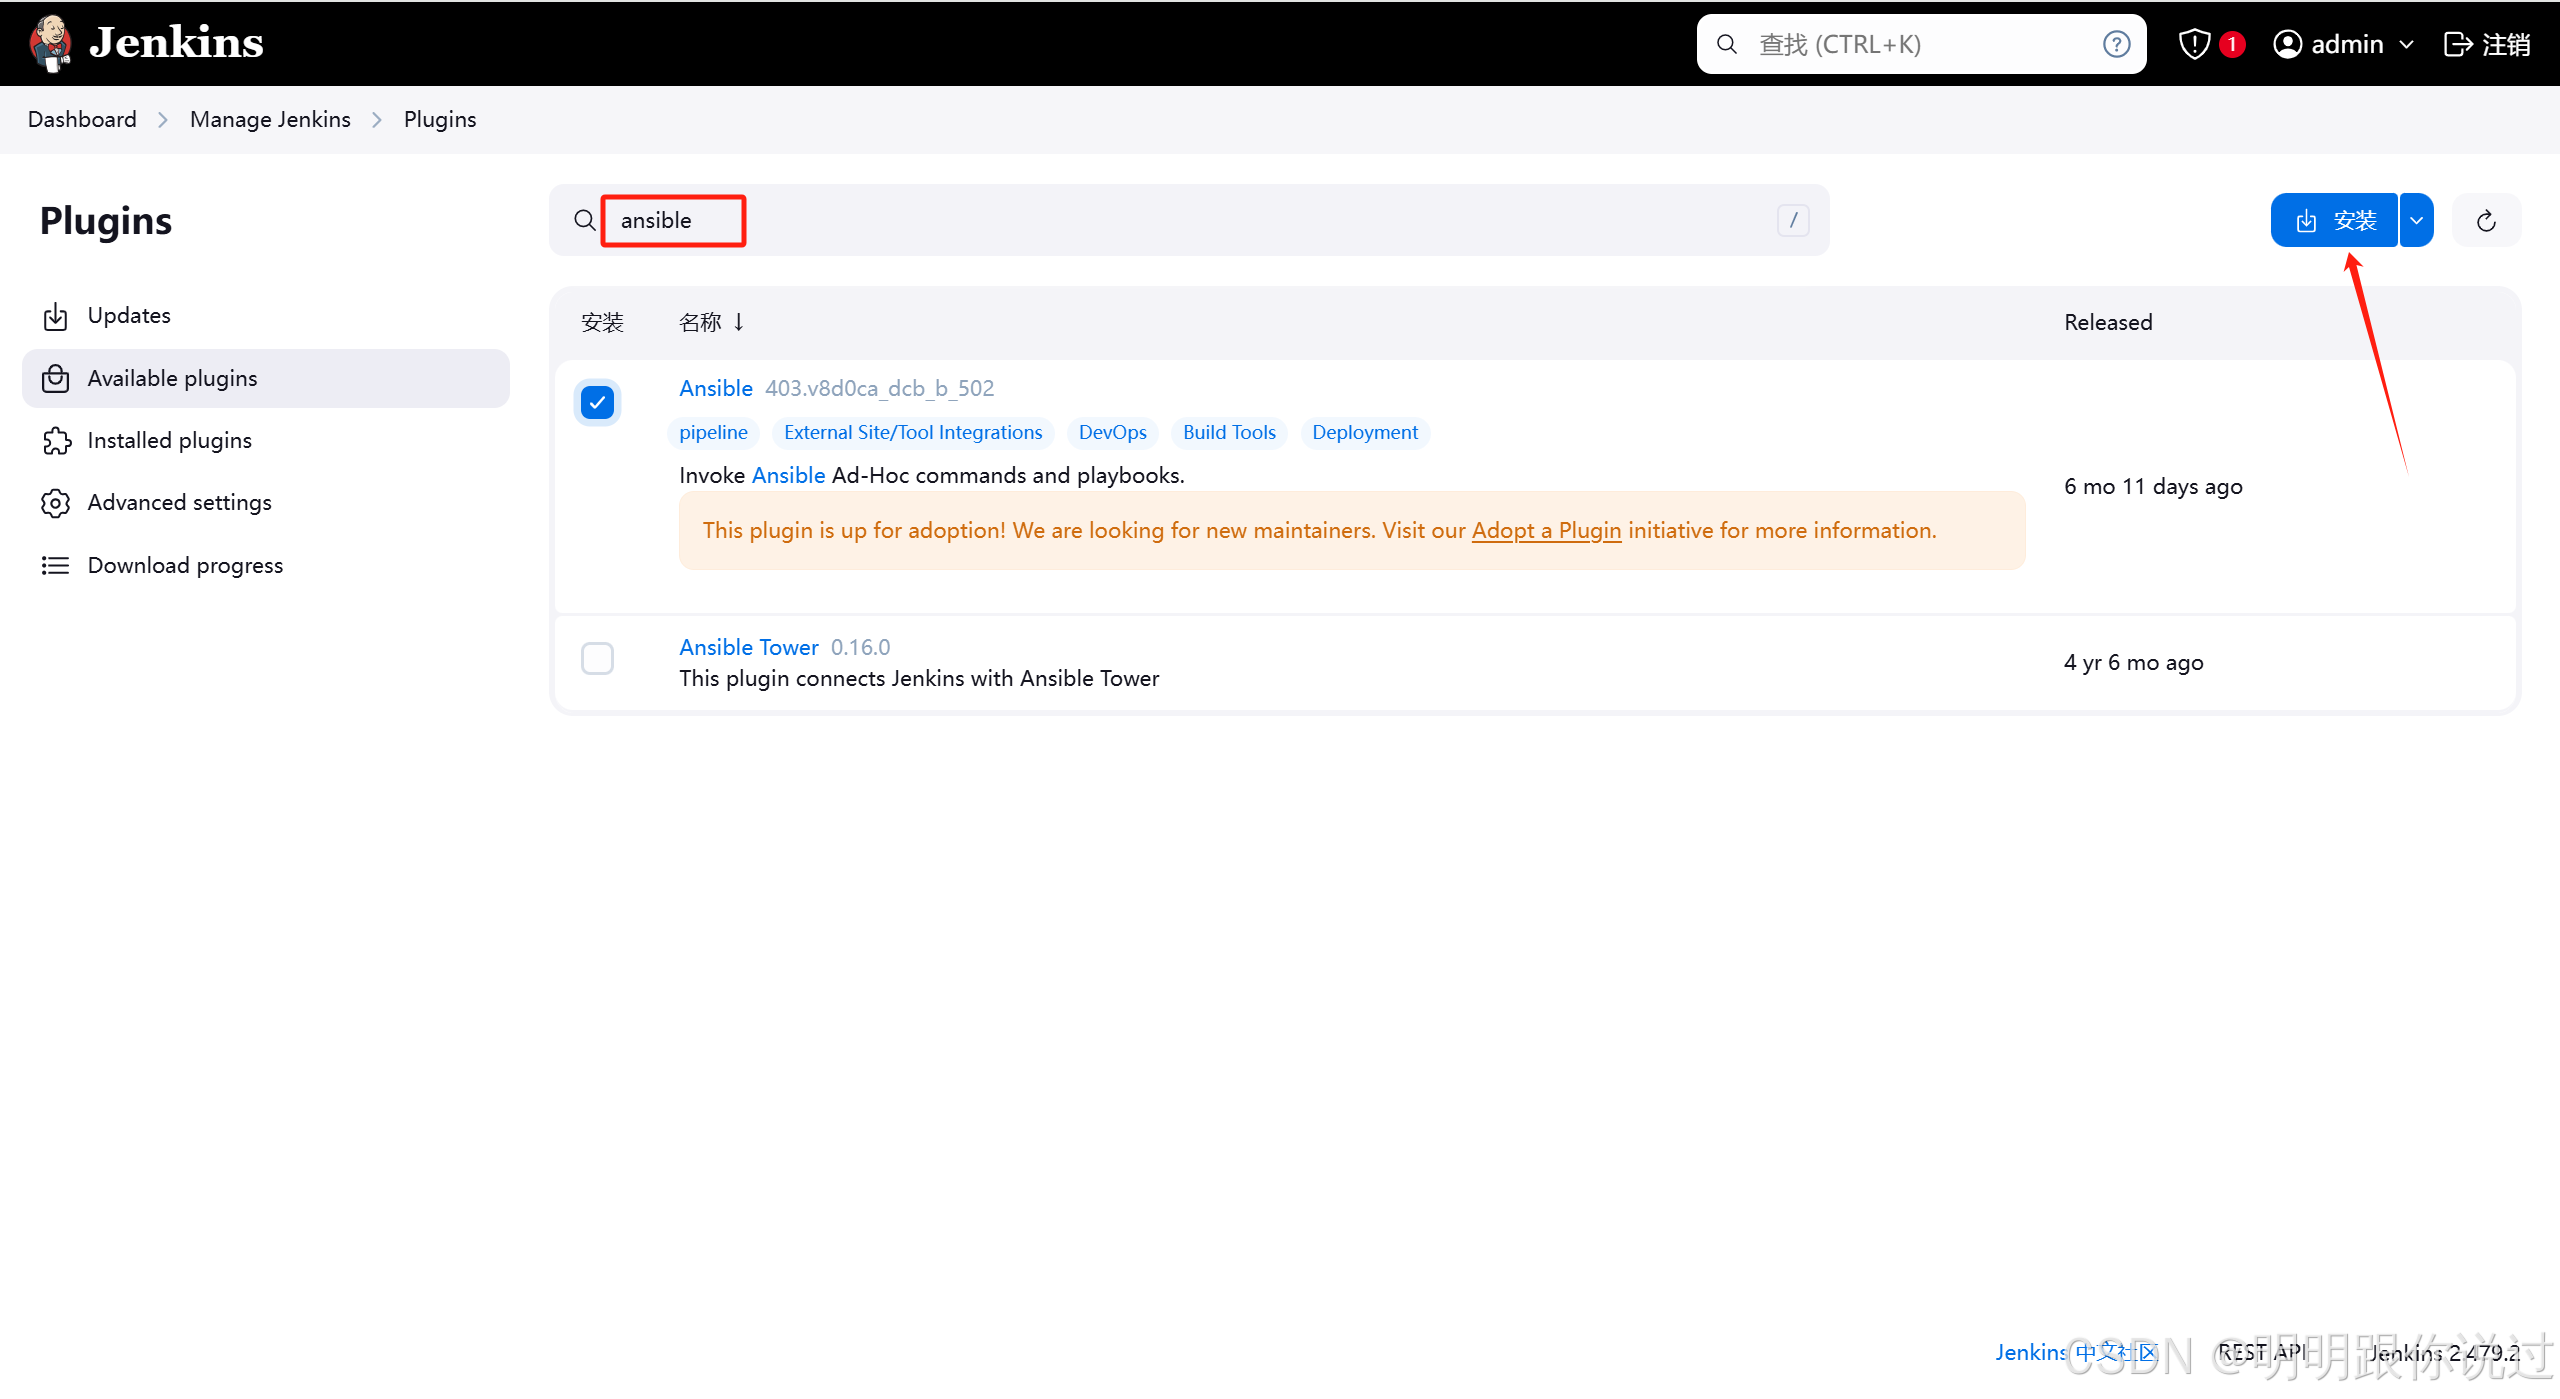
登录到Jenkins,在左侧导航栏点击 Manage Jenkins -> Plugins -> Available plugins
搜索 Ansible、Blue Ocean,点击安装
安装完成后,重启Jenkins
Go
systemctl restart jenkins3、创建Item
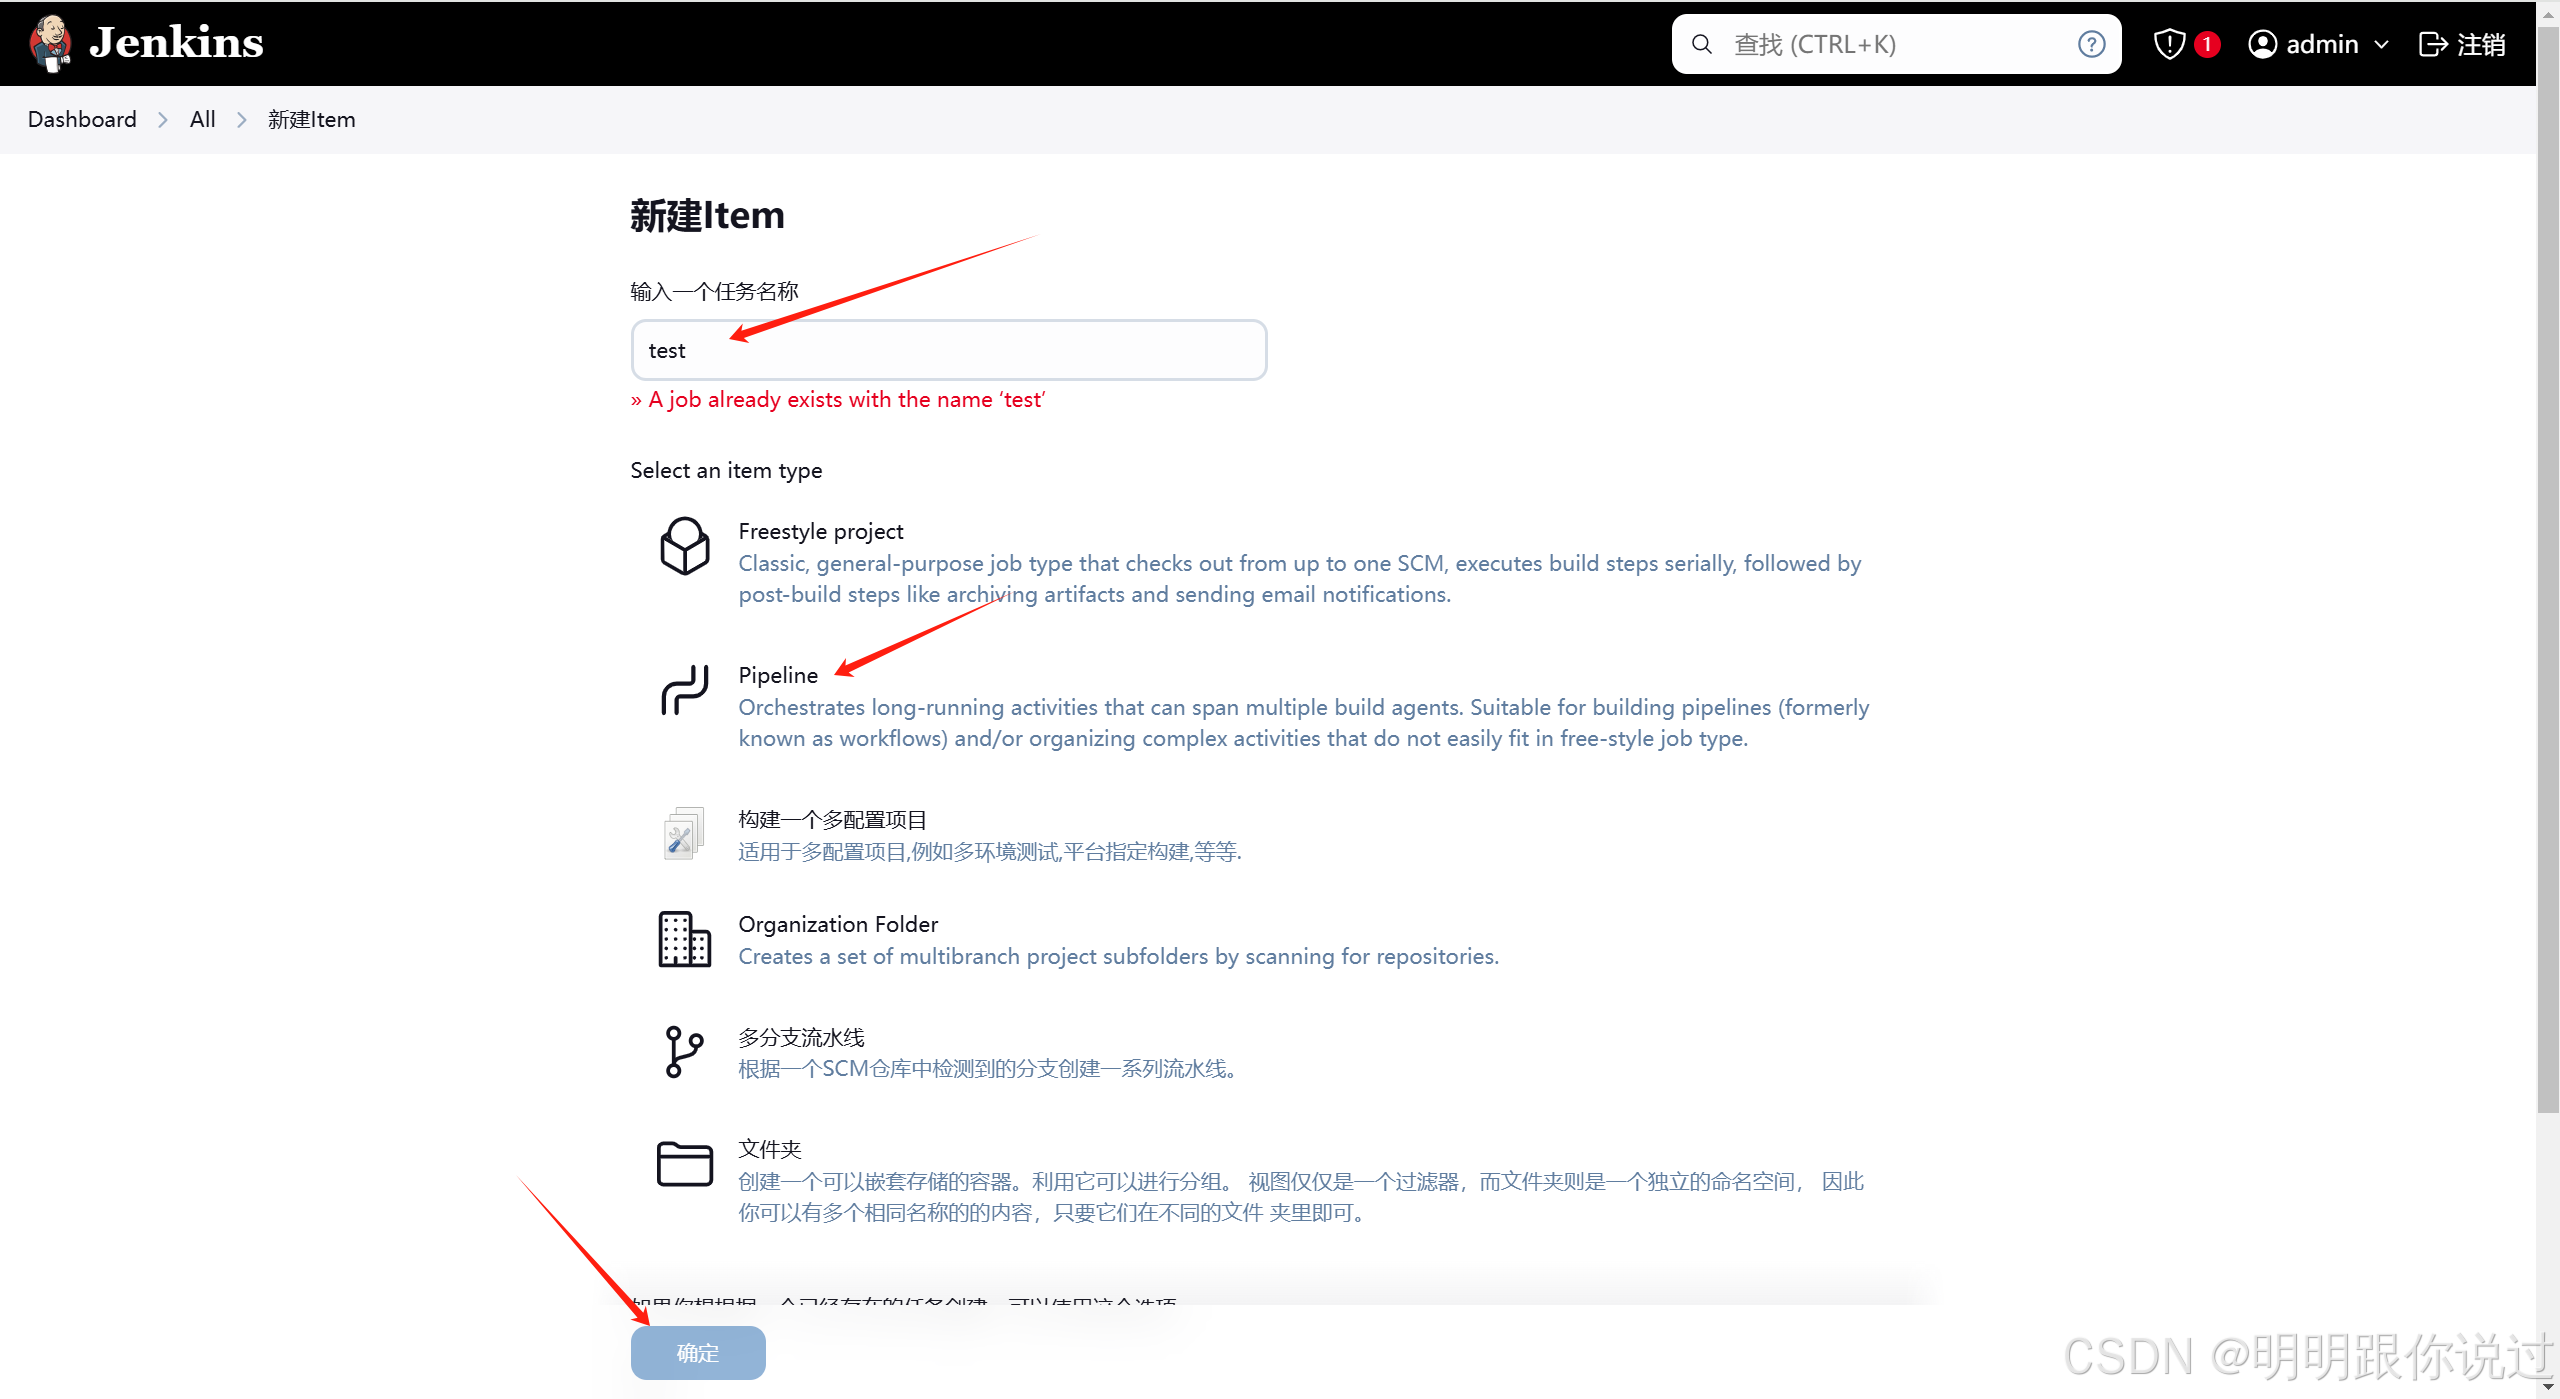
左侧导航栏 点击新建Item,输入名称,选择Pipeline
在定义中,选择 Pipeline script
在脚本中输入如下内容,然后点击保存
Go
pipeline {
    agent any

    environment {
        ANSIBLE_PLAYBOOK_Environmental_Installation = '/etc/ansible/environmental-installation.yaml'
        ANSIBLE_PLAYBOOK_Deploy = '/etc/ansible/deploy.yaml'
    }

    stages {
        stage ('Environmental installation') {
            steps {
                script {
                    sh """
                    ansible-playbook  ${ANSIBLE_PLAYBOOK_Environmental_Installation}
                    """
                }
            }
        }

        stage('Deploy test') {
            steps {
                script {
                    // 获取用户输入,判断是否部署到测试环境
                    def userTestInput = input (
                        id: 'userTestInput',
                        message: "Promote to test?",
                        parameters: [
                            [
                                $class: 'ChoiceParameterDefinition',
                                choices: "YES\nNO",
                                name: 'Env'
                            ]
                        ]
                    )

                    // 判断用户选择
                    if (userTestInput == "YES") {
                        sh "ansible-playbook  ${ANSIBLE_PLAYBOOK_Deploy} -l test"
                    } else {
                        echo "Deployment to test skipped."
                    }
                }
            }
        }

        stage('Deploy prod') {
            steps {
                script {
                    // 获取用户输入,判断是否部署到生产环境
                    def userProdInput = input (
                        id: 'userProdInput',
                        message: "Promote to prod?",
                        parameters: [
                            [
                                $class: 'ChoiceParameterDefinition',
                                choices: "YES\nNO",
                                name: 'Env'
                            ]
                        ]
                    )

                    // 判断用户选择
                    if (userProdInput == "YES") {
                        sh "ansible-playbook  ${ANSIBLE_PLAYBOOK_Deploy} -l prod"
                    } else {
                        echo "Deployment to prod skipped."
                    }
                }
            }
        }
    }
}
4、编写Playbook
Go
vim /etc/ansible/environmental-installation.yaml

# 添加如下内容
---
- name: Install Go and Git
  hosts: all
  become: yes
  tasks:

    # 检查 Go 是否已安装
    - name: Check if Go is installed
      stat:
        path: "/usr/local/go/bin/go"
      register: go_installed

    # 检查 Git 是否已安装
    - name: Check if Git is installed
      command: git --version
      register: git_installed
      ignore_errors: yes

    # 如果 Go 没有安装,下载并安装 Go
    - name: Download Go installation package
      get_url:
        url: "https://go.dev/dl/go1.20.6.linux-amd64.tar.gz"
        dest: "/tmp/go1.20.6.linux-amd64.tar.gz"
      when: not go_installed.stat.exists

    - name: Extract Go installation package
      unarchive:
        src: "/tmp/go1.20.6.linux-amd64.tar.gz"
        dest: "/usr/local/"
        remote_src: yes
      when: not go_installed.stat.exists

    - name: Add Go to PATH
      lineinfile:
        path: "/etc/profile"
        line: "export PATH=$PATH:/usr/local/go/bin"
        create: yes
      when: not go_installed.stat.exists

    - name: Reload profile to apply Go to PATH
      shell: source /etc/profile
      register: result
      changed_when: false
      when: not go_installed.stat.exists

    # 如果 Git 没有安装,则安装 Git
    - name: Install Git
      yum:
        name: git
        state: present
      when: git_installed.failed
上面的Playbook用于检测工作节点是否安装了Git和Go环境,如果没有就进行安装,如何有,则跳过
再写一个Playbook,用于执行代码拉取和服务部署
Go
vim /etc/ansible/deploy.yaml

# 添加如下内容
---
- name: Deploy application to Linux server
  hosts: all
  become: yes
  tasks:
    - name: Pull latest code from Git repository
      git:
        repo: 'http://192.168.40.180/root/test.git'
        dest: '/root/project'
        version: 'master'

    # 编译 Go 程序
    - name: Compile Go application
      command: "/usr/local/go/bin/go build -o /root/project/main /root/project/main.go"
      args:
        chdir: /root/project

    # 运行 Go 程序
    - name: Run Go application
      shell: |
        nohup /root/project/main > /root/project/nohup.out 2>&1 &
      args:
        chdir: /root/project
5、运行Pipeline
在Jenkins主页,点击左侧的 打开 Blue Ocean -> test -> 运行
点击任务,进入到执行页面
第一步的环境检测完成了,现在问我们是否要发布到测试环境,点击是
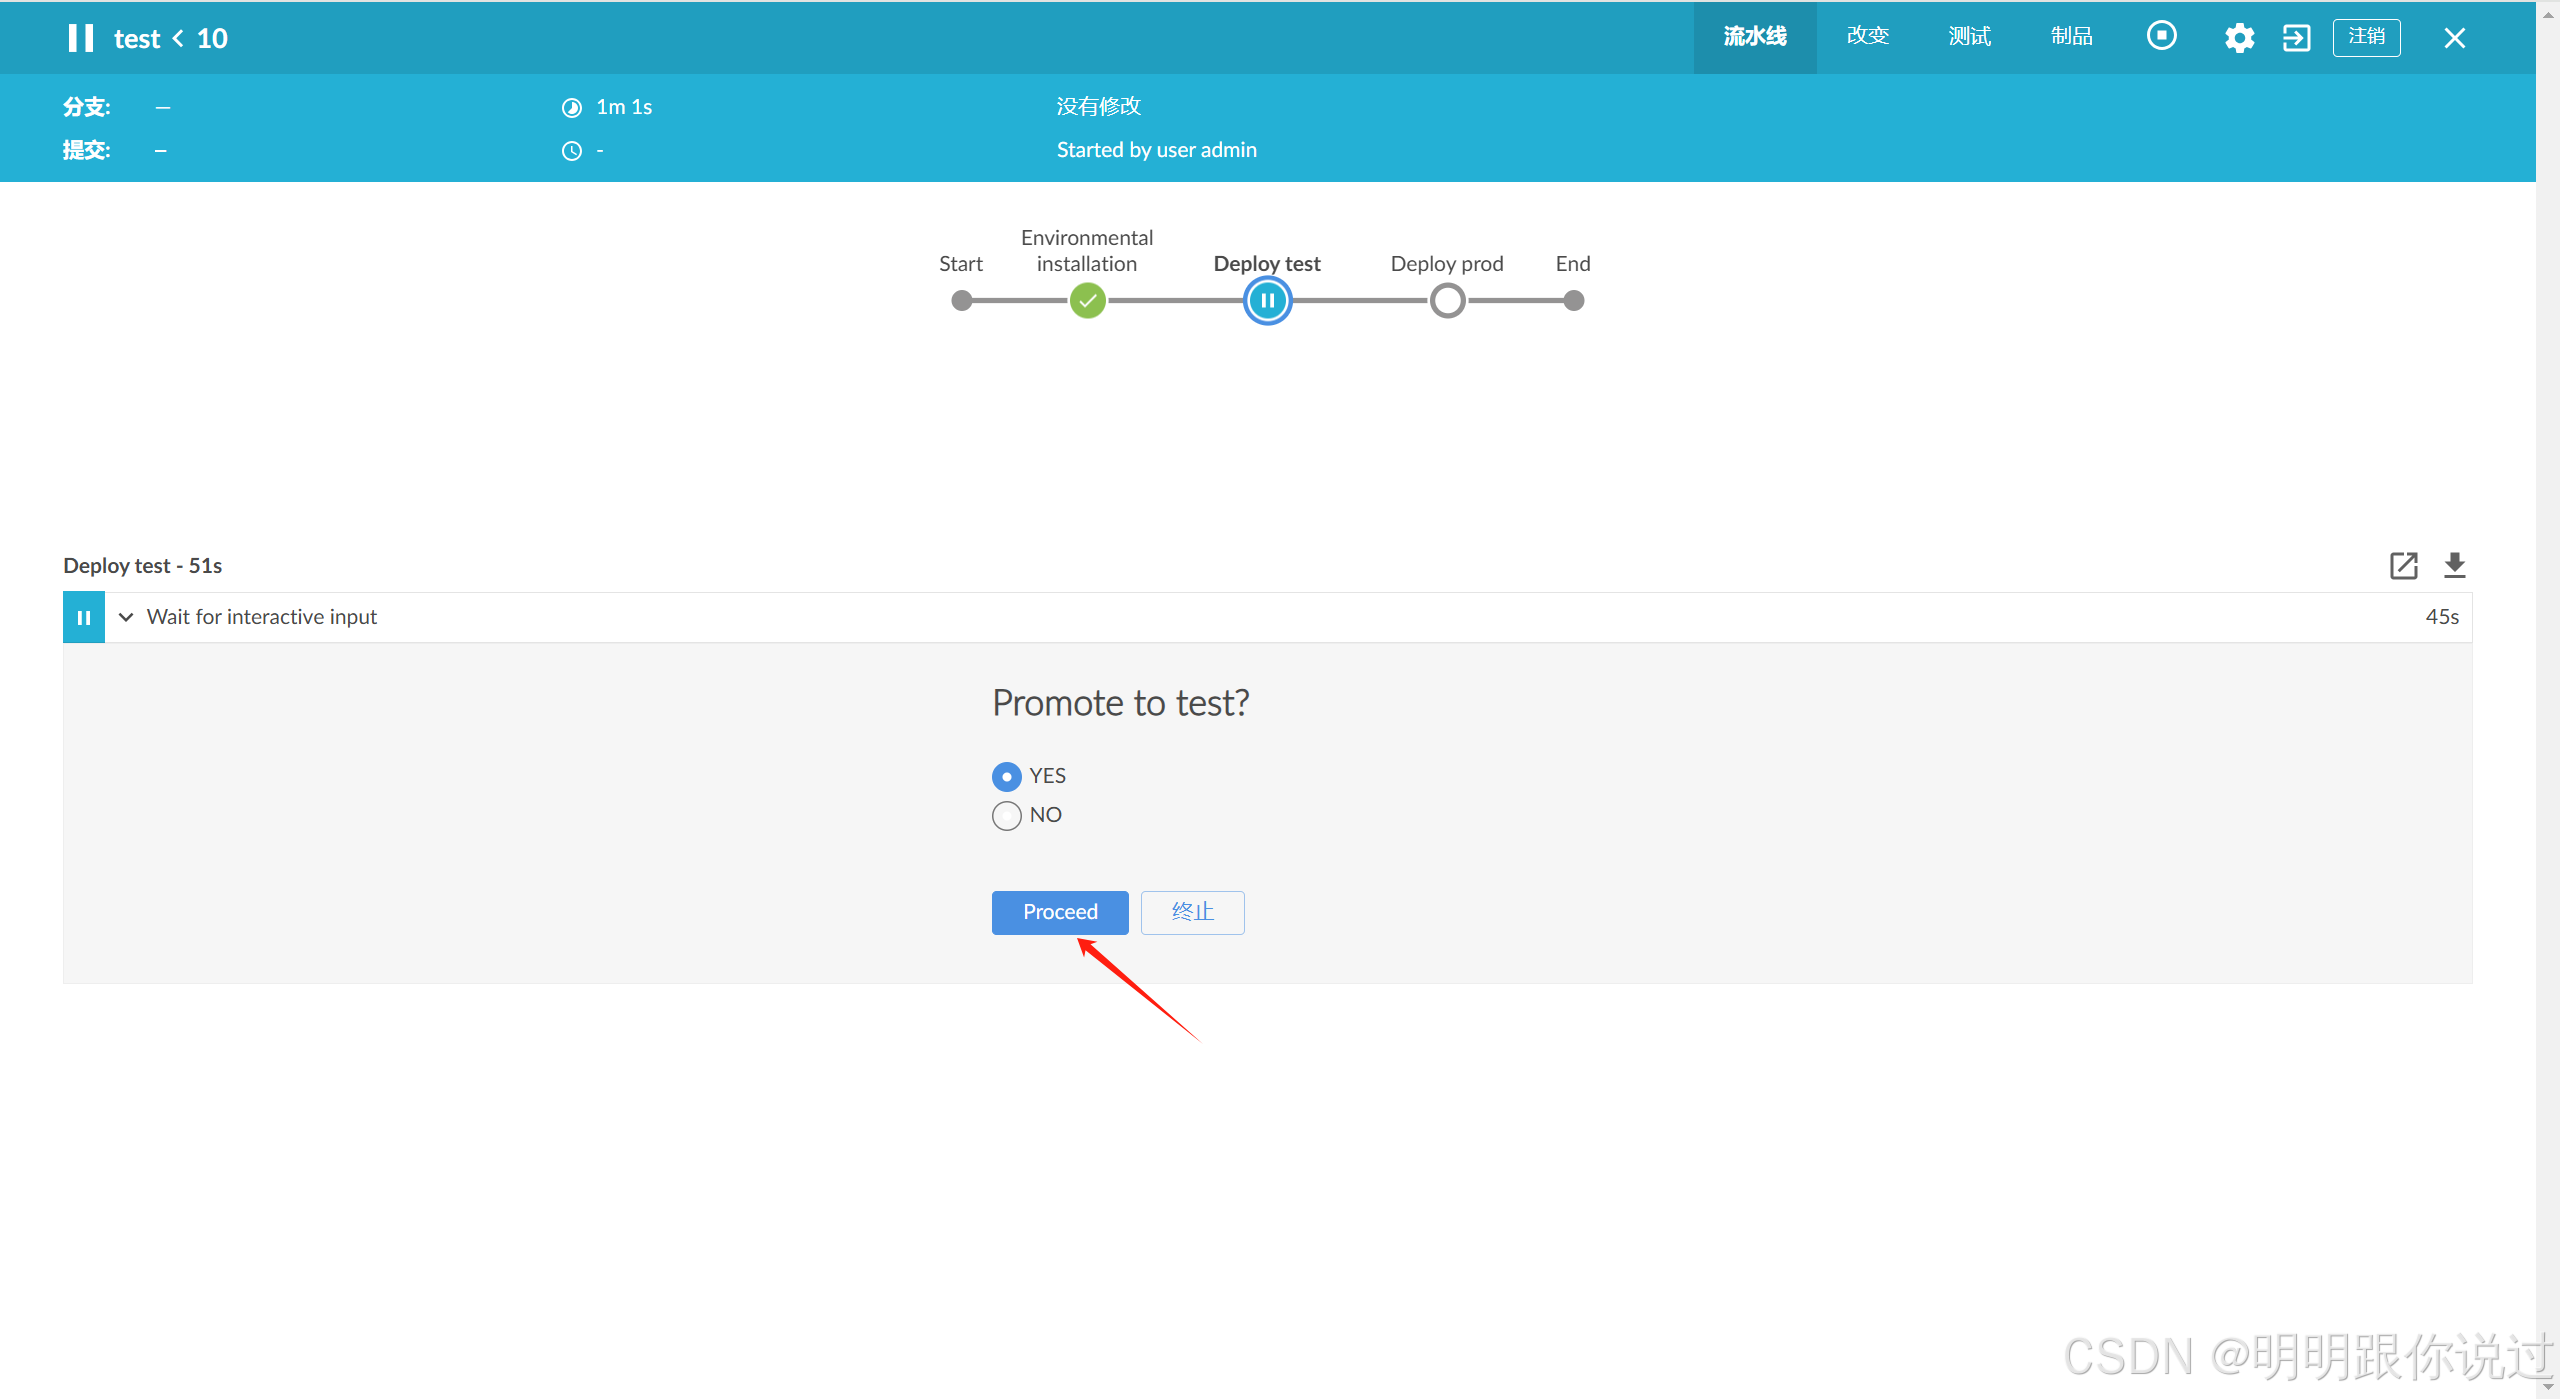
之后就会自动执行代码的拉取和部署操作了,可以使用浏览器访问测试主机的IP + 80端口,如果能正常访问到,则测试环境部署无问题,可以部署到生产环境了
以上就是本次项目实战的全过程,时间原因,其中有许多点还可以进行优化,笔者将在后续文章中更新,如果你有不同的看法,欢迎在评论区留言
💕💕💕每一次的分享都是一次成长的旅程,感谢您的陪伴和关注。希望这些关于云原生的文章能陪伴您走过技术的一段旅程,共同见证成长和进步!😺😺😺
🧨🧨🧨让我们一起在技术的海洋中探索前行,共同书写美好的未来!!!