- 公开视频 -> 链接点击跳转公开课程
- 博客首页 -> 链接点击跳转博客主页
目录
[垂直布局 QVBoxLayout](#垂直布局 QVBoxLayout)
[水平布局 QHBoxLayout](#水平布局 QHBoxLayout)
[网格布局 QGridLayout](#网格布局 QGridLayout)
控件创建
包含对应控件类型头文件
在Qt中使用特定控件前,需要包含相应的头文件。
例如,如果要使用QPushButton和QLineEdit,需要包含以下头文件。
cpp
#include <QPushButton>
#include <QLineEdit>
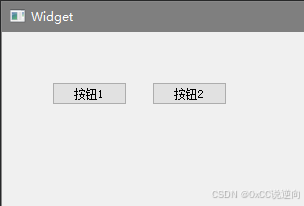
实例化控件类对象
cpp
#include <QPushButton>
#include <QWidget>

class Widget : public QWidget {
public:
    Widget(QWidget *parent = nullptr);
};

Widget::Widget(QWidget *parent)
    : QWidget(parent)
{
    // 创建第一个按钮
    QPushButton* btn1 = new QPushButton(this);
    btn1->setText("按钮1");
    btn1->move(50, 50);

    // 创建第二个按钮
    QPushButton* btn2 = new QPushButton("按钮2", this);
    btn2->move(150, 50);

    // 显示按钮
    btn1->show();
    btn2->show();
}
控件设置
创建控件后,通常需要对其进行一系列设置,以满足具体的界面需求。
设置父控件
在Qt中,控件之间通常存在父子关系。通过设置父控件,可以确保子控件随父控件一起移动和显示。
cpp
QPushButton* btn = new QPushButton(this); // 'this'为父控件设置窗口标题
对于顶层窗口,可以设置窗口的标题,以便用户识别。
cpp
this->setWindowTitle("Qt应用程序");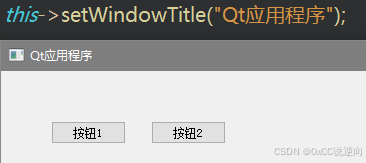
设置控件大小
可以通过resize或setFixedSize方法设置控件的大小。
cpp
this->resize(900, 600);          // 设置初始大小
this->setFixedSize(900, 600);    // 设置固定大小,用户无法更改
设置控件坐标
使用move方法可以设置控件在父容器中的位置。
cpp
btn2->move(0, 50); // 设置按钮2的位置为(0, 50) 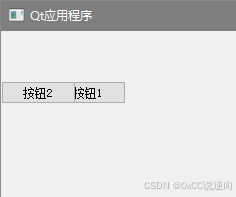
设置文本颜色和背景颜色
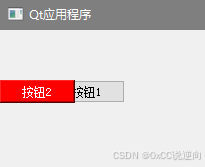
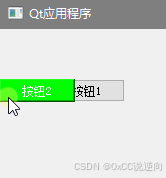
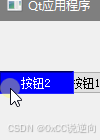
通过setStyleSheet方法,可以自定义控件的样式,包括文本颜色和背景颜色。
cpp
btn2->setStyleSheet(
    "QPushButton{background:#FF0000; color:white}"
    "QPushButton:hover{background:#00FF00;}"
    "QPushButton:pressed{background:#0000FF;}"
);
控件排版
在复杂的界面中,合理的布局管理器能够自动安排控件的位置和大小,提升开发效率和界面一致性。
Qt提供了多种布局管理器,其中的三种常用布局:垂直布局(QVBoxLayout)、水平布局(QHBoxLayout)和网格布局(QGridLayout)。
垂直布局 QVBoxLayout
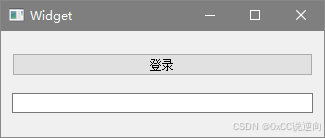
QVBoxLayout按照从上到下的顺序排列控件,适用于需要垂直堆叠控件的场景。
cpp
Widget::Widget(QWidget *parent)
    : QWidget(parent)
{
    m_Btn = new QPushButton("登录", this);
    m_Edit = new QLineEdit(this);

    QVBoxLayout* pVbox = new QVBoxLayout;
    pVbox->addWidget(m_Btn);
    pVbox->addWidget(m_Edit);

    this->setLayout(pVbox);
} 
水平布局 QHBoxLayout
QHBoxLayout按照从左到右的顺序排列控件,适用于需要水平排列控件的场景。
cpp
  m_Btn = new QPushButton("登录", this);
    m_Edit = new QLineEdit(this);

    QHBoxLayout* pHbox = new QHBoxLayout;
    pHbox->addWidget(m_Btn);
    pHbox->addWidget(m_Edit);

this->setLayout(pHbox); 
网格布局 QGridLayout
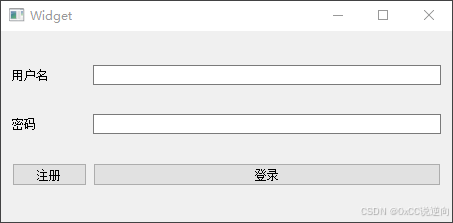
QGridLayout允许将控件按照行和列的方式排列,适用于需要复杂布局的场景,如表单。
cpp
Widget::Widget(QWidget *parent)
    : QWidget(parent)
{
    QLabel* labelUsername = new QLabel("用户名", this);
    QLabel* labelPassword = new QLabel("密码", this);

    QLineEdit* editUsername = new QLineEdit(this);
    QLineEdit* editPassword = new QLineEdit(this);

    QPushButton* btnLogin = new QPushButton("登录", this);
    QPushButton* btnRegister = new QPushButton("注册", this);

    QGridLayout* layout = new QGridLayout(this);

    layout->addWidget(labelUsername, 0, 0);
    layout->addWidget(editUsername, 0, 1);
    layout->addWidget(labelPassword, 1, 0);
    layout->addWidget(editPassword, 1, 1);
    layout->addWidget(btnRegister, 2, 0);
    layout->addWidget(btnLogin, 2, 1);
} 
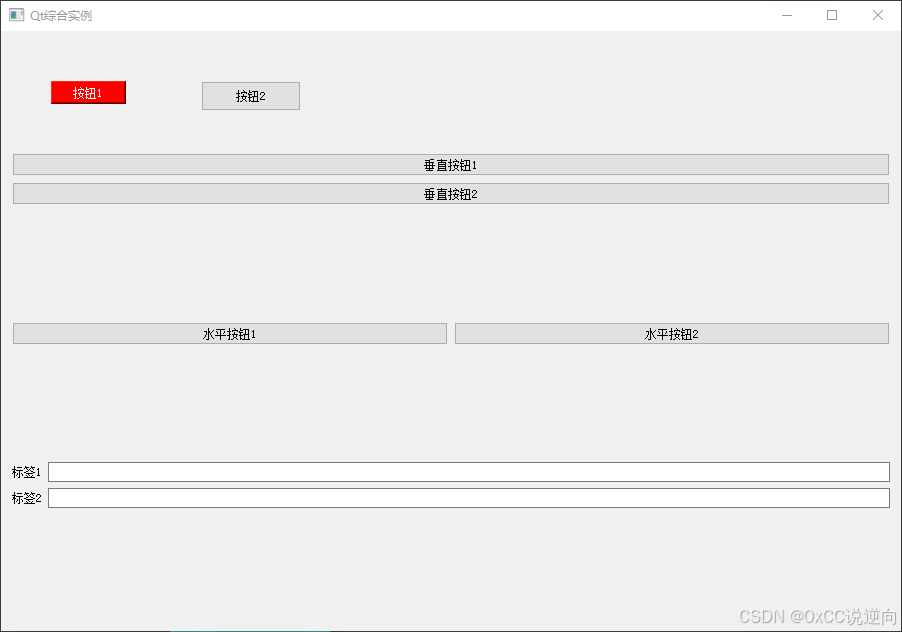
综合实例
cpp
#include <QApplication>
#include <QPushButton>
#include <QLineEdit>
#include <QLabel>
#include <QGridLayout>
#include <QVBoxLayout>
#include <QHBoxLayout>
#include <QWidget>

Widget::Widget(QWidget *parent)
    : QWidget(parent)
    , ui(new Ui::Widget)
{
    ui->setupUi(this);

    // 设置窗口基本信息
    this->resize(900, 600);
    //this->setFixedSize(900, 600);
    this->setWindowTitle("Qt综合实例");

    // 创建按钮1
    QPushButton* btn1 = new QPushButton("按钮1", this);
    btn1->setStyleSheet(
        "QPushButton{background:#FF0000; color:white}"
        "QPushButton:hover{background:#00FF00;}"
        "QPushButton:pressed{background:#0000FF;}"
        );
    btn1->move(50, 50);
    btn1->show();

    // 创建按钮2
    QPushButton* btn2 = new QPushButton("按钮2", this);
    btn2->move(200, 50);

    // 创建垂直布局
    QVBoxLayout* vbox = new QVBoxLayout;
    QPushButton* vBtn1 = new QPushButton("垂直按钮1", this);
    QPushButton* vBtn2 = new QPushButton("垂直按钮2", this);
    vbox->addWidget(vBtn1);
    vbox->addWidget(vBtn2);

    // 创建水平布局
    QHBoxLayout* hbox = new QHBoxLayout;
    QPushButton* hBtn1 = new QPushButton("水平按钮1", this);
    QPushButton* hBtn2 = new QPushButton("水平按钮2", this);
    hbox->addWidget(hBtn1);
    hbox->addWidget(hBtn2);

    // 创建网格布局
    QLabel* label1 = new QLabel("标签1", this);
    QLineEdit* edit1 = new QLineEdit(this);
    QLabel* label2 = new QLabel("标签2", this);
    QLineEdit* edit2 = new QLineEdit(this);

    QGridLayout* grid = new QGridLayout;
    grid->addWidget(label1, 0, 0);
    grid->addWidget(edit1, 0, 1);
    grid->addWidget(label2, 1, 0);
    grid->addWidget(edit2, 1, 1);

    // 创建主垂直布局,将所有布局嵌套其中
    QVBoxLayout* mainLayout = new QVBoxLayout;
    mainLayout->addLayout(vbox);
    mainLayout->addLayout(hbox);
    mainLayout->addLayout(grid);

    this->setLayout(mainLayout);

}