- [1. 使用ipcMain和ipcRenderer](#1. 使用ipcMain和ipcRenderer)
- [2. 实验步骤](#2. 实验步骤)
- [3. 其他方法](#3. 其他方法)
1. 使用ipcMain和ipcRenderer
我们知道electron应用中main.js可以理解成主进程,index.html可以理解成渲染进程。两个进程间是通过 ipcMain 和 ipcRenderer 实现进程通信的。

2. 实验步骤
- 创建项目结构
- main.js:主进程脚本
- preload.js:预加载脚本
- index.html:渲染器进程的 HTML 文件
- renderer.js:渲染器进程的 JavaScript 文件
-
编写主进程代码(main.js)
在主进程中,使用 ipcMain 模块监听来自渲染器进程的消息,并进行处理。以下是一个简单的示例代码:const { app, BrowserWindow, ipcMain } = require('electron');
const path = require('node:path');
function createWindow() {
const mainWindow = new BrowserWindow({
webPreferences: {
preload: path.join(__dirname, 'preload.js'),
contextIsolation: true,
},
});mainWindow.loadFile('index.html');
// 监听来自渲染器进程的消息
ipcMain.on('message-from-renderer', (event, message) => {
console.log('主进程收到消息:', message);
event.reply('reply-from-main', 'Hello from main process!');
});
}app.whenReady().then(createWindow);
app.on('window-all-closed', () => {
if (process.platform !== 'darwin') app.quit();
}); -
编写预加载脚本(preload.js)
使用 contextBridge 和 ipcRenderer 模块,将特定的 IPC 功能暴露给渲染器进程。这可以确保安全性和隔离性:const { contextBridge, ipcRenderer } = require('electron');
contextBridge.exposeInMainWorld('api', {
sendMessage: (message) => ipcRenderer.send('message-from-renderer', message),
onReply: (callback) => ipcRenderer.on('reply-from-main', callback),
}); -
编写渲染器进程代码(index.html 和 renderer.js)
在渲染器进程中,通过 preload.js 暴露的 API 发送消息到主进程,并接收回复。
index.html
<!DOCTYPE html>

<html>

  <head>
    <meta charset="UTF-8">
    <meta http-equiv="Content-Security-Policy" content="default-src 'self'; script-src 'self'">
    <title>IPC Communication</title>
  </head>
  <body>
    <h1>IPC Communication Example</h1>
    <button id="sendButton">Send Message to Main Process</button>
    <p id="replyMessage"></p>
    <script src="./renderer.js"></script>
  </body>
</html>
renderer.js
document.getElementById('sendButton').addEventListener('click', () => {

  window.api.sendMessage('Hello from renderer process!');
});


window.api.onReply((event, message) => {

  document.getElementById('replyMessage').innerText = `Reply from main process: ${message}`;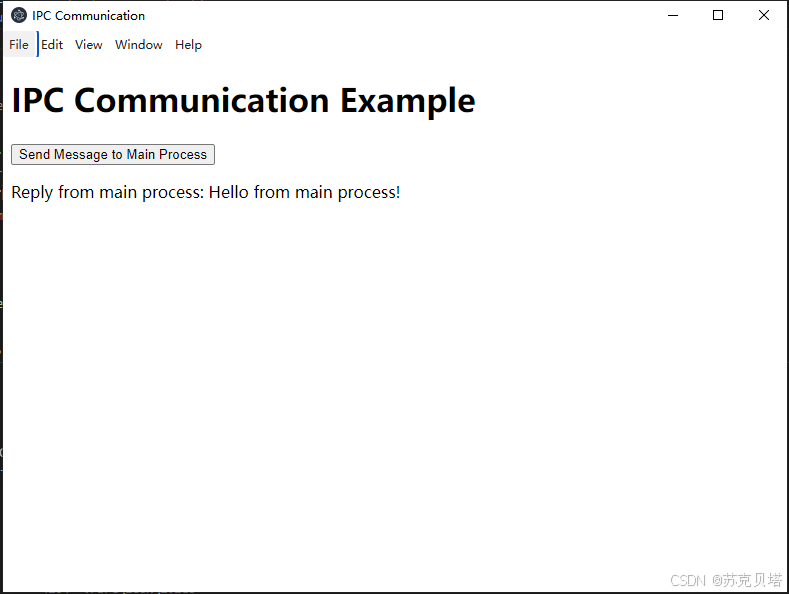
});- 实验结果
当点击页面上的按钮时,渲染器进程会通过 window.api.sendMessage 向主进程发送消息。
主进程接收到消息后,通过 event.reply 向渲染器进程发送回复。
渲染器进程通过 window.api.onReply 接收到回复,并在页面上显示。
3. 其他方法
除了 ipcRenderer.send 和 ipcMain.on 进程通信外还有
ipcRenderer.invoke 和 ipcMain.handle
MessagePort这两种方法将在后面的博文中继续讨论。