目录
实验代码
python
import matplotlib.pyplot as plt
from matplotlib import font_manager
import torch
from torch.utils.data import DataLoader
import torchvision
from torchvision import transforms
# 数据预处理
transform = transforms.Compose([
transforms.ToTensor(),
transforms.Normalize((0.5,), (0.5,))
])
train_data_path = 'E:\\小刘的桌面\\人工智能导论实验\\expr2_trainset'
train_dataset = torchvision.datasets.MNIST(root=train_data_path, train=True, download=True, transform=transform)
test_dataset = torchvision.datasets.MNIST(root=train_data_path, train=False, download=True, transform=transform)
# 使用DataLoader加载数据集
train_loader = DataLoader(dataset=train_dataset, shuffle=True, batch_size=100)
test_loader = DataLoader(dataset=test_dataset, shuffle=False, batch_size=100)
# 定义BP神经网络结构
class BPNetwork(torch.nn.Module):
def __init__(self):
super(BPNetwork, self).__init__()
# # 4层
# self.fc1 = torch.nn.Linear(784, 256)
# self.activation1 = torch.nn.ReLU()
# self.fc2 = torch.nn.Linear(256, 128)
# self.activation2 = torch.nn.ReLU()
# self.fc3 = torch.nn.Linear(128, 64)
# self.activation3 = torch.nn.ReLU()
# self.fc4 = torch.nn.Linear(64, 32)
# self.activation4 = torch.nn.ReLU()
# self.fc5 = torch.nn.Linear(32, 10)
# #2层
# self.fc1 = torch.nn.Linear(784,64)
# self.activation1 = torch.nn.ReLU()
# self.fc2 = torch.nn.Linear(64, 32)
# self.activation2 = torch.nn.ReLU()
# self.fc3 = torch.nn.Linear(32, 10)
# self.softmax = torch.nn.LogSoftmax(dim=1)
# def forward(self, x):
# x = x.view(x.size(0), -1)
# x = self.activation1(self.fc1(x))
# x = self.activation2(self.fc2(x))
# # x = self.activation3(self.fc3(x))
# x = self.softmax(self.fc3(x))
# return x
# def forward(self, x):
# x = x.view(x.size(0), -1)
# x = self.activation1(self.fc1(x))
# x = self.activation2(self.fc2(x))
# x = self.activation3(self.fc3(x))
# x = self.activation4(self.fc4(x))
# x = self.softmax(self.fc5(x)) # 修改为使用fc5
# return x
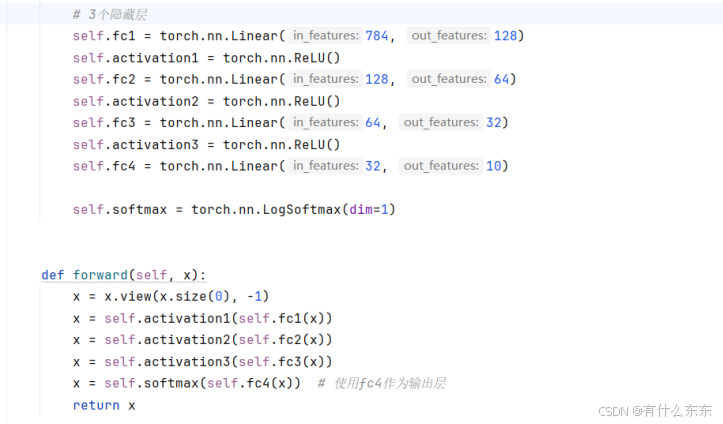
# 3个隐藏层
self.fc1 = torch.nn.Linear(784, 128)
self.activation1 = torch.nn.ReLU()
self.fc2 = torch.nn.Linear(128, 64)
self.activation2 = torch.nn.ReLU()
self.fc3 = torch.nn.Linear(64, 32)
self.activation3 = torch.nn.ReLU()
self.fc4 = torch.nn.Linear(32, 10)
self.softmax = torch.nn.LogSoftmax(dim=1)
def forward(self, x):
x = x.view(x.size(0), -1)
x = self.activation1(self.fc1(x))
x = self.activation2(self.fc2(x))
x = self.activation3(self.fc3(x))
x = self.softmax(self.fc4(x)) # 使用fc4作为输出层
return x
# # 5个隐藏层
# self.fc1 = torch.nn.Linear(784, 512)
# self.activation1 = torch.nn.ReLU()
# self.fc2 = torch.nn.Linear(512, 256)
# self.activation2 = torch.nn.ReLU()
# self.fc3 = torch.nn.Linear(256, 128)
# self.activation3 = torch.nn.ReLU()
# self.fc4 = torch.nn.Linear(128, 64)
# self.activation4 = torch.nn.ReLU()
# self.fc5 = torch.nn.Linear(64, 32)
# self.activation5 = torch.nn.ReLU()
# self.fc6 = torch.nn.Linear(32, 10)
#
# self.softmax = torch.nn.LogSoftmax(dim=1)
#
#
# def forward(self, x):
# x = x.view(x.size(0), -1)
# x = self.activation1(self.fc1(x))
# x = self.activation2(self.fc2(x))
# x = self.activation3(self.fc3(x))
# x = self.activation4(self.fc4(x))
# x = self.activation5(self.fc5(x))
# x = self.softmax(self.fc6(x)) # 使用fc6作为输出层
# return x
# 创建网络模型
model = BPNetwork()
# 定义损失函数与优化器
criterion = torch.nn.NLLLoss()
optimizer = torch.optim.SGD(model.parameters(), lr=0.009, momentum=0.9)
num_epochs = 1
total_batches = 0
font = font_manager.FontProperties()
batch_steps = []
train_accuracies = []
test_accuracies = []
# 训练网络
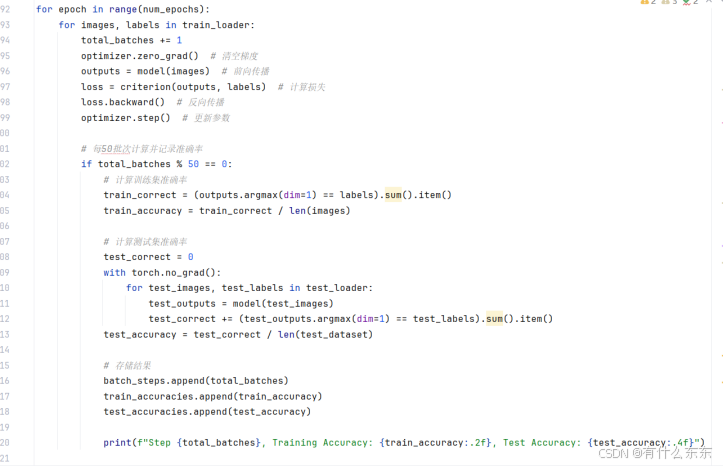
for epoch in range(num_epochs):
for images, labels in train_loader:
total_batches += 1
optimizer.zero_grad() # 清空梯度
outputs = model(images) # 前向传播
loss = criterion(outputs, labels) # 计算损失
loss.backward() # 反向传播
optimizer.step() # 更新参数
# 每50批次计算并记录准确率
if total_batches % 50 == 0:
# 计算训练集准确率
train_correct = (outputs.argmax(dim=1) == labels).sum().item()
train_accuracy = train_correct / len(images)
# 计算测试集准确率
test_correct = 0
with torch.no_grad():
for test_images, test_labels in test_loader:
test_outputs = model(test_images)
test_correct += (test_outputs.argmax(dim=1) == test_labels).sum().item()
test_accuracy = test_correct / len(test_dataset)
# 存储结果
batch_steps.append(total_batches)
train_accuracies.append(train_accuracy)
test_accuracies.append(test_accuracy)
print(f"Step {total_batches}, Training Accuracy: {train_accuracy:.2f}, Test Accuracy: {test_accuracy:.4f}")
# 绘制曲线
plt.figure(figsize=(10, 5))
plt.plot(batch_steps, train_accuracies, label='Training Accuracy', marker='o')
plt.plot(batch_steps, test_accuracies, label='Test Accuracy', marker='x')
plt.title('Training and Test Accuracy Over Time', fontproperties=font, fontsize=18)
plt.xlabel('Batch Steps', fontproperties=font, fontsize=12)
plt.ylabel('Accuracy', fontproperties=font, fontsize=12)
plt.legend()
plt.show()实验内容
1.下载数据集:
MNIST数据集来自美国国家标准与技术研究所(NIST),包含手写数字图片及其标签。数据集分为训练集和测试集,详细信息如下:
训练集:包含60000张图片及其标签,每张图片是一个28 x 28的灰度图像。
测试集:包含10000张图片及其标签,图片格式与训练集相同。
每个样本代表一个手写数字(0-9),图片中像素值已归一化到0, 1范围。
进行数据集的下载:

2.数据预处理:使用torchvision加载MNIST数据集并进行标准化。将训练集和测试集的每个像素点归一化到-1, 1范围,以适应神经网络的输入。

- 定义BP神经网络结构:构建一个多层感知器网络,在本次实验分别采用了2、3、4、5层隐藏层,用以来观察各个的准确率。其中三层隐藏层中,每层隐藏层分别包含128、64、32个神经元,2层和34层分别递减或者递增即可,另外激活函数为ReLU,输出层采用LogSoftmax。
3个隐藏层:
- 训练:设置学习率为0.009,并采用交叉熵损失函数和SGD优化器进行训练。训练集中每批包含100个样本,总共训练1个epoch,每50个批次计算一次训练集和测试集的准确率。最终在训练完所有样本后,记录模型在测试集上的最终准确率。
- 为使训练和测试的准确率更为直观,使用matplotlib绘制训练和测试准确率随批次数变化的折线图,以便观察模型的训练过程。
