目录
需求
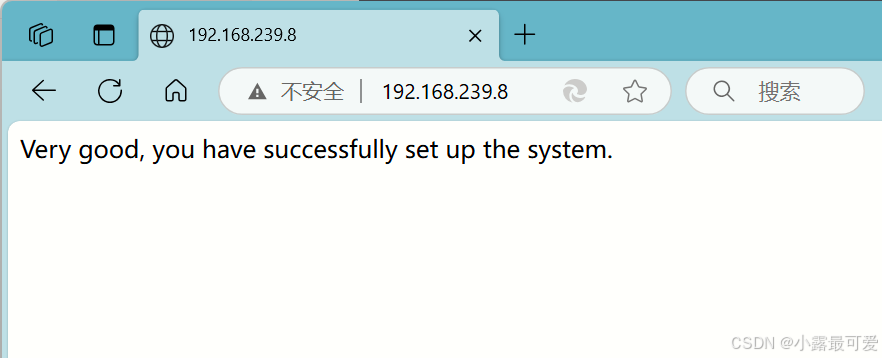
客户端通过访问 www.nihao.com 后,能够通过 dns 域名解析,访问到 nginx 服务中由 nfs 共享的首页文件,内容为:Very good, you have successfully set up the system. 各个主机能够实现时间同步,并且都开启防火墙来保证服务安装。
环境搭建
准备五台redhat9.5虚拟机,并配置IP、修改主机名、安装相应软件。
虚拟机统一操作
bash
//搭建本地仓库
[root@localhost ~]# cat > /etc/yum.repos.d/bendi.repo << EOF
> [base]
> name=base
> baseurl=/mnt/BaseOS
> gpgcheck=0
> [app]
> name=app
> baseurl=/mnt/AppStream
> gpgcheck=0
> EOF

[root@localhost ~]# mount /dev/sr0 /mnt

//安装部分常用软件
[root@localhost ~]# yum install vim make gcc tree net-tools tar -y

//tab补全执行这个文件后才生效
[root@localhost ~]# source /usr/share/bash-completion/bash_completion

//永久修改selinux为宽容模式
[root@localhost ~]# sed -i 's/^SELINUX=enforcing$/SLEINUX=permissive/' /etc/selinux/config
WEB服务器
bash
[root@localhost ~]# hostnamectl hostname web-server

[root@localhost ~]# nmcli connection modify ens160 ipv4.addresses 192.168.239.8/24 ipv4.gateway 192.168.239.2 ipv4.dns 223.5.5.5 ipv4.method manual connection.autoconnect yes

[root@web-server ~]# dnf install -y nginx
NFS服务器
bash
[root@localhost ~]# hostnamectl hostname nfs-server

[root@localhost ~]# nmcli connection modify ens160 ipv4.addresses 192.168.239.9/24 ipv4.gateway 192.168.239.2 ipv4.dns 223.5.5.5 ipv4.method manual connection.autoconnect yes

[root@nfs-server ~]# dnf install -y nfs-utils
主DNS服务器
bash
[root@localhost ~]# hostnamectl hostname dns-master-server

[root@localhost ~]# nmcli connection modify ens160 ipv4.addresses 192.168.239.18/24 ipv4.gateway 192.168.239.2 ipv4.dns 223.5.5.5 ipv4.method manual connection.autoconnect yes

[root@dns-master-server ~]# dnf install -y bind
从DNS服务器
bash
[root@localhost ~]# hostnamectl hostname dns-slave-server

[root@localhost ~]# nmcli connection modify ens160 ipv4.addresses 192.168.239.28/24 ipv4.gateway 192.168.239.2 ipv4.dns 223.5.5.5 ipv4.method manual connection.autoconnect yes

[root@dns-slave-server ~]# dnf install -y bind
客户机
bash
[root@localhost ~]# hostnamectl hostname client

[root@localhost ~]# nmcli connection modify ens160 ipv4.addresses 192.168.239.7/24 ipv4.gateway 192.168.239.2 ipv4.dns "192.168.239.18 192.168.239.28" ipv4.method manual connection.autoconnect yes
至此,基本环境已搭建完毕。
配置nfs服务器
bash
[root@nfs-server ~]# mkdir /nfs/data -p

[root@nfs-server ~]# cat > /etc/exports << EOF
> /nfs/data 192.168.239.8(rw)
> EOF

[root@nfs-server ~]# chmod o+w /nfs/ -R
# 给共享的文件增加些权限

[root@nfs-server ~]# firewall-cmd --permanent --add-service=nfs

[root@nfs-server ~]# firewall-cmd --reload

[root@nfs-server ~]# systemctl enable --now nfs-server


[root@nfs-server ~]# showmount -e 192.168.239.9
Export list for 192.168.239.9:
/nfs/data 192.168.239.8
题目没有特别要求,这里将192.168.239.9也作为ntp服务器
bash
[root@nfs-server ~]# vim /etc/chrony.conf

服务器端修改配置文件的26行和50行,第三行看情况修改
bash
[root@nfs-server ~]# systemctl restart chronyd

[root@nfs-server ~]# firewall-cmd --permanent --add-service=ntp

[root@nfs-server ~]# firewall-cmd --reload
配置web服务器
bash
[root@web-server ~]# mkdir /var/www

[root@web-server ~]# mount -t nfs 192.168.239.9:/nfs/data /var/www

//测试nfs网络文件挂载
[root@web-server ~]# df -h
...
192.168.239.9:/nfs/data   35G  1.8G   33G   6% /var/www

//修改nginx配置文件
[root@web-server ~]# cat > /etc/nginx/conf.d/nihao.conf << EOF
> server {
> server_name www.nihao.com;
> root /var/www/nihao/;
> access_log /var/log/nginx/access.log;
> error_log /var/log/nginx/error.log;
> }
> EOF

[root@web-server ~]# mkdir /var/www/nihao

[root@web-server ~]# echo "Very good, you have successfully set up the system." > /var/www/nihao/index.html

[root@web-server ~]# systemctl enable --now nginx

//放行防火墙
[root@web-server ~]# firewall-cmd --permanent --add-service=http

[root@web-server ~]# firewall-cmd --reload

[root@web-server ~]# vim /etc/chrony.conf

//修改第3行与第50行
3 server 192.168.239.9 iburst
50 log measurements statistics tracking

[root@web-server ~]# systemctl restart chronyd
时间同步测试

网页测试
配置主从dns服务器
主dns服务器
bash
[root@dns-master-server ~]# vim /etc/named.conf

//修改dns主配置文件为以下内容:

options {
        listen-on port 53 { 192.168.239.18; };
        directory       "/var/named";
};
zone "nihao.com" IN {
        type master;
        file "named.nihao";
};

//无返回值说明无语法错误
[root@dns-master-server ~]# named-checkconf

[root@dns-master-server ~]# vim /var/named/named.nihao

//写入dns区域配置文件为以下内容:
$TTL 1D
@       IN      SOA     @       admin.nihao.com.        ( 0 1D 2H 3W 2D )

        IN      NS      ns1
        IN      NS      ns2
ns1     IN      A       192.168.239.18
ns2     IN      A       192.168.239.28
www     IN      A       192.168.239.8

//检查区域文件有无语法错误
[root@dns-master-server ~]# named-checkzone nihao.com /var/named/named.nihao
zone nihao.com/IN: loaded serial 0
OK

[root@dns-master-server ~]# systemctl enable --now named

[root@dns-master-server ~]# firewall-cmd --permanent --add-service=dns

[root@dns-master-server ~]# firewall-cmd --reload

[root@dns-master-server ~]# vim /etc/chrony.conf

//修改第3行与第50行
3 server 192.168.239.9 iburst
50 log measurements statistics tracking

[root@dns-master-server ~]# systemctl restart chronyd
时间同步测试

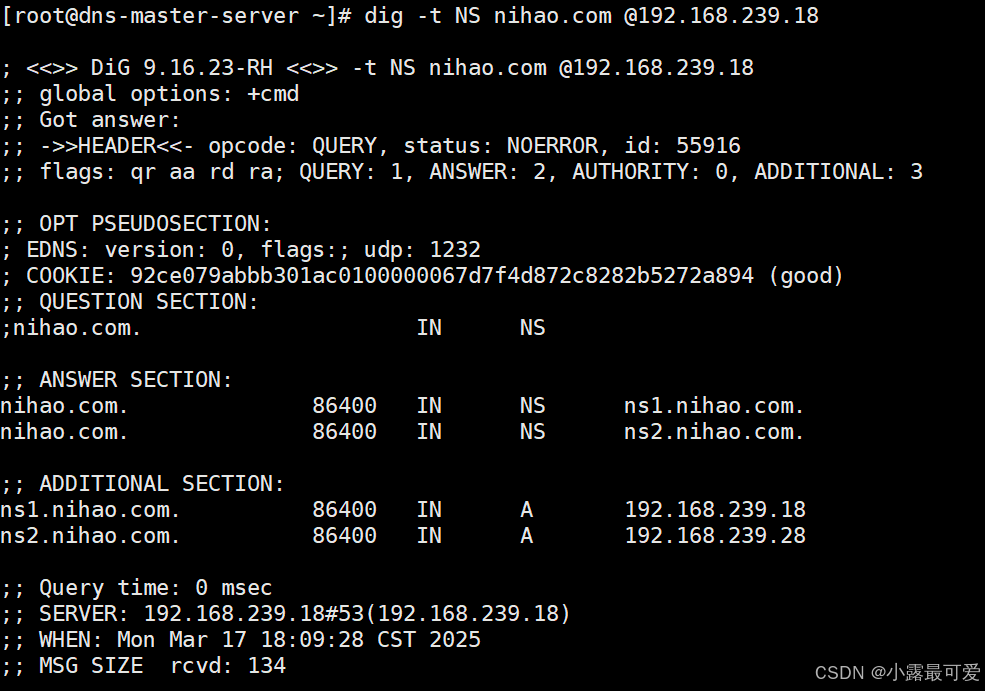
dig测试
从dns服务器
bash
[root@dns-slave-server ~]# vim /etc/named.conf

//修改主配置文件为以下内容:
options {
        listen-on port 53 { 192.168.239.28; };
        directory       "/var/named";
};
zone "nihao.com" IN {
        type slave;
        masters { 192.168.239.18; };
        file "slaves/named.nihao";
};

[root@dns-slave-server ~]# firewall-cmd --permanent --add-service=dns

[root@dns-slave-server ~]# firewall-cmd --reload

//启动服务后自动会自动生成区域文件
[root@dns-slave-server ~]# systemctl enable --now named

[root@dns-slave-server ~]# ls /var/named/slaves/
named.nihao

[root@dns-slave-server ~]# vim /etc/chrony.conf

//修改第3行与第50行
3 server 192.168.239.9 iburst
50 log measurements statistics tracking

[root@dns-slave-server ~]# systemctl restart chronyd
时间同步测试

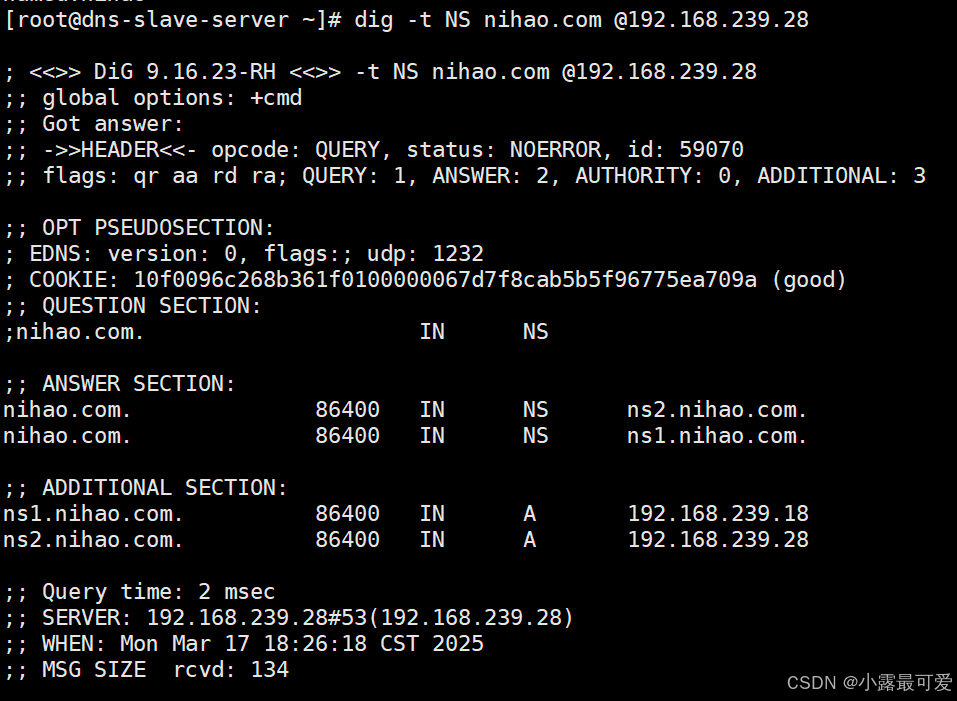
d ig测试
配置客户端
bash
[root@client ~]# vim /etc/chrony.conf

//修改第3行与第50行
3 server 192.168.239.9 iburst
50 log measurements statistics tracking

[root@client ~]# systemctl restart chronyd
时间同步测试

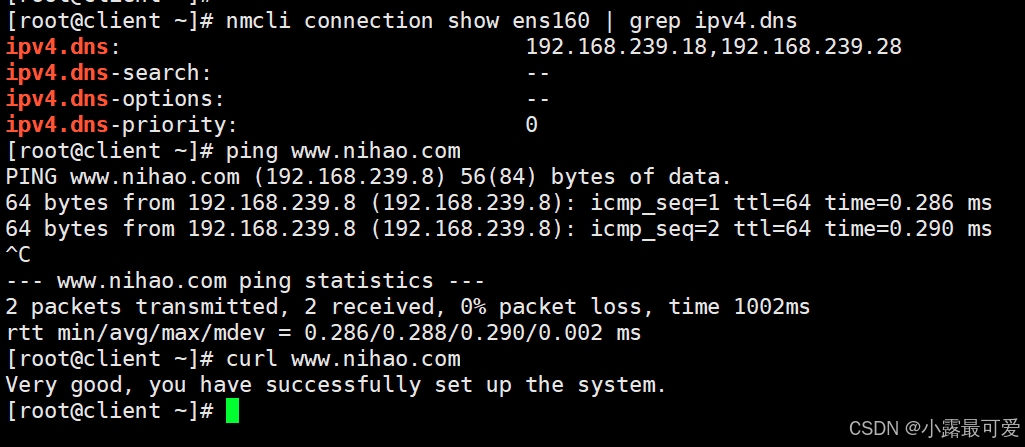
客户端测试
至此实验完成!!