接口
在生活中我们常听说USB接口,那接口是什么呢?
在Java中,接口相当于多个类的一种公共规范,是一种引用数据类型。
定义接口
java
public interface IUSB {
    public static final String SIZE = "small";
    public abstract void openDevice();
    void closeDevice();
    public static void test() {
        System.out.println("调用静态方法test()");
    }
    public default void test1() {
        System.out.println("调用default修饰的test1");
    }
}
上述代码定义了IUSB接口。
创建接口如下:

基本语法:
java
public interface 接口名 {

}
接口类中的成员
在接口中
1、定义成员变量:
java
public static final 数据类型 成员变量名 = 初始化;编译器会默认加上public static final,所以不写这个也可以。
java
数据类型 成员变量名 = 初始化;但要注意:一定要初始化,因为有final关键字
2、定义成员方法:
java
//抽象类方法
public abstract 返回类型 方法名();编译器会默认加上public abstract,所以不写这个也可以。
java
返回类型 方法名();一般成员方法定义为抽象方法。
由于是抽象方法,所以在接入接口的类中一定要重写抽象方法!
但接口中的方法也可以具体实现的(有两种方法)。
java
//1、使用static修饰
public static void test1() {

}
//要调用的话,就直接 接口名.方法名
IUSB.test();
java
//2、使用default修饰
public default void test2() {

}
//要调用的话,可以通过类的对象访问
public default void test1() {//接口中
	System.out.println("调用default修饰的test1()");
}
Screen screen = new Screen();//Screen是实现接口的类
screen.test1();//没有报错

//要调用的话,也可以重写方法
@Override//在Screen中重写
public void test1() {
	System.out.println("调用重写的test1()方法");
}
Screen screen = new Screen();//Screen是实现接口的类
screen.test1();//调用
3、在接口类中,没有静态代码块和构造方法
接口的使用
基本语法:
java
public class 类名 implements 接口名{
}
1、接口不能直接使用,实例化对象。

2、必须要有类来接入接口。通过重写抽象方法来实现接口中的抽象方法。
java
public class Screen implements IUSB {
    @Override
    public void openDevice() {
        System.out.println("打开显示屏");
    }

    @Override
    public void closeDevice() {
        System.out.println("关闭显示屏");
    }
    public void show() {
        System.out.println("开始显示");
    }
}
java
public class Keyborad implements IUSB{
    @Override
    public void openDevice() {
        System.out.println("启动键盘");
    }

    @Override
    public void closeDevice() {
        System.out.println("关闭键盘");
    }

    public void inPut() {
        System.out.println("输入数据");
    }

}
java
public class Computer {
    public void openComputer() {
        System.out.println("打开电脑");
    }
    public void closeComputer() {
        System.out.println("关闭电脑");
    }
    public void useDevice(IUSB usb){
        usb.openDevice();
        usb.test1();
        if(usb instanceof Screen) {
            Screen screen = (Screen)usb;
            screen.show();
        }
        if (usb instanceof Keyborad keyborad){
            keyborad.inPut();
        }
        usb.closeDevice();
    }
}
java
public class Test {
    public static void main(String[] args) {
        Computer computer = new Computer();
        computer.openComputer();
        computer.useDevice(new Keyborad());
        computer.useDevice(new Screen());
        computer.closeComputer();
    System.out.println("-----------");
        IUSB.test();
        Screen screen = new Screen();
        screen.test1();
    }
}
3、根据重写规则,重写的方法访问权限修饰符一定是public。
4、代码中的向上转型和向下转型。
发生向上转型:
java
computer.useDevice(new Keyborad());
computer.useDevice(new Screen());
发生向下转型:
java
if(usb instanceof Screen) {
	Screen screen = (Screen)usb;//强制类型转换
    screen.show();
}
if (usb instanceof Keyborad keyborad){
    keyborad.inPut();
}
向下转型的时候不知道实际指向是哪个引用的,这时候需要if语句来判断。
两种if的写法都是可以的。
第一种,先通过 instanceof 判断类型,再手动强制转换并声明变量。
第二种,在 instanceof 表达式中直接完成类型判断和变量声明,keyborad 会被自动推导为 Keyborad 类型,无需手动强制转换。
上述代码输出:
打开电脑
启动键盘
调用default修饰的test1()
输入数据
关闭键盘
打开显示屏
调用重写的test1()方法
开始显示
关闭显示屏
关闭电脑
调用静态方法test()
调用重写的test1()方法
实现多个接口
一个类虽然不能继承多个类,但可以使用多个接口
java
public class Animal {
    public String name;
    public int age;
}
java
public interface ISwimming {
    void swim();
}
java
public interface IRunning {
    void run();
}
java
public class Dog extends Animal implements ISwimming, IRunning {
    @Override
    public void run() {
        System.out.println("狗在跑步");
    }

    @Override
    public void swim() {
        System.out.println("狗会狗刨");
    }
}
java
public class People implements IRunning{
    @Override
    public void run() {
        System.out.println("人在跑步");
    }
}
java
public class Test {
    public static void main(String[] args) {
        Dog dog = new Dog();
        dog.run();
        dog.swim();
        People people = new People();
        people.run();
    }
}
上述代码输出:
狗在跑步
狗会狗刨
人在跑步
对于Dog类来说,继承了Animal类,并使用了ISwimming和IRunning两个接口。这时候Dog类中要重写两个抽象方法。
注意:
我们此外还定义了People类,来实现IRunning接口。这时候我们并没有注重类型,而是专注于某个类具体的实现功能、能力。
在前面继承的时候说过,继承是 is - a 的关系。而接口就是 can - do 的关系,用于定义一组行为规范,一个类实现某个接口意味着它具备了该接口所定义的行为能力。
接口中的继承
java
public interface IRunAndSwim extends ISwimming,IRunning{
    void test();
}
java
public interface ISwimming {
    void swim();
}
java
public interface IRunning {
    void run();
}
java
public class Dog extends Animal implements IRunAndSwim {
    @Override
    public void run() {
        System.out.println("狗在跑步");
    }

    @Override
    public void swim() {
        System.out.println("狗会狗刨");
    }

    @Override
    public void test() {
        System.out.println("重写test()抽象方法");
    }
}
接口可以继承多个接口,使用 extends 关键字。
接口中的继承有点像将一些接口拼合起来了
使用现成的接口
对象之间进行大小关系比较
使用Comparable接口
代码展示:
java
//定义学生类实现接口Comparable
public class Student implements Comparable<Student>{
    public String name;
    public int age;
    public double score;

    public Student(String name, int age, double score) {
        this.name = name;
        this.age = age;
        this.score = score;
    }
	//重写输出方法
    @Override
    public String toString() {
        return "Student1{" +
                "name='" + name + '\'' +
                ", age=" + age +
                ", score=" + score +
                '}';
    }
	//重写compareTo比较方法
    @Override
    public int compareTo(Student o) {
        if(this.age>o.age) {
            return 1;
        }else  if(this.age<o.age){
            return -1;
        }else return 0;
        //可以简写语句,效果是一样的
        //return Integer.compare(this.age, o.age);
        //return this.age - o.age;
    }
}
java
public class Test {
    public static void main(String[] args) {
        test1();
     }
    public static void test1() {
        Student student1 = new Student("zhangsan",18,99);
        Student student2 = new Student("lisi",20,60);
        if (student1.compareTo(student2) > 0) {
            System.out.println("student1.age > student2.age");
        }else if(student1.compareTo(student2) < 0) {
            System.out.println("student1.age < student2.age");
        }else   System.out.println("student1.age = student2.age");
    }
}
输出:
student1.age < student2.age
代码解释:
1、 当我们查看Comparable接口时:
java
public interface Comparable<T> {
    public int compareTo(T o);
}T代表泛型,里面写谁就比较谁。
根据接口知识,这时候我们需要重写compareTo方法了。
需要注意的是,其方法返回类型为int,在写返回值的时候需要注意。
2、 重写方法中的this表示调用这个方法的对象的调用。
3、 对于这个接口,是有缺点。当我们重写了compareTo方法就不能同时再重写compareTo方法来实现其他的比较(eg.比较成绩、比较姓名)
4、 为了解决这个接口的缺点,我们可以使用Comparator接口,来定义一些比较器来供我们使用。
使用Comparator接口
代码展示:
java
import java.util.Comparator;
//年龄比较器
public class AgeCompare implements Comparator<Student> {
    @Override
    public int compare(Student o1, Student o2) {
        return  o1.age - o2.age;
    }
}
java
import java.util.Comparator;
//成绩比较器
public class ScoreCompare implements Comparator<Student> {
    @Override
    public int compare(Student o1, Student o2) {
        return Double.compare(o1.score,o2.score);
    }
}
java
import java.util.Comparator;
//姓名比较器
public class NameCompare implements Comparator<Student> {
    @Override
    public int compare(Student o1, Student o2) {
        return o1.compareTo(o2);
        //return String.CASE_INSENSITIVE_ORDER.compare(o1.name,o2.name);
    }
}
java
public class Test {
    public static void main(String[] args) {
        test2();
        test3();
        test4();
    }
    public static void test2() {
        Student student3 = new Student("zhangsan",21,99);
        Student student4 = new Student("lisi",20,60);
        AgeCompare ageCompare = new AgeCompare();
        if(ageCompare.compare(student3,student4)>0){
            System.out.println("student3.age > student4.age");
        }else if(ageCompare.compare(student3,student4)<0) {
            System.out.println("student3.age < student4.age");
        }
    }
    public static void test3() {
        Student student5 = new Student("zhangsan",21,91.1);
        Student student6 = new Student("lisi",20,91.2);
        ScoreCompare scoreCompare = new ScoreCompare();
        if(scoreCompare.compare(student5,student6)>0){
            System.out.println("student5.score > student6.score");
        }else if(scoreCompare.compare(student5,student6)<0) {
            System.out.println("student5.score < student6.score");
        }
    }
    public static void test4() {
        Student student7 = new Student("zhangsan",21,91.1);
        Student student8 = new Student("lisi",20,91.2);
        NameCompare nameCompare = new NameCompare();
        if(nameCompare.compare(student7,student8)>0){
            System.out.println("student7.name > student8.name");
        }else if(nameCompare.compare(student7,student8) < 0) {
            System.out.println("student7.name < student8.name");
        }
    }
}
输出:
student3.age > student4.age
student5.score < student6.score
代码解释:
1、 当我们查看Comparator接口时:
java
public interface Comparator<T> {
	int compare(T o1, T o2);
}根据接口知识,这时候我们需要重写compare方法了。
(注意:Comparator接口中不只有这一个抽象方法,但现在我们只需要用这一个抽象方法)
还需要注意的是,其方法返回类型为int,在写返回值的时候需要注意。
2、 通过这个Comparator接口,我们可以实现多个比较器。当我们需要比较谁,就调用那个比较器就可以了。
3、 对于比较String类型的比较时,我们不能像比较int类型样的,返回相减的值。这时候可以调用String类中自己提供的比较方法,也可以调用compareTo方法。
这时候有人要问了,为什么可以调用compareTo方法来比较字符串大小,这不是在Comparable接口中有的吗?
当我们查看String类时,发现其实现了Comparable<T>的接口。

这时候我们可以调用compareTo方法,来实现字符串比较。
使用Comparable接口来实现自定义类型数组排序
基本数据类型的排序
java
public static void test() {
	int[] array = new int[]{1,2,3,4,3,2,6,3,8,4};
    Arrays.sort(array);
    System.out.println(Arrays.toString(array));
}
java
public static void main(String[] args) {
    People[] people = new People[3];
	people[0]= new People(18,"zhangsan");
	people[1] = new People(10,"lisi");
	people[2] = new People(22,"wangwu");
	System.out.println(Arrays.toString(people));
    Arrays.sort(people);//此时编译器不知道比较的那个成员变量,报错
}
这时候报错了。
这时候我们进入sort的底层逻辑代码
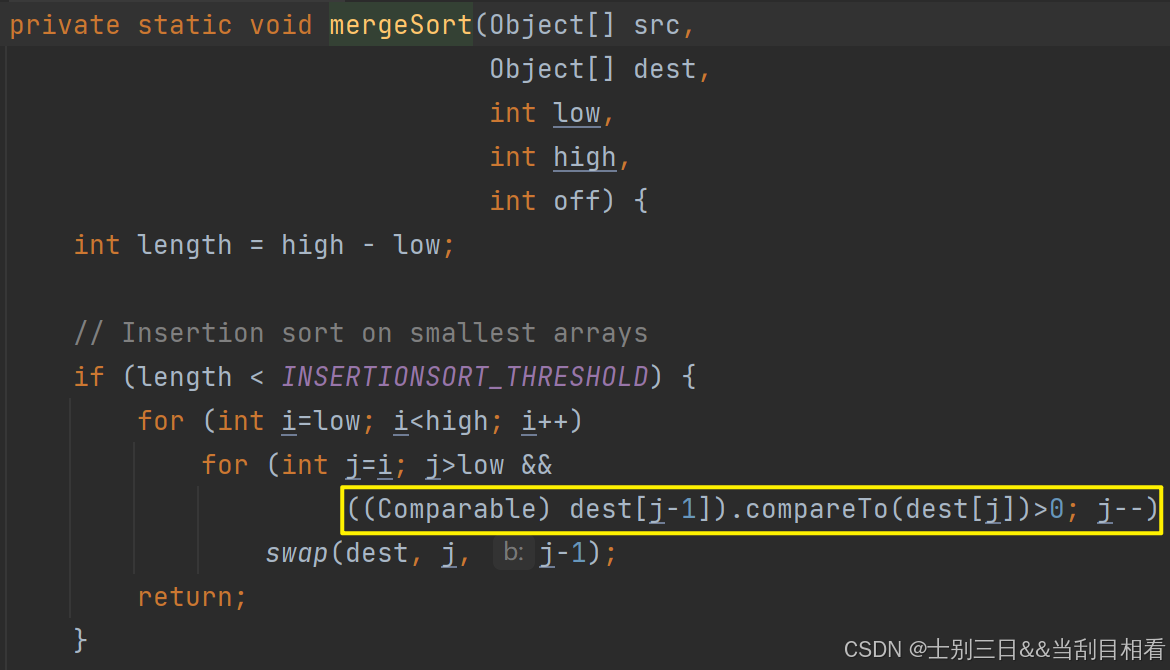
这时候我们发现把数组的元素强转为Comparable接口,这时候我们需要实现Comparable接口,重写compareTo方法。
实现上述代码功能
重写compareTo方法
java
public class People implements Comparable<People>{
    public int age;
    public String name;

    @Override
    public String toString() {
        return "People{" +
                "age=" + age +
                ", name='" + name + '\'' +
                '}';
    }

    public People(int age, String name) {
        this.age = age;
        this.name = name;
    }

    @Override
    public int compareTo(People o) {
        return Integer.compare(this.age,o.age);
    }
}
java
import java.util.Arrays;

public class Test {
    public static void test2() {
        People[] people = new People[3];
        people[0]= new People(18,"zhangsan");
        people[1] = new People(10,"lisi");
        people[2] = new People(22,"wangwu");
        System.out.println(Arrays.toString(people));
        Arrays.sort(people);
        System.out.println("-------------");
        System.out.println(Arrays.toString(people));
    }
    public static void main(String[] args) {
        test2();
    }
}
输出:
People{age=18, name='zhangsan'}, People{age=10, name='lisi'}, People{age=22, name='wangwu'}
People{age=10, name='lisi'}, People{age=18, name='zhangsan'}, People{age=22, name='wangwu'}
当然此代码还是存在Comparable接口中的问题,不能同时再重写compareTo方法来实现其他的比较。
使用Comparator接口,传入比较器,来进行比较
java
public class People implements Comparable<People>{
    public int age;
    public String name;

    @Override
    public String toString() {
        return "People{" +
                "age=" + age +
                ", name='" + name + '\'' +
                '}';
    }

    public People(int age, String name) {
        this.age = age;
        this.name = name;
    }

    @Override
    public int compareTo(People o) {
        return Integer.compare(this.age,o.age);
    }
}
java
public class NameCompare implements Comparator<People> {
    @Override
    public int compare(People o1, People o2) {
        return String.CASE_INSENSITIVE_ORDER.compare(o1.name,o2.name);
    }
}
java
public class AgeCompare implements Comparator<People> {
    @Override
    public int compare(People o1, People o2) {
        return Integer.compare(o1.age,o2.age);
    }
}
java
import java.util.Arrays;

public class Test {
    public static void test3() {
        People[] peoples = new People[3];
        peoples[0]= new People(18,"zhangsan");
        peoples[1] = new People(10,"lisi");
        peoples[2] = new People(22,"wangwu");
        System.out.println("------原始顺序-------");
        System.out.println(Arrays.toString(peoples));
        NameCompare nameCompare = new NameCompare();
        Arrays.sort(peoples,nameCompare);
        System.out.println("------按姓名排序-------");
        System.out.println(Arrays.toString(peoples));
        System.out.println("------按年龄排序-------");
        AgeCompare ageCompare = new AgeCompare();
        Arrays.sort(peoples,ageCompare);
        System.out.println(Arrays.toString(peoples));
    }
    public static void main(String[] args) {
        test3();
    }
}
输出:
------原始顺序-------
People{age=18, name='zhangsan'}, People{age=10, name='lisi'}, People{age=22, name='wangwu'}
------按姓名排序-------
People{age=10, name='lisi'}, People{age=22, name='wangwu'}, People{age=18, name='zhangsan'}
------按年龄排序-------
People{age=10, name='lisi'}, People{age=18, name='zhangsan'}, People{age=22, name='wangwu'}
自己实现冒泡排序完成排序
java
import java.util.Arrays;
import java.util.Comparator;

public class Test {
    public static void BubbleSort(Comparable[] comparables) {//发生向上转型
        for (int i = 0; i < comparables.length; i++) {
            for (int j = i; j <comparables.length-1 ; j++) {
                if(comparables[j].compareTo(comparables[j+1]) > 0) {
                    Comparable temp = comparables[j];
                    comparables[j] = comparables[j+1];
                    comparables[j+1] = temp;
                }
            }
        }
    }
    public static void test4() {
        People[] people1 = new People[3];
        people1[0]= new People(18,"zhangsan");
        people1[1] = new People(10,"lisi");
        people1[2] = new People(22,"wangwu");
        BubbleSort(people1);
        System.out.println("------按年龄排序-------");
        System.out.println(Arrays.toString(people1));
    }
    public static void main(String[] args) {
        test4();
    }
}
输出:
------按年龄排序-------
People{age=10, name='lisi'}, People{age=18, name='zhangsan'}, People{age=22, name='wangwu'}
也可以使用传入比较器来实现冒泡排序
java
public static void BubbleSort(Comparable[] comparables,Comparator comparator) {
	for (int i = 0; i < comparables.length; i++) {
		for (int j = i; j <comparables.length-1 ; j++) {
			if(comparator.compare(comparables[j],comparables[j+1]) > 0) {
				Comparable temp = comparables[j];
                comparables[j] = comparables[j+1];
                comparables[j+1] = temp;
            }
        }
    }
}
java
public static void BubbleSort1(People[] people,Comparator<People> comparator) {
    for (int i = 0; i < people.length; i++) {
        for (int j = i; j <people.length-1 ; j++) {
            if(comparator.compare(people[j],people[j+1]) > 0) {
                People temp = people[j];
                people[j] = people[j+1];
                people[j+1] = temp;
            }
        }
    }
}
java
public static void test4() {
	People[] people1 = new People[3];
	people1[0]= new People(18,"zhangsan");
	people1[1] = new People(10,"lisi");
	people1[2] = new People(22,"wangwu");
	AgeCompare ageCompare = new AgeCompare();
	BubbleSort(people1,ageCompare);
	//或者BubbleSort1(people1,ageCompare);
	System.out.println("------按年龄排序-------");
	System.out.println(Arrays.toString(people1));
}
输出结果和上面一样
对象的拷贝
Cloneable接口
java
public interface Cloneable {
}
我们发现Cloneable接口是个空接口。当一个类实现了Cloneable接口表示当前这个类的对象是可以被克隆的。我们知道Object类是所有类的父类,Object类中有clone方法,这时候我们需要重写clone方法。

注意:其clone的返回类型为Object类
java
public class People implements Cloneable{
	//重写clone方法
    @Override
    protected Object clone() throws CloneNotSupportedException {
        return super.clone();
    }
}
java
public class Test {
    public static void main(String[] args) {
        People people = new People();
        People people1 = people.clone();//报错了
    }
}
这时候我们需要加throws CloneNotSupportedException才能消除警告。
java
public class Test {
    public static void main(String[] args) throws CloneNotSupportedException{
        People people = new People();
        People people1 = people.clone();//还是报错了
    }
}
这时候需要强制类型转换,发生向下转型。
java
public class Test {
    public static void main(String[] args) throws CloneNotSupportedException{
        People people = new People();
        People people1 = (People) people.clone();
    }
}
这时候完成了拷贝。
总结:完成拷贝的步骤
1、实现Cloneable接口
2、声明异常throws CloneNotSupportedException
3、进行强制类型转换
代码演示:
java
public class People implements Cloneable{
    public int age;
    public String name;

    public People(int age, String name) {
        this.age = age;
        this.name = name;
    }

    @Override
    protected Object clone() throws CloneNotSupportedException {
        return super.clone();
    }
}
java
public class Test {
    public static void main(String[] args) throws CloneNotSupportedException{
        People people1 = new People(18,"lisi");
        People people2 = (People) people1.clone();
        System.out.println(people1.name);
        System.out.println(people1.age);
        System.out.println("------------");
        System.out.println(people2.name);
        System.out.println(people2.age);
    }
}
输出:
lisi
18
lisi
18

深拷贝与浅拷贝
java
class Money {
    public double money = 99.99;
}

public class People implements Cloneable{
    public int age;
    public String name;
    Money money = new Money();//组合

    public People(int age, String name) {
        this.age = age;
        this.name = name;
    }

    @Override
    protected Object clone() throws CloneNotSupportedException {
        return super.clone();
    }
}
java
public class Test {
    public static void main(String[] args) throws CloneNotSupportedException{
        People people1 = new People(18,"lisi");
        People people2 = (People) people1.clone();
        System.out.println(people1.name);
        System.out.println(people1.age);
        System.out.println(people1.money.money);
        System.out.println("------------");
        System.out.println(people2.name);
        System.out.println(people2.age);
        System.out.println(people2.money.money);
        System.out.println("------------");
        people1.age = 20;
        System.out.println(people1.age);
        System.out.println(people2.age);
        System.out.println("------------");
        people1.money.money = 10;
        System.out.println(people1.money.money);
        System.out.println(people2.money.money);
    }
}
输出:
lisi
18
99.99
lisi
18
99.99
20
18
10.0
10.0
我们发现
1、people1.age = 20;只改变了people1.age 的值,没有改变people2.age 的值。
2、people2.money.money = 10;改变了people2.money.money的值和people1.money.money的值。这就是有关深拷贝与浅拷贝的问题了。
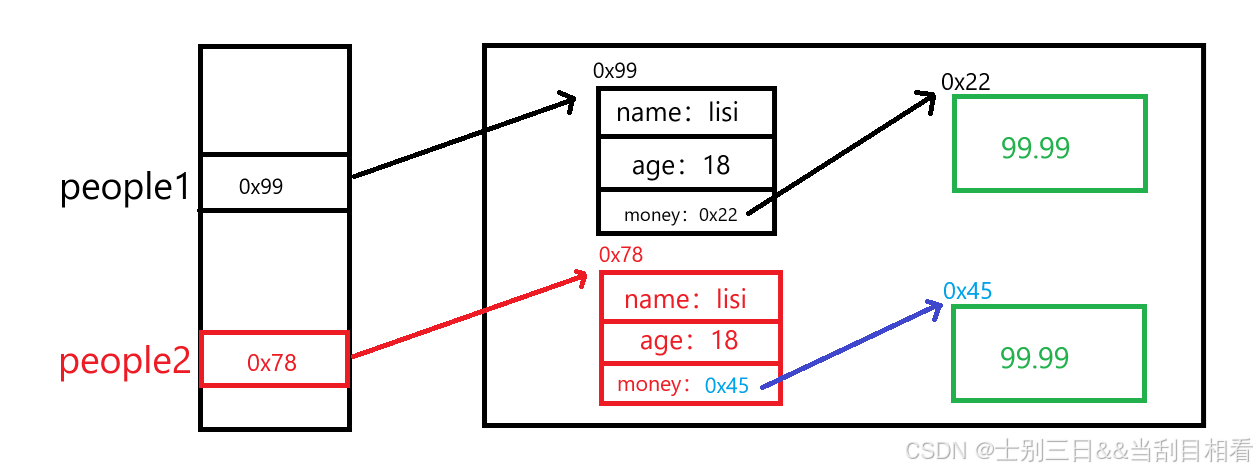
我们通过画图来展示:
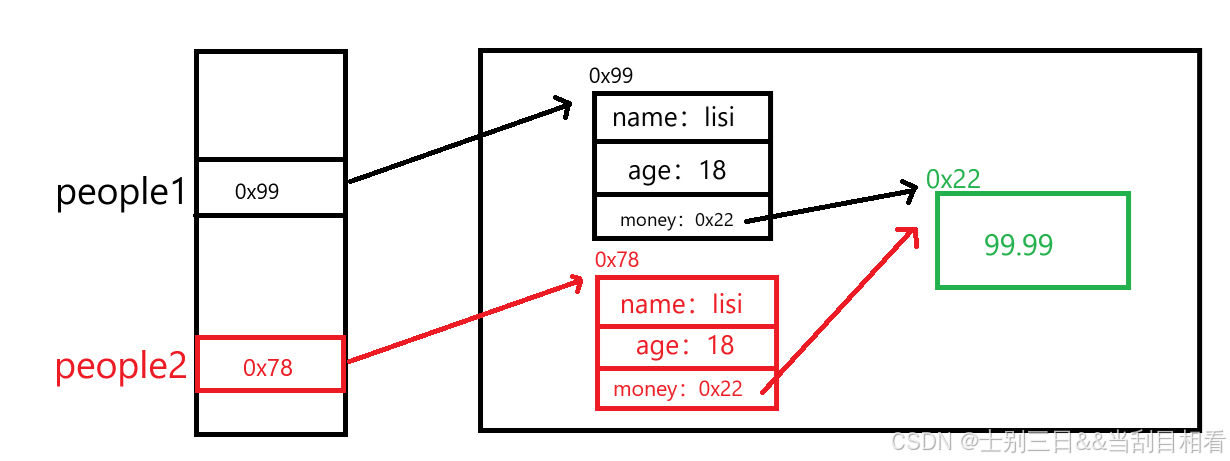
上图是没有改变任何值的分布
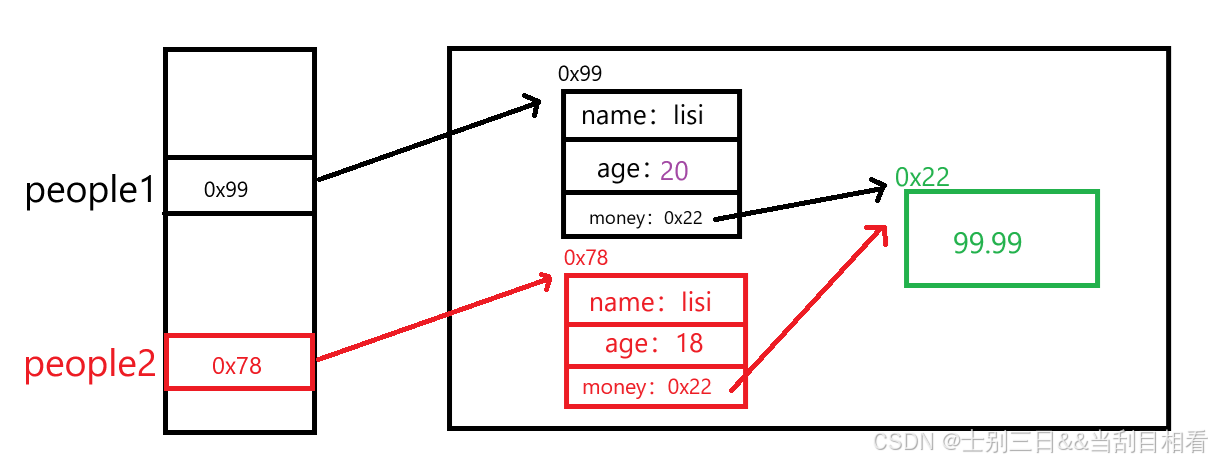
上图是people1.age = 20;改变了people1.age 的值。
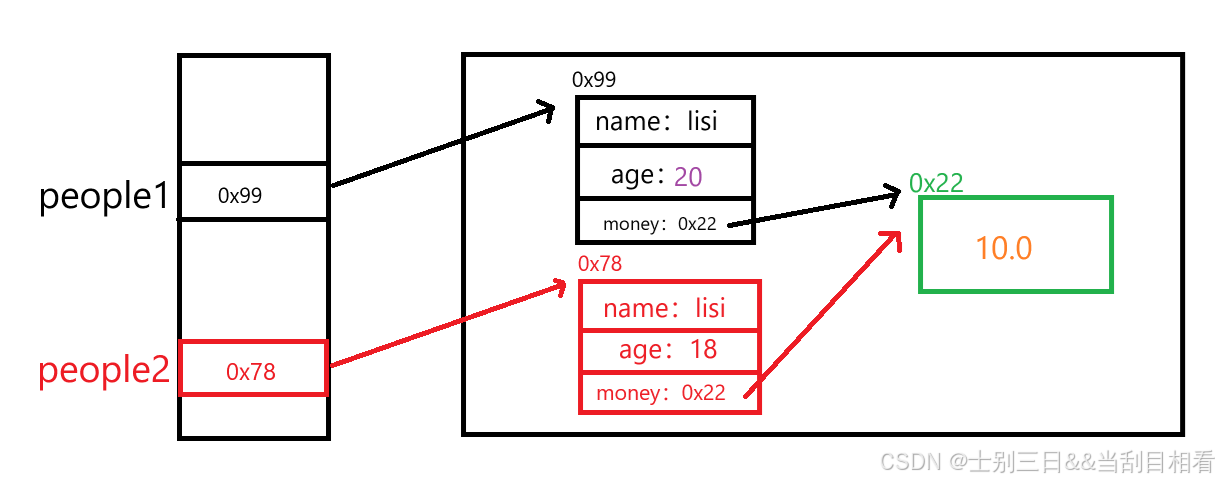
上图是people2.money.money = 10;改变了people2.money.money的值和people1.money.money的值。
上述我们就称之为浅拷贝 。
浅拷贝会创建一个完全一样属性的新对象。但,当属性是引用类型时,拷贝的是同一个地址,也就是说它们共用一个对象。(例如:上述代码,money是引用类型数据,拷贝的都是0x22这个地址)当改变所指向的值时,其原对象的属性也会改变!(例如:上述代码,改变了money的值,当原对象和新对象的对应属性值也都发生变化,都变成10.0)
有了上述浅拷贝的概念,深拷贝就很好理解了。深拷贝要做的就是还要将引用类型属性再创建一个新的对象。
需要产生上图的效果,这时候people2.money.money = 10;只会改变people2.money.money的值。
那么深拷贝是如何实现的呢?
我们需要像浅拷贝一样,再进行克隆一次。中间创建临时变量来接收和调用引用类型变量。
代码演示:
java
class Money implements Cloneable{
    public double money = 99.99;

    @Override
    protected Object clone() throws CloneNotSupportedException {
        return super.clone();
    }
}

public class People implements Cloneable{
    public int age;
    public String name;
    Money money = new Money();//组合

    public People(int age, String name) {
        this.age = age;
        this.name = name;
    }

    @Override
    protected Object clone() throws CloneNotSupportedException {
        //return super.clone();
        People temp = (People) super.clone();
        temp.money = (Money) this.money.clone();
        return temp;
    }
}
java
public class Test {
    public static void main(String[] args) throws CloneNotSupportedException{
        People people1 = new People(18,"lisi");
        People people2 = (People) people1.clone();
        System.out.println(people1.name);
        System.out.println(people1.age);
        System.out.println(people1.money.money);
        System.out.println("------------");
        System.out.println(people2.name);
        System.out.println(people2.age);
        System.out.println(people2.money.money);
        System.out.println("------------");
        people1.age = 20;
        System.out.println(people1.age);
        System.out.println(people2.age);
        System.out.println("------------");
        people1.money.money = 10;
        System.out.println(people1.money.money);
        System.out.println(people2.money.money);
    }
}
输出:
lisi
18
99.99
lisi
18
99.99
20
18
10.0
99.99
people2.money.money的值没有发生改变。这就完成了深拷贝。
通过画图再次理解拷贝过程:
执行
java
People temp = (People) super.clone();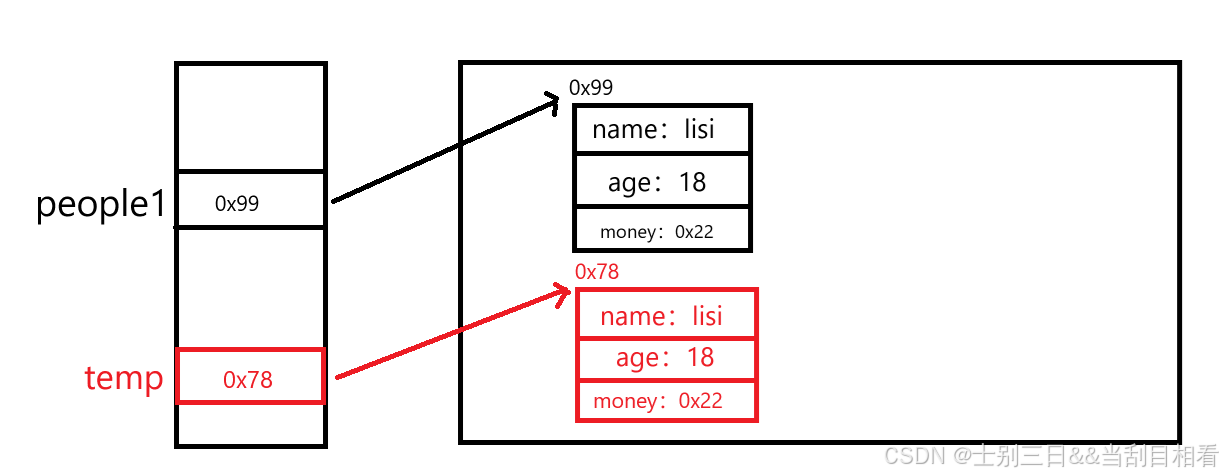
执行:
java
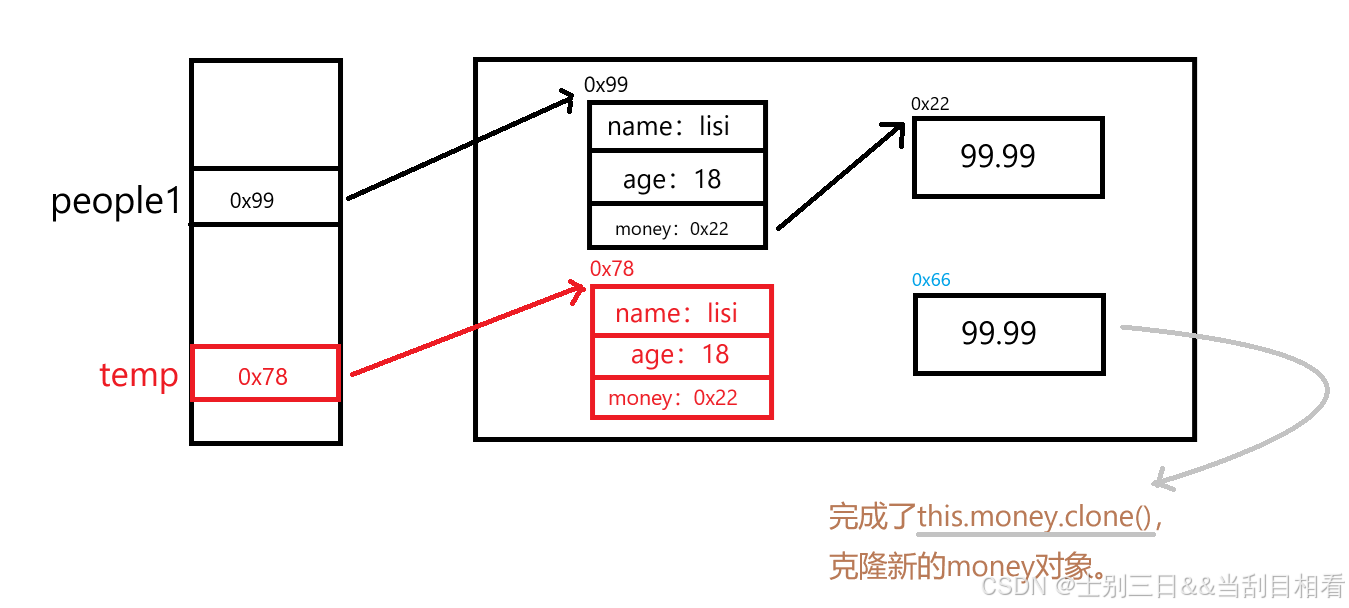
temp.money = (Money) this.money.clone();对这个代码进行拆分。
1、完成(Money)this.money.clone()
2、完成赋值

执行:
java
return temp;
这样就完成了深拷贝!!!
注意:
为了能拷贝引用类型指向的值,也需要对Money类实现Cloneable接口和重写clone方法。