1.SVG 详细介绍
SVG(Scalable Vector Graphics) 是一种基于 XML 的矢量图形格式,用于描述二维图形。
1. 命名空间 (Namespace) ★ 了解
-
命名空间 URI :
http://www.w3.org/2000/svg -
用途:在 XML 或 XHTML 中区分不同标记语言的元素。
-
声明方式:
html<svg xmlns="http://www.w3.org/2000/svg" width="200" height="200"> <!-- SVG 内容 --> </svg>
2. SVG API ★ 了解
-
DOM API:通过 JavaScript 操作 SVG 元素。
-
创建元素:
document.createElementNS(namespaceURI, tagName) -
createElementNS是 JavaScript 中用于 创建带有命名空间(Namespace)的 XML/SVG 元素 的方法。它的核心作用是明确指定元素所属的标记语言规范(如 SVG、XHTML 等),确保浏览器能正确解析和渲染元素标记语言 命名空间 URI SVG http://www.w3.org/2000/svgXHTML http://www.w3.org/1999/xhtmlMathML http://www.w3.org/1998/Math/MathML -
示例:
javascriptconst svg = document.createElementNS("http://www.w3.org/2000/svg", "svg"); svg.setAttribute("width", "100"); svg.setAttribute("height", "100"); document.body.appendChild(svg);
-
-
SVG DOM 接口 :如
SVGElement,SVGRectElement,SVGPathElement等,提供特定元素的属性和方法,用于在代码中操作不同类型的 SVG 元素。它们属于 SVG DOM(文档对象模型)规范,提供了特定 SVG 元素的属性和方法接口 对应的 SVG 元素 作用 SVGElement所有 SVG 元素的基础接口 提供所有 SVG 元素共有的属性和方法(如 id,className,style等)SVGRectElement<rect>操作矩形元素(如修改 x,y,width,height等属性)SVGPathElement<path>操作路径元素(如动态修改 d属性) -
动画 API:支持 SMIL(已部分弃用)、CSS 动画或 JavaScript 动画库(如 GSAP)。
(1) SVGElement - 基础功能 ★ 了解
javascript
const svg = document.querySelector('svg');
console.log(svg instanceof SVGElement); // true
// 通用方法
svg.setAttribute('width', '200');
svg.addEventListener('click', () => alert('SVG被点击了'));(2) SVGRectElement - 操作矩形 ★ 了解
javascript
const rect = document.querySelector('rect');
console.log(rect instanceof SVGRectElement); // true
// 特有属性
rect.x.baseVal.value = 10; // 修改 x 坐标
rect.width.baseVal.value = 50; // 修改宽度
rect.rx.baseVal.value = 5; // 修改圆角半径(3) SVGPathElement - 操作路径 ★ 了解
javascript
const path = document.querySelector('path');
console.log(path instanceof SVGPathElement); // true
// 动态修改路径
path.setAttribute('d', 'M10 10 L50 50');
// 获取路径总长度(用于动画)
const pathLength = path.getTotalLength();(4)完整实例 ★ 了解
html
<!DOCTYPE html>
<html>
<body>
<svg id="mySvg" width="200" height="200" style="border:1px solid #ddd"></svg>
<button id="addRect">添加矩形</button>
<button id="addPath">添加路径</button>
<script>
const svg = document.getElementById('mySvg');
// 添加矩形
document.getElementById('addRect').addEventListener('click', () => {
const rect = document.createElementNS('http://www.w3.org/2000/svg', 'rect');
rect.setAttribute('x', '10');
rect.setAttribute('y', '10');
rect.setAttribute('width', '50');
rect.setAttribute('height', '50');
rect.setAttribute('fill', getRandomColor());
// 类型断言为 SVGRectElement
const rectElement = rect instanceof SVGRectElement ? rect : null;
if (rectElement) {
rectElement.addEventListener('click', () => {
rectElement.width.baseVal.value *= 1.2; // 点击放大宽度
});
}
svg.appendChild(rect);
});
// 添加路径
document.getElementById('addPath').addEventListener('click', () => {
const path = document.createElementNS('http://www.w3.org/2000/svg', 'path');
path.setAttribute('d', 'M10 80 Q 50 10 100 80 T 180 80');
path.setAttribute('stroke', 'black');
path.setAttribute('fill', 'none');
// 类型断言为 SVGPathElement
const pathElement = path instanceof SVGPathElement ? path : null;
if (pathElement) {
console.log('路径长度:', pathElement.getTotalLength());
}
svg.appendChild(path);
});
function getRandomColor() {
return `hsl(${Math.random() * 360}, 70%, 50%)`;
}
</script>
</body>
</html>3. 常用 SVG 代码示例 ★ 基础
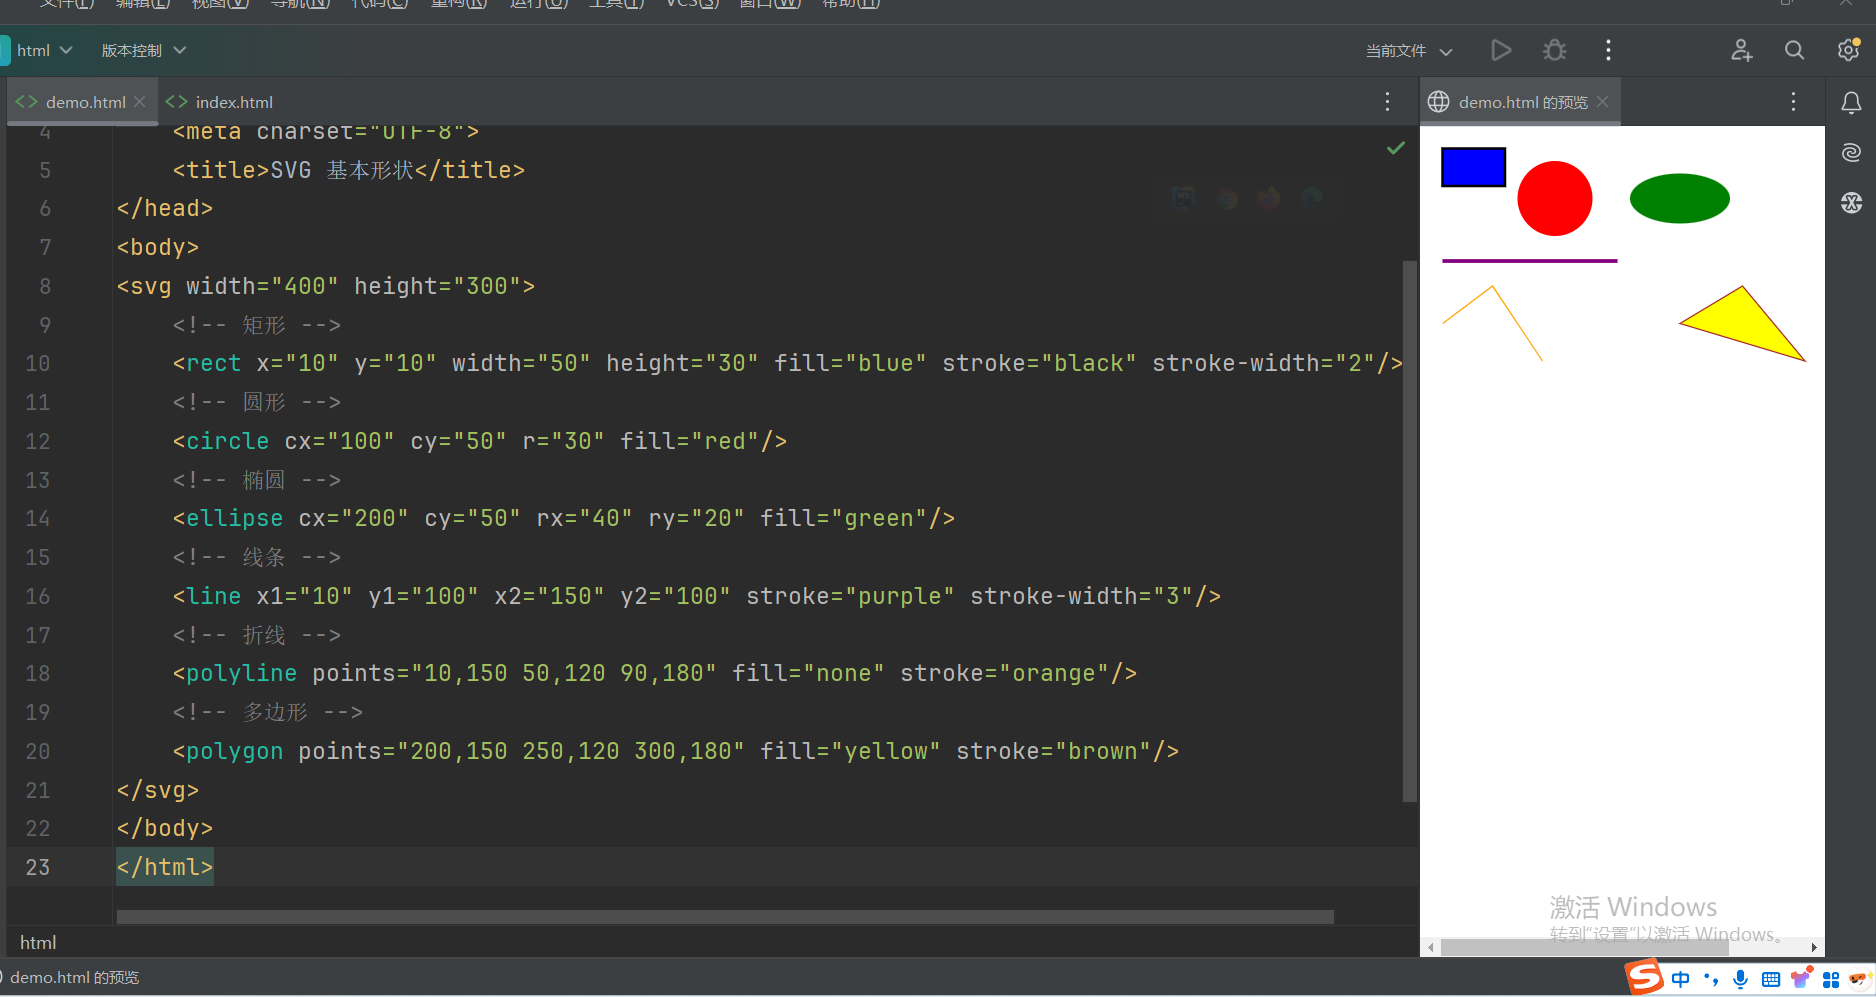
示例 3.1 - 基本形状
html
<!DOCTYPE html>
<html lang="en">
<head>
<meta charset="UTF-8">
<title>SVG 基本形状</title>
</head>
<body>
<svg width="400" height="300">
<!-- 矩形 -->
<rect x="10" y="10" width="50" height="30" fill="blue" stroke="black" stroke-width="2"/>
<!-- 圆形 -->
<circle cx="100" cy="50" r="30" fill="red"/>
<!-- 椭圆 -->
<ellipse cx="200" cy="50" rx="40" ry="20" fill="green"/>
<!-- 线条 -->
<line x1="10" y1="100" x2="150" y2="100" stroke="purple" stroke-width="3"/>
<!-- 折线 -->
<polyline points="10,150 50,120 90,180" fill="none" stroke="orange"/>
<!-- 多边形 -->
<polygon points="200,150 250,120 300,180" fill="yellow" stroke="brown"/>
</svg>
</body>
</html>效果展示:
示例 3.2 - 路径(Path)
html
<!DOCTYPE html>
<html lang="en">
<head>
<meta charset="UTF-8">
<title>SVG 路径</title>
</head>
<body>
<svg width="200" height="200">
<path d="M10 80 Q 100 10 190 80 T 370 80"
fill="none" stroke="black" stroke-width="2"/>
</svg>
</body>
</html>效果展示: 
示例 3.3 - 文本
html
<!DOCTYPE html>
<html lang="en">
<head>
<meta charset="UTF-8">
<title>SVG 文本</title>
</head>
<body>
<svg width="300" height="100">
<text x="20" y="30" font-family="Arial" font-size="20" fill="navy">
SVG 文本示例 --> 沐土
</text>
</svg>
</body>
</html>效果展示: 
示例 3.4 - 渐变与图案
html
<!DOCTYPE html>
<html lang="en">
<head>
<meta charset="UTF-8">
<title>SVG 渐变与图案</title>
</head>
<body>
<svg width="200" height="200">
<defs>
<linearGradient id="grad1" x1="0%" y1="0%" x2="100%" y2="0%">
<stop offset="0%" stop-color="#ff0000"/>
<stop offset="100%" stop-color="#0000ff"/>
</linearGradient>
<pattern id="pattern1" width="20" height="20" patternUnits="userSpaceOnUse">
<rect width="10" height="10" fill="#00ff00"/>
</pattern>
</defs>
<rect x="10" y="10" width="100" height="100" fill="url(#grad1)"/>
<circle cx="150" cy="150" r="30" fill="url(#pattern1)"/>
</svg>
</body>
</html>效果展示: 
示例 3.5 - 滤镜效果
html
<!DOCTYPE html>
<html lang="en">
<head>
<meta charset="UTF-8">
<title>SVG 滤镜</title>
</head>
<body>
<svg width="200" height="200">
<defs>
<filter id="blur">
<feGaussianBlur in="SourceGraphic" stdDeviation="5"/>
</filter>
<filter id="shadow">
<feDropShadow dx="5" dy="5" stdDeviation="3" flood-color="rgba(0,0,0,0.5)"/>
</filter>
</defs>
<rect x="20" y="20" width="100" height="100" fill="teal" filter="url(#shadow)"/>
<circle cx="150" cy="150" r="30" fill="red" filter="url(#blur)"/>
</svg>
</body>
</html>效果展示: 
示例 3.6 - 动画
html
<!DOCTYPE html>
<html lang="en">
<head>
<meta charset="UTF-8">
<title>SVG 动画</title>
<style>
.pulse {
animation: pulse 1s infinite;
}
@keyframes pulse {
0% { r: 10; }
50% { r: 20; }
100% { r: 10; }
}
</style>
</head>
<body>
<!-- SMIL 动画(部分浏览器已弃用) -->
<svg width="200" height="200">
<circle cx="50" cy="50" r="20" fill="blue">
<animate attributeName="cx" from="50" to="150" dur="2s" repeatCount="indefinite"/>
</circle>
</svg>
<!-- CSS 动画 -->
<svg width="200" height="200">
<circle class="pulse" cx="100" cy="100" r="10" fill="green"/>
</svg>
</body>
</html>效果展示: 
示例 3.7 - 交互性(JavaScript)
html
<!DOCTYPE html>
<html lang="en">
<head>
<meta charset="UTF-8">
<title>SVG 交互</title>
</head>
<body>
<svg width="200" height="200">
<rect id="btn" x="50" y="50" width="100" height="50" fill="gray"/>
<script>
document.getElementById('btn').addEventListener('click', function() {
this.setAttribute('fill', '#' + Math.floor(Math.random()*16777215).toString(16));
});
</script>
</svg>
</body>
</html>效果展示: 
示例 3.8 - 视口与 viewBox
html
<!DOCTYPE html>
<html lang="en">
<head>
<meta charset="UTF-8">
<title>SVG 视口</title>
</head>
<body>
<svg width="200" height="200" viewBox="0 0 100 100" preserveAspectRatio="xMidYMid meet">
<circle cx="50" cy="50" r="40" fill="orange"/>
</svg>
</body>
</html>效果展示: 
示例 3.9 - 复用元素
html
<!DOCTYPE html>
<html lang="en">
<head>
<meta charset="UTF-8">
<title>SVG 复用元素</title>
</head>
<body>
<svg width="300" height="100">
<defs>
<symbol id="icon" viewBox="0 0 24 24">
<path d="M12 2L3 9v12h18V9l-9-7z"/>
</symbol>
</defs>
<use href="#icon" x="10" y="10" width="30" height="30" fill="purple"/>
<use href="#icon" x="100" y="10" width="30" height="30" fill="pink"/>
</svg>
</body>
</html>效果展示: 
4.SVG 中常见图形元素的属性总结 ★ 重要
1. 矩形 <rect>
属性列表:
| 属性 | 含义 | 示例值 |
|---|---|---|
x |
矩形左上角的 x 坐标 | "10" |
y |
矩形左上角的 y 坐标 | "10" |
width |
矩形的宽度 | "50" |
height |
矩形的高度 | "30" |
rx |
圆角矩形的水平圆角半径(可选) | "5" |
ry |
圆角矩形的垂直圆角半径(可选) | "5" |
fill |
填充颜色 | "blue", "#00FF00" |
stroke |
边框颜色 | "black" |
stroke-width |
边框宽度 | "2" |
stroke-dasharray |
虚线边框样式(如 "5,3" 表示 5px 实线 + 3px 空白) |
"5,3" |
opacity |
透明度(0-1) | "0.5" |
html
<rect x="10" y="10" width="50" height="30" rx="5" fill="blue" stroke="black" stroke-width="2"/>2. 圆形 <circle>
| 属性 | 含义 | 示例值 |
|---|---|---|
cx |
圆心的 x 坐标 | "100" |
cy |
圆心的 y 坐标 | "50" |
r |
圆的半径 | "30" |
fill |
填充颜色 | "red" |
stroke |
边框颜色(同 <rect>) |
"black" |
示例:
html
<circle cx="100" cy="50" r="30" fill="red"/>3. 椭圆 <ellipse>
| 属性 | 含义 | 示例值 |
|---|---|---|
cx |
椭圆中心的 x 坐标 | "200" |
cy |
椭圆中心的 y 坐标 | "50" |
rx |
水平半径 | "40" |
ry |
垂直半径 | "20" |
fill |
填充颜色 | "green" |
示例:
html
<ellipse cx="200" cy="50" rx="40" ry="20" fill="green"/>4. 线条 <line>
| 属性 | 含义 | 示例值 |
|---|---|---|
x1, y1 |
起点坐标 | "10", "100" |
x2, y2 |
终点坐标 | "150", "100" |
stroke |
线条颜色(必须设置) | "purple" |
stroke-width |
线条宽度 | "3" |
示例:
html
<line x1="10" y1="100" x2="150" y2="100" stroke="purple" stroke-width="3"/>5. 折线 <polyline>
| 属性 | 含义 | 示例值 |
|---|---|---|
points |
一系列坐标点(格式:x1,y1 x2,y2...) |
"10,150 50,120 90,180" |
fill |
填充颜色(通常设为 "none") |
"none" |
stroke |
线条颜色 | "orange" |
示例:
html
<polyline points="10,150 50,120 90,180" fill="none" stroke="orange"/>6. 多边形 <polygon>
| 属性 | 含义 | 示例值 |
|---|---|---|
points |
闭合路径的坐标点(同 <polyline>) |
"200,150 250,120 300,180" |
fill |
填充颜色 | "yellow" |
stroke |
边框颜色 | "brown" |
示例:
html
<polygon points="200,150 250,120 300,180" fill="yellow" stroke="brown"/>7. 路径 <path> ★ 重要·难点
| 属性 | 含义 | 示例值 |
|---|---|---|
d |
路径指令(见下方说明) | "M10 80 Q 100 10 190 80" |
fill |
填充颜色("none" 表示不填充) |
"none" |
stroke |
路径线条颜色 | "black" |
路径指令(d 属性):
SVG 中的 <path> 元素通过 d 属性定义路径形状,d 属性由一系列路径命令(Path Commands)组成。这些命令通过字母(区分大小写)和坐标参数控制绘制行为。以下是所有命令的详细说明:
1. 基本命令分类 ★ 重要·难点
| 类型 | 命令 | 含义 | 参数格式 |
|---|---|---|---|
| 移动 | M, m |
移动到新起点 | (x,y) |
| 直线 | L, l |
画直线到目标点 | (x,y) |
| 水平/垂直线 | H, h |
水平画线 | x |
V, v |
垂直画线 | y |
|
| 曲线 | Q, q |
二次贝塞尔曲线 | (x1,y1 x,y) |
T, t |
平滑二次贝塞尔曲线(自动对称) | (x,y) |
|
C, c |
三次贝塞尔曲线 | (x1,y1 x2,y2 x,y) |
|
S, s |
平滑三次贝塞尔曲线(自动对称) | (x2,y2 x,y) |
|
| 弧线 | A, a |
椭圆弧 | (rx,ry x-axis-rotation large-arc-flag sweep-flag x,y) |
| 闭合路径 | Z, z |
闭合路径(回到起点) | 无参数 |
1. 基本命令分类
2.1 移动命令(Move)
-
M x,y/m dx,dy-
将画笔移动到指定坐标(绝对或相对)。
-
示例 :
M 10,20表示移动到(10,20)。 -
注意 :路径必须以
M或m开始。
-
2.2 直线命令(Line)
-
L x,y/l dx,dy-
从当前点画直线到目标点。
-
示例 :
L 50,50画线到(50,50)。
-
-
H x/h dx- 水平画线到
x坐标(y不变)。
- 水平画线到
-
V y/v dy- 垂直画线到
y坐标(x不变)。
- 垂直画线到
2.3 曲线命令(Curve)
二次贝塞尔曲线(Quadratic Bézier)
-
Q x1,y1 x,y/q dx1,dy1 dx,dy-
通过控制点
(x1,y1)画曲线到(x,y)。 -
示例 :
Q 30,80 50,50- 起点到终点通过
(30,80)控制弯曲。
- 起点到终点通过
-
平滑二次贝塞尔(Smooth Quadratic)
-
T x,y/t dx,dy-
自动对称前一控制点,简化连续曲线绘制。
-
示例:
javascriptM 10,80 Q 30,10 50,80 T 90,80
-
三次贝塞尔曲线(Cubic Bézier)
-
C x1,y1 x2,y2 x,y/c dx1,dy1 dx2,dy2 dx,dy-
两个控制点
(x1,y1)和(x2,y2)定义曲线形状。 -
示例 :
C 20,100 80,0 100,50
-
平滑三次贝塞尔(Smooth Cubic)
-
S x2,y2 x,y/s dx2,dy2 dx,dy- 自动对称前一曲线的第二个控制点。
2.4 弧线命令(Arc)
-
A rx,ry x-axis-rotation large-arc-flag sweep-flag x,y-
参数说明:
-
rx,ry:椭圆半径。 -
x-axis-rotation:椭圆旋转角度(度)。 -
large-arc-flag:0表示小弧,1表示大弧。 -
sweep-flag:0表示逆时针,1表示顺时针。 -
x,y:终点坐标。
-
-
示例:
javascript// 表示从当前点到 (100,100) 画一个半径为 30 的顺时针小弧。 A 30,30 0 0 1 100,100
-
2.5 闭合命令(Close Path)
-
Z/z-
从当前点画直线回路径起点,闭合形状。
-
注意:不区分大小写,无参数。
-
3. 相对 vs 绝对坐标
-
大写字母(如
M,L):绝对坐标(基于 SVG 坐标系原点)。 -
小写字母(如
m,l):相对坐标(基于当前点)。-
示例:
javascriptM 10,10 l 20,20 // 实际绘制到 (30,30)
-
4. 综合示例
绘制一个心形
javascript
<path d="
M 100,30
Q 100,0 70,0
Q 40,0 40,30
Q 40,60 70,80
Q 100,100 120,80
Q 150,60 150,30
Q 150,0 120,0
Q 90,0 90,30
Z
" fill="red"/>解析:
-
M 100,30:起点。 -
多段
Q命令绘制二次贝塞尔曲线形成心形轮廓。 -
Z闭合路径。
5. 高级技巧
-
路径优化 :使用
T/S简化连续曲线。 -
性能:减少冗余命令(如合并相邻直线)。
-
工具:
-
使用 SVG Path Editor 可视化编辑。
-
通过
path.getTotalLength()获取路径长度(用于动画)。
-
6. 浏览器支持
所有现代浏览器均支持完整的 d 属性命令,包括:
-
Chrome, Firefox, Safari, Edge (Chromium), Opera。
-
注意:旧版 IE 可能对复杂路径(如弧线)支持不完整。
path完整的示例代码:
html
<!DOCTYPE html>
<html lang="zh-CN">
<head>
<meta charset="UTF-8">
<meta name="viewport" content="width=device-width, initial-scale=1.0">
<title>SVG Path 命令大全 - 可直接运行示例</title>
<style>
body {
font-family: Arial, sans-serif;
max-width: 1000px;
margin: 0 auto;
padding: 20px;
line-height: 1.6;
}
.demo-container {
display: flex;
flex-wrap: wrap;
gap: 30px;
margin-top: 20px;
}
.demo-box {
border: 1px solid #ddd;
padding: 15px;
border-radius: 5px;
background: #f9f9f9;
width: 400px;
}
svg {
display: block;
margin: 10px auto;
background: #f0f0f0;
}
h2 {
color: #2c3e50;
border-bottom: 2px solid #eee;
padding-bottom: 10px;
}
code {
background: #eee;
padding: 2px 5px;
border-radius: 3px;
font-family: monospace;
}
</style>
</head>
<body>
<h1>SVG Path 命令完整示例</h1>
<div class="demo-container">
<!-- 1. 直线命令 -->
<div class="demo-box">
<h2>1. 直线命令 (M, L, H, V)</h2>
<svg width="200" height="150" viewBox="0 0 200 150">
<path d="M 20,20 L 100,20 L 100,100 H 20 V 50"
fill="none" stroke="red" stroke-width="3"/>
<text x="10" y="130" font-size="12">M 20,20 L 100,20 L 100,100 H 20 V 50</text>
</svg>
<p><strong>说明:</strong></p>
<ul>
<li><code>M 20,20</code> - 移动到起点 (20,20)</li>
<li><code>L 100,20</code> - 画直线到 (100,20)</li>
<li><code>L 100,100</code> - 画直线到 (100,100)</li>
<li><code>H 20</code> - 水平画线到 x=20</li>
<li><code>V 50</code> - 垂直画线到 y=50</li>
</ul>
</div>
<!-- 2. 二次贝塞尔曲线 -->
<div class="demo-box">
<h2>2. 二次贝塞尔曲线 (Q, T)</h2>
<svg width="200" height="150" viewBox="0 0 200 150">
<path d="M 20,50 Q 80,0 140,50 T 260,50"
fill="none" stroke="blue" stroke-width="3"/>
<circle cx="80" cy="0" r="3" fill="green"/>
<circle cx="200" cy="50" r="3" fill="green"/>
<text x="10" y="130" font-size="12">M 20,50 Q 80,0 140,50 T 260,50</text>
</svg>
<p><strong>说明:</strong></p>
<ul>
<li><code>Q 80,0 140,50</code> - 通过控制点 (80,0) 画曲线到 (140,50)</li>
<li><code>T 260,50</code> - 自动对称控制点继续画曲线</li>
<li style="color:green">绿点:控制点位置</li>
</ul>
</div>
<!-- 3. 三次贝塞尔曲线 -->
<div class="demo-box">
<h2>3. 三次贝塞尔曲线 (C, S)</h2>
<svg width="200" height="150" viewBox="0 0 200 150">
<path d="M 20,100 C 40,20 100,20 120,100 S 180,180 200,100"
fill="none" stroke="purple" stroke-width="3"/>
<circle cx="40" cy="20" r="3" fill="orange"/>
<circle cx="100" cy="20" r="3" fill="orange"/>
<circle cx="160" cy="180" r="3" fill="orange"/>
<text x="10" y="130" font-size="12">M 20,100 C 40,20 100,20 120,100 S 180,180 200,100</text>
</svg>
<p><strong>说明:</strong></p>
<ul>
<li><code>C 40,20 100,20 120,100</code> - 两个控制点画曲线</li>
<li><code>S 180,180 200,100</code> - 自动对称第一个控制点</li>
<li style="color:orange">橙点:控制点位置</li>
</ul>
</div>
<!-- 4. 弧线命令 -->
<div class="demo-box">
<h2>4. 弧线命令 (A)</h2>
<svg width="200" height="150" viewBox="0 0 200 150">
<path d="M 50,50 A 30,50 0 1 1 150,50"
fill="none" stroke="brown" stroke-width="3"/>
<text x="10" y="130" font-size="12">M 50,50 A 30,50 0 1 1 150,50</text>
</svg>
<p><strong>参数说明:</strong></p>
<ul>
<li><code>A rx,ry x-axis-rotation large-arc-flag sweep-flag x,y</code></li>
<li><code>30,50</code> - 椭圆半径 (x半径30, y半径50)</li>
<li><code>0</code> - 不旋转</li>
<li><code>1</code> - 大弧 (0为小弧)</li>
<li><code>1</code> - 顺时针方向 (0为逆时针)</li>
<li><code>150,50</code> - 终点坐标</li>
</ul>
</div>
<!-- 5. 闭合路径 -->
<div class="demo-box">
<h2>5. 闭合路径 (Z)</h2>
<svg width="200" height="150" viewBox="0 0 200 150">
<path d="M 50,20 L 100,50 L 80,100 L 30,80 Z"
fill="lightgreen" stroke="darkgreen" stroke-width="3"/>
<text x="10" y="130" font-size="12">M 50,20 L 100,50 L 80,100 L 30,80 Z</text>
</svg>
<p><strong>说明:</strong></p>
<ul>
<li><code>Z</code> - 闭合路径(自动从最后一点画直线回起点)</li>
<li>注意:大小写不敏感 (<code>z</code> 效果相同)</li>
</ul>
</div>
<!-- 6. 综合示例:心形 -->
<div class="demo-box">
<h2>6. 综合示例:心形</h2>
<svg width="200" height="150" viewBox="0 0 200 150">
<path d="
M 100,30
Q 100,0 70,0
Q 40,0 40,30
Q 40,60 70,80
Q 100,100 120,80
Q 150,60 150,30
Q 150,0 120,0
Q 90,0 90,30
Z
" fill="red" stroke="darkred" stroke-width="2"/>
<text x="10" y="130" font-size="12">M 100,30 Q 100,0 70,0 Q 40,0 40,30 ... Z</text>
</svg>
<p><strong>说明:</strong></p>
<ul>
<li>使用多个 <code>Q</code> (二次贝塞尔曲线) 命令绘制</li>
<li><code>Z</code> 闭合路径完成形状</li>
</ul>
</div>
</div>
<h2>使用技巧</h2>
<ul>
<li><strong>相对命令</strong>:小写字母 (<code>m, l, q</code> 等) 使用相对坐标</li>
<li><strong>路径优化</strong>:连续相同命令可省略字母,如 <code>L 10,10 20,20</code></li>
<li><strong>工具推荐</strong>:
<ul>
<li><a href="https://yqnn.github.io/svg-path-editor/" target="_blank">SVG Path 可视化编辑器</a></li>
<li>Adobe Illustrator 或 Inkscape 导出 SVG 路径</li>
</ul>
</li>
</ul>
</body>
</html>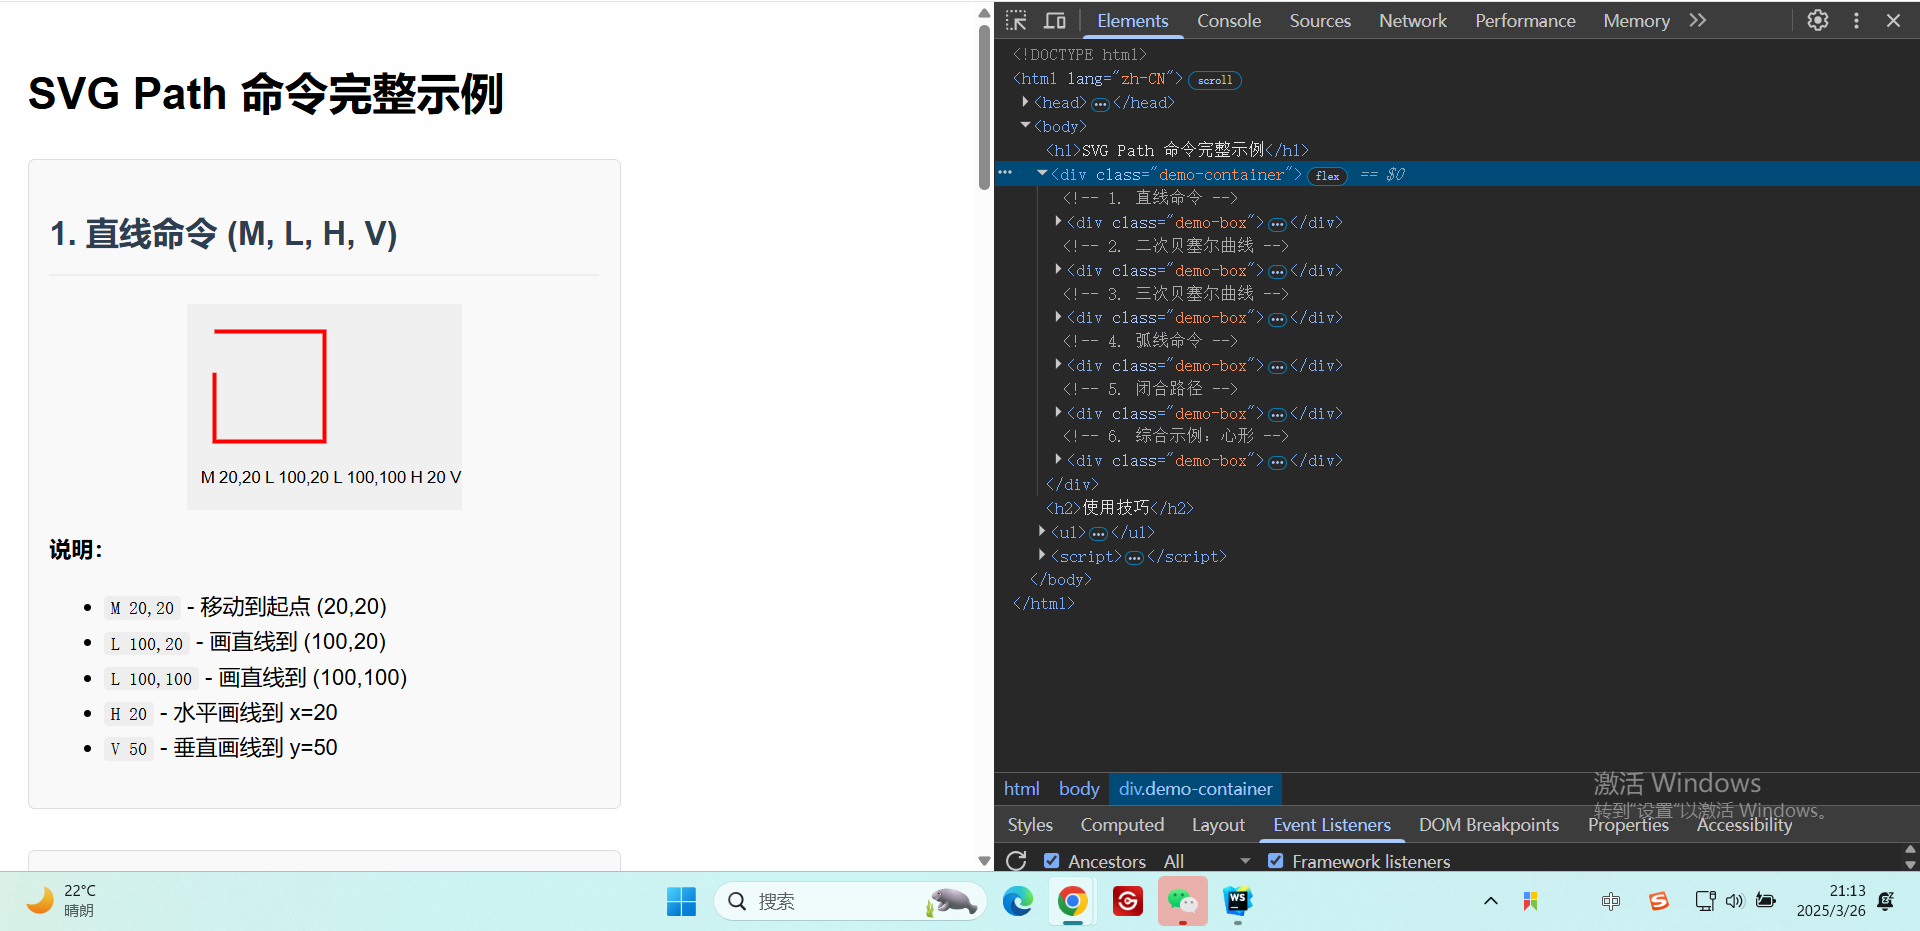
8. 文本 <text>
| 属性 | 含义 | 示例值 |
|---|---|---|
x, y |
文本基线起点坐标 | "20", "30" |
font-family |
字体 | "Arial" |
font-size |
字体大小 | "20" |
fill |
文本颜色 | "navy" |
text-anchor |
文本对齐(start/middle/end) |
"middle" |
示例:
html
<text x="20" y="30" font-family="Arial" font-size="20" fill="navy">SVG Text</text>9.通用属性
所有图形元素均可使用以下属性:
| 属性 | 含义 |
|---|---|
fill |
填充颜色(支持颜色名、HEX、RGB等) |
stroke |
边框颜色 |
stroke-width |
边框宽度 |
opacity |
整体透明度(0-1) |
transform |
变换(如 rotate(45)、scale(2)) |
10.属性总结
-
基本图形 :
<rect>,<circle>,<ellipse>,<line>,<polyline>,<polygon>。 -
高级路径 :
<path>通过指令实现任意形状。 -
文本 :
<text>支持样式和定位。 -
通用样式 :
fill,stroke,opacity等可跨元素复用。
5.使用 SVG 绘制的移动端常见返回按钮 ★ 常用
方案 1:直接使用 <path> 绘制
html
<!DOCTYPE html>
<html lang="en">
<head>
<meta charset="UTF-8">
<title>SVG 返回按钮</title>
<style>
body {
display: flex;
justify-content: center;
align-items: center;
height: 100vh;
margin: 0;
}
.back-button {
width: 40px;
height: 40px;
cursor: pointer;
}
.back-button:hover path {
fill: #007AFF; /* 悬停时变色 */
}
</style>
</head>
<body>
<!-- 返回按钮 SVG -->
<svg class="back-button" viewBox="0 0 24 24" xmlns="http://www.w3.org/2000/svg">
<!--
d属性路径说明:
M20 11 = 移动到起点(20,11)
H7.83 = 水平画线到x=7.83
l5.59-5.59= 相对绘制斜线(箭头头部)
L12 4 = 绝对坐标画线到(12,4)
l-8 8 8 8 = 绘制箭头尾部
1.41-1.41 = 调整箭头头部细节
L7.83 13 = 画线到(7.83,13)
H20v-2 = 完成箭头形状
-->
<path
d="M20 11H7.83l5.59-5.59L12 4l-8 8 8 8 1.41-1.41L7.83 13H20v-2z"
fill="#000000"
stroke="none"
/>
</svg>
<!-- 下方是路径的详细文字说明 -->
<script>
document.addEventListener('DOMContentLoaded', () => {
const pathDescription = `
【路径命令解析】
1. M20 11 : 移动到起点(20,11)
2. H7.83 : 水平向左画线到x=7.83
3. l5.59-5.59: 相对绘制斜线(左上箭头头部)
4. L12 4 : 画线到(12,4)
5. l-8 8 : 向左下方画线
6. 8 8 : 向右下方画线
7. 1.41-1.41: 微调箭头形状
8. L7.83 13 : 画线到(7.83,13)
9. H20v-2 : 完成右侧线条
10. z : 闭合路径
`;
console.log(pathDescription);
});
</script>
</body>
</html>效果展示:
关键点说明:
-
路径 (
d属性):-
M20 11:移动到起点 (20, 11)。 -
H7.83:水平画线到 x=7.83。 -
l5.59-5.59:相对绘制斜线(箭头头部)。 -
L12 4:绝对坐标画线到 (12, 4)。 -
l-8 8 8 8:绘制箭头尾部两段线。 -
1.41-1.41:调整箭头头部细节。 -
H20v-2z:闭合路径。
-
-
交互效果:
-
通过 CSS 悬停 (
:hover) 改变颜色。 -
cursor: pointer表示可点击。
-
方案 2:使用 <symbol> 复用(适合多个按钮)
html
<!DOCTYPE html>
<html lang="en">
<head>
<meta charset="UTF-8">
<title>SVG 复用返回按钮</title>
<style>
body {
display: flex;
gap: 20px;
justify-content: center;
align-items: center;
height: 100vh;
margin: 0;
}
.back-button {
width: 40px;
height: 40px;
cursor: pointer;
}
.back-button:hover use {
fill: #FF3B30; /* 悬停红色 */
}
</style>
</head>
<body>
<!-- 定义符号 -->
<svg style="display: none;">
<symbol id="back-arrow" viewBox="0 0 24 24">
<path d="M20 11H7.83l5.59-5.59L12 4l-8 8 8 8 1.41-1.41L7.83 13H20v-2z"/>
</symbol>
</svg>
<!-- 复用按钮 -->
<svg class="back-button">
<use href="#back-arrow" fill="#000000"/>
</svg>
<svg class="back-button">
<use href="#back-arrow" fill="#007AFF"/>
</svg>
</body>
</html>优势:
-
复用性 :通过
<symbol>定义一次,多处通过<use>引用。 -
灵活样式:每个实例可独立设置颜色/大小。
方案3:其他变体(简洁箭头)
如果需要一个更简单的箭头样式,可以修改 d 属性:
html
<path d="M15 18l-6-6 6-6" fill="none" stroke="#000" stroke-width="2"/>效果:← 样式的细线箭头。
6.SVG 和 Canvas 的区别 ★ 了解
SVG 和 Canvas 是两种完全不同的网页图形技术,它们在实现方式、适用场景和性能特点上有显著差异。以下是它们的核心区别:
1. 基础概念
| 特性 | SVG | Canvas |
|---|---|---|
| 类型 | 矢量图形(基于 XML) | 位图(基于 JavaScript API) |
| 渲染方式 | 保留模式(Retained Mode) | 立即模式(Immediate Mode) |
| DOM 支持 | 是(每个图形是 DOM 元素) | 否(只是一个画布像素区) |
| 分辨率无关 | 是(无限缩放不失真) | 否(放大后像素化) |
2. 技术细节对比
SVG
工作原理 :
通过 XML 描述图形,浏览器解析后生成可操作的 DOM 节点。
html
<svg width="100" height="100">
<circle cx="50" cy="50" r="40" fill="red"/>
</svg>-
特点:
-
支持 CSS 样式和动画。
-
内置事件处理(如
onclick)。 -
适合静态或交互复杂的图形(如图标、图表)。
-
Canvas
工作原理 :
通过 JavaScript 动态绘制像素,无持久化对象。
html
const ctx = canvas.getContext('2d');
ctx.fillStyle = 'red';
ctx.beginPath();
ctx.arc(50, 50, 40, 0, Math.PI * 2);
ctx.fill();-
特点:
-
高性能,适合频繁重绘(如游戏、动态数据可视化)。
-
需要手动管理状态和重绘。
-
无内置事件系统,需通过数学计算实现交互。
-
3. 性能与适用场景
| 场景 | SVG | Canvas |
|---|---|---|
| 图形复杂度 | 适合少量复杂图形(如矢量图标) | 适合大量简单图形(如粒子效果) |
| 动态更新频率 | 低(DOM 操作成本高) | 高(直接操作像素) |
| 交互需求 | 内置事件支持(如点击、悬停) | 需手动计算交互区域 |
| 动画 | CSS/SMIL 动画或 JS 控制属性 | 必须通过 JS 逐帧重绘 |
| 典型应用 | 地图、UI 图标、可缩放图表 | 游戏、实时数据可视化、图像处理 |
4. 代码示例对比
绘制一个可点击的圆形
SVG 实现(自带事件):
html
<svg width="100" height="100">
<circle cx="50" cy="50" r="40" fill="red" onclick="alert('Clicked!')"/>
</svg>Canvas 实现(需手动检测点击):
html
<canvas id="canvas" width="100" height="100"></canvas>
<script>
const canvas = document.getElementById('canvas');
const ctx = canvas.getContext('2d');
// 绘制圆
ctx.fillStyle = 'red';
ctx.beginPath();
ctx.arc(50, 50, 40, 0, Math.PI * 2);
ctx.fill();
// 手动检测点击
canvas.addEventListener('click', (e) => {
const x = e.offsetX, y = e.offsetY;
const distance = Math.sqrt((x - 50) ** 2 + (y - 50) ** 2);
if (distance <= 40) alert('Clicked!');
});
</script>5. 选择建议
-
用 SVG 如果:
-
需要矢量缩放(如响应式设计)。
-
图形需要单独交互或动画。
-
图形数量较少(避免 DOM 性能问题)。
-
-
用 Canvas 如果:
-
需要高性能渲染(如 60fps 动画)。
-
处理像素级操作(如滤镜、图像分析)。
-
图形数量极多(如上万元素的可视化)。
-
6. 进阶对比
| 高级功能 | SVG | Canvas |
|---|---|---|
| 文本渲染 | 完美支持(可选中、样式丰富) | 基础支持(需手动处理换行等) |
| 图像处理 | 有限(通过 <image> 标签) |
强大(像素操作、WebGL 扩展) |
| 内存占用 | 较高(DOM 节点开销) | 较低(纯像素缓冲区) |
| 学习曲线 | 简单(声明式语法) | 较陡(需理解绘图 API) |
7.总结
-
SVG 是声明式的矢量图形,适合交互复杂、需要缩放的场景。
-
Canvas 是命令式的位图绘制,适合高性能、动态渲染的场景。
根据项目需求混合使用两者(例如用 SVG 做 UI,Canvas 渲染背景动画)往往是最佳实践。
7.SVG兼容问题汇总 ★ 重要
1. 浏览器兼容性问题
1.1 旧版浏览器(IE 8 及以下)
-
问题:
-
IE 8 及更早版本完全不支持 SVG。
-
IE 9-11 部分支持,但存在 Bug(如滤镜效果、CSS 动画)。
-
-
解决方案:
-
使用 Polyfill(如 SVG for Everybody)或转换为 PNG 备用。
-
通过
<img>引入 SVG 时,添加onerror回退:html<img src="image.svg" onerror="this.src='fallback.png'" />
-
1.2 Android 4.3 及以下
-
问题:
- 部分 SVG 特性(如
viewport、transform)支持不完整。
- 部分 SVG 特性(如
-
解决方案:
- 避免复杂变换,使用简化 SVG 代码。
2. 功能兼容性问题
2.1 SVG 滤镜(<filter>)
-
问题:
- 部分浏览器(如旧版 Firefox)对
feBlend、feColorMatrix等滤镜效果支持不完整。
- 部分浏览器(如旧版 Firefox)对
-
解决方案:
-
使用 CSS 滤镜(如
filter: blur(5px))作为备用。 -
测试效果并简化滤镜链。
-
2.2 SVG 动画
-
问题:
-
SMIL 动画 (如
<animate>)在 Chrome 45+ 已弃用,但部分浏览器仍支持。 -
CSS 动画对
transform属性的支持不一致。
-
-
解决方案:
-
改用 CSS 动画 或 JavaScript 动画库(如 GSAP、Snap.svg)。
-
检测 SMIL 支持并回退:
javascriptif (!document.createElementNS('http://www.w3.org/2000/svg', 'animate').toString().includes('SVGAnimateElement')) { console.log('SMIL 不支持'); }
-
2.3 字体与文本
-
问题:
<text>元素在跨平台渲染时可能出现字体不一致或换行错误。
-
解决方案:
-
使用
textPath或手动换行(<tspan>)。 -
将文本转换为路径(设计工具中操作)。
-
3. 嵌入方式的兼容性
3.1 <img> 标签引入 SVG
-
问题:
-
无法通过 CSS 修改 SVG 内部样式。
-
部分浏览器禁用 SVG 内联脚本。
-
-
解决方案:
-
改用
<object>或内联 SVG:javascript<object data="image.svg" type="image/svg+xml"></object>
-
3.2 CSS 背景图
-
问题:
- 旧版 iOS Safari 可能无法正确缩放 SVG 背景。
-
解决方案:
-
显式设置
background-size:css.element { background: url('image.svg'); background-size: 100% 100%; }
-
4. 交互与脚本问题
4.1 事件绑定
-
问题:
- 动态创建的 SVG 元素在旧版 Android 中可能无法触发事件。
-
解决方案:
- 使用事件委托(委托到父级 SVG 或 HTML 元素)。
4.2 动态修改 SVG
-
问题:
- 直接修改
d属性(如<path>)在 IE 中可能不触发重绘。
- 直接修改
-
解决方案:
-
强制重绘:
javascriptpath.setAttribute('d', newValue); path.style.transform = 'scale(1)'; // 触发重绘
-
5. 其他常见问题
5.1 尺寸与视口
-
问题:
- 未设置
viewBox时,某些浏览器可能无法正确缩放 SVG。
- 未设置
-
解决方案:
-
始终显式定义
viewBox和width/height:html<svg width="100" height="100" viewBox="0 0 100 100">...</svg>
-
5.2 外链资源
-
问题:
- 外部 SVG 文件中的
<use href="external.svg#icon">在 Firefox 中可能受限。
- 外部 SVG 文件中的
-
解决方案:
- 使用内联 SVG 或工具链(如 Webpack)将 SVG 打包为数据 URI。
6.svg兼容性总结
-
主要问题:旧版浏览器(IE/旧移动端)、滤镜/动画支持、动态交互。
-
检测函数:
javascript// Can I Use 也可以直接看 if (Modernizr.svg) { console.log('SVG 支持'); } -
通用建议:
-
优先使用内联 SVG 以最大化控制权。
-
复杂场景提供 PNG 回退。
-
测试目标平台的关键功能(如动画、滤镜)。
-
通过预处理工具(如 SVGO 优化代码)和渐进增强策略,可以显著降低 SVG 的兼容性风险。
8.SVG 常用小图标集合 ★ 常用
html
<!DOCTYPE html>
<html lang="zh-CN">
<head>
<meta charset="UTF-8">
<meta name="viewport" content="width=device-width, initial-scale=1.0">
<title>前端常用SVG小图标集合</title>
<style>
body {
font-family: 'Arial', sans-serif;
max-width: 800px;
margin: 0 auto;
padding: 20px;
background-color: #f5f5f5;
}
h1 {
color: #333;
text-align: center;
margin-bottom: 30px;
}
.icon-container {
display: grid;
grid-template-columns: repeat(auto-fill, minmax(150px, 1fr));
gap: 20px;
margin-top: 20px;
}
.icon-box {
background: white;
border-radius: 8px;
padding: 15px;
box-shadow: 0 2px 5px rgba(0,0,0,0.1);
text-align: center;
transition: transform 0.2s;
}
.icon-box:hover {
transform: translateY(-5px);
}
.icon {
width: 50px;
height: 50px;
margin: 0 auto 10px;
display: block;
}
.icon-name {
font-weight: bold;
color: #444;
margin-bottom: 5px;
}
.icon-desc {
font-size: 12px;
color: #666;
}
</style>
</head>
<body>
<h1>前端常用SVG小图标集合</h1>
<div class="icon-container">
<!-- 1. 搜索图标 -->
<div class="icon-box">
<svg class="icon" viewBox="0 0 24 24" xmlns="http://www.w3.org/2000/svg">
<!--
搜索图标路径说明:
- 圆形代表放大镜的镜面
- 直线代表放大镜的手柄
-->
<path d="M15.5 14h-.79l-.28-.27a6.5 6.5 0 1 0-.7.7l.27.28v.79l5 4.99L20.49 19l-4.99-5zm-6 0A4.5 4.5 0 1 1 14 9.5 4.5 4.5 0 0 1 9.5 14z"
fill="#4285F4"/>
</svg>
<div class="icon-name">搜索图标</div>
<div class="icon-desc">用于搜索框的放大镜图标</div>
</div>
<!-- 2. 菜单图标 -->
<div class="icon-box">
<svg class="icon" viewBox="0 0 24 24" xmlns="http://www.w3.org/2000/svg">
<!--
菜单图标路径说明:
- 三条水平线代表菜单选项
-->
<path d="M3 18h18v-2H3v2zm0-5h18v-2H3v2zm0-7v2h18V6H3z"
fill="#5F6368"/>
</svg>
<div class="icon-name">菜单图标</div>
<div class="icon-desc">移动端常见的汉堡菜单图标</div>
</div>
<!-- 3. 关闭图标 -->
<div class="icon-box">
<svg class="icon" viewBox="0 0 24 24" xmlns="http://www.w3.org/2000/svg">
<!--
关闭图标路径说明:
- 两条对角线组成X形状
-->
<path d="M19 6.41L17.59 5 12 10.59 6.41 5 5 6.41 10.59 12 5 17.59 6.41 19 12 13.41 17.59 19 19 17.59 13.41 12z"
fill="#EA4335"/>
</svg>
<div class="icon-name">关闭图标</div>
<div class="icon-desc">用于弹窗、标签等的关闭按钮</div>
</div>
<!-- 4. 下载图标 -->
<div class="icon-box">
<svg class="icon" viewBox="0 0 24 24" xmlns="http://www.w3.org/2000/svg">
<!--
下载图标路径说明:
- 箭头向下表示下载方向
- 横线代表下载内容
-->
<path d="M19 9h-4V3H9v6H5l7 7 7-7zM5 18v2h14v-2H5z"
fill="#34A853"/>
</svg>
<div class="icon-name">下载图标</div>
<div class="icon-desc">用于文件下载按钮</div>
</div>
<!-- 5. 上传图标 -->
<div class="icon-box">
<svg class="icon" viewBox="0 0 24 24" xmlns="http://www.w3.org/2000/svg">
<!--
上传图标路径说明:
- 箭头向上表示上传方向
- 横线代表上传内容
-->
<path d="M9 16h6v-6h4l-7-7-7 7h4v6zm-4 2h14v2H5v-2z"
fill="#FBBC05"/>
</svg>
<div class="icon-name">上传图标</div>
<div class="icon-desc">用于文件上传按钮</div>
</div>
<!-- 6. 用户图标 -->
<div class="icon-box">
<svg class="icon" viewBox="0 0 24 24" xmlns="http://www.w3.org/2000/svg">
<!--
用户图标路径说明:
- 圆形代表用户头像
- 路径代表用户身体
-->
<path d="M12 2C6.48 2 2 6.48 2 12s4.48 10 10 10 10-4.48 10-10S17.52 2 12 2zm0 3c1.66 0 3 1.34 3 3s-1.34 3-3 3-3-1.34-3-3 1.34-3 3-3zm0 14.2c-2.5 0-4.71-1.28-6-3.22.03-1.99 4-3.08 6-3.08 1.99 0 5.97 1.09 6 3.08-1.29 1.94-3.5 3.22-6 3.22z"
fill="#4285F4"/>
</svg>
<div class="icon-name">用户图标</div>
<div class="icon-desc">用于用户登录、个人中心等</div>
</div>
<!-- 7. 设置图标 -->
<div class="icon-box">
<svg class="icon" viewBox="0 0 24 24" xmlns="http://www.w3.org/2000/svg">
<!--
设置图标路径说明:
- 齿轮形状代表设置
-->
<path d="M19.14 12.94c.04-.3.06-.61.06-.94 0-.32-.02-.64-.07-.94l2.03-1.58c.18-.14.23-.41.12-.61l-1.92-3.32c-.12-.22-.37-.29-.59-.22l-2.39.96c-.5-.38-1.03-.7-1.62-.94l-.36-2.54c-.04-.24-.24-.41-.48-.41h-3.84c-.24 0-.43.17-.47.41l-.36 2.54c-.59.24-1.13.57-1.62.94l-2.39-.96c-.22-.08-.47 0-.59.22L2.74 8.87c-.12.21-.08.47.12.61l2.03 1.58c-.05.3-.09.63-.09.94s.02.64.07.94l-2.03 1.58c-.18.14-.23.41-.12.61l1.92 3.32c.12.22.37.29.59.22l2.39-.96c.5.38 1.03.7 1.62.94l.36 2.54c.05.24.24.41.48.41h3.84c.24 0 .44-.17.47-.41l.36-2.54c.59-.24 1.13-.56 1.62-.94l2.39.96c.22.08.47 0 .59-.22l1.92-3.32c.12-.22.07-.47-.12-.61l-2.01-1.58zM12 15.6c-1.98 0-3.6-1.62-3.6-3.6s1.62-3.6 3.6-3.6 3.6 1.62 3.6 3.6-1.62 3.6-3.6 3.6z"
fill="#5F6368"/>
</svg>
<div class="icon-name">设置图标</div>
<div class="icon-desc">用于系统设置、偏好设置等</div>
</div>
<!-- 8. 主页图标 -->
<div class="icon-box">
<svg class="icon" viewBox="0 0 24 24" xmlns="http://www.w3.org/2000/svg">
<!--
主页图标路径说明:
- 房屋形状代表主页
-->
<path d="M10 20v-6h4v6h5v-8h3L12 3 2 12h3v8z"
fill="#EA4335"/>
</svg>
<div class="icon-name">主页图标</div>
<div class="icon-desc">用于返回首页的导航按钮</div>
</div>
<!-- 9. 通知图标 -->
<div class="icon-box">
<svg class="icon" viewBox="0 0 24 24" xmlns="http://www.w3.org/2000/svg">
<!--
通知图标路径说明:
- 铃铛形状代表通知
-->
<path d="M12 22c1.1 0 2-.9 2-2h-4c0 1.1.9 2 2 2zm6-6v-5c0-3.07-1.63-5.64-4.5-6.32V4c0-.83-.67-1.5-1.5-1.5s-1.5.67-1.5 1.5v.68C7.64 5.36 6 7.92 6 11v5l-2 2v1h16v-1l-2-2z"
fill="#FBBC05"/>
</svg>
<div class="icon-name">通知图标</div>
<div class="icon-desc">用于显示系统或应用通知</div>
</div>
<!-- 10. 收藏图标 -->
<div class="icon-box">
<svg class="icon" viewBox="0 0 24 24" xmlns="http://www.w3.org/2000/svg">
<!--
收藏图标路径说明:
- 星形代表收藏
-->
<path d="M12 17.27L18.18 21l-1.64-7.03L22 9.24l-7.19-.61L12 2 9.19 8.63 2 9.24l5.46 4.73L5.82 21z"
fill="#34A853"/>
</svg>
<div class="icon-name">收藏图标</div>
<div class="icon-desc">用于标记收藏内容</div>
</div>
</div>
<div style="margin-top: 30px; padding: 15px; background: white; border-radius: 8px; box-shadow: 0 2px 5px rgba(0,0,0,0.1);">
<h2>使用说明</h2>
<ol>
<li>直接复制整个HTML文件保存即可使用</li>
<li>每个图标都是独立的SVG元素,可以直接复制到其他项目中使用</li>
<li>通过修改<code>fill</code>属性可以改变图标颜色</li>
<li>通过修改<code>width</code>和<code>height</code>可以调整图标大小</li>
<li>所有图标都使用标准的24x24 viewBox,保持清晰度</li>
</ol>
</div>
</body>
</html>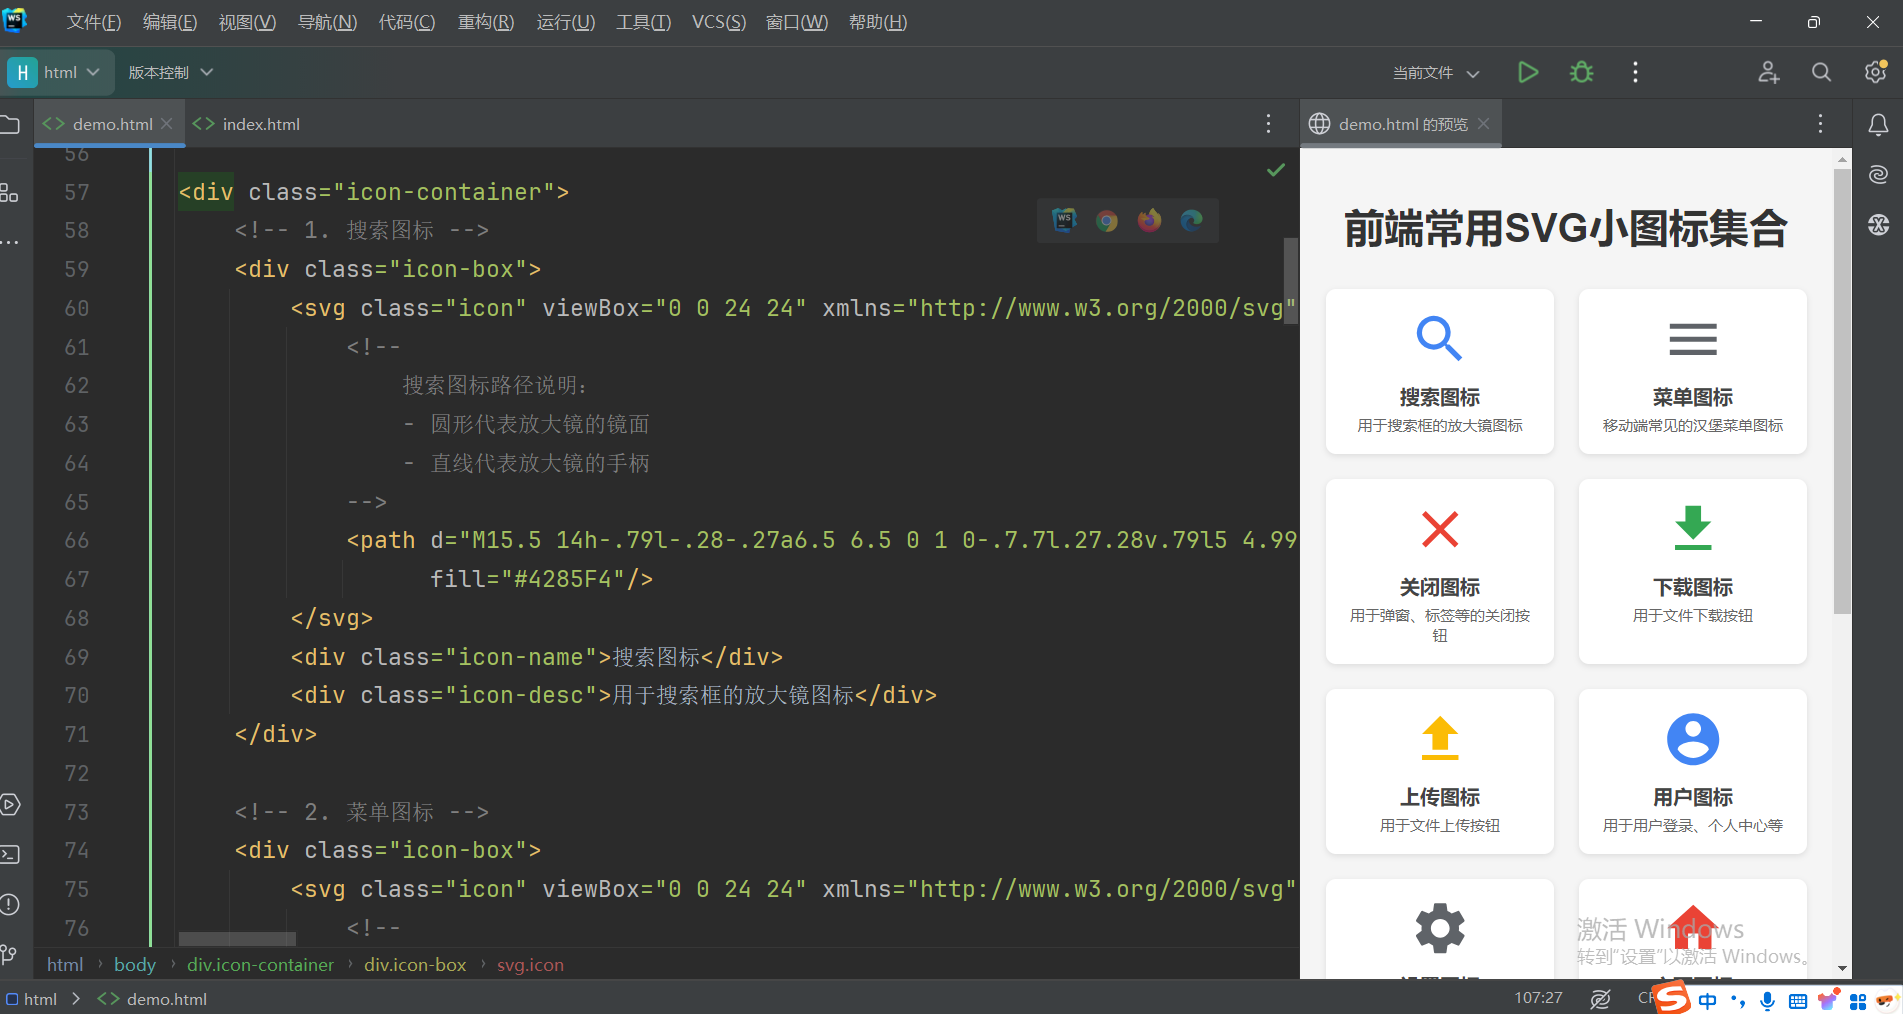
9.命名空间拓展 ★ 了解
SVG 需要命名空间(Namespace)主要是为了解决 XML 文档中元素和属性名称冲突的问题,确保 SVG 元素能够被正确识别和处理;
1. 命名空间的核心作用
(1) 避免元素名称冲突
当 XML 文档中混合多种标记语言时(例如 SVG + HTML),命名空间可以区分同名元素。
示例:
javascript
<html xmlns="http://www.w3.org/1999/xhtml">
<body>
<!-- SVG 画布 -->
<svg xmlns="http://www.w3.org/2000/svg" width="100" height="100">
<circle cx="50" cy="50" r="40" fill="red"/>
</svg>
<!-- 假设HTML也有一个<circle>元素 -->
<div class="circle"></div>
</body>
</html>- 如果没有命名空间,浏览器无法区分
<circle>是 SVG 的圆形还是 HTML 的其他元素。
(2) 明确语法规则
命名空间定义了元素的合法结构和属性,确保浏览器/解析器能正确渲染 SVG。
2. SVG 命名空间的声明方式
(1) 内联 SVG(HTML5 中)
所有 SVG 元素继承自 SVGElement,提供通用属性和事件支持
javascript
<!-- 可以省略命名空间(浏览器会自动推断) -->
<svg width="100" height="100">
<circle cx="50" cy="50" r="40" fill="blue"/>
</svg>(2) 独立 SVG 文件或混合 XML
javascript
<!-- 必须声明命名空间 -->
<svg xmlns="http://www.w3.org/2000/svg" viewBox="0 0 100 100">
<rect x="10" y="10" width="80" height="80"/>
</svg>(3) 动态创建 SVG 元素
javascript
// 必须使用 createElementNS 而非 createElement
const svg = document.createElementNS("http://www.w3.org/2000/svg", "svg");
svg.setAttribute("width", "100");
svg.setAttribute("height", "100");
document.body.appendChild(svg);(4)完整实例
html
<!DOCTYPE html>
<html>
<body>
  <svg id="mySvg" width="200" height="200" style="border:1px solid #ddd"></svg>
  <button id="addRect">添加矩形</button>
  <button id="addPath">添加路径</button>

  <script>
    const svg = document.getElementById('mySvg');

    // 添加矩形
    document.getElementById('addRect').addEventListener('click', () => {
      const rect = document.createElementNS('http://www.w3.org/2000/svg', 'rect');
      rect.setAttribute('x', '10');
      rect.setAttribute('y', '10');
      rect.setAttribute('width', '50');
      rect.setAttribute('height', '50');
      rect.setAttribute('fill', getRandomColor());

      // 类型断言为 SVGRectElement
      const rectElement = rect instanceof SVGRectElement ? rect : null;
      if (rectElement) {
        rectElement.addEventListener('click', () => {
          rectElement.width.baseVal.value *= 1.2; // 点击放大宽度
        });
      }

      svg.appendChild(rect);
    });

    // 添加路径
    document.getElementById('addPath').addEventListener('click', () => {
      const path = document.createElementNS('http://www.w3.org/2000/svg', 'path');
      path.setAttribute('d', 'M10 80 Q 50 10 100 80 T 180 80');
      path.setAttribute('stroke', 'black');
      path.setAttribute('fill', 'none');

      // 类型断言为 SVGPathElement
      const pathElement = path instanceof SVGPathElement ? path : null;
      if (pathElement) {
        console.log('路径长度:', pathElement.getTotalLength());
      }

      svg.appendChild(path);
    });

    function getRandomColor() {
      return `hsl(${Math.random() * 360}, 70%, 50%)`;
    }
  </script>
</body>
</html>
3. 为什么 HTML5 中可以省略命名空间?
-
浏览器智能推断 :当
<svg>直接嵌入 HTML5 文档时,浏览器会自动将其关联到 SVG 命名空间。 -
历史兼容性:HTML5 规范对混合内容做了特殊处理,简化了写法。
4. 必须显式使用命名空间的场景
| 场景 | 原因 |
|---|---|
| XML 文档(非HTML) | XML 严格依赖命名空间来区分元素类型 |
| XHTML | XHTML 是 XML 的一种,必须严格声明 |
| 动态创建 SVG 元素 | JavaScript 无法自动推断命名空间 |
| SVG 滤镜/动画等高级功能 | 部分浏览器要求明确命名空间以支持特性(如 <filter>、<animate>) |
5. 命名空间的 URI 含义
-
http://www.w3.org/2000/svg是一个标识符而非实际网址,用于唯一标识 SVG 规范。 -
即使该 URL 不可访问,浏览器仍能识别它代表 SVG。
6. 常见问题
问题1:忘记命名空间导致 SVG 不显示
javascript
// 错误写法(创建的是HTML元素,非SVG元素)
const circle = document.createElement("circle");
// 正确写法
const circle = document.createElementNS("http://www.w3.org/2000/svg", "circle");
问题2:混合命名空间冲突
javascript
<!-- 错误示例 -->
<svg xmlns="http://example.com/custom-ns">
  <!-- 浏览器无法识别此命名空间中的SVG元素 -->
  <circle cx="50" cy="50" r="40" fill="green"/>
</svg>
命名空间总结
| 场景 | 是否需要命名空间 | 示例 |
|---|---|---|
| 内联 SVG(HTML5) | 可选 | <svg><circle/></svg> |
| 独立 SVG 文件 | 必须 | <svg xmlns="..."><path/></svg> |
| 动态创建 SVG | 必须 | createElementNS("...", "svg") |
| XML/XHTML 文档 | 必须 | <svg xmlns="...">...</svg> |
命名空间是 XML 体系的基石,确保 SVG 在复杂文档环境中能够被正确解析和渲染。