现在的AI写python太方便了
说的话
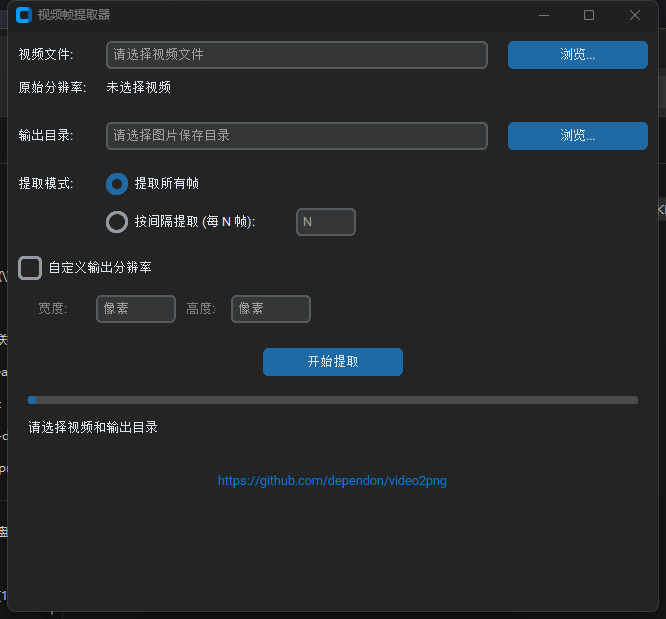
我想用python实现一个能够将视频的所有帧数转化为图片的软件,可以自由配置转换的帧率或者全部,需要有界面,我需要增加一点功能,就是我需要读取出视频的分辨率,然后设置输出帧的分辨率设置
效果图
完整代码
python
import tkinter
import tkinter.filedialog
import customtkinter as ctk
import cv2
import os
import threading
import math
import webbrowser

# --- 主应用类 ---
class FrameExtractorApp(ctk.CTk):
    def __init__(self):
        super().__init__()

        self.title("视频帧提取器")
        self.geometry("650x580") # 调整窗口大小以容纳新控件
        ctk.set_appearance_mode("System")
        ctk.set_default_color_theme("blue")

        self.video_path = ""
        self.output_dir = ""
        self.is_processing = False
        self.original_width = 0
        self.original_height = 0
        self.github_url = "https://github.com/dependon/video2png" # <-- 定义URL

        # --- GUI 组件 ---
        self.grid_columnconfigure(1, weight=1)

        # --- 行计数器 ---
        current_row = 0

        # 1. 视频文件选择
        self.label_video = ctk.CTkLabel(self, text="视频文件:")
        self.label_video.grid(row=current_row, column=0, padx=10, pady=(10, 5), sticky="w")
        self.entry_video_path = ctk.CTkEntry(self, placeholder_text="请选择视频文件", width=350)
        self.entry_video_path.grid(row=current_row, column=1, padx=10, pady=(10, 5), sticky="ew")
        self.button_browse_video = ctk.CTkButton(self, text="浏览...", command=self.select_video_file)
        self.button_browse_video.grid(row=current_row, column=2, padx=10, pady=(10, 5))
        current_row += 1

        # 1.5 显示原始分辨率
        self.label_original_res_info = ctk.CTkLabel(self, text="原始分辨率:")
        self.label_original_res_info.grid(row=current_row, column=0, padx=10, pady=(0, 10), sticky="w")
        self.label_original_resolution = ctk.CTkLabel(self, text="未选择视频")
        self.label_original_resolution.grid(row=current_row, column=1, columnspan=2, padx=10, pady=(0, 10), sticky="w")
        current_row += 1

        # 2. 输出目录选择
        self.label_output = ctk.CTkLabel(self, text="输出目录:")
        self.label_output.grid(row=current_row, column=0, padx=10, pady=10, sticky="w")
        self.entry_output_dir = ctk.CTkEntry(self, placeholder_text="请选择图片保存目录", width=350)
        self.entry_output_dir.grid(row=current_row, column=1, padx=10, pady=10, sticky="ew")
        self.button_browse_output = ctk.CTkButton(self, text="浏览...", command=self.select_output_dir)
        self.button_browse_output.grid(row=current_row, column=2, padx=10, pady=10)
        current_row += 1

        # 3. 提取模式选择
        self.label_mode = ctk.CTkLabel(self, text="提取模式:")
        self.label_mode.grid(row=current_row, column=0, padx=10, pady=10, sticky="w")
        self.radio_var = tkinter.IntVar(value=0) # 0: All, 1: Interval
        self.radio_all = ctk.CTkRadioButton(self, text="提取所有帧", variable=self.radio_var, value=0, command=self.toggle_interval_entry)
        self.radio_all.grid(row=current_row, column=1, padx=(10,0), pady=10, sticky="w")
        current_row += 1
        self.radio_interval = ctk.CTkRadioButton(self, text="按间隔提取 (每 N 帧):", variable=self.radio_var, value=1, command=self.toggle_interval_entry)
        self.radio_interval.grid(row=current_row, column=1, padx=(10,0), pady=(0, 10), sticky="w")

        self.entry_interval = ctk.CTkEntry(self, width=60, placeholder_text="N")
        self.entry_interval.grid(row=current_row, column=1, padx=(200, 0), pady=(0, 10), sticky="w") # 调整位置
        self.entry_interval.configure(state=tkinter.DISABLED) # 默认禁用
        current_row += 1

        # 4. 自定义分辨率设置
        self.custom_resolution_var = tkinter.IntVar(value=0) # 0: No, 1: Yes
        self.check_custom_res = ctk.CTkCheckBox(self, text="自定义输出分辨率", variable=self.custom_resolution_var,
                                                  onvalue=1, offvalue=0, command=self.toggle_custom_resolution_entries)
        self.check_custom_res.grid(row=current_row, column=0, columnspan=2, padx=10, pady=10, sticky="w")
        current_row += 1

        self.label_custom_width = ctk.CTkLabel(self, text="宽度:")
        self.label_custom_width.grid(row=current_row, column=0, padx=(30, 5), pady=5, sticky="w") # 缩进
        self.entry_custom_width = ctk.CTkEntry(self, width=80, placeholder_text="像素")
        self.entry_custom_width.grid(row=current_row, column=1, padx=(0, 5), pady=5, sticky="w")

        self.label_custom_height = ctk.CTkLabel(self, text="高度:")
        self.label_custom_height.grid(row=current_row, column=1, padx=(90, 5), pady=5, sticky="w") # 调整位置
        self.entry_custom_height = ctk.CTkEntry(self, width=80, placeholder_text="像素")
        self.entry_custom_height.grid(row=current_row, column=1, padx=(135, 0), pady=5, sticky="w") # 调整位置

        # 初始禁用自定义分辨率输入框
        self.entry_custom_width.configure(state=tkinter.DISABLED)
        self.label_custom_width.configure(text_color="gray") # 视觉提示
        self.entry_custom_height.configure(state=tkinter.DISABLED)
        self.label_custom_height.configure(text_color="gray") # 视觉提示
        current_row += 1


        # 5. 图片格式 (保持简化)
        self.image_format = ".png"
        # 可以取消注释并调整 current_row 来添加格式选择
        # self.label_format = ctk.CTkLabel(self, text="图片格式:")
        # self.label_format.grid(row=current_row, column=0, padx=10, pady=10, sticky="w")
        # self.format_var = tkinter.StringVar(value=".png")
        # self.option_format = ctk.CTkOptionMenu(self, variable=self.format_var, values=[".png", ".jpg", ".bmp"])
        # self.option_format.grid(row=current_row, column=1, padx=10, pady=10, sticky="w")
        # current_row += 1


        # 6. 开始按钮
        self.button_start = ctk.CTkButton(self, text="开始提取", command=self.start_extraction_thread)
        self.button_start.grid(row=current_row, column=0, columnspan=3, padx=20, pady=20)
        current_row += 1

        # 7. 进度条
        self.progress_bar = ctk.CTkProgressBar(self, orientation="horizontal", mode="determinate")
        self.progress_bar.grid(row=current_row, column=0, columnspan=3, padx=20, pady=(0, 10), sticky="ew")
        self.progress_bar.set(0)
        current_row += 1

        # 8. 状态标签
        self.label_status = ctk.CTkLabel(self, text="请选择视频和输出目录")
        self.label_status.grid(row=current_row, column=0, columnspan=3, padx=20, pady=(0, 10), sticky="w")

        current_row += 1 # 移到下一行准备放超链接

        self.label_github = ctk.CTkLabel(
            self,
            text=self.github_url,
            text_color="#0078D7", # 亮蓝色,更像超链接
            cursor="hand2"        # 默认显示手形光标
        )
        self.label_github.grid(
            row=current_row,
            column=0,
            columnspan=3, # 跨越所有列
            padx=20,
            pady=(15, 10), # 顶部增加间距,底部保留一点间距
            sticky="s"     # 放在底部居中
        )
        # 绑定点击事件
        self.label_github.bind("<Button-1>", self.open_github_link)

    # --- 回调函数 ---
    def select_video_file(self):
        file_path = tkinter.filedialog.askopenfilename(
            title="选择视频文件",
            filetypes=[("视频文件", "*.mp4 *.avi *.mov *.mkv"), ("所有文件", "*.*")]
        )
        if file_path:
            self.video_path = file_path
            self.entry_video_path.delete(0, tkinter.END)
            self.entry_video_path.insert(0, self.video_path)
            self.update_status(f"已选择视频: {os.path.basename(self.video_path)}")
            self.get_video_resolution(file_path) # 获取并显示分辨率

    def get_video_resolution(self, path):
        """尝试读取视频分辨率并更新标签"""
        cap = None
        try:
            cap = cv2.VideoCapture(path)
            if not cap.isOpened():
                self.update_original_resolution_label("无法打开视频")
                return

            self.original_width = int(cap.get(cv2.CAP_PROP_FRAME_WIDTH))
            self.original_height = int(cap.get(cv2.CAP_PROP_FRAME_HEIGHT))

            if self.original_width > 0 and self.original_height > 0:
                self.update_original_resolution_label(f"{self.original_width} x {self.original_height}")
            else:
                self.update_original_resolution_label("无法读取分辨率")

        except Exception as e:
            print(f"读取分辨率时出错: {e}")
            self.update_original_resolution_label("读取出错")
        finally:
            if cap is not None:
                cap.release() # 确保释放

    def update_original_resolution_label(self, text):
         # 使用 'after' 确保从主线程更新 GUI
        self.after(0, lambda: self.label_original_resolution.configure(text=text))


    def select_output_dir(self):
        dir_path = tkinter.filedialog.askdirectory(title="选择图片保存目录")
        if dir_path:
            self.output_dir = dir_path
            self.entry_output_dir.delete(0, tkinter.END)
            self.entry_output_dir.insert(0, self.output_dir)
            self.update_status(f"已选择输出目录: {self.output_dir}")

    def toggle_interval_entry(self):
        if self.is_processing: return # 处理中不允许切换
        if self.radio_var.get() == 1: # Interval mode selected
            self.entry_interval.configure(state=tkinter.NORMAL)
        else: # All frames mode selected
            self.entry_interval.configure(state=tkinter.DISABLED)

    def toggle_custom_resolution_entries(self):
        if self.is_processing: return # 处理中不允许切换
        is_checked = self.custom_resolution_var.get() == 1
        new_state = tkinter.NORMAL if is_checked else tkinter.DISABLED
        text_color = "white" if is_checked else "gray" # 根据主题可能需要调整

        self.entry_custom_width.configure(state=new_state)
        self.label_custom_width.configure(text_color=text_color)
        self.entry_custom_height.configure(state=new_state)
        self.label_custom_height.configure(text_color=text_color)


    def update_status(self, message):
        self.after(0, lambda: self.label_status.configure(text=message))

    def update_progress(self, value):
        self.after(0, lambda: self.progress_bar.set(value))

    def set_ui_state(self, enabled: bool):
        """启用或禁用UI控件"""
        state = tkinter.NORMAL if enabled else tkinter.DISABLED
        self.is_processing = not enabled

        # 使用 lambda 确保在 after 调用时使用的是正确的 state 值
        self.after(0, lambda s=state: self.button_browse_video.configure(state=s))
        self.after(0, lambda s=state: self.button_browse_output.configure(state=s))
        self.after(0, lambda s=state: self.radio_all.configure(state=s))
        self.after(0, lambda s=state: self.radio_interval.configure(state=s))
        self.after(0, lambda s=state: self.check_custom_res.configure(state=s))

        # 只有在间隔模式启用时才控制间隔输入框
        interval_entry_state = state if self.radio_var.get() == 1 and enabled else tkinter.DISABLED
        self.after(0, lambda s=interval_entry_state: self.entry_interval.configure(state=s))

        # 只有在自定义分辨率启用时才控制自定义输入框
        custom_res_checked = self.custom_resolution_var.get() == 1
        custom_entry_state = state if custom_res_checked and enabled else tkinter.DISABLED
        self.after(0, lambda s=custom_entry_state: self.entry_custom_width.configure(state=s))
        self.after(0, lambda s=custom_entry_state: self.entry_custom_height.configure(state=s))

        # 更新自定义标签颜色
        custom_label_color = "white" if custom_res_checked and enabled else "gray"
        if not enabled: custom_label_color = "gray" # 处理中全部置灰
        self.after(0, lambda c=custom_label_color: self.label_custom_width.configure(text_color=c))
        self.after(0, lambda c=custom_label_color: self.label_custom_height.configure(text_color=c))


        self.after(0, lambda s=state: self.button_start.configure(state=s, text="开始提取" if enabled else "处理中..."))


    def start_extraction_thread(self):
        """启动提取过程的线程"""
        if self.is_processing:
            self.update_status("错误:已经在处理中!")
            return

        self.video_path = self.entry_video_path.get()
        self.output_dir = self.entry_output_dir.get()
        mode = self.radio_var.get()
        interval_str = self.entry_interval.get()
        interval = 1

        use_custom_res = self.custom_resolution_var.get() == 1
        output_width = 0
        output_height = 0

        # --- 输入验证 ---
        if not self.video_path or not os.path.isfile(self.video_path):
            self.update_status("错误:请选择一个有效的视频文件!")
            return
        if not self.output_dir or not os.path.isdir(self.output_dir):
            if self.output_dir:
                try:
                    os.makedirs(self.output_dir, exist_ok=True)
                    self.update_status(f"输出目录不存在,已创建: {self.output_dir}")
                except OSError as e:
                    self.update_status(f"错误:无法创建输出目录: {e}")
                    return
            else:
                self.update_status("错误:请选择一个输出目录!")
                return

        if mode == 1: # Interval mode
            if not interval_str.isdigit() or int(interval_str) < 1:
                self.update_status("错误:帧间隔必须是一个大于等于 1 的整数!")
                return
            interval = int(interval_str)

        if use_custom_res:
            width_str = self.entry_custom_width.get()
            height_str = self.entry_custom_height.get()
            if not width_str.isdigit() or int(width_str) <= 0:
                self.update_status("错误:自定义宽度必须是一个正整数!")
                return
            if not height_str.isdigit() or int(height_str) <= 0:
                self.update_status("错误:自定义高度必须是一个正整数!")
                return
            output_width = int(width_str)
            output_height = int(height_str)

        # --- 禁用 UI 并开始处理 ---
        self.set_ui_state(False)
        self.update_progress(0)
        self.update_status("正在准备提取...")

        # 创建并启动线程
        extraction_thread = threading.Thread(
            target=self.extract_frames,
            args=(self.video_path, self.output_dir, mode, interval,
                  use_custom_res, output_width, output_height), # 传递新参数
            daemon=True
        )
        extraction_thread.start()

    def extract_frames(self, video_path, output_dir, mode, interval,
                       use_custom_res, output_width, output_height): # 接收新参数
        """
        在单独的线程中执行帧提取。
        """
        cap = None # Initialize cap outside try block
        try:
            cap = cv2.VideoCapture(video_path)
            if not cap.isOpened():
                raise IOError(f"无法打开视频文件: {video_path}")

            total_frames = int(cap.get(cv2.CAP_PROP_FRAME_COUNT))
            fps = cap.get(cv2.CAP_PROP_FPS)
            # 读取一次原始分辨率以防万一(虽然应该在选择文件时已经获取)
            original_w = int(cap.get(cv2.CAP_PROP_FRAME_WIDTH))
            original_h = int(cap.get(cv2.CAP_PROP_FRAME_HEIGHT))
            self.update_status(f"视频信息: {original_w}x{original_h}, 共 {total_frames} 帧, FPS: {fps:.2f}")


            frame_count = 0
            saved_count = 0
            step = 1 if mode == 0 else interval

            while True:
                ret, frame = cap.read()
                if not ret:
                    break # 读取结束或发生错误

                frame_count += 1

                # 检查是否需要保存此帧
                if (frame_count - 1) % step == 0:
                    saved_count += 1
                    output_frame = frame # 默认使用原始帧

                    # 如果需要,调整帧大小
                    if use_custom_res and output_width > 0 and output_height > 0:
                        try:
                            # 使用INTER_AREA进行缩放,通用性较好
                            output_frame = cv2.resize(frame, (output_width, output_height), interpolation=cv2.INTER_AREA)
                        except Exception as resize_error:
                            print(f"警告:调整帧 {frame_count} 大小时出错: {resize_error}")
                            # 可以选择跳过此帧或保存原始帧
                            # 这里选择继续尝试保存调整后的帧(如果resize成功但imwrite失败)或跳过(如果resize失败)
                            # 如果希望即使resize失败也保存原始帧,可以将 output_frame = frame 放在 try 外部

                    # 构建文件名并保存
                    filename = f"frame_{saved_count:06d}{self.image_format}"
                    output_path = os.path.join(output_dir, filename)

                    try:
                        success = cv2.imwrite(output_path, output_frame)
                        if not success:
                            print(f"警告:无法写入帧 {frame_count} 到 {output_path}")
                    except Exception as write_error:
                        print(f"警告:写入帧 {frame_count} 到 {output_path} 时发生异常: {write_error}")
                        # 考虑是否需要更强的错误处理,例如停止进程

                # 更新进度条和状态
                if frame_count % max(1, total_frames // 100) == 0 or frame_count == total_frames:
                    progress = frame_count / total_frames
                    self.update_progress(progress)
                    self.update_status(f"处理中: {frame_count}/{total_frames}帧 | 已保存: {saved_count}帧")

            # 确保进度条最终为100%
            self.update_progress(1.0)
            resolution_info = f"{output_width}x{output_height}" if use_custom_res else "原始分辨率"
            self.update_status(f"提取完成!共处理 {frame_count} 帧,成功保存 {saved_count} 帧 ({resolution_info}) 到 {output_dir}")

        except Exception as e:
            self.update_status(f"提取过程中发生错误: {e}")
            self.update_progress(0) # 出错时重置或保持进度
        finally:
            if cap is not None and cap.isOpened():
                cap.release()
            # 无论成功还是失败,都要重新启用 UI
            self.set_ui_state(True)

        # --- 新增:打开 GitHub 链接的回调 ---
    def open_github_link(self, event=None): # event 参数是 bind 传过来的,可以不用
        """在默认浏览器中打开 GitHub 仓库链接"""
        try:
            webbrowser.open_new_tab(self.github_url)
            self.update_status(f"正在打开: {self.github_url}") # 给用户反馈
        except Exception as e:
            self.update_status(f"无法打开链接: {e}")
            print(f"Error opening URL: {e}") # 在控制台打印错误

# --- 启动应用 ---
if __name__ == "__main__":
    # GitHub项目地址:https://github.com/dependon/video2png
    app = FrameExtractorApp()
    app.mainloop()
    # GitHub项目地址:https://github.com/dependon/video2png
依赖
pip install opencv-python-headless customtkinter Pillow