文章目录
功能
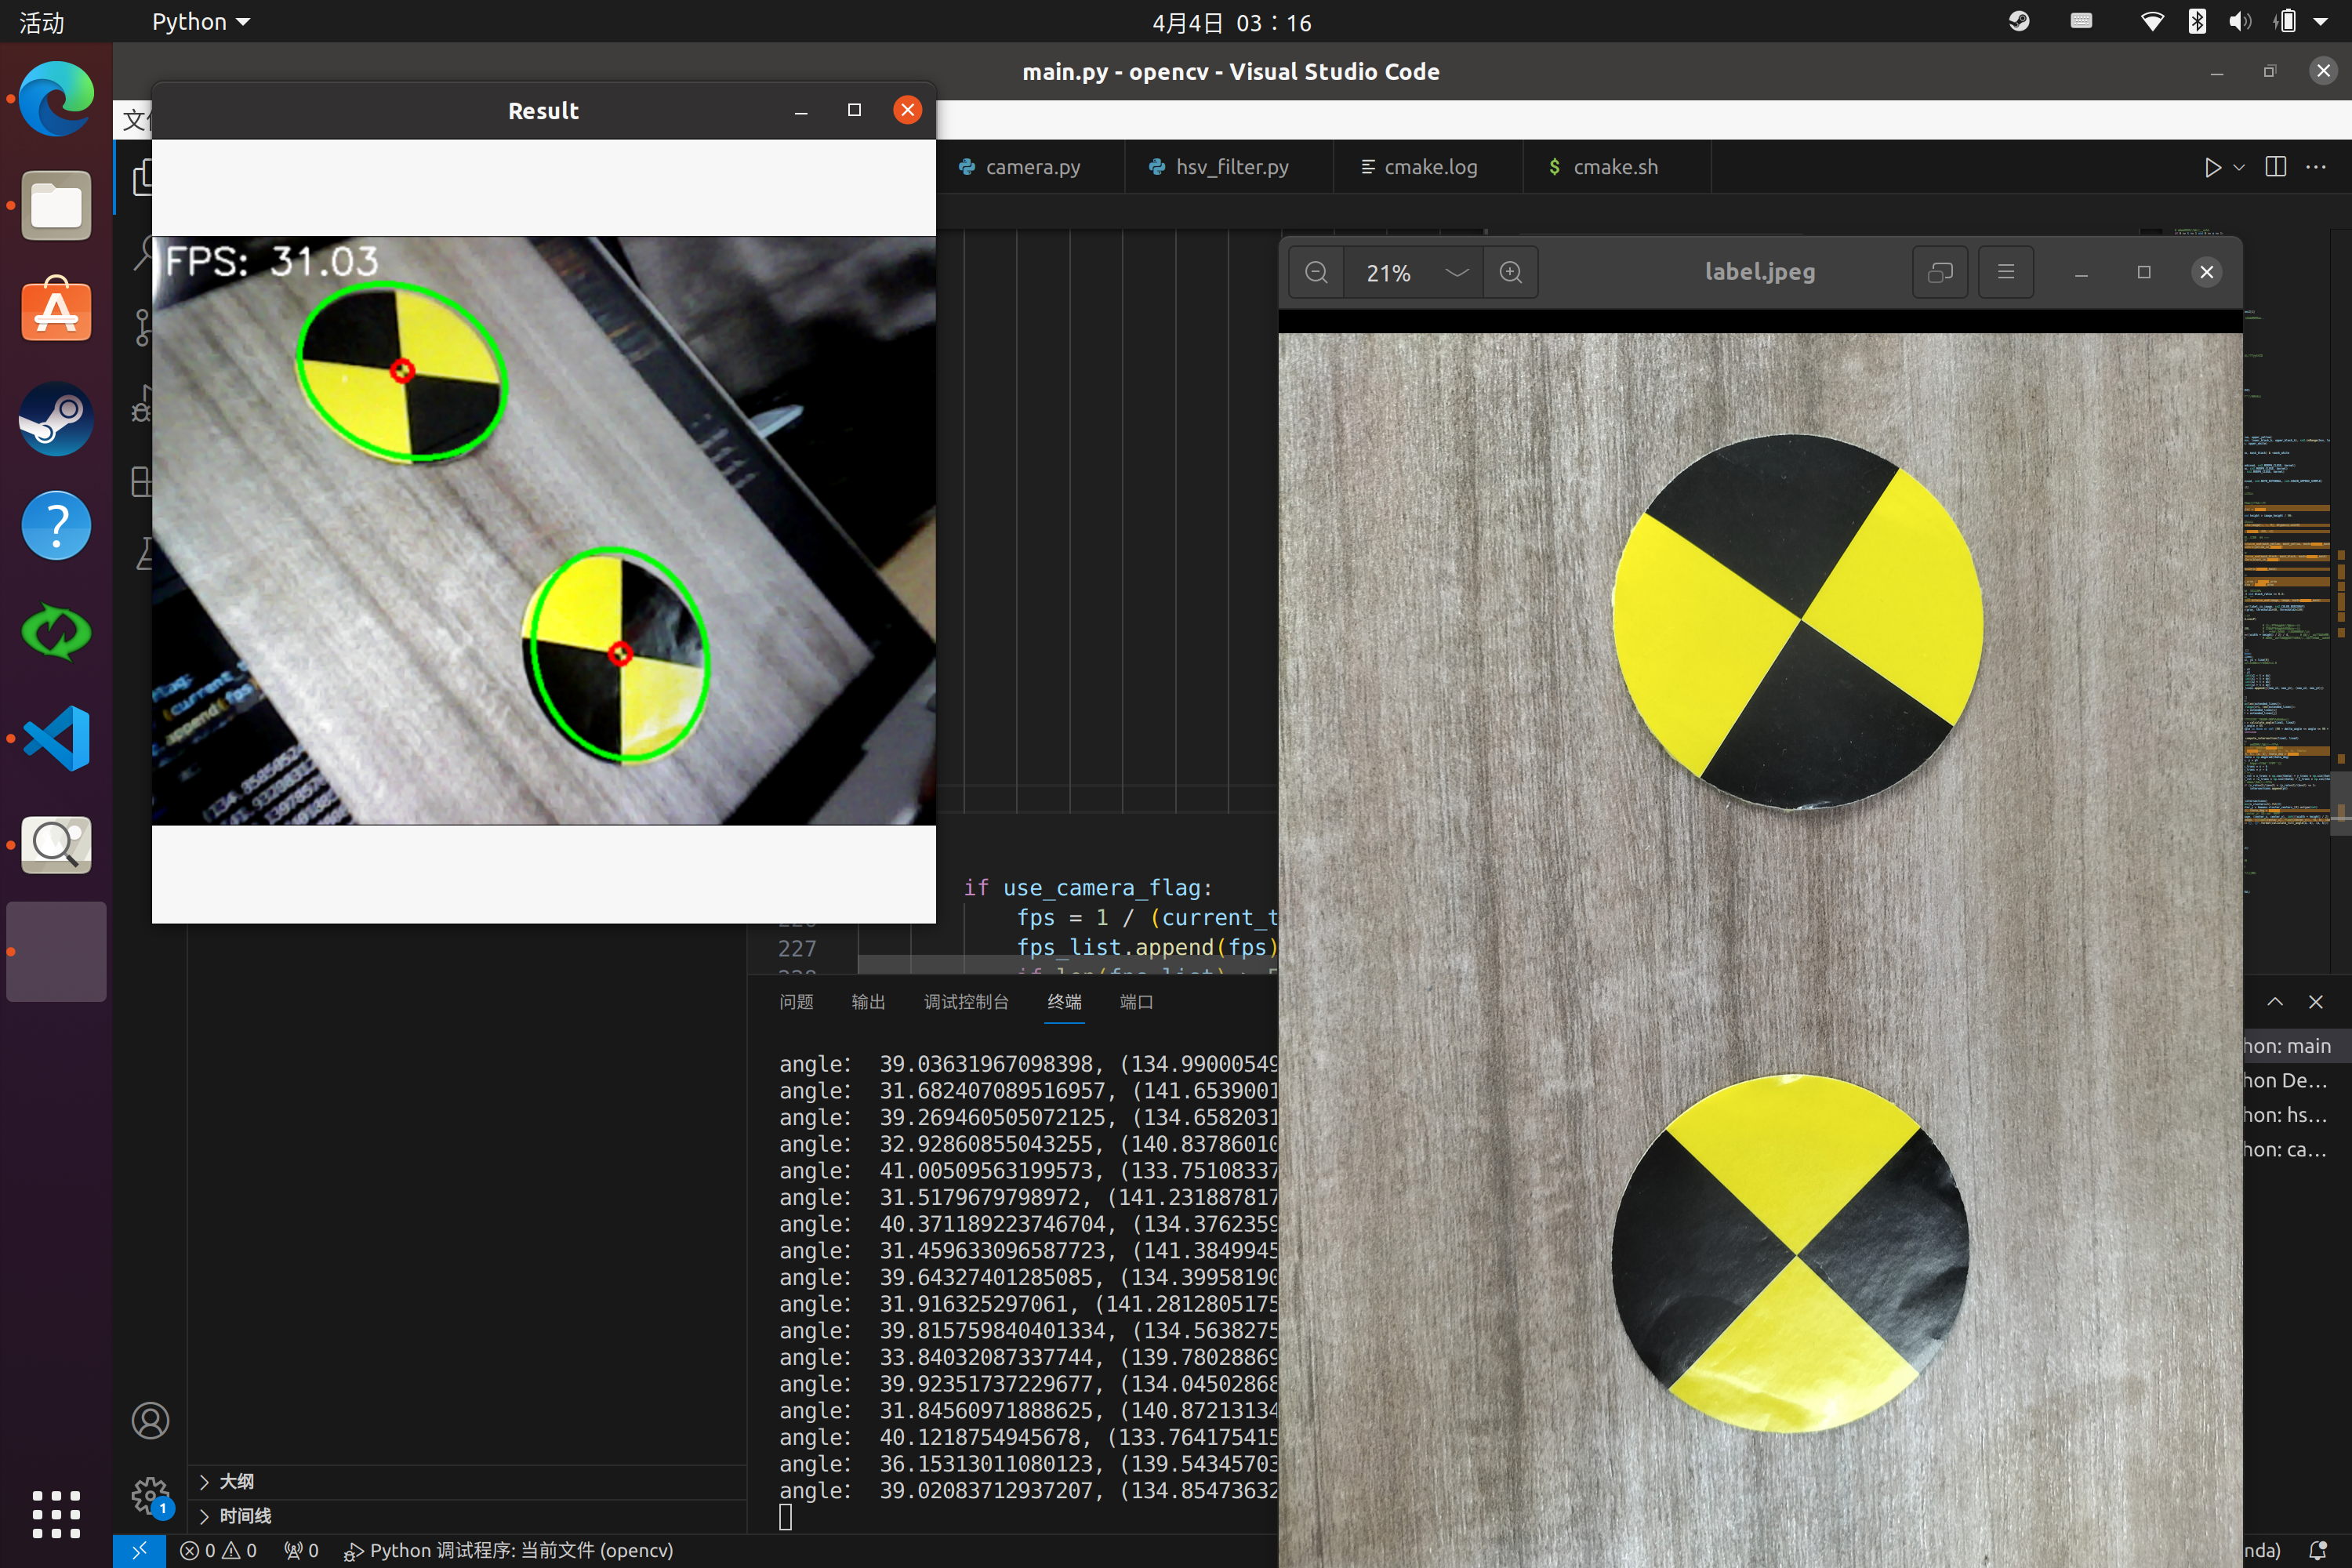
实现对形似宝马标的黄黑四象限光学识别标定位
背景
大学同学遇到了这个场景,琢磨了下,以备不时之需。
代码
所用opencv版本:4.12
numpy==2.2.4
scikit_learn==1.6.1
python3
import time
import cv2
import numpy as np
import math
from sklearn.cluster import KMeans

def calculate_tilt_angle(a, b):
    # 确保 a >= b
    if a < b:
        a, b = b, a

    # 计算倾斜角度(弧度)
    theta_rad = math.acos(b / a)

    # 转为角度
    theta_deg = math.degrees(theta_rad)
    return theta_deg

def compute_intersection(line1, line2):
    """计算两条直线的交点"""
    (x1, y1), (x2, y2) = line1
    (x3, y3), (x4, y4) = line2

    # 计算分母
    den = (x1 - x2) * (y3 - y4) - (y1 - y2) * (x3 - x4)
    if den == 0:  # 直线平行
        return None

    # 计算交点坐标
    t = ((x1 - x3) * (y3 - y4) - (y1 - y3) * (x3 - x4)) / den
    u = -((x1 - x2) * (y1 - y3) - (y1 - y2) * (x1 - x3)) / den

    # 判断交点是否在线段内
    if 0 <= t <= 1 and 0 <= u <= 1:
        x = x1 + t * (x2 - x1)
        y = y1 + t * (y2 - y1)
        return (int(x), int(y))
    else:
        return None

def calculate_angle(line1, line2):
    """计算两条线段之间的夹角(度数)"""
    # 提取线段端点坐标
    (x1, y1), (x2, y2) = line1
    (x3, y3), (x4, y4) = line2

    # 计算方向向量
    vec1 = (x2 - x1, y2 - y1)
    vec2 = (x4 - x3, y4 - y3)

    # 计算向量模长
    mod1 = np.sqrt(vec1[0]**2 + vec1[1]**2)
    mod2 = np.sqrt(vec2[0]**2 + vec2[1]**2)

    if mod1 == 0 or mod2 == 0:
        return None  # 无效向量(线段长度为0)

    # 计算点积和夹角余弦
    dot_product = vec1[0] * vec2[0] + vec1[1] * vec2[1]
    cos_theta = dot_product / (mod1 * mod2)
    cos_theta = np.clip(cos_theta, -1.0, 1.0)  # 处理浮点误差

    # 计算角度(0°~180°)
    angle = np.degrees(np.arccos(cos_theta))
    return angle

if __name__ == '__main__':
    use_camera_flag = 1
    fps_list = []
    prev_time = 0

    if use_camera_flag:
        cap = cv2.VideoCapture(2)   # 自己修改为摄像头对应ID
    while True:
        if use_camera_flag:
            current_time = time.time()
            ret, image = cap.read()
        else:
            # 读取图像
            image = cv2.imread("label.jpeg")
            # image = cv2.imread("label0.png")
            # image = cv2.imread("label1.png")
            # image = cv2.imread("label2.jpeg")
        hsv = cv2.cvtColor(image, cv2.COLOR_BGR2HSV)

        # 定义黄色和黑色的HSV阈值范围(需根据实际图像调整)
        lower_yellow = np.array([20, 100, 100])
        upper_yellow = np.array([40, 255, 255])

        lower_black_h = np.array([35,10,0])
        upper_black_h = np.array([120,230,255])
        lower_black_l = np.array([0,0,0])
        upper_black_l = np.array([120,120,60])

        lower_white = np.array([0,0,125])
        upper_white = np.array([180,50,255])

        # 创建黄色和黑色的掩模
        mask_yellow = cv2.inRange(hsv, lower_yellow, upper_yellow)
        mask_black = cv2.bitwise_or(cv2.inRange(hsv, lower_black_h, upper_black_h), cv2.inRange(hsv, lower_black_l, upper_black_l))
        mask_white = cv2.inRange(hsv, lower_white, upper_white)

        # 合并黑黄区域的掩模并减去白色部分的掩模
        mask_combined = cv2.bitwise_or(mask_yellow, mask_black) & ~mask_white

        # 形态学操作(去噪+连接区域)
        kernel = np.ones((5,5), np.uint8)
        mask_processed = cv2.morphologyEx(mask_combined, cv2.MORPH_CLOSE, kernel)
        mask_yellow = cv2.morphologyEx(mask_yellow, cv2.MORPH_CLOSE, kernel)
        mask_black = cv2.morphologyEx(mask_black, cv2.MORPH_CLOSE, kernel)

        # 查找轮廓
        contours, _ = cv2.findContours(mask_processed, cv2.RETR_EXTERNAL, cv2.CHAIN_APPROX_SIMPLE)

        image_height, image_width = image.shape[:2]

        # 筛选最大轮廓(假设标记是图像中最显著的物体)
        if contours:
            for cnt in contours:
                if len(cnt) >= 5:  # 至少需要5个点才能拟合椭圆
                    ellipse = cv2.fitEllipse(cnt)
                    (center, (width, height), angle) = ellipse
                    # 过滤条件:长宽均大于阈值
                    if width > image_width / 50 and height > image_height / 50:

                        # 创建空白掩膜(与原图同尺寸)
                        ellipse_mask = np.zeros_like(image[:, :, 0], dtype=np.uint8)
                        # 绘制填充的椭圆(白色)
                        cv2.ellipse(ellipse_mask, ellipse, 255, -1)

                        # --- 计算椭圆区域内的黄色和黑色占比 ---
                        # 提取椭圆区域内的黄色部分
                        yellow_in_ellipse = cv2.bitwise_and(mask_yellow, mask_yellow, mask=ellipse_mask)
                        yellow_area = cv2.countNonZero(yellow_in_ellipse)

                        # 提取椭圆区域内的黑色部分
                        black_in_ellipse = cv2.bitwise_and(mask_black, mask_black, mask=ellipse_mask)
                        black_area = cv2.countNonZero(black_in_ellipse)

                        # 计算椭圆总面积
                        ellipse_area = cv2.countNonZero(ellipse_mask)

                        # 计算比例(避免除零错误)
                        if ellipse_area > 0:
                            yellow_ratio = yellow_area / ellipse_area
                            black_ratio = black_area / ellipse_area

                            # 过滤条件:黄黑区域各占至少30%
                            if yellow_ratio >= 0.3 and black_ratio >= 0.3:
                                # 使用椭圆掩膜提取原图
                                label_in_image = cv2.bitwise_and(image, image, mask=ellipse_mask)

                                gray = cv2.cvtColor(label_in_image, cv2.COLOR_BGR2GRAY)
                                edges = cv2.Canny(gray, threshold1=50, threshold2=150)

                                # 直线检测与交点计算
                                lines = cv2.HoughLinesP(
                                    edges,
                                    rho=1,                  # 距离分辨率(像素单位)
                                    theta=np.pi/180,        # 角度分辨率(弧度单位)
                                    threshold=50,           # 检测阈值(累加器投票数阈值)
                                    minLineLength=((width + height) / 2) / 4,       # 最小线段长度(短于此长度的线段被丢弃)
                                    maxLineGap=10           # 允许线段间的最大间隔(小于此间隔的线段合并)
                                )

                                # 延长线段
                                extended_lines = []
                                if lines is not None:
                                    for line in lines:
                                        x1, y1, x2, y2 = line[0]
                                        # 延长线段,例如延长比例t=1.0
                                        t=1.0
                                        dx = x2 - x1
                                        dy = y2 - y1
                                        new_x1 = int(x1 - t * dx)
                                        new_y1 = int(y1 - t * dy)
                                        new_x2 = int(x2 + t * dx)
                                        new_y2 = int(y2 + t * dy)
                                        extended_lines.append([(new_x1, new_y1), (new_x2, new_y2)])

                                # 计算交点
                                intersections = []
                                if extended_lines:
                                    for i in range(len(extended_lines)):
                                        for j in range(i+1, len(extended_lines)):
                                            line1 = extended_lines[i]
                                            line2 = extended_lines[j]

                                            # 计算夹角并过滤5°~175°以外的结果
                                            angle = calculate_angle(line1, line2)
                                            delta_angle = 85
                                            if angle is None or not (90 - delta_angle <= angle <= 90 + delta_angle):
                                                continue

                                            pt = compute_intersection(line1, line2)
                                            if pt:
                                                # 检查交点是否在椭圆内
                                                # 椭圆参数来自ellipse变量
                                                # ellipse的格式是((h, k), (a, b), theta)
                                                (h, k), (a, b), theta_deg = ellipse
                                                theta = np.deg2rad(theta_deg)
                                                x, y = pt
                                                # 转换到椭圆的标准坐标系
                                                x_trans = x - h
                                                y_trans = y - k
                                                # 旋转
                                                x_rot = x_trans * np.cos(theta) + y_trans * np.sin(theta)
                                                y_rot = -x_trans * np.sin(theta) + y_trans * np.cos(theta)
                                                # 判断是否在椭圆内
                                                if (x_rot**2)/(a**2) + (y_rot**2)/(b**2) <= 1:
                                                    intersections.append(pt)

                                # 聚类确定中心
                                if intersections:
                                    X = np.array(intersections)
                                    kmeans = KMeans(n_clusters=1).fit(X)
                                    center_x, center_y = kmeans.cluster_centers_[0].astype(int)
                                    (h, k), (a, b), theta_deg = ellipse
                                    # (center_x, center_y) 即为目标点坐标
                                    cv2.circle(image, (center_x, center_y), int(((width + height) / 2) / 20 + 0.5), (0, 0, 255), int(((width + height) / 2) / 50 + 0.5))
                                    cv2.ellipse(image, ((float(center_x), float(center_y)), (a, b), theta_deg), (0, 255, 0), int(((width + height) / 2) / 50 + 0.5))
                                    print("angle: {}, {}".format(calculate_tilt_angle(a, b), (a, b)))


        if use_camera_flag:
            fps = 1 / (current_time - prev_time)
            fps_list.append(fps)
            if len(fps_list) > 5:
                fps_list.pop(0)
            avg_fps = sum(fps_list) / len(fps_list)
            # 将帧率文本绘制到左上角
            cv2.putText(
                image,
                f"FPS: {fps:.2f}",  # 显示两位小数
                (10, 30),  # 左上角坐标 (x, y)
                cv2.FONT_HERSHEY_SIMPLEX,  # 字体
                1,  # 字体大小
                (255, 255, 255),  # 颜色 (BGR格式,白色)
                2,  # 字体厚度
            )


        # 显示结果
        cv2.namedWindow("Result", cv2.WINDOW_NORMAL)
        cv2.resizeWindow("Result", 500, 500)
        cv2.imshow("Result", image)
        if not use_camera_flag:
            cv2.waitKey(0)
            cv2.destroyAllWindows()
            cv2.imwrite("output.jpg", image)
            break
        else:
            prev_time = current_time
            if cv2.waitKey(1) == ord('q'):
                cap.release()
                break
    cv2.destroyAllWindows()
效果
部分图片取自c++识别象限标 ------ 灯火~


具有一定的抗倾斜能力