目录
[1.efficientNet 网络](#1.efficientNet 网络)
[2. 猫和老鼠](#2. 猫和老鼠)
[3. QT推理](#3. QT推理)
[4. 项目](#4. 项目)
1.efficientNet 网络
本章做了一个视频内容识别的系统
本文选用的模型是efficientNet b0版本
EfficientNet 是 Google 团队在 2019 年提出的一系列高效卷积神经网络模型,其核心思想是通过**复合缩放(Compound Scaling)**方法平衡网络的深度(depth)、宽度(width)和分辨率(resolution),从而在计算资源受限的条件下实现更高的性能。EfficientNet-B0 是该系列的基础模型,后续版本(B1-B7)基于 B0 进行缩放。
EfficientNet-B0 的核心设计
- 基础架构:MobileNet-like + 优化
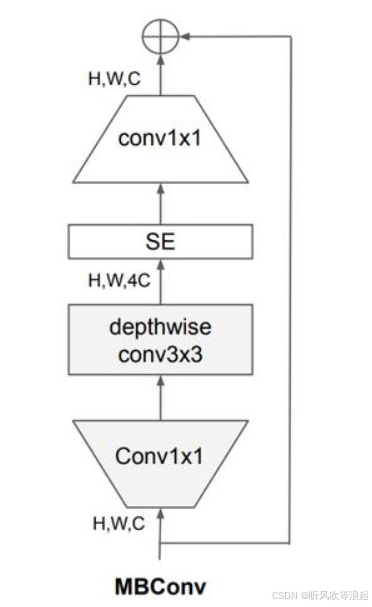
EfficientNet-B0 的骨干网络基于反向残差块(MBConv,Mobile Inverted Bottleneck),类似 MobileNetV2,但通过神经架构搜索(NAS)优化了层结构和连接方式。主要特点包括:
-
MBConv 模块:包含扩展(expansion)、深度可分离卷积(depthwise convolution)和压缩(squeeze-and-excitation)操作。
-
扩展层:先用 1x1 卷积扩展通道数(通常扩展比为 6)。
-
深度可分离卷积:3x3 或 5x5 的逐通道卷积,减少计算量。
-
SE 注意力机制:压缩激励(Squeeze-and-Excitation)模块动态调整通道权重。
-
残差连接:当输入输出维度相同时引入。
-
- 复合缩放(Compound Scaling)
EfficientNet 提出统一的缩放规则,同时调整三个维度:
-
深度(d):网络层数,通过重复堆叠 MBConv 实现。
-
宽度(w):每层的通道数。
-
分辨率(r):输入图像的分辨率(如 224x224 → 更高分辨率)。
缩放公式:
depth:d=αϕ,width:w=βϕ,resolution:r=γϕ
其中 α,β,γα,β,γ 是通过网格搜索确定的基础缩放系数(B0 的 ϕ=1)。
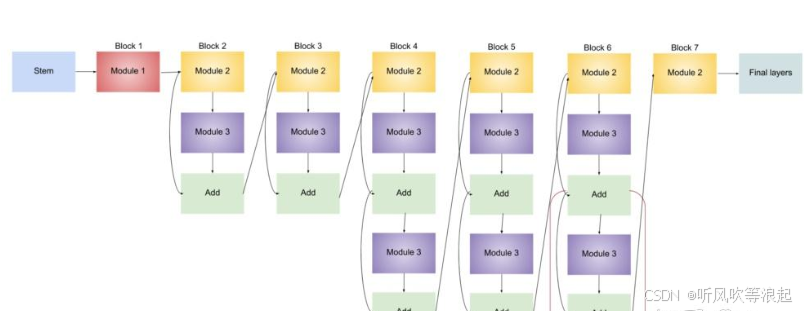
EfficientNet-B0 的具体结构
以下是 B0 的详细层结构(输入分辨率 224x224):
| Stage | Operator | Resolution | Channels | Layers |
|---|---|---|---|---|
| 1 | Conv3x3 | 224x224 | 32 | 1 |
| 2 | MBConv1 (k3x3, stride1) | 112x112 | 16 | 1 |
| 3 | MBConv6 (k3x3, stride2) | 112x112 | 24 | 2 |
| 4 | MBConv6 (k5x5, stride2) | 56x56 | 40 | 2 |
| 5 | MBConv6 (k3x3, stride2) | 28x28 | 80 | 3 |
| 6 | MBConv6 (k5x5, stride1) | 14x14 | 112 | 3 |
| 7 | MBConv6 (k5x5, stride2) | 14x14 | 192 | 4 |
| 8 | MBConv6 (k3x3, stride1) | 7x7 | 320 | 1 |
| 9 | Conv1x1 + Pooling + FC | 7x7 | 1280 | 1 |
-
k :卷积核大小,stride :步长,MBConv6:扩展比为 6 的 MBConv 模块。
-
最后一层使用 1x1 卷积升维到 1280 通道,接全局平均池化和全连接分类层。
关键创新点
-
MBConv + SE 模块:
-
深度可分离卷积减少计算量。
-
SE 模块(通道注意力)提升特征表达能力。
-
-
复合缩放:
- 平衡深度、宽度、分辨率,避免单一维度的过度缩放导致性能饱和。
-
神经架构搜索(NAS):
- 基于 AutoML 搜索最优的基础结构(B0),再通过缩放得到 B1-B7。
性能对比
-
参数量:B0 仅 5.3M 参数,比 ResNet-50(25.5M)少 5 倍。
-
准确率 :在 ImageNet 上达到 77.1% top-1 准确率(ResNet-50 为 76%),FLOPs 仅 0.39B。
应用场景
-
移动端/边缘设备:因低计算开销和高效率。
-
迁移学习:作为特征提取器用于下游任务(如检测、分割)。
代码实现(PyTorch 示例)
import torch
from efficientnet_pytorch import EfficientNet

model = EfficientNet.from_pretrained('efficientnet-b0')
input = torch.randn(1, 3, 224, 224)
output = model(input)
print(output.shape)  # [1, 1000]
EfficientNet-B0 通过智能设计和缩放策略,实现了在小模型中的卓越性能,成为轻量级网络的标杆之一。后续的 EfficientNetV2 进一步优化了训练速度和精度。
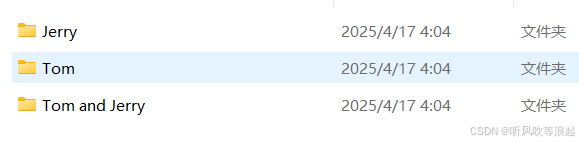
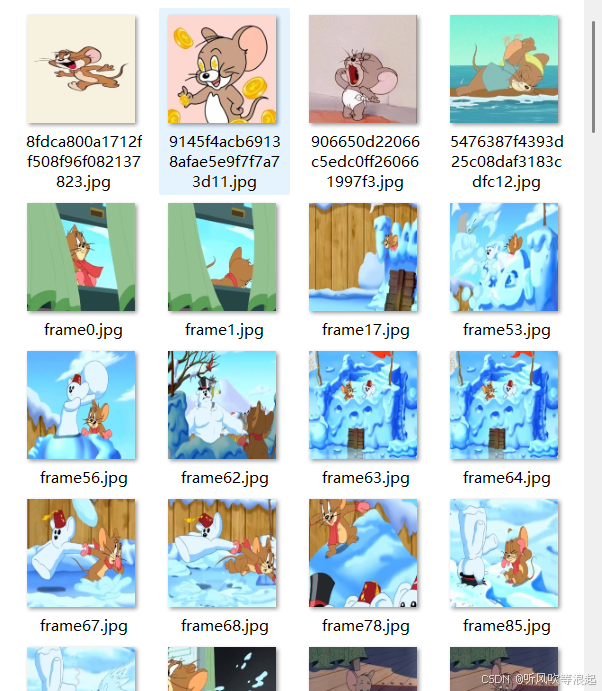
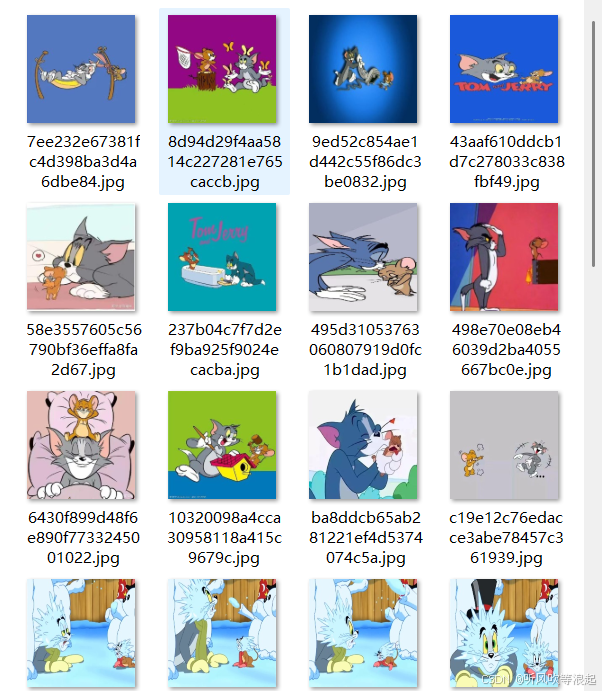
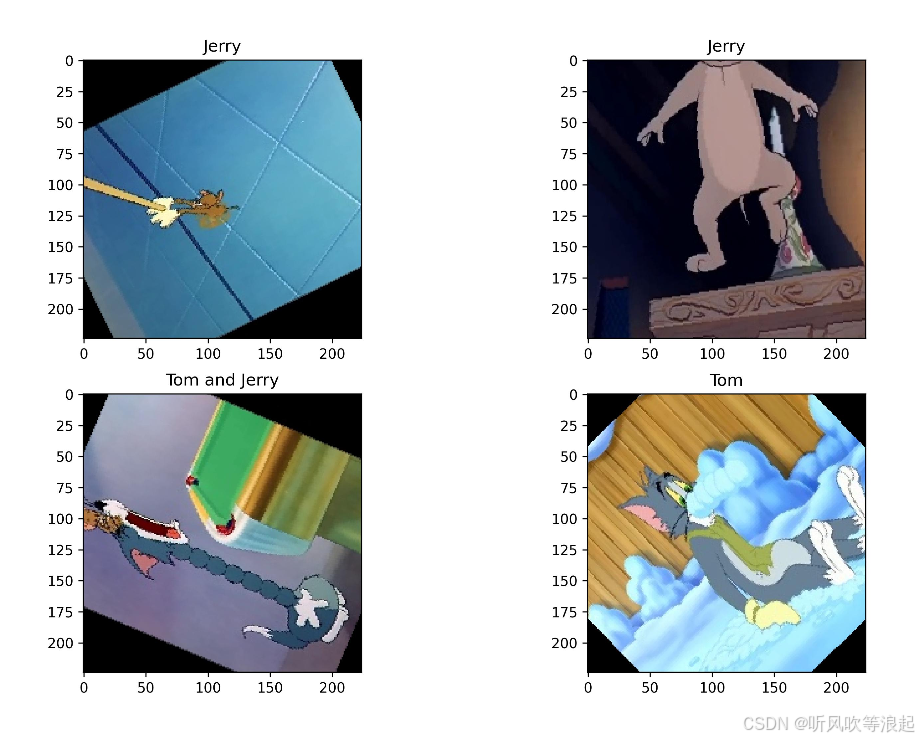
2. 猫和老鼠
数据集这里用的是猫和老鼠的例子:

训练参数在这里:
python
parser.add_argument("--model", default='b0', type=str,help='b0')
parser.add_argument("--pretrained", default=False, type=bool) # 采用官方权重
parser.add_argument("--freeze_layers", default=False, type=bool) # 冻结权重
parser.add_argument("--batch-size", default=8, type=int)
parser.add_argument("--epochs", default=200, type=int)
parser.add_argument("--optim", default='Adam', type=str,help='SGD,Adam,AdamW') # 优化器选择
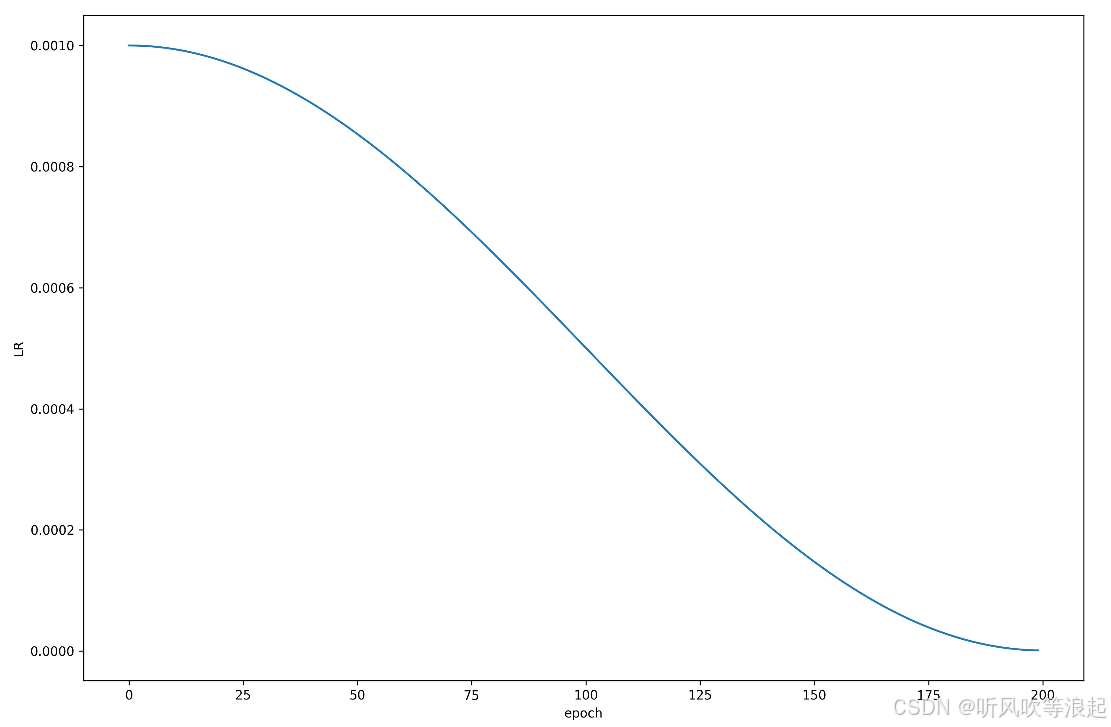
parser.add_argument('--lr', default=0.001, type=float)
parser.add_argument('--lrf',default=0.001,type=float) # 最终学习率 = lr * lrf
parser.add_argument('--save_ret', default='runs', type=str) # 保存结果
parser.add_argument('--data_train',default='./data/train',type=str) # 训练集路径
parser.add_argument('--data_val',default='./data/val',type=str) # 测试集路径这里不多介绍了,大概训练的流程和本专栏的差不多


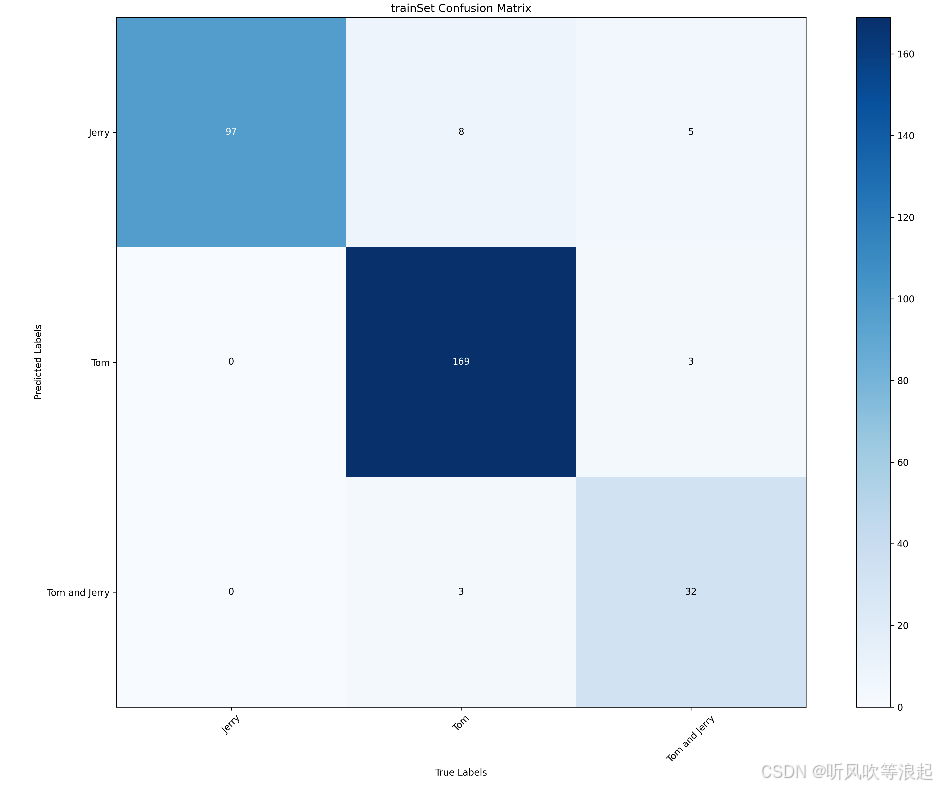
最后一个epoch:
python
    "epoch:199": {
        "train info": {
            "accuracy": 0.9873817034388839,
            "Jerry": {
                "Precision": 0.9798,
                "Recall": 1.0,
                "Specificity": 0.9909,
                "F1 score": 0.9898
            },
            "Tom": {
                "Precision": 0.9944,
                "Recall": 0.9889,
                "Specificity": 0.9927,
                "F1 score": 0.9916
            },
            "Tom and Jerry": {
                "Precision": 0.9744,
                "Recall": 0.95,
                "Specificity": 0.9964,
                "F1 score": 0.962
            },
            "mean precision": 0.9828666666666667,
            "mean recall": 0.9796333333333335,
            "mean specificity": 0.9933333333333333,
            "mean f1 score": 0.9811333333333333
        },
        "valid info": {
            "accuracy": 0.7619047617838246,
            "Jerry": {
                "Precision": 0.8333,
                "Recall": 0.9091,
                "Specificity": 0.9024,
                "F1 score": 0.8696
            },
            "Tom": {
                "Precision": 0.7187,
                "Recall": 0.8846,
                "Specificity": 0.7568,
                "F1 score": 0.7931
            },
            "Tom and Jerry": {
                "Precision": 0.7143,
                "Recall": 0.3333,
                "Specificity": 0.9583,
                "F1 score": 0.4545
            },
            "mean precision": 0.7554333333333334,
            "mean recall": 0.7090000000000001,
            "mean specificity": 0.8725,
            "mean f1 score": 0.7057333333333333
        }
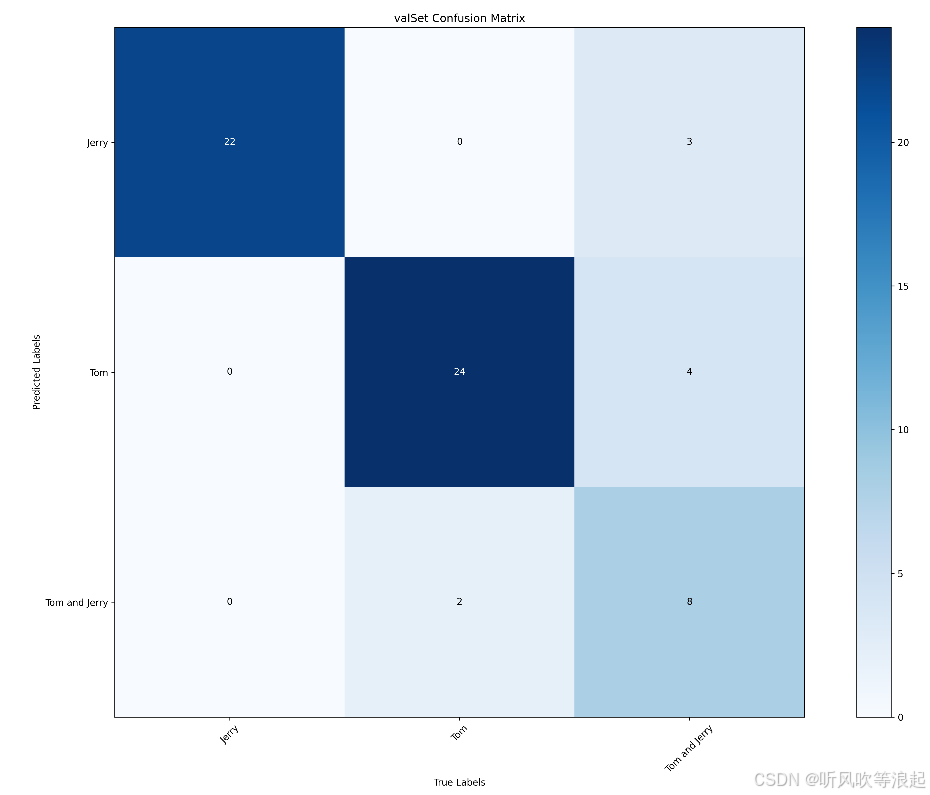
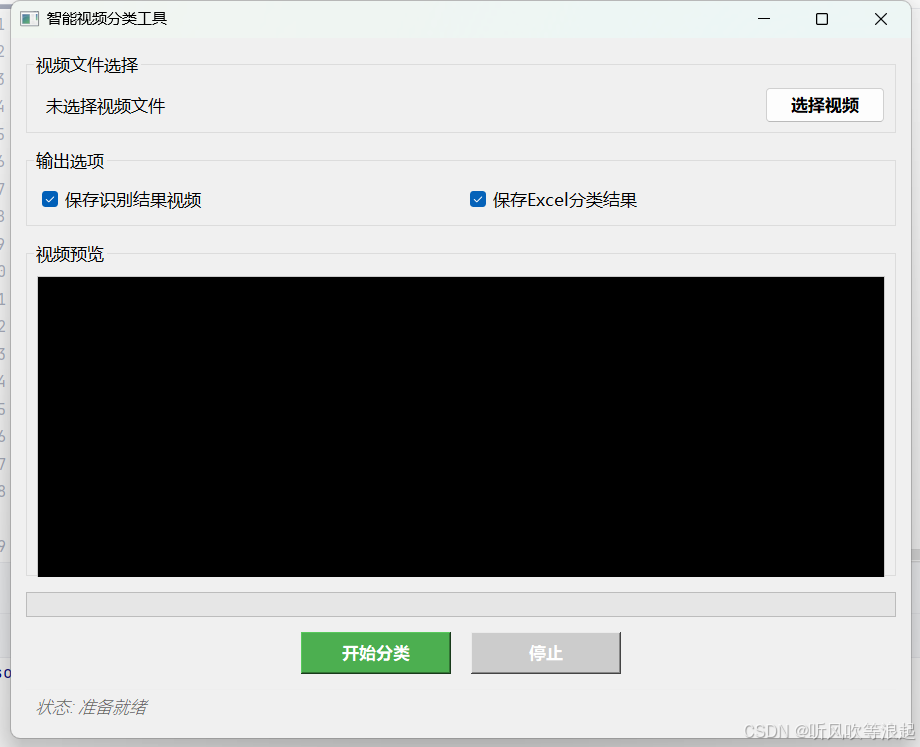
3. QT推理
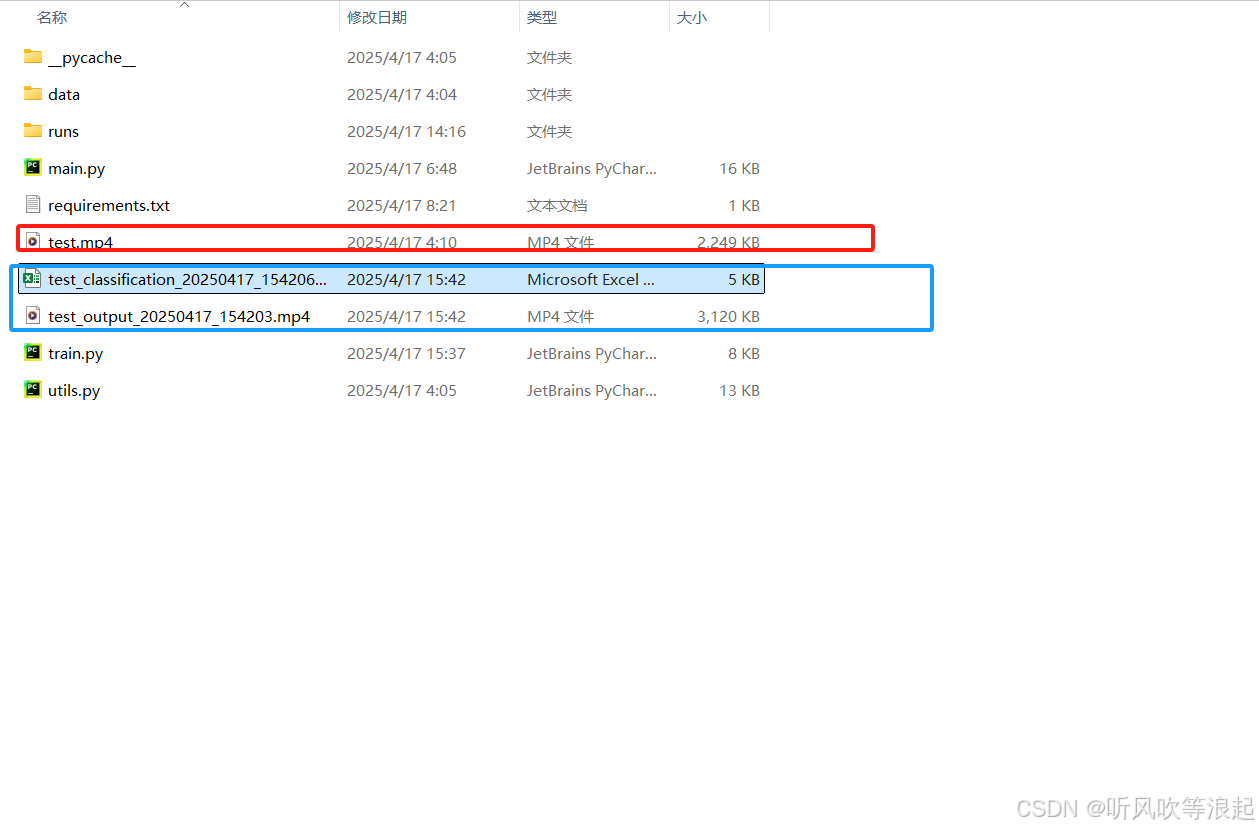
运行结果:
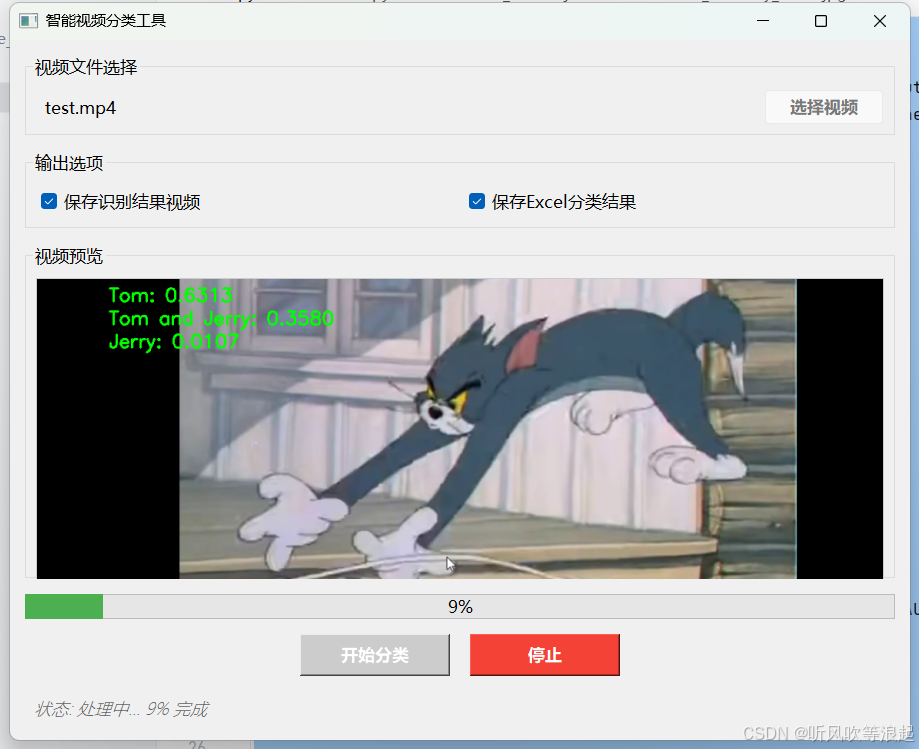
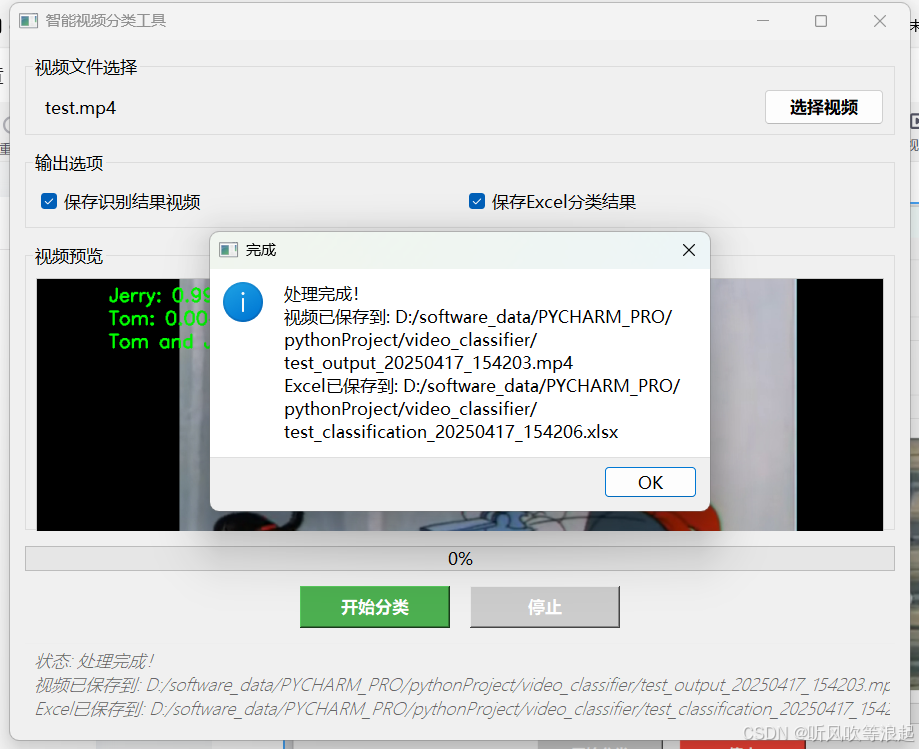
生成的视频:
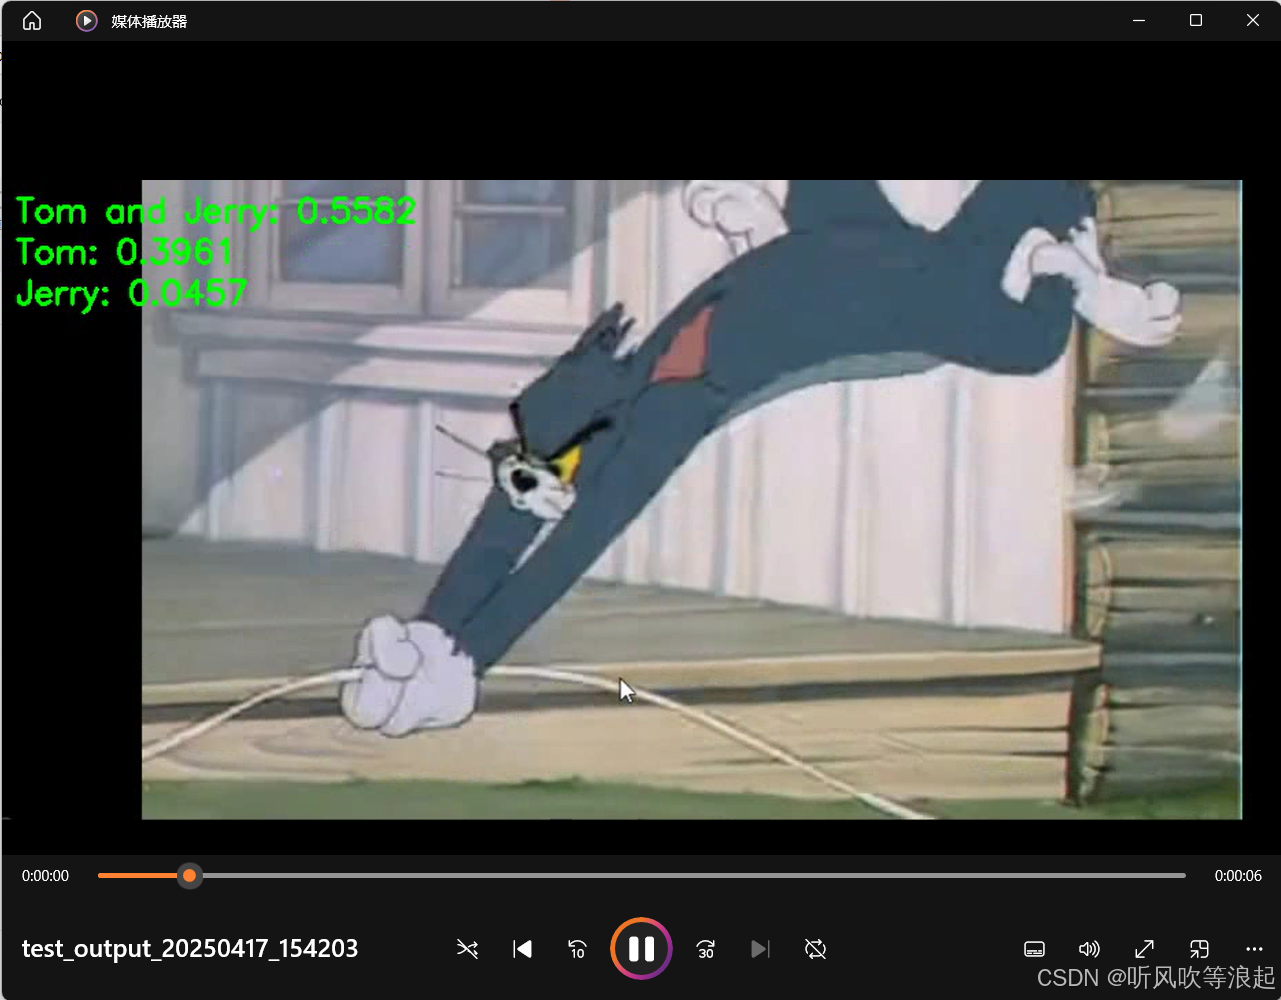
视频检测记录:

代码参考:
python
import os
import sys
from PyQt5.QtWidgets import (QApplication, QMainWindow, QVBoxLayout, QHBoxLayout,
                             QPushButton, QLabel, QFileDialog, QCheckBox, QWidget,
                             QProgressBar, QMessageBox, QGroupBox, QSpacerItem,
                             QSizePolicy)
from PyQt5.QtCore import Qt, QThread, pyqtSignal
from PyQt5.QtGui import QImage, QPixmap, QFont
import cv2
from PIL import Image
from openpyxl import Workbook
from openpyxl.styles import Font
import datetime
import torch
import torchvision.models as m
from torchvision import transforms


def create_model(model,num,weights):

    net = m.efficientnet_b0(weights=m.EfficientNet_B0_Weights.DEFAULT if weights else False,progress=True)
    tmp = list(net.classifier)[-1].in_features
    net.classifier = torch.nn.Linear(tmp,num,bias=True)

    return net


def data_trans(train_mean=[0.485, 0.456, 0.406], train_std=[0.229, 0.224, 0.225]):
    train_transform = transforms.Compose([transforms.Resize(256),
                                          transforms.RandomRotation(90),                # 随机旋转
                                          transforms.CenterCrop(224),
                                          transforms.ToTensor(),
                                          transforms.Normalize(train_mean, train_std)])

    test_transform = transforms.Compose([transforms.Resize(256),transforms.CenterCrop(224),
                                         transforms.ToTensor(),transforms.Normalize(train_mean, train_std)])

    return train_transform,test_transform


def get_device():
    device = torch.device("cuda" if torch.cuda.is_available() else "cpu")
    print("Using device is: ", device)
    return device


class VideoProcessor(QThread):
    update_frame = pyqtSignal(QImage)
    update_progress = pyqtSignal(int)
    finished_processing = pyqtSignal(str, str)  # 修改为返回两个路径
    error_occurred = pyqtSignal(str)

    def __init__(self, video_path, save_video, save_excel):
        super().__init__()
        self.video_path = video_path
        self.save_video = save_video
        self.save_excel = save_excel
        self.running = True

    def run(self):
        output_video_path = ""
        output_excel_path = ""

        try:
            device = get_device()
            _, data_transform = data_trans()

            labels = {"0": "Jerry","1": "Tom","2": "Tom and Jerry"}

            # 创建模型
            net = create_model(model='b0', num=len(labels), weights=False)
            net.load_state_dict(torch.load('./runs/weights/best.pth'), strict=False)
            net.to(device)
            net.eval()

            # 视频输入
            cap = cv2.VideoCapture(self.video_path)
            if not cap.isOpened():
                self.error_occurred.emit("无法打开视频文件")
                return

            # 获取视频信息
            fps = cap.get(cv2.CAP_PROP_FPS)
            width = int(cap.get(cv2.CAP_PROP_FRAME_WIDTH))
            height = int(cap.get(cv2.CAP_PROP_FRAME_HEIGHT))
            total_frames = int(cap.get(cv2.CAP_PROP_FRAME_COUNT))

            # 创建Excel工作簿(如果需要)
            if self.save_excel:
                wb = Workbook()
                ws = wb.active
                ws.title = "Video Classification Results"
                headers = ["时间范围(秒)", "识别类别"]
                for col, header in enumerate(headers, 1):
                    ws.cell(row=1, column=col, value=header).font = Font(bold=True)

            # 创建视频输出(如果需要)
            if self.save_video:
                timestamp = datetime.datetime.now().strftime("%Y%m%d_%H%M%S")
                output_video_path = os.path.splitext(self.video_path)[0] + f"_output_{timestamp}.mp4"
                fourcc = cv2.VideoWriter_fourcc(*'mp4v')
                out = cv2.VideoWriter(output_video_path, fourcc, fps, (width, height))

            current_second = -1
            row_idx = 2
            last_class = None
            start_time = 0
            end_time = 0

            frame_count = 0
            with torch.no_grad():
                while self.running and cap.isOpened():
                    ret, frame = cap.read()
                    if not ret:
                        if last_class is not None and self.save_excel:
                            time_range = f"{start_time}~{end_time}" if start_time != end_time else str(start_time)
                            ws.cell(row=row_idx, column=1, value=time_range)
                            ws.cell(row=row_idx, column=2, value=last_class)
                        break

                    frame_count += 1
                    progress = int((frame_count / total_frames) * 100)
                    self.update_progress.emit(progress)

                    current_time = frame_count / fps
                    second = int(current_time)

                    # 转换帧为PIL Image并进行预处理
                    pil_img = Image.fromarray(cv2.cvtColor(frame, cv2.COLOR_BGR2RGB))
                    img = data_transform(pil_img)
                    img = torch.unsqueeze(img, dim=0)

                    # 预测
                    output = net(img.to(device))
                    output = torch.softmax(output, dim=1)
                    p, index = torch.topk(output, k=3)
                    current_class = labels[str(index.to("cpu").numpy()[0][0])]

                    # 在左上角显示三个类别的概率
                    text_y = 30
                    for i in range(3):
                        class_idx = index.to("cpu").numpy()[0][i]
                        class_name = labels[str(class_idx)]
                        prob = p.to("cpu").numpy()[0][i]
                        text = f'{class_name}: {prob:.4f}'
                        cv2.putText(frame, text, (10, text_y), cv2.FONT_HERSHEY_SIMPLEX, 0.8, (0, 255, 0), 2)
                        text_y += 30

                    # 每秒检查一次结果
                    if second != current_second:
                        current_second = second

                        if current_class != last_class:
                            if last_class is not None and self.save_excel:
                                time_range = f"{start_time}~{end_time}" if start_time != end_time else str(start_time)
                                ws.cell(row=row_idx, column=1, value=time_range)
                                ws.cell(row=row_idx, column=2, value=last_class)
                                row_idx += 1
                            start_time = second
                            last_class = current_class
                        end_time = second

                    # 转换为Qt图像并发送
                    rgb_image = cv2.cvtColor(frame, cv2.COLOR_BGR2RGB)
                    h, w, ch = rgb_image.shape
                    bytes_per_line = ch * w
                    qt_image = QImage(rgb_image.data, w, h, bytes_per_line, QImage.Format_RGB888)
                    self.update_frame.emit(qt_image)

                    # 保存结果(如果需要)
                    if self.save_video:
                        out.write(frame)

            # 保存Excel文件
            if self.save_excel:
                timestamp = datetime.datetime.now().strftime("%Y%m%d_%H%M%S")
                output_excel_path = os.path.splitext(self.video_path)[0] + f"_classification_{timestamp}.xlsx"
                wb.save(output_excel_path)

            # 释放资源
            cap.release()
            if self.save_video:
                out.release()

            self.finished_processing.emit(output_video_path, output_excel_path)

        except Exception as e:
            self.error_occurred.emit(f"处理过程中发生错误: {str(e)}")

    def stop(self):
        self.running = False


class VideoClassifierApp(QMainWindow):
    def __init__(self):
        super().__init__()
        self.setWindowTitle("智能视频分类工具")
        self.setGeometry(100, 100, 900, 700)
        self.setMinimumSize(800, 600)

        self.video_path = ""

        self.init_ui()
        self.processor = None

    def init_ui(self):
        main_widget = QWidget()
        main_layout = QVBoxLayout()
        main_layout.setContentsMargins(15, 15, 15, 15)
        main_layout.setSpacing(15)

        # 文件选择区域
        file_group = QGroupBox("视频文件选择")
        file_layout = QHBoxLayout()
        file_layout.setContentsMargins(10, 10, 10, 10)

        self.video_label = QLabel("未选择视频文件")
        self.video_label.setStyleSheet("QLabel { padding: 5px; }")
        self.video_label.setMinimumWidth(300)

        self.browse_button = QPushButton("选择视频")
        self.browse_button.setFixedWidth(120)
        self.browse_button.setStyleSheet(
            "QPushButton { padding: 5px; font-weight: bold; }"
            "QPushButton:hover { background-color: #e0e0e0; }"
        )
        self.browse_button.clicked.connect(self.browse_video)

        file_layout.addWidget(self.video_label)
        file_layout.addWidget(self.browse_button)
        file_group.setLayout(file_layout)
        main_layout.addWidget(file_group)

        # 选项区域
        options_group = QGroupBox("输出选项")
        options_layout = QHBoxLayout()
        options_layout.setContentsMargins(10, 10, 10, 10)

        self.save_video_check = QCheckBox("保存识别结果视频")
        self.save_video_check.setChecked(True)
        self.save_video_check.setStyleSheet("QCheckBox { padding: 5px; }")

        self.save_excel_check = QCheckBox("保存Excel分类结果")
        self.save_excel_check.setChecked(True)
        self.save_excel_check.setStyleSheet("QCheckBox { padding: 5px; }")

        options_layout.addWidget(self.save_video_check)
        options_layout.addWidget(self.save_excel_check)
        options_group.setLayout(options_layout)
        main_layout.addWidget(options_group)

        # 视频显示区域
        display_group = QGroupBox("视频预览")
        display_layout = QVBoxLayout()
        display_layout.setContentsMargins(10, 10, 10, 10)

        self.video_display = QLabel()
        self.video_display.setAlignment(Qt.AlignCenter)
        self.video_display.setMinimumSize(640, 360)
        self.video_display.setStyleSheet(
            "QLabel { background-color: black; border: 1px solid #ccc; }"
        )

        display_layout.addWidget(self.video_display)
        display_group.setLayout(display_layout)
        main_layout.addWidget(display_group)

        # 进度条区域
        self.progress_bar = QProgressBar()
        self.progress_bar.setStyleSheet(
            "QProgressBar { height: 20px; text-align: center; }"
            "QProgressBar::chunk { background-color: #4CAF50; }"
        )
        main_layout.addWidget(self.progress_bar)

        # 按钮区域
        button_layout = QHBoxLayout()
        button_layout.setSpacing(20)

        spacer = QSpacerItem(40, 20, QSizePolicy.Expanding, QSizePolicy.Minimum)
        button_layout.addItem(spacer)

        self.start_button = QPushButton("开始分类")
        self.start_button.setFixedWidth(150)
        self.start_button.setStyleSheet(
            "QPushButton { padding: 8px; font-weight: bold; background-color: #4CAF50; color: white; }"
            "QPushButton:hover { background-color: #45a049; }"
            "QPushButton:disabled { background-color: #cccccc; }"
        )
        self.start_button.clicked.connect(self.start_processing)

        self.stop_button = QPushButton("停止")
        self.stop_button.setFixedWidth(150)
        self.stop_button.setStyleSheet(
            "QPushButton { padding: 8px; font-weight: bold; background-color: #f44336; color: white; }"
            "QPushButton:hover { background-color: #d32f2f; }"
            "QPushButton:disabled { background-color: #cccccc; }"
        )
        self.stop_button.clicked.connect(self.stop_processing)
        self.stop_button.setEnabled(False)

        button_layout.addWidget(self.start_button)
        button_layout.addWidget(self.stop_button)
        button_layout.addItem(spacer)

        main_layout.addLayout(button_layout)

        # 状态栏
        self.status_bar = QLabel()
        self.status_bar.setStyleSheet(
            "QLabel { color: #666666; font-style: italic; border-top: 1px solid #eeeeee; padding: 5px; }"
        )
        self.update_status("准备就绪")
        main_layout.addWidget(self.status_bar)

        main_widget.setLayout(main_layout)
        self.setCentralWidget(main_widget)

    def browse_video(self):
        file_path, _ = QFileDialog.getOpenFileName(
            self,
            "选择视频文件",
            "",
            "视频文件 (*.mp4 *.avi *.mov);;所有文件 (*.*)"
        )
        if file_path:
            self.video_path = file_path
            self.video_label.setText(os.path.basename(file_path))
            self.update_status(f"已选择视频: {os.path.basename(file_path)}")

    def start_processing(self):
        if not self.video_path:
            QMessageBox.warning(self, "警告", "请先选择视频文件")
            return

        self.start_button.setEnabled(False)
        self.stop_button.setEnabled(True)
        self.browse_button.setEnabled(False)
        self.update_status("正在处理视频...")

        self.processor = VideoProcessor(
            self.video_path,
            self.save_video_check.isChecked(),
            self.save_excel_check.isChecked()
        )
        self.processor.update_frame.connect(self.update_frame)
        self.processor.update_progress.connect(self.update_progress)
        self.processor.finished_processing.connect(self.processing_finished)
        self.processor.error_occurred.connect(self.show_error)
        self.processor.start()

    def stop_processing(self):
        if self.processor:
            self.processor.stop()
            self.processor = None
        self.reset_ui()
        self.update_status("处理已停止")

    def update_frame(self, image):
        pixmap = QPixmap.fromImage(image)
        self.video_display.setPixmap(pixmap.scaled(
            self.video_display.size(), Qt.KeepAspectRatio, Qt.SmoothTransformation
        ))

    def update_progress(self, value):
        self.progress_bar.setValue(value)
        self.update_status(f"处理中... {value}% 完成")

    def processing_finished(self, video_path, excel_path):
        self.reset_ui()
        message = "处理完成!"
        if video_path:
            message += f"\n视频已保存到: {video_path}"
        if excel_path:
            message += f"\nExcel已保存到: {excel_path}"

        self.update_status(message)
        QMessageBox.information(self, "完成", message)

    def show_error(self, message):
        self.reset_ui()
        self.update_status(f"错误: {message}")
        QMessageBox.critical(self, "错误", message)

    def reset_ui(self):
        self.start_button.setEnabled(True)
        self.stop_button.setEnabled(False)
        self.browse_button.setEnabled(True)
        self.progress_bar.setValue(0)

    def update_status(self, message):
        self.status_bar.setText(f"状态: {message}")

    def closeEvent(self, event):
        if self.processor and self.processor.isRunning():
            self.processor.stop()
            self.processor.wait()
        event.accept()


if __name__ == '__main__':
    os.environ['KMP_DUPLICATE_LIB_OK'] = 'True'
    app = QApplication(sys.argv)

    # 设置全局字体
    font = QFont()
    font.setFamily("Microsoft YaHei")
    font.setPointSize(10)
    app.setFont(font)

    window = VideoClassifierApp()
    window.show()
    sys.exit(app.exec_())
4. 项目
下载地址:猫和老鼠
关于图像分类、分割网络的改进:图像分类网络改进_听风吹等浪起的博客-CSDN博客