文章目录
- 类描述
- 构造方法
- 主要方法
-
- [1. 基础属性](#1. 基础属性)
- [2. 边界操作](#2. 边界操作)
- [3. 几何运算](#3. 几何运算)
- [4. 坐标调整](#4. 坐标调整)
- [5. 转换方法](#5. 转换方法)
- [6. 状态判断](#6. 状态判断)
- 类特点总结
-
- [1. 浮点精度:](#1. 浮点精度:)
- [2. 坐标系统:](#2. 坐标系统:)
- [3. 有效性判断:](#3. 有效性判断:)
- [4. 几何运算:](#4. 几何运算:)
- [5. 类型转换:](#5. 类型转换:)
- [6. 特殊处理:](#6. 特殊处理:)
- 典型应用场景
-
- [1. 图形碰撞检测:](#1. 图形碰撞检测:)
- [2. 动态布局调整:](#2. 动态布局调整:)
- [3. 高精度绘图:](#3. 高精度绘图:)
- [4. 动画路径计算:](#4. 动画路径计算:)
- 注意事项
-
- [1. 坐标系差异:](#1. 坐标系差异:)
- [2. 精度转换:](#2. 精度转换:)
- [3. 性能优化:](#3. 性能优化:)
- [4. 异常处理:](#4. 异常处理:)
- [5. 边界情况:](#5. 边界情况:)
- 附:与QRect核心区别
类描述
QRectF类使用浮点精度定义平面上的矩形,继承自Shiboken.Object。用于图形界面开发中高精度矩形区域操作。
构造方法
python
# 通过坐标构造
rect1 = QRectF(100.0, 200.0, 50.5, 30.2)    # QRectF(float x, float y, float w, float h)
print(rect1)    # QRectF(100.0,200.0,50.5,30.2)
# 通过QPointF和QSizeF构造
top_left = QPointF(100.0, 200.0)
size = QSizeF(50.5, 30.2)
rect2 = QRectF(top_left, size)  # QRectF(QPointF topLeft, QSizeF size)
print(rect2)    # QRectF(100.0,200.0,50.5,30.2)

# 从QRect转换
qrect = QRect(100, 200, 50, 30)
rect3 = QRectF(qrect)   # QRectF(QRect rect)
print(rect3)    # QRectF(100.0,200.0,50.0,30.0)
主要方法
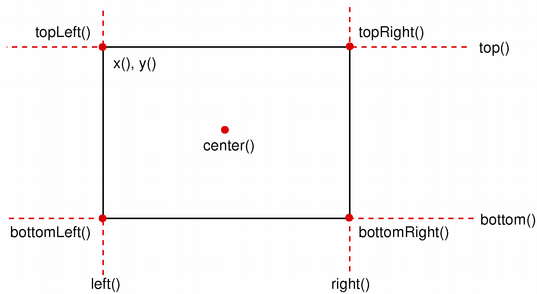
1. 基础属性
python
print(rect1.x())        # 左边缘x坐标 (100.0)
print(rect1.y())        # 上边缘y坐标 (200.0)
print(rect1.width())    # 宽度 (50.5)
print(rect1.height())   # 高度 (30.2)
print(rect1.center())   # 中心点 QPointF(125.25, 215.1)
2. 边界操作
python
rect = QRectF(100, 200, 50, 30)
rect.setLeft(110)       # 调整左边界,宽度变为40.0
print(rect)             # QRectF(110.0, 200.0, 40.0, 30.0)
rect.moveBottom(250)    # 保持高度,移动到底部到y=250
print(rect)             # QRectF(110.0, 220.0, 40.0, 30.0)
print(rect.bottomRight()) # 右下角 QPointF(150.0, 250.0)
3. 几何运算
python
rectA = QRectF(0, 0, 100, 100)
rectB = QRectF(50, 50, 100, 100)

# 交集
intersection = rectA.intersected(rectB)  # QRectF(50,50,50,50)
print(intersection)

# 并集
united = rectA.united(rectB)            # QRectF(0,0,150,150)
print(united)

# 包含检测
print(rectA.contains(QPointF(30, 30)))  # True
print(rectA.intersects(rectB))          # True
4. 坐标调整
python
rect = QRectF(100, 200, 50.5, 30.2)
# 相对调整
new_rect = rect.adjusted(10, 5, -20, -10)
# 原rect (100,200,50.5,30.2)
# 新矩形 (110,205,20.5,15.2)
print(new_rect)      # QRectF(110.0,205.0,20.5,15.2)

# 绝对设置
rect.setCoords(110, 205, 130.5, 220.2)
print(rect)          # QRectF(110.0,205.0,20.5,15.2)
5. 转换方法
python
# 转为整数矩形QRect
int_rect = rect.toRect()  # 四舍五入坐标

# 转置宽高
transposed = rect.transposed()  # 宽高交换
6. 状态判断
python
print(QRectF().isNull())   # True(宽高均为0)
print(QRectF(0,0,0,10).isEmpty())  # True(宽或高为0)
print(QRectF(0,0,10,10).isValid())  # True
类特点总结
1. 浮点精度:
• 使用float类型存储坐标,适合需要高精度定位的场景
• 可精确表示小数位置和尺寸(如50.5像素)
2. 坐标系统:
• 使用Top-Left坐标系(左上角为原点)
• 边界方法包含数学边界(right()和bottom()返回实际坐标+宽高)
3. 有效性判断:
• isValid():宽高均>0时为True
• isEmpty():宽或高≤0时为True
• isNull():宽高均为0时为True
4. 几何运算:
• 支持交集(intersected)、并集(united)、包含检测
• 提供adjusted()进行相对调整和setRect()绝对设置
5. 类型转换:
• 与QRect可互转(toRect()会四舍五入)
• 与QPointF/QSizeF无缝协作
6. 特殊处理:
• normalized()自动处理负宽高情况
• transposed()交换宽高
• 支持margin操作(marginsAdded/Removed)
典型应用场景
1. 图形碰撞检测:
python
def check_collision(obj1, obj2):
    return obj1.geometry().intersects(obj2.geometry())
2. 动态布局调整:
python
def resize_handler(new_size):
    global rect
    rect.setSize(QSizeF(new_size.width()*0.8, new_size.height()-20))
    update()
3. 高精度绘图:
python
painter.drawEllipse(QRectF(100.5, 200.3, 50.7, 50.7)) # 平滑圆形绘制4. 动画路径计算:
python
def animate(pos):
    current_rect = QRectF(pos.x(), pos.y(), 50, 50)
    return current_rect.translated(2.5, 1.8)  # 平滑移动
注意事项
1. 坐标系差异:
• 数学坐标系:右下边界包含计算值(right=x+width)
• 渲染时:抗锯齿处理会使实际绘制范围略大于数学范围
2. 精度转换:
• 转QRect时使用四舍五入,可能丢失精度
• 关键计算建议保持QRectF类型直到最终渲染
3. 性能优化:
• 频繁计算时建议使用adjust()代替adjusted()
• 批量操作时优先使用setCoords/setRect
4. 异常处理:
• 所有参数必须为有限数值(非NaN/Inf)
• 无效矩形无法进行几何运算
5. 边界情况:
python
# 处理负尺寸
rect = QRectF(100, 100, -50, -30)
valid_rect = rect.normalized()  # (50, 70, 50, 30)
附:与QRect核心区别
| 特性 | QRect | QRectF |
|---|---|---|
| 存储类型 | 整数(int) | 浮点数(float) |
| 精度 | 像素级对齐 | 亚像素级精度 |
| 构造开销 | 较低 | 略高 |
| 适用场景 | UI元素定位 | 图形绘制/动画/复杂计算 |
| 转换方式 | 直接截断 | 四舍五入 |
| 无效值处理 | (0,0,0,0) | 允许负宽高(需normalized) |