这里写目录
Java发送消息给MQ
    public void testSendMessage() throws IOException, TimeoutException {
        // 1.建立连接
        ConnectionFactory factory = new ConnectionFactory();
        // 1.1.设置连接参数,分别是:主机名、端口号、vhost、用户名、密码
        factory.setHost("117.72.210.37");
        factory.setPort(5672);
        factory.setVirtualHost("bthost");
        factory.setUsername("admin");
        factory.setPassword("hURA6SxC6YrBFoqt");
        // 1.2.建立连接
        Connection connection = factory.newConnection();

        // 2.创建通道Channel
        Channel channel = connection.createChannel();

        // 3.创建队列
        String queueName = "simple.queue";
        channel.queueDeclare(queueName, false, false, false, null);

        // 4.发送消息
        String message = "hello, rabbitmq!";
        channel.basicPublish("", queueName, null, message.getBytes());
        System.out.println("发送消息成功:【" + message + "】");

        // 5.关闭通道和连接
        channel.close();
        connection.close();

    }
消费者接收消息
@RabbitListener(queues = "simple.queue")//指定要监听哪个队列
public void listenSimpleQueueMessage(String msg){
System.out.println("spring 消费者接收到消息 :【" + msg + "】");
throw new RuntimeException("故意的");//MQ会一直投递消息
// throw new MessageConversionException("故意的");//失败后返回reject不再投递
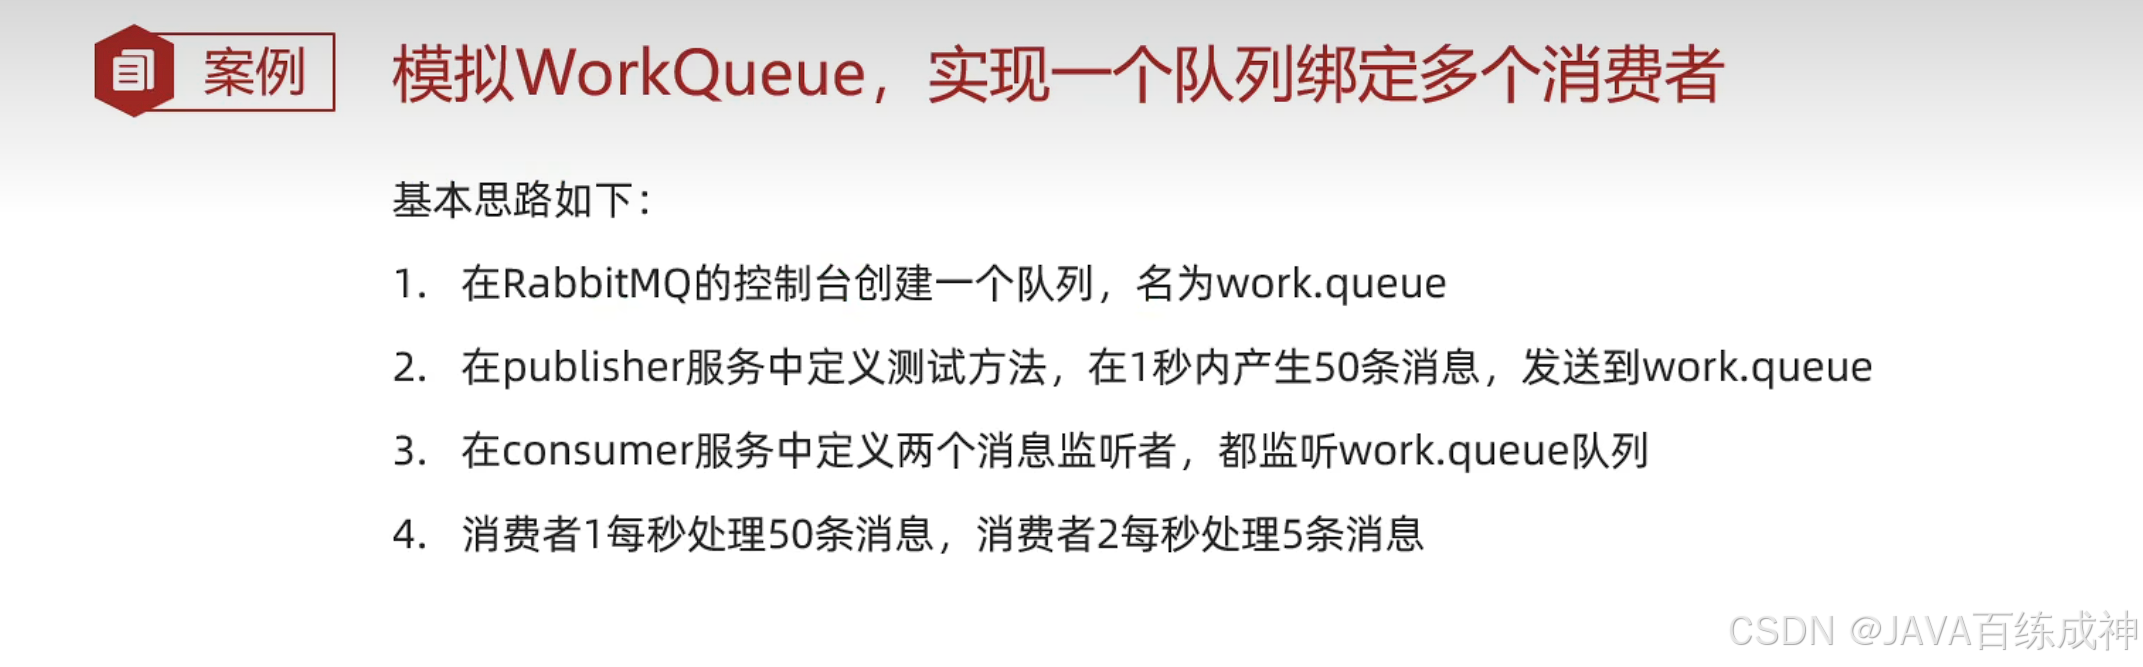
}实现一个队列绑定多个消费者
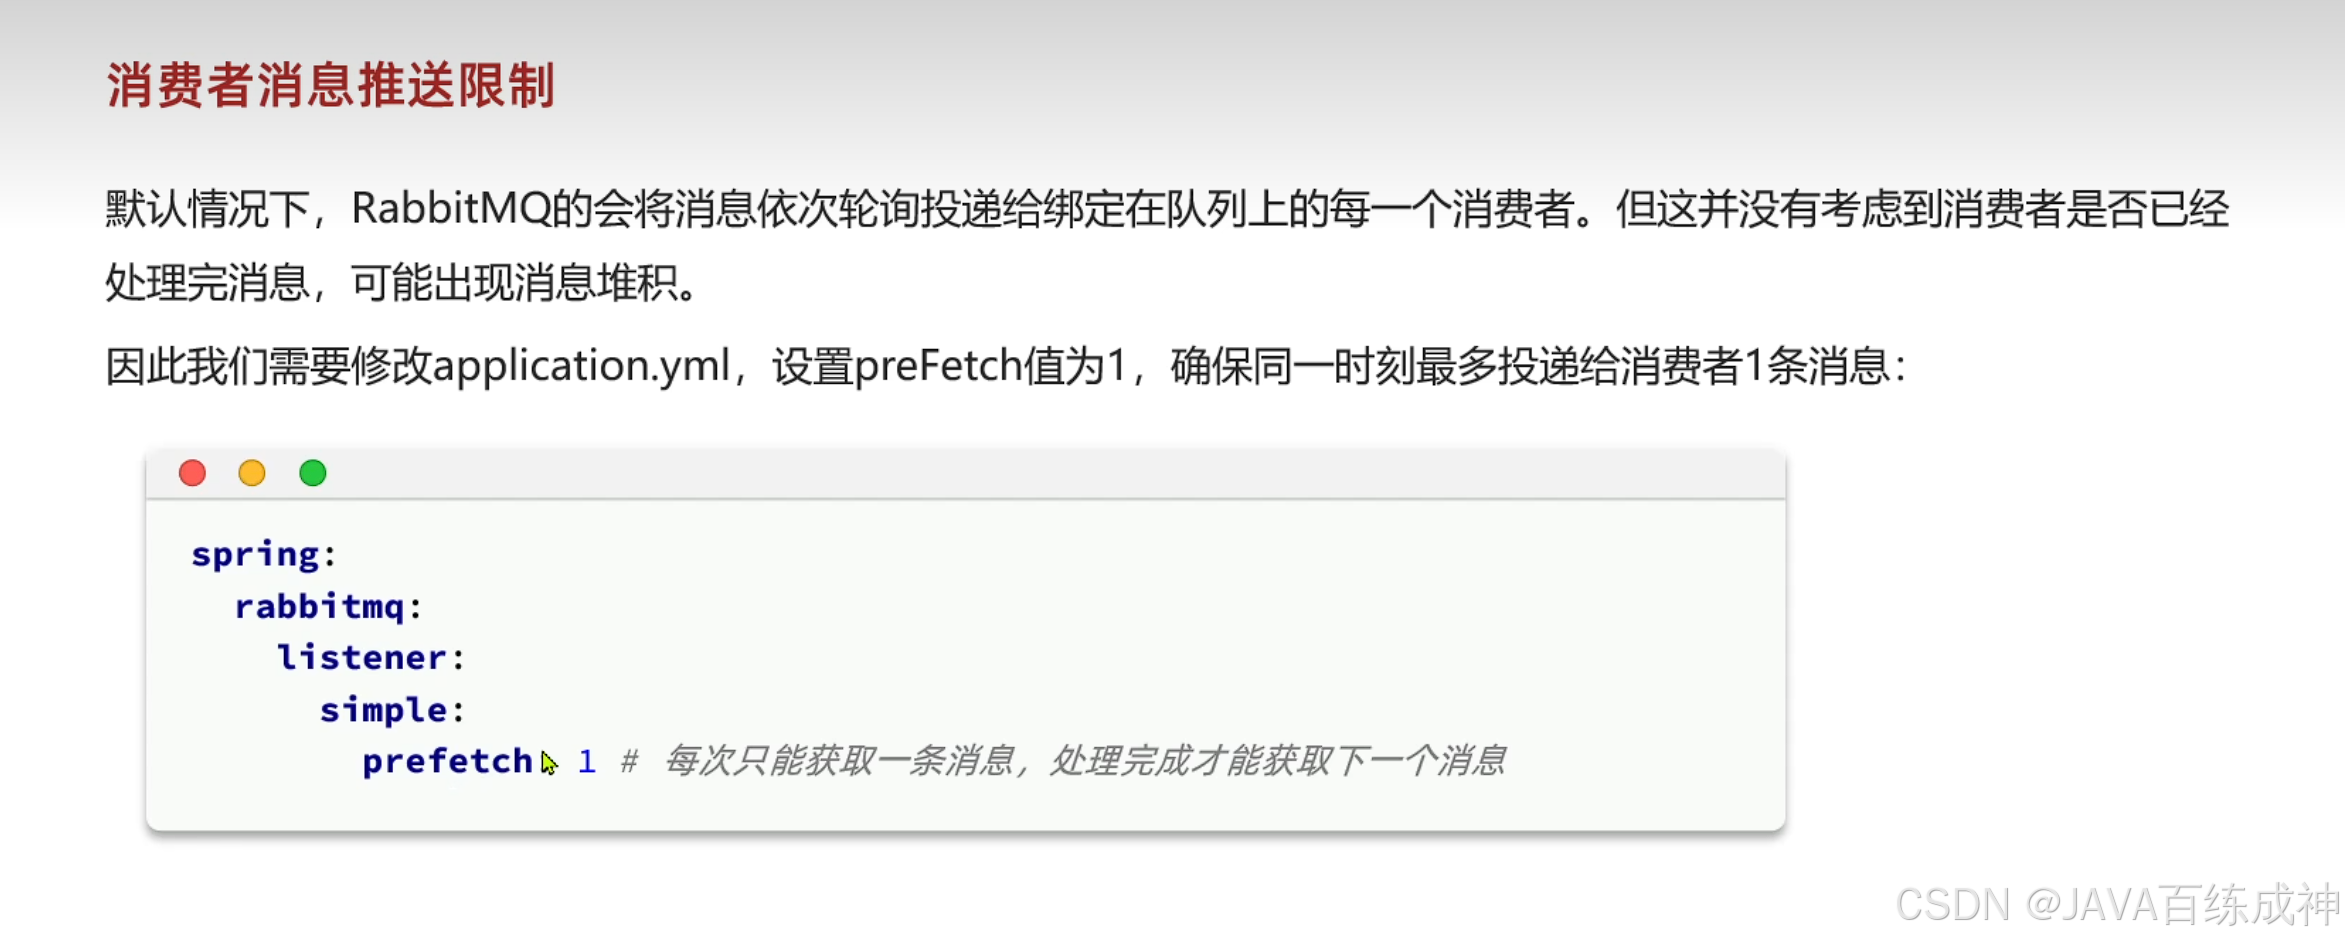
消息推送限制

如果没有设置限制话不管你上一条消息是否处理完,消费者会一直接收,设置厚只有处理完消息才会接受下一条。
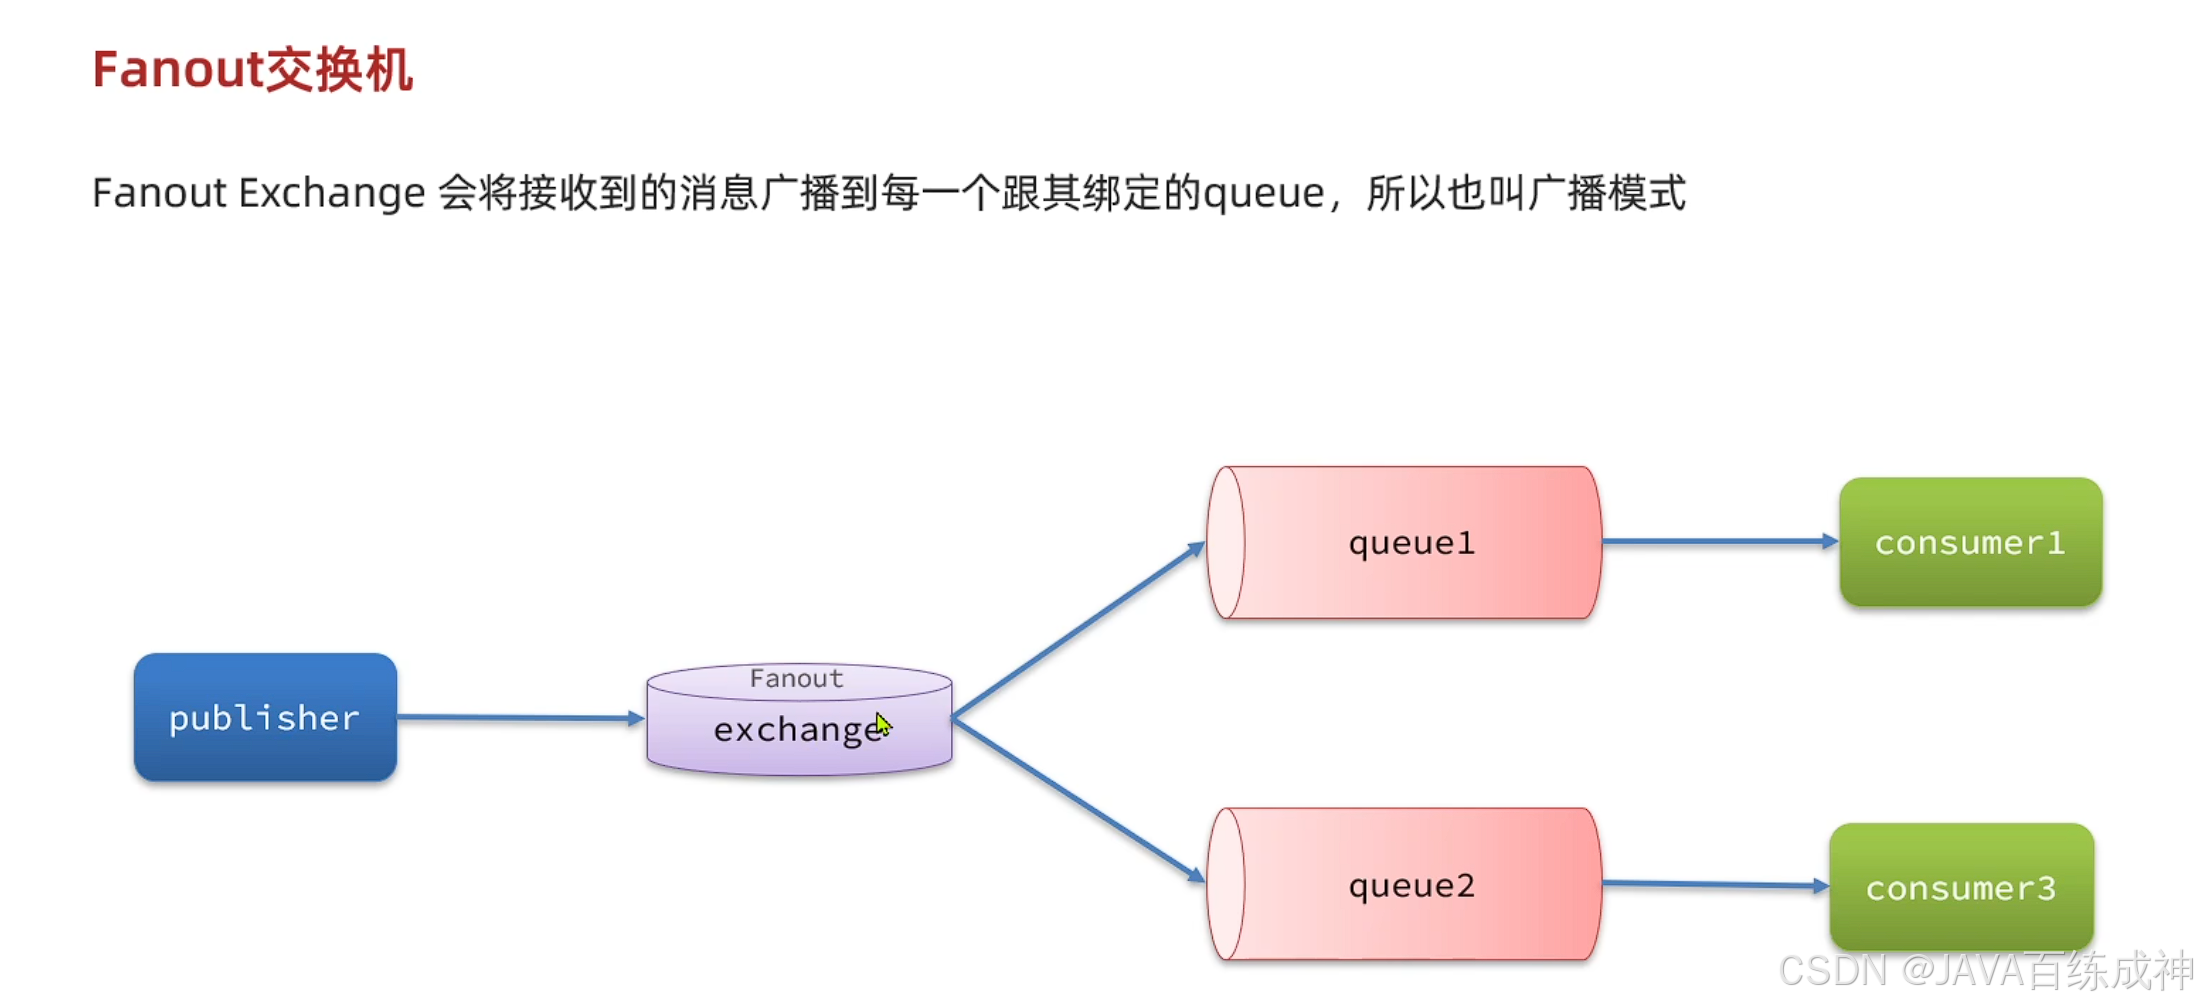
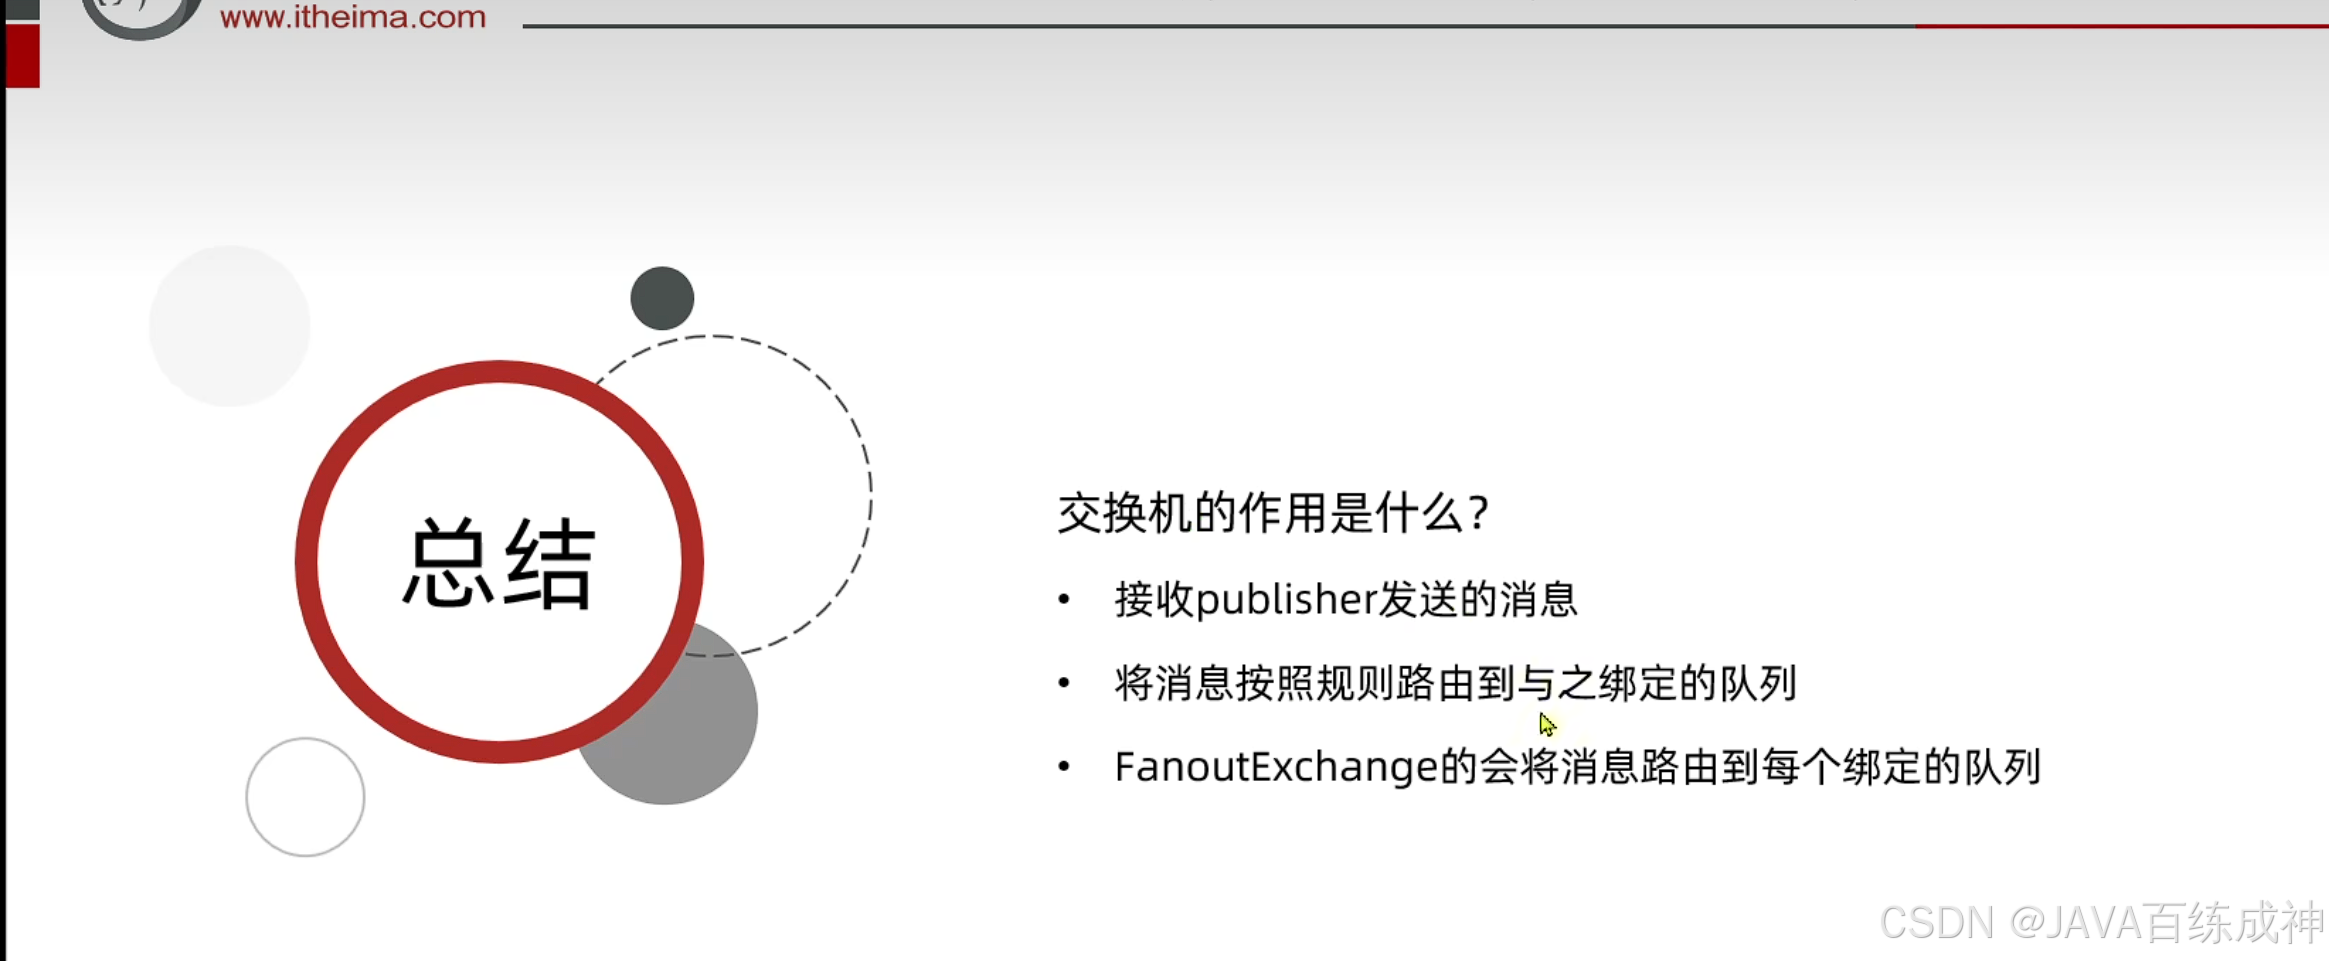
Fanout交换机
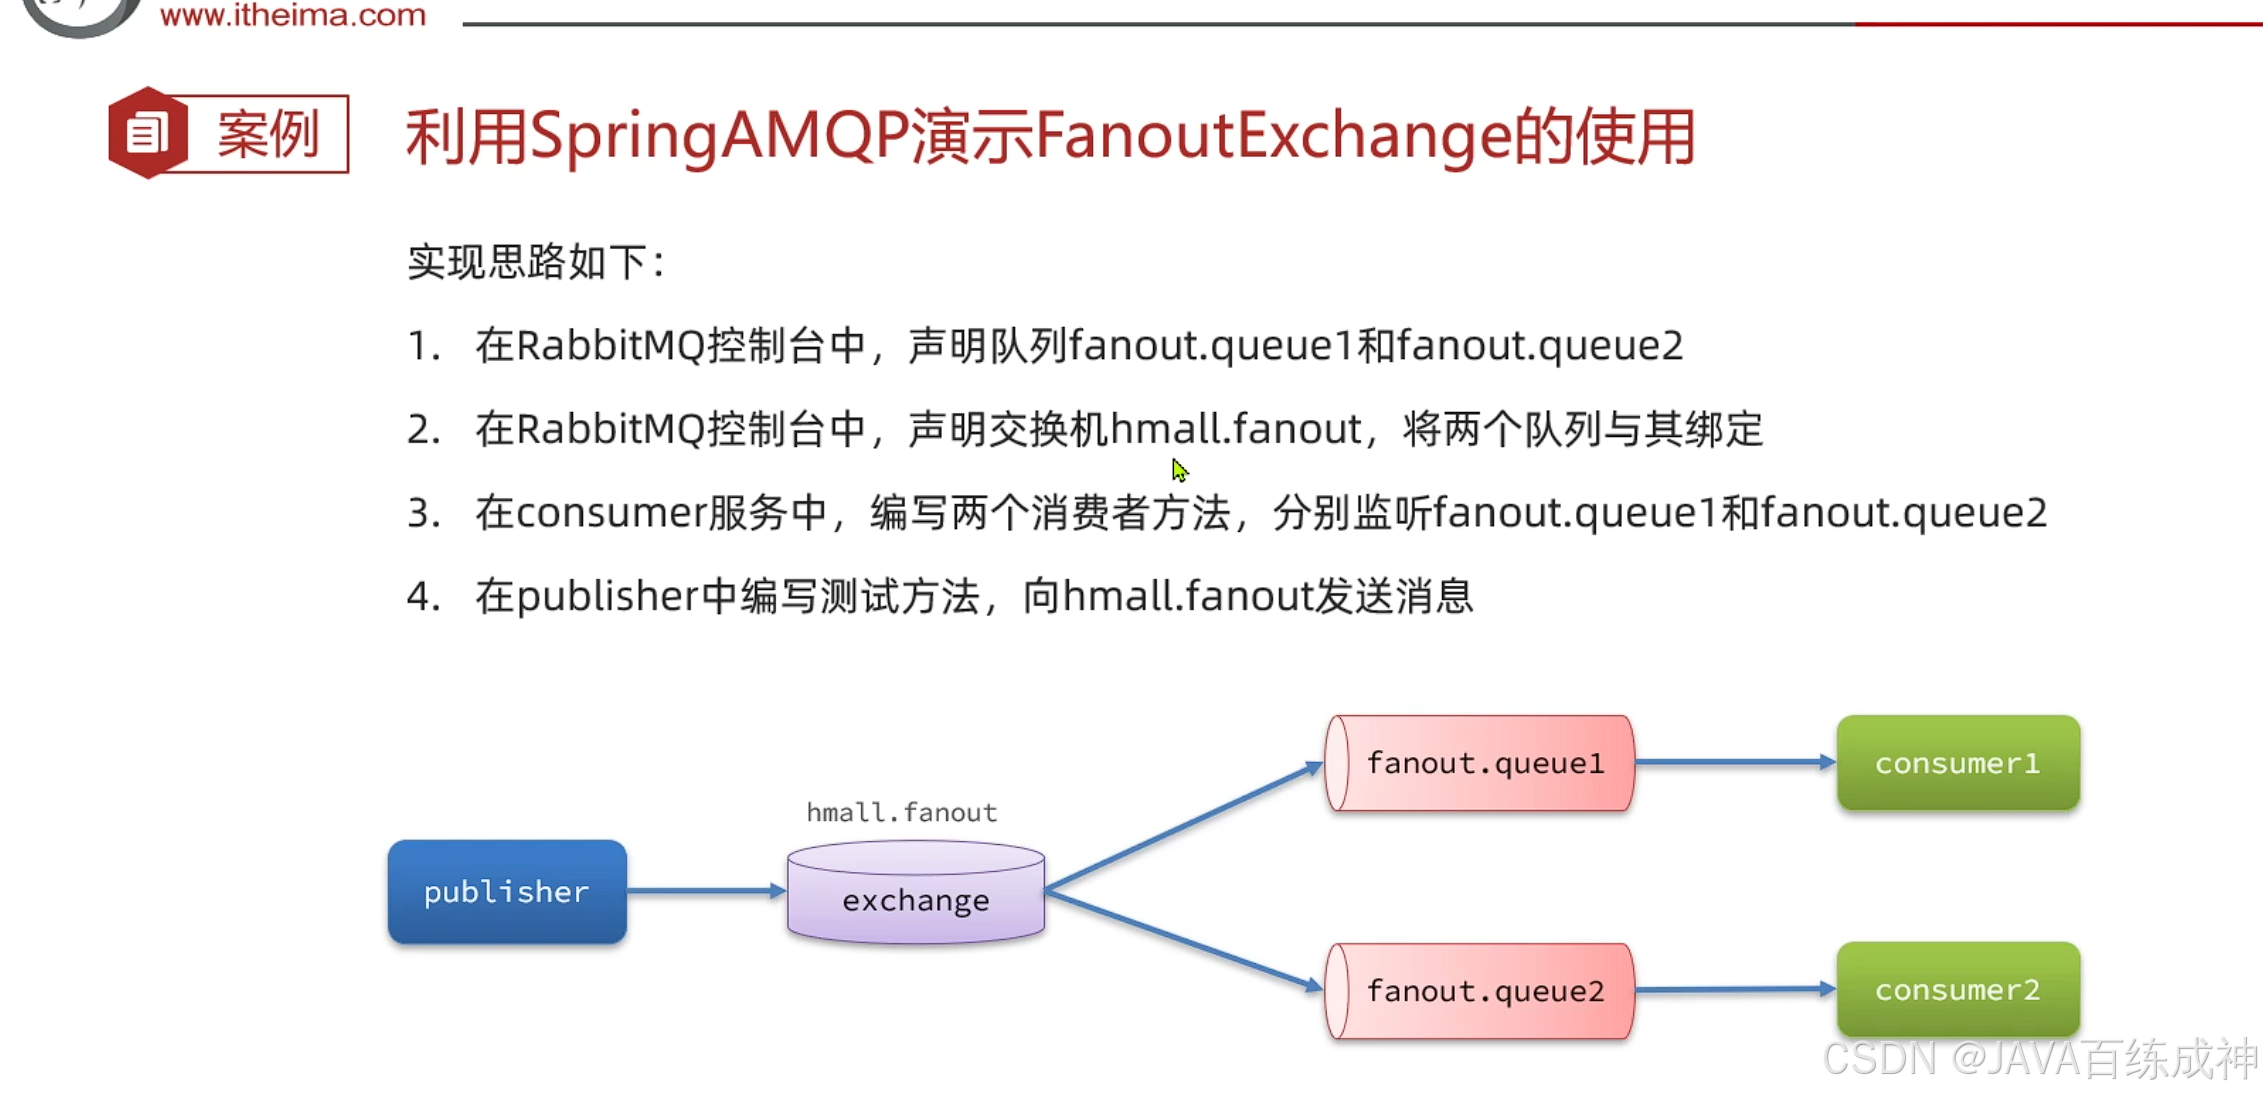
将消息发送给交换机
    @Test
    public void testFanoutExchange() throws InterruptedException {
        //交换机名称
        String exchangeName = "itcast.fanout";
        String message = "hello, everyone";
        //这次是将消息发送到交换机,不再是队列
        rabbitTemplate.convertAndSend(exchangeName, "",message);
    }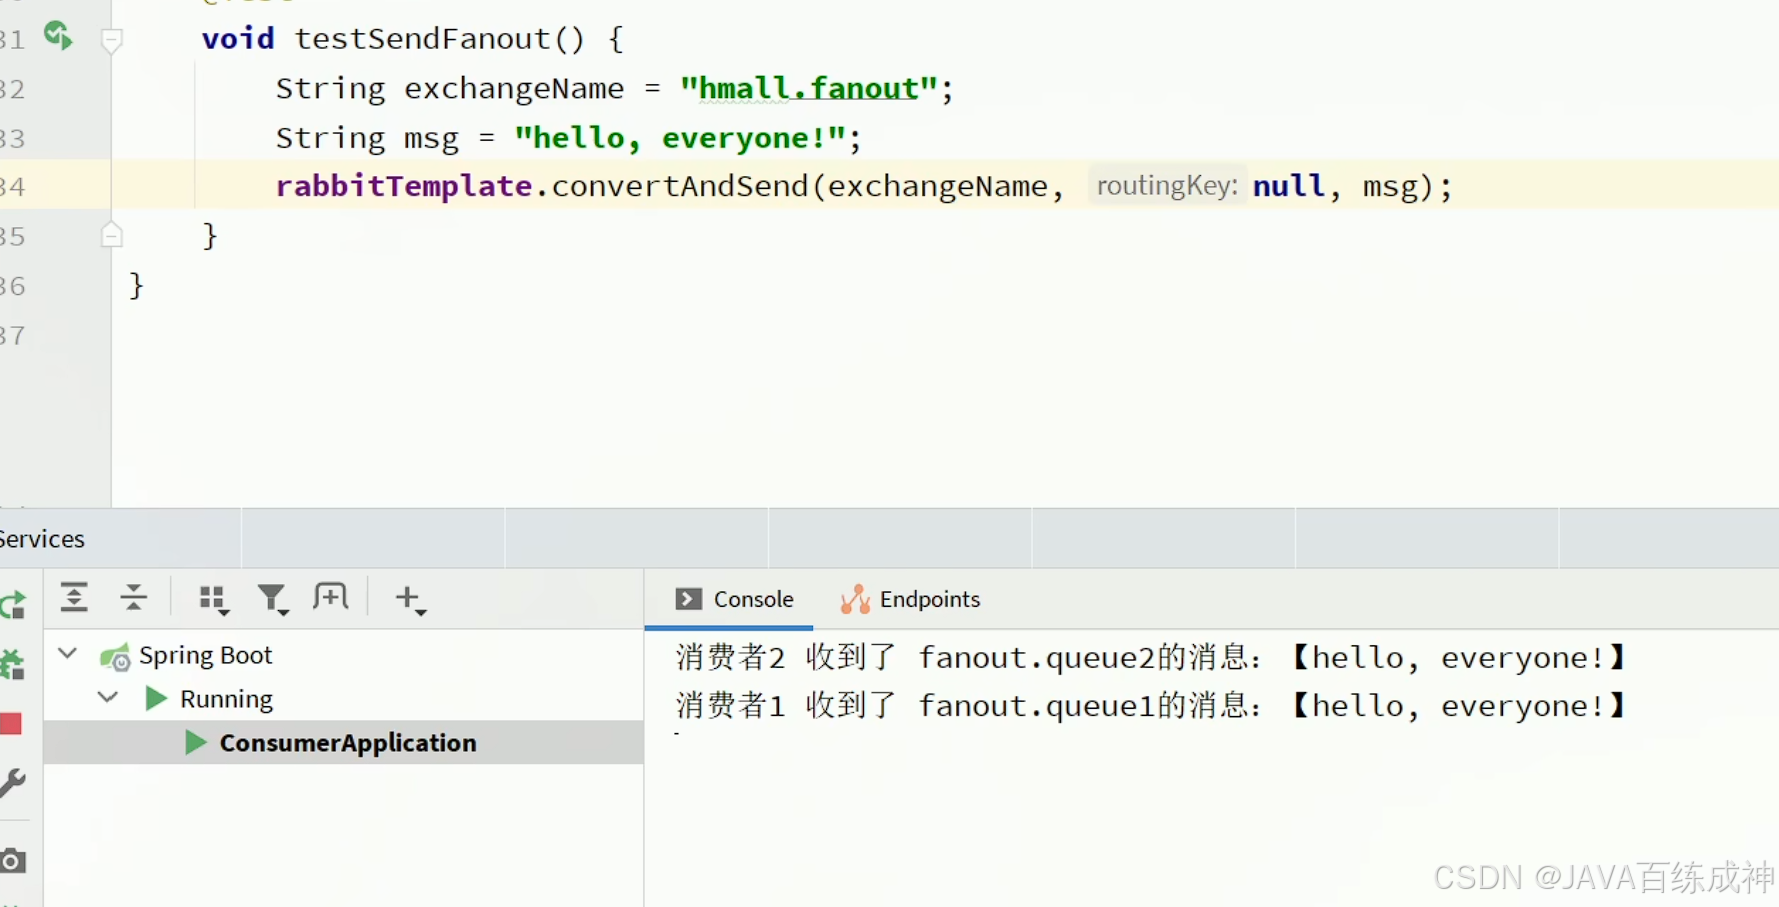
接收消息
    @RabbitListener(queues = "fanout.queue1")
    public void listenFanoutQueue1(String msg) {
        System.out.println("消费者1接收到Fanout消息:【" + msg + "】");
    }
    @RabbitListener(queues = "fanout.queue2")
    public void listenFanoutQueue2(String msg) {
        System.out.println("消费者2接收到Fanout消息:【" + msg + "】");
    }
路由的作用
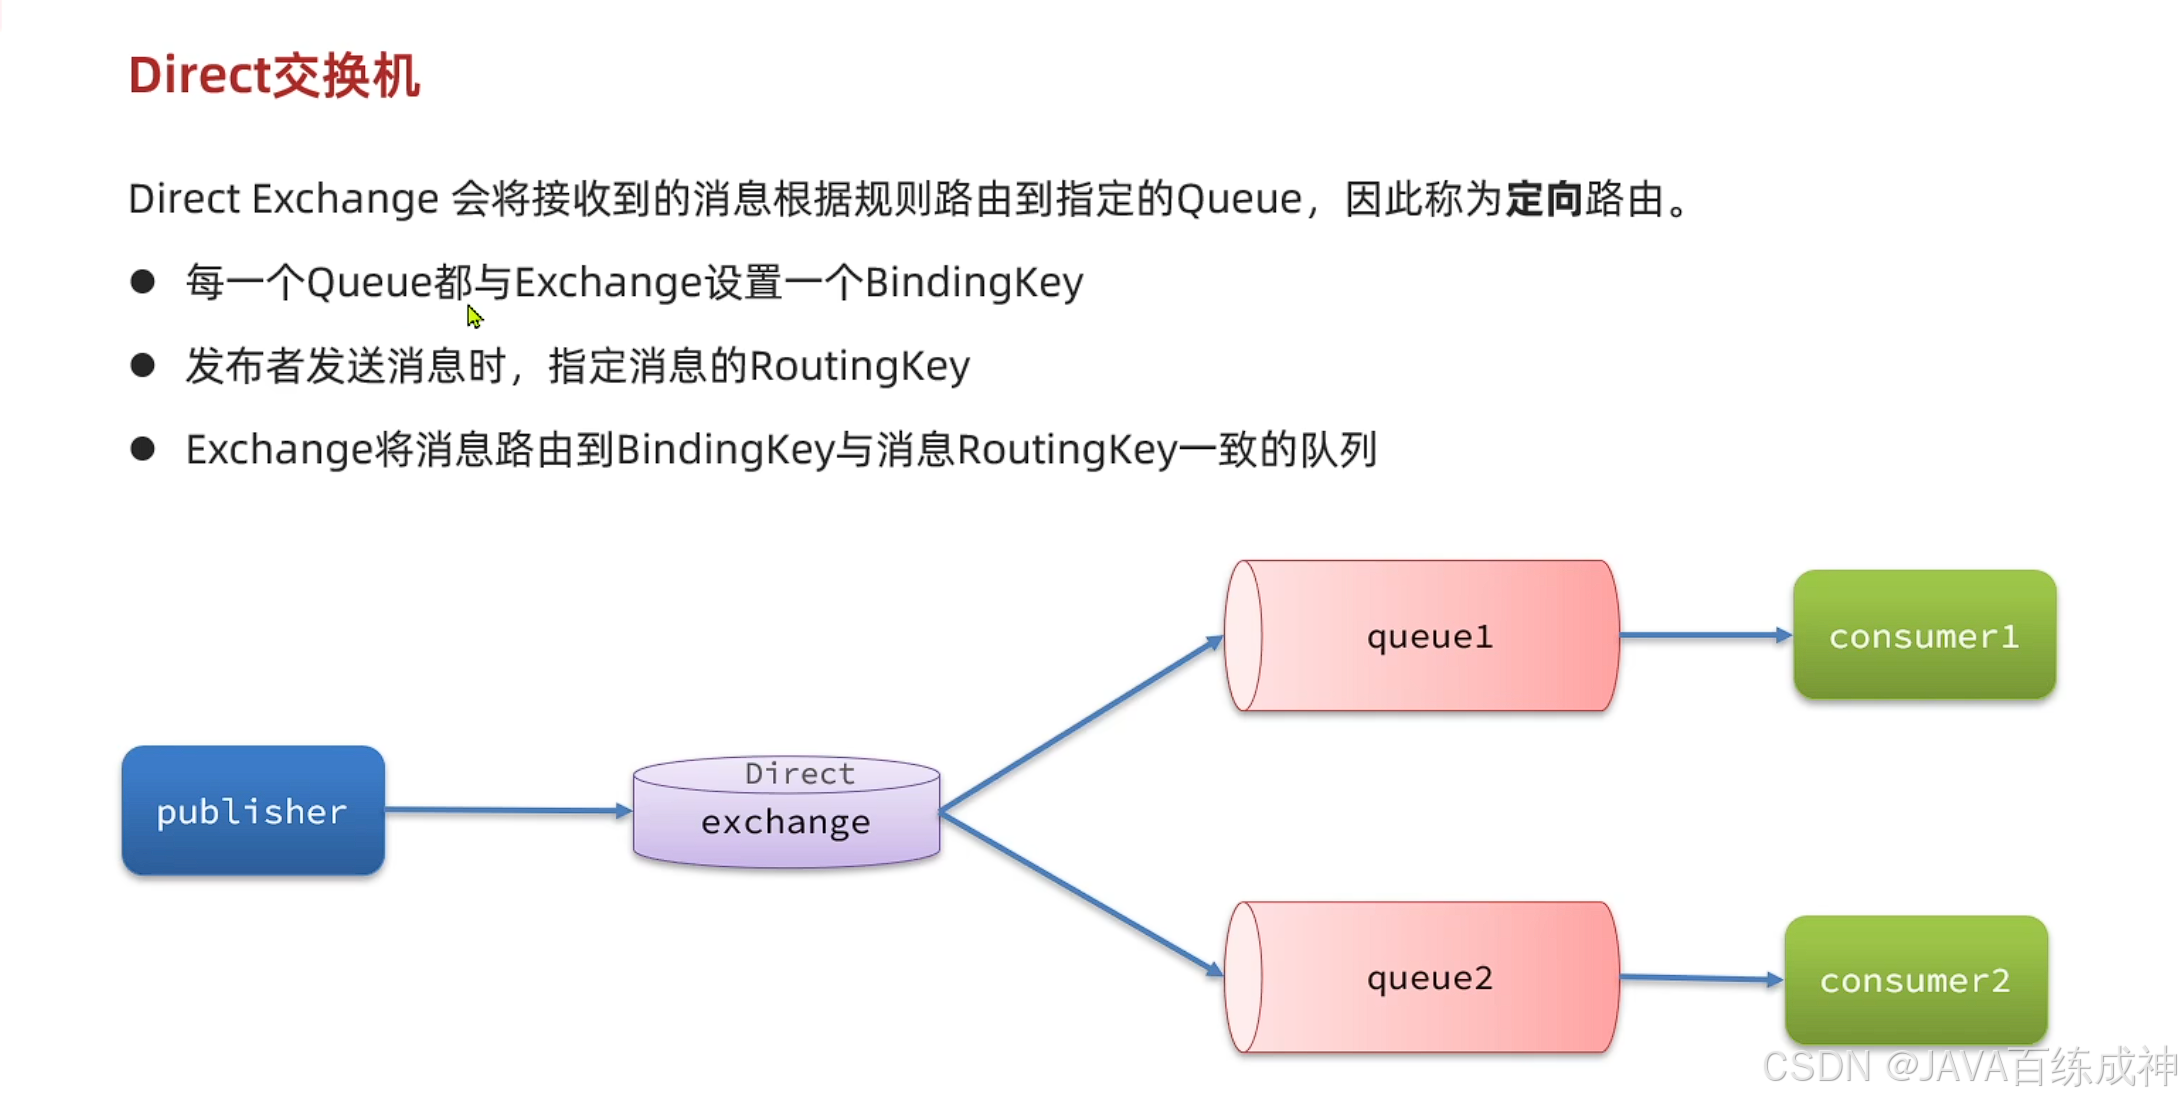
Direct交换机
使用案例
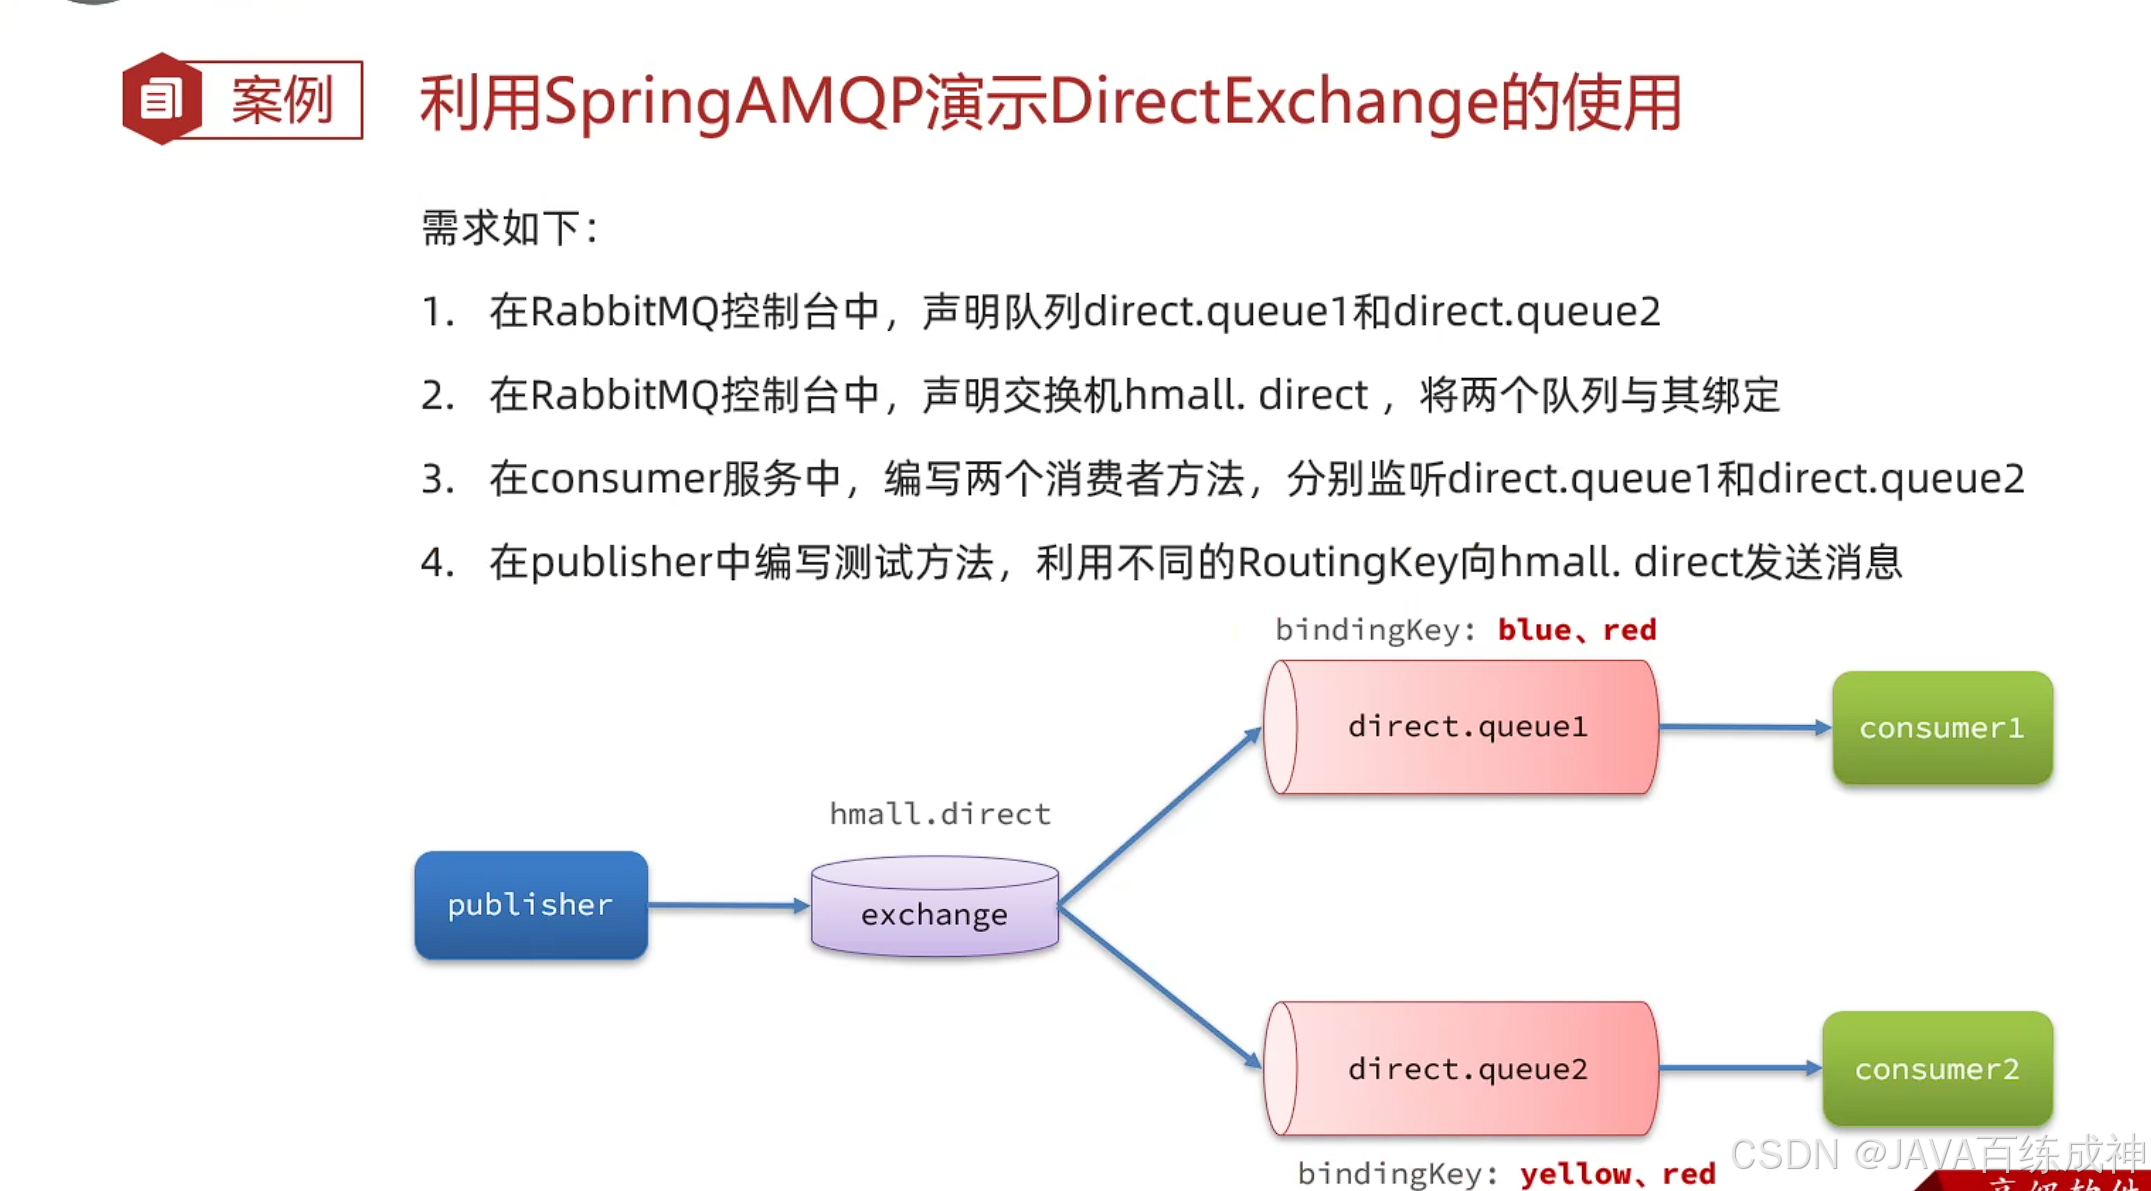
交换机绑定
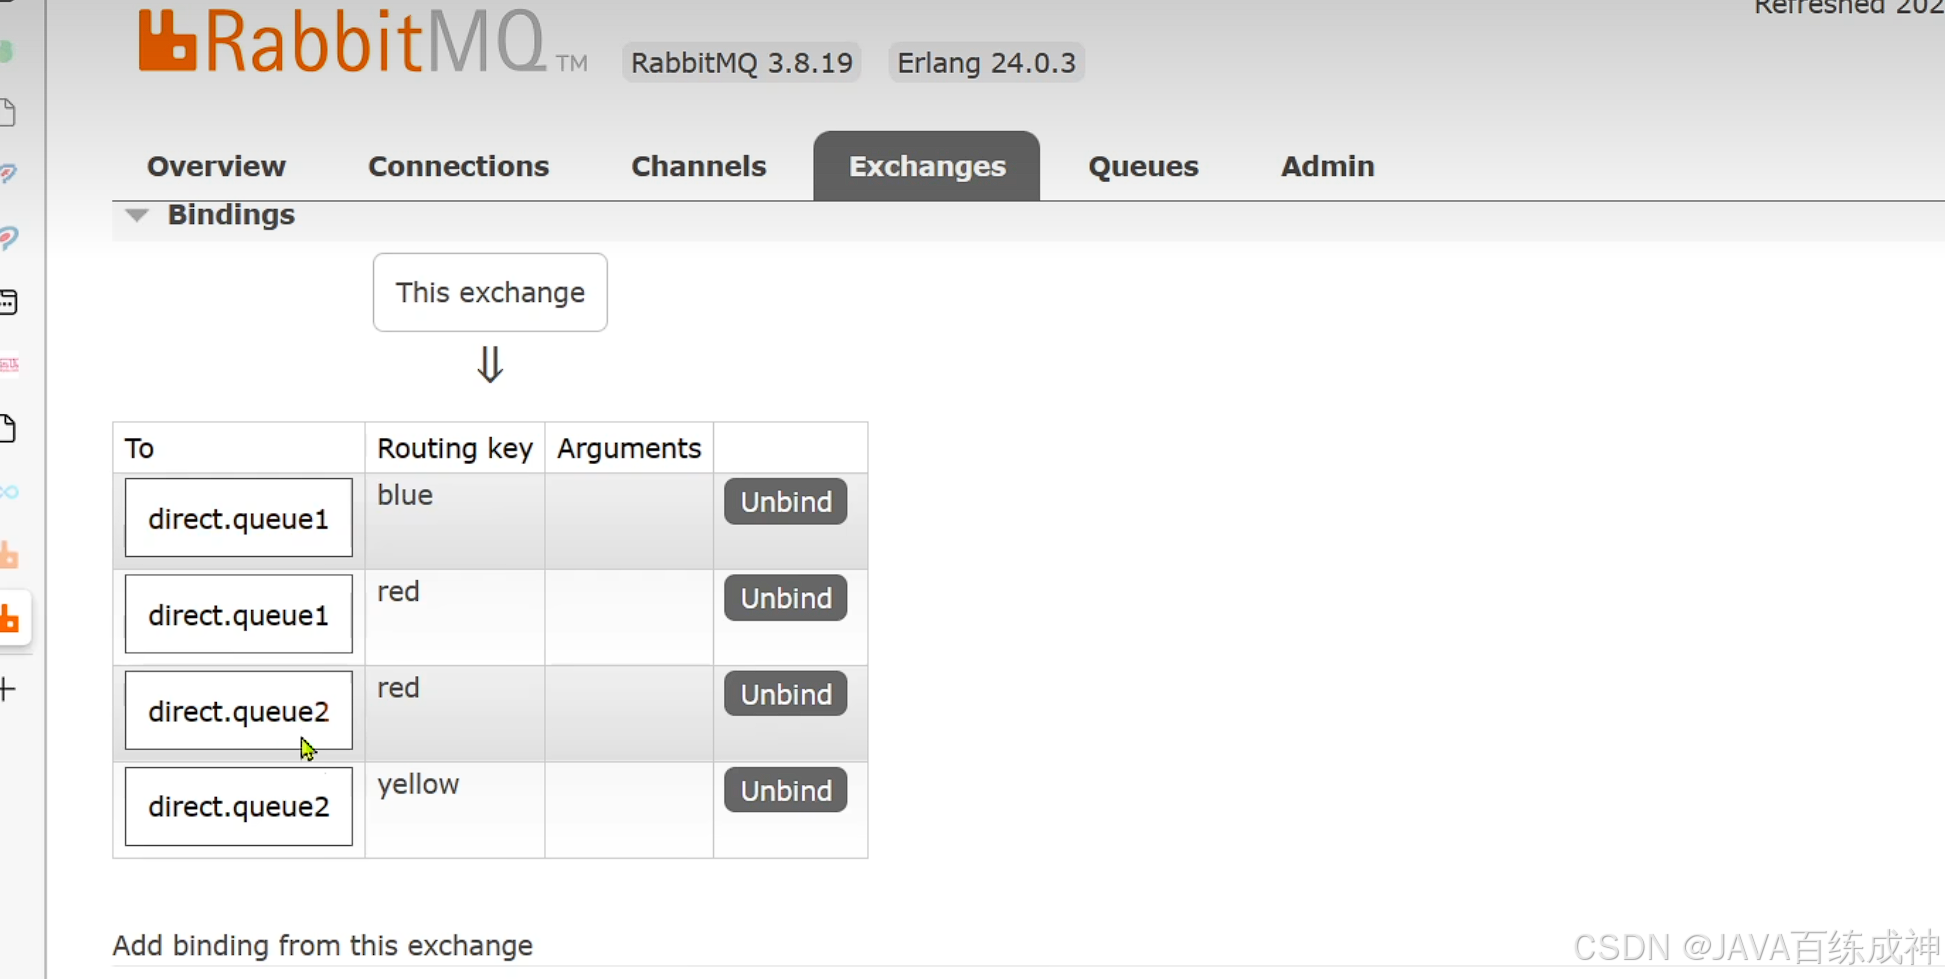
@RabbitListener(bindings = @QueueBinding(
value = @Queue(name = "direct.queue1"),
exchange = @Exchange(name="itcast.direct",type = ExchangeTypes.DIRECT),
key = {"red","blue"}
))
public void listenDirectQueue1(String msg){
System.out.println("消费者1接收到Direct消息:【" + msg + "】");
}
@RabbitListener(bindings = @QueueBinding(
value = @Queue(name = "direct.queue2"),
exchange = @Exchange(name="itcast.direct",type = ExchangeTypes.DIRECT),
key = {"red","yellow"}
))
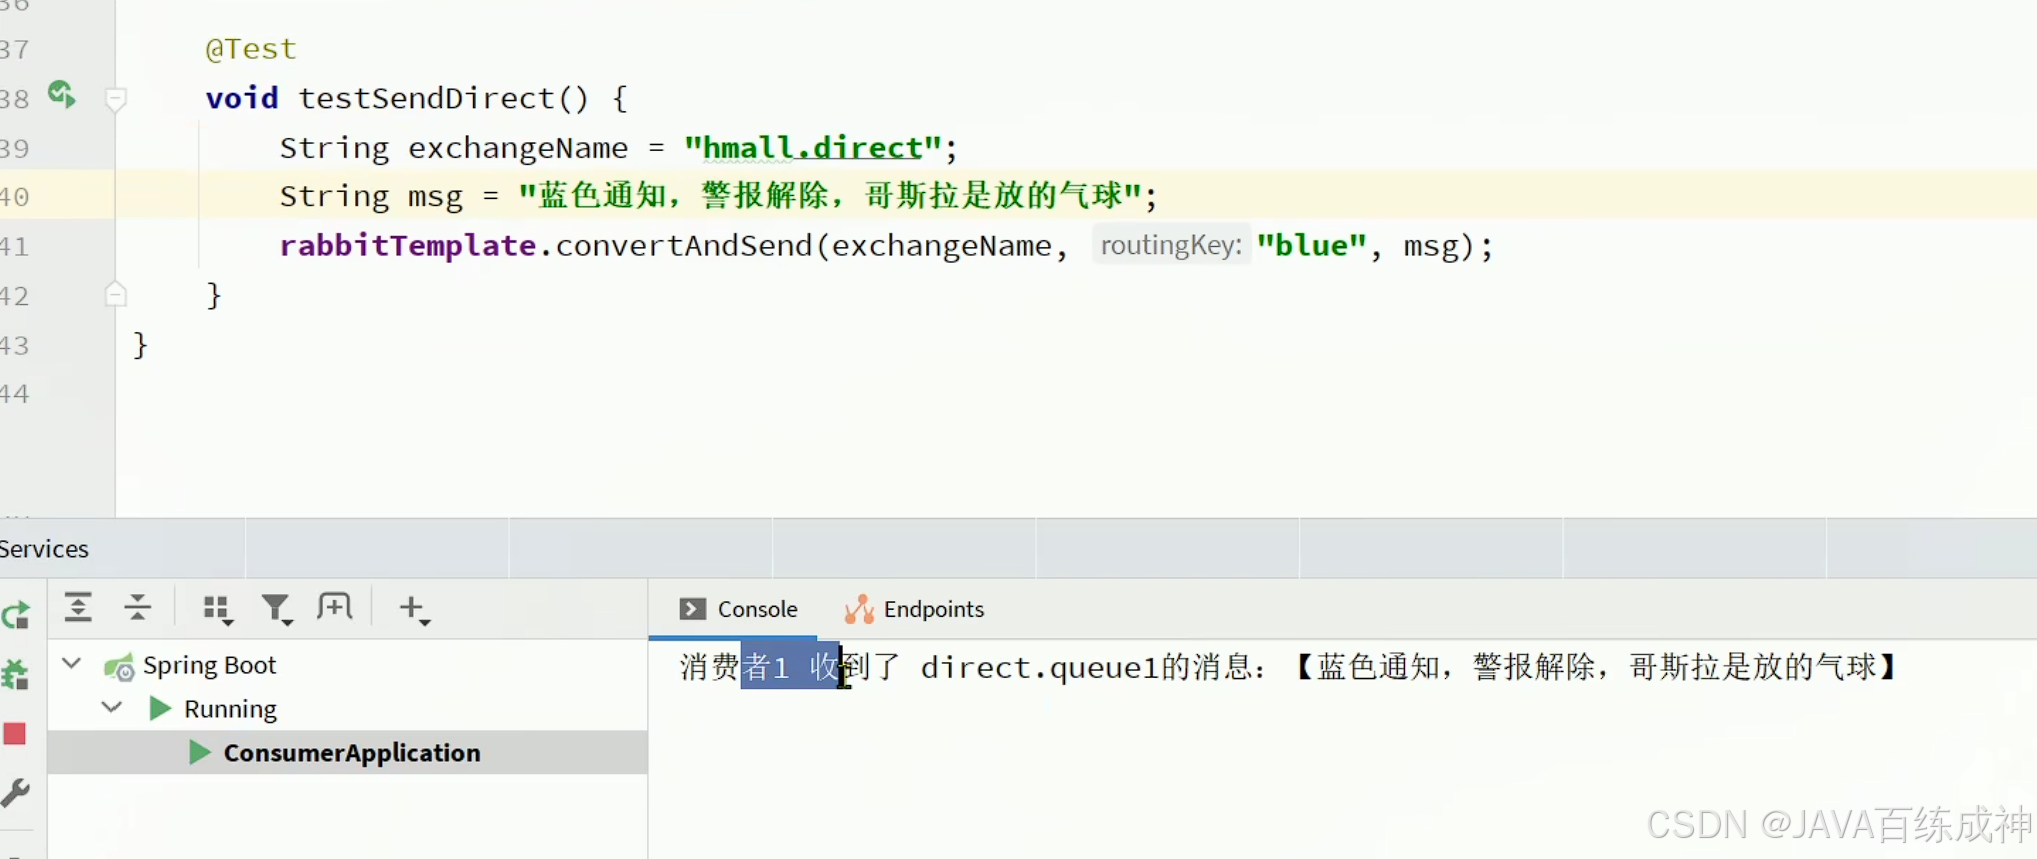
** @Test
public void testDirectExchange() {
//交换机名称
String exchangeName = "itcast.direct";
String message = "hello, blue";
//这次是将消息发送到交换机,不再是队列
rabbitTemplate.convertAndSend(exchangeName, "red", message);
}**
key是谁对应消费者就会接收到对应key的消息
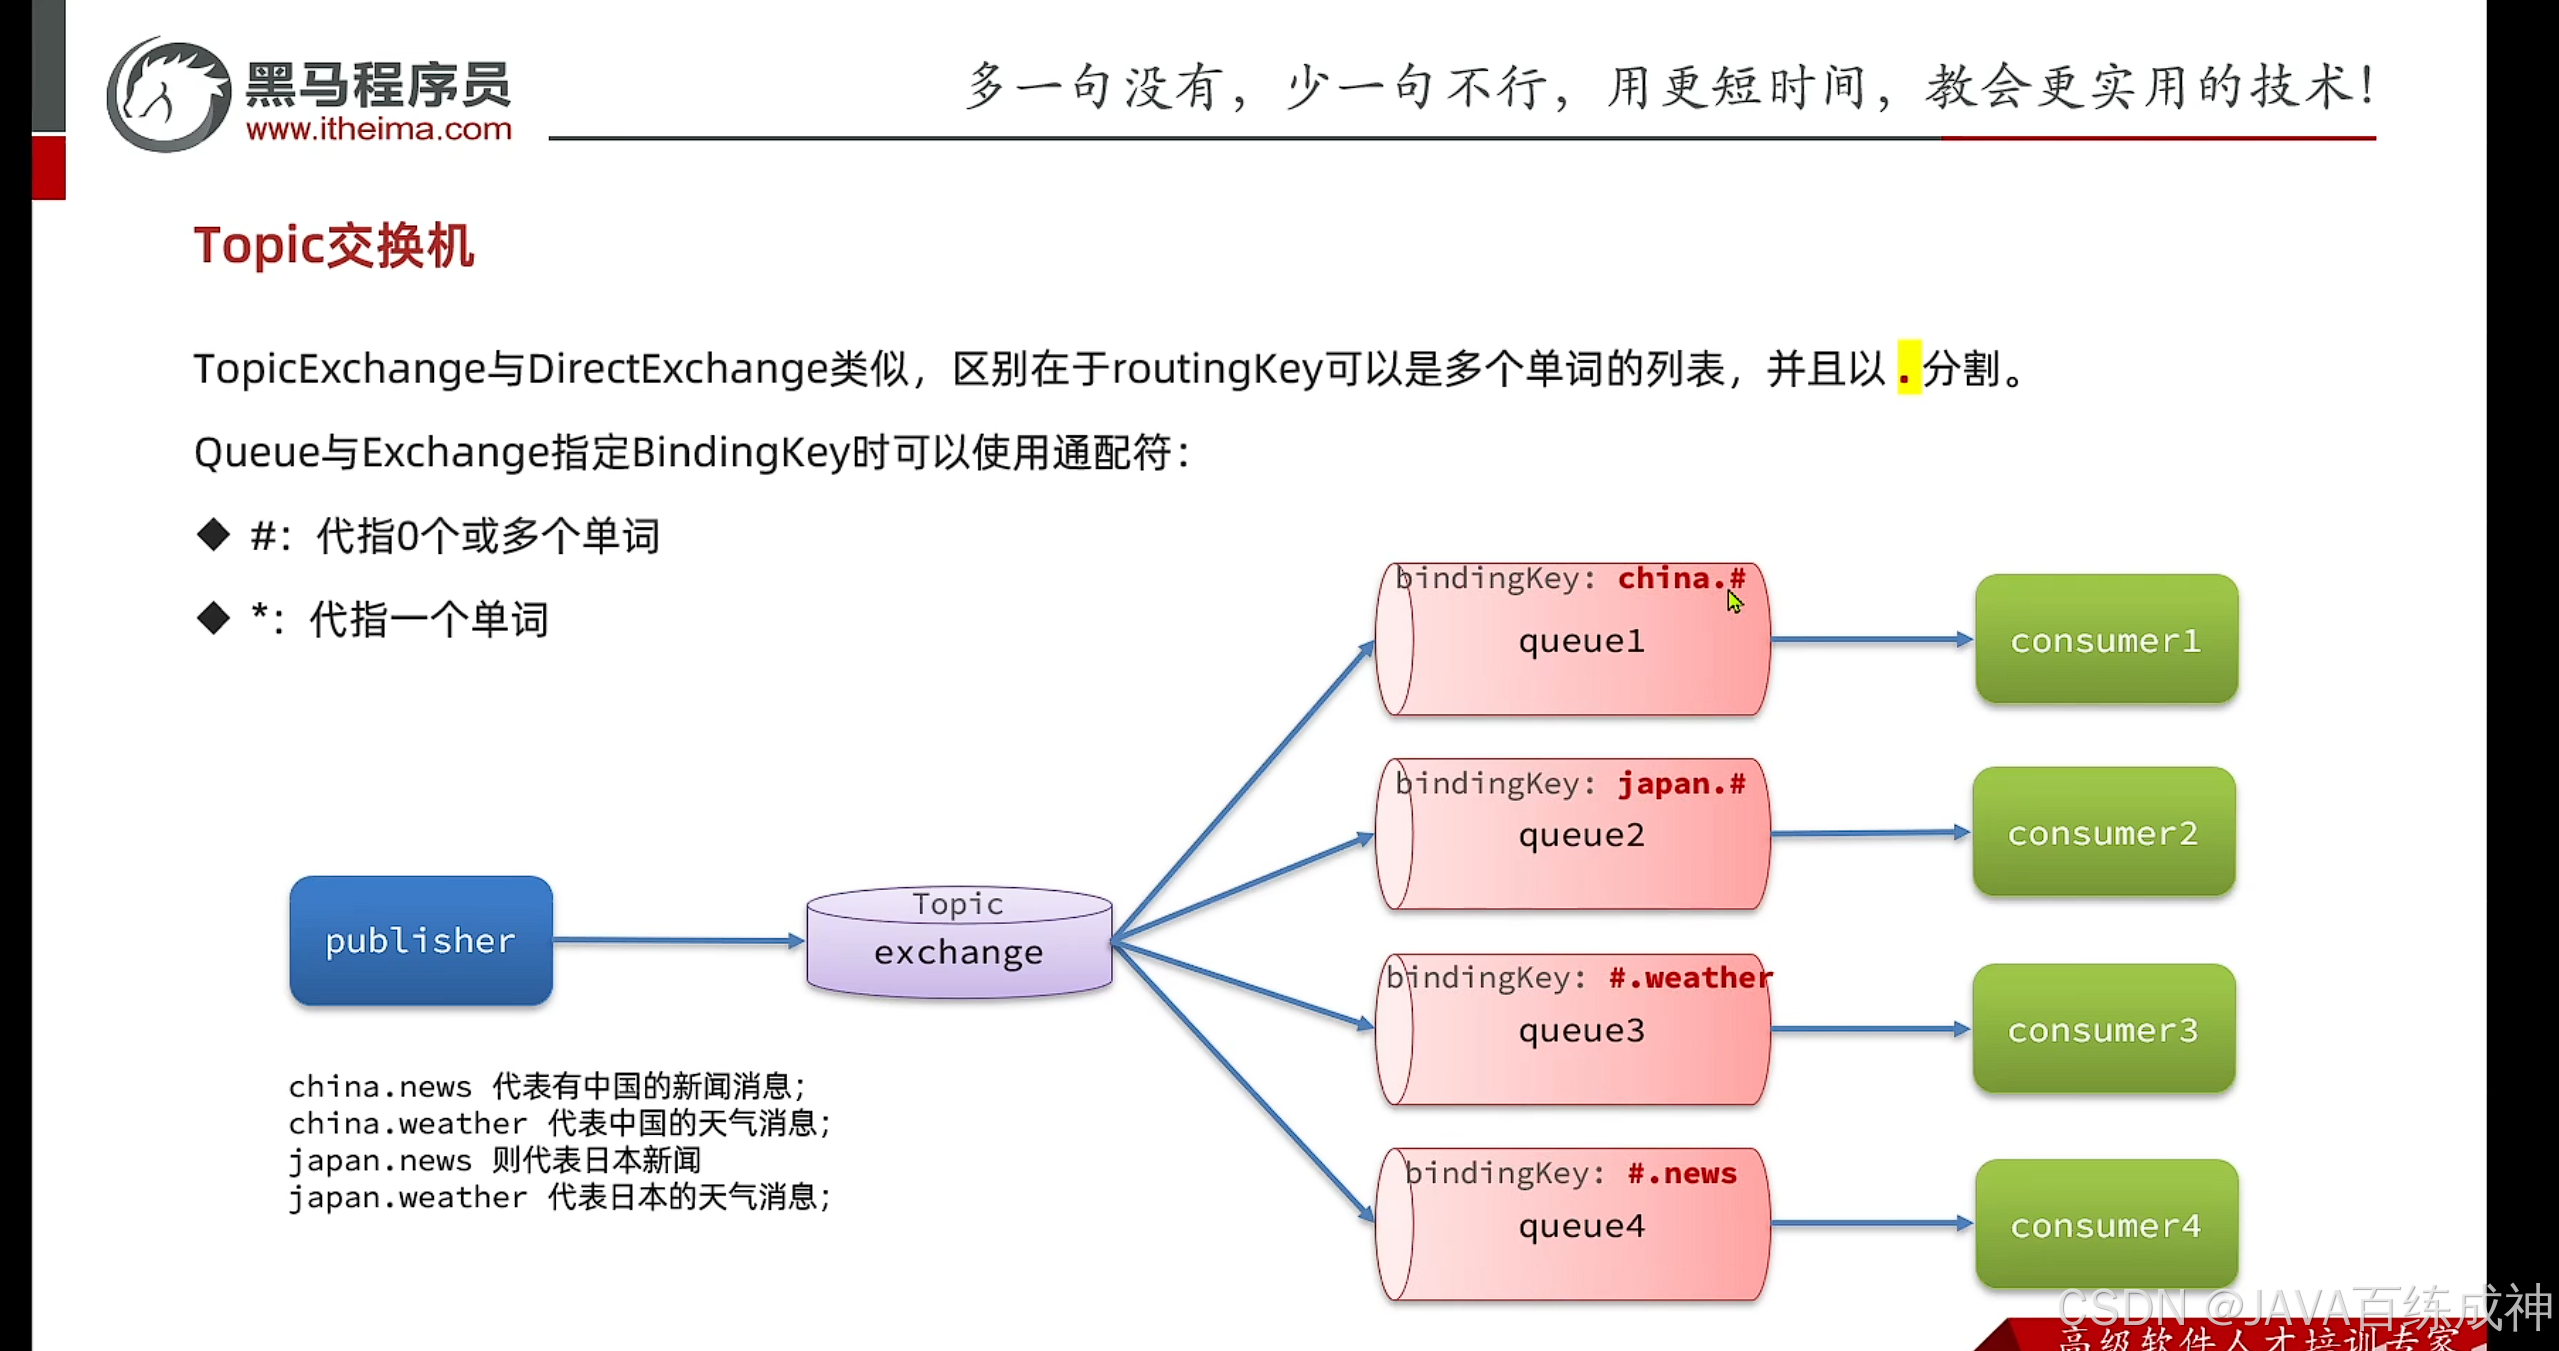
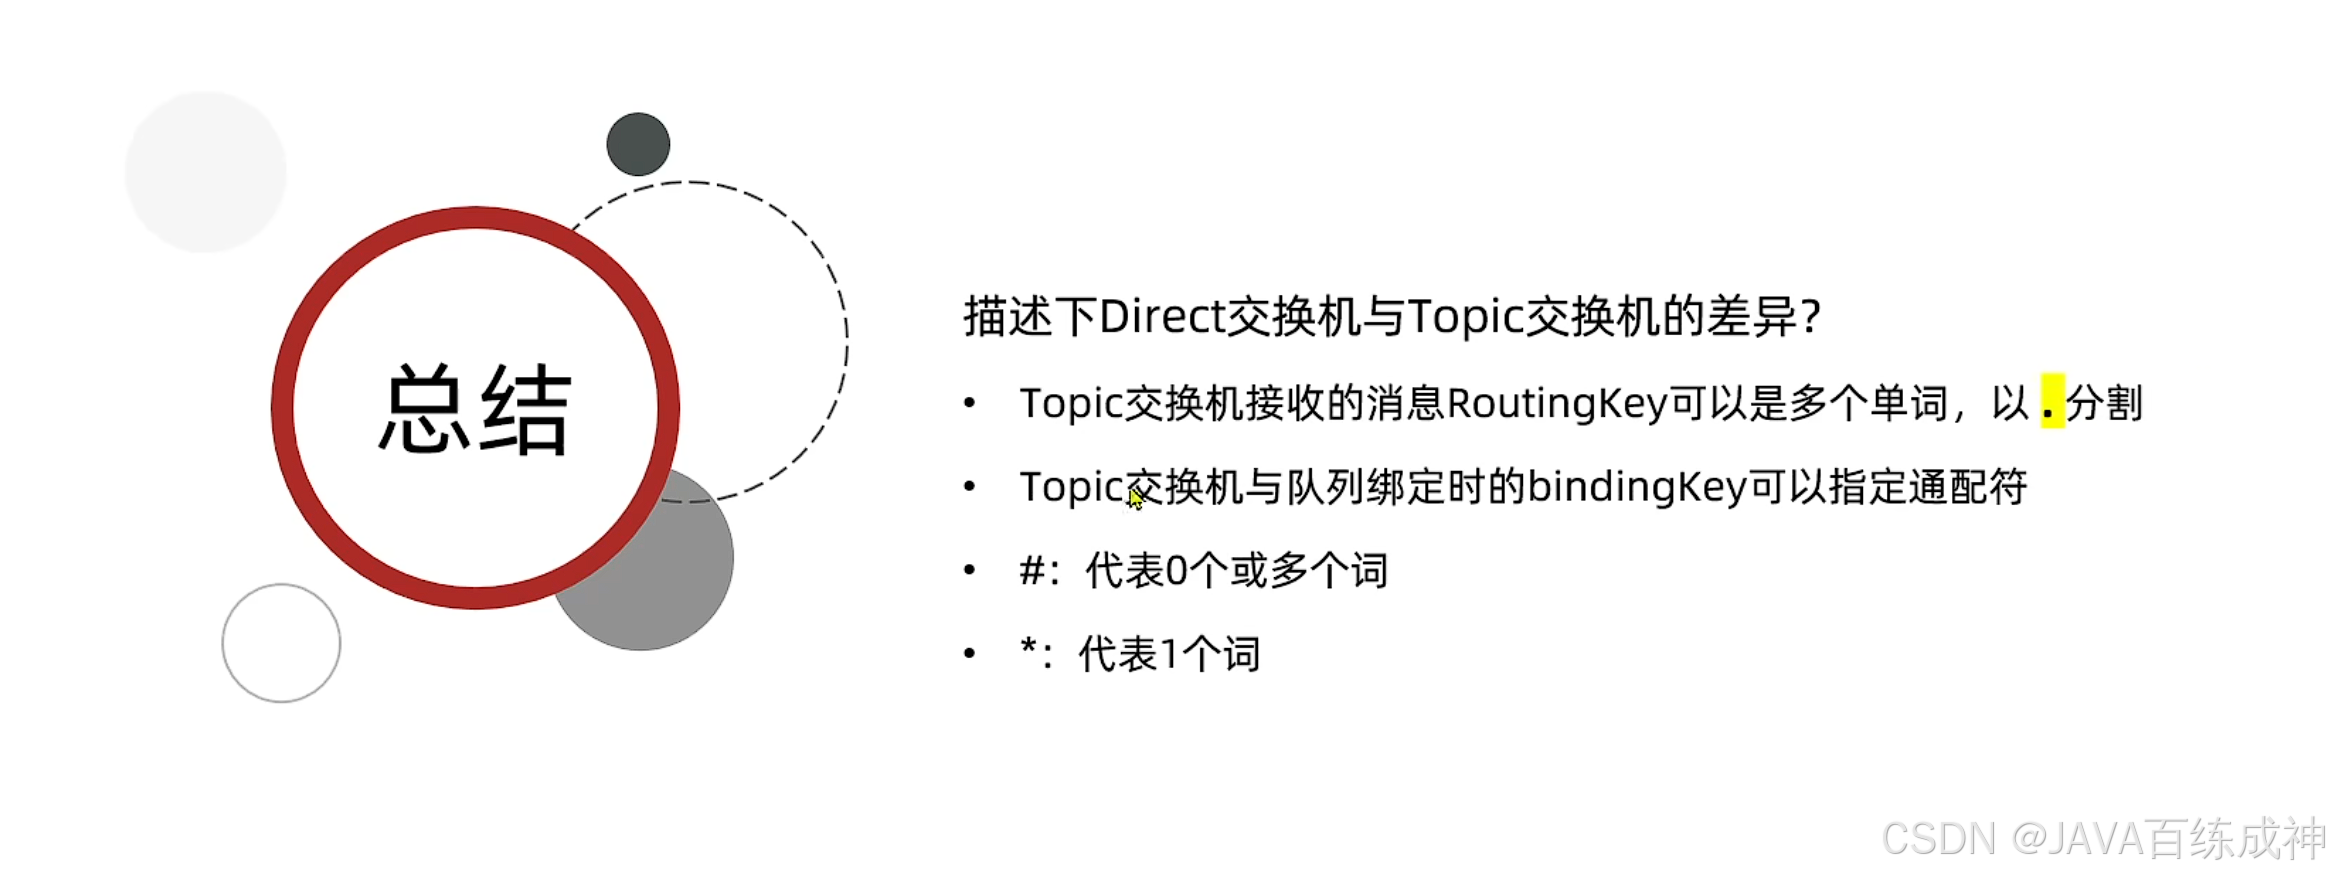
Topic交换机
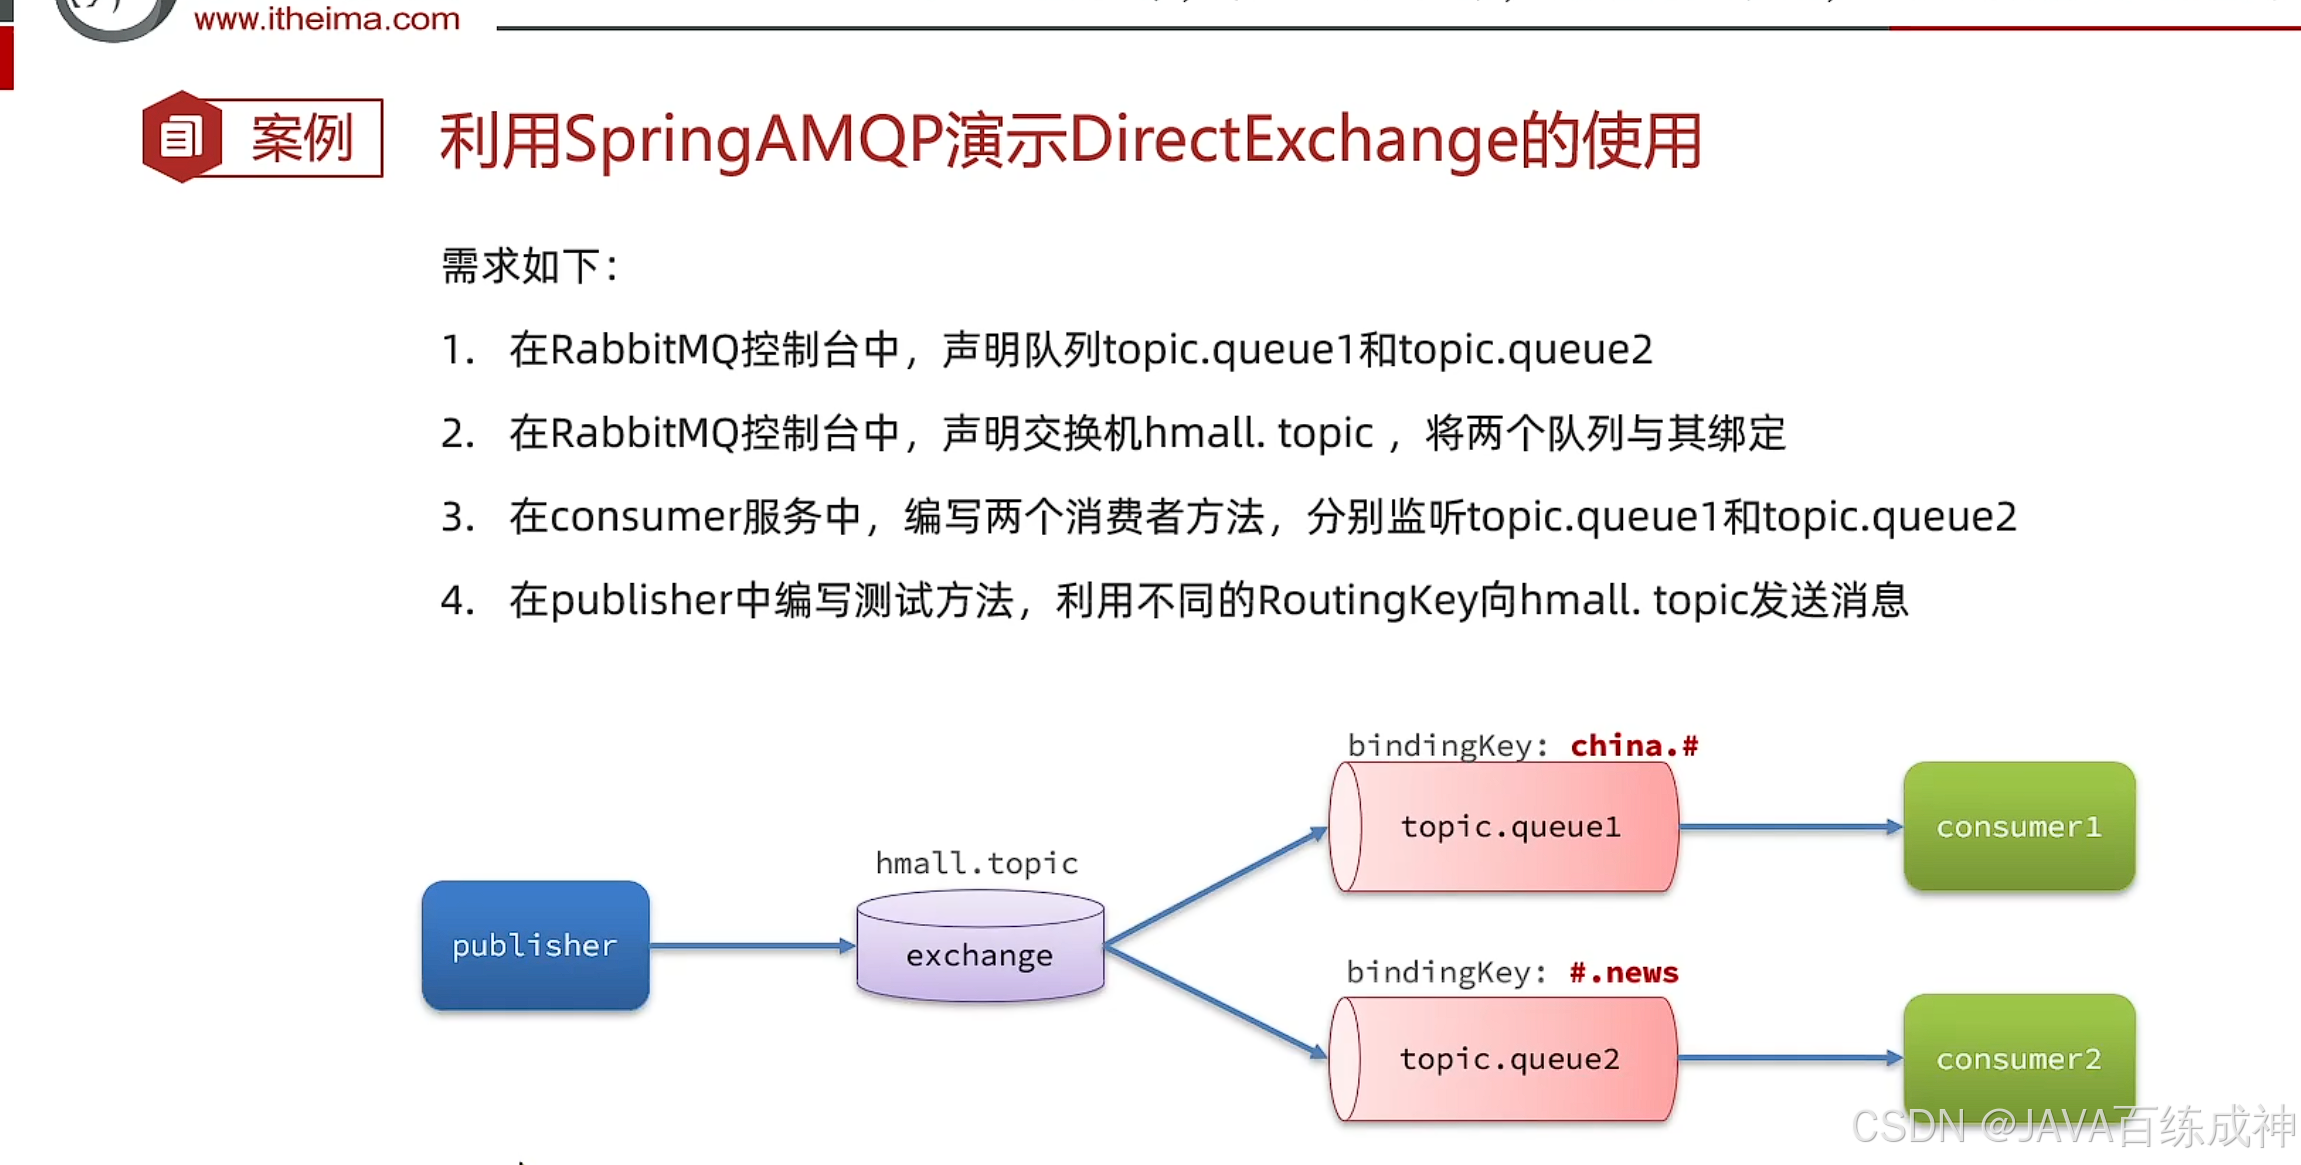
创建两个交换机

绑定交换机
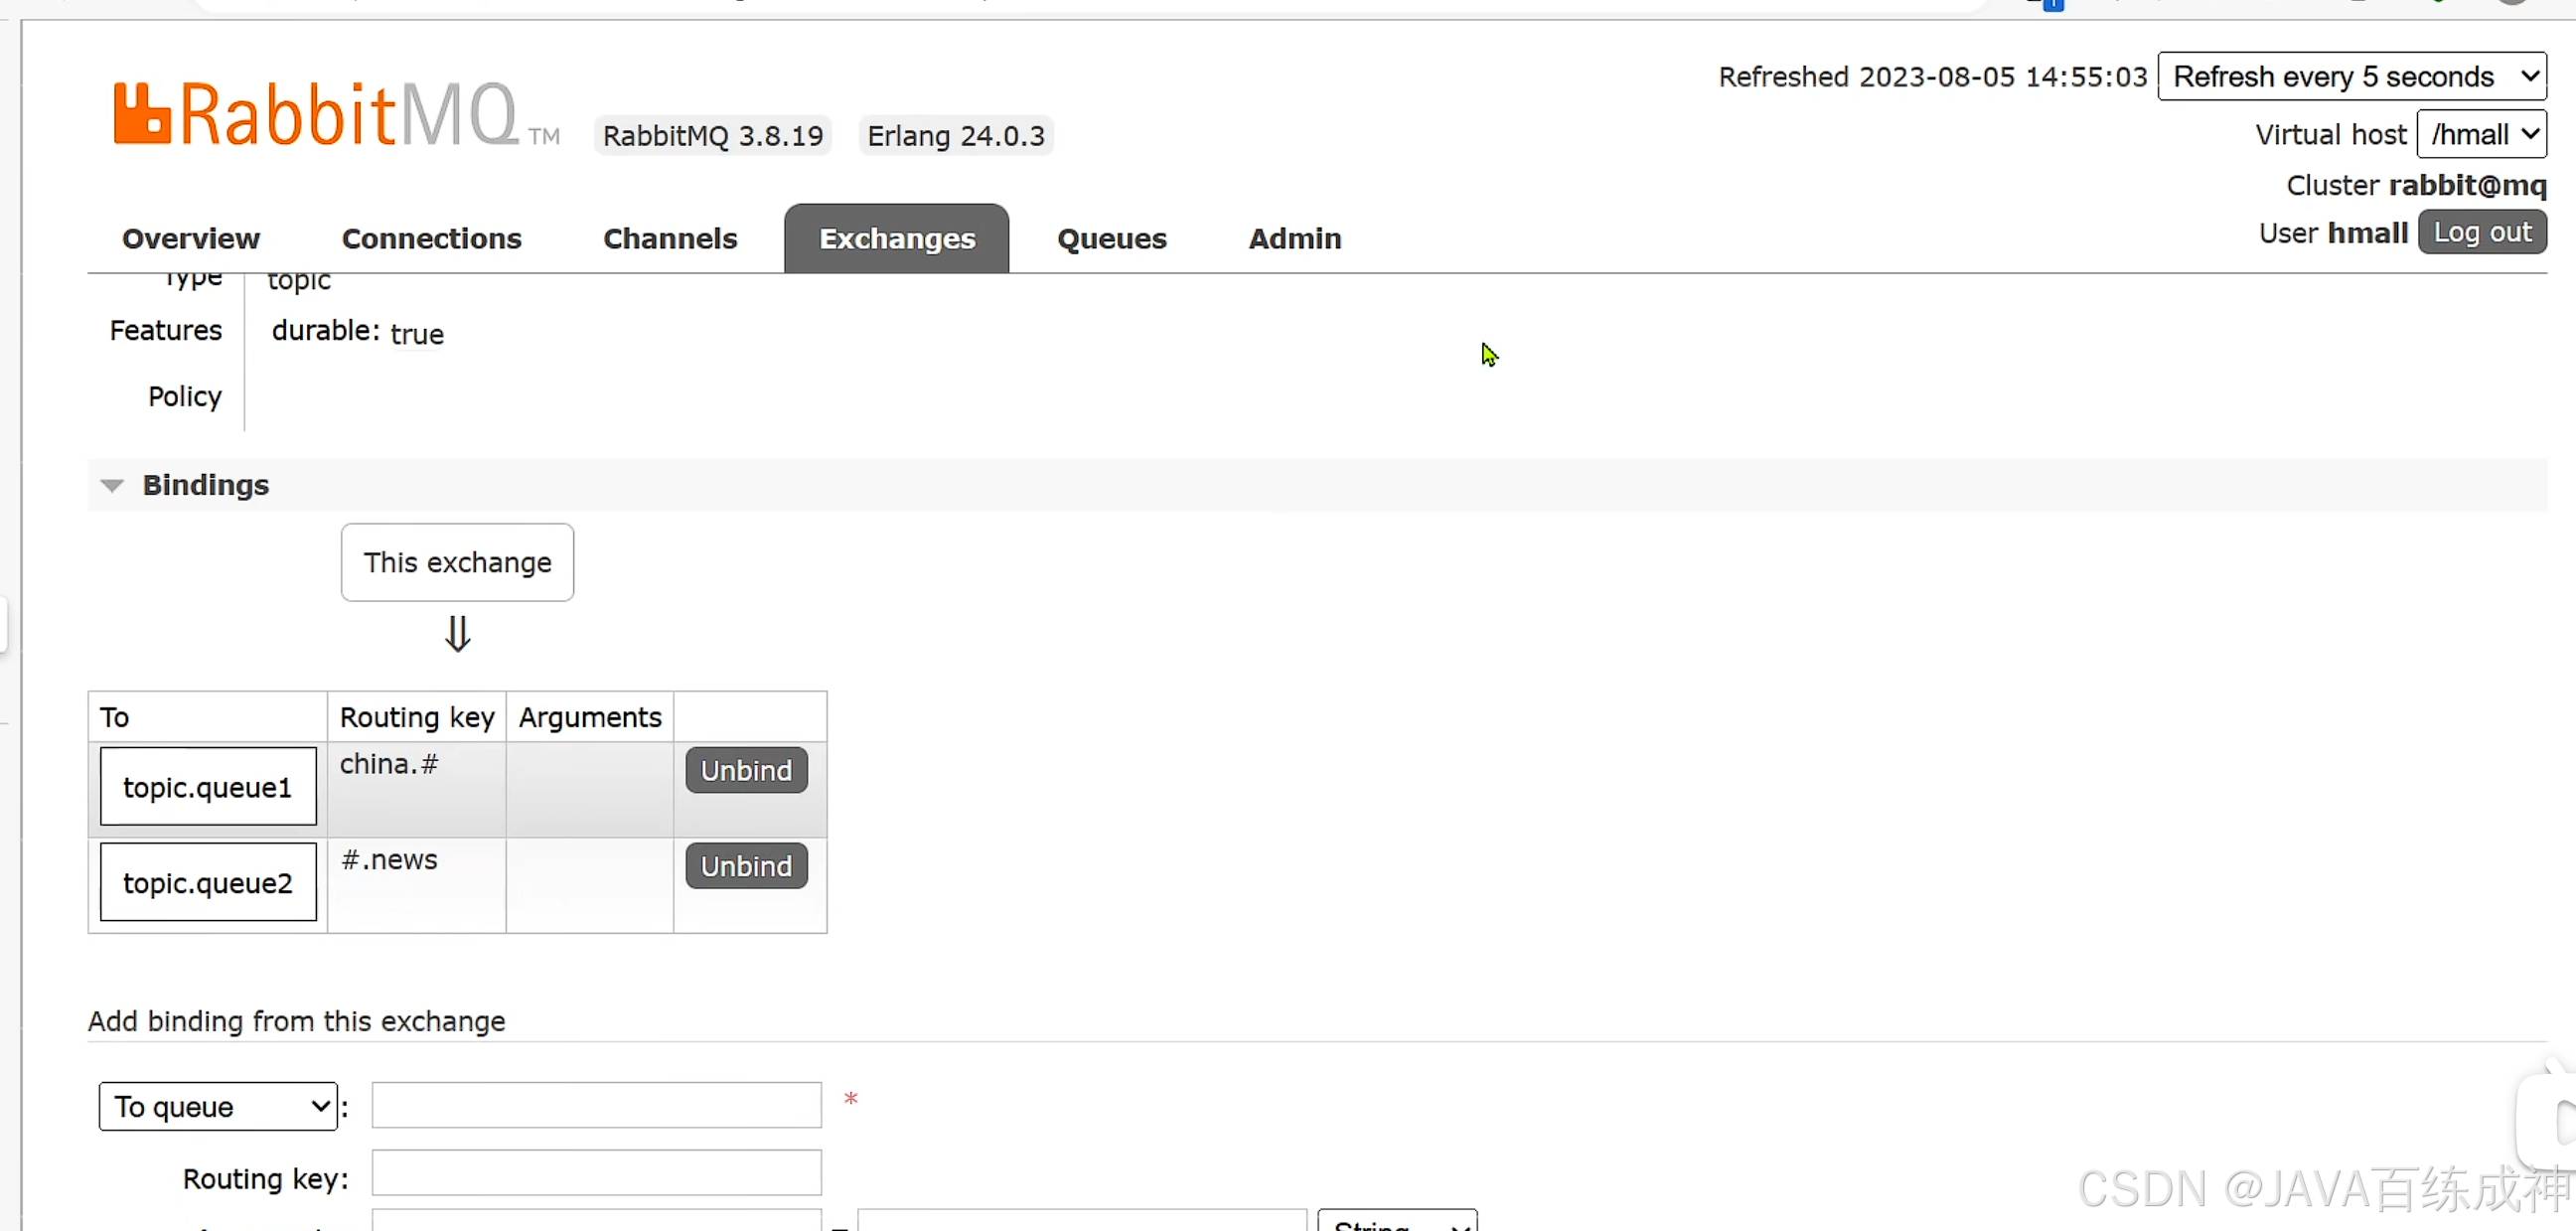
发送消息
    @RabbitListener(bindings = @QueueBinding(
            value =@Queue(name = "topic.queue1"),
            exchange = @Exchange(value = "itcast.topic",type = ExchangeTypes.TOPIC),
            key = "china.#"
    ))
接收
    @RabbitListener(bindings = @QueueBinding(
            value =@Queue(name = "topic.queue1"),
            exchange = @Exchange(value = "itcast.topic",type = ExchangeTypes.TOPIC),
            key = "china.#"
    ))
    public void listenTopicQueue1(String msg){
        System.out.println("消费者1接收到topic消息:【" + msg + "】");
    }

    @RabbitListener(bindings = @QueueBinding(
            value =@Queue(name = "topic.queue2"),
            exchange = @Exchange(value = "itcast.topic",type = ExchangeTypes.TOPIC),
            key = "#.news"
    ))
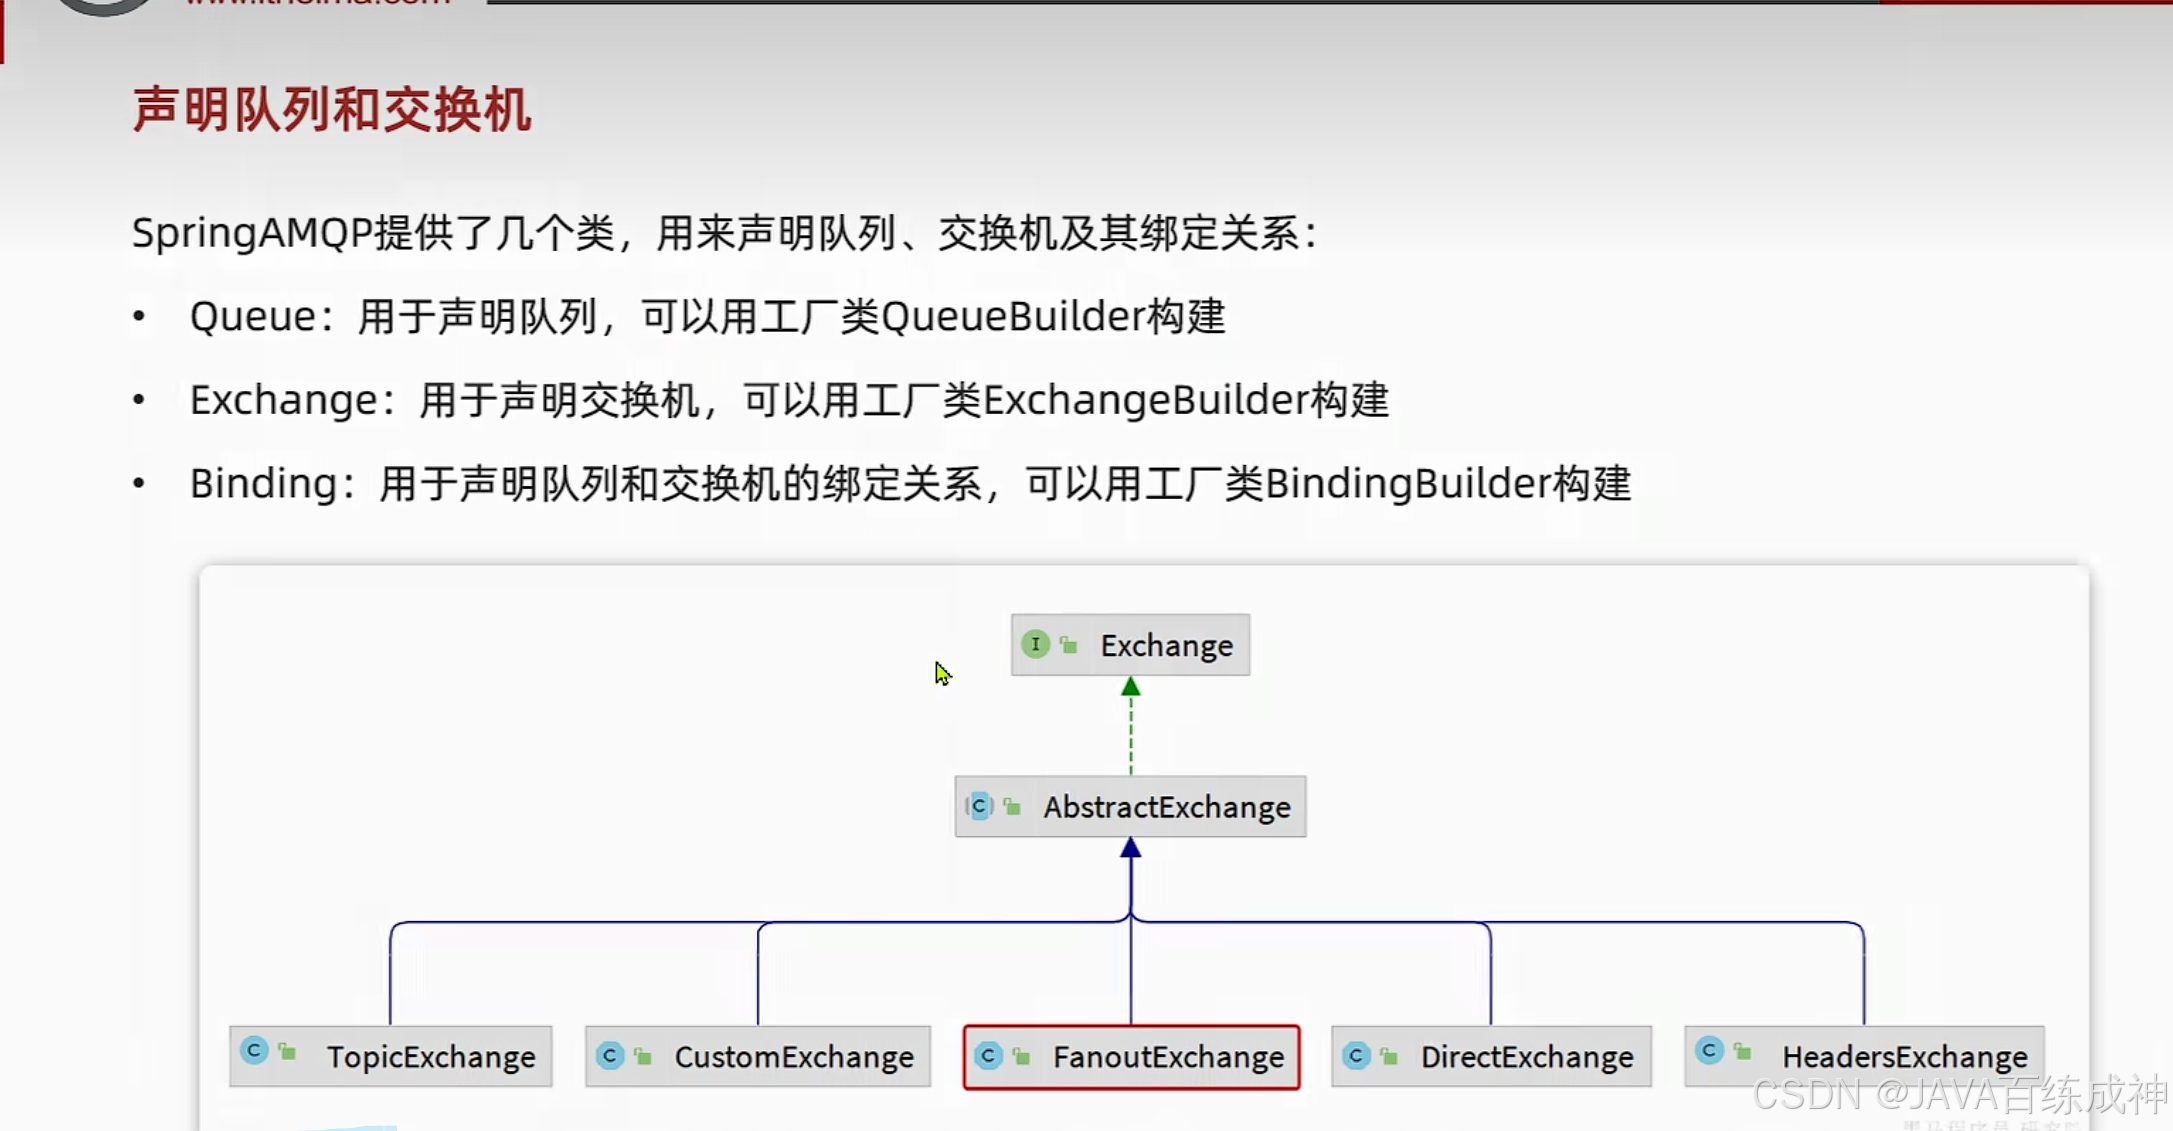
声明队列和交换机的方式
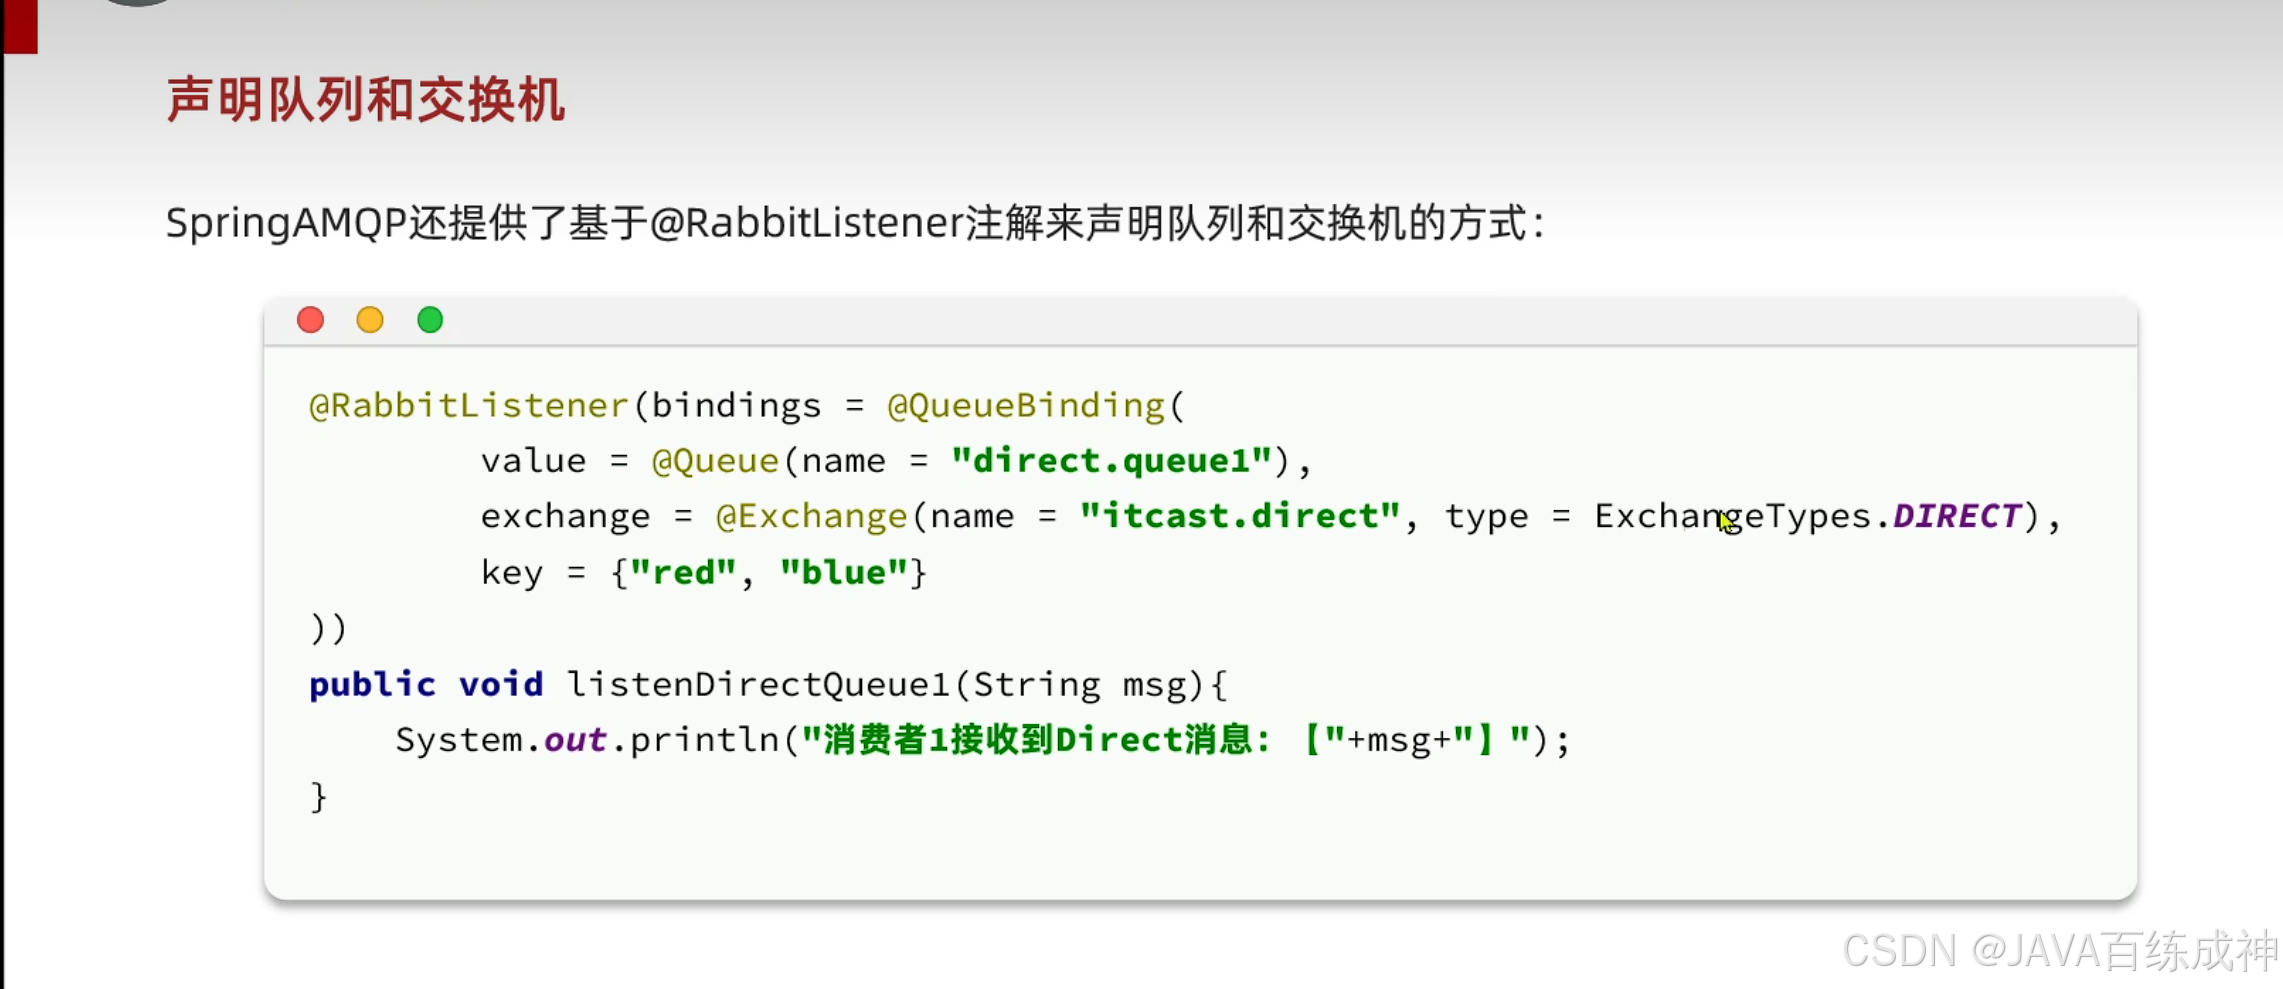
使用注解的方式来声明交换机绑定
注解及作用
@RabbitListener:将一个方法标记为 RabbitMQ 消息的监听器,让 Spring 知道这个方法要处理来自特定队列的消息。
@QueueBinding:定义了队列和交换器之间的绑定关系。
@Queue(name = "topic.queue1"):声明了一个名为 topic.queue1 的队列,如果该队列不存在,Spring 会自动创建。
@Exchange(value = "itcast.topic", type = ExchangeTypes.TOPIC):指定了一个名为 itcast.topic 的主题(TOPIC)类型的交换器。主题交换器根据消息的路由键和绑定键来决定消息的路由。
key = "china.#":绑定键使用了通配符 #,表示匹配以 china. 开头的任意路由键。也就是说,只要消息的路由键以 china. 开头,这个交换器就会把消息路由到 topic.queue1 队列。
    @RabbitListener(bindings = @QueueBinding(
            value =@Queue(name = "topic.queue1"),
            exchange = @Exchange(value = "itcast.topic",type = ExchangeTypes.TOPIC),
            key = "china.#"
    ))
    public void listenTopicQueue1(String msg){
        System.out.println("消费者1接收到topic消息:【" + msg + "】");
    }
会自动创建并绑定
直接发送就能收到了
@Test
public void testTopicExchange() {
//交换机名称
String exchangeName = "itcast.topic";
String message = "日本天气";
//这次是将消息发送到交换机,不再是队列
rabbitTemplate.convertAndSend(exchangeName, "china.news", message);
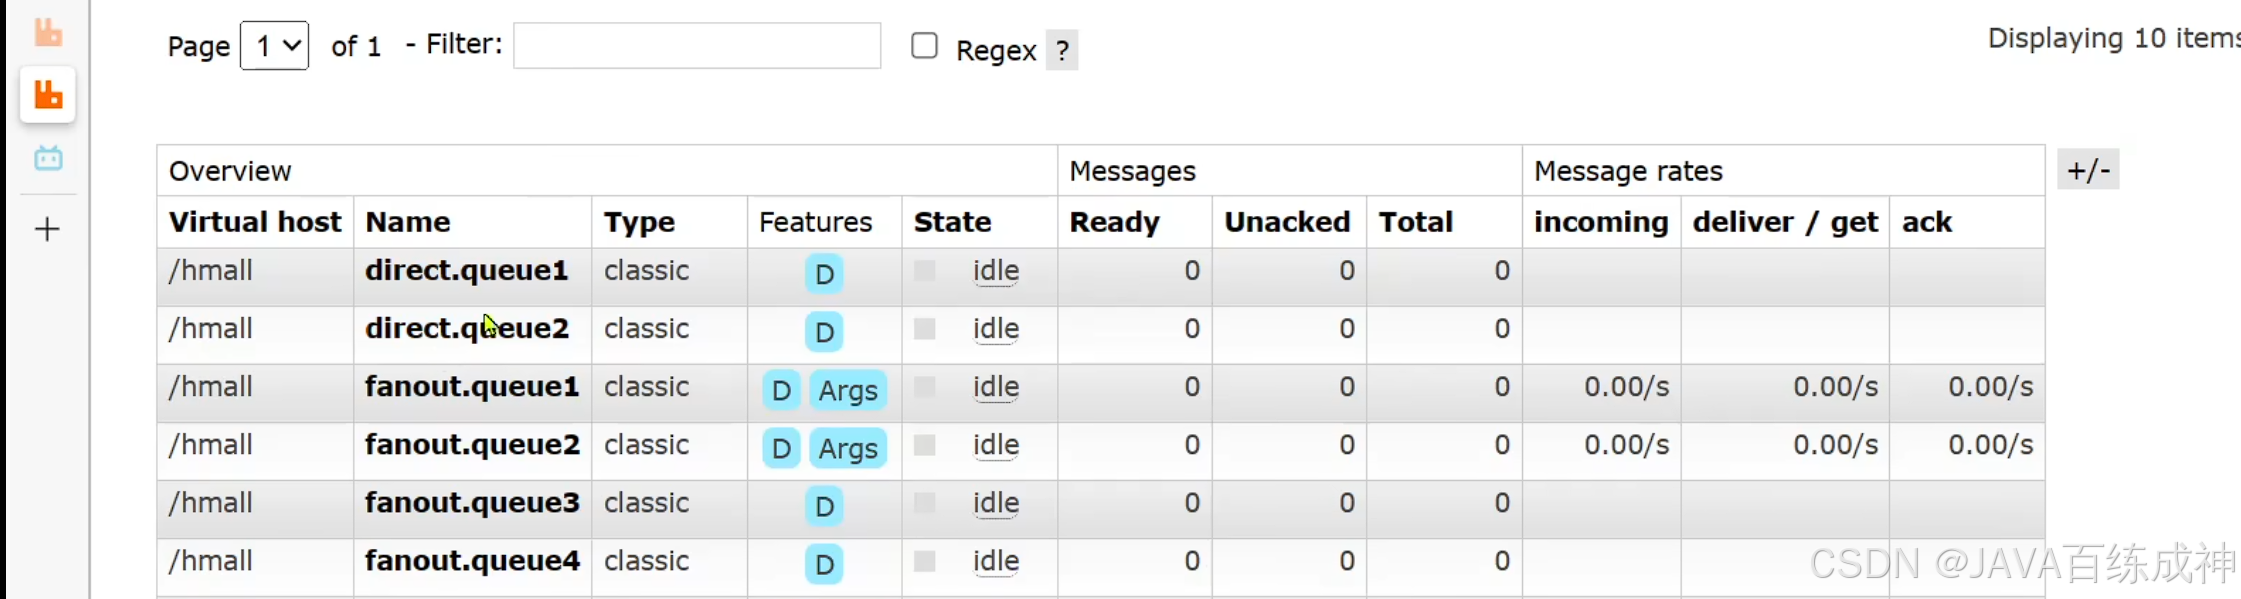
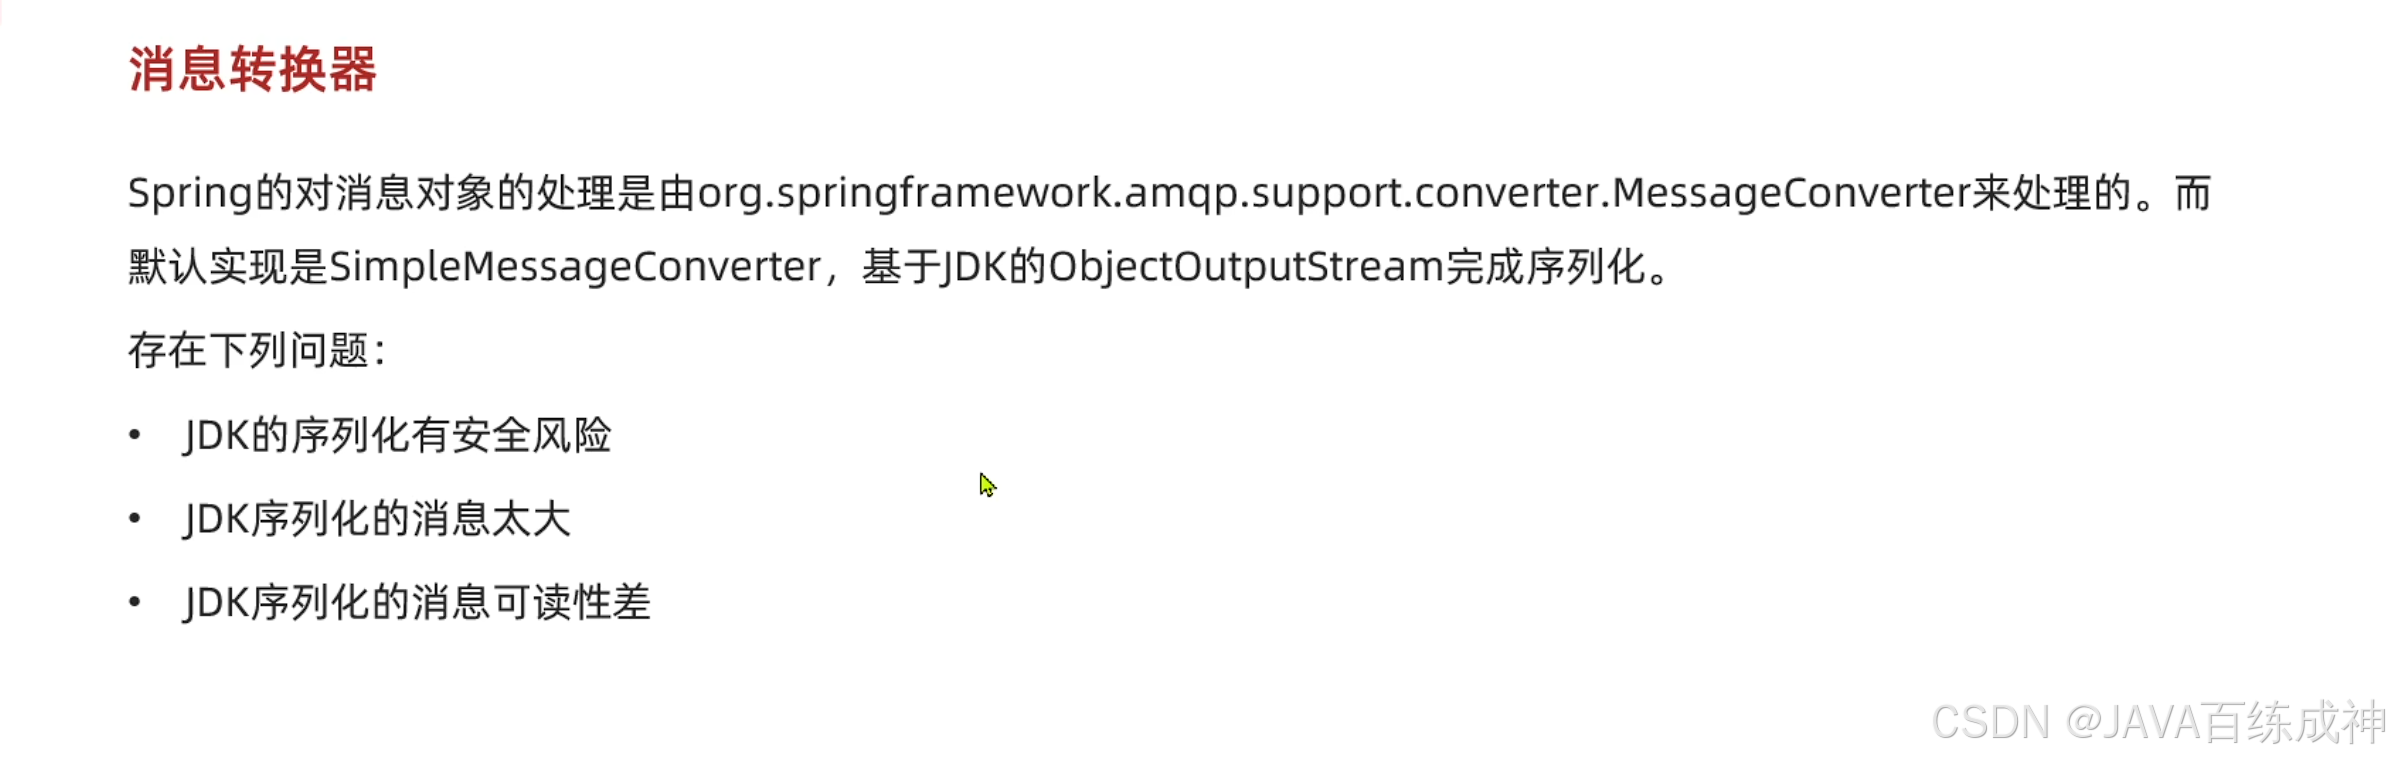
}MQ消息转换器
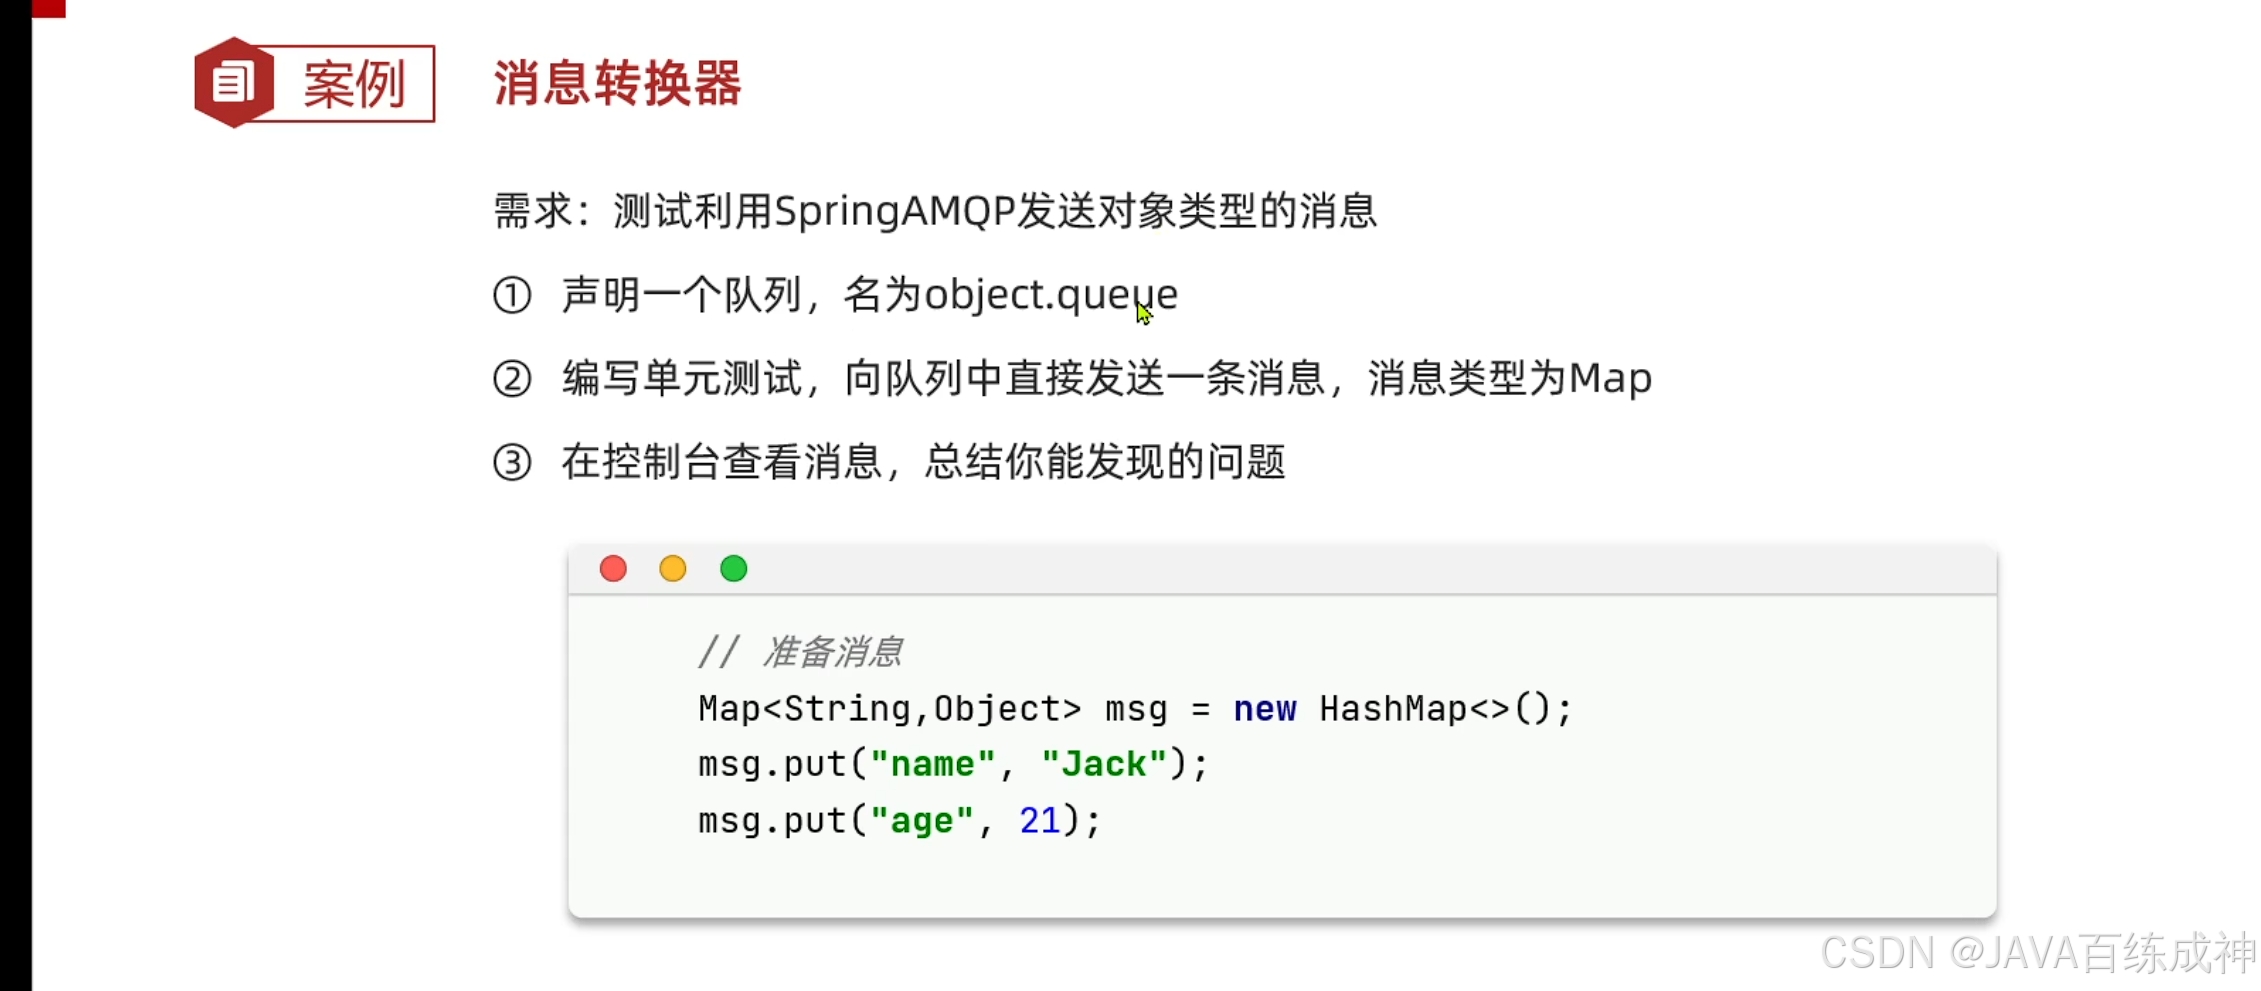
结果会变成一堆乱码
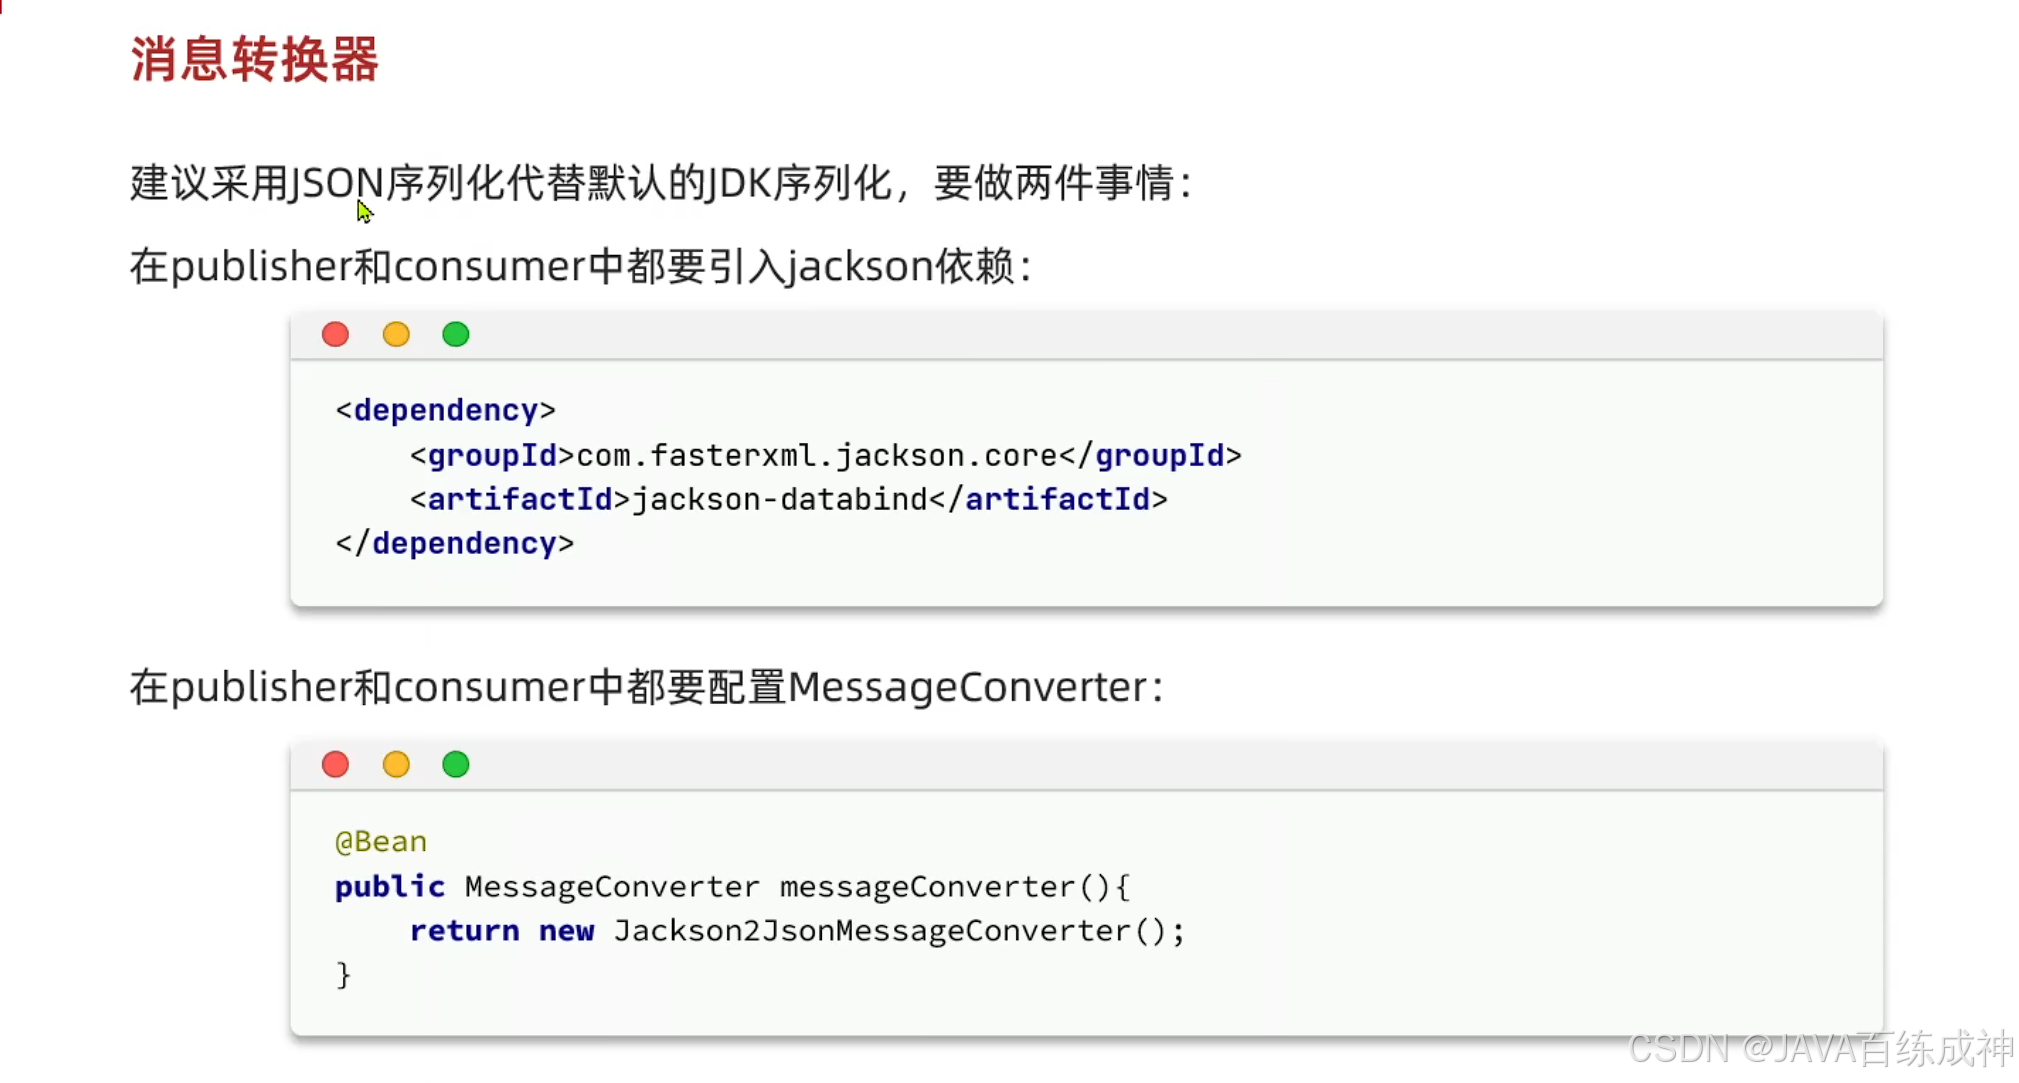
在main方法下添加消息转换器
package cn.itcast.mq;
import org.springframework.amqp.support.converter.Jackson2JsonMessageConverter;
import org.springframework.amqp.support.converter.MessageConverter;
import org.springframework.boot.SpringApplication;
import org.springframework.boot.autoconfigure.SpringBootApplication;
import org.springframework.context.annotation.Bean;
@SpringBootApplication
public class ConsumerApplication {
public static void main(String[] args) {
SpringApplication.run(ConsumerApplication.class, args);
}
/**
* 序列化对象
* @return
*/
@Bean
public MessageConverter jsonMessageConverter(){
Jackson2JsonMessageConverter jjmc =new Jackson2JsonMessageConverter();
jjmc.setCreateMessageIds(true);
return jjmc;
}
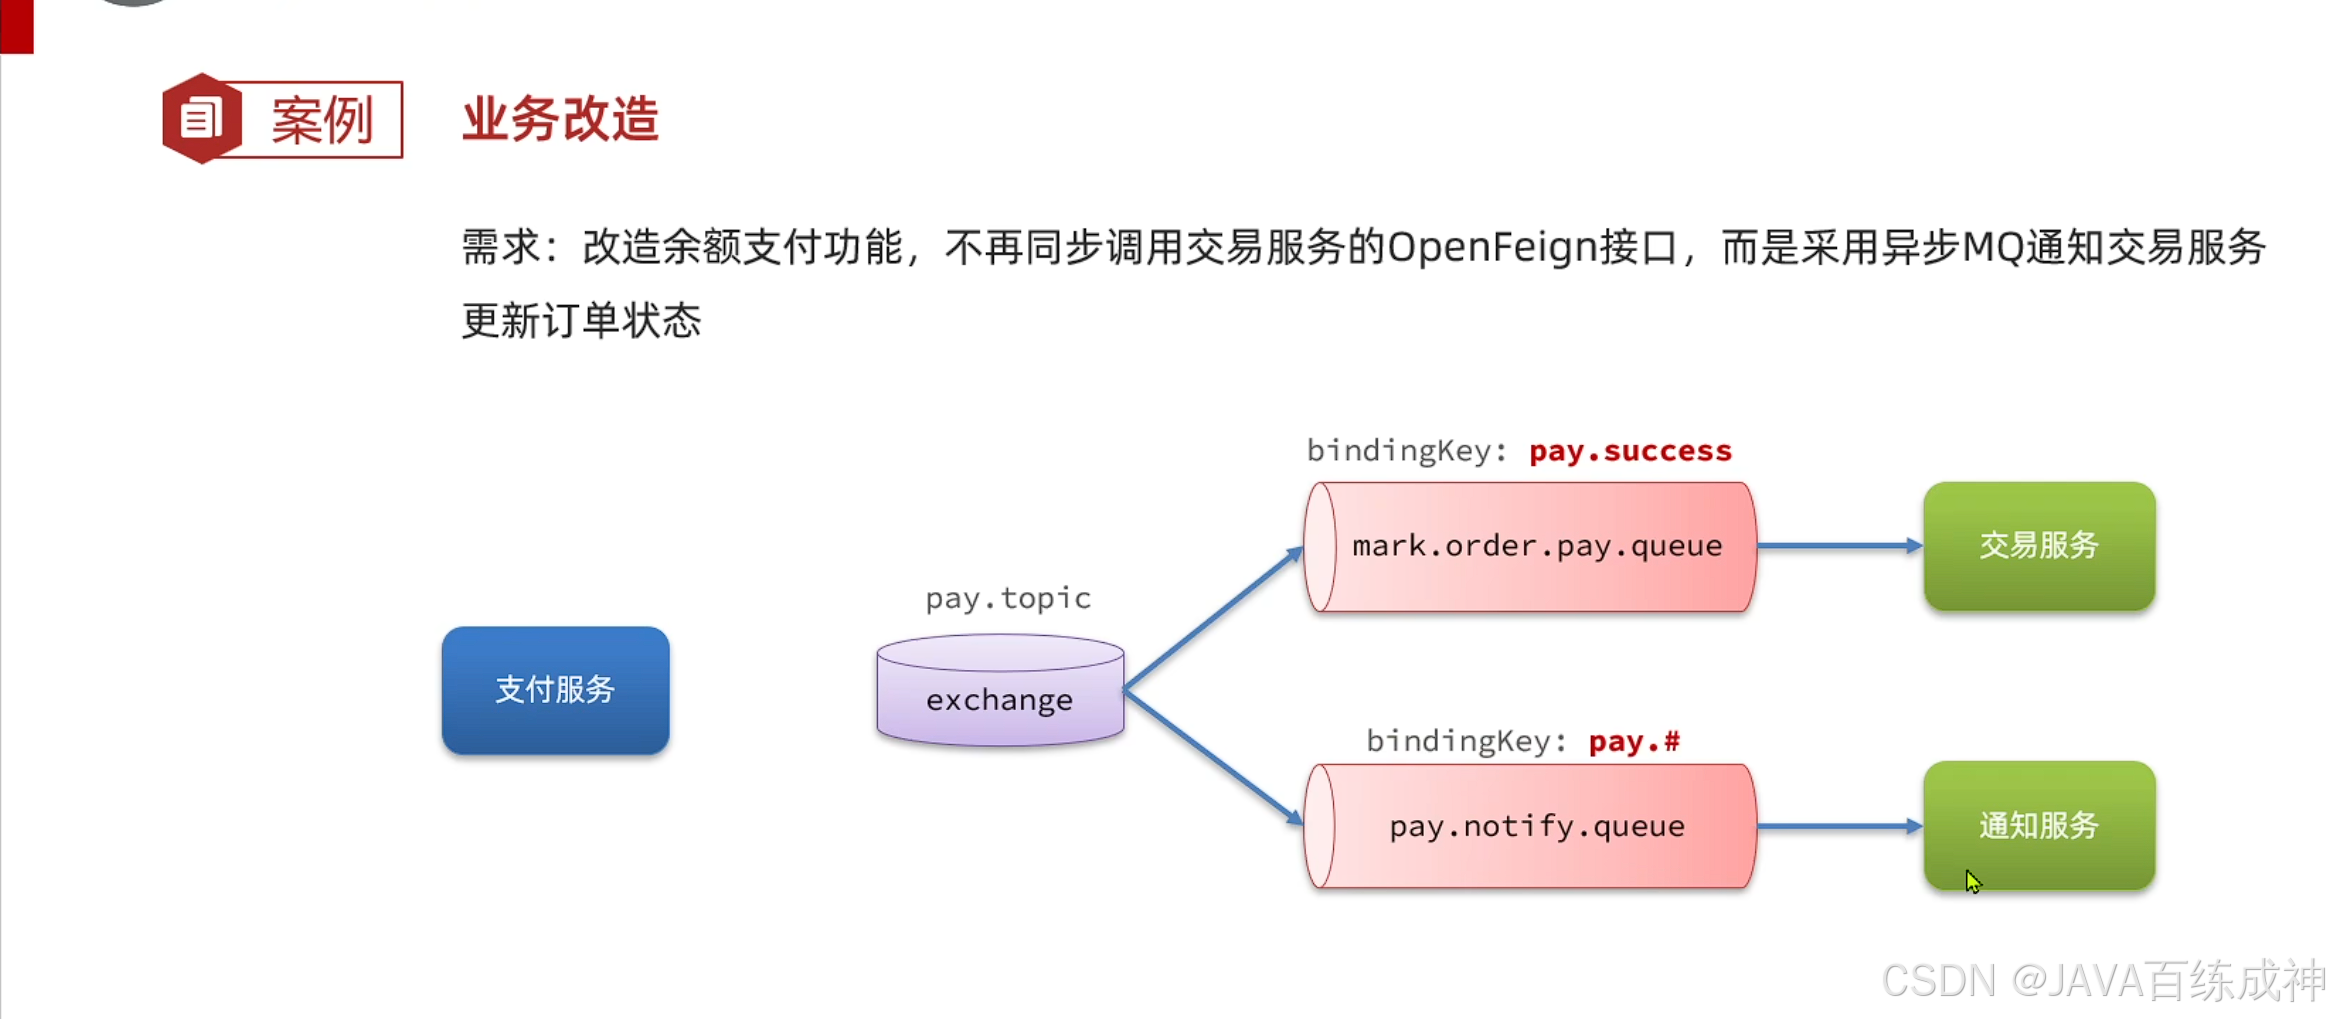
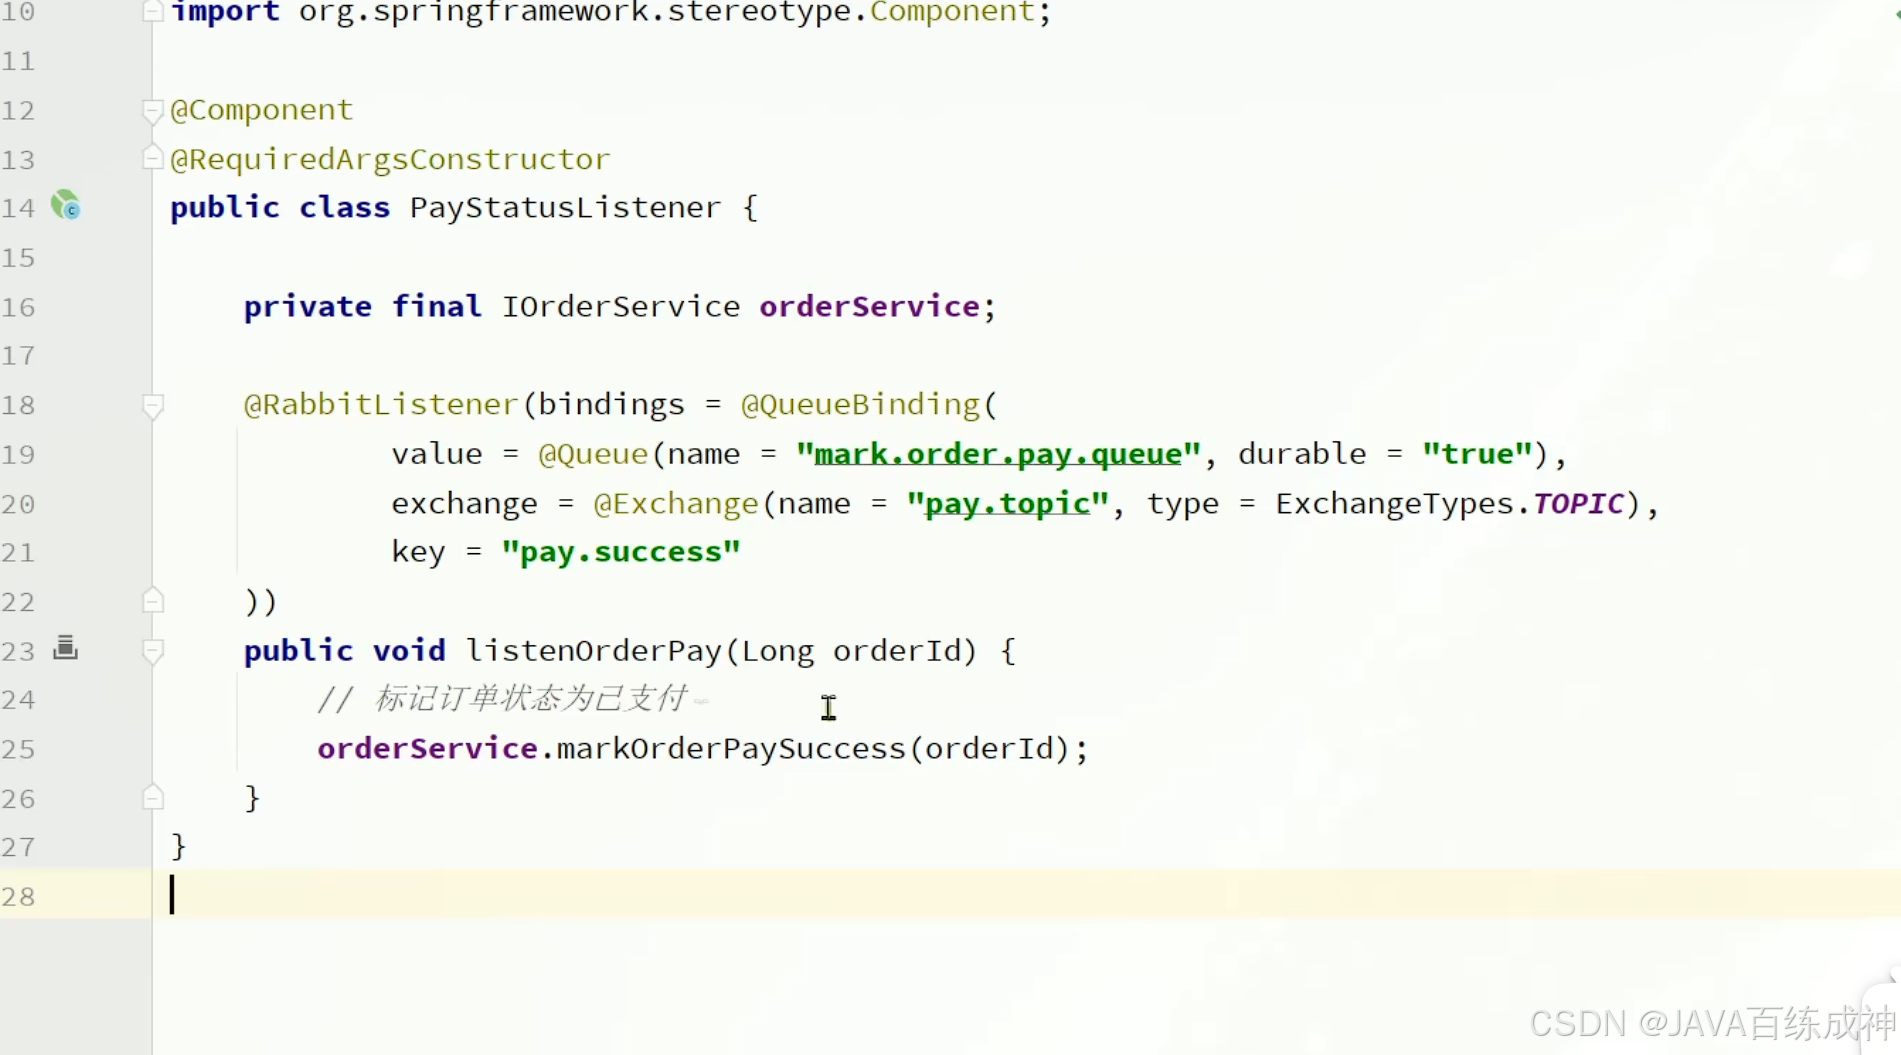
}业务改造
消费者
生产者
