1.先贴AndroidManifest.xml
内容如下:
<?xml version="1.0" encoding="UTF-8"?>
<manifest
android:compileSdkVersion="30"
android:compileSdkVersionCodename="11"
android:versionCode="1679077605"
android:versionName="17.1"
package="symx.virtues"
platformBuildVersionCode="30"
platformBuildVersionName="11"
xmlns:android="http://schemas.android.com/apk/res/android">
<uses-sdk
android:minSdkVersion="19"
android:targetSdkVersion="30"/>
<uses-feature
android:name="android.hardware.touchscreen"
required="false"/>
<uses-permission android:name="android.permission.WAKE_LOCK"/>
<uses-permission android:name="android.permission.WRITE_EXTERNAL_STORAGE"/>
<uses-permission android:name="com.android.vending.BILLING"/>
<uses-permission android:name="android.permission.VIBRATE"/>
<uses-permission android:name="android.permission.INTERNET"/>
<uses-feature
android:glEsVersion="0x30000"
android:required="true"/>
<uses-permission android:name="android.permission.FOREGROUND_SERVICE"/>
<application
android:allowBackup="true"
android:fullBackupContent="@xml/backup"
android:fullBackupOnly="true"
android:hardwareAccelerated="true"
android:icon="@mipmap/icon"
android:isGame="true"
android:label="@string/appName"
android:theme="@android:style/Theme.NoTitleBar.Fullscreen">
<activity
android:alwaysRetainTaskState="true"
android:configChanges="keyboard|keyboardHidden|layoutDirection|locale|navigation|orientation|screenLayout|screenSize|smallestScreenSize|uiMode"
android:label="@string/iconName"
android:launchMode="singleTop"
android:name="org.renpy.android.PythonSDLActivity"
android:screenOrientation="sensorLandscape">
<intent-filter>
<action android:name="android.intent.action.MAIN"/>
<category android:name="android.intent.category.LAUNCHER"/>
</intent-filter>
</activity>
<receiver
android:name="com.amazon.device.iap.ResponseReceiver"
android:permission="com.amazon.inapp.purchasing.Permission.NOTIFY">
<intent-filter>
<action android:name="com.amazon.inapp.purchasing.NOTIFY"/>
</intent-filter>
</receiver>
<meta-data
android:name="com.google.android.play.billingclient.version"
android:value="3.0.0"/>
<activity
android:configChanges="keyboard|keyboardHidden|orientation|screenLayout|screenSize"
android:name="com.android.billingclient.api.ProxyBillingActivity"
android:theme="@android:style/Theme.Translucent.NoTitleBar"/>
<activity
android:enabled="false"
android:exported="false"
android:launchMode="singleInstance"
android:name="com.google.android.play.core.missingsplits.PlayCoreMissingSplitsActivity"
android:process=":playcore_missing_splits_activity"
android:stateNotNeeded="true"/>
<activity
android:enabled="false"
android:exported="false"
android:name="com.google.android.play.core.common.PlayCoreDialogWrapperActivity"
android:stateNotNeeded="true"
android:theme="@style/Theme.PlayCore.Transparent"/>
<service
android:enabled="false"
android:exported="true"
android:name="com.google.android.play.core.assetpacks.AssetPackExtractionService">
<meta-data
android:name="com.google.android.play.core.assetpacks.versionCode"
android:value="11000"/>
</service>
<service
android:enabled="false"
android:exported="false"
android:name="com.google.android.play.core.assetpacks.ExtractionForegroundService"/>
</application>
</manifest>
可以看到启动入口
org.renpy.android.PythonSDLActivity
如果没有经过特殊定制,renPy打包apk的时候生成的自动入口都是它;
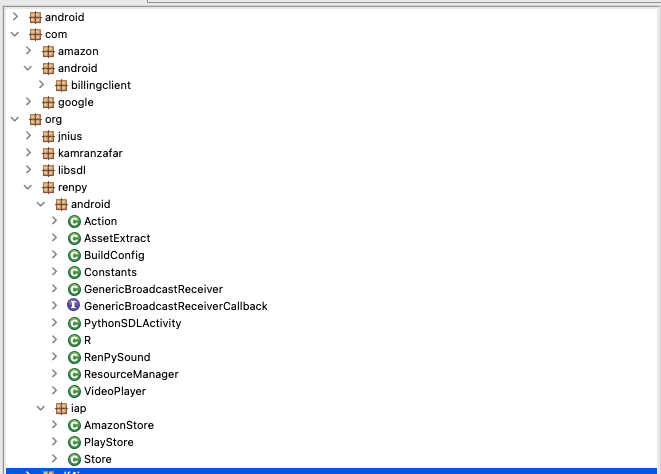
2. 通过 JEB打开android 的apk 可以看到目录结构如下:
3.对象创建
public PythonSDLActivity() {
    this.mPresplash = null;
    this.mAllPacksReady = false;
    this.mAssetPackManager = null;
    this.mProgressBar = null;
    this.waitForWifiConfirmationShown = false;
    this.assetPackStates = new HashMap();
    this.mOldProgress = 0L;
    this.wakeLock = null;
    this.mActivityResultRequestCode = -1;
    this.mActivityResultResultCode = -1;
    this.mActivityResultResultData = null;
}
4.实际和renPy相关的入口 PythonSDLActivity#onCreate
@Override  // org.libsdl.app.SDLActivity
protected void onCreate(Bundle bundle0) {

1. 日志记录与父类调用
    Log.v("python", "onCreate()");
    super.onCreate(bundle0);
2.调用 Store.create() 方法,初始化应用内购买(IAP)模块。不用关注
    Store.create(this);
    boolean z = true;
3. 设置 SurfaceView 格式
    PythonSDLActivity.setSurfaceViewFormat(1);
    if(Constants.assetPacks.length > 0) {
5. 处理 Asset Pack 下载(Google Play Asset Delivery)
        AssetPackManager assetPackManager0 = AssetPackManagerFactory.getInstance(this);
        this.mAssetPackManager = assetPackManager0;
        assetPackManager0.registerListener(this);
        String[] arr_s = Constants.assetPacks;
        for(int v = 0; v < arr_s.length; ++v) {
            String s = arr_s[v];
            if(!this.checkPack(s)) {
                Log.i("python", "fetching: " + s);
                this.mAssetPackManager.fetch(Collections.singletonList(s));
                z = false;
            }
        }
    }
6. 预加载启动画面 (Presplash) 或下载进度条
    this.mAllPacksReady = z;
    Bitmap bitmap0 = this.getBitmap((z ? "android-presplash" : "android-downloading") + ".png");
    if(bitmap0 == null) {
        bitmap0 = this.getBitmap((z ? "android-presplash" : "android-downloading") + ".jpg");
    }
7. 显示 Presplash 图像
    if(bitmap0 != null) {
        ImageView imageView0 = new ImageView(this);
        this.mPresplash = imageView0;
        imageView0.setBackgroundColor(bitmap0.getPixel(0, 0));
        this.mPresplash.setScaleType(ImageView.ScaleType.FIT_CENTER);
        this.mPresplash.setImageBitmap(bitmap0);
        PythonSDLActivity.mLayout.addView(this.mPresplash, new ViewGroup.LayoutParams(-1, -1));
    }
8. 显示下载进度条(如果资源未完全准备好)
    if(!this.mAllPacksReady) {
        RelativeLayout.LayoutParams relativeLayout$LayoutParams0 = new RelativeLayout.LayoutParams(-1, 20);
        relativeLayout$LayoutParams0.addRule(12);
        relativeLayout$LayoutParams0.leftMargin = 20;
        relativeLayout$LayoutParams0.rightMargin = 20;
        relativeLayout$LayoutParams0.bottomMargin = 20;
        this.mProgressBar = new ProgressBar(this, null, 0x1010078);
        PythonSDLActivity.mLayout.addView(this.mProgressBar, relativeLayout$LayoutParams0);
    }
}
功能
描述
生命周期
onCreate() 是整个游戏/应用的入口点
游戏引擎集成
继承自 SDLActivity,初始化图形、音频等底层系统
资源管理
支持 Google Play Asset Delivery,动态下载大资源包
UI 展示
加载 presplash 图片或下载进度条
日志与调试
输出关键流程信息,便于调试资源加载和初始化过程
实际的与RenPy相关的初始化下一章分析