
✨✨ 欢迎大家来到景天科技苑✨✨
🎈🎈 养成好习惯,先赞后看哦~🎈🎈
🏆 作者简介:景天科技苑
🏆《头衔》:大厂架构师,华为云开发者社区专家博主,阿里云开发者社区专家博主,CSDN全栈领域优质创作者,掘金优秀博主,51CTO博客专家等。
🏆《博客》:Rust开发,Python全栈,Golang开发,云原生开发,PyQt5和Tkinter桌面开发,小程序开发,人工智能,js逆向,App逆向,网络系统安全,数据分析,Django,fastapi,flask等框架,云原生K8S,linux,shell脚本等实操经验,网站搭建,数据库等分享。
所属的专栏: Rust语言通关之路
景天的主页: 景天科技苑

文章目录
- [Rust trait(特征)](#Rust trait(特征))
-
- [1. Trait基础概念](#1. Trait基础概念)
-
- [1.1 什么是Trait](#1.1 什么是Trait)
- [1.2 Trait与接口的区别](#1.2 Trait与接口的区别)
- [1.3 Trait的基本语法](#1.3 Trait的基本语法)
- [2. Trait实现与使用](#2. Trait实现与使用)
-
- [2.1 为类型实现Trait](#2.1 为类型实现Trait)
- [2.2 Trait的多种用法](#2.2 Trait的多种用法)
-
- [1. Trait作为参数](#1. Trait作为参数)
- [2. 默认实现](#2. 默认实现)
- [3. Trait Bound泛型约束](#3. Trait Bound泛型约束)
- [4. trait作为返回值](#4. trait作为返回值)
- [5. 注意事项](#5. 注意事项)
- [3. 标准库中的常用Trait](#3. 标准库中的常用Trait)
-
- [3.1 格式化相关Trait](#3.1 格式化相关Trait)
- [3.2 转换Trait](#3.2 转换Trait)
- [3.3 运算符重载Trait](#3.3 运算符重载Trait)
- [3.4 其他比较重要的内置trait](#3.4 其他比较重要的内置trait)
Rust trait(特征)
1. Trait基础概念
1.1 什么是Trait
在Rust中,Trait是一种定义共享行为的机制,类似于其他语言中的"接口"(interface)或"抽象类"(abstract class)。
Trait允许我们定义一组方法签名,这些方法可以被不同类型实现,从而实现多态行为。
1.2 Trait与接口的区别
虽然Trait类似于接口,但Rust的Trait更加灵活和强大:
关联类型:Trait可以定义关联类型
默认实现:方法可以有默认实现
Trait对象:支持动态分发
条件实现:可以根据类型参数有条件地实现Trait
1.3 Trait的基本语法
定义Trait的基本语法如下:
trait里面定义各种方法
rust
trait TraitName {
    fn method1(&self, ...) -> ReturnType;
    fn method2(&mut self, ...) -> ReturnType;
    // 可以有默认实现
    fn method_with_default(&self) {
        println!("Default implementation");
    }
}
使用 trait 关键字来声明一个 trait,后面是 trait 的名字,在这个例子中是 TraitName 。
在大括号中声明描述实现这个trait 的类型所需要的行为的方法,在这个例子中有三个方法 。
在方法签名后跟分号,而不是在大括号中提供其实现。
接着每一个实现这个 trait 的类型都需要提供其自定义行为的方法体,编译器也会确保任何实现TraitName trait 的类型都拥有与这个签名的定义完全一致的方法。
trait 体中可以有多个方法,一行一个方法签名且都以分号结尾。
2. Trait实现与使用
2.1 为类型实现Trait
我们可以为任何类型实现Trait,包括标准库类型和我们自定义的类型。
实现trait
impl 关键字之后,我们提供需要实现 trait 的名称,接着是for 和需要实现 trait 的 类型的名称。
在 impl 块中,使用 trait 定义中的方法签名,不过不再后跟分号,而是需要在大括号中编写函数体来为特定类型实现 trait 方法所拥有的行为。
语法如下:
impl trait for 类型名 {}
注意:实现 trait时,方法的签名必须与 trait 中定义的方法一致。trait 中的方法签名包括方法名、参数类型和返回值类型。
实现trait,必须将trait中的方法全部实现,默认实现的方法除外
不能自定义方法的签名
rust
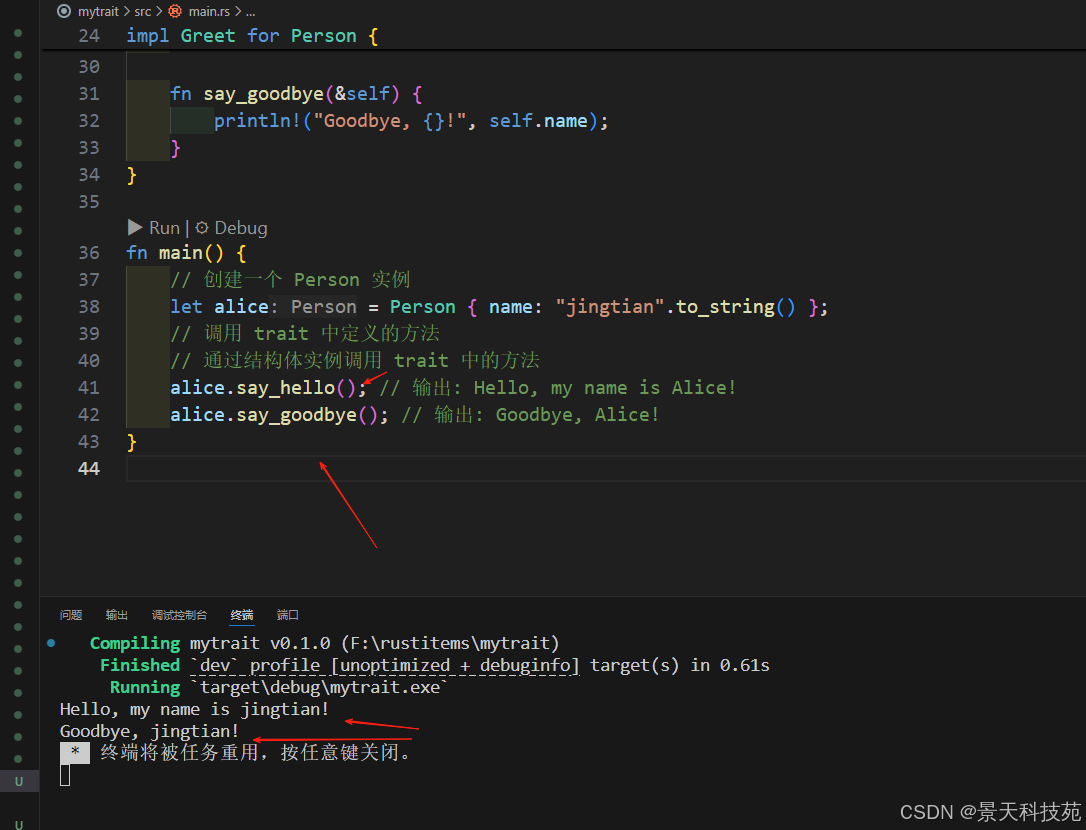
//定义一个 trait 和一个实现了该 trait 的结构体
// 这个 trait 定义了一个方法 say_hello
// 结构体 Person 实现了这个 trait
// 通过实现 trait 的方法,我们可以在结构体实例上调用这个方法
// 这个例子展示了如何使用 trait 来定义行为
// 以及如何在结构体中实现这些行为
// 通过 trait,我们可以定义一组方法的签名
// 然后在不同的结构体中实现这些方法
// 这使得代码更加灵活和可扩展
// 通过 trait,我们可以实现多态
trait Greet {
    fn say_hello(&self);
    fn say_goodbye(&self);
}

// 定义一个结构体 Person
struct Person {
    name: String,
}

// 实现 trait Greet 的方法
// 为结构体 Person 实现 trait Greet
// 通过实现 trait 的方法,我们可以在结构体实例上调用这个方法
impl Greet for Person {
    //注意:实现 trait时,方法的签名必须与 trait 中定义的方法一致。trait 中的方法签名包括方法名、参数类型和返回值类型。
    //不能自定义方法的签名
    fn say_hello(&self) {
        println!("Hello, my name is {}!", self.name);
    }

    fn say_goodbye(&self) {
        println!("Goodbye, {}!", self.name);
    }
}

fn main() {
    // 创建一个 Person 实例
    let alice = Person { name: "jingtian".to_string() };
    // 调用 trait 中定义的方法
    // 通过结构体实例调用 trait 中的方法
    alice.say_hello(); // 输出: Hello, my name is Alice!
    alice.say_goodbye(); // 输出: Goodbye, Alice!
}
2.2 Trait的多种用法
1. Trait作为参数
传参的时候,我们并不知道item的具体类型
但是我们知道它实现了Summary这个trait
所以我们可以把它当做Summary来使用
只要某个类,实现了这个特征,这个类的实例就可以调用特征里面的方法
rust
trait Summary {
fn summarize(&self) -> String;
fn summarize_author(&self) -> String;
// 可以有默认实现
fn summarize_default(&self) -> String {
format!("(Read more from {}...)", self.summarize_author())
}
}
struct NewsArticle {
headline: String,
location: String,
}
impl Summary for NewsArticle {
fn summarize(&self) -> String {
format!("{} - {}", self.headline, self.location)
}
fn summarize_author(&self) -> String {
String::from("jingtian")
}
}
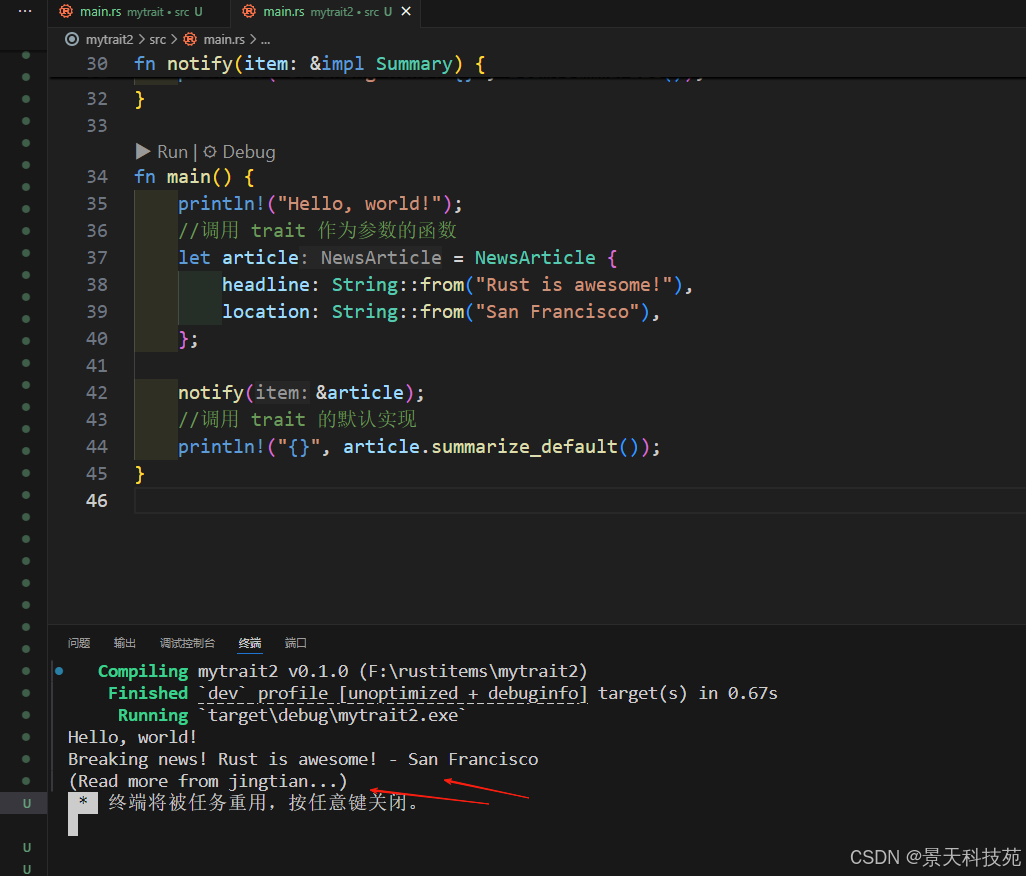
//trait作为参数
//传参的时候,我们并不知道item的具体类型
//但是我们知道它实现了Summary这个trait,实现了这个特征的类型的对象,就可以作为参数传进来
//所以我们可以把它当做Summary来使用
fn notify(item: &impl Summary) {
println!("Breaking news! {}", item.summarize());
}
fn main() {
println!("Hello, world!");
//调用 trait 作为参数的函数
let article = NewsArticle {
headline: String::from("Rust is awesome!"),
location: String::from("San Francisco"),
};
notify(&article);
//调用 trait 的默认实现
println!("{}", article.summarize_default());
}
2. 默认实现
trait的默认实现,就是在定义trait的时候,将里面的函数体写出来,而不是简单的只定义一个函数签名
这样,当某个类型实现了这个trait,不用再去写具体的方法内容,就可以调用这个trait的方法
Trait方法可以有默认实现,实现者可以选择使用默认实现或覆盖它。
有时为 trait 中的某些或全部方法提供默认的行为,而不是在每个类型的每个实现中都定义自己的行为是很有用的。
这样当为某个特定类型实现 trait 时,可以选择保留或重载每个方法的默认行为。
rust
//trait的默认实现
trait Summary {
fn summarize(&self) -> String;
fn summarize_author(&self) -> String;
// 在定义trait的时候,就将方法体给实现的方法,称为默认实现
fn summarize_default(&self) -> String {
format!("(Read more from {}...)", self.summarize_author())
}
}
struct NewsArticle {
headline: String,
location: String,
}
//可以看到我们实现trait的时候,并没有实现默认的方法
// 但是我们可以直接使用默认的方法
// 这就是 trait 的默认实现的好处
impl Summary for NewsArticle {
fn summarize(&self) -> String {
format!("{} - {}", self.headline, self.location)
}
fn summarize_author(&self) -> String {
String::from("jingtian")
}
}
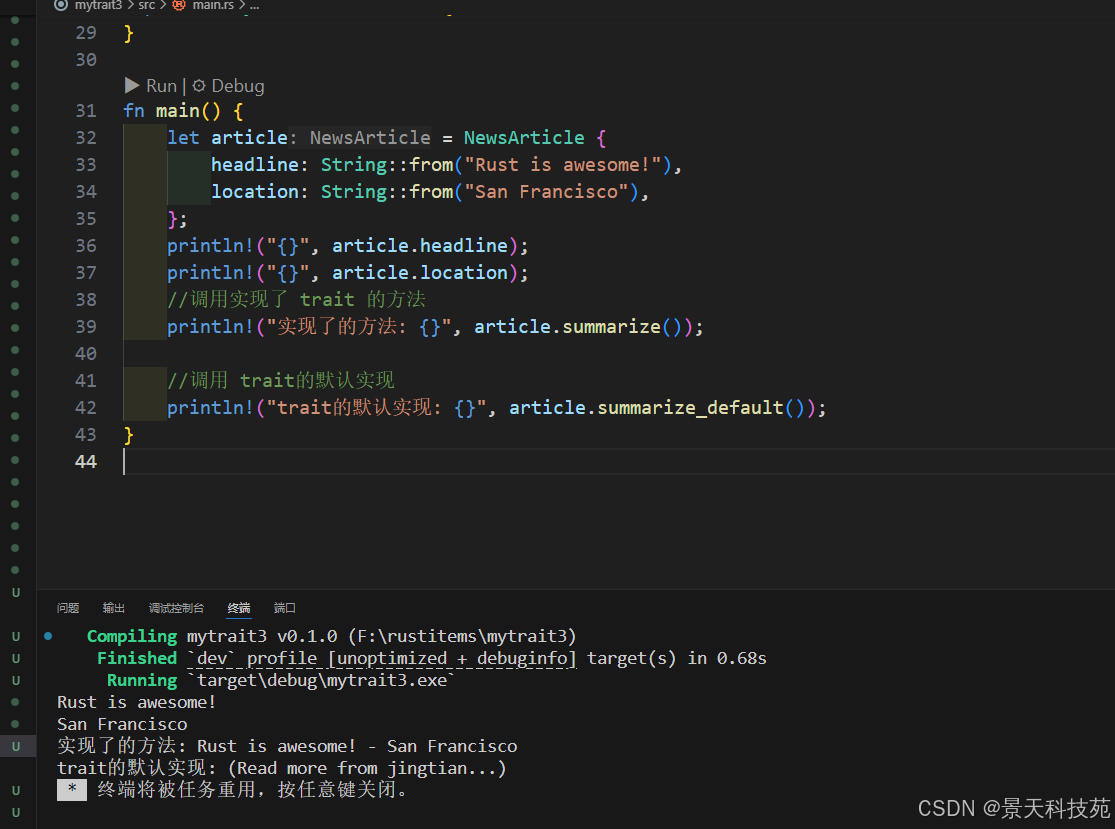
fn main() {
let article = NewsArticle {
headline: String::from("Rust is awesome!"),
location: String::from("San Francisco"),
};
println!("{}", article.headline);
println!("{}", article.location);
//调用实现了 trait 的方法
println!("实现了的方法: {}", article.summarize());
//调用 trait的默认实现
println!("trait的默认实现: {}", article.summarize_default());
}
当然,我们也可以不使用默认的实现,将默认的实现给改成自己的实现
将默认实现的函数重写
rust
//trait的默认实现
trait Summary {
fn summarize(&self) -> String;
// 可以有默认实现
fn summarize_author(&self) -> String;
fn summarize_default(&self) -> String {
format!("(Read more from {}...)", self.summarize_author())
}
}
struct NewsArticle {
headline: String,
location: String,
}
//可以看到我们实现trait的时候,并没有实现默认的方法
// 但是我们可以直接使用默认的方法
// 这就是 trait 的默认实现的好处
impl Summary for NewsArticle {
fn summarize(&self) -> String {
format!("{} - {}", self.headline, self.location)
}
fn summarize_author(&self) -> String {
String::from("jingtian")
}
//将默认实现的函数重写
fn summarize_default(&self) -> String {
format!("(Read more from {}...)", "jingtian".to_string())
}
}
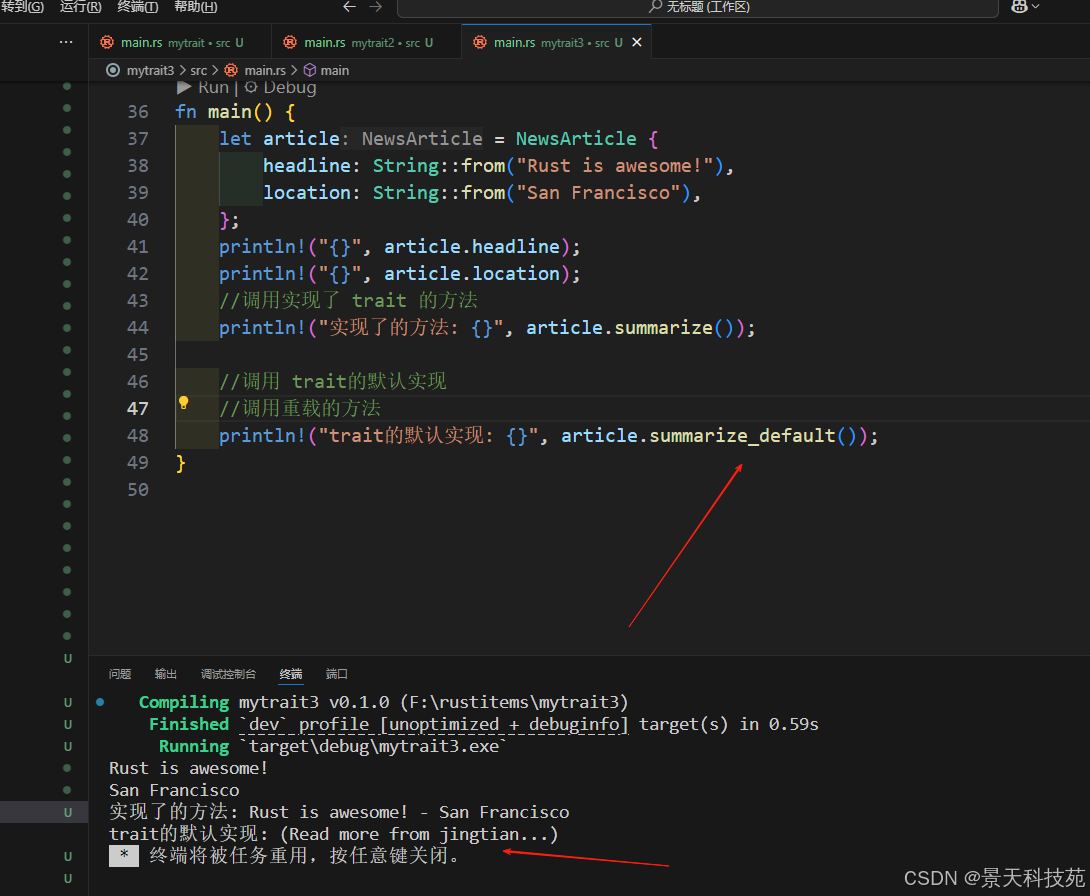
fn main() {
let article = NewsArticle {
headline: String::from("Rust is awesome!"),
location: String::from("San Francisco"),
};
println!("{}", article.headline);
println!("{}", article.location);
//调用实现了 trait 的方法
println!("实现了的方法: {}", article.summarize());
//调用 重载后的实现
println!("trait的默认实现: {}", article.summarize_default());
}此时,就是我们重载后的方法实现
这样其实就是实现了多态
3. Trait Bound泛型约束
Rust 中的 trait bound 是一种对泛型类型添加约束的机制,用来确保某个类型实现了特定的 trait,这样我们就可以在函数或结构体中安全地使用该 trait 的方法或功能。
📘 1)什么是 trait bound?
在 Rust 中,trait 类似于其他语言中的接口,它定义了一组方法签名。trait bound 就是用来约束泛型类型必须实现某个 trait 的方式。
示例1:
rust
// 定义一个 trait
trait Printable {
    fn print(&self);
}

// 使用 trait bound 约束 T 必须实现 Printable
fn print_item<T: Printable>(item: T) {
    item.print();
}
示例2:
rust
//trait bound
// trait bound 是 Rust 中的一种语法,用于指定泛型类型参数必须实现某个 trait
// trait bound 可以用于函数、结构体、枚举等的定义中
// trait bound 的语法是:<T: Trait>,其中 T 是泛型类型参数,Trait 是 trait 的名称
// trait bound 的作用是限制泛型类型参数的类型,使得在使用泛型时,编译器可以检查泛型类型参数是否实现了指定的 trait
trait Summary {
fn summarize(&self) -> String;
}
struct NewsArticle {
headline: String,
location: String,
}
impl Summary for NewsArticle {
fn summarize(&self) -> String {
format!("{} - {}", self.headline, self.location)
}
}
fn notify(item: &impl Summary) {
println!("Breaking news! {}", item.summarize());
}
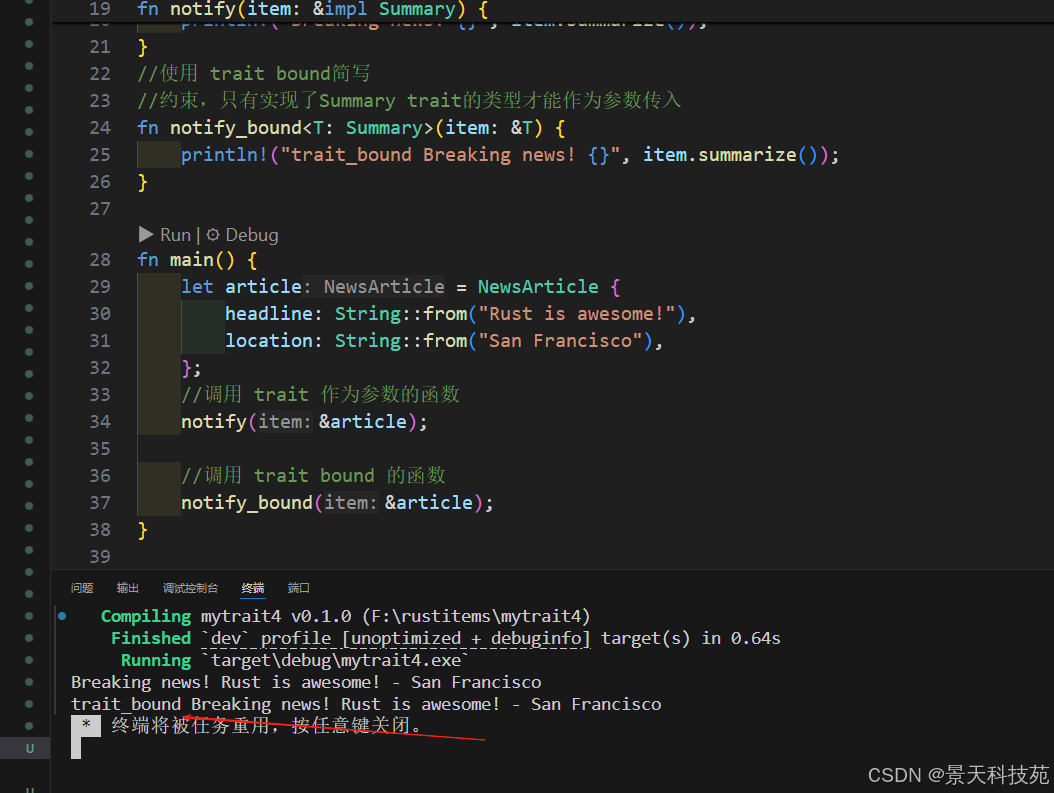
//使用 trait bound简写
//约束,只有实现了Summary trait的类型才能作为参数传入
fn notify_bound<T: Summary>(item: &T) {
println!("trait_bound Breaking news! {}", item.summarize());
}
fn main() {
let article = NewsArticle {
headline: String::from("Rust is awesome!"),
location: String::from("San Francisco"),
};
//调用 trait 作为参数的函数
notify(&article);
//调用 trait bound 的函数
notify_bound(&article);
}
🧩 2)trait bound 的几种语法
- 简写语法:T: Trait
rust
fn do_something<T: Trait1 + Trait2>(val: T) {
    // T 实现了 Trait1 和 Trait2
}- where 语法(更清晰,适用于复杂约束)
rust
fn do_something<T, U>(t: T, u: U)
where
    T: Trait1 + Trait2,
    U: Trait3,
{
    // 可以使用 T 和 U 的 trait 方法
}- 用于结构体或枚举中
rust
struct Wrapper<T: Printable> {
    value: T,
}
或者使用 where:
rust
struct Wrapper<T>
where
    T: Printable,
{
    value: T,
}
🛠️ 3)trait bound 的常见用途
- 约束泛型函数
rust
fn compare<T: PartialOrd>(a: T, b: T) -> T {
    if a < b { a } else { b }
}- 实现泛型 trait
rust
impl<T: Display> ToString for Wrapper<T> {
    fn to_string(&self) -> String {
        format!("{}", self.value)
    }
}- 配合 impl Trait 简化语法(Rust 2018+)
rust
fn print_item(item: impl Printable) {
    item.print();
}
这等价于 fn print_item<T: Printable>(item: T)。
🛠️ 4)通过 trait bound 有条件地实现方法
在 Rust 中,可以通过 Trait Bound 为泛型类型有条件地实现方法,这意味着只有当类型满足特定约束时,这些方法才可用。
这是一种非常强大的模式,允许你为特定类型的子集提供额外功能。
通过使用带有 trait bound 的泛型 impl 块,可以有条件的只为实现了特定 trait 的类型实现方法。
基本语法
rust
struct Wrapper<T>(T);

// 为所有类型 T 实现的方法
impl<T> Wrapper<T> {
    fn new(value: T) -> Self {
        Wrapper(value)
    }
}

// 只为实现了 Display 的类型 T 实现的方法
impl<T: std::fmt::Display> Wrapper<T> {
    fn display(&self) {
        println!("Wrapper contains: {}", self.0);
    }
}
实际应用示例
- 为实现了特定 trait 的类型添加方法
rust
use std::fmt::Debug;
struct Printer<T>(T);
// 无条件实现的方法
impl<T> Printer<T> {
fn new(value: T) -> Self {
Printer(value)
}
}
//有条件实现的方法
// 这里的 T 必须实现 Debug trait
// 这意味着我们可以在这个方法中使用 {:?} 来打印 T 的值
// 这使得我们可以在实现方法时,限制 T 的类型
// 只有实现了 Debug trait 的类型才能使用这个方法
// 这就是 trait bound 的作用
// 只为实现了 Debug 的类型实现的方法
//当然,也可以实现我们自定义的trait
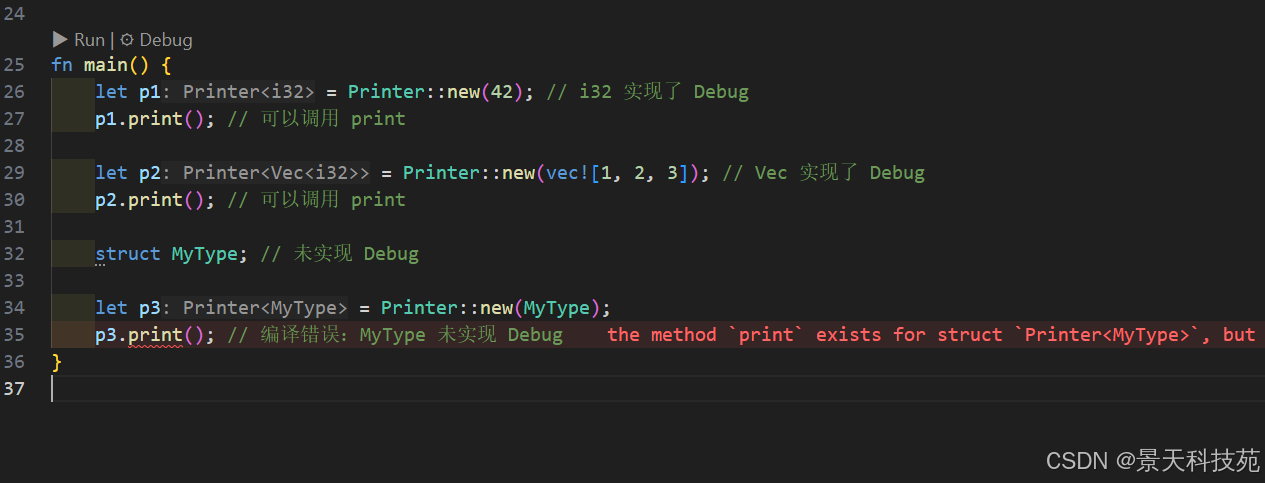
impl<T: Debug> Printer<T> {
fn print(&self) {
println!("{:?}", self.0);
}
}
fn main() {
let p1 = Printer::new(42); // i32 实现了 Debug
p1.print(); // 可以调用 print
let p2 = Printer::new(vec![1, 2, 3]); // Vec 实现了 Debug
p2.print(); // 可以调用 print
struct MyType; // 未实现 Debug
let p3 = Printer::new(MyType);
p3.print(); // 编译错误:MyType 未实现 Debug
}
- 为实现了多个 trait 的类型实现方法
rust
use std::fmt::{ Display, Debug };
//元组结构体
// 这个结构体可以存储任何类型的值
// 只要它们实现了 Display 和 Debug trait
// 这个结构体的作用是将值打印出来
// 这个结构体的泛型参数 T 可以是任何类型
struct MultiPrinter<T>(T);
impl<T> MultiPrinter<T> {
fn new(value: T) -> Self {
MultiPrinter(value)
}
}
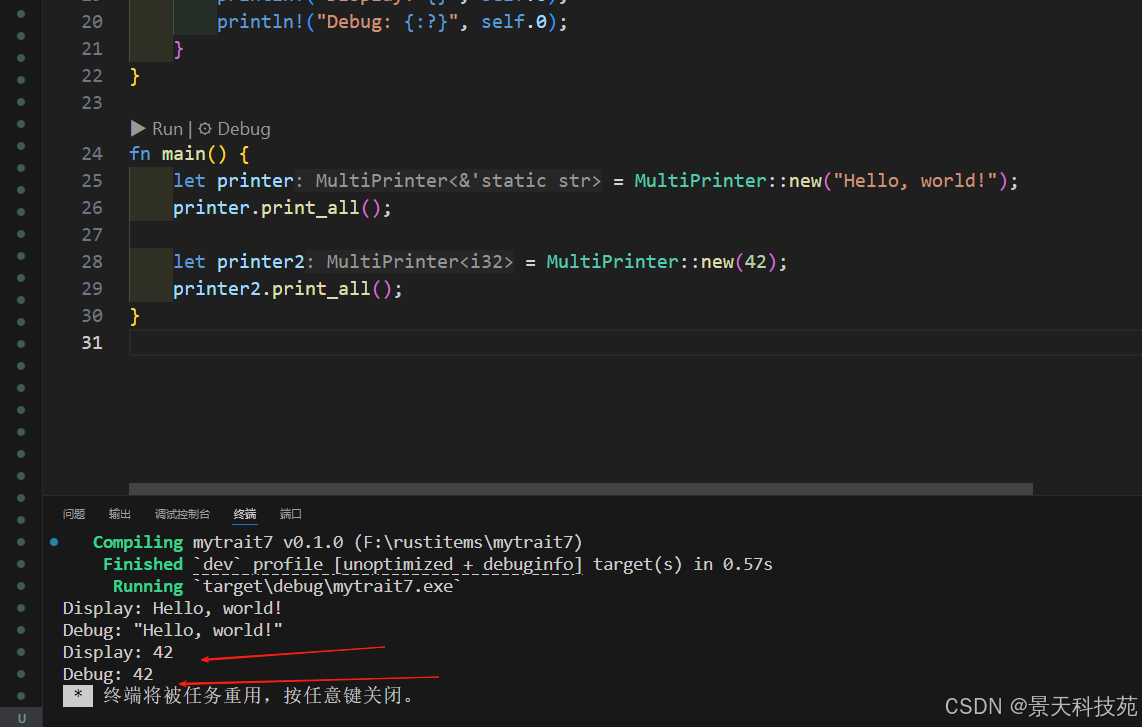
// 要求同时实现 Display 和 Debug
impl<T: Display + Debug> MultiPrinter<T> {
fn print_all(&self) {
println!("Display: {}", self.0);
println!("Debug: {:?}", self.0);
}
}
fn main() {
let printer = MultiPrinter::new("Hello, world!");
printer.print_all();
let printer2 = MultiPrinter::new(42);
printer2.print_all();
}
🛠️ 4)有条件地实现trait
可以对任何实现了特定 trait 的类型有条件的实现 trait。
对任何满足特定 trait bound 的类型实现 trait 被称为 blanket implementations,他们被广泛的用于 Rust 标准库中。
类似于其他语言的继承
例如,标准库为任何实现了 Display trait 的类型实现了 ToString trait。这个 impl 块看起来像这样:
rust
impl<T: Display> ToString for T {
    // --snip--
}
因为标准库有了这些 blanket implementation,我们可以对任何实现了 Display trait 的类型调用由 ToString 定义的to_string 方法。
例如,可以将整型转换为对应的 String 值,因为整型实现了 Display :
let s = 3.to_string();
blanket implementation 会出现在 trait 文档的 "Implementers" 部分。
trait 和 trait bound 让我们使用泛型类型参数来减少重复,并仍然能够向编译器明确指定泛型类型需要拥有哪些行为。
因为我们向编译器提供了 trait bound 信息,它就可以检查代码中所用到的具体类型是否提供了正确的行为。
在动态类型语言中,如果我们尝试调用一个类型并没有实现的方法,会在运行时出现错误。
Rust 将这些错误移动到了编译时,甚至在代码能够运行之前就强迫我们修复错误。
另外,我们也无需编写运行时检查行为的代码,因为在编译时就已经检查过了,这样相比其他那些不愿放弃泛型灵活性的语言有更好的性能。
基本语法
rust
impl<T: TraitBound> MyTrait for T {
    // 实现方法
}
或者使用 where 子句:
rust
impl<T> MyTrait for T
where
    T: Trait1 + Trait2,
{
    // 实现方法
}
常见应用模式
- 为实现了其他 trait 的类型实现你的 trait
rust
use std::fmt::Display;
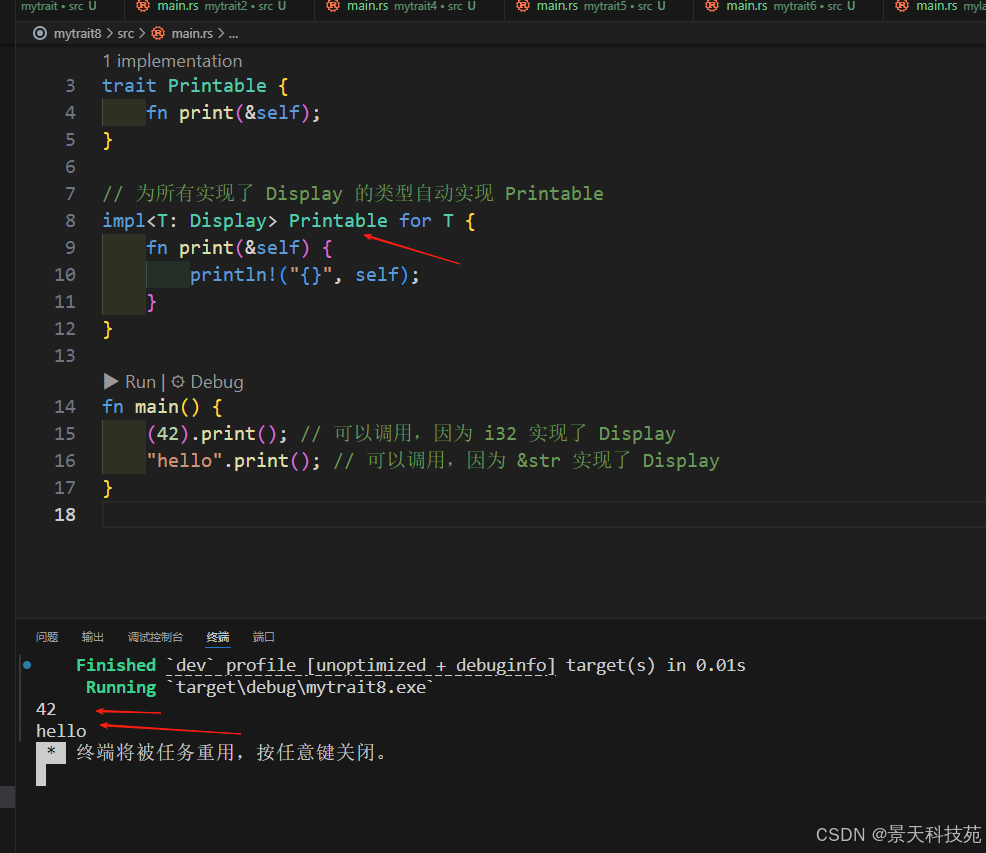
trait Printable {
fn print(&self);
}
// 为所有实现了 Display 的类型自动实现 Printable
impl<T: Display> Printable for T {
fn print(&self) {
println!("{}", self);
}
}
fn main() {
(42).print(); // 可以调用,因为 i32 实现了 Display
"hello".print(); // 可以调用,因为 &str 实现了 Display
}只要实现了Display的类型,都会自动实现我们自定义的trait Printable
其实例就可以调用print方法
- 为特定类型组合实现 trait
rust
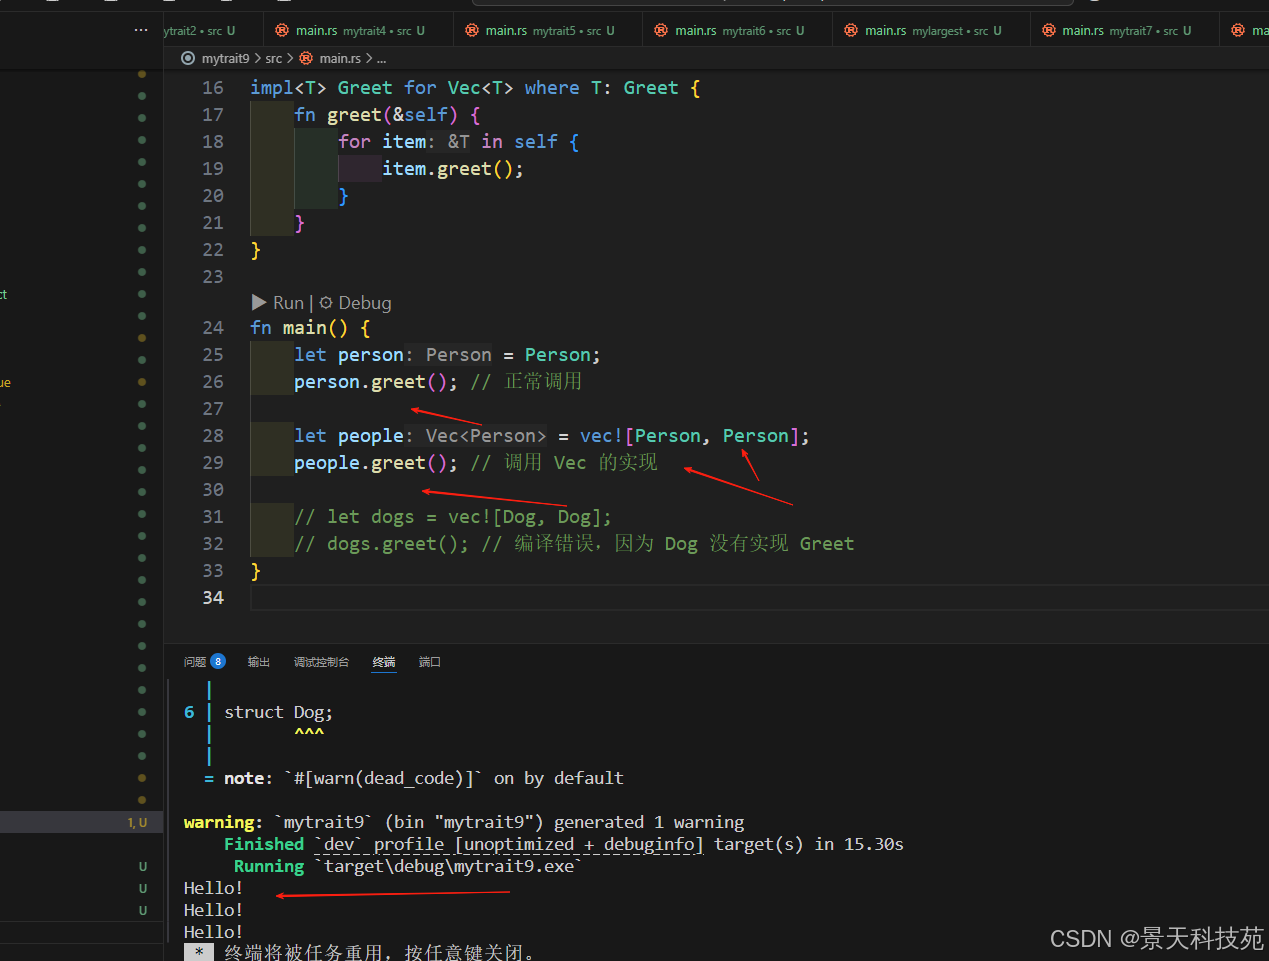
trait Greet {
    fn greet(&self);
}

struct Person;
struct Dog;

// 只为 Person 实现 Greet
impl Greet for Person {
    fn greet(&self) {
        println!("Hello!");
    }
}

// 有条件地为某些泛型类型实现 Greet
// 实现Greet的T,Vec<T>也实现了Greet
impl<T> Greet for Vec<T> where T: Greet {
    fn greet(&self) {
        for item in self {
            item.greet();
        }
    }
}

fn main() {
    let person = Person;
    person.greet(); // 正常调用

    let people = vec![Person, Person];
    people.greet(); // 调用 Vec 的实现

    // let dogs = vec![Dog, Dog];
    // dogs.greet(); // 编译错误,因为 Dog 没有实现 Greet
}
🧠 6)使用 trait bound 的好处
类型安全:编译时就能检查类型是否满足要求。
泛型复用:编写更通用的代码。
自动推导实现:结合 derive 宏可以快速添加常用 trait(如 Debug, Clone 等)。
4. trait作为返回值
在 Rust 中,trait 不能直接作为函数返回值的类型,因为 trait 是一个抽象类型(即它本身没有大小,Sized)。
但我们可以通过两种方式让函数 "返回一个实现了 trait 的值":
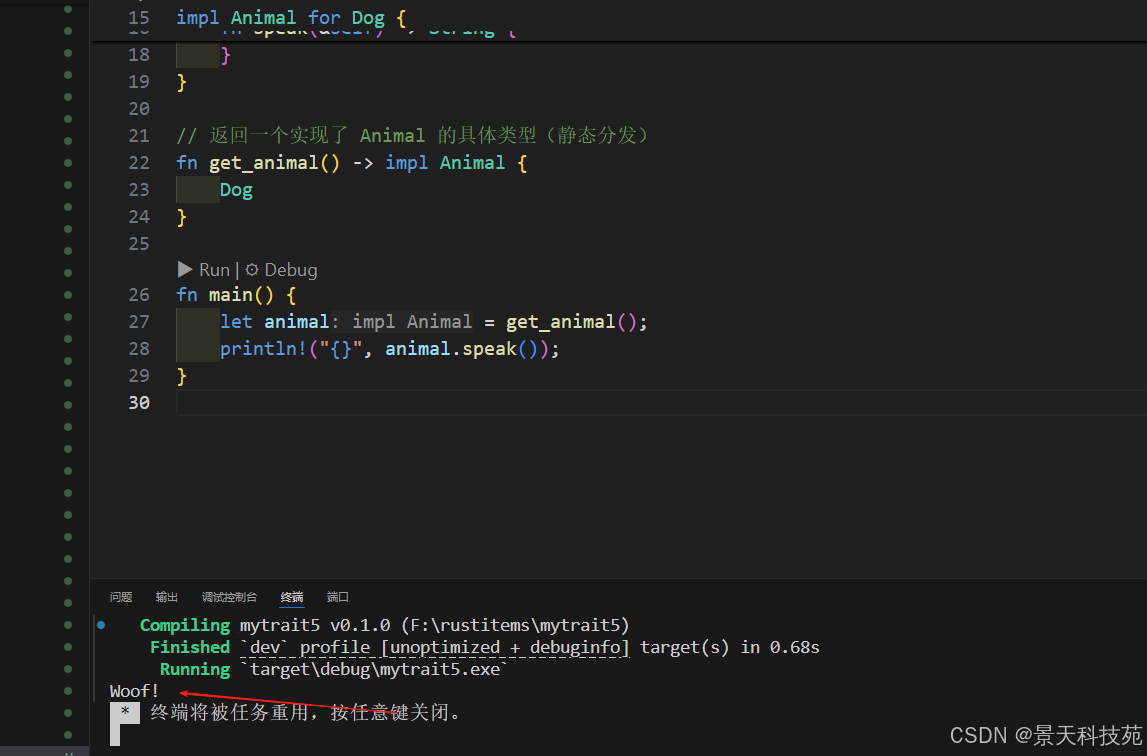
1)使用 impl Trait 作为返回类型(静态分发 ✅)
impl Trait 作为返回类型时,函数必须返回单一的具体类型,不能根据条件返回不同类型。
返回impl Trait,其实就是返回实现了这个特征的类型对象
rust
//trait作为返回值
// trait 作为返回值
// trait 作为返回值是 Rust 中的一种用法,可以让函数返回实现了某个 trait 的类型
// trait 作为返回值的语法有两种:
//一种是静态发布,返回特征的实现  fn function_name() -> impl Trait
//一种是动态发布,fn function_name() -> Box<dyn Trait>,其中 Box<dyn Trait> 是一个 trait 对象
// trait 对象是一个指向实现了 trait 的类型的指针
// trait 对象可以在运行时动态地决定具体的类型


trait Animal {
    fn speak(&self) -> String;
}

struct Dog;

impl Animal for Dog {
    fn speak(&self) -> String {
        "Woof!".to_string()
    }
}

// 返回一个实现了 Animal 的具体类型(静态分发)
//返回值是个特征的实现的时候,就是返回实现了这个特征的对象
fn get_animal() -> impl Animal {
    Dog
}

fn main() {
    let animal = get_animal();
    println!("{}", animal.speak());
}
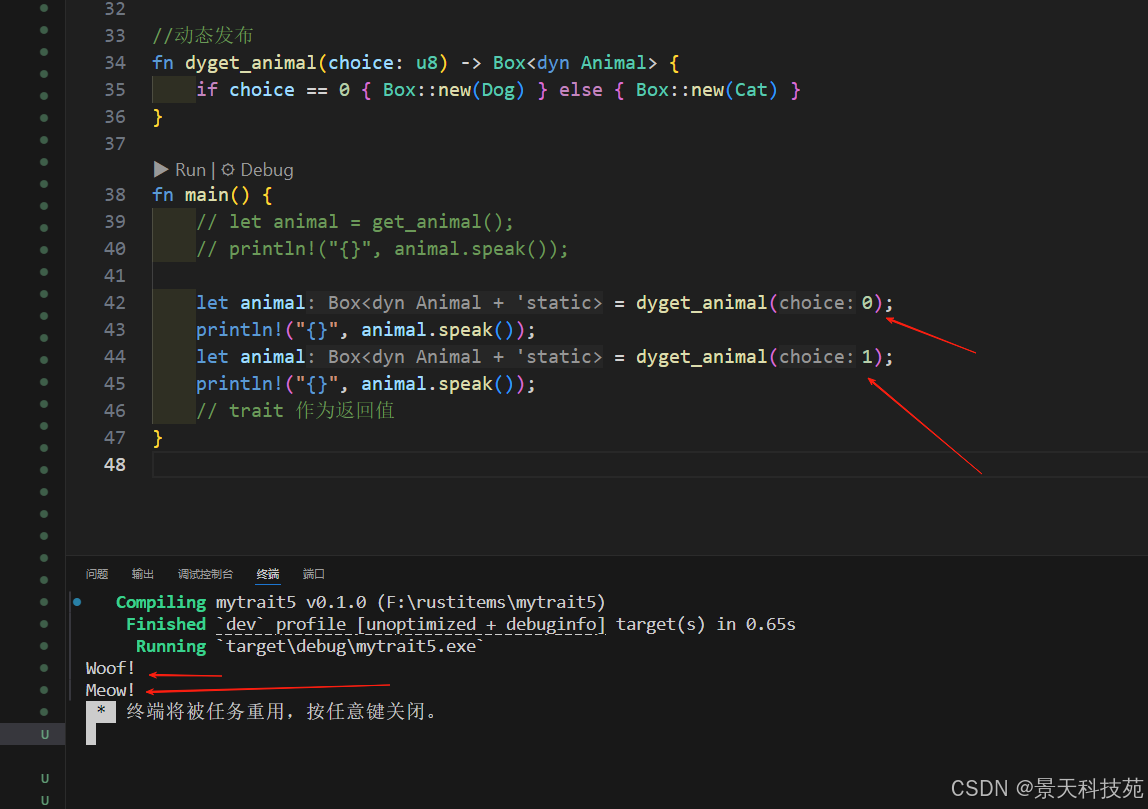
2)使用 Box 返回 trait 对象(动态分发 ✅)
使用 trait 对象 (dyn Trait) 返回多种类型
rust
//trait作为返回值
// trait 作为返回值
// trait 作为返回值是 Rust 中的一种用法,可以让函数返回实现了某个 trait 的类型
// trait 作为返回值的语法是:fn function_name() -> Box<dyn Trait>,其中 Box<dyn Trait> 是一个 trait 对象
// trait 对象是一个指向实现了 trait 的类型的指针
// trait 对象可以在运行时动态地决定具体的类型
// trait 对象的大小是固定的,可以在运行时动态地决定具体的类型

trait Animal {
    fn speak(&self) -> String;
}

struct Dog;
struct Cat;

impl Animal for Cat {
    fn speak(&self) -> String {
        "Meow!".to_string()
    }
}

impl Animal for Dog {
    fn speak(&self) -> String {
        "Woof!".to_string()
    }
}


//动态发布
fn dyget_animal(choice: u8) -> Box<dyn Animal> {
    if choice == 0 { Box::new(Dog) } else { Box::new(Cat) }
}

fn main() {
    let animal = dyget_animal(0);
    println!("{}", animal.speak());
    let animal = dyget_animal(1);
    println!("{}", animal.speak());

}
这是 trait 作为返回值的"对象安全"用法。
✅ 优点:
可以返回不同的具体类型(如 Dog 或 Cat)
灵活性更高
⚠️ 限制:
动态分发,运行时有一点性能开销
需要 dyn Trait 是对象安全(只能包含不依赖于 Self 的方法,且不能有泛型)
注意事项
对象安全:当使用 dyn Trait 时,trait 必须是对象安全的
不能有返回 Self 的方法
不能有泛型方法
生命周期:trait 对象默认有 'static 生命周期,如果需要更短的生命周期需要明确指定
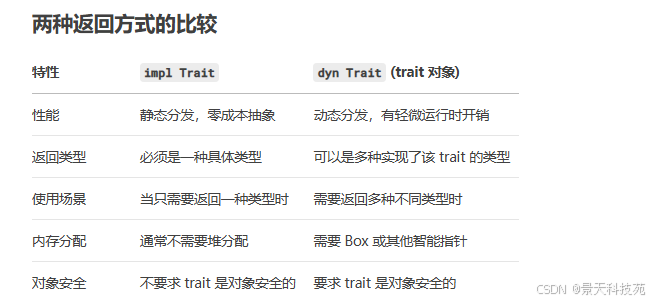
两种方法比较
5. 注意事项
孤儿规则:实现 trait 时,必须保证 trait 或类型至少有一个是在当前 crate 中定义的
特化限制:Rust 目前不支持完全的 trait 实现特化
方法优先级:更具体的实现会覆盖更通用的实现
冲突实现:避免创建会导致编译器无法确定使用哪个实现的场景
文档:为条件实现添加清晰的文档说明
3. 标准库中的常用Trait
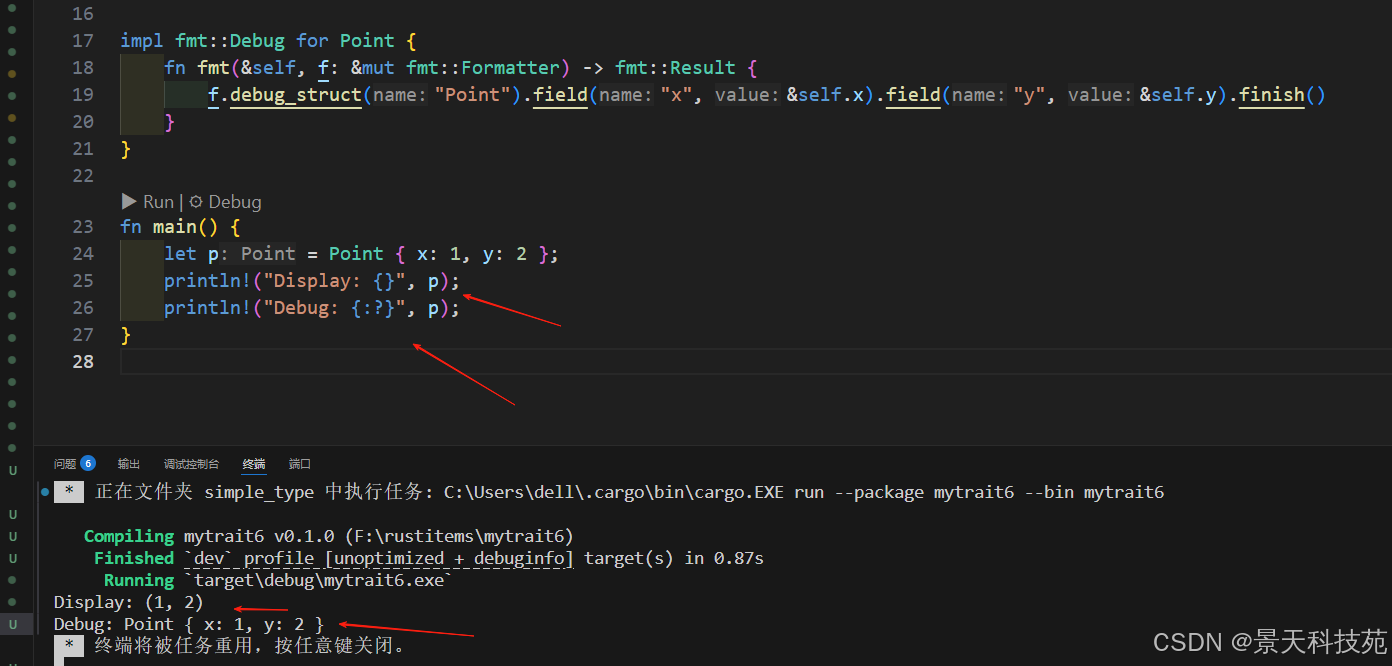
3.1 格式化相关Trait
Display:用户友好的展示
Debug:调试输出
LowerHex:十六进制小写格式化
rust
use std::fmt;

struct Point {
    x: i32,
    y: i32,
}

//让自己实现的类型实现 Display 和 Debug trait
// 通过实现 fmt::Display trait 来实现格式化输出
// 通过实现 fmt::Debug trait 来实现调试输出
impl fmt::Display for Point {
    fn fmt(&self, f: &mut fmt::Formatter) -> fmt::Result {
        write!(f, "({}, {})", self.x, self.y)
    }
}

impl fmt::Debug for Point {
    fn fmt(&self, f: &mut fmt::Formatter) -> fmt::Result {
        f.debug_struct("Point").field("x", &self.x).field("y", &self.y).finish()
    }
}

fn main() {
    let p = Point { x: 1, y: 2 };
    println!("Display: {}", p);
    println!("Debug: {:?}", p);
}
3.2 转换Trait
From/Into:类型转换
TryFrom/TryInto:可能失败的转换
AsRef/AsMut:引用转换
rust
struct Inches(f64);
struct Millimeters(f64);

impl From<Millimeters> for Inches {
    fn from(mm: Millimeters) -> Self {
        Inches(mm.0 / 25.4)
    }
}

fn print_inches(inches: Inches) {
    println!("{} inches", inches.0);
}

fn main() {
    let mm = Millimeters(254.0);
    let inches: Inches = mm.into();
    print_inches(inches); // 输出: 10 inches
}
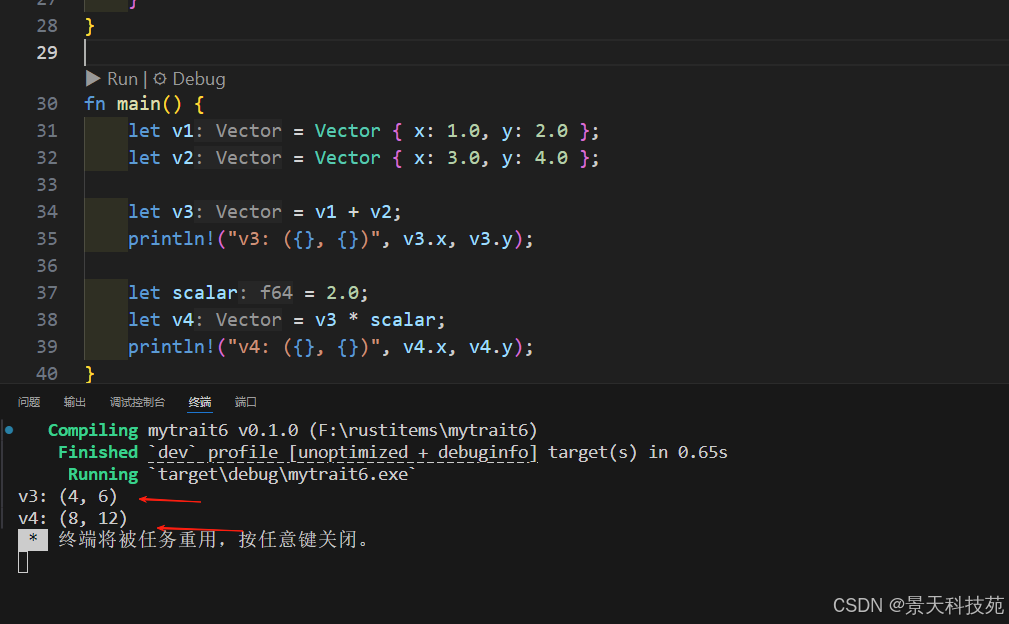
3.3 运算符重载Trait
Add/Sub/Mul/Div:算术运算
Neg:一元负号
Index/IndexMut:索引操作
use std::ops::{ Add, Mul };
rust
struct Vector {
    x: f64,
    y: f64,
}

impl Add for Vector {
    type Output = Vector;

    fn add(self, other: Vector) -> Vector {
        Vector {
            x: self.x + other.x,
            y: self.y + other.y,
        }
    }
}

impl Mul<f64> for Vector {
    type Output = Vector;

    fn mul(self, scalar: f64) -> Vector {
        Vector {
            x: self.x * scalar,
            y: self.y * scalar,
        }
    }
}

fn main() {
    let v1 = Vector { x: 1.0, y: 2.0 };
    let v2 = Vector { x: 3.0, y: 4.0 };

    let v3 = v1 + v2;
    println!("v3: ({}, {})", v3.x, v3.y);

    let scalar = 2.0;
    let v4 = v3 * scalar;
    println!("v4: ({}, {})", v4.x, v4.y);
}
3.4 其他比较重要的内置trait
Clone: 显式复制对象
Copy: 标记类型可以在赋值时进行位复制
PartialEq/Eq: 相等比较
PartialOrd/Ord: 排序比较
Default: 创建默认值
Iterator: 迭代器
Drop: 自定义析构逻辑