目录
[第一步 实例化](#第一步 实例化)
[第二步 属性赋值](#第二步 属性赋值)
[第三步 初始化](#第三步 初始化)
[aware 接口](#aware 接口)
[BeanPostProcessor 接口](#BeanPostProcessor 接口)
[InitializingBean 和 init-method](#InitializingBean 和 init-method)
描述一下 Bean 的 生命周期
导图
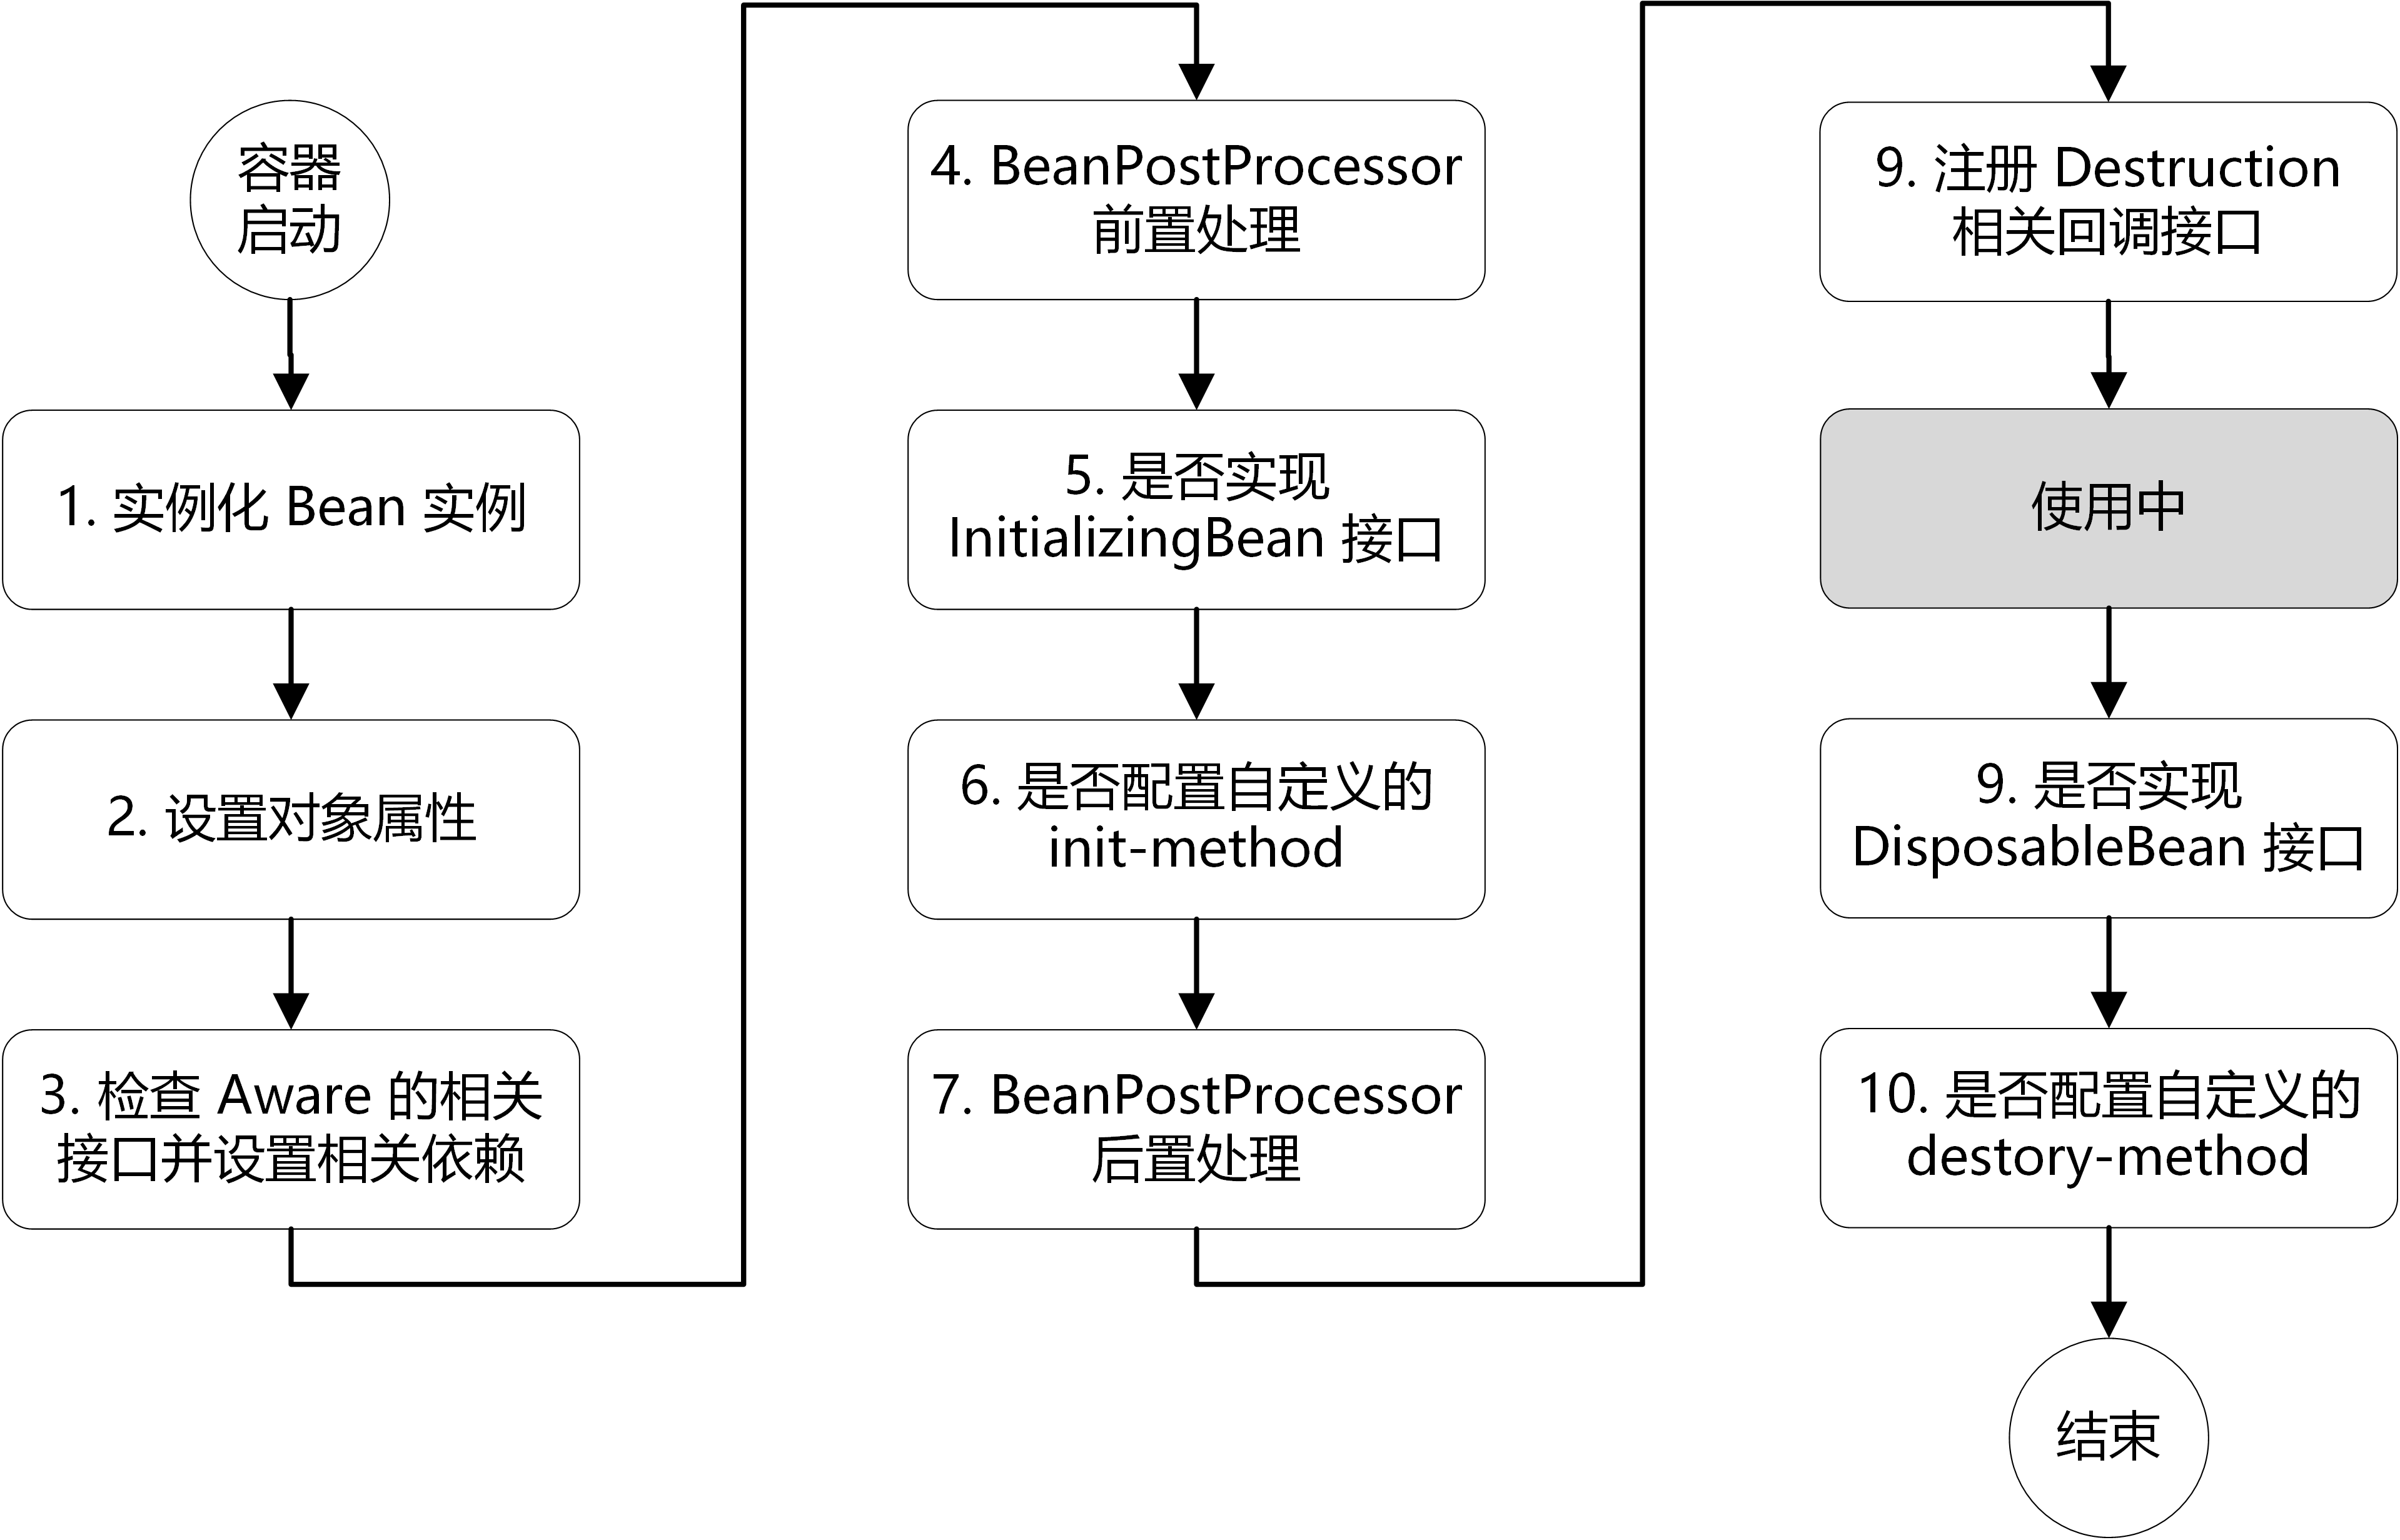
步骤
总体上可以分为五步
- 首先是 Bean 的实例化
- Bean 在进行实例化后 , 进行属性赋值
- 接着初始化 Bean
- 使用 Bean
- Bean 销毁
第一步 实例化
首先是实例化一个 Bean 对象
主要使用的 createBeanInstance()方法实现
将 bean 挂载到一个包装器上 BeanWrapper
    BeanWrapper instanceWrapper = null;
    if (instanceWrapper == null) {
        instanceWrapper = createBeanInstance(beanName, mbd, args);
    }
createBeanInstance()方法 是用来实例化 bean 的
伪代码逻辑
通过反射(无参构造函数)拿到 工厂方法拿到 动态代理...
protected BeanWrapper createBeanInstance(String beanName, RootBeanDefinition mbd, @Nullable Object[] args) {
    // 1. 解析bean的class类型
    Class<?> beanClass = resolveBeanClass(mbd, beanName);

    // 2. 检查是否指定了工厂方法
    if (mbd.getFactoryMethodName() != null) {
        return instantiateUsingFactoryMethod(beanName, mbd, args);
    }

    // 3. 处理有参构造函数
    if (args != null) {
        return autowireConstructor(beanName, mbd, null, args);
    }

    // 4. 处理无参构造函数
    if (mbd.getResolvedAutowireMode() == RootBeanDefinition.AUTOWIRE_CONSTRUCTOR ||
            mbd.hasConstructorArgumentValues() || !ObjectUtils.isEmpty(args)) {
        return autowireConstructor(beanName, mbd, null, args);
    }

    // 5. 默认使用无参构造函数实例化
    return instantiateBean(beanName, mbd);
}
第二步 属性赋值
使用 populateBean() 方法 进行赋值
        // 2. 属性赋值
        populateBean(beanName, mbd, instanceWrapper);
我来详细讲一下这个populateBean 方法
我们把 beanname 还有一个刚刚的 beanwapper 包装器传入populateBean() 方法
- 前置处理:
-
- 允许 BeanPostProcessor 干预属性注入流程(如 @Autowired 字段注入)
- 属性值准备:
-
- 获取配置的属性值(XML / 注解)
- 处理自动装配(byName/byType)
- 应用 BeanPostProcessor 修改属性值(如 @Value 解析)
- 属性注入:
-
-
解析属性值(处理对其他 bean 的引用)
-
类型转换(字符串 → 目标类型)
-
通过 BeanWrapper 完成最终注入
protected void populateBean(String beanName, RootBeanDefinition mbd, BeanWrapper bw) {
// 1. 检查 BeanWrapper 是否为空
if (bw == null) {
return;
}// 2. 允许 BeanPostProcessor 在属性注入前修改 bean(如 @Autowired 字段注入) boolean continuePopulation = true; if (hasInstantiationAwareBeanPostProcessors()) { for (BeanPostProcessor processor : getBeanPostProcessors()) { if (processor instanceof InstantiationAwareBeanPostProcessor) { InstantiationAwareBeanPostProcessor ibp = (InstantiationAwareBeanPostProcessor) processor; // 例如:AutowiredAnnotationBeanPostProcessor 会在此处理 @Autowired 字段 if (!ibp.postProcessAfterInstantiation(bw.getWrappedInstance(), beanName)) { continuePopulation = false; break; } } } } if (!continuePopulation) { return; } // 3. 获取配置的属性值(来自 XML 或注解) PropertyValues pvs = mbd.hasPropertyValues() ? mbd.getPropertyValues() : null; // 4. 处理自动装配(byName/byType) int autowireMode = mbd.getResolvedAutowireMode(); if (autowireMode == RootBeanDefinition.AUTOWIRE_BY_NAME || autowireMode == RootBeanDefinition.AUTOWIRE_BY_TYPE) { MutablePropertyValues newPvs = new MutablePropertyValues(pvs); // 按名称自动装配:例如 <property name="userService"/> if (autowireMode == RootBeanDefinition.AUTOWIRE_BY_NAME) { autowireByName(beanName, mbd, bw, newPvs); } // 按类型自动装配:例如 @Autowired UserService userService; if (autowireMode == RootBeanDefinition.AUTOWIRE_BY_TYPE) { autowireByType(beanName, mbd, bw, newPvs); } pvs = newPvs; } // 5. 应用 BeanPostProcessor 修改属性值(如 @Value 解析) if (hasInstantiationAwareBeanPostProcessors()) { for (BeanPostProcessor processor : getBeanPostProcessors()) { if (processor instanceof InstantiationAwareBeanPostProcessor) { InstantiationAwareBeanPostProcessor ibp = (InstantiationAwareBeanPostProcessor) processor; // 例如:CommonAnnotationBeanPostProcessor 处理 @Resource PropertyValues processedPvs = ibp.postProcessProperties(pvs, bw.getWrappedInstance(), beanName); if (processedPvs != null) { pvs = processedPvs; } } } } // 6. 应用最终的属性值到 bean 实例 if (pvs != null) { applyPropertyValues(beanName, mbd, bw, pvs); }}
// 简化版:按名称自动装配
private void autowireByName(String beanName, BeanDefinition mbd, BeanWrapper bw, MutablePropertyValues pvs) {
// 获取所有未设置值的属性
String[] propertyNames = getUnsatisfiedPropertyNames(bw);for (String propertyName : propertyNames) { // 如果容器中有同名的 bean,则自动注入 if (containsBean(propertyName)) { Object bean = getBean(propertyName); pvs.add(propertyName, bean); // 注册依赖关系 registerDependentBean(propertyName, beanName); } }}
// 简化版:按类型自动装配
private void autowireByType(String beanName, BeanDefinition mbd, BeanWrapper bw, MutablePropertyValues pvs) {
TypeConverter converter = getTypeConverter();
String[] propertyNames = getUnsatisfiedPropertyNames(bw);for (String propertyName : propertyNames) { try { // 获取属性类型 PropertyDescriptor pd = bw.getPropertyDescriptor(propertyName); Class<?> propertyType = pd.getPropertyType(); // 查找匹配类型的 bean Object autowiredValue = resolveDependencyByType(propertyType, beanName); if (autowiredValue != null) { pvs.add(propertyName, autowiredValue); } } catch (BeansException ex) { throw new BeanCreationException("自动装配失败: " + propertyName, ex); } }}
// 简化版:应用属性值
private void applyPropertyValues(String beanName, BeanDefinition mbd, BeanWrapper bw, PropertyValues pvs) {
if (pvs.isEmpty()) {
return;
}TypeConverter converter = getTypeConverter(); BeanDefinitionValueResolver resolver = new BeanDefinitionValueResolver( this, beanName, mbd, converter); // 解析所有属性值(处理引用、类型转换等) List<PropertyValue> resolvedValues = new ArrayList<>(); for (PropertyValue pv : pvs.getPropertyValues()) { String propertyName = pv.getName(); Object originalValue = pv.getValue(); // 解析可能的 bean 引用(如 ref="userService") Object resolvedValue = resolver.resolveValueIfNecessary(pv, originalValue); // 类型转换(如 String → Integer) Object convertedValue = convertIfNecessary(resolvedValue, propertyName, bw, converter); resolvedValues.add(new PropertyValue(propertyName, convertedValue)); } // 应用解析后的属性值到 bean try { bw.setPropertyValues(new MutablePropertyValues(resolvedValues)); } catch (BeansException ex) { throw new BeanCreationException("设置属性值失败", ex); }}
-
第三步 初始化
初始化还是比较复杂的
大体上的逻辑
-
检查 aware 相关接口设置依赖
-
BeanPostProcessor 前置处理
-
若实现 InitializingBean 接口,调用 afterPropertiesSet() 方法
-
若配置自定义的 init-method方法,则执行
-
BeanPostProceesor 后置处理
// AbstractAutowireCapableBeanFactory.java
protected Object initializeBean(final String beanName, final Object bean, @Nullable RootBeanDefinition mbd) {
// 3. 检查 Aware 相关接口并设置相关依赖
if (System.getSecurityManager() != null) {
AccessController.doPrivileged((PrivilegedAction// 4. BeanPostProcessor 前置处理 Object wrappedBean = bean; if (mbd == null || !mbd.isSynthetic()) { wrappedBean = applyBeanPostProcessorsBeforeInitialization(wrappedBean, beanName); } // 5. 若实现 InitializingBean 接口,调用 afterPropertiesSet() 方法 // 6. 若配置自定义的 init-method方法,则执行 try { invokeInitMethods(beanName, wrappedBean, mbd); } catch (Throwable ex) { throw new BeanCreationException( (mbd != null ? mbd.getResourceDescription() : null), beanName, "Invocation of init method failed", ex); } // 7. BeanPostProceesor 后置处理 if (mbd == null || !mbd.isSynthetic()) { wrappedBean = applyBeanPostProcessorsAfterInitialization(wrappedBean, beanName); } return wrappedBean;}
aware 接口
注入相关依赖
若 Spring 检测到 bean 实现了 Aware 接口,则会为其注入相应的依赖。所以通过让bean 实现 Aware 接口,则能在 bean 中获得相应的 Spring 容器资源。
Spring 中提供的 Aware 接口有:
-
BeanNameAware:注入当前 bean 对应 beanName;
-
BeanClassLoaderAware:注入加载当前 bean 的 ClassLoader;
-
BeanFactoryAware:注入 当前BeanFactory容器 的引用。
// AbstractAutowireCapableBeanFactory.java
private void invokeAwareMethods(final String beanName, final Object bean) {
if (bean instanceof Aware) {
if (bean instanceof BeanNameAware) {
((BeanNameAware) bean).setBeanName(beanName);
}
if (bean instanceof BeanClassLoaderAware) {
((BeanClassLoaderAware) bean).setBeanClassLoader(bcl);} if (bean instanceof BeanFactoryAware) { ((BeanFactoryAware) bean).setBeanFactory(AbstractAutowireCapableBeanFactory.this); } }}
以上是针对 BeanFactory 类型的容器,而对于 ApplicationContext 类型的容器,也提供了 Aware 接口,只不过这些 Aware 接口的注入实现,是通过 BeanPostProcessor 的方式注入的,但其作用仍是注入依赖。
-
EnvironmentAware:注入 Enviroment,一般用于获取配置属性;
-
EmbeddedValueResolverAware:注入 EmbeddedValueResolver(Spring EL解析器),一般用于参数解析;
-
ApplicationContextAware(ResourceLoader、ApplicationEventPublisherAware、MessageSourceAware):注入 ApplicationContext 容器本身。
// ApplicationContextAwareProcessor.java
private void invokeAwareInterfaces(Object bean) {
if (bean instanceof EnvironmentAware) {
((EnvironmentAware)bean).setEnvironment(this.applicationContext.getEnvironment());
}if (bean instanceof EmbeddedValueResolverAware) { ((EmbeddedValueResolverAware)bean).setEmbeddedValueResolver(this.embeddedValueResolver); } if (bean instanceof ResourceLoaderAware) { ((ResourceLoaderAware)bean).setResourceLoader(this.applicationContext); } if (bean instanceof ApplicationEventPublisherAware) { ((ApplicationEventPublisherAware)bean).setApplicationEventPublisher(this.applicationContext); } if (bean instanceof MessageSourceAware) { ((MessageSourceAware)bean).setMessageSource(this.applicationContext); } if (bean instanceof ApplicationContextAware) { ((ApplicationContextAware)bean).setApplicationContext(this.applicationContext); }}
BeanPostProcessor 接口
BeanPostProcessor 是 Spring 为修改 bean提供的强大扩展点,其可作用于容器中所有 bean,其定义如下:
常用场景有:
-
对于标记接口的实现类,进行自定义处理。例如3.1节中所说的ApplicationContextAwareProcessor,为其注入相应依赖;再举个例子,自定义对实现解密接口的类,将对其属性进行解密处理;
-
为当前对象提供代理实现。例如 Spring AOP 功能,生成对象的代理类,然后返回。
// AbstractAutoProxyCreator.java
public Object postProcessBeforeInstantiation(Class<?> beanClass, String beanName) {
TargetSource targetSource = getCustomTargetSource(beanClass, beanName);
if (targetSource != null) {
if (StringUtils.hasLength(beanName)) {
this.targetSourcedBeans.add(beanName);
}
Object[] specificInterceptors = getAdvicesAndAdvisorsForBean(beanClass, beanName, targetSource);
Object proxy = createProxy(beanClass, beanName, specificInterceptors, targetSource);
this.proxyTypes.put(cacheKey, proxy.getClass());
// 返回代理类
return proxy;
}return null;}
InitializingBean 和 init-method
初始化拓展点
InitializingBean 接口
public interface InitializingBean {
	void afterPropertiesSet() throws Exception;
}
指定 init-method 方法,指定初始化方法:
<?xml version="1.0" encoding="UTF-8"?>
<beans xmlns="http://www.springframework.org/schema/beans"
       xmlns:xsi="http://www.w3.org/2001/XMLSchema-instance"
       xsi:schemaLocation="http://www.springframework.org/schema/beans http://www.springframework.org/schema/beans/spring-beans.xsd">

    <bean id="demo" class="com.chaycao.Demo" init-method="init()"/>

</beans>
第四步使用
第五步使用后销毁
类似于 InitializingBean() 和 init-method()