什么是Spring Boot?
Spring Boot 是一个用于简化 Spring 应用程序开发的框架,它通过提供默认配置和自动配置来减少开发者的工作量。Spring Boot 的核心目标是让开发者能够快速启动和运行 Spring 应用程序,而无需进行繁琐的配置。
Spring Boot 的主要特点
Spring Boot 提供了许多开箱即用的功能,包括嵌入式服务器(如 Tomcat、Jetty)、自动配置、健康检查、外部化配置等。这些功能使得开发者能够专注于业务逻辑,而不必过多关注底层配置。
创建 Spring Boot 项目
使用 Spring Initializr 可以快速生成一个 Spring Boot 项目。Spring Initializr 是一个在线工具,允许开发者选择项目依赖并生成项目结构。
bash
curl https://start.spring.io/starter.zip -o myproject.zip解压生成的 ZIP 文件后,会得到一个标准的 Maven 或 Gradle 项目结构。
编写一个简单的 Spring Boot 应用
以下是一个简单的 Spring Boot 应用程序示例,它启动一个嵌入式服务器并提供一个 REST 端点。
java
import org.springframework.boot.SpringApplication;
import org.springframework.boot.autoconfigure.SpringBootApplication;
import org.springframework.web.bind.annotation.GetMapping;
import org.springframework.web.bind.annotation.RestController;

@SpringBootApplication
@RestController
public class MyApplication {

    public static void main(String[] args) {
        SpringApplication.run(MyApplication.class, args);
    }

    @GetMapping("/hello")
    public String sayHello() {
        return "Hello, World!";
    }
}
运行 Spring Boot 应用
在项目根目录下,使用 Maven 或 Gradle 命令运行应用程序。
bash
mvn spring-boot:run或者
bash
./gradlew bootRun应用程序启动后,访问 http://localhost:8080/hello 将会看到 "Hello, World!" 的响应。
配置 Spring Boot 应用
Spring Boot 支持通过 application.properties 或 application.yml 文件进行配置。以下是一个简单的配置示例:
properties
server.port=8081
spring.application.name=MyApp
添加依赖
Spring Boot 项目通常使用 Maven 或 Gradle 进行依赖管理。以下是一个 Maven 依赖示例,用于添加 Spring Web 模块:
xml
<dependencies>
    <dependency>
        <groupId>org.springframework.boot</groupId>
        <artifactId>spring-boot-starter-web</artifactId>
    </dependency>
</dependencies>
自动配置
Spring Boot 的自动配置功能会根据项目中的依赖自动配置 Spring 应用程序。例如,如果项目中包含 spring-boot-starter-web 依赖,Spring Boot 会自动配置一个嵌入式 Tomcat 服务器。
外部化配置
Spring Boot 支持通过多种方式外部化配置,包括环境变量、命令行参数、配置文件等。这使得应用程序的配置更加灵活和可维护。
健康检查与监控
Spring Boot 提供了 Actuator 模块,用于监控和管理应用程序。通过 Actuator,可以获取应用程序的健康状态、性能指标等信息。
xml
<dependency>
    <groupId>org.springframework.boot</groupId>
    <artifactId>spring-boot-starter-actuator</artifactId>
</dependency>
部署 Spring Boot 应用
Spring Boot 应用程序可以打包为 JAR 文件,并通过 java -jar 命令运行。这种方式使得应用程序的部署和分发变得非常简单。
bash
mvn clean package
java -jar target/myproject-0.0.1-SNAPSHOT.jar
Spring Boot 是一个功能强大且易于使用的框架,适用于各种规模的应用程序开发。通过其自动配置和默认设置,开发者可以快速构建和部署 Spring 应用程序。Spring Boot 是一个用于简化 Spring 应用程序开发的框架,它通过提供默认配置和自动配置来减少开发者的工作量。Spring Boot 的核心目标是让开发者能够快速启动和运行 Spring 应用程序,而无需进行繁琐的配置。
二、需求分析
-
需求分析:
- 确定CRM系统的核心功能模块,例如:客户管理、销售管理、市场营销、客户服务、数据分析等。
-
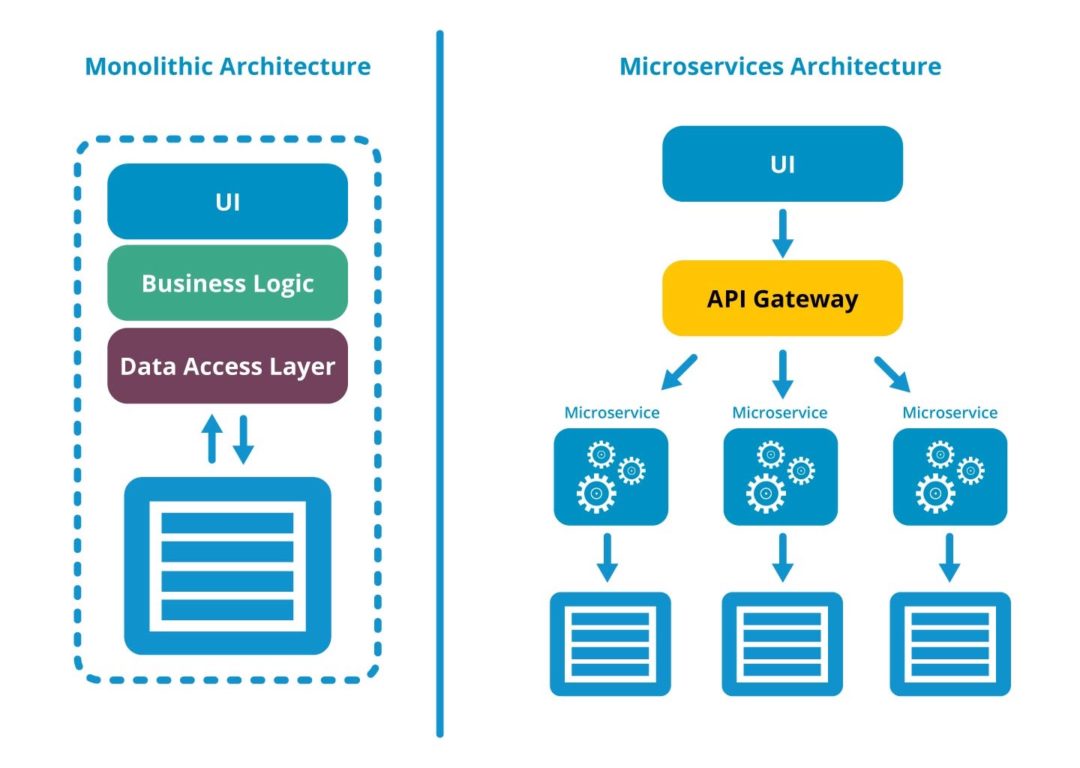
微服务拆分:
- 根据功能模块将CRM系统拆分为多个微服务,每个微服务负责一个独立的功能模块。
- 例如:
- 客户管理服务(Customer Service)
- 销售管理服务(Sales Service)
- 市场营销服务(Marketing Service)
- 客户服务服务(Customer Support Service)
- 数据分析服务(Analytics Service)
-
技术选型:
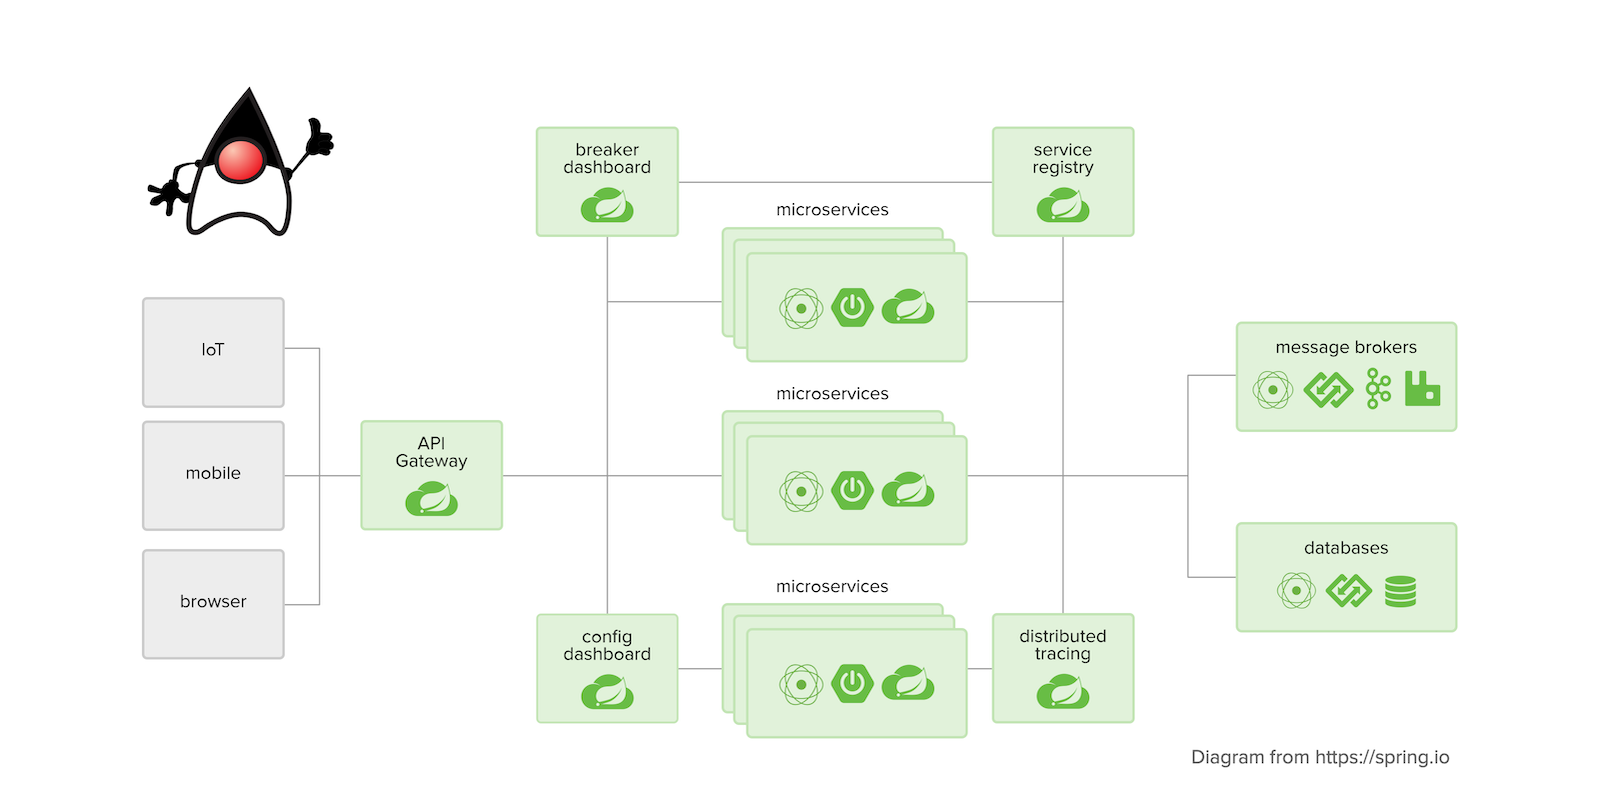
- 使用Spring Boot作为微服务开发框架。
- 使用Spring Cloud进行服务发现、配置管理、负载均衡等。
- 使用数据库(如MySQL、PostgreSQL)存储数据,每个微服务可以有自己的数据库。
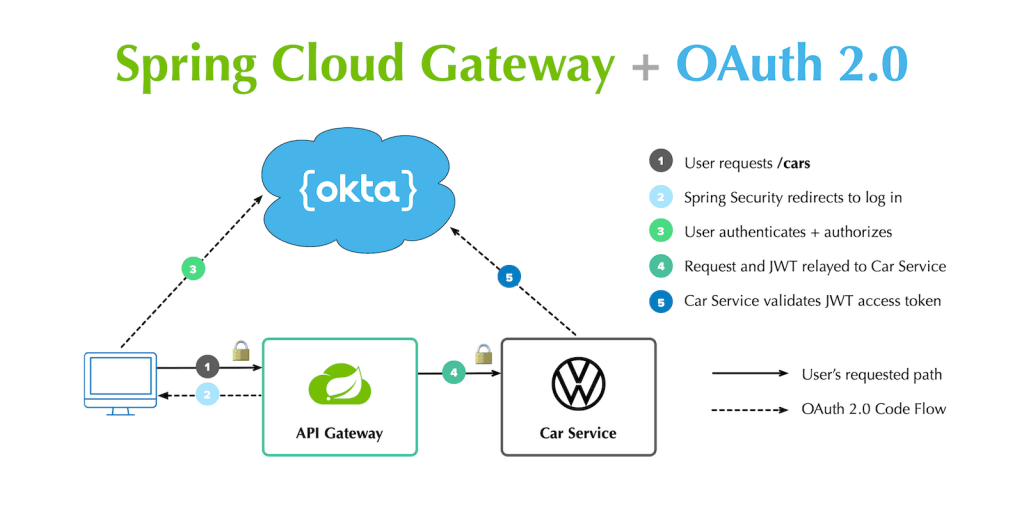
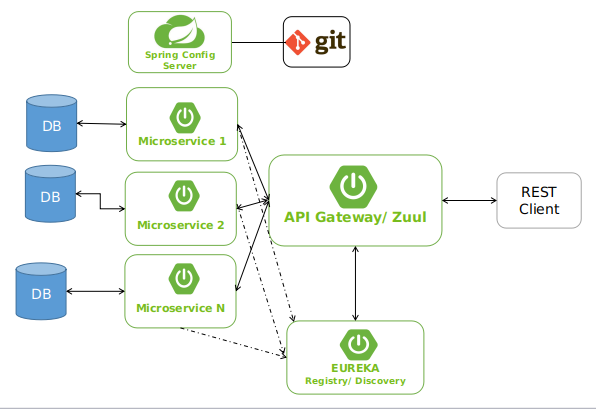
- 使用API网关(如Spring Cloud Gateway)进行请求路由。
- 使用服务注册与发现(如Eureka或Nacos)。
- 使用分布式配置中心(如Spring Cloud Config)。
-
微服务开发:
- 为每个微服务创建独立的Spring Boot项目。
- 每个微服务实现自己的业务逻辑,并提供RESTful API。
- 配置每个微服务的数据库连接和其他依赖。
-
服务注册与发现:
- 配置服务注册中心(如Eureka或Nacos),让每个微服务在启动时注册到注册中心。
- 其他微服务可以通过注册中心发现并调用其他微服务。
-
API网关配置:
- 配置API网关,将外部请求路由到对应的微服务。
- 配置路由规则、负载均衡、安全认证等。
-
分布式配置管理:
- 配置分布式配置中心,集中管理所有微服务的配置文件。
- 每个微服务从配置中心获取配置。
-
部署与运行:
- 使用Docker容器化每个微服务。
- 使用Kubernetes或Docker Compose进行容器编排和部署。
- 配置服务之间的网络通信。
- 启动所有微服务,验证系统功能。
三、代码示例:
以下是一个简单的微服务拆分和部署的示例,以客户管理服务和销售管理服务为例。
1. 客户管理服务(Customer Service)
pom.xml:
xml
<dependencies>
    <dependency>
        <groupId>org.springframework.boot</groupId>
        <artifactId>spring-boot-starter-web</artifactId>
    </dependency>
    <dependency>
        <groupId>org.springframework.cloud</groupId>
        <artifactId>spring-cloud-starter-netflix-eureka-client</artifactId>
    </dependency>
    <dependency>
        <groupId>org.springframework.boot</groupId>
        <artifactId>spring-boot-starter-data-jpa</artifactId>
    </dependency>
    <dependency>
        <groupId>mysql</groupId>
        <artifactId>mysql-connector-java</artifactId>
    </dependency>
</dependencies>application.yml:
yaml
server:
  port: 8081

spring:
  application:
    name: customer-service
  datasource:
    url: jdbc:mysql://localhost:3306/customer_db
    username: root
    password: root
  jpa:
    hibernate:
      ddl-auto: update
    show-sql: true

eureka:
  client:
    service-url:
defaultZone: http://localhost:8761/eureka/主启动类:
java
import org.springframework.boot.SpringApplication;
import org.springframework.boot.autoconfigure.SpringBootApplication;
import org.springframework.cloud.netflix.eureka.EnableEurekaClient;

@SpringBootApplication
@EnableEurekaClient
public class CustomerServiceApplication {
    public static void main(String[] args) {
        SpringApplication.run(CustomerServiceApplication.class, args);
    }
}控制器示例:
java
import org.springframework.web.bind.annotation.GetMapping;
import org.springframework.web.bind.annotation.RequestMapping;
import org.springframework.web.bind.annotation.RestController;

@RestController
@RequestMapping("/customers")
public class CustomerController {

    @GetMapping
    public String getCustomers() {
        return "Customer List";
    }
}
2. 销售管理服务(Sales Service)
pom.xml:
xml
<dependencies>
    <dependency>
        <groupId>org.springframework.boot</groupId>
        <artifactId>spring-boot-starter-web</artifactId>
    </dependency>
    <dependency>
        <groupId>org.springframework.cloud</groupId>
        <artifactId>spring-cloud-starter-netflix-eureka-client</artifactId>
    </dependency>
    <dependency>
        <groupId>org.springframework.boot</groupId>
        <artifactId>spring-boot-starter-data-jpa</artifactId>
    </dependency>
    <dependency>
        <groupId>mysql</groupId>
        <artifactId>mysql-connector-java</artifactId>
    </dependency>
</dependencies>application.yml:
yaml
server:
  port: 8082

spring:
  application:
    name: sales-service
  datasource:
    url: jdbc:mysql://localhost:3306/sales_db
    username: root
    password: root
  jpa:
    hibernate:
      ddl-auto: update
    show-sql: true

eureka:
  client:
    service-url:
defaultZone: http://localhost:8761/eureka/主启动类:
java
import org.springframework.boot.SpringApplication;
import org.springframework.boot.autoconfigure.SpringBootApplication;
import org.springframework.cloud.netflix.eureka.EnableEurekaClient;

@SpringBootApplication
@EnableEurekaClient
public class SalesServiceApplication {
    public static void main(String[] args) {
        SpringApplication.run(SalesServiceApplication.class, args);
    }
}控制器示例:
java
import org.springframework.web.bind.annotation.GetMapping;
import org.springframework.web.bind.annotation.RequestMapping;
import org.springframework.web.bind.annotation.RestController;

@RestController
@RequestMapping("/sales")
public class SalesController {

    @GetMapping
    public String getSales() {
        return "Sales List";
    }
}
3. 服务注册中心(Eureka Server)
pom.xml:
xml
<dependencies>
    <dependency>
        <groupId>org.springframework.cloud</groupId>
        <artifactId>spring-cloud-starter-netflix-eureka-server</artifactId>
    </dependency>
</dependencies>application.yml:
yaml
server:
  port: 8761

eureka:
  client:
    register-with-eureka: false
fetch-registry: false主启动类:
java
import org.springframework.boot.SpringApplication;
import org.springframework.boot.autoconfigure.SpringBootApplication;
import org.springframework.cloud.netflix.eureka.server.EnableEurekaServer;

@SpringBootApplication
@EnableEurekaServer
public class EurekaServerApplication {
    public static void main(String[] args) {
        SpringApplication.run(EurekaServerApplication.class, args);
    }
}
4. 部署与运行
- 启动Eureka Server(
EurekaServerApplication)。 - 启动客户管理服务(
CustomerServiceApplication)。 - 启动销售管理服务(
SalesServiceApplication)。 - 使用Postman或浏览器访问:
- 客户管理服务:
http://localhost:8081/customers - 销售管理服务:
http://localhost:8082/sales
- 客户管理服务:
5. 扩展
- 添加API网关(如Spring Cloud Gateway)进行路由。
- 添加分布式配置中心(如Spring Cloud Config)。
- 使用Docker容器化每个微服务。
- 使用Kubernetes进行容器编排。