系列文章目录
文章目录
- 系列文章目录
- 前言
- 一、工具栏修改
- 二、切片窗口显示方位文字
-
- [1. 修改mprvr.js,添加函数getOrientationMarkers](#1. 修改mprvr.js,添加函数getOrientationMarkers)
- [2. 修改DisplayerArea3D.vue](#2. 修改DisplayerArea3D.vue)
- 三、vr窗口显示坐标系
-
- [1. 修改mprvr.js 添加OrientationMarkerTool](#1. 修改mprvr.js 添加OrientationMarkerTool)
- [2. view3d.vue中响应工具栏事件](#2. view3d.vue中响应工具栏事件)
- [3. 修改DisplayerArea3D.vue](#3. 修改DisplayerArea3D.vue)
- 四、vr窗口显示轮廓线
-
- [1. 修改mprvr.js 添加addOutline,showOutline函数](#1. 修改mprvr.js 添加addOutline,showOutline函数)
- [2. view3d.vue中响应工具栏操作](#2. view3d.vue中响应工具栏操作)
- [3. 修改DisplayerArea3D.vue](#3. 修改DisplayerArea3D.vue)
- 总结
前言
vr = volume rendering 体绘制,体渲染
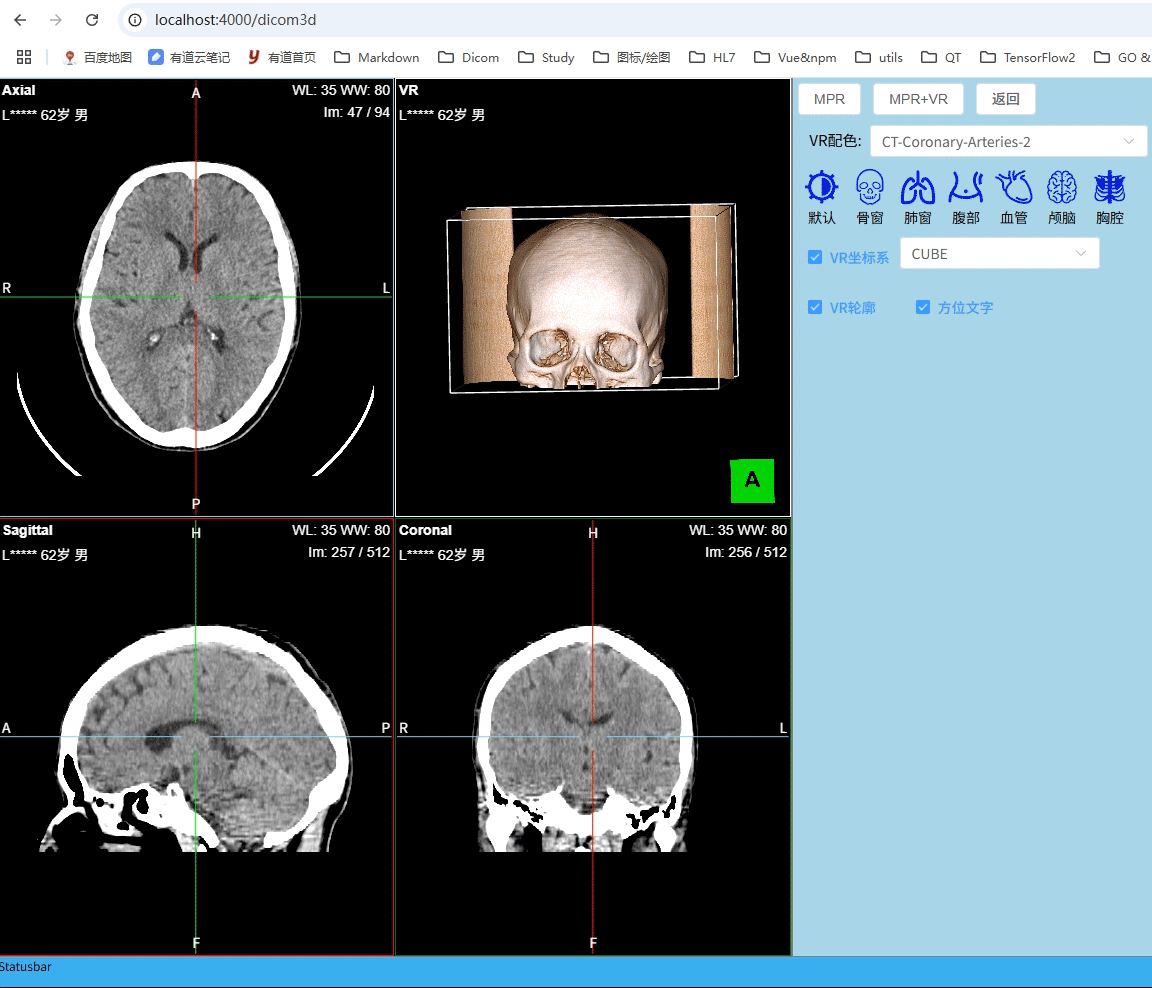
本章实现三个功能:
- mpr窗口中显示方位文字
- vr窗口右下角显示坐标系
- vr窗口显示轮廓线
效果如下:
一、工具栏修改
- 在工具栏上添加"VR坐标系"、"VR轮廓"、"方位文字" 三个checkbox,用来控制各自的显示与隐藏。添加select选择器用来切换VR坐标系的显示外观(CUBE, AXES, CUSTOM)。 其中CUSTOM的vtp文件点此处下载
javascript
<template>
	<div class="toolbar">
		...
		<div class="toolbar-row">
			<el-checkbox v-model="showAxes" label="VR坐标系" size="large" style="margin: 0 10px" />
			<el-select v-model="currentAxes" placeholder="Select Axes Type" style="width: 200px">
				<el-option v-for="item in axes" :key="item.name" :label="item.name" :value="item.value" />
			</el-select>
		</div>

		<div class="toolbar-row">
			<el-checkbox v-model="showOutline" label="VR轮廓" size="large" style="margin-left: 10px" />
			<el-checkbox v-model="showOrientText" label="方位文字" size="large" style="margin-left: 10px" />
		</div>
	</div>
</template>- 监听以上各元素绑定的变量,发送事件到view3d
javascript
const currentAxes = ref(1);
const showOutline = ref(true);
const showAxes = ref(true);
const showOrientText = ref(true);

watch(showAxes, (newValue) => {
	emit("action", { name: "showAxes", value: newValue });
});

watch(showOutline, (newValue) => {
	emit("action", { name: "showOutline", value: newValue });
});

watch(showOrientText, (newValue) => {
	emit("action", { name: "toggleOrientText" });
});

watch(currentAxes, (newValue) => {
	emit("action", { name: "changeAxesType", value: newValue });
});
二、切片窗口显示方位文字
计算切片方位文字的算法参考第八章 在Displayer中显示图像方位
1. 修改mprvr.js,添加函数getOrientationMarkers
javascript
export default class MPR {
	constructor(params) {
		this.toolGroup = null;
		this.vrToolGroup = null;
		this.renderingEngine = null;
		this.registered = false;
		...
		this.init(params);
	}

	init(config = {}) {
	...
	}
	...
	getOrientationMarkers({ camera, rotation }) {
		let flipVertical = camera.flipVertical || false;
		let flipHorizontal = camera.flipHorizontal || false;
		let newRotation = rotation || 0;

		let rowCosines, columnCosines;
		const { viewUp, viewPlaneNormal } = camera;

		const viewRight = vec3.create();
		vec3.cross(viewRight, viewUp, viewPlaneNormal);

		columnCosines = [-viewUp[0], -viewUp[1], -viewUp[2]];
		rowCosines = viewRight;

		const rowString = getOrientationStringLPS(rowCosines);
		const columnString = getOrientationStringLPS(columnCosines);
		const oppositeRowString = invertOrientationStringLPS(rowString);
		const oppositeColumnString = invertOrientationStringLPS(columnString);

		const markers = {
			top: oppositeColumnString,
			left: oppositeRowString,
			right: rowString,
			bottom: columnString
		};

		// If any vertical or horizontal flips are applied, change the orientation strings ahead of
		// the rotation applications
		if (flipVertical) {
			markers.top = invertOrientationStringLPS(markers.top);
			markers.bottom = invertOrientationStringLPS(markers.bottom);
		}

		if (flipHorizontal) {
			markers.left = invertOrientationStringLPS(markers.left);
			markers.right = invertOrientationStringLPS(markers.right);
		}

		// Swap the labels accordingly if the viewport has been rotated
		// This could be done in a more complex way for intermediate rotation values (e.g. 45 degrees)
		if (newRotation === 90 || newRotation === -270) {
			return {
				top: markers.left,
				left: invertOrientationStringLPS(markers.top),
				right: invertOrientationStringLPS(markers.bottom),
				bottom: markers.right // left
			};
		} else if (newRotation === -90 || newRotation === 270) {
			return {
				top: invertOrientationStringLPS(markers.left),
				left: markers.top,
				bottom: markers.left,
				right: markers.bottom
			};
		} else if (newRotation === 180 || newRotation === -180) {
			return {
				top: invertOrientationStringLPS(markers.top),
				left: invertOrientationStringLPS(markers.left),
				bottom: invertOrientationStringLPS(markers.bottom),
				right: invertOrientationStringLPS(markers.right)
			};
		}

		return markers;
	}
}
2. 修改DisplayerArea3D.vue
- 在mpr 三个div上中、下中、左中、右中添加用于显示方位文字的元素。都与变量showOrientText绑定,用来控制显示/隐藏
javascript
<template>
	<div
		class="container3d"
		ref="elContainer"
		v-loading="loading"
		element-loading-text="正在处理..."
		element-loading-background="rgba(0, 0, 0, 0.8)"
		@mousedown.prevent="OnSelectView"
	>
		<div class="axialparent" :style="axialStyle" v-show="showAxial" @dblclick="OnDbClick">
			<div ref="elAxial" class="sliceview" @contextmenu.prevent>
				...
				<!--显示方位文字-->
				<span class="orient_top" v-show="showOrientText">{{ axialText.orient.top }}</span>
				<span class="orient_bottom" v-show="showOrientText">{{ axialText.orient.bottom }}</span>
				<span class="orient_left" v-show="showOrientText">{{ axialText.orient.left }}</span>
				<span class="orient_right" v-show="showOrientText">{{ axialText.orient.right }}</span>
			</div>
		</div>
		<div class="vrcprparent" v-show="showVR" @dblclick="OnDbClick">
			...
		</div>
		<div class="sagittalparent" v-show="showSagittal" @dblclick="OnDbClick">
			<div ref="elSagittal" class="sliceview" @contextmenu.prevent>
				...
				<!--显示方位文字-->
				<span class="orient_top" v-show="showOrientText">{{ sagittalText.orient.top }}</span>
				<span class="orient_bottom" v-show="showOrientText">{{ sagittalText.orient.bottom }}</span>
				<span class="orient_left" v-show="showOrientText">{{ sagittalText.orient.left }}</span>
				<span class="orient_right" v-show="showOrientText">{{ sagittalText.orient.right }}</span>
			</div>
		</div>
		<div class="coronalparent" v-show="showCoronal" @dblclick="OnDbClick">
			<div ref="elCoronal" class="sliceview" @contextmenu.prevent>
				...
				<!--显示方位文字-->
				<span class="orient_top" v-show="showOrientText">{{ coronalText.orient.top }}</span>
				<span class="orient_bottom" v-show="showOrientText">{{ coronalText.orient.bottom }}</span>
				<span class="orient_left" v-show="showOrientText">{{ coronalText.orient.left }}</span>
				<span class="orient_right" v-show="showOrientText">{{ coronalText.orient.right }}</span>
			</div>
		</div>
	</div>
</template>- 定义三个切片方位文字的保存变量axialText,sagittalText, coronalText
- 在onMounted中调用MPR bindCameraEvent绑定CAMERA_MODIFIED事件,调用UdpateOrientation函数
- 添加cameraHandler,UdpateOrientation函数更新方位文字
javascript
import { ViewportId, getDicomInfo } from "../cornerstone3D/mprvr.js";

const cornerText = reactive({
	[ViewportId.AXIAL]: {
		wwwc: "",
		slice: "",
		orient: {
			top: "",
			bottom: "",
			left: "",
			right: ""
		}
	},
	[ViewportId.SAGITTAL]: {
		wwwc: "",
		slice: "",
		orient: {
			top: "",
			bottom: "",
			left: "",
			right: ""
		}
	},
	[ViewportId.CORONAL]: {
		wwwc: "",
		slice: "",
		orient: {
			top: "",
			bottom: "",
			left: "",
			right: ""
		}
	}
});

const cameraHandler = e => {
	UdpateOrientation(e);
};

const UdpateOrientation = e => {
	const { viewportId, camera, rotation} = e.detail;
	const markers = theMPR.getOrientationMarkers({ camera, rotation });
	if (markers && showOrientText.value) {
		cornerText[viewportId].orient = markers;
	}
};

onMounted(() => {
	theMPR = new MPR({
		elAxial: elAxial.value,
		elSagittal: elSagittal.value,
		elCoronal: elCoronal.value,
		elVR: elVR.value
	});

	load();
	theMPR.bindRenderEvent(renderHandler);
	theMPR.bindCameraEvent(cameraHandler);

});
三、vr窗口显示坐标系
1. 修改mprvr.js 添加OrientationMarkerTool
- 添加axesConfig 为OrientationMarkerTool定义三种类型外观配置项
- 添加工具 this.vrToolGroup.addTool(OrientationMarkerTool.toolName, axesConfig)
- 添加showAxes函数,显示/隐藏坐标系
- 添加setAxesType函数,切换坐标系外观
- loadImages中调用this.showAxes(true),显示默认坐标系-CUBE
javascript
const {
	ToolGroupManager,
	Enums: csToolsEnums,
	...
	OrientationMarkerTool
} = cornerstoneTools;

const axesConfig = {
	orientationWidget: {
		viewportSize: 0.08,
		minPixelSize: 70,
		maxPixelSize: 200
	},

	overlayMarkerType: OrientationMarkerTool.OVERLAY_MARKER_TYPES.ANNOTATED_CUBE,

	overlayConfiguration: {
		[OrientationMarkerTool.OVERLAY_MARKER_TYPES.ANNOTATED_CUBE]: {
			faceProperties: {
				xPlus: {
					text: "L",
					faceColor: viewportColors[idSagittal], //"#ffff00",
					faceRotation: 90
				},
				xMinus: {
					text: "R",
					faceColor: viewportColors[idSagittal], //"#ffff00",
					faceRotation: 270
				},
				yPlus: {
					text: "P",
					faceColor: viewportColors[idCoronal], //"#00ffff",
					fontColor: "black",
					faceRotation: 180
				},
				yMinus: {
					text: "A",
					faceColor: viewportColors[idCoronal], //"#00ffff",
					fontColor: "black"
				},
				zPlus: {
					text: "S",
					faceColor: viewportColors[idAxial] //"#00ffff",
					// fontColor: "white",
				},
				zMinus: {
					text: "I",
					faceColor: viewportColors[idAxial] //"#00ffff",
					// fontColor: "white",
				}
			},
			defaultStyle: {
				fontStyle: "bold",
				fontFamily: "Arial",
				fontColor: "black",
				fontSizeScale: res => res / 2,
				faceColor: "#0000ff",
				edgeThickness: 0.05,
				edgeColor: "black",
				resolution: 400
			}
		},
		[OrientationMarkerTool.OVERLAY_MARKER_TYPES.AXES]: {},
		[OrientationMarkerTool.OVERLAY_MARKER_TYPES.CUSTOM]: {
			polyDataURL: "/src/assets/Human.vtp"
		}
	}
};

export default class MPR {
	constructor(params) {
		this.toolGroup = null;
		this.vrToolGroup = null;
		this.renderingEngine = null;
		this.registered = false;
		this.viewportInputArray = null;
		this.crosshairsToolActive = true;
		this.loaded = false;
		this.selecteToolName = "";
		this.params = params;
		this.volume = null;
		this.init(params);
	}

	init(config = {}) {
		const { elAxial, elSagittal, elCoronal, elVR } = config;

		cornerstoneTools.addTool(CrosshairsTool);
		...
		cornerstoneTools.addTool(OrientationMarkerTool);

		this.vrToolGroup = ToolGroupManager.getToolGroup(vrToolGroupId);
		if (!this.vrToolGroup) {
			this.vrToolGroup = ToolGroupManager.createToolGroup(vrToolGroupId);
			this.vrToolGroup.addTool(TrackballRotateTool.toolName);
			this.vrToolGroup.addTool(ZoomTool.toolName, {
				zoomToCenter: true,
				invert: true,
				minZoomScale: 0.15,
				maxZoomScale: 20
			});
			...
			// 添加坐标系工具
			this.vrToolGroup.addTool(OrientationMarkerTool.toolName, axesConfig);
		}
	}
	async loadImages(imageIds) {
		let newImageIds = [...new Set(imageIds)];
		for (let i = 0; i < newImageIds.length; i++) {
			await cornerstoneDICOMImageLoader.wadouri.loadImage(newImageIds[i]).promise;
		}

		// Define a volume in memory
		this.volume = await volumeLoader.createAndCacheVolume(volumeId, {
			imageIds: newImageIds
		});
		...
		// 显示坐标系
		this.showAxes(true);
		this.loaded = true;

	}
	...
	setAxesType(type) {  // 坐标系外观
		axesConfig.overlayMarkerType = type;
		const options = this.vrToolGroup.getToolOptions(OrientationMarkerTool.toolName);
		if (options.mode === "Enabled") {
			this.vrToolGroup.setToolDisabled(OrientationMarkerTool.toolName);
			this.vrToolGroup.setToolConfiguration(OrientationMarkerTool.toolName, {
				overlayMarkerType: type
			});

			this.vrToolGroup.setToolEnabled(OrientationMarkerTool.toolName);
		}
	}

	showAxes(show) {  // 显示/隐藏坐标系
		if (show) {
			this.vrToolGroup.setToolConfiguration(OrientationMarkerTool.toolName, {
				overlayMarkerType: axesConfig.overlayMarkerType
			});
			this.vrToolGroup.setToolEnabled(OrientationMarkerTool.toolName);
		} else {
			this.vrToolGroup.setToolDisabled(OrientationMarkerTool.toolName);
		}
	}
}
2. view3d.vue中响应工具栏事件
javascript
async function OnToolbarAction(action) {
	switch (action.name) {
		...
		case "showOutline":  // 显示/隐藏 轮廓线
			displayArea.value.showOutline(action.value);
			break;
		case "showAxes":  // 显示/隐藏 坐标系
			displayArea.value.showAxes(action.value);
			break;
		case "toggleOrientText":  // 显示/隐藏 切片窗口方位文字
			displayArea.value.toggleOrientText();
			break;
		case "changeAxesType":  // 切换坐标系外观
			displayArea.value.changeAxesType(action.value);
			break;
		default:
			break;
	}
}
3. 修改DisplayerArea3D.vue
添加并导出工具栏操作响应函数:showAxes,changeAxesType
javascript
const showAxes = show => {
	theMPR.showAxes(show);
};

const changeAxesType = type => {
	theMPR.setAxesType(type);
};

defineExpose({
	...
	showAxes,
	changeAxesType,
});
四、vr窗口显示轮廓线
1. 修改mprvr.js 添加addOutline,showOutline函数
- 导入vtk.js中的vtkOutlineFilter,vtkMapper,vtkActor
- 添加addOutline函数,vtkOutlineFilter输入连接this.volume.imageData
- 添加showOutline函数,显示/隐藏轮廓线
- loadImages中调用this.showOutline(true),默认显示轮廓线
javascript
import vtkOutlineFilter from "@kitware/vtk.js/Filters/General/OutlineFilter";
import vtkMapper from "@kitware/vtk.js/Rendering/Core/Mapper";
import vtkActor from "@kitware/vtk.js/Rendering/Core/Actor";

let outlineActor = null;

export default class MPR {
	constructor(params) {
		this.toolGroup = null;
		this.vrToolGroup = null;
		...
		this.init(params);
	}

	init(config = {}) {
		...
	}
	...
	addOutline() {
		// Create image outline in 3D view
		const outline = vtkOutlineFilter.newInstance();
		const mapper = vtkMapper.newInstance();
		outlineActor = vtkActor.newInstance();
		outlineActor.setMapper(mapper);

		outline.setInputData(this.volume.imageData);
		mapper.setInputData(outline.getOutputData());

		const viewport = this.renderingEngine.getViewport(idVolume);
		viewport.addActor({ uid: "VOLUME_OUTLINE", actor: outlineActor });
		outlineActor.setVisibility(true);
		viewport.render();
	}
	showOutline(show) {
		if (!outlineActor) return;
		outlineActor.setVisibility(show);
		const viewport = this.renderingEngine.getViewport(idVolume);
		viewport.render();
	}
}
2. view3d.vue中响应工具栏操作
参考第三节
3. 修改DisplayerArea3D.vue
添加并导出工具栏操作响应函数:showOutline
javascript
const showOutline = show => {
	theMPR.showOutline(show);
};

defineExpose({
	...
	showOutline
});
总结
mpr切片窗口显示/隐藏 方位文字。
vr窗口显示/隐藏坐标系,切换坐标系外观
vr窗口显示/隐藏轮廓线。