本文是对图像自适应3DLUT技术的代码解读,原文解读请看图像自适应3DLUT文章讲解
1、原文概要
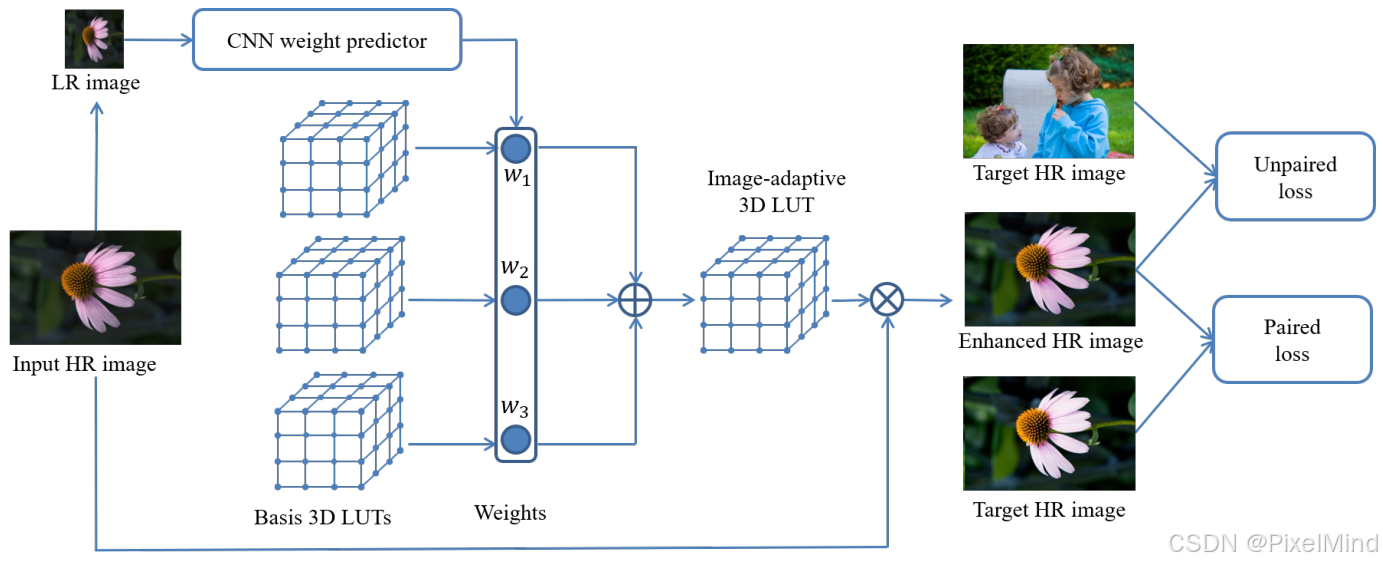
结合3D LUT和CNN,使用成对和非成对的数据集进行训练,训练后能够完成自动的图像增强,同时还可以做到极低的资源消耗。下图为整个模型的结构示意图,本篇代码讲解只讲解成对数据的情况,非成对是类似的。
2、代码结构
代码整体结构如下:
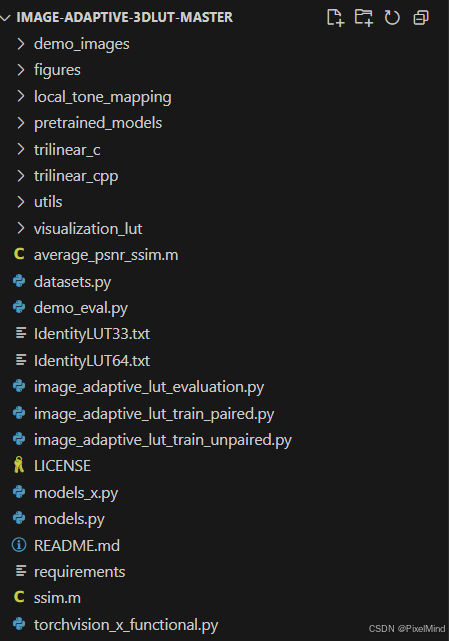
image_adaptive_lut_train_paired.py是成对数据训练脚本,models.py文件中是网络结构和损失函数。
3 、核心代码模块
models.py 文件
这个文件包含了3DLUT中CNN weight predictor的实现、三次插值的实现和两个正则损失(平滑损失和单调损失)的计算。
1. Classifier类
此为CNN weight predictor的实现。
python
class Classifier(nn.Module):
    def __init__(self, in_channels=3):
        super(Classifier, self).__init__()

        self.model = nn.Sequential(
            nn.Upsample(size=(256,256),mode='bilinear'),
            nn.Conv2d(3, 16, 3, stride=2, padding=1),
            nn.LeakyReLU(0.2),
            nn.InstanceNorm2d(16, affine=True),
            *discriminator_block(16, 32, normalization=True),
            *discriminator_block(32, 64, normalization=True),
            *discriminator_block(64, 128, normalization=True),
            *discriminator_block(128, 128),
            #*discriminator_block(128, 128, normalization=True),
            nn.Dropout(p=0.5),
            nn.Conv2d(128, 3, 8, padding=0),
        )

    def forward(self, img_input):
        return self.model(img_input)
可以看到,输入首先进行resize到256分辨率,即HR->LR的过程,然后经过一系列卷积和归一化模块,最终经过一个kernel_size为8,输出通道为3的卷积,变成只有3个输出的weight,后续可以作用于LUT上。
其中的discriminator_block实现如下:
python
def discriminator_block(in_filters, out_filters, normalization=False):
    """Returns downsampling layers of each discriminator block"""
    layers = [nn.Conv2d(in_filters, out_filters, 3, stride=2, padding=1)]
    layers.append(nn.LeakyReLU(0.2))
    if normalization:
        layers.append(nn.InstanceNorm2d(out_filters, affine=True))
        #layers.append(nn.BatchNorm2d(out_filters))

    return layers
其实就是一个简单的卷积,搭配了一个激活函数,根据normalization选项的不同插入InstanceNorm。
2. TrilinearInterpolation
该类实现了3DLUT中会使用到的插值方法:
python
class TrilinearInterpolation(torch.autograd.Function):

    def forward(self, LUT, x):

        x = x.contiguous()
        output = x.new(x.size())
        dim = LUT.size()[-1]
        shift = dim ** 3
        binsize = 1.0001 / (dim-1)
        W = x.size(2)
        H = x.size(3)
        batch = x.size(0)

        self.x = x
        self.LUT = LUT
        self.dim = dim
        self.shift = shift
        self.binsize = binsize
        self.W = W
        self.H = H
        self.batch = batch

        if x.is_cuda:
            if batch == 1:
                trilinear.trilinear_forward_cuda(LUT,x,output,dim,shift,binsize,W,H,batch)
            elif batch > 1:
                output = output.permute(1,0,2,3).contiguous()
                trilinear.trilinear_forward_cuda(LUT,x.permute(1,0,2,3).contiguous(),output,dim,shift,binsize,W,H,batch)
                output = output.permute(1,0,2,3).contiguous()

        else:
            trilinear.trilinear_forward(LUT,x,output,dim,shift,binsize,W,H,batch)

        return output

    def backward(self, grad_x):

        grad_LUT = torch.zeros(3,self.dim,self.dim,self.dim,dtype=torch.float)

        if grad_x.is_cuda:
            grad_LUT = grad_LUT.cuda()
            if self.batch == 1:
                trilinear.trilinear_backward_cuda(self.x,grad_x,grad_LUT,self.dim,self.shift,self.binsize,self.W,self.H,self.batch)
            elif self.batch > 1:
                trilinear.trilinear_backward_cuda(self.x.permute(1,0,2,3).contiguous(),grad_x.permute(1,0,2,3).contiguous(),grad_LUT,self.dim,self.shift,self.binsize,self.W,self.H,self.batch)
        else:
            trilinear.trilinear_backward(self.x,grad_x,grad_LUT,self.dim,self.shift,self.binsize,self.W,self.H,self.batch)

        return grad_LUT, None
作者将其封装成了一个Function,前向和反向的gpu计算过程作者用cuda文件编写的(作者也实现了cpu的版本),具体的实现在trilinear_c/src/trilinear_kernel.cu(对应cpu的版本是trilinear_c/src/trilinear.c)文件中,TriLinearForward和TriLinearBackward是实际调用会使用到的核函数,前向核函数每一个thread实现的逻辑跟我们讲到的实际插值的过程是一致的,这里就不做代码讲解了。
3. TV_3D
该类实现的是两个正则化的损失函数。
python
class TV_3D(nn.Module):
    def __init__(self, dim=33):
        super(TV_3D,self).__init__()

        self.weight_r = torch.ones(3,dim,dim,dim-1, dtype=torch.float)
        self.weight_r[:,:,:,(0,dim-2)] *= 2.0
        self.weight_g = torch.ones(3,dim,dim-1,dim, dtype=torch.float)
        self.weight_g[:,:,(0,dim-2),:] *= 2.0
        self.weight_b = torch.ones(3,dim-1,dim,dim, dtype=torch.float)
        self.weight_b[:,(0,dim-2),:,:] *= 2.0
        self.relu = torch.nn.ReLU()

    def forward(self, LUT):

        dif_r = LUT.LUT[:,:,:,:-1] - LUT.LUT[:,:,:,1:]
        dif_g = LUT.LUT[:,:,:-1,:] - LUT.LUT[:,:,1:,:]
        dif_b = LUT.LUT[:,:-1,:,:] - LUT.LUT[:,1:,:,:]
        tv = torch.mean(torch.mul((dif_r ** 2),self.weight_r)) + torch.mean(torch.mul((dif_g ** 2),self.weight_g)) + torch.mean(torch.mul((dif_b ** 2),self.weight_b))

        mn = torch.mean(self.relu(dif_r)) + torch.mean(self.relu(dif_g)) + torch.mean(self.relu(dif_b))

        return tv, mn
这个没有特别需要讲解的,基本上是照着论文给出的公式将其翻译成代码,tv代表平滑性损失,mn代表单调性损失,因此这个类会同时输出两个损失,至于平滑损失中的w正则会在后续的训练中看到。
image_adaptive_lut_train_paired.py 文件
存放着跟训练相关的代码。以一个epoch的一个batch的一次iteration为例:
python
for epoch in range(opt.epoch, opt.n_epochs):
    mse_avg = 0
    psnr_avg = 0
    classifier.train()
    for i, batch in enumerate(dataloader):

        # Model inputs
        real_A = Variable(batch["A_input"].type(Tensor))
        real_B = Variable(batch["A_exptC"].type(Tensor))

        # ------------------
        #  Train Generators
        # ------------------

        optimizer_G.zero_grad()

        fake_B, weights_norm = generator_train(real_A)

        # Pixel-wise loss
        mse = criterion_pixelwise(fake_B, real_B)

        tv0, mn0 = TV3(LUT0)
        tv1, mn1 = TV3(LUT1)
        tv2, mn2 = TV3(LUT2)
        #tv3, mn3 = TV3(LUT3)
        #tv4, mn4 = TV3(LUT4)
        tv_cons = tv0 + tv1 + tv2 #+ tv3 + tv4
        mn_cons = mn0 + mn1 + mn2 #+ mn3 + mn4

        loss = mse + opt.lambda_smooth * (weights_norm + tv_cons) + opt.lambda_monotonicity * mn_cons

        psnr_avg += 10 * math.log10(1 / mse.item())

        mse_avg += mse.item()

        loss.backward()

        optimizer_G.step()
real_A 和real_B分别是增强前图像和增强后的HQ,generator_train是根据LUT生成图像的过程,实现如下所示:
python
def generator_train(img):

    pred = classifier(img).squeeze()
    if len(pred.shape) == 1:
        pred = pred.unsqueeze(0)
    gen_A0 = LUT0(img)
    gen_A1 = LUT1(img)
    gen_A2 = LUT2(img)
    #gen_A3 = LUT3(img)
    #gen_A4 = LUT4(img)

    weights_norm = torch.mean(pred ** 2)

    combine_A = img.new(img.size())
    for b in range(img.size(0)):
        combine_A[b,:,:,:] = pred[b,0] * gen_A0[b,:,:,:] + pred[b,1] * gen_A1[b,:,:,:] + pred[b,2] * gen_A2[b,:,:,:] #+ pred[b,3] * gen_A3[b,:,:,:] + pred[b,4] * gen_A4[b,:,:,:]

    return combine_A, weights_norm
这里的classifier是我们刚讲到的网络结构,LUT0-2分别是预设置好的3条LUT,根据3条LUT生成3幅图像A0-A2,最后根据pred对gen图像进行加权后就可以输出了,顺带计算w的L2,即weights_norm。
之后是计算损失的过程:
python
        # Pixel-wise loss
        mse = criterion_pixelwise(fake_B, real_B)

        tv0, mn0 = TV3(LUT0)
        tv1, mn1 = TV3(LUT1)
        tv2, mn2 = TV3(LUT2)
        #tv3, mn3 = TV3(LUT3)
        #tv4, mn4 = TV3(LUT4)
        tv_cons = tv0 + tv1 + tv2 #+ tv3 + tv4
        mn_cons = mn0 + mn1 + mn2 #+ mn3 + mn4

        loss = mse + opt.lambda_smooth * (weights_norm + tv_cons) + opt.lambda_monotonicity * mn_cons
包含mse损失和正则损失,正则损失使用的是我们前面讲到的TV_3D类。
3、总结
代码实现核心的部分讲解完毕,Classifier和LUT0-2对应于CNN和LUT的结合,最终在数据集上学习到的LUT可以对应于预设的3条LUT曲线,Classifier预测的3个权重对他们进行加权得到最终的一条3DLUT作用于实际图像上。该文章是3DLUT的开山之作,相信也已经得到业界的应用。
代码中也有作者的预训练权重,读者可以自己自行实验下效果。
感谢阅读,欢迎留言或私信,一起探讨和交流。
如果对你有帮助的话,也希望可以给博主点一个关注,感谢。