
1.list(容器,不是类)模拟实现基本结构
这个实现是和源码的实现不同的,不要进行强制类型转换了,很麻烦。我们把定义放在.h文件中,在.cpp中放测试代码。
注:这个基本结构之后会改变,到时候再讲原因。
cpp
//.h
#include<iostream>
#include<list>
#include<assert.h>
using namespace std;
namespace td
{
	template<class T>
	struct list_node
	{
    public:
		list_node<T>* _next;
		list_node<T>* _prev;
		T _data;
	};
	template<class T>
	class list
	{
	public:
		typedef list_node<T> Node;
	private:
		Node* _head;
	};
}
cpp
//.cpp
#include"test.h"
namespace td
{
void test()
{ }
}
int main()
{
	return 0;
}
2.list的无参构造函数的实现
这个很简单,我们直接先申请一个Node大小的空间,然后再改变指向即可:
cpp
//.h
list()
{
	_head = new Node;
	_head->_next = _head;
	_head->_prev = _head;
}
3.list_node的有参构造函数的实现
这个函数比较简单,用初始化列表即可,但是,注意:我们这个构造有参是因为要把数据存储起来,一般建议:给一个缺省值,这样让它更好的进行初始化。在C++中一般给T()即可:
cpp
//.h
list_node(const T& x = T())
	:_next(nullptr)
	,_prev(nullptr)
	,_data(x)
{ }
4.list::push_back的实现
这个尾插难度不是很高,只要注意改变指向即可:
cpp
//.h
void push_back(const T& val)
{
	Node* newnode = new Node(x);
	Node* tail = _head->_prev;
	newnode->_prev = tail;
	tail->_next = newnode;
	newnode->_next = _head;
	_head->_prev = newnode;
}
这个代码确实有些难看懂,主要是我们对双向链表了解不是很全面,首先tail是尾结点,我们尾插是在尾结点之后插入结点,然后再把另外一些的指向改成正确的,这样就没太大的问题了。
5.list_iterator类的基本结构
我们无法用typedef Node* iterator的方式来得到迭代器,因为我们无法遍历,如果std::list<int> lt1;std::list<int>::iterator it1=lt1.begin();其中如果*it1那么本质上可以理解*it1为:it1.operator*();而在这里面解引用是用_node->_data的方式实现的。所以我们需要用迭代器,这个迭代器是被封装的一个类,那么基本结构为:
cpp
template<class T>
struct list_iterator
{
	typedef list_node<T> Node;
	Node* _node;
};
5.1list_iterator类的基本函数实现
一般包括但不限于*、++、--、==、!=这些运算符,还有->,这里一并实现了:
cpp
list_iterator(Node* node)
	:_node(node)
{ }
T& operator*()
{
	return _node->data;
}
//前置++
list_iterator<T>& operator++()
{
	_node = _node->next;
	return *this;
}
bool operator!=(const list_iterator<T>& it)
{
	return _node != it._node;
}
bool operator==(const list_iterator<T>& it)
{
	return _node == it._node;
}
5.2list_iterator::operator->()的实现
这里先讲它的写法:
cpp
T* operator->()
{
	return &_node->_data;
}
为什么能这样写?
假设:
cpp
struct A
{
	int _a1;
	int _a2;
};
如果在我们std::list<A> lt;auto it=lt.begin();如果it->_a1,
那么实际上它会转化为it.operator->()->_a1也就是说,之前我们应当写为:it->->_a1的,但是,为了可读性,编译器做了特殊处理,省略了一个->。所以能这样写。
6.如何实现list_const_iterator
我们无法在list_iterator里面加一个const迭代器版本,因为这样并不能作为重载,因为返回值不同并不能作为重载,比如begin它在普通迭代器就要返回值为iterator,那么如果是const迭代器就要返回值为const_iterator,实际上就是:const T,所以我们只能自己写一个额外的迭代器,那么我们可以这样写:
cpp
template<class T>
struct list_const_iterator
{
	typedef list_node<T> Node;

	Node* _node;

	list_const_iterator(Node* node)
		:_node(node)
	{
	}

	const T& operator*()
	{
		return _node->_data;
	}

	const T* operator->()
	{
		return &_node->_data;
	}

	list_const_iterator<T>& operator++()
	{
		_node = _node->_next;
		return *this;
	}

	bool operator!=(const list_const_iterator<T>& it)
	{
		return _node != it._node;
	}

	bool operator==(const list_const_iterator<T>& it)
	{
		return _node == it._node;
	}
};
我们发现大部分只是返回值不一样而已,所以这种方式确实不是那么好,所以我们可以把它再写为模板的形式。
7.list_iterator类的改进结构
为了适应多种迭代器,所以我们可以把它写为模板形式,不过如果真再写一个模板我们是没有思路的,所以我们可以改成如下形式(先看一下,理解难度有些高):
cpp
template<class T,class Ref,class Ptr>
struct list_iterator
{
	typedef list_node<T> Node;
	typedef list_iterator<T, Ref, Ptr> Self;

	Node* _node;

	list_iterator(Node* node)
		:_node(node)
	{
	}

	Ref operator*()
	{
		return _node->_data;
	}

	Ptr operator->()
	{
		return &_node->_data;
	}
	//前置++
	Self& operator++()
	{
		_node = _node->_next;
		return *this;
	}
	//后置++
	Self operator++(int)
	{
		Self tmp(*this);
		_node = _node->_next;
		return tmp;
	}
	//前置--
	Self& operator--()
	{
		_node = _node->_prev;
		return *this;
	}
	//后置--
	Self operator--(int)
	{
		Self tmp(*this);
		_node = _node->_prev;
		return tmp;
	}

	bool operator!=(const Self& it)
	{
		return _node != it._node;
	}

	bool operator==(const Self& it)
	{
		return _node == it._node;
	}
};这个结构就是改进后的结构,添加的两个模板参数其中Ref意思是:引用,Ptr的意思是:指针。所以之后传递的时候就要这样传递。其次,我们把之前写为list_iterator的部分都改为Self。这里的++、--有后置与前置之分,所以我们要注意它的写法,这里就不做过多讲解了。
8.list类的改进结构
通过这些改变,我们可以加上这些:
cpp
typedef list_iterator<T, T&, T*> iterator;
typedef list_iterator<T, const T&,const T*> const_iterator;
9.list::begin、list::end的实现
这两个函数都有const迭代器版本和普通迭代器版本,我们要注意的是,如果是begin,那么就是_head->_next,因为头结点是哨兵位,不存储数据;如果是end那么就是哨兵位,因为end这个位置是不存储数据的,可以认为这是尾结点的后面一个指针!!!所以我们可以写出:
cpp
//list
iterator begin()
{
	return _head->_next;
}
iterator end()
{
	return _head;
}
const_iterator begin() const
{
	return _head->_next;
}
const_iterator end() const
{
	return _head;
}
10.list的增删查改的实现
这些增删查改相对于我们之前的数据结构中的双向链表没什么太大的区别,如果想要更加深入了解代码生成的原因,可以看我之前的博客:
cpp
//list
//在pos位置之前插入
void insert(iterator pos, const T& x)
{
	Node* cur = pos._node;
	Node* prev = cur->_prev;
	Node* newnode = new Node(x);
	//这不是唯一的写法
	//但是一定要改变四个指针的指向
	prev->_next = newnode;
	newnode->_prev = prev;
	newnode->_next = cur;
	cur->_prev = newnode;
}
//清除pos位置的数据,并返回清除后该位置的指针
iterator erase(iterator pos)
{
	//防止链表为空
	assert(pos != end());
	Node* cur = pos._node;
	Node* nextNode = cur->_next;
	Node* prevNode = cur->_prev;
	//只要改变两个指针的指向即可
	prevNode->_next = nextNode;
	nextNode->_prev = prevNode;
	delete cur;
	//强制类型转换
	return iterator(nextNode);
}
void push_back(const T& x)
{
	insert(end(), x);
}
void push_front(const T& x)
{
	insert(begin(), x);
}
void pop_front()
{
	erase(begin());
}
void pop_back()
{
	//end位置没有数据,所以要清除end位置前面一个位置的数据
	erase(--end());
}
11.list::size的实现
这个函数的实现可能需要先加一个_size到成员变量里面,所以可以写出:
cpp
//list
template<class T>
class list
{
public:
	typedef list_node<T> Node;
	typedef list_iterator<T, T&, T*> iterator;
	typedef list_iterator<T, const T&,const T*> const_iterator;
	list()
	{
		_head = new Node;
		_head->_next = _head;
		_head->_prev = _head;
		_size = 0;
	}
	//void push_back(const T& val)
	//{
	//	Node* newnode = new Node(x);
	//	Node* tail = _head->_prev;
	//	newnode->_prev = tail;
	//	tail->_next = newnode;
	//	newnode->_next = _head;
	//	_head->_prev = newnode;
	//}
	iterator begin()
	{
		return _head->_next;
	}
	iterator end()
	{
		return _head;
	}
	const_iterator begin() const
	{
		return _head->_next;
	}
	const_iterator end() const
	{
		return _head;
	}
	//在pos位置之前插入
	void insert(iterator pos, const T& x)
	{
		Node* cur = pos._node;
		Node* prev = cur->_prev;
		Node* newnode = new Node(x);
		//这不是唯一的写法
		//但是一定要改变四个指针的指向
		prev->_next = newnode;
		newnode->_prev = prev;
		newnode->_next = cur;
		cur->_prev = newnode;
		++_size;
	}
	//清除pos位置的数据,并返回清除后该位置的指针
	iterator erase(iterator pos)
	{
		//防止链表为空
		assert(pos != end());
		Node* cur = pos._node;
		Node* nextNode = cur->_next;
		Node* prevNode = cur->_prev;
		//只要改变两个指针的指向即可
		prevNode->_next = nextNode;
		nextNode->_prev = prevNode;
		delete cur;
		--_size;
		//强制类型转换
		return iterator(nextNode);
	}
	void push_back(const T& x)
	{
		insert(end(), x);
	}
	void push_front(const T& x)
	{
		insert(begin(), x);
	}
	void pop_front()
	{
		erase(begin());
	}
	void pop_back()
	{
		//end位置没有数据,所以要清除end位置前面一个位置的数据
		erase(--end());
	}
	size_t size() const
	{
		return _size;
	}
private:
	Node* _head;
	size_t size;
};
12.list::clear的实现
这个函数我们可以知道,直接先erase后返回值是有效的,所以我们不用怕it是野指针,所以我们可以这样写:
cpp
void clear()
{
	iterator it = begin();
	while (it != end())
	{
		it = erase(it);
	}
}
由于erase已经delete了pos位置的结点(原it位置),所以直接这样写就可以了。
13.list::~list的实现
这个函数只要先调用clear函数后再把哨兵位的空间释放,_size置为0即可:
cpp
~list()
{
	clear();
	delete _head;
	_head = nullptr;
	_size = 0;
}
14.list::swap的实现
这个函数实现不是很难,所以直接写了:
cpp
void swap(list<T>& lt)
{
	std::swap(_head, lt._head);
	std::swap(_size, lt._size);
}
15.list的拷贝构造函数的实现
我们和list底层相似的方式进行完善:
cpp
void empty_init()
{
	//哨兵位
	_head = new Node;
	_head->_next = _head;
	_head->_prev = _head;
	_size = 0;
}
list(const list<T>& lt)
{
	empty_init();
	for (auto e : lt)
	{
		push_back(e);
	}
}
16.list::operator=的实现
这个函数也是比较简单的实现,但是要注意:我们不能给形参加上引用,因为那样是比较麻烦的写法:
cpp
list<T>& operator=(list<T> lt)
{
	swap(lt);
	return *this;
}
17.list::list(initializer_list<T> lt)的实现
这个函数实现不是很难,我们直接先构造一个头结点,再和拷贝构造一样尾插即可:
cpp
list(initializer_list<T> lt)
{
	empty_init();
	for (auto& e : lt)
	{
		push_back(e);
	}
}
18.测试
我们用以下代码进行测试:
cpp
namespace td
{
	void test()
	{
		td::list<int> l1 = { 5,6,3,6,1,9 };
		td::list<int> l2 = l1;
		td::list<int> l3(l1);
		td::list<int> l4;
		l4 = l1;
		for (const auto& e : l1)
		{
			cout << e << " ";
		}
		cout << endl;
		for (const auto& e : l2)
		{
			cout << e << " ";
		}
		cout << endl;
		for (const auto& e : l3)
		{
			cout << e << " ";
		}
		cout << endl;
		for (const auto& e : l4)
		{
			cout << e << " ";
		}
		cout << endl;
		l1.push_back(3);
		l2.pop_back();
		l3.push_front(8);
		l4.pop_front();
		for (const auto& e : l1)
		{
			cout << e << " ";
		}
		cout << endl;
		for (const auto& e : l2)
		{
			cout << e << " ";
		}
		cout << endl;
		for (const auto& e : l3)
		{
			cout << e << " ";
		}
		cout << endl;
		for (const auto& e : l4)
		{
			cout << e << " ";
		}
		cout << endl;
	}
}
//struct A
//{
//	int _a1;
//	int _a2;
//};
int main()
{
	td::test();
	return 0;
}
那么最终运行结果为:
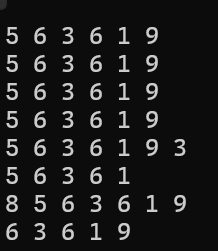
如果有人想测试一下insert和erase,可以用一个迭代器通过begin()和end()进行++、--的操作,进行插入删除测试即可。
19.总结
list的模拟实现已经全部讲解完,有些不常用的函数如:remove_if、splice这些感兴趣的可以自己去实现一下。std::list已经全部讲完了,下讲将讲解:stack和queue(栈和队列)。喜欢的可以一键三连哦,下讲再见!