最近在开发一款仿真程序时,遇到了一个需求:需要在游戏场景中添加水面涟漪效果,既要能自动生成营造氛围,又要能响应玩家点击产生互动效果。经过一番研究和实践,最终实现了一个效果不错的解决方案,所以来分享一下。
一、效果展示
我们最终将实现两种效果:
1 自动涟漪:按照设定的时间间隔自动在随机位置生成涟漪
2 点击涟漪:在鼠标点击位置生成涟漪效果
二、原理和步骤
-
后期处理(Post-Processing):在相机渲染完成后对图像进行处理
-
波形传播算法:模拟水波扩散的物理效果
-
法线扰动:通过改变UV坐标实现折射效果
-
渲染队列控制:确保涟漪在UI之上正确显示
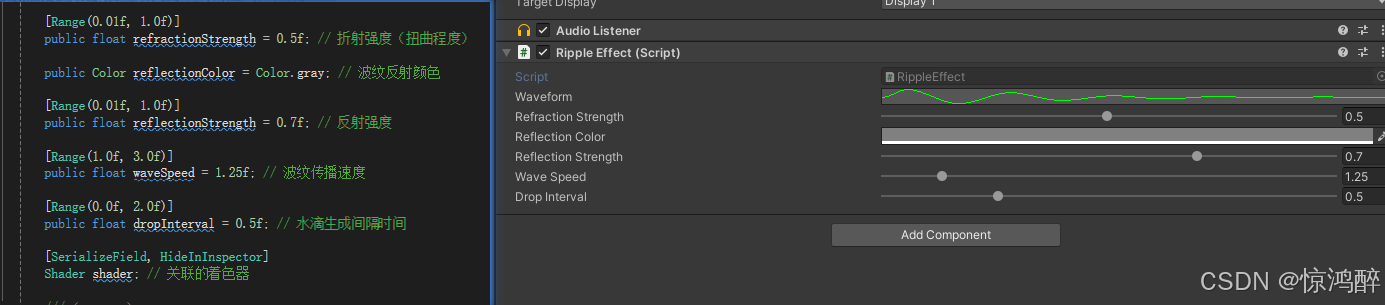
步骤:创建场景 将RippleEffect挂载在主相机上 可以拖拽调整波纹样式
三、完整代码实现
3.1 自动涟漪效果
cs
using UnityEngine;
using System.Collections;

/// <summary>
/// 屏幕波纹效果脚本,附加到相机上实现水滴波纹效果
/// </summary>
public class RippleEffect : MonoBehaviour
{
    // 波纹波形曲线定义(控制波纹的形状和衰减)
    public AnimationCurve waveform = new AnimationCurve(
        new Keyframe(0.00f, 0.50f, 0, 0),  // 起始点
        new Keyframe(0.05f, 1.00f, 0, 0),  // 快速上升到峰值
        new Keyframe(0.15f, 0.10f, 0, 0), // 快速下降
        new Keyframe(0.25f, 0.80f, 0, 0), // 二次波动
        new Keyframe(0.35f, 0.30f, 0, 0), // 二次下降
        new Keyframe(0.45f, 0.60f, 0, 0), // 三次波动
        new Keyframe(0.55f, 0.40f, 0, 0), // 三次下降
        new Keyframe(0.65f, 0.55f, 0, 0), // 四次波动
        new Keyframe(0.75f, 0.46f, 0, 0), // 四次下降
        new Keyframe(0.85f, 0.52f, 0, 0), // 五次波动
        new Keyframe(0.99f, 0.50f, 0, 0)  // 回到基准线
    );

    [Range(0.01f, 1.0f)]
    public float refractionStrength = 0.5f; // 折射强度(扭曲程度)

    public Color reflectionColor = Color.gray; // 波纹反射颜色

    [Range(0.01f, 1.0f)]
    public float reflectionStrength = 0.7f; // 反射强度

    [Range(1.0f, 3.0f)]
    public float waveSpeed = 1.25f; // 波纹传播速度

    [Range(0.0f, 2.0f)]
    public float dropInterval = 0.5f; // 水滴生成间隔时间

    [SerializeField, HideInInspector]
    Shader shader; // 关联的着色器

    /// <summary>
    /// 水滴波纹数据类
    /// </summary>
    class Droplet
    {
        Vector2 position; // 水滴位置(标准化坐标)
        float time;       // 水滴存在时间

        public Droplet()
        {
            time = 1000; // 初始设为较大值表示未激活
        }

        /// <summary>
        /// 重置水滴状态(创建新水滴)
        /// </summary>
        public void Reset()
        {
            position = new Vector2(Random.value, Random.value); // 随机位置
            time = 0; // 重置时间
        }

        /// <summary>
        /// 更新水滴时间
        /// </summary>
        public void Update()
        {
            time += Time.deltaTime;
        }

        /// <summary>
        /// 生成着色器所需的参数向量
        /// </summary>
        /// <param name="aspect">相机宽高比</param>
        public Vector4 MakeShaderParameter(float aspect)
        {
            return new Vector4(
                position.x * aspect, // x位置(考虑宽高比)
                position.y,          // y位置
                time,                // 存在时间
                0                   // 未使用
            );
        }
    }

    Droplet[] droplets;    // 水滴数组(最多3个同时存在)
    Texture2D gradTexture; // 波纹波形纹理
    Material material;     // 使用的材质
    float timer;          // 水滴生成计时器
    int dropCount;        // 水滴计数器(用于循环使用数组)

    /// <summary>
    /// 更新着色器参数
    /// </summary>
    void UpdateShaderParameters()
    {
        var c = GetComponent<Camera>();

        // 传递三个水滴的参数
        material.SetVector("_Drop1", droplets[0].MakeShaderParameter(c.aspect));
        material.SetVector("_Drop2", droplets[1].MakeShaderParameter(c.aspect));
        material.SetVector("_Drop3", droplets[2].MakeShaderParameter(c.aspect));

        // 传递反射颜色和其他参数
        material.SetColor("_Reflection", reflectionColor);
        material.SetVector("_Params1", new Vector4(c.aspect, 1, 1 / waveSpeed, 0));
        material.SetVector("_Params2", new Vector4(1, 1 / c.aspect, refractionStrength, reflectionStrength));
    }

    void Awake()
    {
        // 初始化三个水滴
        droplets = new Droplet[3];
        droplets[0] = new Droplet();
        droplets[1] = new Droplet();
        droplets[2] = new Droplet();

        // 创建波纹波形纹理(2048x1的Alpha纹理)
        gradTexture = new Texture2D(2048, 1, TextureFormat.Alpha8, false);
        gradTexture.wrapMode = TextureWrapMode.Clamp;
        gradTexture.filterMode = FilterMode.Bilinear;

        // 根据波形曲线填充纹理
        for (var i = 0; i < gradTexture.width; i++)
        {
            var x = 1.0f / gradTexture.width * i;
            var a = waveform.Evaluate(x);
            gradTexture.SetPixel(i, 0, new Color(a, a, a, a));
        }
        gradTexture.Apply();

        // 创建材质并设置纹理
        material = new Material(shader);
        material.hideFlags = HideFlags.DontSave;
        material.SetTexture("_GradTex", gradTexture);

        UpdateShaderParameters();
    }

    void Update()
    {
        // 自动生成水滴逻辑
        if (dropInterval > 0)
        {
            timer += Time.deltaTime;
            while (timer > dropInterval)
            {
                Emit();
                timer -= dropInterval;
            }
        }

        // 更新所有水滴
        foreach (var d in droplets) d.Update();

        // 更新着色器参数
        UpdateShaderParameters();
    }

    /// <summary>
    /// 渲染后期处理效果
    /// </summary>
    void OnRenderImage(RenderTexture source, RenderTexture destination)
    {
        Graphics.Blit(source, destination, material);
    }

    /// <summary>
    /// 外部调用生成新水滴
    /// </summary>
    public void Emit()
    {
        droplets[dropCount++ % droplets.Length].Reset(); // 循环使用水滴数组
    }
}
3.2 点击涟漪效果
cs
using UnityEngine;
using System.Collections;

/// <summary>
/// 屏幕波纹效果脚本,附加到相机上实现水滴波纹效果
/// </summary>
public class RippleEffect : MonoBehaviour
{
    [Header("Wave Settings")]
    public AnimationCurve waveform = new AnimationCurve(
         new Keyframe(0.00f, 0.50f, 0, 0),
         new Keyframe(0.05f, 1.00f, 0, 0),
         new Keyframe(0.15f, 0.10f, 0, 0),
         new Keyframe(0.25f, 0.80f, 0, 0),
         new Keyframe(0.35f, 0.30f, 0, 0),
         new Keyframe(0.45f, 0.60f, 0, 0),
         new Keyframe(0.55f, 0.40f, 0, 0),
         new Keyframe(0.65f, 0.55f, 0, 0),
         new Keyframe(0.75f, 0.46f, 0, 0),
         new Keyframe(0.85f, 0.52f, 0, 0),
         new Keyframe(0.99f, 0.50f, 0, 0)
     );

    [Range(0.01f, 1.0f)]
    public float refractionStrength = 0.5f;
    public Color reflectionColor = Color.gray;
    [Range(0.01f, 1.0f)]
    public float reflectionStrength = 0.7f;
    [Range(1.0f, 3.0f)]
    public float waveSpeed = 1.25f;

    [Header("Click Settings")]
    public bool requireMouseClick = true; // 是否要求鼠标点击
    public LayerMask clickableLayers; // 可点击的层

    [SerializeField, HideInInspector]
    Shader shader;

    class Droplet
    {
        Vector2 position;
        float time;
        bool active;

        public Droplet()
        {
            time = 1000;
            active = false;
        }

        public void Reset(Vector2 pos)
        {
            position = pos;
            time = 0;
            active = true;
        }

        public void Update()
        {
            time += Time.deltaTime;
        }

        public bool IsActive()
        {
            return active && time < 1.0f; // 假设1秒后波纹消失
        }

        public Vector4 MakeShaderParameter(float aspect)
        {
            return new Vector4(position.x * aspect, position.y, time, active ? 1 : 0);
        }
    }

    Droplet[] droplets;
    Texture2D gradTexture;
    Material material;
    Camera rippleCamera;

    void Awake()
    {
        rippleCamera = GetComponent<Camera>();
        droplets = new Droplet[1]; // 只需要一个水滴
        droplets[0] = new Droplet();

        gradTexture = new Texture2D(2048, 1, TextureFormat.Alpha8, false);
        gradTexture.wrapMode = TextureWrapMode.Clamp;
        gradTexture.filterMode = FilterMode.Bilinear;
        for (var i = 0; i < gradTexture.width; i++)
        {
            var x = 1.0f / gradTexture.width * i;
            var a = waveform.Evaluate(x);
            gradTexture.SetPixel(i, 0, new Color(a, a, a, a));
        }
        gradTexture.Apply();

        material = new Material(shader);
        material.hideFlags = HideFlags.DontSave;
        material.SetTexture("_GradTex", gradTexture);
        material.renderQueue = (int)UnityEngine.Rendering.RenderQueue.Transparent + 1;
    }

    void Update()
    {
        // 鼠标点击检测
        if (requireMouseClick && Input.GetMouseButtonDown(0))
        {
            Ray ray = rippleCamera.ScreenPointToRay(Input.mousePosition);
            RaycastHit hit;

            // 如果不需要检测特定层,可以移除层掩码检查
            if (Physics.Raycast(ray, out hit, Mathf.Infinity, clickableLayers))
            {
                // 将点击位置转换为视口坐标(0-1)
                Vector2 screenPos = rippleCamera.WorldToViewportPoint(hit.point);
                droplets[0].Reset(new Vector2(screenPos.x, screenPos.y));
            }
            else if (clickableLayers == 0) // 如果没有设置层,则在任何点击位置生成
            {
                Vector2 screenPos = rippleCamera.ScreenToViewportPoint(Input.mousePosition);
                droplets[0].Reset(screenPos);
            }
        }

        // 更新所有水滴
        foreach (var d in droplets) d.Update();

        // 更新着色器参数
        UpdateShaderParameters();
    }

    void UpdateShaderParameters()
    {
        material.SetVector("_Drop1", droplets[0].MakeShaderParameter(rippleCamera.aspect));
        material.SetColor("_Reflection", reflectionColor);
        material.SetVector("_Params1", new Vector4(rippleCamera.aspect, 1, 1 / waveSpeed, 0));
        material.SetVector("_Params2", new Vector4(1, 1 / rippleCamera.aspect, refractionStrength, reflectionStrength));
    }

    void OnRenderImage(RenderTexture source, RenderTexture destination)
    {
        Graphics.Blit(source, destination, material);
    }
}
3.3 通用Shader代码
cs
Shader "Hidden/Ripple Effect"
{
    Properties
    {
        _MainTex ("Base", 2D) = "white" {}          // 主纹理(屏幕图像)
        _GradTex ("Gradient", 2D) = "white" {}      // 波纹波形纹理
        _Reflection ("Reflection Color", Color) = (0, 0, 0, 0) // 反射颜色
        _Params1 ("Parameters 1", Vector) = (1, 1, 0.8, 0)     // [宽高比, 1, 波纹速度倒数, 0]
        _Params2 ("Parameters 2", Vector) = (1, 1, 1, 0)       // [1, 1/宽高比, 折射强度, 反射强度]
        _Drop1 ("Drop 1", Vector) = (0.49, 0.5, 0, 0)         // 水滴1参数 [x, y, 时间, 0]
        _Drop2 ("Drop 2", Vector) = (0.50, 0.5, 0, 0)         // 水滴2参数
        _Drop3 ("Drop 3", Vector) = (0.51, 0.5, 0, 0)         // 水滴3参数
    }

    CGINCLUDE

    #include "UnityCG.cginc"

    // 纹理和参数声明
    sampler2D _MainTex;
    float2 _MainTex_TexelSize;  // 主纹理像素尺寸

    sampler2D _GradTex;         // 波纹波形纹理

    half4 _Reflection;          // 反射颜色
    float4 _Params1;            // 参数1 [aspect, 1, 1/waveSpeed, 0]
    float4 _Params2;            // 参数2 [1, 1/aspect, refractionStrength, reflectionStrength]

    float3 _Drop1;              // 水滴1 [x, y, time]
    float3 _Drop2;              // 水滴2
    float3 _Drop3;              // 水滴3

    /// <summary>
    /// 计算单个波纹在指定位置和时间的波形高度
    /// </summary>
    /// <param name="position">当前像素位置</param>
    /// <param name="origin">波纹中心位置</param>
    /// <param name="time">波纹存在时间</param>
    float wave(float2 position, float2 origin, float time)
    {
        float d = length(position - origin);                // 计算与波纹中心的距离
        float t = time - d * _Params1.z;                   // 计算波形时间(考虑传播速度)
        return (tex2D(_GradTex, float2(t, 0)).a - 0.5f) * 2; // 从梯度纹理采样并转换为[-1,1]范围
    }

    /// <summary>
    /// 计算所有波纹的叠加高度
    /// </summary>
    float allwave(float2 position)
    {
        return wave(position, _Drop1.xy, _Drop1.z) +  // 水滴1波纹
               wave(position, _Drop2.xy, _Drop2.z) +  // 水滴2波纹
               wave(position, _Drop3.xy, _Drop3.z);   // 水滴3波纹
    }

    /// <summary>
    /// 片段着色器主函数
    /// </summary>
    half4 frag(v2f_img i) : SV_Target
    {
        // 用于计算梯度的微小偏移量
        const float2 dx = float2(0.01f, 0);
        const float2 dy = float2(0, 0.01f);

        // 调整坐标考虑宽高比
        float2 p = i.uv * _Params1.xy;

        // 计算波纹高度和梯度(法线)
        float w = allwave(p);
        float2 dw = float2(allwave(p + dx) - w, allwave(p + dy) - w);

        // 应用折射扭曲(根据法线偏移UV)
        float2 duv = dw * _Params2.xy * 0.2f * _Params2.z;
        half4 c = tex2D(_MainTex, i.uv + duv);

        // 计算反射强度(基于法线长度)
        float fr = pow(length(dw) * 3 * _Params2.w, 3);

        // 混合原始颜色和反射颜色
        return lerp(c, _Reflection, fr);
    }

    ENDCG

    SubShader
    {

        Pass
        {
            ZTest Always  // 禁用深度测试
            Cull Off      // 禁用背面剔除
            ZWrite Off    // 禁用深度写入
            Fog { Mode off } // 禁用雾效

            CGPROGRAM
            #pragma fragmentoption ARB_precision_hint_fastest // 使用最快精度
            #pragma target 3.0                                // 使用Shader Model 3.0
            #pragma vertex vert_img                           // 使用内置简单顶点着色器
            #pragma fragment frag                             // 指定片段着色器
            ENDCG
        }
    }
}