一、软件介绍
文末提供程序和源码下载
Apache TVM 是一个机器学习编译框架,遵循 Python 优先开发 、通用部署的原则。它采用预先训练的机器学习模型,编译并生成可嵌入和在任何地方运行的可部署模块。Apache TVM 还支持自定义优化流程,以引入新的优化、库、代码生成等。
二、Apache TVM can help to:Apache TVM 可以帮助:
-
Optimize performance of ML workloads, composing libraries and codegen.
优化 ML 工作负载、组合库和 codegen 的性能。 -
Deploy ML workloads to a diverse set of new environments, including new runtime and new hardware.
部署ML 工作负载部署到各种新环境,包括新运行时和新硬件。 -
Continuously improve and customize ML deployment pipeline in Python by quickly customizing library dispatching, bringing in customized operators and code generation.
持续改进和定制通过快速自定义库调度、引入自定义运算符和代码生成,在 Python 中部署 ML 管道。
**Overall Flow
Then we will show the overall flow of using Apache TVM to compile a neural network model, showing how to optimize, deploy and run the model. The overall flow is illustrated as the figure:
然后我们将展示使用 Apache TVM 编译神经网络模型的整体流程,展示如何优化、部署和运行模型。整个流程如图所示:
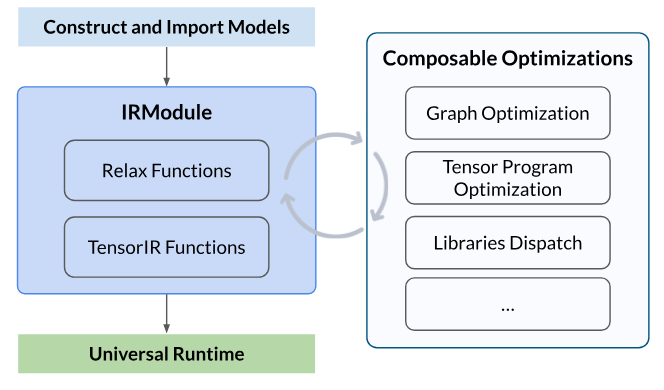
The overall flow consists of the following steps:
整个流程包括以下步骤:
-
Construct or Import a Model : Construct a neural network model or import a pre-trained model from other frameworks (e.g. PyTorch, ONNX), and create the TVM IRModule, which contains all the information needed for compilation, including high-level Relax functions for computational graph, and low-level TensorIR functions for tensor program.
构造或导入模型:构造神经网络模型或从其他框架(例如 PyTorch、ONNX)导入预训练模型,并创建 TVM IRModule,其中包含编译所需的所有信息,包括用于计算图的高级 Relax 函数和用于张量编程的低级 TensorIR 函数。 -
Perform Composable Optimizations : Perform a series of optimization transformations, such as graph optimizations, tensor program optimizations, and library dispatching.
执行可组合优化:执行一系列优化转换,例如图形优化、张量程序优化和库调度。 -
Build and Universal Deployment : Build the optimized model to a deployable module to the universal runtime, and execute it on different devices, such as CPU, GPU, or other accelerators.
构建和通用部署:将优化后的模型构建为通用运行时的可部署模块,并在不同的设备(如 CPU、GPU 或其他加速器)上执行。
**Construct or Import a Model
Before we get started, let's construct a neural network model first. In this tutorial, to make things simple, we will defined a two-layer MLP networks directly in this script with TVM Relax frontend, which is a similar API to PyTorch.
在开始之前,我们先构建一个神经网络模型。在本教程中,为了简单起见,我们将在此脚本中直接使用 TVM Relax 前端定义一个两层 MLP 网络,该 API 类似于 PyTorch。
import tvm
from tvm import relax
from tvm.relax.frontend import nn


class MLPModel(nn.Module):
    def __init__(self):
        super(MLPModel, self).__init__()
        self.fc1 = nn.Linear(784, 256)
        self.relu1 = nn.ReLU()
        self.fc2 = nn.Linear(256, 10)

    def forward(self, x):
        x = self.fc1(x)
        x = self.relu1(x)
        x = self.fc2(x)
        return x
Then we can export the model to TVM IRModule, which is the central intermediate representation in TVM.
然后我们可以将模型导出到 TVM IRModule,这是 TVM 中的中心中间表示。
mod, https://docs.python.org/3/library/stdtypes.html#list = MLPModel().export_tvm(
    spec={"forward": {"x": nn.spec.Tensor((1, 784), "float32")}}
)
mod.show()# from tvm.script import ir as I
# from tvm.script import relax as R
@I.ir_module
class Module:
@R.function
def forward(x: R.Tensor((1, 784), dtype="float32"), fc1_weight: R.Tensor((256, 784), dtype="float32"), fc1_bias: R.Tensor((256,), dtype="float32"), fc2_weight: R.Tensor((10, 256), dtype="float32"), fc2_bias: R.Tensor((10,), dtype="float32")) -> R.Tensor((1, 10), dtype="float32"):
R.func_attr({"num_input": 1})
with R.dataflow():
permute_dims: R.Tensor((784, 256), dtype="float32") = R.permute_dims(fc1_weight, axes=None)
matmul: R.Tensor((1, 256), dtype="float32") = R.matmul(x, permute_dims, out_dtype="void")
add: R.Tensor((1, 256), dtype="float32") = R.add(matmul, fc1_bias)
relu: R.Tensor((1, 256), dtype="float32") = R.nn.relu(add)
permute_dims1: R.Tensor((256, 10), dtype="float32") = R.permute_dims(fc2_weight, axes=None)
matmul1: R.Tensor((1, 10), dtype="float32") = R.matmul(relu, permute_dims1, out_dtype="void")
add1: R.Tensor((1, 10), dtype="float32") = R.add(matmul1, fc2_bias)
gv: R.Tensor((1, 10), dtype="float32") = add1
R.output(gv)
return gv**Perform Optimization Transformations
Apache TVM leverage pipeline to transform and optimize program. The pipeline encapsulates a collection of transformation that gets two goals (at the same level):
Apache TVM 利用管道来转换和优化程序。管道封装了一组转换,该集合获取两个目标(在同一级别):
-
Model optimizations : such as operator fusion, layout rewrites.
模型优化:如算子融合、布局重写等。 -
Tensor program optimization : Map the operators to low-level implementations (both library or codegen)
张量程序优化:将运算符映射到低级实现(库或 codegen)
Note 注意
The twos are goals but not the stages of the pipeline. The two optimizations are performed at the same level , or separately in two stages.
这两个是目标,但不是管道的各个阶段。这两个优化在同一级别执行,或分别分两个阶段执行。
Note 注意
In this tutorial we only demonstrate the overall flow, by leverage zero optimization pipeline, instead of optimizing for any specific target.
在本教程中,我们只通过利用零优化管道来演示整个流程,而不是针对任何特定目标进行优化。
mod = https://tvm.apache.org/docs/reference/api/python/relax/relax.html#tvm.relax.get_pipeline("zero")(mod)**Build and Universal Deployment
After the optimization, we can build the model to a deployable module and run it on different devices.
优化后,我们可以将模型构建为可部署的模块,并在不同的设备上运行它。
import numpy as np

https://tvm.apache.org/docs/reference/api/python/target.html#tvm.target.Target = https://tvm.apache.org/docs/reference/api/python/target.html#tvm.target.Target("llvm")
https://tvm.apache.org/docs/reference/api/python/relax/relax.html#tvm.relax.VMExecutable = https://tvm.apache.org/docs/reference/api/python/driver.html#tvm.compile(mod, https://tvm.apache.org/docs/reference/api/python/target.html#tvm.target.Target)
device = tvm.cpu()
https://tvm.apache.org/docs/reference/api/python/runtime/vm.html#tvm.runtime.vm.VirtualMachine = https://tvm.apache.org/docs/reference/api/python/runtime/vm.html#tvm.runtime.vm.VirtualMachine(https://tvm.apache.org/docs/reference/api/python/relax/relax.html#tvm.relax.VMExecutable, device)
data = np.random.rand(1, 784).astype("float32")
tvm_data = tvm.nd.array(data, device=device)
https://docs.python.org/3/library/stdtypes.html#list = [np.random.rand(*param.shape).astype("float32") for _, param in https://docs.python.org/3/library/stdtypes.html#list]
https://docs.python.org/3/library/stdtypes.html#list = [tvm.nd.array(param, device=device) for param in https://docs.python.org/3/library/stdtypes.html#list]
print(https://tvm.apache.org/docs/reference/api/python/runtime/vm.html#tvm.runtime.vm.VirtualMachine["forward"](tvm_data, *https://docs.python.org/3/library/stdtypes.html#list).numpy())[[26010.225 25455.51 25715.475 26772.12 27430.238 25771.195 26410.059
27640.848 25111.514 24961.797]]Our goal is to bring machine learning to the application with any language of interest, with the minimum runtime support.
我们的目标是以最少的运行时支持,将机器学习引入任何感兴趣的语言的应用程序。
-
Each function in IRModule becomes a runnable function in the runtime. For example in LLM cases, we can call
prefillanddecodefunctions directly.
IRModule 中的每个函数在运行时都成为可运行的函数。例如,在某些情况下LLM,我们可以直接调用prefill和decode函数。prefill_logits = https://tvm.apache.org/docs/reference/api/python/runtime/vm.html#tvm.runtime.vm.VirtualMachine["prefill"](inputs, weight, kv_cache) decoded_logits = https://tvm.apache.org/docs/reference/api/python/runtime/vm.html#tvm.runtime.vm.VirtualMachine["decode"](inputs, weight, kv_cache) -
TVM runtime comes with native data structures, such as NDArray, can also have zero copy exchange with existing ecosystem (DLPack exchange with PyTorch)
TVM 运行时带有原生数据结构,例如 NDArray,也可以与现有生态系统进行零副本交换(与 PyTorch 进行 DLPack 交换)# Convert PyTorch tensor to TVM NDArray x_tvm = tvm.nd.from_dlpack(x_torch.to_dlpack()) # Convert TVM NDArray to PyTorch tensor x_torch = torch.from_dlpack(x_tvm.to_dlpack()) -
TVM runtime works in non-python environments, so it works on settings such as mobile
TVM 运行时在非 python 环境中工作,因此它适用于移动设备等设置// C++ snippet runtime::Module https://tvm.apache.org/docs/reference/api/python/runtime/vm.html#tvm.runtime.vm.VirtualMachine = https://tvm.apache.org/docs/reference/api/python/relax/relax.html#tvm.relax.VMExecutable.GetFunction("load_executable")(); https://tvm.apache.org/docs/reference/api/python/runtime/vm.html#tvm.runtime.vm.VirtualMachine.GetFunction("init")(...); NDArray out = https://tvm.apache.org/docs/reference/api/python/runtime/vm.html#tvm.runtime.vm.VirtualMachine.GetFunction("prefill")(data, weight, kv_cache);// Java snippet Module https://tvm.apache.org/docs/reference/api/python/runtime/vm.html#tvm.runtime.vm.VirtualMachine = https://tvm.apache.org/docs/reference/api/python/relax/relax.html#tvm.relax.VMExecutable.getFunction("load_executable").invoke(); https://tvm.apache.org/docs/reference/api/python/runtime/vm.html#tvm.runtime.vm.VirtualMachine.getFunction("init").pushArg(...).invoke; NDArray out = https://tvm.apache.org/docs/reference/api/python/runtime/vm.html#tvm.runtime.vm.VirtualMachine.getFunction("prefill").pushArg(data).pushArg(weight).pushArg(kv_cache).invoke();
三、Installing TVM安装 TVM
Install from Source 从源码安装
**Step 1. Install Dependencies
步骤 1.安装依赖项 **
Apache TVM requires the following dependencies:
Apache TVM 需要以下依赖项:
-
CMake (>= 3.24.0) CMake (>= 3.24.0)
-
LLVM (recommended >= 15) LLVM (建议 >= 15)
-
Git Git 公司
-
A recent C++ compiler supporting C++ 17, at the minimum
最新的 C++ 编译器至少支持 C++ 17
-
GCC 7.1 海湾合作委员会 7.1
-
Clang 5.0
-
Apple Clang 9.3 苹果叮当 9.3
-
Visual Studio 2019 (v16.7)
Visual Studio 2019 (v16.7)
-
-
Python (>= 3.8) Python (>= 3.8)
-
(Optional) Conda (Strongly Recommended)
(可选)Conda (强烈推荐)
To easiest way to manage dependency is via conda, which maintains a set of toolchains including LLVM across platforms. To create the environment of those build dependencies, one may simply use:
管理依赖项的最简单方法是通过 conda,它维护着一组工具链,包括跨平台的 LLVM。要创建这些构建依赖项的环境,可以简单地使用:
# make sure to start with a fresh environment
conda env remove -n tvm-build-venv
# create the conda environment with build dependency
conda create -n tvm-build-venv -c conda-forge \\
    "llvmdev>=15" \\
    "cmake>=3.24" \\
    git \\
    python=3.11
# enter the build environment
conda activate tvm-build-venv**Step 2. Get Source from Github
步骤 2。从 Github 获取源代码 **
You can also choose to clone the source repo from github.
您还可以选择从 github 克隆源存储库。
git clone --recursive https://github.com/apache/tvm tvmNote 注意
It's important to use the --recursive flag when cloning the TVM repository, which will automatically clone the submodules. If you forget to use this flag, you can manually clone the submodules by running git submodule update --init --recursive in the root directory of the TVM repository.
在克隆 TVM 存储库时使用标志 --recursive 很重要,它将自动克隆子模块。如果您忘记使用此标志,您可以通过在 TVM 仓库的根目录中运行 git submodule update --init --recursive 来手动克隆子模块。
**Step 3. Configure and Build
步骤 3。配置和构建 **
Create a build directory and run CMake to configure the build. The following example shows how to build
创建一个构建目录并运行 CMake 来配置构建。以下示例演示如何生成
cd tvm
rm -rf build && mkdir build && cd build
# Specify the build configuration via CMake options
cp ../cmake/config.cmake .
We want to specifically tweak the following flags by appending them to the end of the configuration file:
我们想通过将以下标志附加到配置文件的末尾来专门调整它们:
# controls default compilation flags (Candidates: Release, Debug, RelWithDebInfo)
echo "set(CMAKE_BUILD_TYPE RelWithDebInfo)" >> config.cmake

# LLVM is a must dependency for compiler end
echo "set(USE_LLVM \"llvm-config --ignore-libllvm --link-static\")" >> config.cmake
echo "set(HIDE_PRIVATE_SYMBOLS ON)" >> config.cmake

# GPU SDKs, turn on if needed
echo "set(USE_CUDA OFF)" >> config.cmake
echo "set(USE_METAL OFF)" >> config.cmake
echo "set(USE_VULKAN OFF)" >> config.cmake
echo "set(USE_OPENCL OFF)" >> config.cmake

# cuBLAS, cuDNN, cutlass support, turn on if needed
echo "set(USE_CUBLAS OFF)" >> config.cmake
echo "set(USE_CUDNN OFF)" >> config.cmake
echo "set(USE_CUTLASS OFF)" >> config.cmake
Note 注意
HIDE_PRIVATE_SYMBOLS is a configuration option that enables the -fvisibility=hidden flag. This flag helps prevent potential symbol conflicts between TVM and PyTorch. These conflicts arise due to the frameworks shipping LLVMs of different versions.
HIDE_PRIVATE_SYMBOLS 是启用该标志的 -fvisibility=hidden 配置选项。此标志有助于防止 TVM 和 PyTorch 之间潜在的符号冲突。这些冲突是由于框架提供不同版本的 LLVM 而引起的。
CMAKE_BUILD_TYPE controls default compilation flag:
CMAKE_BUILD_TYPE controls 默认编译标志:
-
Debugsets-O0 -gDebug集-O0 -g -
RelWithDebInfosets-O2 -g -DNDEBUG(recommended)
RelWithDebInfosets-O2 -g -DNDEBUG(推荐) -
Releasesets-O3 -DNDEBUGRelease集-O3 -DNDEBUG
Once config.cmake is edited accordingly, kick off build with the commands below:
相应地编辑后 config.cmake ,使用以下命令启动构建:
cmake .. && cmake --build . --parallel $(nproc)Note 注意
nproc may not be available on all systems, please replace it with the number of cores on your system
nproc 可能并非在所有系统上都可用,请将其替换为您系统上的内核数
A success build should produce libtvm and libtvm_runtime under build/ directory.
成功的构建应生成 libtvm and libtvm_runtime under build/ directory.
Leaving the build environment tvm-build-venv, there are two ways to install the successful build into your environment:
离开构建环境 tvm-build-venv ,有两种方法可以将成功的构建安装到您的环境中:
- Install via environment variable
通过环境变量安装
export TVM_HOME=/path-to-tvm
export PYTHONPATH=$TVM_HOME/python:$PYTHONPATH- Install via pip local project
通过 pip 本地项目安装
conda activate your-own-env
conda install python # make sure python is installed
export TVM_LIBRARY_PATH=/path-to-tvm/build
pip install -e /path-to-tvm/python**Step 4. Validate Installation
步骤 4。验证安装 **
Using a compiler infrastructure with multiple language bindings could be error-prone. Therefore, it is highly recommended to validate Apache TVM installation before use.
使用具有多种语言绑定的编译器基础结构可能容易出错。因此,强烈建议在使用前验证 Apache TVM 安装。
Step 1. Locate TVM Python package. The following command can help confirm that TVM is properly installed as a python package and provide the location of the TVM python package:
步骤 1.找到 TVM Python 包。以下命令可以帮助确认 TVM 是否已正确安装为 python 包,并提供 TVM python 包的位置:
>>> python -c "import tvm; print(tvm.__file__)"
/some-path/lib/python3.11/site-packages/tvm/__init__.py
Step 2. Confirm which TVM library is used. When maintaining multiple build or installation of TVM, it becomes important to double check if the python package is using the proper libtvm with the following command:
步骤 2。确认使用的是哪个 TVM 库。在维护 TVM 的多个构建或安装时,使用以下命令仔细检查 python 包是否使用正确 libtvm 变得很重要:
>>> python -c "import tvm; print(tvm._ffi.base._LIB)"
<CDLL '/some-path/lib/python3.11/site-packages/tvm/libtvm.dylib', handle 95ada510 at 0x1030e4e50>
Step 3. Reflect TVM build option. Sometimes when downstream application fails, it could likely be some mistakes with a wrong TVM commit, or wrong build flags. To find it out, the following commands will be helpful:
步骤 3。Reflect TVM 构建选项。有时,当下游应用程序失败时,可能是一些错误,即错误的 TVM 提交或错误的构建标志。要找出它,以下命令将有所帮助:
>>> python -c "import tvm; print('\n'.join(f'{k}: {v}' for k, v in tvm.support.libinfo().items()))"
... # Omitted less relevant options
GIT_COMMIT_HASH: 4f6289590252a1cf45a4dc37bce55a25043b8338
HIDE_PRIVATE_SYMBOLS: ON
USE_LLVM: llvm-config --link-static
LLVM_VERSION: 15.0.7
USE_VULKAN: OFF
USE_CUDA: OFF
CUDA_VERSION: NOT-FOUND
USE_OPENCL: OFF
USE_METAL: ON
USE_ROCM: OFF
Step 4. Check device detection. Sometimes it could be helpful to understand if TVM could detect your device at all with the following commands:
步骤 4。检查设备检测。有时,了解TVM是否可以通过以下命令检测到您的设备可能会有所帮助:
>>> python -c "import tvm; print(tvm.metal().exist)"
True # or False
>>> python -c "import tvm; print(tvm.cuda().exist)"
False # or True
>>> python -c "import tvm; print(tvm.vulkan().exist)"
False # or True
Please note that the commands above verify the presence of an actual device on the local machine for the TVM runtime (not the compiler) to execute properly. However, TVM compiler can perform compilation tasks without requiring a physical device. As long as the necessary toolchain, such as NVCC, is available, TVM supports cross-compilation even in the absence of an actual device.
请注意,上述命令会验证本地计算机上是否存在实际设备,以便 TVM 运行时(而不是编译器)正确执行。但是,TVM 编译器可以在不需要物理设备的情况下执行编译任务。只要必要的工具链(如 NVCC)可用,即使没有实际设备,TVM 也支持交叉编译。
**Step 5. Extra Python Dependencies
步骤 5。额外的 Python 依赖项 **
Building from source does not ensure the installation of all necessary Python dependencies. The following commands can be used to install the extra Python dependencies:
从源代码构建并不能确保安装所有必要的 Python 依赖项。以下命令可用于安装额外的 Python 依赖项:
- Necessary dependencies: 必要的依赖项:
pip3 install numpy- If you want to use RPC Tracker
如果您想使用 RPC Tracker
pip3 install tornado- If you want to use auto-tuning module
如果您想使用 auto-tuning 模块
pip3 install tornado psutil 'xgboost>=1.1.0' cloudpickle**Advanced Build Configuration
高级构建配置 **
Ccache 缓存
On supported platforms, the Ccache compiler wrapper may be helpful for reducing TVM's build time, especially when building with cutlass. There are several ways to enable CCache in TVM builds:
在支持的平台上,Ccache 编译器包装器可能有助于减少 TVM 的构建时间,尤其是在使用 cutlass 进行构建时。有几种方法可以在 TVM 构建中启用 CCache:
Leave
USE_CCACHE=AUTOinbuild/config.cmake. CCache will be used if it is found.
留在USE_CCACHE=AUTObuild/config.cmake. 如果找到 CCache,将使用它。Ccache's Masquerade mode. This is typically enabled during the Ccache installation process. To have TVM use Ccache in masquerade, simply specify the appropriate C/C++ compiler paths when configuring TVM's build system. For example:
cmake -DCMAKE_CXX_COMPILER=/usr/lib/ccache/c++ ....
Ccache 的假面舞会模式。这通常在 Ccache 安装过程中启用。要让 TVM 在伪装中使用 Ccache,只需在配置 TVM 的构建系统时指定适当的 C/C++ 编译器路径即可。例如:cmake -DCMAKE_CXX_COMPILER=/usr/lib/ccache/c++ ....Ccache as CMake's C++ compiler prefix. When configuring TVM's build system, set the CMake variable
CMAKE_CXX_COMPILER_LAUNCHERto an appropriate value. E.g.cmake -DCMAKE_CXX_COMPILER_LAUNCHER=ccache ....
Ccache 作为 CMake 的 C++ 编译器前缀。在配置 TVM 的构建系统时,将 CMake 变量CMAKE_CXX_COMPILER_LAUNCHER设置为适当的值。例如cmake -DCMAKE_CXX_COMPILER_LAUNCHER=ccache ....
**Building on Windows
在 Windows 上构建 **
TVM support build via MSVC using cmake. You will need to obtain a visual studio compiler. The minimum required VS version is Visual Studio Enterprise 2019 (NOTE: we test against GitHub Actions' Windows 2019 Runner, so see that page for full details. We recommend following Step 1. Install Dependencies to obtain necessary dependencies and get an activated tvm-build environment. Then you can run the following command to build
TVM 支持使用 cmake 通过 MSVC 构建。您将需要获取 Visual Studio 编译器。所需的最低 VS 版本是 Visual Studio Enterprise 2019(注意:我们针对 GitHub Actions 的 Windows 2019 Runner 进行测试,因此请参阅该页面了解完整详细信息。我们建议遵循步骤 1。Install Dependencies 以获取必要的依赖项并获取激活的 tvm-build 环境。然后,您可以运行以下命令进行构建
mkdir build
cd build
cmake ..
cd ..
The above command generates the solution file under the build directory. You can then run the following command to build
上述命令在 build 目录下生成解决方案文件。然后,您可以运行以下命令来构建
cmake --build build --config Release -- /m**Building ROCm support
构建 ROCm 支持 **
Currently, ROCm is supported only on linux, so all the instructions are written with linux in mind.
-
Set
set(USE_ROCM ON), set ROCM_PATH to the correct path.
将 、set(USE_ROCM ON)ROCM_PATH 设置为正确的路径。 -
You need to first install HIP runtime from ROCm. Make sure the installation system has ROCm installed in it.
您需要首先从 ROCm 安装 HIP 运行时。确保安装系统中安装了 ROCm。 -
Install latest stable version of LLVM (v6.0.1), and LLD, make sure
ld.lldis available via command line.
安装最新稳定版本的 LLVM (v6.0.1) 和 LLD,确保ld.lld通过命令行可用。
**Enable C++ Tests
启用 C++ 测试 **
We use Google Test to drive the C++ tests in TVM. The easiest way to install GTest is from source.
我们使用 Google Test 在 TVM 中驱动 C++ 测试。安装 GTest 的最简单方法是从源码安装 GTest。
git clone https://github.com/google/googletest
cd googletest
mkdir build
cd build
cmake -DBUILD_SHARED_LIBS=ON ..
make
sudo make install
After installing GTest, the C++ tests can be built and started with ./tests/scripts/task_cpp_unittest.sh or just built with make cpptest.
安装 GTest 后,可以使用 构建和启动 C++ 测试 ./tests/scripts/task_cpp_unittest.sh ,也可以只使用 make cpptest 构建。
软件下载
本文信息来源于GitHub作者地址:https://github.com/apache/tvm