目录
- 一、请求数据
- 二、获取并解析数据
- 四、保存数据
-
- [1. 保存为 CSV 文件](#1. 保存为 CSV 文件)
- [2. 保存为 Excel 文件](#2. 保存为 Excel 文件)
-
- [打开网页图片并将其插入到 Excel 文件中](#打开网页图片并将其插入到 Excel 文件中)
- 五、加密参数逆向分析
-
- [1. 定位加密位置](#1. 定位加密位置)
- [2. 断点调试分析](#2. 断点调试分析)
- [3. 复制相关 js 加密代码,在本地进行调试(难)](#3. 复制相关 js 加密代码,在本地进行调试(难))
- [4. 获取 sign 加密参数](#4. 获取 sign 加密参数)
- 六、其他示例
-
- [1. 单页数据处理与保存](#1. 单页数据处理与保存)
- [2. 翻页数据采集 --- MD5 加密](#2. 翻页数据采集 — MD5 加密)
-
- [1)分析请求链接 / 参数的变化](#1)分析请求链接 / 参数的变化)
- [2)sign 加密参数逆向分析](#2)sign 加密参数逆向分析)
- [3)Python 代码实现](#3)Python 代码实现)
学习视频;【Python爬虫实战:采集常用软件数据(得物、闲鱼、小红书、微信小程序、验证码识别)】
参考文档:【Requests: 让 HTTP 服务人类】
一、请求数据
Requests 模块通过模拟浏览器对 url 地址发送请求。
- 打开需要采集数据的网站,通过浏览器的开发者工具分析对应的数据位置。
- 右键选择 "检查" → "网络" ,打开开发者工具;
- 刷新网页;
- 通过关键字搜索找到对应的数据位置。

- 请求标头:通过使用请求标头中的参数内容模拟浏览器,该参数需要使用字典
dict={'键':'值',}接收。
PyCharm 批量添加引号和逗号的方法:
- 选中要替换的内容,输入 Ctrl + R 打开替换栏;
- 勾选
.*,使用正则命令匹配数据进行替换;- 第一栏输入
(.*?):(.*),第二栏输入'$1':'$2',,再选中要替换的内容点击 "全部替换" 。

-
请求网址:复制抓包分析找到的链接地址。
-
请求方法:
- POST 请求 → 需要向服务器提交表单数据 / 请求载荷;
- GET 请求 → 向服务器获取数据。

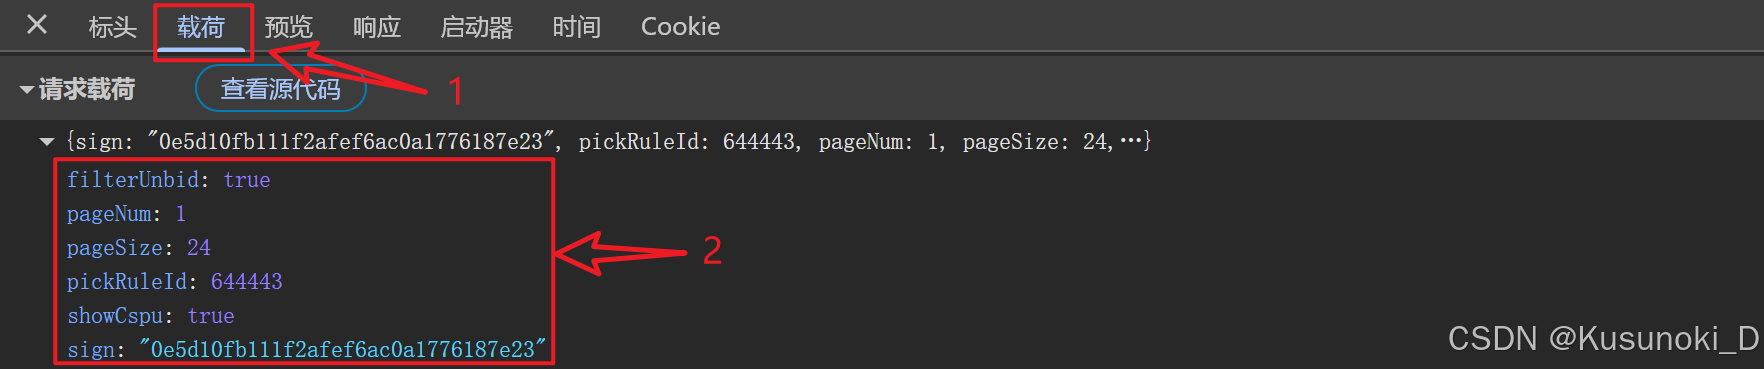
- 请求参数:可以在 "载荷" 中进行查看
- POST 请求 → 隐性;
- GET 请求 → 显性(查询的参数直接在请求网址的链接中就可以看出)。
参考文章:【HTTP 方法:GET 对比 POST | 菜鸟教程】
- 发送请求:使用 requests 模块。
- 如果没有安装该模块,则 Win + R 输入 cmd ,输入
pip install requests命令并运行即可。 - 在 PyCharm 中输入
import requests导入数据请求模块。
- 如果没有安装该模块,则 Win + R 输入 cmd ,输入
Python 代码:
python
import requests

# 请求标头
request_header = {
    'accept': '*/*',
    'accept-encoding': 'gzip, deflate, br, zstd',
    'accept-language': 'zh-CN,zh;q=0.9',
    'connection': 'keep-alive',
    'content-length': '124',
    'content-type': 'application/json',
    'cookie': '...',
    'host': 'app.dewu.com',
    'ltk': '...',
    'origin': 'https://www.dewu.com',
    'referer': 'https://www.dewu.com/',
    'sec-ch-ua': '"Google Chrome";v="137", "Chromium";v="137", "Not/A)Brand";v="24"',
    'sec-ch-ua-mobile': '?0',
    'sec-ch-ua-platform': '"Windows"',
    'sec-fetch-dest': 'empty',
    'sec-fetch-mode': 'cors',
    'sec-fetch-site': 'same-site',
    'sessionid': '...',
    'shumeiid': '...',
    'sk': '',
    'traceparent': '...',
    'user-agent': '...'
}

# 请求网址
request_url = r'https://app.dewu.com/api/v1/h5/commodity-pick-interfaces/pc/pick-rule-result/feeds/info'

# 请求载荷
request_parameters = {
    'filterUnbid': True,
    'pageNum': 1,  # 页数
    'pageSize': 24,
    'pickRuleId': 644443,
    'showCspu': True,
    'sign': "0e5d10fb111f2afef6ac0a1776187e23"  # 签名(加密参数)
}

# 请求数据
response = requests.post(url=request_url, json=request_parameters, headers=request_header)
二、获取并解析数据
-
获取服务器返回的响应数据。
response.text→ 获取响应的文本数据(字符串)response.json()→ 获取响应的 json 数据(字典 / 列表)response.content→ 获取响应的二进制数据(二进制数据)
-
对键值对进行取值,提取出所需信息。
Python 代码:
python
# from pprint import pprint

# 获取数据
data_json = response.json()
# print(data_json)

# 解析数据
info_list = data_json['data']['list']
for index in info_list:
    # pprint(index)
    # print('-' * 50)
    info_dict = {
        '标题': index['title'],
        '价格': index['price'],
        '图片网址': index['logoUrl']
    }
    for key, value in info_dict.items():
        print(f'{key} : {value}')
    print('-' * 50)
注:如果出现 "requests.exceptions.InvalidHeader: xxx" 的报错,说明你的 request_header 字典中的值存在多余的空格,仔细检查后删除即可。
四、保存数据
1. 保存为 CSV 文件
Python 代码:
python
import requests
import csv

request_header = {...}
request_url = r'https://app.dewu.com/api/v1/h5/commodity-pick-interfaces/pc/pick-rule-result/feeds/info'
request_parameters = {
    'filterUnbid': True,
    'pageNum': 1,  # 页数
    'pageSize': 24,
    'pickRuleId': 644443,
    'showCspu': True,
    'sign': "0e5d10fb111f2afef6ac0a1776187e23"  # 签名(加密参数)
}

# 创建文件对象
f = open('dewu.csv', mode='w', encoding='utf-8-sig', newline='')
# 字典写入方法
cd = csv.DictWriter(f, fieldnames=['标题', '价格', '图片网址'])
# 写入表头
cd.writeheader()

# 请求数据
response = requests.post(url=request_url, json=request_parameters, headers=request_header)
# 获取数据
data_json = response.json()
# 解析数据
info_list = data_json['data']['list']
for index in info_list:
    info_dict = {
        '标题': index['title'],
        '价格': index['price'] / 100,
        '图片网址': index['logoUrl']
    }
    # 写入数据
    cd.writerow(info_dict)

f.close()
2. 保存为 Excel 文件
Python 代码:
python
import requests
import pandas as pd

request_header = {...}
request_url = r'https://app.dewu.com/api/v1/h5/commodity-pick-interfaces/pc/pick-rule-result/feeds/info'
request_parameters = {
    'filterUnbid': True,
    'pageNum': 1,  # 页数
    'pageSize': 24,
    'pickRuleId': 644443,
    'showCspu': True,
    'sign': "0e5d10fb111f2afef6ac0a1776187e23"  # 签名(加密参数)
}

# 请求数据
response = requests.post(url=request_url, json=request_parameters, headers=request_header)
# 获取数据
data_json = response.json()
# 创建一个空列表
dewu_info = []

# 解析数据
info_list = data_json['data']['list']
for index in info_list:
    info_dict = {
        '标题': index['title'],
        '价格': index['price'] / 100,
        '图片网址': index['logoUrl']
    }
    # 写入数据
    dewu_info.append(info_dict)

# 转换数据
df = pd.DataFrame(dewu_info)
# 导出保存为 Excel 表格
df.to_excel('dewu.xlsx', index=False)
打开网页图片并将其插入到 Excel 文件中
Python 代码:
python
import openpyxl
from openpyxl.drawing.image import Image as xlImage
from openpyxl.utils import get_column_letter
from PIL import Image
from io import BytesIO


def download_image(url):
    rg_url = requests.get(url)
    # 检查响应状态码
    if rg_url.status_code == 200:
        # 创建图像对象
        image = Image.open(BytesIO(rg_url.content))
        # 统一图像类型
        if image.mode != 'RGB':
            image = image.convert('RGB')
        # 调整图像大小
        return image.resize((150, 96))
    else:
        raise Exception(f"无法下载图片,状态码: {rg_url.status_code}")


# 加载 Excel 文件
wb = openpyxl.load_workbook(r'dewu.xlsx')
# 默认为第一个 sheet
sheet = wb.active
# 调整行高和列宽
for row in range(2, sheet.max_row + 1):
    sheet.row_dimensions[row].height = 75
sheet.column_dimensions['C'].width = 20

# 读取链接并下载图片插入到对应位置
for row in range(2, sheet.max_row + 1):
    # 假设图片链接在第 2 行开始,第 C 列是链接(对应 column = 3),获取链接单元格的值
    link = sheet.cell(row=row, column=3).value
    # 清空内容
    sheet.cell(row=row, column=3).value = None
    # 如果链接不为空
    if link:
        # 发送 HTTP 请求下载图片
        try:
            # 尝试下载图像
            resized_image = download_image(link)
        except OSError:
            print(f"下载图片 {link} 失败")
            continue
        else:
            # 将调整后的图像插入到工作表中
            img_bytes = BytesIO()
            resized_image.save(img_bytes, format='PNG')  # 将图片保存到内存中
            img = xlImage(img_bytes)
            sheet.add_image(img, f'{get_column_letter(3)}{row}')  # 插入图片到指定位置

wb.save(r'dewu_result.xlsx')  # 必要
wb.close() # 必要五、加密参数逆向分析
1. 定位加密位置
通过开发者工具定位加密位置。

2. 断点调试分析
断点调试分析,分析加密规则。
- 搜索后返回了三个文件中的四个匹配行,分析可能的加密位置,然后添加断点。

- 通过对网页进行操作来调试断点,程序停止的位置就是我们要找的断点位置。

- 通过过滤请求网址,找到对应的请求载荷数据,查看 sign: 后的数据是否与刚刚断点处的 sign: c(e) 值一致。


- 移除上面的那个不需要的 sign: c(e) 断点。

注意:
c(e) 返回 sign 值,其中 e 是参数,c 是方法。
- e 是除 sign 以外的 POST 请求载荷。


-
c() 的返回值是 "0e5d10fb111f2afef6ac0a1776187e23"(由 0-9 a-f 组成的 32 位字符)。
-
由 0-9 a-f 组成的 32 位字符可能是 md5 加密。
验证是否为标准的 md5 加密,只需要调用加密函数,并传入字符串参数 '123456' ,如果返回值是以 'e10adc' 开头、'883e' 结尾,那么就是标准的 md5 加密。

由参数 e 是字典也可以看出,该方法 c() 不是 md5 加密,因为 md5 加密的参数一般是字符串。
3. 复制相关 js 加密代码,在本地进行调试(难)
较难理解的一部分,详细讲解请见:【Python爬虫实战:采集常用软件数据(得物)】的 0:50:25 处。
- 进入 c() 函数。


- 新建一个 JavaScript 文件(我的命名:js_file.js),并将上图红框中的代码复制进去。
javascript
function c(t) {...}

t = {
    filterUnbid: true,
    pageNum: 1,
    pageSize: 24,
    pickRuleId: 644443,
    showCspu: true
}  // 请求载荷

console.log(c(t))- 运行出现错误:
ReferenceError: u is not defined,出现此类报错是正常的,说明存在代码缺失。解决方案就是:缺方法补方法、缺参数补参数、缺环境补环境。

- 找到相应的加载器,并将代码添加至 JavaScript 文件里。


JavaScript 代码如下:
javascript
var a_temp;  // 添加

!function a_method(e) {
    var n = {}

    function a(r) {...}

    a_temp = a  // 添加

    a.e = function (e) {...},
    a.m = e,
    a.c = n,
    a.d = function (e, r, t) {...},
    a.r = function (e) {...},
    a.t = function (e, r) {...},
    a.n = function (e) {...},
    a.o = function (e, r) {...},
    a.p = "",
    a.oe = function (e) {...}
}({});

a = (a_temp("cnSC"), a_temp("ODXe"), a_temp("aCH8"))  // 将 r 修改为 a_temp
u = a_temp.n(a);  // 将 r 修改为 a_temp

function c(t) {...}

t = {
    filterUnbid: true,
    pageNum: 1,
    pageSize: 24,
    pickRuleId: 644443,
    showCspu: true
}

console.log(c(t))- 运行上述代码会出现
TypeError: Cannot read properties of undefined (reading 'call')的错误。如下图所示添加代码:

- 将运行后输出的缺失代码添加至 JavaScript 文件里。


JavaScript 代码如下:
javascript
var a_temp;  // 添加

!function a_method(e) {
    var n = {}

    function a(r) {
    	...
    	try {
        	console.log(r)  // 添加
            e[r].call(t.exports, t, t.exports, a),
                o = !1
        } finally {
            o && delete n[r]
        }
    	...
    }

    a_temp = a  // 添加

    a.e = function (e) {...},
    a.m = e,
    a.c = n,
    a.d = function (e, r, t) {...},
    a.r = function (e) {...},
    a.t = function (e, r) {...},
    a.n = function (e) {...},
    a.o = function (e, r) {...},
    a.p = "",
    a.oe = function (e) {...}
}({  // 添加
	cnSC: function (t, e) {...},
	ODXe: function (e, t, n) {...},
	BsWD: function (e, t, n) {...},
	a3WO: function (e, t, n) {...},
	aCH8: function (t, e, r) {...},
	ANhw: function (t, e) {...},
	mmNF: function (t, e) {...},
	BEtg: function (t, e) {...}
});

a = (a_temp("cnSC"), a_temp("ODXe"), a_temp("aCH8"))  // 将 r 修改为 a_temp
u = a_temp.n(a);  // 将 r 修改为 a_temp

function c(t) {...}

t = {
    filterUnbid: true,
    pageNum: 1,
    pageSize: 24,
    pickRuleId: 644443,
    showCspu: true
}

console.log(c(t))
详细的 js_file.js 文件代码见:【对得物进行爬虫时使用到的 js 模块】
- 运行结果如下图所示:

4. 获取 sign 加密参数
-
Win + R 输入 cmd 进入命令提示符,输入命令
pip install pyexecjs安装 execjs 库,安装好后在 PyCharm 中输入import execjs就可以使用该模块了。 -
编译 js 代码并获取 sign 加密参数,并将 sign 值添加至请求载荷中。
Python 代码:
python
import requests
# 导入编译 js 代码模块
import execjs

# 请求标头
request_header = {...}
# 请求网址
request_url = r'https://app.dewu.com/api/v1/h5/commodity-pick-interfaces/pc/pick-rule-result/feeds/info'
# 请求载荷
request_parameters = {
    'filterUnbid': True,
    'pageNum': 1,  # 页码
    'pageSize': 24,
    'pickRuleId': 644443,  # 类目 ID
    'showCspu': True
}

# 编译 js 代码
js_code = execjs.compile(open('./js_file.js', encoding='utf-8').read())
# 获取 sign 加密参数
sign_data = js_code.call('c', request_parameters)
# 0e5d10fb111f2afef6ac0a1776187e23
# 将 sign 添加至请求载荷中
request_parameters['sign'] = sign_data

# 请求数据
response = requests.post(url=request_url, json=request_parameters, headers=request_header)
# 获取数据
data_json = response.json()
# 解析数据
info_list = data_json['data']['list']
for index in info_list:
    info_dict = {
        '标题': index['title'],
        '价格': index['price'] / 100,
        '图片网址': index['logoUrl']
    }
    for key, value in info_dict.items():
        print(f'{key} : {value}')
    print('-' * 50)
六、其他示例
1. 单页数据处理与保存
Python 代码:
python
# 导入数据请求模块
import requests
import csv


def get_data_csv(file_path, head_name):
    # 模拟浏览器(请求标头)
    request_header = {
        'Referer': 'https://www.goofish.com/',
        # cookie 代表用户信息,常用于检测是否有登陆账户(不论是否登录都有 cookie)
        'Cookie': '...'
        # user-agent 代表用户代理,显示浏览器 / 设备的基本身份信息
        'User-Agent': '...'
    }
    # 请求网址
    request_url = r'https://h5api.m.goofish.com/h5/mtop.taobao.idlemtopsearch.pc.search/1.0/'
    # 查询参数
    query_parameters = {
        'jsv': '2.7.2',
        'appKey': '34839810',
        't': '1750520204194',
        'sign': '0dba40964b402d00dc448081c8e04127',
        'v': '1.0',
        'type': 'originaljson',
        'accountSite': 'xianyu',
        'dataType': 'json',
        'timeout': '20000',
        'api': 'mtop.taobao.idlemtopsearch.pc.search',
        'sessionOption': 'AutoLoginOnly',
        'spm_cnt': 'a21ybx.search.0.0',
        'spm_pre': 'a21ybx.home.searchSuggest.1.4c053da6IXTxSx',
        'log_id': '4c053da6IXTxSx'
    }
    # 表单数据
    form_data = {
        "pageNumber": 1,
        "keyword": "python爬虫书籍",
        "fromFilter": False,
        "rowsPerPage": 30,
        "sortValue": "",
        "sortField": "",
        "customDistance": "",
        "gps": "",
        "propValueStr": {},
        "customGps": "",
        "searchReqFromPage": "pcSearch",
        "extraFilterValue": "{}",
        "userPositionJson": "{}"
    }
    print('Data is being requested and processed...')
    # 发送请求
    response = requests.post(url=request_url, params=query_parameters, data=form_data, headers=request_header)

    # 获取响应的 json 数据 → 字典数据类型
    data_json = response.json()
    # 键值对取值,提取商品信息所在列表
    info_list = data_json['data']['resultList']
    # 创建文件对象
    f = open(file_path, mode='a', encoding='utf-8-sig', newline='')
    # 字典写入方法
    cd = csv.DictWriter(f, fieldnames=head_name)
    cd.writeheader()

    # for 循环遍历,提取列表里的元素
    for index in info_list:
        # 处理用户名
        nick_name = '未知'
        if 'userNickName' in index['data']['item']['main']['exContent']:
            nick_name = index['data']['item']['main']['exContent']['userNickName']
        # 处理售价
        price_list = index['data']['item']['main']['exContent']['price']
        price = ''
        for p in price_list:
            price += p['text']
        # 处理详情页链接
        item_id = index['data']['item']['main']['exContent']['itemId']
        link = f'https://www.goofish.com/item?id={item_id}'

        temporarily_dict = {
            '标题': index['data']['item']['main']['exContent']['title'],
            '地区': index['data']['item']['main']['exContent']['area'],
            '售价': price,
            '用户名': nick_name,
            '详情页链接': link
        }
        cd_file.writerow(temporarily_dict)
    f.close()


if __name__ == '__main__':
	f_path = './fish.csv'
    h_name = ['标题', '地区', '售价', '用户名', '详情页链接']
    get_data_csv(f_path, h_name)
2. 翻页数据采集 --- MD5 加密
1)分析请求链接 / 参数的变化
如下图所示,其中 t 可以通过 time 模块获取;pageNumber 可以通过 for 循环构建。

2)sign 加密参数逆向分析
- 通过开发者工具定位加密位置。

- 断点调试分析。

k = i(d.token + "&" + j + "&" + h + "&" + c.data) ,其中:
javascript
d.token = "b92a905a245d2523e9ca49dd382dad12"  // 固定
j = 1750571387066  // 时间戳(变化)
h = "34839810"  // 固定
// 表单数据,其中只有页码 pageNumber 会变化
c.data = ('{"pageNumber": 1, '
          '"keyword": "python爬虫书籍", '
          '"fromFilter": false, '
          '"rowsPerPage": 30, '
          '"sortValue": "", '
          '"sortField": "", '
          '"customDistance": "", '
          '"gps": "", '
          '"propValueStr": {}, '
          '"customGps": "", '
          '"searchReqFromPage": "pcSearch", '
          '"extraFilterValue": "{}", '
          '"userPositionJson": "{}"}')

k = "1c32f4de228112a3a59df6972d186b41" // 返回值 由 0-9 a-f 构成的 32 位字符- 判断是否为 md5 加密的方法:调用加密函数
i(),并传入字符串参数 '123456' ,如果返回值是以 'e10adc' 开头、'883e' 结尾,那么就是标准的 md5 加密。

python
# 导入哈希模块
import hashlib

d_token = 'b92a905a245d2523e9ca49dd382dad12'
j = 1750571387066  # <class 'int'>
h = '34839810'
c_data = ('{"pageNumber": 1, '
          '"keyword": "python爬虫书籍", '
          '"fromFilter": false, '
          '"rowsPerPage": 30, '
          '"sortValue": "", '
          '"sortField": "", '
          '"customDistance": "", '
          '"gps": "", '
          '"propValueStr": {}, '
          '"customGps": "", '
          '"searchReqFromPage": "pcSearch", '
          '"extraFilterValue": "{}", '
          '"userPositionJson": "{}"}')
result_str = d_token + "&" + str(j) + "&" + h + "&" + c_data
# 使用 md5 加密
md_str = hashlib.md5()
# 传入加密参数
md_str.update(result_str.encode('utf-8'))
# 进行加密处理
sign = md_str.hexdigest()  # <class 'str'>
print(sign)  # 1c32f4de228112a3a59df6972d186b41
3)Python 代码实现
python
# 导入数据请求模块
import requests
import csv
# 导入哈希模块
import hashlib
import time


def get_sign(page):
    d_token = '...'  # token 是有时效性的,请自行填入
    j = int(time.time() * 1000)
    h = '...'
    c_data = ('{"pageNumber": %d, ...}') % page
    result_str = d_token + "&" + str(j) + "&" + h + "&" + c_data
    # 使用 md5 加密
    md_str = hashlib.md5()
    # 传入加密参数
    md_str.update(result_str.encode('utf-8'))
    # 进行加密处理
    sign = md_str.hexdigest()
    return sign, j, c_data


def get_data_csv(file_path, head_name):
    # 模拟浏览器(请求标头)
    request_header = {
        'Referer': 'https://www.goofish.com/',
        # cookie 代表用户信息,常用于检测是否有登陆账户(不论是否登录都有 cookie)
        # cookie 是有时效性的,请自行填入
        'Cookie': '...',
        # user-agent 代表用户代理,显示浏览器 / 设备的基本身份信息
        'User-Agent': '...'
    }
    # 请求网址
    request_url = r'https://h5api.m.goofish.com/h5/mtop.taobao.idlemtopsearch.pc.search/1.0/'
    # 创建文件对象
    f = open(file_path, mode='a', encoding='utf-8-sig', newline='')
    # 字典写入方法
    cd = csv.DictWriter(f, fieldnames=head_name)
    cd.writeheader()

    # for 构建循环翻页
    num = 10
    for i in range(1, num + 1):
        print(f'正在采集第 {i} 页数据...')
        # 获取 sign 加密参数、时间戳和表单数据
        sign, j_time, c_data = get_sign(i)
        # 查询参数
        query_parameters = {
            'jsv': '2.7.2',
            'appKey': '34839810',
            't': str(j_time),
            'sign': sign,
            'v': '1.0',
            'type': 'originaljson',
            'accountSite': 'xianyu',
            'dataType': 'json',
            'timeout': '20000',
            'api': 'mtop.taobao.idlemtopsearch.pc.search',
            'sessionOption': 'AutoLoginOnly',
            'spm_cnt': 'a21ybx.search.0.0',
            'spm_pre': 'a21ybx.home.searchSuggest.1.4c053da6IXTxSx',
            'log_id': '4c053da6IXTxSx'
        }
        # 表单数据
        form_data = {"data": c_data}
        # 发送请求
        response = requests.post(url=request_url, params=query_parameters, data=form_data, headers=request_header)

        # 获取响应的 json 数据 → 字典数据类型
        data_json = response.json()
        # 键值对取值,提取商品信息所在列表
        info_list = data_json['data']['resultList']
        # for 循环遍历,提取列表里的元素
        for index in info_list:
            # 处理用户名
            nick_name = '未知'
            if 'userNickName' in index['data']['item']['main']['exContent']:
                nick_name = index['data']['item']['main']['exContent']['userNickName']
            # 处理售价
            price_list = index['data']['item']['main']['exContent']['price']
            price = ''
            for p in price_list:
                price += p['text']
            # 处理详情页链接
            item_id = index['data']['item']['main']['exContent']['itemId']
            link = f'https://www.goofish.com/item?id={item_id}'

            temporarily_dict = {
                '标题': index['data']['item']['main']['exContent']['title'],
                '地区': index['data']['item']['main']['exContent']['area'],
                '售价': price,
                '用户名': nick_name,
                '详情页链接': link
            }
            cd.writerow(temporarily_dict)
    f.close()


if __name__ == '__main__':
    f_path = './fish_python.csv'
    h_name = ['标题', '地区', '售价', '用户名', '详情页链接']
    get_data_csv(f_path, h_name)
运行结果展示:

注意:运行时可能会出现 {'api': 'mtop.taobao.idlemtopsearch.pc.search', 'data': {}, 'ret': ['FAIL_SYS_TOKEN_EXOIRED::令牌过期'], 'v': '1.0'} 的错误,那是因为 d_token 和 cookie 都是具有时效性的,每过一段时间都会改变,因此自行修改成当下的 d_token 值和 cookie 值即可。