在前文,我们从零手写了GPT2和Llama2的代码,现在将在Llama2代码的基础上改造,给出Llama3的模型代码。
GPT和Llama3的架构对比,可参考链接,如下:
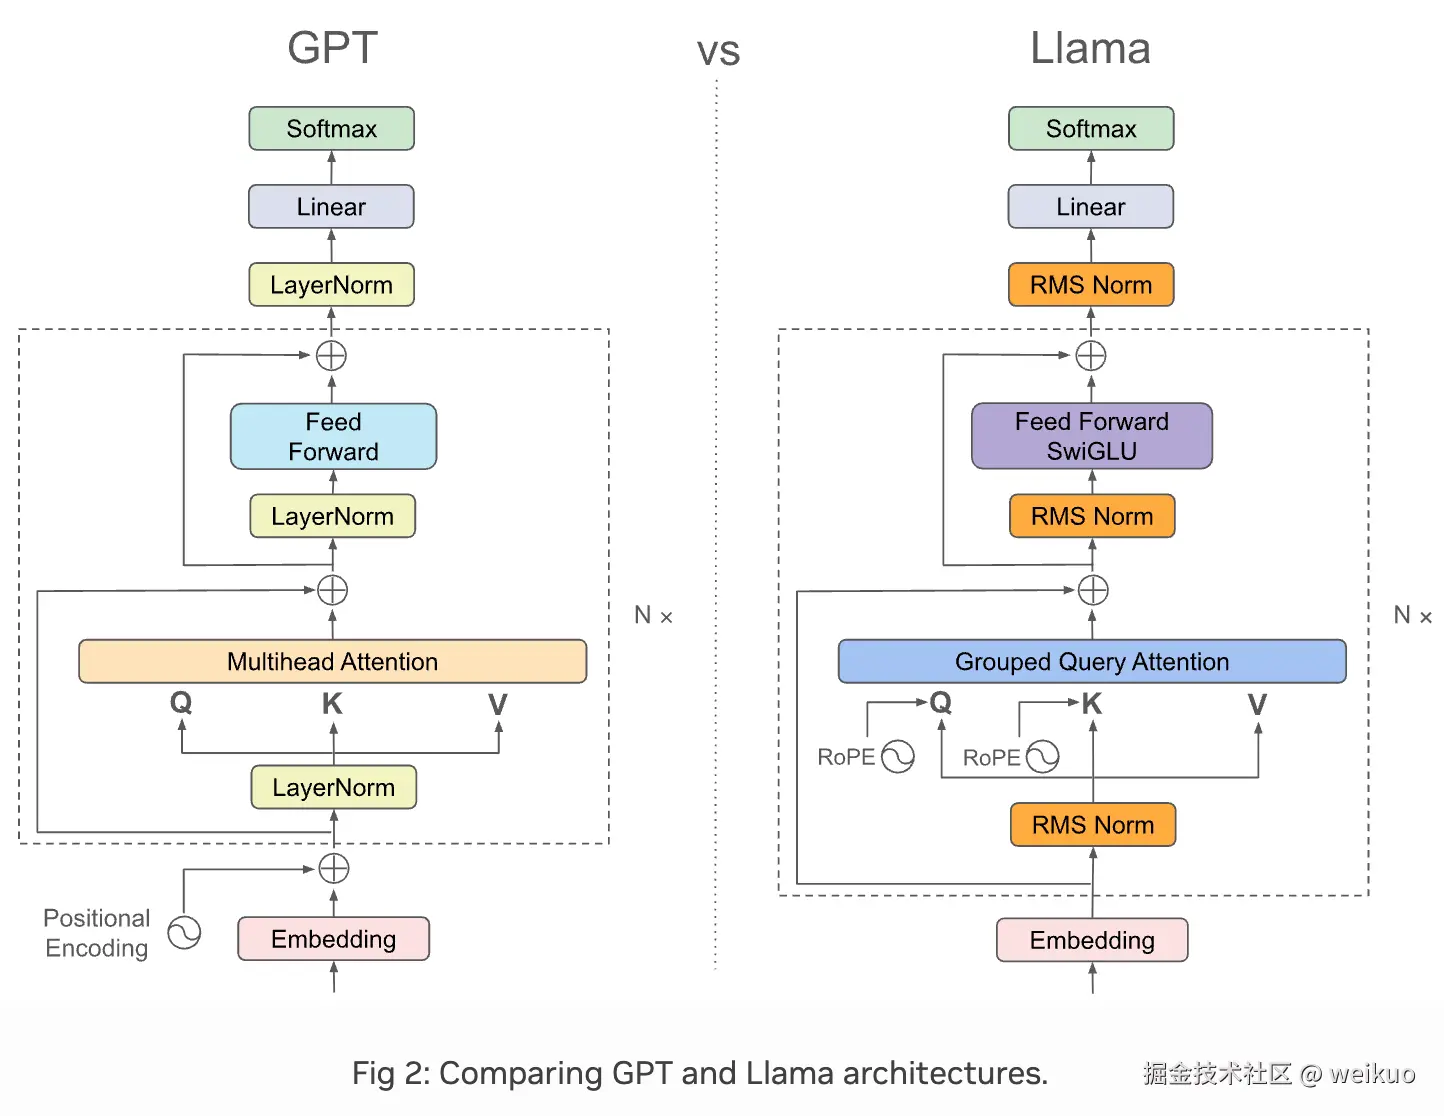
主要差异点:
- Position Encoding从Learned Absolute Positional Embeddings,变成RoPE。这点同Llama2,但是Llama3的RoPE引入了变频机制(Dynamic NTK scaling 或 Multi-Scale RoPE)。
- 注意力机制从MHA变成了Grouped Query Attention。这点也不同于Llama2。
- Tokenizer使用了兼容Tiktoken的分词器,这点不同于Llama2。
- 其他变化,如RMSNorm、SwiGLU层等,均与Llama2相同。
Scaled RoPE
相比Llama2的原始RoPE,Llama3采用了变体的RoPE,即RoPE-scaling,采用频率缩放技术,可以支持更长上下文。
原始RoPE(Rotary Positional Embedding)在上下文长度增加时,高频维度的快速振荡可能导致位置编码精度下降。Scaled RoPE通过调整频率分布(如平滑中频、拉长低频周期),增强位置编码对长上下文的稳健性。
Scaled RoPE 修改的是传入 RoPE 的位置 x,从位置 x到位置 x/α,也就是:
RoPE(x)→RoPE(x/α)
核心步骤是:
-
计算每个频率的"波长":把
inv_freq(用于 RoPE 的频率编码)转换成每个频率对应的波长。inv_freq越大,波长越短(高频)。inv_freq越小,波长越长(低频)
-
定义低频/高频阈值:
- 波长 > low_wavelen ⇒ 是低频(不敏感,适合缩放)
- 波长 < high_wavelen ⇒ 是高频(保留原值)
- 中间区间是中频(逐渐从缩放过渡到不缩放)
-
处理低频部分(直接缩放)
- 如果是低频部分 (波长很长),则对
inv_freq除以 scale_factor,即波动变慢(更稳健) - 否则不变
- 如果是低频部分 (波长很长),则对
-
平滑处理中频部分
smooth_factor=1⇒ 完全保留原始inv_freqsmooth_factor=0⇒ 完全使用缩放的inv_freq / scale_factor- 中间 ⇒ 插值
-
应用平滑频率:做线性插值:逐渐从缩放版过渡到原始值。
-
最终融合:
- 如果是中频 ⇒ 使用
smoothed_inv_freq - 如果是低频 ⇒ 使用
inv_freq / scale_factor - 如果是高频 ⇒ 保留
inv_freq
- 如果是中频 ⇒ 使用
总体实现的效果是:低频 → 频率被 除以 scale_factor(如8) → 频率变小、波长变大 → 编码变化得更慢 → 适应更长距离。
值得注意的是,这里的频率跟token的位置没有关系,跟embedding维度的编号有关。低频对应的是embedding维度的后面部分(索引较高的维度)。
从直观上感受下缩放前后的差异,代码如下:
ini
import numpy as np
import matplotlib.pyplot as plt

# Parameters
base = 500000  # RoPE base used in LLaMA 3
scale_factor = 2.0  # Scaling factor for low frequencies
d = 512        # Total embedding dimension
positions = np.arange(0, 1000)  # Token position range

# Frequency index range: 0 to d/2 - 1 (each frequency corresponds to 2 embedding dims)
i_high = 0      # High frequency (fast variation, low dimension index)
i_mid  = 32    # Mid frequency
i_low  = 64    # Low frequency (slow variation, high dimension index)

# Calculate corresponding angular frequency ω_i = 1 / base^{2i/d}
def calc_omega(i):
    return 1 / (base ** (2 * i / d))

omega_high = calc_omega(i_high)
omega_mid = calc_omega(i_mid)
omega_low = calc_omega(i_low)

# Piecewise scaling
omega_high_scaled = omega_high  # High frequency remains unchanged
smooth_factor = 0.5             # Interpolation factor between mid and low frequencies
omega_mid_scaled = smooth_factor * omega_mid + (1 - smooth_factor) * omega_low
omega_low_scaled = omega_low / scale_factor  # Scale down low frequency (make frequency smaller, wavelength longer)

# Plotting
fig, (ax1, ax2) = plt.subplots(2, 1, figsize=(10, 8), sharex=True)

# Standard RoPE plot
ax1.plot(positions, np.sin(omega_high * positions), label=f'High freq (i={i_high}, ω={omega_high:.2e})', color='blue')
ax1.plot(positions, np.sin(omega_mid * positions), label=f'Mid freq (i={i_mid}, ω={omega_mid:.2e})', color='green')
ax1.plot(positions, np.sin(omega_low * positions), label=f'Low freq (i={i_low}, ω={omega_low:.2e})', color='red')
ax1.set_title("Standard RoPE: sin(ω × position)")
ax1.set_ylabel("sin(ω × position)")
ax1.legend()
ax1.grid(True, linestyle='--', alpha=0.7)

# Scaled RoPE plot
ax2.plot(positions, np.sin(omega_high_scaled * positions), label=f'High freq (i={i_high}, ω={omega_high_scaled:.2e})', color='blue')
ax2.plot(positions, np.sin(omega_mid_scaled * positions), label=f'Mid freq scaled (i={i_mid}, ω={omega_mid_scaled:.2e})', color='green')
ax2.plot(positions, np.sin(omega_low_scaled * positions), label=f'Low freq scaled (i={i_low}, ω={omega_low_scaled:.2e})', color='red')
ax2.set_title(f"Segmented Scaled RoPE (scale_factor={scale_factor}, smooth_factor={smooth_factor})")
ax2.set_xlabel("Position")
ax2.set_ylabel("sin(ω × position)")
ax2.legend()
ax2.grid(True, linestyle='--', alpha=0.7)

plt.tight_layout()
plt.show()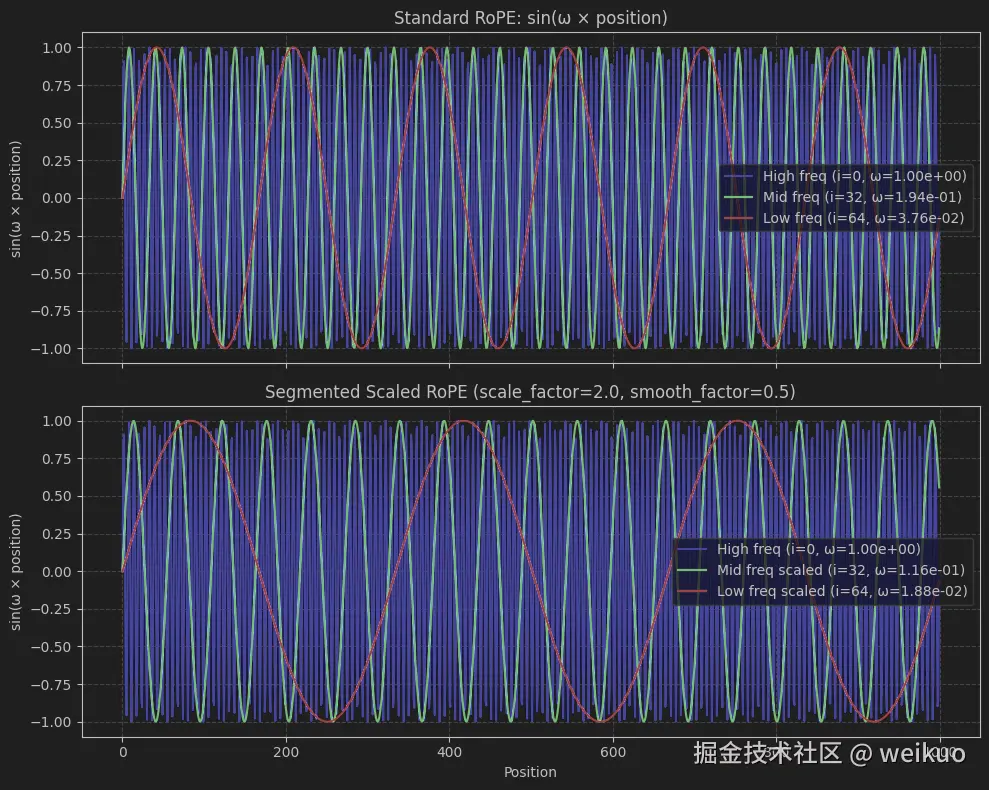
完整的rope-scaling和预计算rope的代码如下:
ini
from typing import Optional

import torch

def precompute_rope_params(
    context_length: int,
    head_dim: int,
    theta_base: float = 500000.0,  # Default base for LLaMA 3
    freq_config: Optional[dict] = None,
):
    """
Precompute sin and cos tensors for RoPE with optional frequency scaling/smoothing.

Args:
context_length: Sequence length
head_dim: Embedding dimension (must be even)
theta_base: Base for inverse frequency calculation (default 500000)
freq_config: Optional dict with keys:
- original_context_length: int, original training context length
- low_freq_factor: float, low frequency threshold factor (>1)
- high_freq_factor: float, high frequency threshold factor (>1)
- factor: float, scaling factor (>1)

Returns:
sin, cos: Tensors of shape (seq_len, half_dim)
"""
assert head_dim % 2 == 0, "head_dim must be even"

    half_dim = head_dim // 2
    # Compute inverse frequencies
    inv_freq = 1.0 / (theta_base ** (torch.arange(half_dim, dtype=torch.float32) / half_dim))

    if freq_config is not None:
        # Extract frequency config parameters
        orig_len = freq_config["original_context_length"]
        low_factor = freq_config["low_freq_factor"]
        high_factor = freq_config["high_freq_factor"]
        scale_factor = freq_config["factor"]

        # Compute wavelength
        wavelen = 2 * torch.pi / inv_freq
        low_wavelen = orig_len / low_factor
        high_wavelen = orig_len / high_factor

        # Scale inverse frequencies for low frequency bands
        condition = wavelen > low_wavelen
        inv_freq_scaled = torch.where(condition, inv_freq / scale_factor, inv_freq)

        # Compute smooth factor for medium frequency band
        smooth_factor = (orig_len / wavelen - low_factor) / (high_factor - low_factor)
        smooth_factor = smooth_factor.clamp(0.0, 1.0)
        smoothed_inv_freq = (1 - smooth_factor) * (inv_freq / scale_factor) + smooth_factor * inv_freq

        # Apply smoothed frequencies for medium band
        is_medium = (wavelen <= low_wavelen) & (wavelen >= high_wavelen)
        inv_freq = torch.where(is_medium, smoothed_inv_freq, inv_freq_scaled)

    # Compute position angles
    positions = torch.arange(context_length, dtype=torch.float32)
    angles = torch.einsum("i,j->ij", positions, inv_freq)  # Shape: (seq_len, half_dim)
    return torch.sin(angles), torch.cos(angles)
Llama3使用的context和rope base如下:
ini
# Instantiate RoPE parameters

llama_3_context_len = 8192
llama_3_theta_base = 500_000
构造示例,计算RoPE,如下:
ini
from Llama2_v1 import rotary_pos_emb

# Settings
batch_size = 2
num_heads = 4
head_dim = 16

# Instantiate RoPE parameters
cos, sin = precompute_rope_params(
    head_dim=head_dim,
    theta_base=llama_3_theta_base,
    context_length=llama_3_context_len
)

# Dummy query and key tensors
torch.manual_seed(123)
queries = torch.randn(batch_size, num_heads, llama_3_context_len, head_dim)
keys = torch.randn(batch_size, num_heads, llama_3_context_len, head_dim)

# Apply rotary position embeddings
queries_rot = rotary_pos_emb(queries, cos, sin)
keys_rot = rotary_pos_emb(keys, cos, sin)

print("shape of queries:", queries.shape)
print("shape of keys:", keys.shape)
结果如下:
yaml
shape of queries: torch.Size([2, 4, 8192, 16])
shape of keys: torch.Size([2, 4, 8192, 16])
为了优化性能和资源利用,我们通常会将 cos 和 sin 等预计算的张量存储在 buffer 中。Buffer 是模型中一种特殊的变量类型,它们不同于模型参数(parameters),不会参与梯度计算和训练过程。通常用于存放不需要更新、但在推理和前向传播中需要频繁使用的中间变量。
ini
class SharedBuffers:
    _buffers = {}

    @staticmethod
    def get_buffers(context_length, head_dim, rope_base, freq_config, dtype=torch.float32):
        key = (context_length, head_dim, rope_base, tuple(freq_config.values()) if freq_config else freq_config, dtype)

        if key not in SharedBuffers._buffers:
            # Create or fetch the buffers
            mask = torch.triu(torch.ones(context_length, context_length), diagonal=1).bool()
            cos, sin = precompute_rope_params(context_length, head_dim, rope_base, freq_config)
            if dtype is not None:
                cos = cos.to(dtype)
                sin = sin.to(dtype)
            SharedBuffers._buffers[key] = (mask, cos, sin)

        return SharedBuffers._buffers[key]
Grouped-query attention
按照GQA的论文,注意力机制各个模型有以下对比图:
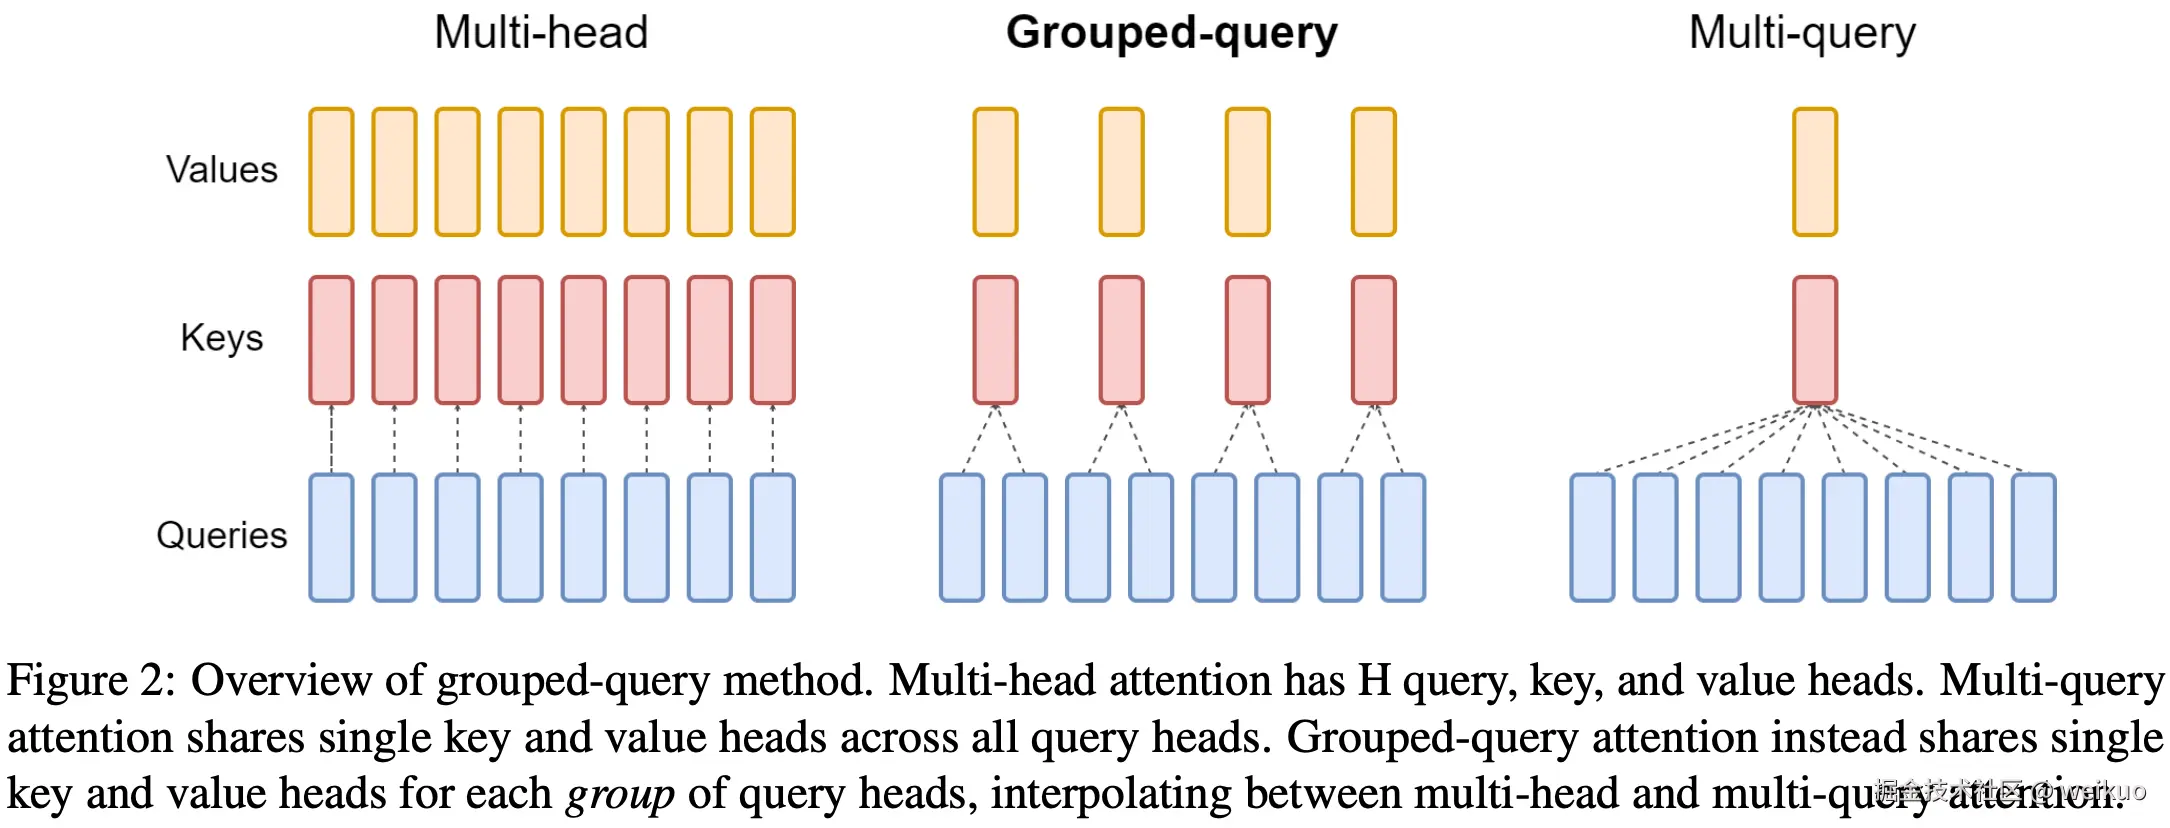
其差异一目了然:
- MHA的query、key、value数量相同;
- MQA的query数量不变,但是key和value数量仅有1,也就是所有head共享key和value;
- GQA是二者的中间状态,key和value分组共享权重。
换言之,GQA引入了分组共享的思想,在该框架下,MHA和MQA都可以看做是其特例(kv_groups = heads 或 kv_groups = 1 )。这样做的主要目的是在不显著降低性能的前提下节省大量计算和显存开销。
而明白了上述思想,GQA的代码就非常简单,如下:
python
from torch import nn

class GroupedQueryAttention(nn.Module):
    def __init__(
            self, d_in, d_out, context_length, num_heads,
            num_kv_groups,
            rope_base=10_000,
            rope_config=None,
            dtype=None
        ):
        super().__init__()
        assert d_out % num_heads == 0, "d_out must be divisible by num_heads"
        assert num_heads % num_kv_groups == 0, "num_heads must be divisible by num_kv_groups"

        self.d_out = d_out
        self.num_heads = num_heads
        self.num_kv_groups = num_kv_groups
        self.head_dim = d_out // num_heads
        self.group_size = num_heads // num_kv_groups
        log.debug(f"d_out={self.d_out}, num_heads={self.num_heads}, num_kv_groups={self.num_kv_groups}, head_dim={self.head_dim}, group_size={self.group_size}")

        linear_kwargs = dict(bias=False, dtype=dtype)
        self.W_query = nn.Linear(d_in, d_out, **linear_kwargs)
        self.W_key = nn.Linear(d_in, num_kv_groups * self.head_dim, **linear_kwargs)
        self.W_value = nn.Linear(d_in, num_kv_groups * self.head_dim, **linear_kwargs)
        self.out_proj = nn.Linear(d_out, d_out, **linear_kwargs)

        mask, cos, sin = SharedBuffers.get_buffers(
            context_length, self.head_dim, rope_base, rope_config, dtype
        )
        self.register_buffer("mask", mask)
        self.register_buffer("cos", cos)
        self.register_buffer("sin", sin)

    def forward(self, x):
        b, seq_len, _ = x.shape
        log.debug("shape of x: %s", x.shape)

        queries = self.W_query(x).view(b, seq_len, self.num_heads, self.head_dim).transpose(1, 2)
        keys = self.W_key(x).view(b, seq_len, self.num_kv_groups, self.head_dim).transpose(1, 2)
        values = self.W_value(x).view(b, seq_len, self.num_kv_groups, self.head_dim).transpose(1, 2)
        log.debug("shape of queries: %s", queries.shape)
        log.debug("shape of keys: %s", keys.shape)

        # Apply rotary positional embeddings
        queries = rotary_pos_emb(queries, self.cos, self.sin)
        keys = rotary_pos_emb(keys, self.cos, self.sin)
        log.debug("shape of queries: %s", queries.shape)

        # Repeat keys and values to match num_heads
        keys = keys.repeat_interleave(self.group_size, dim=1)  # (b, num_heads, seq_len, head_dim)
        values = values.repeat_interleave(self.group_size, dim=1)
        log.debug("shape of keys: %s", keys.shape)
        log.debug("shape of values: %s", values.shape)

        # Compute attention scores with causal mask
        attn_scores = torch.matmul(queries, keys.transpose(-2, -1))
        mask_bool = self.mask.bool()[:seq_len, :seq_len]
        attn_scores = attn_scores.masked_fill(mask_bool, -torch.inf)
        log.debug("shape of attn_scores: %s", attn_scores.shape)

        attn_weights = torch.softmax(attn_scores / (self.head_dim ** 0.5), dim=-1)
        log.debug("shape of attn_weights: %s", attn_weights.shape)
        assert keys.shape[-1] == self.head_dim

        context = torch.matmul(attn_weights, values)  # (b, num_heads, seq_len, head_dim)
        log.debug("shape of context: %s", context.shape)
        context = context.transpose(1, 2).reshape(b, seq_len, self.d_out)
        log.debug("shape of context: %s", context.shape)

        out = self.out_proj(context)
        log.debug("shape of out: %s", out.shape)
        return out
我们执行如下计算示例:
ini
batch_size = 2
context_len = 3000
max_context_len = 8192
embed_dim = 4096
num_heads = 32

example_batch = torch.randn((batch_size, context_len, embed_dim))

gqa = GroupedQueryAttention(
    d_in=embed_dim,
    d_out=embed_dim,
    context_length=max_context_len,
    num_heads=num_heads,
    num_kv_groups=8,
    rope_base=llama_3_theta_base
)

gqa(example_batch)

print("W_query:", gqa.W_query.weight.shape)
print("W_key:", gqa.W_key.weight.shape)
print("W_value:", gqa.W_value.weight.shape)
结果是:
yaml
W_query: torch.Size([4096, 4096])
W_key: torch.Size([1024, 4096])
W_value: torch.Size([1024, 4096])
可见,32个头,分为了8个group,相当于每4个head共享key和value。因此相当于把key和value的数量降低到了原来的1/4。query的embedding dimension不变,与MHA相同,但是key和value的embedding dimension从MHA的4096, 4096降低到了1024, 4096。
有兴趣可以计算比较下二者的参数量,在上面示例中MHA的总参数是67,108,864,而GQA的总参数是41,943,040,降低了约40%。
Update Transformer Block with GQA
因为引入了 rope scaling和GQA,因此需要简单更新Transformer代码如下:
ini
from Llama2_v1 import FeedForward, RMSNorm

class TransformerBlock(nn.Module):
    def __init__(self, cfg):
        super().__init__()
        self.att = GroupedQueryAttention(
            d_in=cfg["emb_dim"],
            d_out=cfg["emb_dim"],
            context_length=cfg["context_length"],
            num_heads=cfg["n_heads"],
            num_kv_groups=cfg["n_kv_groups"],  # NEW
            rope_base=cfg["rope_base"],        # NEW
            rope_config=cfg["rope_freq"],      # NEW
            dtype=cfg["dtype"]
        )
        self.ff = FeedForward(cfg)

        self.norm1 = RMSNorm(cfg["emb_dim"], eps=1e-5)
        self.norm2 = RMSNorm(cfg["emb_dim"], eps=1e-5)
    def forward(self, x):
        # Shortcut connection for attention block
        shortcut = x
        x = self.norm1(x)
        x = self.att(x)   # Shape [batch_size, num_tokens, emb_size]
        x = x + shortcut  # Add the original input back

        # Shortcut connection for feed-forward block
        shortcut = x
        x = self.norm2(x)
        x = self.ff(x)
        x = x + shortcut  # Add the original input back

        return x
Update Model
而Llama3与Llama2在Model上几乎一样,只需更新model代码如下:
ini
class Llama3Model(nn.Module):
    def __init__(self, cfg):
        super().__init__()
        self.tok_emb = nn.Embedding(cfg["vocab_size"], cfg["emb_dim"], dtype=cfg["dtype"])
        self.trf_blocks = nn.Sequential(
            *[TransformerBlock(cfg) for _ in range(cfg["n_layers"])])
        self.final_norm = RMSNorm(cfg["emb_dim"], eps=1e-5)
        self.out_head = nn.Linear(cfg["emb_dim"], cfg["vocab_size"], bias=False, dtype=cfg["dtype"])

    def forward(self, in_idx):
        x = self.tok_emb(in_idx)
        x = self.trf_blocks(x)
        x = self.final_norm(x)
        logits = self.out_head(x.to(torch.bfloat16))
        return logits
Initialize Model
Llama3使用的配置如下:
yaml
LLAMA3_CONFIG_8B = {
    "vocab_size": 128_256,   # Increased vocabulary size for broader language coverage
    "context_length": 8192,  # Extended context window for handling longer sequences
    "emb_dim": 4096,         # Embedding dimension for token representations
    "n_heads": 32,           # Number of attention heads in each self-attention layer
    "n_layers": 32,          # Total number of transformer blocks
    "hidden_dim": 14_336,    # Expanded feedforward network dimension (MLP inner size)
    "n_kv_groups": 8,        # Number of key-value groups for grouped-query attention (GQA)
    "rope_base": 500_000.0,  # Higher RoPE base to better encode longer positions
    "rope_freq": None,       # Optional override for RoPE frequency scaling
    "dtype": torch.bfloat16  # Use bfloat16 for lower memory usage and faster compute
}
加载模型如下:
ini
model = Llama3Model(LLAMA3_CONFIG_8B)有兴趣可以计算模型总参数和不同类型下需要的总内存,如下:
scss
total_params = sum(p.numel() for p in model.parameters())
print(f"Total number of parameters: {total_params:,}")
scss
def model_memory_size(model, input_dtype=torch.float32):
    element_size = torch.tensor([], dtype=input_dtype).element_size()
    total_elements = sum(p.numel() * (1 + int(p.requires_grad)) for p in model.parameters())
    total_elements += sum(b.numel() for b in model.buffers())
    return total_elements * element_size / (1024 ** 3)

print(f"float32 (PyTorch default): {model_memory_size(model, torch.float32):.2f} GB")
print(f"bfloat16: {model_memory_size(model, torch.bfloat16):.2f} GB")
当前模型共有8,030,261,248参数,也就是8B。
在默认的float32精度下需要60GB内存,而在bfloat16精度下需要30GB内存。以下演示需要,我们使用bfloat16精度。
Load Tokenizer
LLaMA 3使用自定义的Byte Pair Encoding(BPE)分词器,基于SentencePiece实现,与OpenAI的 cl100k_base、p50k_base、r50k_base 分词器不同。
tiktoken.get_encoding() 是为OpenAI模型(如GPT-3.5、GPT-4)设计的,加载预定义的BPE分词器,依赖特定的正则表达式(pat_str)进行文本预分割。
LLaMA 3的分词器通过专有的 tokenizer.model 文件定义合并规则(merge rules),需显式加载(如通过Hugging Face的 transformers 库),无法使用 tiktoken.get_encoding() 的默认分词器。
LLaMA 3的BPE分词器不依赖显式的正则表达式预分割,而是直接在Unicode字符或字节级别上训练合并规则,适配其训练数据特性(如多语言文本、代码、学术数据),对Unicode字符、换行、标点的处理更灵活。
因此,LLaMA 3的分词器无法直接使用tiktoken的固定正则表达式(pat_str)或分词器,需加载其自定义的BPE模型以确保token化与模型训练一致。
Llama3使用的tokenizer可用下面代码实现:
python
from pathlib import Path
import tiktoken
from tiktoken.load import load_tiktoken_bpe


class Tokenizer:
    """
Tokenizer wrapper for LLaMA 3 using custom tiktok en BPE files.

Automatically loads custom merge rules, special tokens, and regex-based tokenization pattern.
"""

def __init__(self, model_path: str):
        """
Initialize the tokenizer with a given BPE model file.

Args:
model_path (str): Path to the . tiktok en file used by LLaMA 3.
"""
model_path = Path(model_path)
        if not model_path.is_file():
            raise FileNotFoundError(f"Tokenizer model file not found: {model_path}")

        # Load mergeable BPE ranks from file
        mergeable_ranks = load_tiktoken_bpe(str(model_path))

        # Define special token IDs
        special_tokens = {
            "<|begin_of_text|>": 128000,
            "<|end_of_text|>": 128001,
            "<|start_header_id|>": 128006,
            "<|end_header_id|>": 128007,
            "<|eot_id|>": 128009,
        }

        # Add reserved special tokens from 128002 to 128257 (excluding used IDs)
        special_tokens.update({
            f"<|reserved_{i}|>": 128002 + i
            for i in range(256)
            if (128002 + i) not in special_tokens.values()
        })

        # Regex pattern string used for LLaMA-style tokenization
        pat_str = (
            r"(?i:'s|'t|'re|'ve|'m|'ll|'d)|"
            r"[^\r\n\p{L}\p{N}]?\p{L}+|"
            r"\p{N}{1,3}|"
            r" ?[^\s\p{L}\p{N}]+[\r\n]*|"
            r"\s*[\r\n]+|"
            r"\s+(?!\S)|"
            r"\s+"
        )

        self.special_tokens = special_tokens

        # Create the tiktoken Encoding instance
        self.model = tiktoken.Encoding(
            name=model_path.name,
            pat_str=pat_str,
            mergeable_ranks=mergeable_ranks,
            special_tokens=special_tokens,
        )

    def encode(self, text: str, bos: bool = False, eos: bool = False,
               allowed_special: set = set(), disallowed_special=()) -> list[int]:
        """
Encode a text string into token IDs.

Args:
text (str): Input string to tokenize.
bos (bool): Whether to prepend <|begin_of_text|> token.
eos (bool): Whether to append <|end_of_text|> token.
allowed_special (set): Set of allowed special token strings.
disallowed_special: Set or policy for disallowed tokens.

Returns:
List[int]: Token ID list.
"""
tokens = []
        if bos:
            tokens.append(self.special_tokens["<|begin_of_text|>"])

        tokens += self.model.encode(
            text,
            allowed_special=allowed_special,
            disallowed_special=disallowed_special
        )

        if eos:
            tokens.append(self.special_tokens["<|end_of_text|>"])
        return tokens

    def decode(self, tokens: list[int]) -> str:
        """
Decode a list of token IDs back into text.

Args:
tokens (List[int]): Token ID list.

Returns:
str: Decoded string.
"""
return self.model.decode(tokens)
不过我们需要从HuggingFace下载tokenizer.model文件,如下:
ini
from pathlib import Path
from huggingface_hub import hf_hub_download

def download_tokenizer_if_needed(repo_id: str, filename: str, local_dir: str) -> str:
    local_path = Path(local_dir) / filename
    if local_path.exists():
        print(f"Tokenizer file {local_path} already exists, skipping.")
        return str(local_path)

    return hf_hub_download(
        repo_id=repo_id,
        filename=filename,
        local_dir=local_dir
    )

# Example usage
tokenizer_file_path = download_tokenizer_if_needed(
    repo_id="meta-llama/Meta-Llama-3-8B",
    filename="original/tokenizer.model",
    local_dir="Llama-3-8B"
)
初始化tokenizer并运行示例如下:
ini
tokenizer = Tokenizer(tokenizer_file_path)
ini
# Encode with BOS and EOS tokens
tokens = tokenizer.encode("Hello world!",bos=True,eos=False)
print(tokens)

# Decode back to text
text = tokenizer.decode(tokens)
print(text)
结果如下:
yaml
[128000, 9906, 1917, 0]
<|begin_of_text|>Hello world!
另外,我们也可以直接使用HuggingFace的AutoTokenizer API直接加载,结果一样,如下:
ini
from transformers import AutoTokenizer
tokenizer = AutoTokenizer.from_pretrained("meta-llama/Meta-Llama-3-8B")
tokens = tokenizer.encode("Hello world!")
print(tokens)
# Decode back to text
text = tokenizer.decode(tokens)
print(text)
我们也可以简单对比下Llama3与GPT2分词器的结果差异,如下:
python
from transformers import AutoTokenizer
import tiktoken

text = "hello\nworld, 世界!"
# LLaMA 3 tokenizer
llama_tokenizer = AutoTokenizer.from_pretrained("meta-llama/Meta-Llama-3-8B")
llama_tokens = llama_tokenizer.encode(text)
print("LLaMA 3 tokens:", llama_tokens)
print("LLaMA 3 decoded:", llama_tokenizer.decode(llama_tokens))

# tiktoken using gpt or cl100k_base
tiktoken_encoding = tiktoken.get_encoding("gpt2")
# tiktoken_encoding = tiktoken.get_encoding("cl100k_base")

tiktoken_tokens = tiktoken_encoding.encode(text)
print("tiktoken tokens:", tiktoken_tokens)
print("tiktoken decoded:", tiktoken_encoding.decode(tiktoken_tokens))
结果如下:
yaml
LLaMA 3 tokens: [128000, 15339, 198, 14957, 11, 127365, 6447]
LLaMA 3 decoded: <|begin_of_text|>hello
world, 世界!
tiktoken tokens: [31373, 198, 6894, 11, 220, 10310, 244, 45911, 234, 171, 120, 223]
tiktoken decoded: hello
world, 世界!
Load pretrained weights
同Llama2,我们需要先从HuggingFace下载Llama3的公开权重(需要申请权限)。代码如下:
ini
from pathlib import Path
from huggingface_hub import hf_hub_download
from safetensors.torch import load_file

def load_combined_weights(repo_id, filenames, local_dir):
    combined = {}
    local_dir = Path(local_dir)
    local_dir.mkdir(parents=True, exist_ok=True)

    for name in filenames:
        local_path = local_dir / name
        if not local_path.exists():
            # download if not already present
            hf_hub_download(
                repo_id=repo_id,
                filename=name,
                local_dir=str(local_dir)
            )
        weights = load_file(str(local_path))
        combined.update(weights)

    return combined

# Use the function
filenames = [f"model-0000{i}-of-00004.safetensors" for i in range(1, 5)]
combined_weights = load_combined_weights(
    repo_id="meta-llama/Meta-Llama-3-8B",
    filenames=filenames,
    local_dir="Llama-3-8B"
)
共有4个文件,需要空间4.6+4.7+4.6+1.1=15G硬盘空间。
而接下来就是比较枯燥的赋值过程了,核心是对比两边参数,代码如下:
python
def assign(left, right):
    if left.shape != right.shape:
        raise ValueError(f"Shape mismatch. Left: {left.shape}, Right: {right.shape}")
    return torch.nn.Parameter(right.clone().detach()) if isinstance(right, torch.Tensor) else torch.nn.Parameter(torch.tensor(right))


def load_weights_into_llama(model, param_config, params):
    # Embedding
    model.tok_emb.weight = assign(model.tok_emb.weight, params["model.embed_tokens.weight"])

    for l in range(param_config["n_layers"]):
        block = model.trf_blocks[l]

        # map of attribute path (relative to block) -> param name
        attr_param_map = {
            f"att.W_query.weight": f"model.layers.{l}.self_attn.q_proj.weight",
            f"att.W_key.weight": f"model.layers.{l}.self_attn.k_proj.weight",
            f"att.W_value.weight": f"model.layers.{l}.self_attn.v_proj.weight",
            f"att.out_proj.weight": f"model.layers.{l}.self_attn.o_proj.weight",
            f"norm1.weight": f"model.layers.{l}.input_layernorm.weight",
            f"ff.fc1.weight": f"model.layers.{l}.mlp.gate_proj.weight",
            f"ff.fc2.weight": f"model.layers.{l}.mlp.up_proj.weight",
            f"ff.fc3.weight": f"model.layers.{l}.mlp.down_proj.weight",
            f"norm2.weight": f"model.layers.{l}.post_attention_layernorm.weight",
        }

        for attr_path, param_name in attr_param_map.items():
            obj = block
            *parents, attr = attr_path.split('.')
            for p in parents:
                obj = getattr(obj, p)
            old_tensor = getattr(obj, attr)
            setattr(obj, attr, assign(old_tensor, params[param_name]))

    # Final normalization
    model.final_norm.weight = assign(model.final_norm.weight, params["model.norm.weight"])

    # Output head with fallback (for weight tying)
    if "lm_head.weight" in params:
        model.out_head.weight = assign(model.out_head.weight, params["lm_head.weight"])
    else:
        model.out_head.weight = assign(model.out_head.weight, params["model.embed_tokens.weight"])
        print("Model uses weight tying.")
把权重加载到模型中,如下:
scss
device = torch.device("cpu")
load_weights_into_llama(model, LLAMA3_CONFIG_8B, combined_weights)
model.to(device)
del combined_weights
最后,我们同样运行之前的示例,看看模型是否能够补全文本,如下:
ini
from gpt2_v2 import generate_text_simple, text_to_tensor, tensor_to_text

torch.manual_seed(123)

token_ids = generate_text_simple(
    model=model,
    idx=text_to_tensor("At the start of", tokenizer).to("cpu"),
    max_new_tokens=30,
    context_size=LLAMA3_CONFIG_8B["context_length"],
    top_k=1,
    temperature=0.
)

print("Output text:\n", tensor_to_text(token_ids, tokenizer))
结果如下:
vbnet
Output text:
 At the start of the 2018 season, the club was in the 2nd division of the Dutch football league. The team is in the 1st place
由此证明,我们的Llama3模型代码是正确的。
这里我们下载的Llama3 8B的基础模型,只能进行文本补全,无法响应指令。有兴趣可以同样地下载instruction-finetuned版本,即meta-llama/Meta-Llama-3-8B-Instruct,这里不再赘述。