作者:SkyXZ
CSDN:SkyXZ~-CSDN博客
博客园:SkyXZ - 博客园
开发机环境:Ubuntu 22.04 | 112x CPU | 1TB RAM | 8×NVIDIA A100-40GB | CUDA 12.4 |
- HuggingFace官方accelerate库中文文档:https://hugging-face.cn/docs/accelerate/index
在大模型训练和推理任务中,单卡资源往往难以满足性能需求,尤其在模型参数量动辄数亿甚至数十亿的今天,高效利用多卡资源成为提升训练效率的关键手段,目前PyTorch有如下几个常见的多卡并行训练的方式,这几种方式的优缺点都非常明显,那么有没有一个用起简单顺手,计算资源调度又非常优秀的框架呢?
| 并行方式 | 优点 | 局限性 |
|---|---|---|
torch.nn.DataParallel |
使用简单,无需修改太多代码 | 已不推荐使用,存在性能瓶颈,通信开销大,只在主卡做前向/反向调度 |
torch.nn.parallel.DistributedDataParallel(DDP) |
官方推荐,性能优秀,支持多机多卡 | 配置繁琐,需手动设置启动参数、分布式环境变量、训练脚本需精细改写 |
手动使用 torch.distributed.launch 或 torchrun |
灵活性强,适合大规模集群 | 易踩坑,调试困难,对新手不友好 |
有的有的兄弟,那就是HuggingFace推出的Accelerate库,它屏蔽了底层的分布式细节,极大简化了多GPU甚至多机训练的配置和使用流程,适用于 PyTorch 生态下绝大多数任务,本教程将基于本人在A100集群 上的实际部署经验,详尽讲解 Accelerate 的配置方式、训练脚本改写建议,以及与 DeepSpeed 等工具的集成策略,帮助你快速构建一个稳定、高效、可复现的多卡分布式训练环境。
Accelerate的安装配置
Accelerate库具备非常好的跨平台适应能力,支持多种类型的集群环境。在 CPU 训练 方面,它不仅支持单节点多进程的 CPU 分布式训练 ,也同样支持多节点 CPU 集群训练 ;在 GPU 和 TPU 环境中,Accelerate 同样支持单节点多卡 与多节点多卡 的分布式训练,能够灵活适配从本地开发到大规模集群部署的各种场景,其安装也非常的简单,仅需在Python3.8+以上的环境运行一下命令即可完成:
bash
# pip安装
pip install accelerate
# conda安装
conda install -c conda-forge accelerate
在完成安装之后我们需要配置 Accelerate 以适应当前系统的训练设置,完成配置仅需要输入以下命令并按照要求回答问题即可:
bash
# 输入以下命令
accelerate config
# 问题参考如下:
(xq) qi.xiong@instance-qih2207m:~$ accelerate config
--------------------------------------------------------------------------------------------------------------------------------
In which compute environment are you running?
Please select a choice using the arrow or number keys, and selecting with enter
 ➔  This machine                                                                                                                      AWS (Amazon SageMaker)
Which type of machine are you using?                                                                                             Please select a choice using the arrow or number keys, and selecting with enter
    No distributed training
    multi-CPU
    multi-XPU
    multi-HPU
 ➔ multi-GPU
    multi-NPU
    multi-MLU
    multi-SDAA
    multi-MUSA
    TPU
How many different machines will you use (use more than 1 for multi-node training)? [1]:
Should distributed operations be checked while running for errors? This can avoid timeout issues but will be slower. [yes/NO]:
Do you wish to optimize your script with torch dynamo?[yes/NO]:
Which dynamo backend would you like to use?                                                                                     Please select a choice using the arrow or number keys, and selecting with enter                                                 	eager                                                                                                                      		aot_eager                                                                                                                   ➔  inductor                                                                                                                     	aot_ts_nvfuser                                                                                                               	 nvprims_nvfuser
    cudagraphs
    ofi
    fx2trt
    onnxrt
    tensorrt
    aot_torchxla_trace_once
    torhchxla_trace_once
    ipex
    tvm
Do you want to customize the defaults sent to torch.compile? [yes/NO]:
Do you want to use DeepSpeed? [yes/NO]:
What GPU(s) (by id) should be used for training on this machine as a comma-separated list? [all]:
Do you wish to use mixed precision? Please select a choice using the arrow or number keys, and selecting with enter ➔ no fp16 bf16 fp8 完成了如上问题的选择之后便会在以下地址/home/qi.xiong/.cache/huggingface/accelerate/default_config.yaml生成当前的训练配置文件,具体内容格式如下:
yaml
compute_environment: LOCAL_MACHINE
debug: true
distributed_type: MULTI_GPU
downcast_bf16: 'no'
dynamo_config:
  dynamo_backend: INDUCTOR
enable_cpu_affinity: false
gpu_ids: 2,3,4,5
machine_rank: 0
main_training_function: main
mixed_precision: 'no'
num_machines: 1
num_processes: 4
rdzv_backend: static
same_network: true
tpu_env: []
tpu_use_cluster: false
tpu_use_sudo: false
use_cpu: false
如果要检查配置的环境是否正确的话我们还可以在命令行运行如下命令:
bash
# 检查配置:
accelerate env
# 示例输出:
(xq) qi.xiong@instance-qih2207m:~$ accelerate env
Copy-and-paste the text below in your GitHub issue
- `Accelerate` version: 1.9.0
- Platform: Linux-5.15.0-72-generic-x86_64-with-glibc2.35
- `accelerate` bash location: /home/qi.xiong/miniconda3/envs/xq/bin/accelerate
- Python version: 3.10.18
- Numpy version: 1.23.4
- PyTorch version: 2.2.2+cu121
- PyTorch accelerator: CUDA
- System RAM: 1005.77 GB
- GPU type: NVIDIA GeForce RTX 4090
- `Accelerate` default config:
        - compute_environment: LOCAL_MACHINE
        - distributed_type: MULTI_GPU
        - mixed_precision: no
        - use_cpu: False
        - debug: True
        - num_processes: 4
        - machine_rank: 0
        - num_machines: 1
        - gpu_ids: 2,3,4,5
        - rdzv_backend: static
        - same_network: True
        - main_training_function: main
        - enable_cpu_affinity: False
        - downcast_bf16: no
        - tpu_use_cluster: False
        - tpu_use_sudo: False
        - tpu_env: []
- dynamo_config: {'dynamo_backend': 'INDUCTOR'}同时我们还可以运行以下命令来对分布式配置进行一次测试来验证我们的Accelerate是否已在服务器上正确配置并运行,其中的arguments为我们上述配置文件生成的路径,默认情况下会指向我们前面在.cache下生成的default_config.yaml
bash
# 测试命令
accelerate test [arguments]
options:
  -h, --help            show this help message and exit
  --config_file CONFIG_FILE, --config-file CONFIG_FILE
The path to use to store the config file. Will default to a file named default_config.yaml in the cache location, which is the
content of the environment `HF_HOME` suffixed with 'accelerate', or if you don't have such an environment variable, your cache
directory ('~/.cache' or the content of `XDG_CACHE_HOME`) suffixed with 'huggingface'.
# 出现以下log即代表配置正确无误
stdout: **Breakpoint trigger test**s
Test is a success! You are ready for your distributed training!
完成训练代码的配置
在完成了基本配置之后我们便可以开始丢弃过时的nn.DataParallel修改我们的训练脚本以支持Accelerate啦,我们以我之前自己搭的一个ViT训练脚本为例子,这个脚本使用的是典型的nn.DataParallel分布式训练方式,通过将模型包裹在 nn.DataParallel(model) 中,并手动选择可用 GPU,这个方式有几个缺点首先是nn.DataParallel 只能在单节点 使用,且依赖主 GPU 聚合梯度,存在性能瓶颈;其次它不支持多进程训练,对模型部署和迁移都不够灵活,所以接下来我们来对这个训练脚本进行升级,原始训练脚本如下:
python
from model.transformer_net import VisonTransformer
from cifar10_dataset import CIFAR10DataLoad
import os
import torch
import numpy as np
import torch.nn as nn
import torch.optim as optim
from tqdm import tqdm
import matplotlib.pyplot as plt
os.environ["CUDA_VISIBLE_DEVICES"] = "4,5"
def train_cifar10(
root="/home/qi.xiong/Dataset/cifar-10-batches-py", # CIFAR-10数据集根目录
img_size=224,
patch_size=16, # 改为4,这样有64个patch (32/4)²
in_channels=3,
num_features=768, # 减少特征维度,适应较小的模型
depth=12, # 减少层数
num_heads=12, # 减少注意力头数
mlp_ratio=4.0,
qkv_bias=True,
drop_rate=0.1,
attn_drop_rate=0.1,
drop_path_rate=0.1,
epochs=20,
batch_size=128,
num_workers=8,
lr=1e-4,
device="cuda"
):
device = device or ("cuda" if torch.cuda.is_available() else "cpu")
print(f"使用设备: {device}")
# 数据加载
train_loader, test_loader = CIFAR10DataLoad(root, batch_size, num_workers, img_size)
num_classes = 10 # CIFAR-10固定10个类别
input_shape = (in_channels, img_size, img_size)
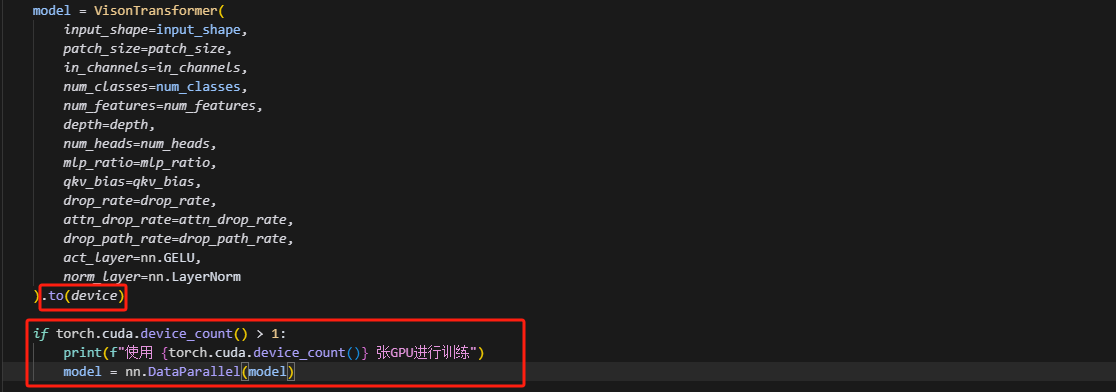
model = VisonTransformer(
input_shape=input_shape,
patch_size=patch_size,
in_channels=in_channels,
num_classes=num_classes,
num_features=num_features,
depth=depth,
num_heads=num_heads,
mlp_ratio=mlp_ratio,
qkv_bias=qkv_bias,
drop_rate=drop_rate,
attn_drop_rate=attn_drop_rate,
drop_path_rate=drop_path_rate,
act_layer=nn.GELU,
norm_layer=nn.LayerNorm
).to(device)
if torch.cuda.device_count() > 1:
print(f"使用 {torch.cuda.device_count()} 张GPU进行训练")
model = nn.DataParallel(model)
print(f"模型参数量: {sum(p.numel() for p in model.parameters() if p.requires_grad):,}")
criterion = nn.CrossEntropyLoss()
optimizer = optim.AdamW(model.parameters(), lr=lr, weight_decay=0.01)
scheduler = optim.lr_scheduler.CosineAnnealingLR(optimizer, T_max=epochs)
best_acc = 0
train_loss_list, test_loss_list = [], []
train_acc_list, test_acc_list = [], []
for epoch in range(epochs):
model.train()
total_loss, correct, total = 0, 0, 0
pbar = tqdm(train_loader, desc=f"Epoch {epoch+1}/{epochs}")
for images, labels in pbar:
images, labels = images.to(device), labels.to(device)
optimizer.zero_grad()
outputs = model(images)
loss = criterion(outputs, labels)
loss.backward()
optimizer.step()
total_loss += loss.item() * images.size(0)
_, preds = outputs.max(1)
correct += preds.eq(labels).sum().item()
total += labels.size(0)
# 更新进度条
pbar.set_postfix({
'Loss': f'{loss.item():.4f}',
'Acc': f'{100.*correct/total:.2f}%'
})
train_loss = total_loss / total
train_acc = correct / total
train_loss_list.append(train_loss)
train_acc_list.append(train_acc)
# 测试阶段
model.eval()
test_loss, test_correct, test_total = 0, 0, 0
with torch.no_grad():
for images, labels in test_loader:
images, labels = images.to(device), labels.to(device)
outputs = model(images)
loss = criterion(outputs, labels)
test_loss += loss.item() * images.size(0)
_, preds = outputs.max(1)
test_correct += preds.eq(labels).sum().item()
test_total += labels.size(0)
test_loss = test_loss / test_total
test_acc = test_correct / test_total
test_loss_list.append(test_loss)
test_acc_list.append(test_acc)
# 更新学习率
scheduler.step()
current_lr = scheduler.get_last_lr()[0]
print(f"Epoch {epoch+1}: Train Loss={train_loss:.4f}, Train Acc={train_acc:.4f}, "
f"Test Loss={test_loss:.4f}, Test Acc={test_acc:.4f}, LR={current_lr:.6f}")
# 保存最优模型
if test_acc > best_acc:
best_acc = test_acc
torch.save(model.module.state_dict(), "best_vit_cifar10.pth")
print(f"保存最优模型,测试准确率: {best_acc:.4f}")
# 可视化loss和acc
plt.figure(figsize=(12, 4))
plt.subplot(1, 2, 1)
plt.plot(train_loss_list, label="Train Loss")
plt.plot(test_loss_list, label="Test Loss")
plt.legend()
plt.title("Loss Curve")
plt.xlabel("Epoch")
plt.ylabel("Loss")
plt.subplot(1, 2, 2)
plt.plot(train_acc_list, label="Train Acc")
plt.plot(test_acc_list, label="Test Acc")
plt.legend()
plt.title("Accuracy Curve")
plt.xlabel("Epoch")
plt.ylabel("Accuracy")
plt.tight_layout()
plt.savefig("cifar10_training_curves.png", dpi=300, bbox_inches='tight')
plt.show()
print(f"训练完成!最优测试准确率: {best_acc:.4f}")
return model, best_acc
if __name__ == "__main__":
train_cifar10() 我们首先要做的便是导入Accelerate库,同时继承Accelerator()类,并把我们最开始的显式指定GPU以及device设置给删去让accelerate自动帮我们进行配置
python
from model.transformer_net import VisonTransformer
from cifar10_dataset import CIFAR10DataLoad
import os
import torch
import numpy as np
import torch.nn as nn
import torch.optim as optim
from tqdm import tqdm
import matplotlib.pyplot as plt
# 导入accelerate
from accelerate import Accelerator
# 删去以下手动GPU设置,让Accelerate进行管理
# os.environ["CUDA_VISIBLE_DEVICES"] = "4,5"

def train_cifar10(
    root="/home/qi.xiong/Dataset/cifar-10-batches-py", # CIFAR-10数据集根目录
    img_size=224,
    patch_size=16,      # 改为4,这样有64个patch (32/4)²
    in_channels=3,
    num_features=768,  # 减少特征维度,适应较小的模型
    depth=12,          # 减少层数
    num_heads=12,      # 减少注意力头数
    mlp_ratio=4.0,
    qkv_bias=True,
    drop_rate=0.1,
    attn_drop_rate=0.1,
    drop_path_rate=0.1,
    epochs=20,
    batch_size=128,
    num_workers=8,
    lr=1e-4,
    device="cuda"
):
    # 注释掉以下device设置内容,并初始化Accelerator()类,并使用accelerator.device来管理设备
    # device = device or ("cuda" if torch.cuda.is_available() else "cpu")
    accelerator = Accelerator()
device = accelerator.device我们在上面已经使用了accelerator.device,因此我们需要删去代码中所有的.to(device)操作 ,并不用nn.DataParallel包裹我们的模型
接下来我们使用Accelerate来包装我们的模型、优化器和数据加载器,我们用到的是Accelerate类中的prepare方法(具体介绍见:https://hugging-face.cn/docs/accelerate/v1.6.0/en/package_reference/accelerator#accelerate.Accelerator.prepare),这个方法也是HF官方最推荐的方法,可以一步准备多个组件,其官方介绍如下,我们可以传入任何顺序组合的torch.utils.data.DataLoader数据加载器、torch.nn.Module模型、torch.optim.Optimizer优化器以及torch.optim.lr_scheduler.LRScheduler学习器,同时我们还可以使用device_placement来选择是否让 Accelerate 自动将这些对象转到目标设备,如果仅想让某几个Args转移,可以传一个与 args 相同长度的布尔列表例如 [True, True, False, True]):
python
def prepare(self, *args, device_placement=None):
    """
    Prepare all objects passed in `args` for distributed training and mixed precision, then return them in the same
    order.
    Args:
        *args (list of objects):
            Any of the following type of objects:

            - `torch.utils.data.DataLoader`: PyTorch Dataloader
            - `torch.nn.Module`: PyTorch Module
            - `torch.optim.Optimizer`: PyTorch Optimizer
            - `torch.optim.lr_scheduler.LRScheduler`: PyTorch LR Scheduler

        device_placement (`list[bool]`, *optional*):
            Used to customize whether automatic device placement should be performed for each object passed. Needs
            to be a list of the same length as `args`. Not compatible with DeepSpeed or FSDP.
    <Tip>
      You don't need to prepare a model if you only use it for inference without any kind of mixed precision
    </Tip>
    """
# device_placement example:
device_placement = [True, True, False, False]
model, optimizer, data_loader, scheduler = accelerator.prepare(
    model, optimizer, data_loader, scheduler, device_placement=device_placement
)
虽然 accelerator.prepare() 是最推荐用法,但 Accelerate 也提供了以下更细化的封装函数,适用于只想准备某一类对象的场景,它们的功能其实和 prepare() 一致,只不过拆解得更细,灵活性更高,下面是简要介绍(实际中使用场景较少,因此不做深入讲解):
python
# 1.prepare_data_loader方法只包装一个数据加载器DataLoader
# 用于将单个数据加载器适配到分布式环境下,并可选择是否自动将数据移动到目标设备(如 GPU)
import torch
from accelerate import Accelerato
accelerator = Accelerator()
data_loader = torch.utils.data.DataLoader(...)
data_loader = accelerator.prepare_data_loader(data_loader, device_placement=True)
	# 参数说明:
    	device_placement=True:是否自动将 batch 移动到正确设备(默认使用 accelerator.device)
        slice_fn_for_dispatch:用于多进程数据切分,一般无需手动设置
# 2.prepare_model方法只准备模型
# 用于将模型加载到合适设备,并根据设置(如是否开启混合精度、是否启用 torch.compile)对其进行优化。
from accelerate import Accelerator
accelerator = Accelerator()
model = accelerator.prepare_model(model, device_placement=True, evaluation_mode=False)
	# 参数说明:
    	device_placement:是否将模型移动到正确设备
        evaluation_mode:如果设置为 True,表示模型仅用于推理,不参与训练,适用于纯推理场景
# 3.prepare_optimizer方法只包装优化器
# 适配优化器在多卡训练场景下的兼容性,确保其工作在正确的设备上
import torch
from accelerate import Accelerator
accelerator = Accelerator()
optimizer = torch.optim.Adam(...)
optimizer = accelerator.prepare_optimizer(optimizer, device_placement=True)
	# 参数说明:
    	device_placement:是否将模型移动到正确设备
# 4.prepare_scheduler只包装学习率调度器
# 适配调度器逻辑到分布式环境,通常在 optimizer 已被 prepare 后调用
import torch
from accelerate import Accelerator
accelerator = Accelerator()
optimizer = torch.optim.Adam(...)
scheduler = torch.optim.lr_scheduler.LambdaLR(optimizer, ...)
scheduler = accelerator.prepare_scheduler(scheduler)因此我们这里使用推荐的prepare方法,修改后的代码如下:
python
# 具体修改如下
criterion = nn.CrossEntropyLoss()
optimizer = optim.AdamW(model.parameters(), lr=lr, weight_decay=0.01)
scheduler = optim.lr_scheduler.CosineAnnealingLR(optimizer, T_max=epochs)
# 使用Accelerate包装我们的模型、优化器和数据加载器,并默认全部加载到目标设备也就是GPU上
model, optimizer, train_loader, test_loader, scheduler = accelerator.prepare(
    model, optimizer, train_loader, test_loader, scheduler
)接着我们删去所有的images, labels = images.to(device), labels.to(device),用accelerator.backward(loss)来替换原先的loss.backward(),同时将模型的保存修改为以下:
python
# 模型保存,修改以下为:
# torch.save(model.module.state_dict(), "best_vit_cifar10.pth")
accelerator.save_state("best_vit_cifar10")至此我们accelerate的适配就基本完成啦!接着我们在添加一点小细节,比如训练的进度显示及进程同步,在分布式训练环境中,多个进程同时运行会导致进度条显示混乱和日志重复打印因此我们需要使用accelerate给我们提供的更简洁、安全,会自动只在主进程输出的print方法,仅需将原始的print修改为accelerate.print即可,同时要注意的是我们这里的batch_size将会变为每张卡上加载的大小,如果需要自动划分的话自行除以线程数即可,修改后的完整代码如下:
python
from model.transformer_net import VisonTransformer
from cifar10_dataset import CIFAR10DataLoad
import os
import torch
import numpy as np
import torch.nn as nn
import torch.optim as optim
from tqdm import tqdm
import matplotlib.pyplot as plt
from accelerate import Accelerator
from accelerate.logging import get_logger
# 移除手动GPU设置,让Accelerate管理
# os.environ["CUDA_VISIBLE_DEVICES"] = "4,5"
def train_cifar10(
    root="/home/qi.xiong/Dataset/cifar-10-batches-py", # CIFAR-10数据集根目录
    img_size=224,
    patch_size=16,
    in_channels=3,
    num_features=768,
    depth=12,
    num_heads=12,
    mlp_ratio=4.0,
    qkv_bias=True,
    drop_rate=0.1,
    attn_drop_rate=0.1,
    drop_path_rate=0.1,
    epochs=20,
    batch_size=128,
    num_workers=8,
    lr=1e-4,
    device="cuda"
):
    # 初始化Accelerate
    accelerator = Accelerator()
    device = accelerator.device
    # 使用 accelerator.print() 自动只在主进程输出
    accelerator.print(f"使用设备: {device}")
    accelerator.print(f"分布式训练: {accelerator.num_processes} 个进程")
    # 数据加载
    train_loader, test_loader = CIFAR10DataLoad(root, batch_size, num_workers, img_size)
    num_classes = 10  # CIFAR-10固定10个类别
    input_shape = (in_channels, img_size, img_size)
    accelerator.print(f"训练数据: {len(train_loader.dataset)} 张图像")
    accelerator.print(f"测试数据: {len(test_loader.dataset)} 张图像")
    accelerator.print(f"批次大小: {batch_size}, 训练步数: {len(train_loader)}")
    # 模型
    model = VisonTransformer(
        input_shape=input_shape,
        patch_size=patch_size,
        in_channels=in_channels,
        num_classes=num_classes,
        num_features=num_features,
        depth=depth,
        num_heads=num_heads,
        mlp_ratio=mlp_ratio,
        qkv_bias=qkv_bias,
        drop_rate=drop_rate,
        attn_drop_rate=attn_drop_rate,
        drop_path_rate=drop_path_rate,
        act_layer=nn.GELU,
        norm_layer=nn.LayerNorm
    )
    accelerator.print(f"模型参数量: {sum(p.numel() for p in model.parameters() if p.requires_grad):,}")
    criterion = nn.CrossEntropyLoss()
    optimizer = optim.AdamW(model.parameters(), lr=lr, weight_decay=0.01)
    scheduler = optim.lr_scheduler.CosineAnnealingLR(optimizer, T_max=epochs)
    # 使用Accelerate包装模型、优化器和数据加载器
    model, optimizer, train_loader, test_loader, scheduler = accelerator.prepare(
        model, optimizer, train_loader, test_loader, scheduler
    )
    best_acc = 0
    train_loss_list, test_loss_list = [], []
    train_acc_list, test_acc_list = [], []
    for epoch in range(epochs):
        # 训练阶段
        model.train()
        total_loss, correct, total = 0, 0, 0

        if accelerator.is_local_main_process:
            pbar = tqdm(train_loader, desc=f"Epoch {epoch+1}/{epochs}")
        else:
            pbar = train_loader
        for images, labels in pbar:
            optimizer.zero_grad()
            outputs = model(images)
            loss = criterion(outputs, labels)
            accelerator.backward(loss)
            optimizer.step()
            _, preds = outputs.max(1)
            gathered_loss = accelerator.gather(loss.unsqueeze(0))
            gathered_correct = accelerator.gather(preds.eq(labels).sum().unsqueeze(0))
            gathered_total = accelerator.gather(torch.tensor(labels.size(0)).unsqueeze(0).to(device))
            global_loss = gathered_loss.mean().item()
            global_correct = gathered_correct.sum().item()
            global_total = gathered_total.sum().item()
            global_acc = 100. * global_correct / global_total if global_total > 0 else 0
            total_loss += loss.item() * images.size(0)
            correct += preds.eq(labels).sum().item()
            total += labels.size(0)
            if accelerator.is_local_main_process and hasattr(pbar, 'set_postfix'):
                pbar.set_postfix({
                    'Loss': f'{global_loss:.4f}',
                    'Acc': f'{global_acc:.2f}%'
                })
        train_loss = total_loss / total
        train_acc = correct / total
        train_loss_list.append(train_loss)
        train_acc_list.append(train_acc)
        # 测试阶段
        model.eval()
        test_loss, test_correct, test_total = 0, 0, 0
        with torch.no_grad():
            for images, labels in test_loader:
                outputs = model(images)
                loss = criterion(outputs, labels)
                test_loss += loss.item() * images.size(0)
                _, preds = outputs.max(1)
                test_correct += preds.eq(labels).sum().item()
                test_total += labels.size(0)

        test_loss = test_loss / test_total
        test_acc = test_correct / test_total
        test_loss_list.append(test_loss)
        test_acc_list.append(test_acc)
        # 更新学习率
        scheduler.step()
        current_lr = scheduler.get_last_lr()[0]
        accelerator.print(f"Epoch {epoch+1}: Train Loss={train_loss:.4f}, Train Acc={train_acc:.4f}, "
                  f"Test Loss={test_loss:.4f}, Test Acc={test_acc:.4f}, LR={current_lr:.6f}")

        accelerator.wait_for_everyone()
        if test_acc > best_acc:
            best_acc = test_acc
            accelerator.save_state("best_vit_cifar10")
            accelerator.print(f"保存最优模型,测试准确率: {best_acc:.4f}")
    # 可视化loss和acc
    plt.figure(figsize=(12, 4)
    plt.subplot(1, 2, 1)
    plt.plot(train_loss_list, label="Train Loss")
    plt.plot(test_loss_list, label="Test Loss")
    plt.legend()
    plt.title("Loss Curve")
    plt.xlabel("Epoch")
    plt.ylabel("Loss")

    plt.subplot(1, 2, 2)
    plt.plot(train_acc_list, label="Train Acc")
    plt.plot(test_acc_list, label="Test Acc")
    plt.legend()
    plt.title("Accuracy Curve")
    plt.xlabel("Epoch")
    plt.ylabel("Accuracy")
    accelerator.wait_for_everyone()
    if accelerator.is_local_main_process:
        plt.tight_layout()
        plt.savefig("cifar10_training_curves.png", dpi=300, bbox_inches='tight')
        plt.show()
        accelerator.print(f"训练完成!最优测试准确率: {best_acc:.4f}")
    return model, best_acc
if __name__ == "__main__":
train_cifar10() 完成了训练之后我们便可以使用以下命令开启分布式训练啦!由于我们前面已经使用accelerate config对训练进行了配置因此我们直接启动即可,如果需要使用自定义或者其他位置的配置文件的话手动传入配置文件位置即可
bash
accelerate launch --multi_gpu train.py 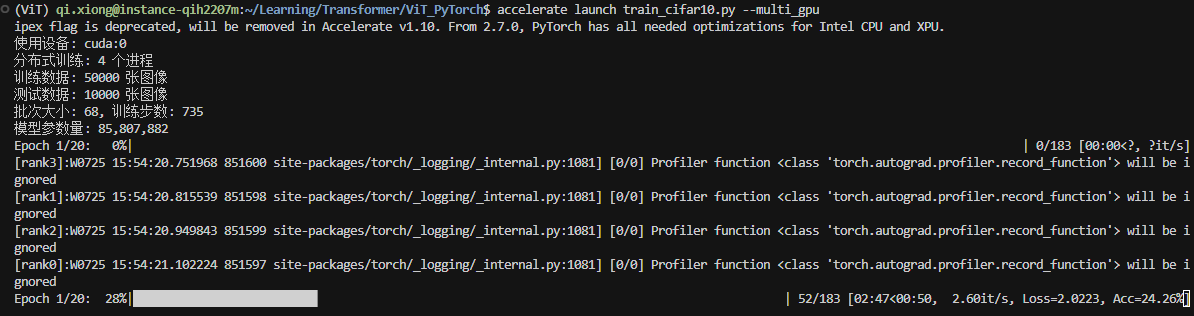
当然,accelerate也支持不提前配置而是直接启动传入参数,具体有哪些参数可以使用大家可以看官方文档启动 Accelerate 脚本 - Hugging Face 机器学习平台或者是使用如下命令
bash
accelerate launch -h