大家好,我是Edison。
上一篇我们学习了Semantic Kernel中的群聊编排模式,它非常适合集思广益、协作解决问题等类型任务场景。今天,我们学习新的模式:移交编排。
移交编排模式简介
在移交(也可以叫做交接)编排模式中,允许各个Agent根据上下文或用户请求相互转移控制权,每个Agent都可以通过适当的专业知识将对话"移交"给另一个Agent,确保每个Agent处理任务的某个指定部分。这种模式非常适合于客户支持(客服)、专家系统或需要动态委派类型的任务场景。
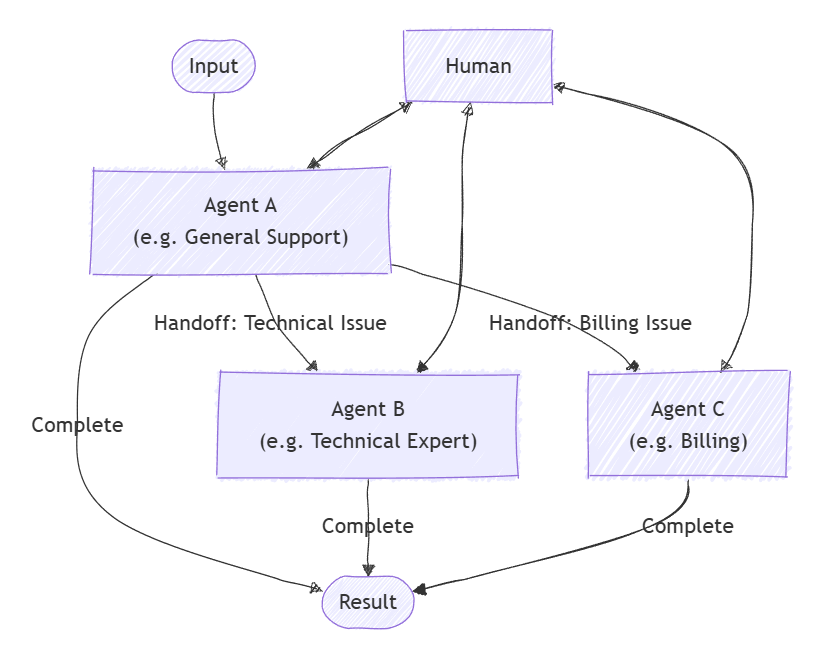
下图展示了一个客户支持的用例场景,当用户提交售后请求,先由某个前台代理(这里是General Support)进行请求分析,并将具体请求转移给某个后台专家(如Technical Expert)或 计费人员(如Billing)。
实现移交编排模式
这里我们来实现一个客户支持的DEMO,假设我们是一个电商的后台客服中心,我们找了一群AI Agent来帮我们进行一些订单查询、退款、退货等通用类请求的客户服务支持。

我们定义4个Agent:
(1)分流客服Agent:负责初步分流客户问题;
(2)订单状态查询Agent:负责处理客户的订单状态查询问题;
(3)订单退货处理Agent:负责处理客户申请的退货请求;
(4)订单退款处理Agent:负责处理客户申请的退款请求;
为了简单地实现这个功能,我们还是创建一个.NET控制台项目,然后安装以下包:
Microsoft.SemanticKernel.Agents.Core
Microsoft.SemanticKernel.Agents.OpenAI (Preview版本)
Microsoft.SemanticKernel.Agents.Orchestration (Preview版本)
Microsoft.SemanticKernel.Agents.Runtime.InProcess (Preview版本)
需要注意的是,由于Semantic Kernel的较多功能目前还处于实验预览阶段,所以建议在该项目的csproj文件中加入以下配置,统一取消警告:
<PropertyGroup>
  <NoWarn>$(NoWarn);CA2007;IDE1006;SKEXP0001;SKEXP0110;OPENAI001</NoWarn>
</PropertyGroup>
创建一个appsettings.json配置文件,填入以下关于LLM API的配置,其中API_KEY请输入你自己的:
{
  "LLM": {
    "BASE_URL": "https://api.siliconflow.cn",
    "API_KEY": "******************************",
    "MODEL_ID": "Qwen/Qwen2.5-32B-Instruct"
  }
}
这里我们使用SiliconCloud提供的 Qwen2.5-32B-Instruct 模型,你可以通过这个URL注册账号:https://cloud.siliconflow.cn/i/DomqCefW 获取大量免费的Token来进行本次实验。
有了LLM API,我们可以创建一个Kernel供后续使用,这也是老面孔了:
Console.WriteLine("Now loading the configuration...");
var config = new ConfigurationBuilder()
    .AddJsonFile($"appsettings.json", optional: false, reloadOnChange: true)
    .Build();
Console.WriteLine("Now loading the chat client...");
var chattingApiConfiguration = new OpenAiConfiguration(
    config.GetSection("LLM:MODEL_ID").Value,
    config.GetSection("LLM:BASE_URL").Value,
    config.GetSection("LLM:API_KEY").Value);
var openAiChattingClient = new HttpClient(new OpenAiHttpHandler(chattingApiConfiguration.EndPoint));
var kernel = Kernel.CreateBuilder()
    .AddOpenAIChatCompletion(chattingApiConfiguration.ModelId, chattingApiConfiguration.ApiKey, httpClient: openAiChattingClient)
    .Build();
接下来,我们就一步一步地来看看核心的代码。
定义4个Agent
这里我们来定义4个Agent:
(1)分流客服Agent: 负责初步分流客户问题;
var triageAgent = new ChatCompletionAgent()
{
    Name = "TriageAgent",
    Description = "处理客户请求",
    Instructions = "一个负责分流客户问题的客服智能体",
    Kernel = kernel.Clone()
};(2)订单状态查询Agent: 负责处理客户的订单状态查询问题;
var statusAgent = new ChatCompletionAgent()
{
    Name = "OrderStatusAgent",
    Description = "一个负责查询订单状态的客服智能体",
    Instructions = "处理订单状态请求",
    Kernel = kernel.Clone()
};
statusAgent.Kernel.Plugins.Add(KernelPluginFactory.CreateFromObject(new OrderStatusPlugin()));(3)订单退货处理Agent :负责处理客户申请的退货请求;
var returnAgent = new ChatCompletionAgent()
{
    Name = "OrderReturnAgent",
    Description = "一个负责处理订单退货的客服智能体",
    Instructions = "处理订单退货并记录退货原因(用户需确认原因:不想要了 或 7天无理由退换 或 没有时间消费)",
    Kernel = kernel.Clone()
};
returnAgent.Kernel.Plugins.Add(KernelPluginFactory.CreateFromObject(new OrderReturnPlugin()));(4)订单退款处理Agent: 负责处理客户申请的退款请求;
var refundAgent = new ChatCompletionAgent()
{
    Name = "OrderRefundAgent",
    Description = "一个负责处理订单退款的客服智能体",
    Instructions = "处理订单退款请求并记录退款原因(用户需确认原因:不想要了 或 7天无理由退换 或 没有时间消费)",
    Kernel = kernel.Clone()
};
refundAgent.Kernel.Plugins.Add(KernelPluginFactory.CreateFromObject(new OrderRefundPlugin()));
需要注意的是:这里多个Agent都有使用Function Calling调用外部方法实现一些功能,所以在Kernel的设置处通过Clone方法实现隔离。
下面是这几个订单帮助的Plugin的定义:
public sealed class OrderRefundPlugin
{
    [KernelFunction]
    public string ProcessReturn(string orderId, string reason) => $"订单 {orderId} 的退款申请已通过!退款理由:{reason}";
}
public sealed class OrderReturnPlugin
{
    [KernelFunction]
    public string ProcessReturn(string orderId, string reason) => $"订单 {orderId} 的退货申请已通过!退货理由:{reason} ";
}
public sealed class OrderStatusPlugin
{
    [KernelFunction]
    public string CheckOrderStatus(string orderId) => $"订单 {orderId} 已发货 并将于 2-3日内送达!";
}
选择编排模式
这里我们选择的是群聊编排模式:HandoffOrchestration,除了将需要编排的4个Agent作为参数传递给它之外,我们还需要定义一个移交流程,让Agent知道他们应该如何实现交接。
var handoffs = OrchestrationHandoffs
        .StartWith(triageAgent)
        .Add(source: triageAgent, targets: [statusAgent, returnAgent, refundAgent]) // 分流客服可交接给状态、退货、退款智能体
        .Add(source: statusAgent, target: triageAgent, "如非订单状态相关问题则交回分流客服")
        .Add(source: returnAgent, target: triageAgent, "如非退货相关问题则交回分流客服")
        .Add(source: refundAgent, target: triageAgent, "如非退款相关问题则交回分流客服");
同时,为了实现聊天记录的存储和监控,自定义一个Monitor类:
public sealed class OrchestrationMonitor
{
    public ChatHistory History { get; } = new ChatHistory();
    public ValueTask ResponseCallback(ChatMessageContent response)
    {
        History.Add(response);
        return ValueTask.CompletedTask;
    }
}
最后,初始化移交编排:
// -- Create the HandoffOrchestration
var orchestration = new HandoffOrchestration(
  handoffs,
  members: [triageAgent, statusAgent, returnAgent, refundAgent])
{
    Name = "CustomerSupportOrchestration",
    Description = "处理客户请求并根据问题类型交接给对应的智能体",
    InteractiveCallback = () =>
    {
        var lastMessage = monitor.History.LastOrDefault();
        Console.WriteLine($"# Agent: \n{lastMessage?.Content}\n");
        Console.WriteLine($"# User:");
        var userInput = Console.ReadLine();
        Console.WriteLine();
        var message = new ChatMessageContent(AuthorRole.User, userInput);
        monitor.History.Add(message);
        return ValueTask.FromResult(message);
    },
    ResponseCallback = monitor.ResponseCallback
};
启动运行时
在Semantic Kernel中,需要运行时(Runtime)才能管理Agent的执行,因此这里我们需要在正式开始前使用InProcessRuntime并启动起来。
// Start the Runtime
var runtime = new InProcessRuntime();
await runtime.StartAsync();
调用编排 并 收集结果
准备工作差不多了,现在我们可以开始调用编排了。这也是老面孔代码了,不过多解释。
唯一需要注意的是:这里设置TimeSpan.FromSeconds(100*3)是为了给足对话时间。
// Start the Chat
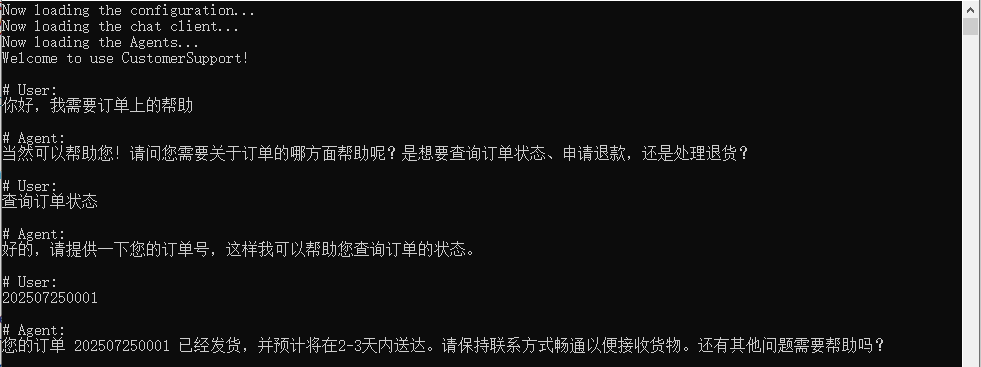
Console.WriteLine($"Welcome to use CustomerSupport!\n");
var task = "你好,我需要订单上的帮助";
Console.WriteLine($"# User: \n{task}\n");
try
{
// Invoke the Orchestration
var result = await orchestration.InvokeAsync(task, runtime);
// Collect Results from multi Agents
var output = await result.GetValueAsync(TimeSpan.FromSeconds(100 * 3));
// Print the Results
Console.WriteLine($"# 处理结果总结: \n{output}\n");
}
catch (HttpOperationException ex)
{
Console.WriteLine($"Exception: {ex.Message}");
}
finally
{
await runtime.RunUntilIdleAsync();
Console.WriteLine($"\n----------See you next time!----------");
Console.ReadKey();
}上面的代码示例中我们给出的第一句话是:"你好,我需要订单上的帮助"来进入客服场景。
效果展示
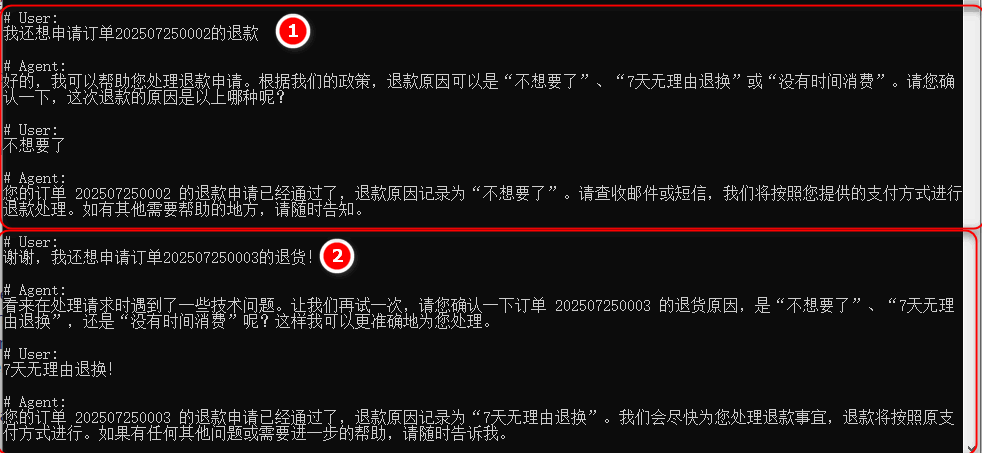
假设我是客户,我有3个订单,想要查询一个订单的状态,以及对另外两个订单进行退款和退货,对话过程如下图所示。
请求1:查询订单状态
请求2&3:申请退款 和 退货
示例源码
GitHub: https://github.com/EdisonTalk/MultiAgentOrchestration
小结
本文介绍了移交编排模式的基本概念,然后通过一个案例介绍了如何实现一个移交编排的经典场景:客户支持,相信通过这个案例你能够有个感性的认识。
下一篇,我们将学习磁性编排模式。
参考资料
Microsoft Learn: https://learn.microsoft.com/zh-cn/semantic-kernel/frameworks/agent/agent-orchestration
推荐学习
圣杰:《.NET+AI | Semantic Kernel入门到精通》

作者:爱迪生
出处:https://edisontalk.cnblogs.com
本文版权归作者和博客园共有,欢迎转载,但未经作者同意必须保留此段声明,且在文章页面明显位置给出原文链接。