前言🐻
类似 Cursor、Trae 此类的编程辅助 AI 已经流行一段时间了,它们能提高我们的编码效率。当你看到 AI 助手敏捷准确地回应指令,是不是好奇背后的原理?
我也有同样的疑问,正巧前段时间,字节旗下的 Trae 公开了核心模块的源码,我在阅读之后进行总结,理解到了此类辅助编程 AI 工具背后的实现原理,希望将其分享出来,所以写了这篇文章。
在这篇文章中,无论你是刚听说过 Agent 的新手,还是渴望深入了解 AI 的探索者,都能轻松跟上节奏。我们会先从基础的 Agent 入手,了解它如何接收和处理指令,接着为它添加调用工具、对话等 "超能力",最终见证一个编程辅助工具的诞生。
第一节:调用 LLM 接口实例🐥
要搭建一个 AI 工具,得先会用它的 "大脑"------ 大语言模型(LLM)。这一节用 OpenAI 接口举个简单例子,带你看看怎么调用 LLM,以及它能做些什么。
准备工作
- python 环境
- 去火山引擎随意找一个大语言模型,获取授权后,在下面的代码中填入 base_url、api_key、model。
- 找到对应模型调用的例子代码
调用示例:让 AI 提取天气查询中的地点和时间
下面代码让 AI 处理用户关于天气的询问,从中提取出地点和时间,并以 JSON 格式输出,直观展示 LLM 的信息提取能力:
python
from openai import OpenAI

env = parse_env_file()
base_url = ""
api_key = ""
model = ""

client = OpenAI(
    base_url=base_url,
    api_key=api_key,
)

messages = [
    {"role": "system", "content": "分析用户关于天气的询问,用JSON格式输出,包含'地点'、'时间'两个键,每个键的值为对应的描述"},
    {"role": "user", "content": "今天北京天气如何?"}
]

if __name__ == "__main__":
    completion = client.chat.completions.create(
        model=model,
        messages=messages,
    )
    print(completion.choices[0].message.content)
    # 运行后可能得到这样的结果: {"地点": "北京", "时间": "今天"}
LLM 的核心能力在这里体现
从这个例子能看出 LLM 的能力:
- 信息提取:能从用户的自然语言询问中挑出地点和时间信息
- 按格式输出:严格按照要求以 JSON 格式呈现,方便后续程序处理(前提是选用的 LLM 足够智能,不然它很可能会返回一个不能解析为 JSON 的字符串。为了强制输出 JSON,调用的方法基本都内置了是否要输出为 JSON 的配置项)
- 多信息处理:即使一句话中包含多个地点和时间,也能对应和区分
这就是 Trae 的基础 ------ 调用 LLM 接口,让机器理解并处理用户需求中的关键信息。下一节会给它加 "自主决策" 功能,让它从 "被动提取信息" 变 "主动完成任务"。
第二节:调用工具的实例🐣
有了 LLM 处理信息的基础,接下来我们要给它配上 "工具包"------ 让 AI 能根据需求主动调用外部工具,完成更复杂的任务。这一节我们就来实现两个常用工具:查询天气预报和数字相加,并演示 AI 如何根据用户指令选择合适的工具。
工具定义。首先,我们需要定义两个工具函数,分别处理天气查询和数字相乘:
python
def get_current_weather(location, unit="摄氏度"):
    # 实际调用天气查询 API 的逻辑
    # 此处为示例,返回模拟的天气数据
    return f"{location}今天天气晴朗,温度 25 {unit}。"


def multiplication(a, b):
    return a * b
让 AI 决定调用哪个工具。接下来,我们需要让 LLM 理解工具的功能,并根据用户的问题判断该调用哪个工具。这里我们通过设计 Prompt 来实现这一点:
python
import json
from openai import OpenAI

# LLM Client 参数
env = parse_env_file()
base_url = ""
api_key = ""
model = ""

client = OpenAI(
    base_url=base_url,
    api_key=api_key,
)

def get_current_weather(location, unit="摄氏度"):
    # 实际调用天气查询 API 的逻辑
    # 此处为示例,返回模拟的天气数据
    return f"{location}今天天气晴朗,温度 25 {unit}。"


def multiplication(a, b):
    return a * b

tools = [
    {
        "type": "function",
        "function": {
            "name": "get_current_weather",
            "description": "获取指定地点的天气信息,支持摄氏度和华氏度两种单位",
            "parameters": {
                "type": "object",
                "properties": {
                    "location": {
                        "type": "string",
                        "description": "地点的位置信息,例如北京、上海"
                    },
                    "unit": {
                        "type": "string",
                        "enum": ["摄氏度", "华氏度"],
                        "description": "温度单位,可选值为摄氏度或华氏度"
                    }
                },
                "required": ["location"]
            }
        }
    },
    {
        "type": "function",
        "function": {
            "name": "multiplication",
            "description": "计算两个数的乘积并返回结果",
            "parameters": {
                "type": "object",
                "properties": {
                    "a": {
                        "type": "number",
                        "description": "参与乘法运算的第一个数"
                    },
                    "b": {
                        "type": "number",
                        "description": "参与乘法运算的第二个数"
                    }
                },
                "required": ["a", "b"]
            }
        }
    }
]

messages = [
    # {"role": "user", "content": "5乘以6结果是多少?"},
    {"role": "user", "content": "北京今天多少度?"}
]

if __name__ == "__main__":
    completion = client.chat.completions.create(
        # 指定您创建的方舟推理接入点 ID,此处已帮您修改为您的推理接入点 ID
        model=model,
        messages=messages,
        tools=tools
    )

    tool_call = completion.choices[0].message.tool_calls[0]
    # 工具名称
    tool_name = tool_call.function.name
    # 如果判断需要调用查询天气工具,则运行查询天气工具
    if tool_name == "get_current_weather":
        arguments = json.loads(tool_call.function.arguments)
        tool_result = get_current_weather(**arguments)
        print(tool_result)
    # 假如是要算乘法
    elif tool_name == "multiplication":
        arguments = json.loads(tool_call.function.arguments)
        tool_result = multiplication(**arguments)
        print(tool_result)
运行上述代码,你会得到类似这样的输出:
python
调用get_weather的结果:深圳今天天气晴朗,温度 25 摄氏度。
调用 multiplication 的结果:30
从这个例子中,我们可以看到工具调用的关键步骤:
-
定义工具 :明确每个工具的功能、输入参数和返回值
-
告诉 AI 工具信息 :通过 Prompt 让 LLM 知道有哪些工具可用,以及如何调用
-
AI 决策 :LLM 根据用户的问题,判断需要调用哪个工具,并生成对应的参数
-
执行工具调用 :根据 AI 的决策,调用相应的工具函数,并返回结果
有了工具调用能力,AI 就从单纯的信息处理者变成了能实际解决问题的助手。下一节,我们会将这些能力整合起来,构建一个简单的 Agent。
第三节:工具调用的原理🐷
上一节我们演示了 AI 如何调用天气预报和数字相加的工具,可能你会好奇:这背后的核心逻辑到底是什么?其实说穿了很简单 --------- 工具调用的本质,还是通过精心设计的 Prompt,引导 LLM 完成 "理解工具→选择工具→生成参数" 的全过程。
用 Prompt 让 AI "认识" 工具:就像给新人发工具说明书,我们在 Prompt 里写明工具信息:比如 get_weather 能查天气,需 location 和 date 参数;add_numbers 能做加法,需 a 和 b 参数。这些 "工具清单" 会让 LLM 提前 "记住" 工具特性。
用 Prompt 让 AI "选择" 工具:用户提问时,Prompt 会引导 LLM 对照工具清单做判断:问天气就选 get_weather,问加法就选 add_numbers ,并限制 "只能从清单里选"。
用 Prompt 让 AI "生成" 参数:选好工具后,Prompt 要求 LLM 从问题中提取参数并整理成 JSON。比如从 "北京明天的天气" 中拆出 location="北京" 和 date="明天",确保后续程序能直接使用。
简化的 Prompt 是这样的模板:
js
你现在需要处理用户的问题,可用工具如下:
{工具清单,包含名称、功能、参数要求}
请按以下步骤处理:
1. 分析用户问题,判断需要调用哪个工具
2. 从问题中提取工具所需的参数
3. 按这个格式返回结果:{"tool": "工具名", "parameters": {参数键值对}}是不是很简单?所谓的工具选择、总结参数,只不过是用 Prompt 包了一层。整个工具调用的流程,就是靠这样的 Prompt "指挥" LLM 完成的。没有高深的算法,没有复杂的黑科技,核心就是让大语言模型的理解能力和工具的执行能力结合起来。
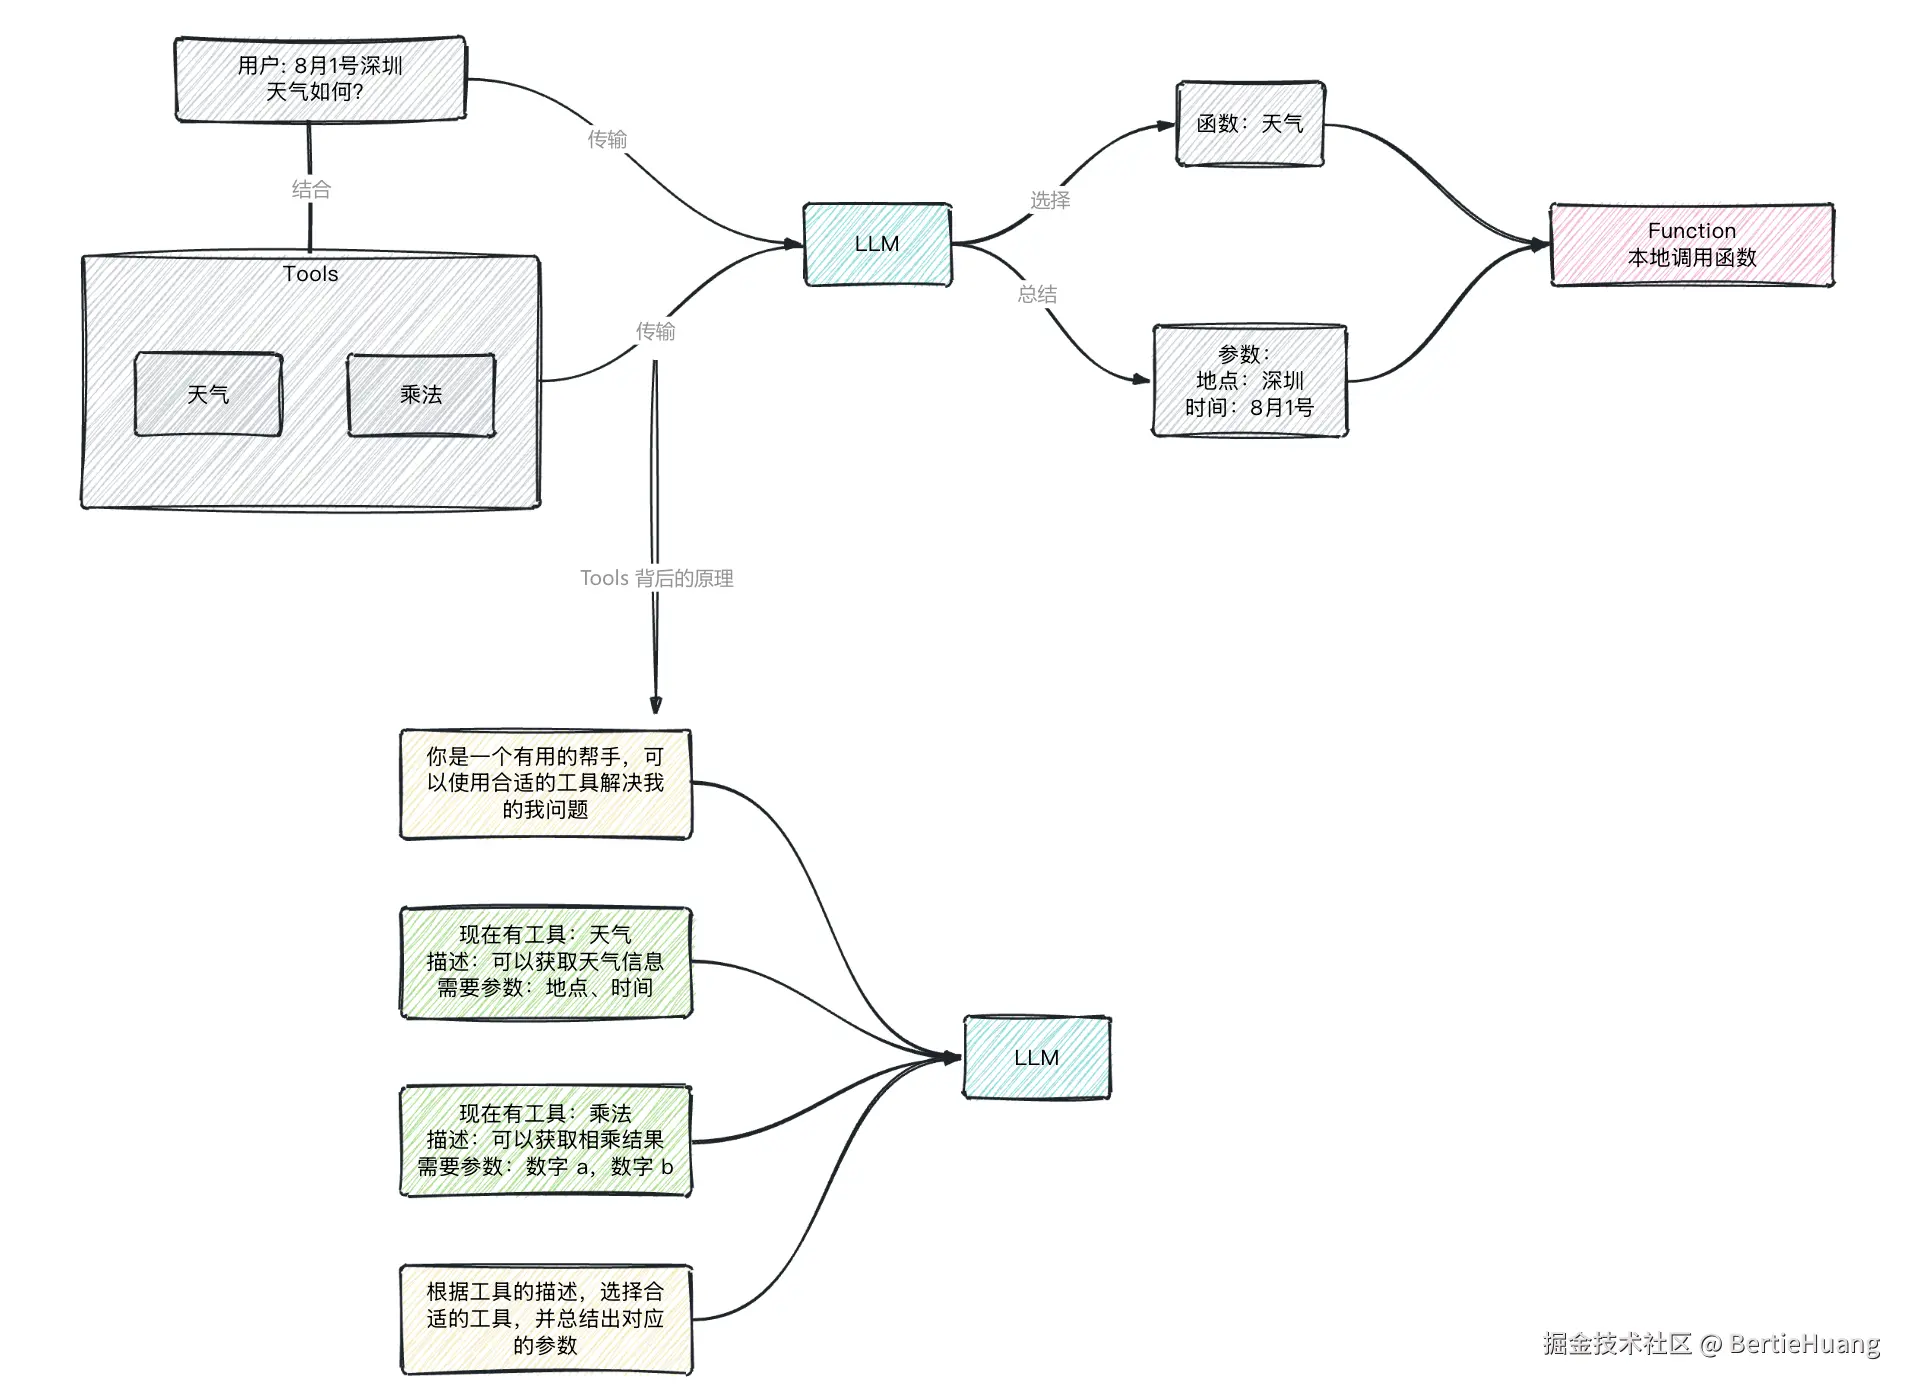
理解了这个原理,你就能明白:只要掌握了 Prompt 的设计技巧,理论上可以让 AI 调用任何工具 ------ 无论是查天气、算数字,还是调用数据库、发送邮件,甚至控制硬件设备。下一节,我们会基于这个原理,把 LLM 和工具调用整合起来,搭建一个更智能的 agent。
第四节:Bash Tool 🦄
前面我们了解了工具调用的通用原理,现在让我们聚焦 Trae 这款强大的工具,来看看它核心的 Bash Tool 是如何工作的。Trae 作为一款与 AI 深度集成的开发助手,能让开发者通过自然语言指令完成复杂的软件工程任务, Bash Tool 在其中扮演着关键角色。
首先,一个工具无非 3 个因素:1、函数描述;2:参数描述;3:执行函数。在源码中, Bash Tool 的函数描述是:
python
description = """Run commands in a bash shell
* When invoking this tool, the contents of the "command" parameter does NOT need to be XML-escaped.
* You have access to a mirror of common linux and python packages via apt and pip.
* State is persistent across command calls and discussions with the user.
* To inspect a particular line range of a file, e.g. lines 10-25, try 'sed -n 10,25p /path/to/the/file'.
* Please avoid commands that may produce a very large amount of output.
* Please run long lived commands in the background, e.g. 'sleep 10 &' or start a server in the background.
"""
翻译为中文是:
ini
 description = """在 bash shell 中运行命令

 调用此工具时,"command" 参数的内容无需进行 XML 转义。
 你可以通过 apt 和 pip 访问常见的 Linux 和 Python 软件包镜像。
 状态在命令调用和与用户的对话过程中是持久的。
 若要查看文件的特定行范围(例如第 10-25 行),可以尝试使用命令 "sed -n 10,25p /path/to/the/file"。
 请避免使用可能产生大量输出的命令。
 请在后台运行长时间运行的命令,例如 "sleep 10 &" 或在后台启动服务器。"""
总结就是根据用户的意思,拟 Bash Command 并执行。下一步我们来看参数描述:
python
tools = [
    {
        "type": "function",
        "function": {
            "name": "bash",
            "description": description,
            "parameters": {
                "type": "object",
                "properties": {
                    "command": {
                        "type": "string",
                        "description": "The bash command to run."
                    },
                    "restart": {
                        "type": "boolean",
                        "description": "Set to true to restart the bash session."
                    }
                },
                "required": ["command", "restart"]
            }
        }
    }
]
Command 很好理解,就是运行的 Bash 命令。 Restart 描述的是新开一个 Bash Session,可以理解为新开一个终端窗口,每一个 Session 内维护着 Bash 的上下文关系,比如环境变量和当前目录。
有了工具描述和参数,那么下面就是执行函数。这里包含一个数据类,用于描述工具函数执行的结果。主体是 execute 函数,在这个函数里,获取到 LLM 总结出来的参数,然后传给 run_bash 函数执行:
python
@dataclass
class ToolExecResult:
    """Intermediate result of a tool execution."""

    output: str | None = None
    error: str | None = None
    error_code: int = 0

async def execute(arguments):
    # 源码中的 session 维护逻辑比较复杂,并非必须实现,放在文中反倒会影响理解,在此略过
    # if arguments.get("restart"):
    #     if self._session:
    #         self._session.stop()
    #     self._session = _BashSession()
    #     await self._session.start()
    #
    #     return ToolExecResult(output="tool has been restarted.")

    command = str(arguments["command"]) if "command" in arguments else None

    if command is None:
         return ToolExecResult(
                error=f"No command provided for the bash tool",
                error_code=-1,
            )
    try:
        return await run_bash(command)
    except Exception as e:
        return ToolExecResult(error=f"Error running bash command: {e}", error_code=-1)
接着是执行 Bash 函数。这个函数中,主要做 2 个事情,第一是命令的执行,然后返回执行输出,这是主要的核心功能。第二是 Sentinel,用于辅助标识命令的执行完成信息,非必须。
python
async def run_bash(command: str):
    """
    异步执行Bash命令并获取输出结果和错误信息

    该函数通过创建子进程运行Bash命令,使用特殊标记(sentinel)跟踪命令执行完成状态,
    并捕获命令的返回码、标准输出和标准错误。适用于需要异步执行Shell命令的场景。

    如果没有这个标记,程序无法区分 "命令还在运行,后续还有输出" 和 "命令已经结束"。
    比如执行echo "hello",输出是hello,程序看到这个输出后,无法确定是不是还有后续内容;
    但加上sentinel后,输出会是hello,,,,bash-command-exit-0-banner,,,,,程序看到标记就知道命令已结束,hello是有效输出,返回码是0。
    """
    # 输出检查延迟时间(秒),避免过于频繁地检查输出缓冲区
    _output_delay: float = 0.2
    # 命令执行超时时间(秒),超过此时长将终止等待
    _timeout: float = 120.0
    # 命令执行结束的标记字符串,用于识别命令何时完成
    # 其中__ERROR_CODE__会被替换为实际的错误码变量($?或!errorlevel!)
    _sentinel: str = ",,,,bash-command-exit-__ERROR_CODE__-banner,,,,"

    # 创建Bash子进程,配置输入输出管道
    # shell=True表示通过shell执行命令
    # stdin=PIPE: 允许向子进程输入数据
    # stdout=PIPE: 捕获子进程的标准输出
    # stderr=PIPE: 捕获子进程的标准错误
    # preexec_fn=os.setsid: 在Unix系统中创建新的进程组,避免信号干扰
    _process = await asyncio.create_subprocess_shell(
        "/bin/bash",
        shell=True,
        bufsize=0,  # 无缓冲,实时读写
        stdin=asyncio.subprocess.PIPE,
        stdout=asyncio.subprocess.PIPE,
        stderr=asyncio.subprocess.PIPE,
        preexec_fn=os.setsid,
    )

    # 类型断言:确保输入输出管道已正确创建(非None)
    assert _process.stdin
    assert _process.stdout
    assert _process.stderr

    # 初始化命令返回码
    error_code = 0

    # 解析标记字符串,分离出错误码前后的部分
    # 例如将",,,,bash-command-exit-__ERROR_CODE__-banner,,,"拆分为:
    # sentinel_before = ",,,,bash-command-exit-"
    # pivot = "__ERROR_CODE__"
    # sentinel_after = "-banner,,,,"
    sentinel_before, pivot, sentinel_after = _sentinel.partition("__ERROR_CODE__")
    # 确保成功拆分出了__ERROR_CODE__部分
    assert pivot == "__ERROR_CODE__"

    # 根据操作系统类型选择错误码获取方式
    # Windows使用!errorlevel!,Unix-like系统使用$?
    errcode_retriever = "!errorlevel!" if os.name == "nt" else "$?"
    # 选择命令分隔符,Windows使用&,Unix-like系统使用;
    command_sep = "&" if os.name == "nt" else ";"

    # 向子进程的标准输入写入命令
    # 命令格式:[用户命令] [分隔符] echo [替换了错误码变量的标记]
    # 例如:ls -l ; echo ,,,,bash-command-exit-$?-banner,,,,
    _process.stdin.write(
        command.encode()  # 将命令字符串编码为字节流
        + f"{command_sep} echo {_sentinel.replace('__ERROR_CODE__', errcode_retriever)}\n".encode()
    )

    # 确保数据被真正发送到子进程
    await _process.stdin.drain()

    # 读取子进程输出,直到发现结束标记
    try:
        # 设置超时上下文管理器,超过指定时间未完成则抛出TimeoutError
        async with asyncio.timeout(_timeout):
            while True:
                # 等待一小段时间再检查输出,减少CPU占用
                await asyncio.sleep(_output_delay)
                # 直接读取标准输出缓冲区的内容
                output: str = _process.stdout._buffer.decode()
                # 检查是否已出现标记的前半部分,判断命令是否已执行完成
                if sentinel_before in output:
                    # 从输出中分离出实际命令输出和标记部分
                    # rpartition从右侧查找分隔符,确保只拆分一次
                    output, pivot, exit_banner = output.rpartition(sentinel_before)
                    assert pivot  # 确保成功拆分

                    # 从标记部分提取错误码
                    error_code_str, pivot, _ = exit_banner.partition(sentinel_after)
                    # 验证错误码格式是否正确(必须是数字)
                    if not pivot or not error_code_str.isdecimal():
                        continue  # 格式不正确则继续等待

                    # 将错误码转换为整数
                    error_code = int(error_code_str)
                    break  # 成功获取结果,退出循环

    except asyncio.TimeoutError:
        # 标记超时状态
        _timed_out = True
        # 抛出超时错误,说明命令执行时间过长
        raise f"timed out: bash has not returned in {_timeout} seconds and must be restarted" from None

    # 处理输出:移除末尾的换行符(如果存在)
    if output.endswith("\n"):
        output = output[:-1]

    # 读取标准错误缓冲区的内容
    error: str = _process.stderr._buffer.decode()
    # 处理错误输出:移除末尾的换行符(如果存在)
    if error.endswith("\n"):
        error = error[:-1]

    # 清空输出和错误缓冲区,确保下次执行命令时不会受到残留数据影响
    _process.stdout._buffer.clear()
    _process.stderr._buffer.clear()

    return ToolExecResult(output=output, error=error,
                          error_code=error_code)
Bash Tool 的主要素我已经向你介绍完了,下面是该工具完整的代码例子,你需要修改 messages 中 的 content 适配你的实际情况,来让工具来替你执行 Bash 命令:
python
import asyncio
import json
import os
from dataclasses import dataclass
from openai import OpenAI

base_url = ""
api_key = ""
model = ""

client = OpenAI(
    base_url=base_url,
    api_key=api_key,
)


@dataclass
class ToolExecResult:
    """Intermediate result of a tool execution."""

    output: str | None = None
    error: str | None = None
    error_code: int = 0


description = """Run commands in a bash shell
* When invoking this tool, the contents of the "command" parameter does NOT need to be XML-escaped.
* You have access to a mirror of common linux and python packages via apt and pip.
* State is persistent across command calls and discussions with the user.
* To inspect a particular line range of a file, e.g. lines 10-25, try 'sed -n 10,25p /path/to/the/file'.
* Please avoid commands that may produce a very large amount of output.
* Please run long lived commands in the background, e.g. 'sleep 10 &' or start a server in the background.
"""

tools = [
    {
        "type": "function",
        "function": {
            "name": "bash",
            "description": description,
            "parameters": {
                "type": "object",
                "properties": {
                    "command": {
                        "type": "string",
                        "description": "The bash command to run."
                    },
                    "restart": {
                        "type": "boolean",
                        "description": "Set to true to restart the bash session."
                    }
                },
                "required": ["command", "restart"]
            }
        }
    }
]

async def run_bash(command: str):
    """
    异步执行Bash命令并获取输出结果和错误信息

    该函数通过创建子进程运行Bash命令,使用特殊标记(sentinel)跟踪命令执行完成状态,
    并捕获命令的返回码、标准输出和标准错误。适用于需要异步执行Shell命令的场景。

    如果没有这个标记,程序无法区分 "命令还在运行,后续还有输出" 和 "命令已经结束"。
    比如执行echo "hello",输出是hello,程序看到这个输出后,无法确定是不是还有后续内容;
    但加上sentinel后,输出会是hello,,,,bash-command-exit-0-banner,,,,,程序看到标记就知道命令已结束,hello是有效输出,返回码是0。
    """
    # 输出检查延迟时间(秒),避免过于频繁地检查输出缓冲区
    _output_delay: float = 0.2
    # 命令执行超时时间(秒),超过此时长将终止等待
    _timeout: float = 120.0
    # 命令执行结束的标记字符串,用于识别命令何时完成
    # 其中__ERROR_CODE__会被替换为实际的错误码变量($?或!errorlevel!)
    _sentinel: str = ",,,,bash-command-exit-__ERROR_CODE__-banner,,,,"

    # 创建Bash子进程,配置输入输出管道
    # shell=True表示通过shell执行命令
    # stdin=PIPE: 允许向子进程输入数据
    # stdout=PIPE: 捕获子进程的标准输出
    # stderr=PIPE: 捕获子进程的标准错误
    # preexec_fn=os.setsid: 在Unix系统中创建新的进程组,避免信号干扰
    _process = await asyncio.create_subprocess_shell(
        "/bin/bash",
        shell=True,
        bufsize=0,  # 无缓冲,实时读写
        stdin=asyncio.subprocess.PIPE,
        stdout=asyncio.subprocess.PIPE,
        stderr=asyncio.subprocess.PIPE,
        preexec_fn=os.setsid,
    )

    # 类型断言:确保输入输出管道已正确创建(非None)
    assert _process.stdin
    assert _process.stdout
    assert _process.stderr

    # 初始化命令返回码
    error_code = 0

    # 解析标记字符串,分离出错误码前后的部分
    # 例如将",,,,bash-command-exit-__ERROR_CODE__-banner,,,"拆分为:
    # sentinel_before = ",,,,bash-command-exit-"
    # pivot = "__ERROR_CODE__"
    # sentinel_after = "-banner,,,,"
    sentinel_before, pivot, sentinel_after = _sentinel.partition("__ERROR_CODE__")
    # 确保成功拆分出了__ERROR_CODE__部分
    assert pivot == "__ERROR_CODE__"

    # 根据操作系统类型选择错误码获取方式
    # Windows使用!errorlevel!,Unix-like系统使用$?
    errcode_retriever = "!errorlevel!" if os.name == "nt" else "$?"
    # 选择命令分隔符,Windows使用&,Unix-like系统使用;
    command_sep = "&" if os.name == "nt" else ";"

    # 向子进程的标准输入写入命令
    # 命令格式:[用户命令] [分隔符] echo [替换了错误码变量的标记]
    # 例如:ls -l ; echo ,,,,bash-command-exit-$?-banner,,,,
    _process.stdin.write(
        command.encode()  # 将命令字符串编码为字节流
        + f"{command_sep} echo {_sentinel.replace('__ERROR_CODE__', errcode_retriever)}\n".encode()
    )

    # 确保数据被真正发送到子进程
    await _process.stdin.drain()

    # 读取子进程输出,直到发现结束标记
    try:
        # 设置超时上下文管理器,超过指定时间未完成则抛出TimeoutError
        async with asyncio.timeout(_timeout):
            while True:
                # 等待一小段时间再检查输出,减少CPU占用
                await asyncio.sleep(_output_delay)
                # 直接读取标准输出缓冲区的内容
                output: str = _process.stdout._buffer.decode()
                # 检查是否已出现标记的前半部分,判断命令是否已执行完成
                if sentinel_before in output:
                    # 从输出中分离出实际命令输出和标记部分
                    # rpartition从右侧查找分隔符,确保只拆分一次
                    output, pivot, exit_banner = output.rpartition(sentinel_before)
                    assert pivot  # 确保成功拆分

                    # 从标记部分提取错误码
                    error_code_str, pivot, _ = exit_banner.partition(sentinel_after)
                    # 验证错误码格式是否正确(必须是数字)
                    if not pivot or not error_code_str.isdecimal():
                        continue  # 格式不正确则继续等待

                    # 将错误码转换为整数
                    error_code = int(error_code_str)
                    break  # 成功获取结果,退出循环

    except asyncio.TimeoutError:
        # 标记超时状态
        _timed_out = True
        # 抛出超时错误,说明命令执行时间过长
        raise f"timed out: bash has not returned in {_timeout} seconds and must be restarted" from None

    # 处理输出:移除末尾的换行符(如果存在)
    if output.endswith("\n"):
        output = output[:-1]

    # 读取标准错误缓冲区的内容
    error: str = _process.stderr._buffer.decode()
    # 处理错误输出:移除末尾的换行符(如果存在)
    if error.endswith("\n"):
        error = error[:-1]

    # 清空输出和错误缓冲区,确保下次执行命令时不会受到残留数据影响
    _process.stdout._buffer.clear()
    _process.stderr._buffer.clear()

    return ToolExecResult(output=output, error=error,
                          error_code=error_code)


async def execute(arguments):
    # 源码中的 session 维护逻辑比较复杂,并非必须实现,放在文中反倒会影响理解,在此略过
    # if arguments.get("restart"):
    #     if self._session:
    #         self._session.stop()
    #     self._session = _BashSession()
    #     await self._session.start()
    #
    #     return ToolExecResult(output="tool has been restarted.")

    command = str(arguments["command"]) if "command" in arguments else None

    if command is None:
         return ToolExecResult(
                error=f"No command provided for the bash tool",
                error_code=-1,
            )
    try:
        return await run_bash(command)
    except Exception as e:
        return ToolExecResult(error=f"Error running bash command: {e}", error_code=-1)


if __name__ == "__main__":
    messages = [
        {"role": "user", "content": "在 /root 目录下新建 hello.txt 文件"}
    ]

    completion = client.chat.completions.create(
        model=model,
        messages=messages,
        tools=tools
    )

    tool_call = completion.choices[0].message.tool_calls[0]
    # 工具名称
    tool_name = tool_call.function.name
    if tool_name == "bash":
        arguments = json.loads(tool_call.function.arguments)
        # {'command': 'touch /root/hello.txt', 'restart': False}
        result = asyncio.run(execute(arguments))
至此该系列的第一章结束,这一章中我向你描述了 Agent 和其工具的使用方法和原理,还有 Trae 核心的工具之一:Bash Tool。在下一篇中,我将继续向你介绍 Trae 其他的核心工具。假如在阅读过程中碰到任何问题,都欢迎在评论区留言,我会尽快回复。
Trae Agent 源码地址:github.com/bytedance/t...
源码量在 3000 行左右,压力较小,推荐阅读。