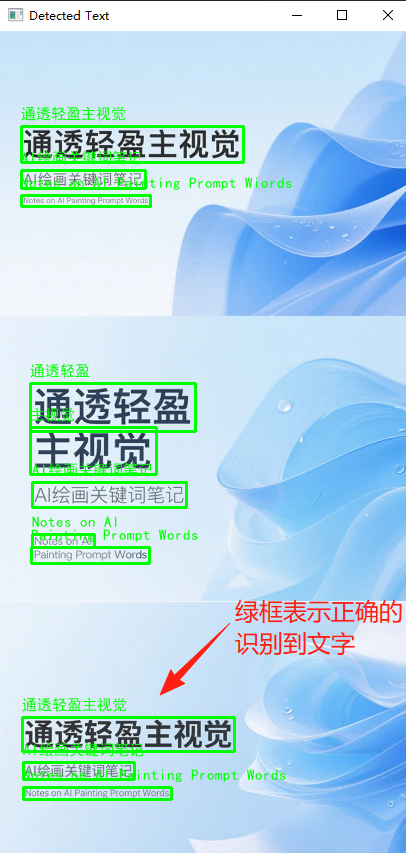
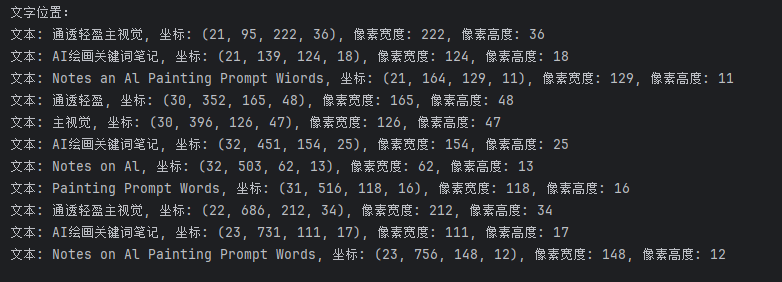
同时还 计算出坐标及字体大小
bash
from cnocr import CnOcr
import cv2
import numpy as np
from PIL import Image, ImageDraw, ImageFont

# 初始化 cnocr
ocr = CnOcr()


def put_chinese_text(image, text, position, font_size=20, color=(0, 255, 0)):
    """
    在图像上绘制中文文本
    """
    # 将OpenCV的BGR图像转换为RGB图像
    image_pil = Image.fromarray(cv2.cvtColor(image, cv2.COLOR_BGR2RGB))

    # 设置字体,需要系统中有支持中文的字体
    try:
        # Windows系统常用字体
        font = ImageFont.truetype("simhei.ttf", font_size)
    except:
        try:
            # 尝试其他常见中文字体
            font = ImageFont.truetype("arial.ttf", font_size)
        except:
            # 如果找不到特定字体,使用默认字体
            font = ImageFont.load_default()

    # 创建绘图对象
    draw = ImageDraw.Draw(image_pil)

    # 绘制文本
    draw.text(position, text, font=font, fill=color)

    # 转换回OpenCV格式
    image_cv = cv2.cvtColor(np.asarray(image_pil), cv2.COLOR_RGB2BGR)

    return image_cv


def detect_text_positions(image_path):
    """检测图片中的文字位置"""
    # 加载图片
    image = cv2.imread(image_path)
    gray = cv2.cvtColor(image, cv2.COLOR_BGR2GRAY)

    # 使用 cnocr 检测文字
    results = ocr.ocr(gray)  # 使用 ocr.ocr 而不是 ocr.ocr_for_single_line

    # 保存文字框
    text_positions = []
    for result in results:
        text = result['text']
        bbox = result['position']
        x_min, y_min = bbox[0]
        x_max, y_max = bbox[2]
        x, y, w, h = int(x_min), int(y_min), int(x_max - x_min), int(y_max - y_min)

        # 计算文字的像素宽度和高度
        pixel_width = w
        pixel_height = h

        text_positions.append({
            "text": text,
            "bbox": (x, y, w, h),
            "pixel_width": pixel_width,
            "pixel_height": pixel_height
        })

        # 在图片上绘制文字框
        cv2.rectangle(image, (x, y), (x + w, y + h), (0, 255, 0), 2)
        # 使用支持中文的函数绘制文本
        image = put_chinese_text(image, text, (x, y - 20), font_size=15, color=(0, 255, 0))

    return image, text_positions


def main(image_path):
    """主函数:检测文字位置"""
    # 检测文字
    text_image, text_positions = detect_text_positions(image_path)

    # 显示结果
    cv2.imshow("Detected Text", text_image)
    cv2.waitKey(0)
    cv2.destroyAllWindows()

    # 打印文字位置及尺寸信息
    print("文字位置:")
    for text_pos in text_positions:
        print(f"文本: {text_pos['text']}, 坐标: {text_pos['bbox']}, "
              f"像素宽度: {text_pos['pixel_width']}, 像素高度: {text_pos['pixel_height']}")

    return {"text_positions": text_positions}


if __name__ == "__main__":
    image_path = "6.png"  # 替换为你的图片路径
    results = main(image_path)