前言
(Bloom)泛光是后处理中最常用的技术之一,通过提升超过阈值部位的亮度,并模拟高亮部分向周围扩散光晕的效果,能够让整个场景更梦幻、更有真实感,极大的提升了视觉表现力。
Bloom的原理并不复杂,就是将超过阈值的高亮像素提取出来,用高斯模糊过滤后,再和原图叠加,以达到增强高亮和向周围扩散的效果。
所以我认为,了解Bloom的原理非常有必要,在Three.js的开发中,对于隧道、城市、地下、夜晚等一些场景,使用Bloom可以让很大程度的提升渲染效果。恰好Three.js中有两种Bloom后处理方式,BloomPass和UnrealBloomPass,两种方式的实现非常不同,UnrealBloomPass的渲染效果明显更好,这里我们用Three.js官方实例中的法拉利车做一个对比。 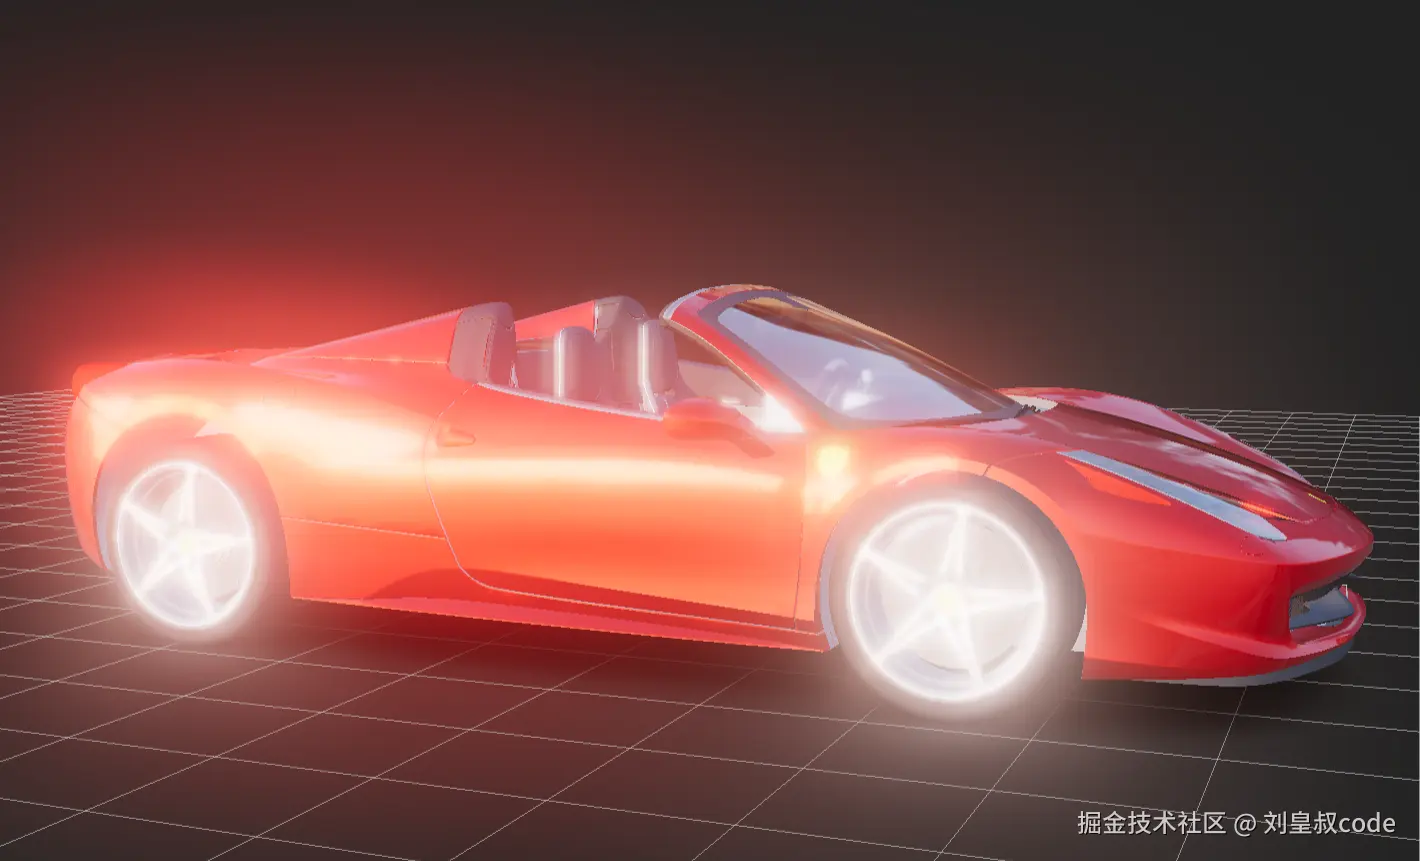 UnrealBloomPass
 BloomPass
从上面例子看来,BloomPass的效果非常差,完全没有达到泛光的效果,而且画面非常模糊,这是因为Bloom直接将一个高斯模糊后的图像与原图混合,在这个场景中就导致画面非常模糊。UnrealBloomPass的效果不错,它具有以下特征:
- 高亮的区域足够亮;
- 光扩散的范围足够大;
- 光晕的过度比较自然。
所以接下来,我们来分析UnrealBloomPass的效果是如何达到的。
bloom的原理及源码分析
1.识别高亮区域
这一步比较简单,就是根据一个设置的阈值将原图上亮度超过阈值的像素提取出来,低于这个阈值的像素直接去掉,渲染输出到一张纹理上。
glsl
// 原图的纹理
uniform sampler2D tDiffuse;
uniform vec3 defaultColor;
uniform float defaultOpacity;
// 阈值
uniform float luminosityThreshold;
//平滑过渡的区域
uniform float smoothWidth;

varying vec2 vUv;

void main() {

    vec4 texel = texture2D( tDiffuse, vUv );

    float v = luminance( texel.xyz );

    vec4 outputColor = vec4( defaultColor.rgb, defaultOpacity );

    float alpha = smoothstep( luminosityThreshold, luminosityThreshold + smoothWidth, v );

    gl_FragColor = mix( outputColor, texel, alpha );

}
2.高光扩散------下采样
要形成高光的扩散效果,原理就是对高光区域进行模糊处理,模糊滤波本质上就是将一个像素和它周围的像素进行加权平均,比如这个像素本来很暗,但周围有高光像素,这样一平均,这个像素也就变亮了,这就形成了高光的扩散效果。
想要高光扩散的范围比较大,就需要这个"周围"的范围比较大,也就是滤波的kernel尺寸比较大。但是扩大kernel尺寸肯定要增加很大的性能开销,想要快速查询更大范围的加权平均值,这就需要采用mipmap的思想。mipmap将形成一个金字塔结构,每一级mipmap图像的长宽都是上一级图像的1/2,像素值都是上一级图像2x2像素的加权平均值。查询高层级的mipmap图像得到的像素值近似相当于查询低层级图像的加权平均值。
在纹理渲染时,通常需要设置gl.TEXTURE_MIN_FILTER,代表将大纹理渲染到小屏幕时,采用怎样的过滤方式,如果选择了使用mipmap,比如gl.LINEAR_MIPMAP_LINEAR,就需要执行gl.generateMipmap()来生成的mipmap,但是这里生成的mipmap只能在这个纹理最终渲染时由系统自动查询并插值计算最终渲染到屏幕的像素值,我们不能使用mipmap某个层级的图像。所以如果我们要使用mipmap中某个层级的图像,只能我们自己手动生成mipmap。
自己生成mipmap的方式就是下采样,将原图像渲染到长宽都是原图1/2的纹理上,依次缩小,比如1024×1024到512×512、512×512到256×256、......,依此类推。这个渲染到纹理时要将gl.TEXTURE_MIN_FILTER设置成gl.GL_LINEAR,恰好Three.js中WebGLRenderTarget的默认设置就是gl.GL_LINEAR。所以我们就需要依此使用WebGLRenderTarget渲染到比之前缩小的纹理上。
但是gl.GL_LINEAR采用的双线性插值,取周围4个纹素的加权平均值本质上是一个2×2的box滤波,为了更平滑,这里就采用更高级的滤波核,那就是在下采样时使用高斯模糊。
下面看下源码:
js
//nMips为5,一共五层,创建五组RenderTarget,每一层都比上一次缩小,长宽时上一层的1/2
for ( let i = 0; i < this.nMips; i ++ ) {
	const renderTargetHorizontal = new WebGLRenderTarget( resx, resy, { type: HalfFloatType } );
	renderTargetHorizontal.texture.name = 'UnrealBloomPass.h' + i;
	renderTargetHorizontal.texture.generateMipmaps = false;
	this.renderTargetsHorizontal.push( renderTargetHorizontal );
	const renderTargetVertical = new WebGLRenderTarget( resx, resy, { type: HalfFloatType } );
	renderTargetVertical.texture.name = 'UnrealBloomPass.v' + i;
	renderTargetVertical.texture.generateMipmaps = false;
	this.renderTargetsVertical.push( renderTargetVertical );
	resx = Math.round( resx / 2 );
	resy = Math.round( resy / 2 );
}

//设置每一层的shader,shader写在ShaderMaterial中,kernelSizeArray为每一层高斯函数的标准差。
this.separableBlurMaterials = [];
const kernelSizeArray = [ 3, 5, 7, 9, 11 ];
resx = Math.round( this.resolution.x / 2 );
resy = Math.round( this.resolution.y / 2 );
for ( let i = 0; i < this.nMips; i ++ ) {
	this.separableBlurMaterials.push( this.getSeperableBlurMaterial( kernelSizeArray[ i ] ) );
	this.separableBlurMaterials[ i ].uniforms[ 'invSize' ].value = new Vector2( 1 / resx, 1 / resy );
	resx = Math.round( resx / 2 );
	resy = Math.round( resy / 2 );
}

//根据标准差,将高斯函数计算的权重提取计算好,根据权重采样,最后加权求均值。
getSeperableBlurMaterial( kernelRadius ) {
	const coefficients = [];
	for ( let i = 0; i < kernelRadius; i ++ ) {
		coefficients.push( 0.39894 * Math.exp( - 0.5 * i * i / ( kernelRadius * kernelRadius ) ) / kernelRadius );
	}

	return new ShaderMaterial( {
		defines: {
			'KERNEL_RADIUS': kernelRadius
		},
		uniforms: {
			'colorTexture': { value: null },
			'invSize': { value: new Vector2( 0.5, 0.5 ) }, // inverse texture size
			'direction': { value: new Vector2( 0.5, 0.5 ) },
			'gaussianCoefficients': { value: coefficients } // precomputed Gaussian coefficients
		},
		vertexShader:
			`varying vec2 vUv;
			void main() {
				vUv = uv;
				gl_Position = projectionMatrix * modelViewMatrix * vec4( position, 1.0 );
			}`,
		fragmentShader:
			`#include <common>
			varying vec2 vUv;
			uniform sampler2D colorTexture;
			uniform vec2 invSize;
			uniform vec2 direction;
			uniform float gaussianCoefficients[KERNEL_RADIUS];

			void main() {
				float weightSum = gaussianCoefficients[0];
				vec3 diffuseSum = texture2D( colorTexture, vUv ).rgb * weightSum;
				for( int i = 1; i < KERNEL_RADIUS; i ++ ) {
					float x = float(i);
					float w = gaussianCoefficients[i];
					vec2 uvOffset = direction * invSize * x;
					vec3 sample1 = texture2D( colorTexture, vUv + uvOffset ).rgb;
					vec3 sample2 = texture2D( colorTexture, vUv - uvOffset ).rgb;
					diffuseSum += (sample1 + sample2) * w;
					weightSum += 2.0 * w;
				}
				gl_FragColor = vec4(diffuseSum/weightSum, 1.0);
			}`
	} );
}

//初始化inputRenderTarget为上一步提取的高亮纹理的renderTarget
let inputRenderTarget = this.renderTargetBright;

//依次下采样得到一组金字塔型的mipmap
for ( let i = 0; i < this.nMips; i ++ ) {
	this.fsQuad.material = this.separableBlurMaterials[ i ];
	this.separableBlurMaterials[ i ].uniforms[ 'colorTexture' ].value = inputRenderTarget.texture;
	this.separableBlurMaterials[ i ].uniforms[ 'direction' ].value = UnrealBloomPass.BlurDirectionX;
	renderer.setRenderTarget( this.renderTargetsHorizontal[ i ] );
	renderer.clear();
	this.fsQuad.render( renderer );

	this.separableBlurMaterials[ i ].uniforms[ 'colorTexture' ].value = this.renderTargetsHorizontal[ i ].texture;
	this.separableBlurMaterials[ i ].uniforms[ 'direction' ].value = UnrealBloomPass.BlurDirectionY;
	renderer.setRenderTarget( this.renderTargetsVertical[ i ] );
	renderer.clear();
	this.fsQuad.render( renderer );

	inputRenderTarget = this.renderTargetsVertical[ i ];
}
3.mipmap叠加
下来一步就是将之前的的5层mipmap全部叠加,再叠加到原图上,这样主要有两个目的:
- 让中心足够亮;
- 让扩散的光晕不仅最够大,而且过度均匀。 我们来看代码:
js
this.compositeMaterial = this._getCompositeMaterial( this.nMips );
this.compositeMaterial.uniforms[ 'blurTexture1' ].value = this.renderTargetsVertical[ 0 ].texture;
this.compositeMaterial.uniforms[ 'blurTexture2' ].value = this.renderTargetsVertical[ 1 ].texture;
this.compositeMaterial.uniforms[ 'blurTexture3' ].value = this.renderTargetsVertical[ 2 ].texture;
this.compositeMaterial.uniforms[ 'blurTexture4' ].value = this.renderTargetsVertical[ 3 ].texture;
this.compositeMaterial.uniforms[ 'blurTexture5' ].value = this.renderTargetsVertical[ 4 ].texture;
this.compositeMaterial.uniforms[ 'bloomStrength' ].value = strength;
this.compositeMaterial.uniforms[ 'bloomRadius' ].value = 0.1;

const bloomFactors = [ 1.0, 0.8, 0.6, 0.4, 0.2 ];
this.compositeMaterial.uniforms[ 'bloomFactors' ].value = bloomFactors;
this.bloomTintColors = [ new Vector3( 1, 1, 1 ), new Vector3( 1, 1, 1 ), new Vector3( 1, 1, 1 ), new Vector3( 1, 1, 1 ), new Vector3( 1, 1, 1 ) ];
this.compositeMaterial.uniforms[ 'bloomTintColors' ].value = this.bloomTintColors;

_getCompositeMaterial( nMips ) {

    return new ShaderMaterial( {

        defines: {
            'NUM_MIPS': nMips
        },

        uniforms: {
            'blurTexture1': { value: null },
            'blurTexture2': { value: null },
            'blurTexture3': { value: null },
            'blurTexture4': { value: null },
            'blurTexture5': { value: null },
            'bloomStrength': { value: 1.0 },
            'bloomFactors': { value: null },
            'bloomTintColors': { value: null },
            'bloomRadius': { value: 0.0 }
        },

        vertexShader:
            `varying vec2 vUv;
            void main() {
                vUv = uv;
                gl_Position = projectionMatrix * modelViewMatrix * vec4( position, 1.0 );
            }`,

        fragmentShader:
            `varying vec2 vUv;
            uniform sampler2D blurTexture1;
            uniform sampler2D blurTexture2;
            uniform sampler2D blurTexture3;
            uniform sampler2D blurTexture4;
            uniform sampler2D blurTexture5;
            uniform float bloomStrength;
            uniform float bloomRadius;
            uniform float bloomFactors[NUM_MIPS];
            uniform vec3 bloomTintColors[NUM_MIPS];

            //mipmap叠加时每个层级图像的系数由lerpBloomFactor函数决定,由上文const bloomFactors = [ 1.0, 0.8, 0.6, 0.4, 0.2 ]可知,
            //层级越高,lerpBloomFactor的factor参数越小,mirrorFactor越大。所以可以看到bloomRadius越小,低层级占比越大,这样光晕的
            //范围就比较小,反之光晕的效果就比较大。所以bloomRadius就决定了光晕的大小。显然,bloomStrength决定了mipmap叠加以后光的
            //整体亮度。
            float lerpBloomFactor(const in float factor) {
                float mirrorFactor = 1.2 - factor;
                return mix(factor, mirrorFactor, bloomRadius);
            }

            void main() {
                gl_FragColor = bloomStrength * ( lerpBloomFactor(bloomFactors[0]) * vec4(bloomTintColors[0], 1.0) * texture2D(blurTexture1, vUv) +
                    lerpBloomFactor(bloomFactors[1]) * vec4(bloomTintColors[1], 1.0) * texture2D(blurTexture2, vUv) +
                    lerpBloomFactor(bloomFactors[2]) * vec4(bloomTintColors[2], 1.0) * texture2D(blurTexture3, vUv) +
                    lerpBloomFactor(bloomFactors[3]) * vec4(bloomTintColors[3], 1.0) * texture2D(blurTexture4, vUv) +
                    lerpBloomFactor(bloomFactors[4]) * vec4(bloomTintColors[4], 1.0) * texture2D(blurTexture5, vUv) );
            }`
    } );

}
这里需要注意的是,lerpBloomFactor这个函数。mipmap叠加时每个层级图像的系数由lerpBloomFactor函数决定,由bloomFactors可知,层级越高,lerpBloomFactor的factor参数越小,mirrorFactor越大。所以可以看到bloomRadius越小,低层级占比越大,这样光晕的范围就比较小,反之光晕的效果就比较大。所以bloomRadius就决定了光晕的大小。显然,bloomStrength决定了mipmap叠加以后光的整体亮度。
4.和原图叠加
js
this.copyUniforms = UniformsUtils.clone( CopyShader.uniforms );

this.blendMaterial = new ShaderMaterial( {
        uniforms: this.copyUniforms,
        vertexShader: CopyShader.vertexShader,
        fragmentShader: CopyShader.fragmentShader,
        blending: AdditiveBlending,
        depthTest: false,
        depthWrite: false,
        transparent: true
} );
最后一步唯一需要注意的就是采用了blending参数使用了AdditiveBlending,将叠加mipmap后的图像和原图进行了1:1混合。
最后使用UnrealBloomPass一定要设置renderer的toneMapping属性,推荐使用ReinhardToneMapping或ACESFilmicToneMapping。因为图像叠加后有些高亮区域的亮度远远大于1,如果不设置toneMapping会导致高光位置过曝,闪烁,画面一片白,暗部细节丢失等不自然的问题。