2. LangChain4J 中的 Hello World
@toc
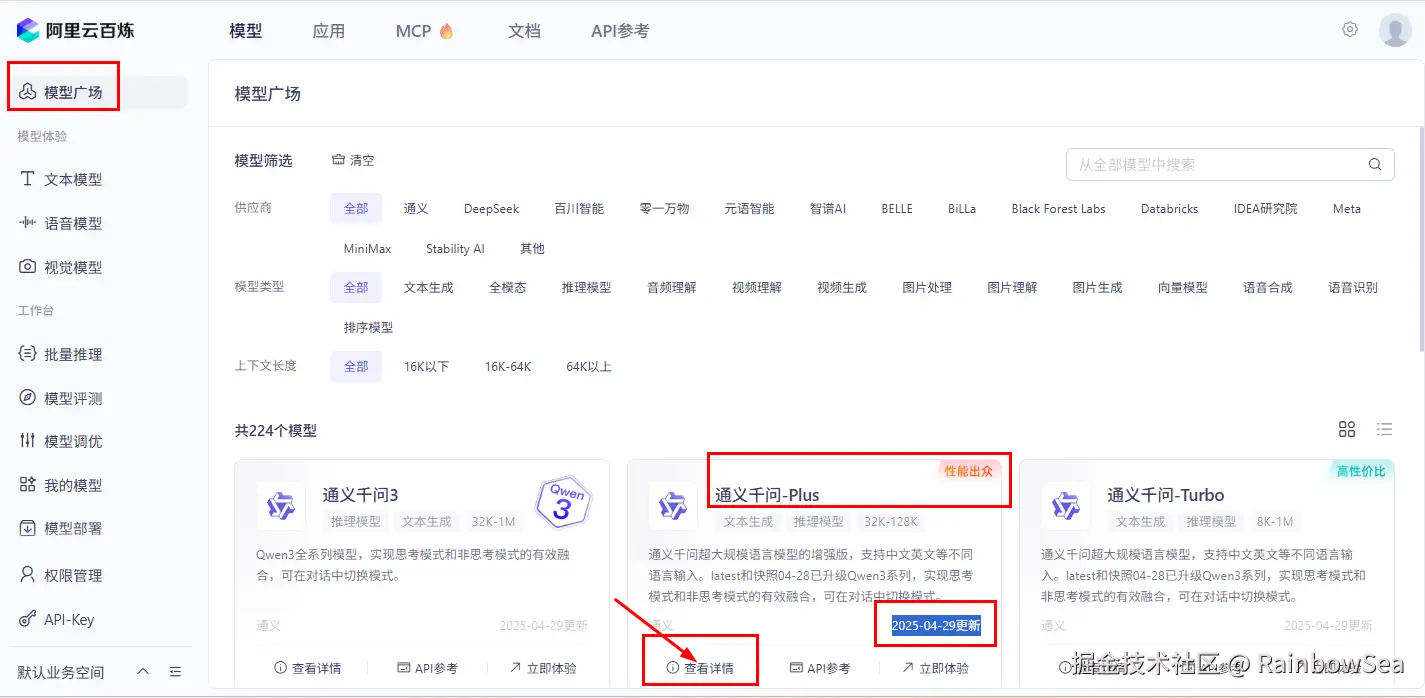
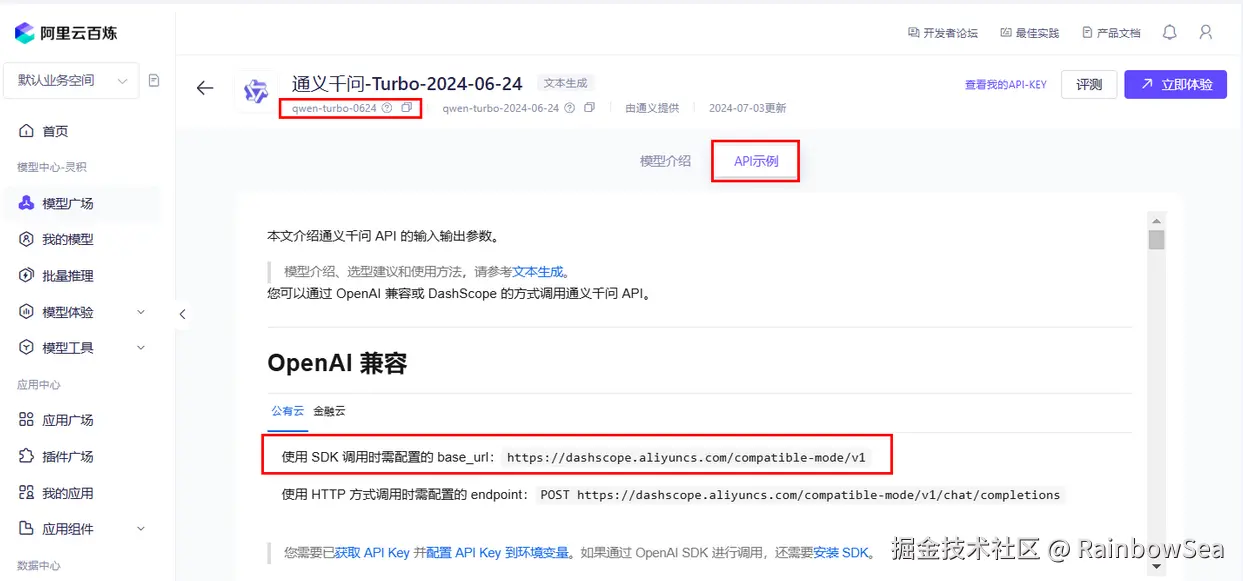
1. 接入阿里百炼大模型 ------ 通义千问
接入阿里百炼平台的通义模型:bailian.console.aliyun.com/?tab=home#/...

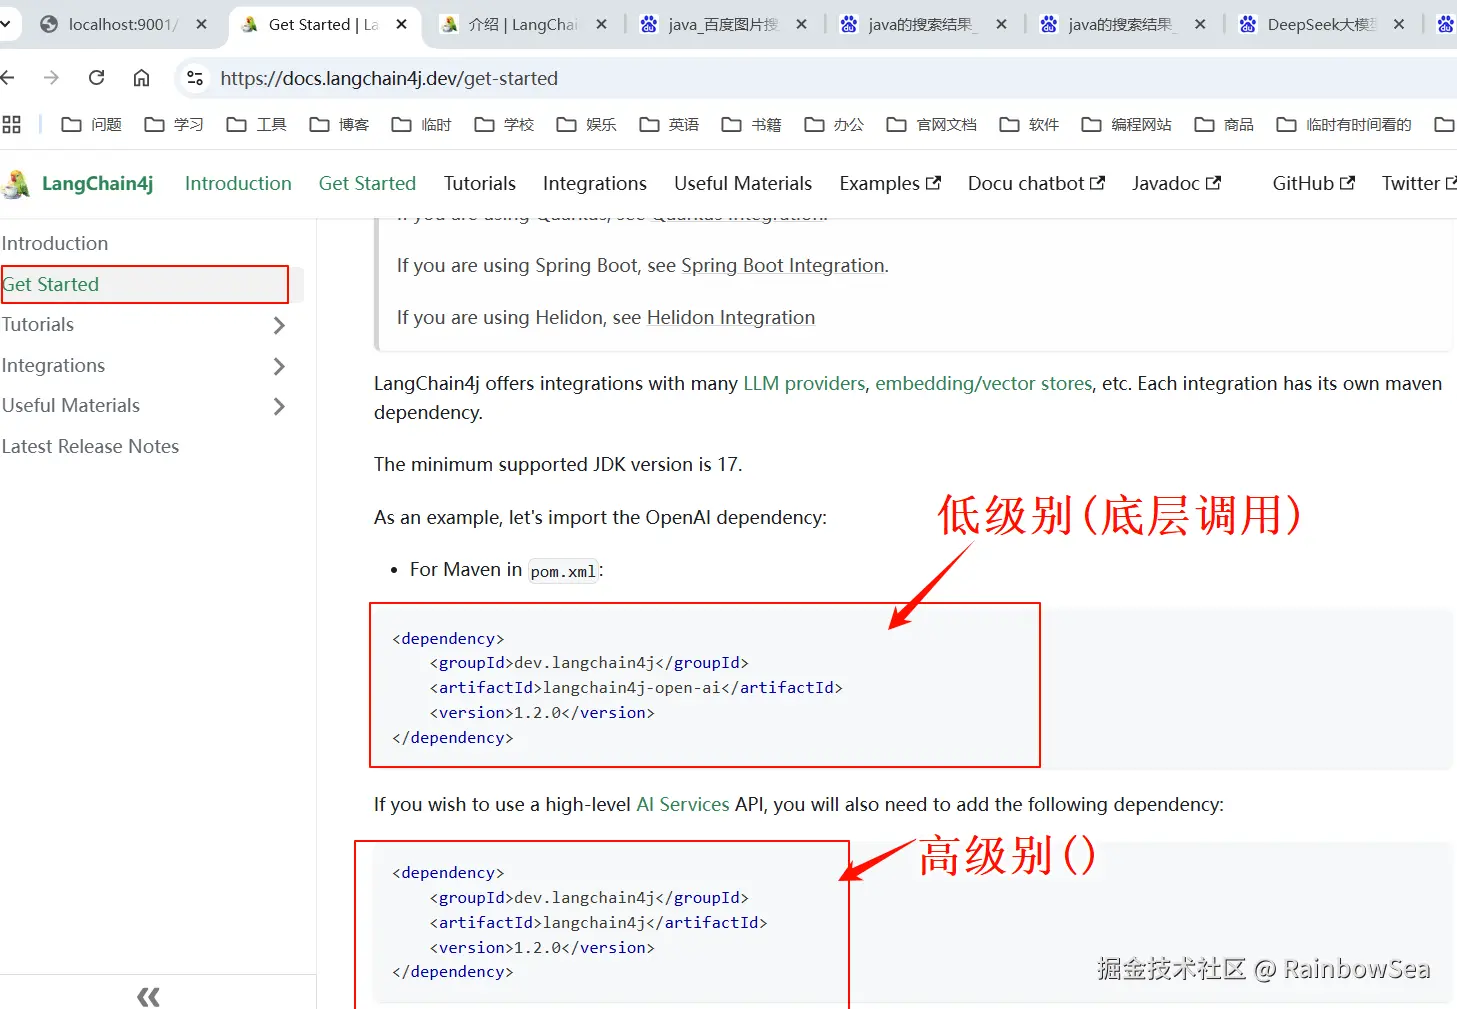
大模型调用三件套:
- 获得对应大模型的 Api-Key
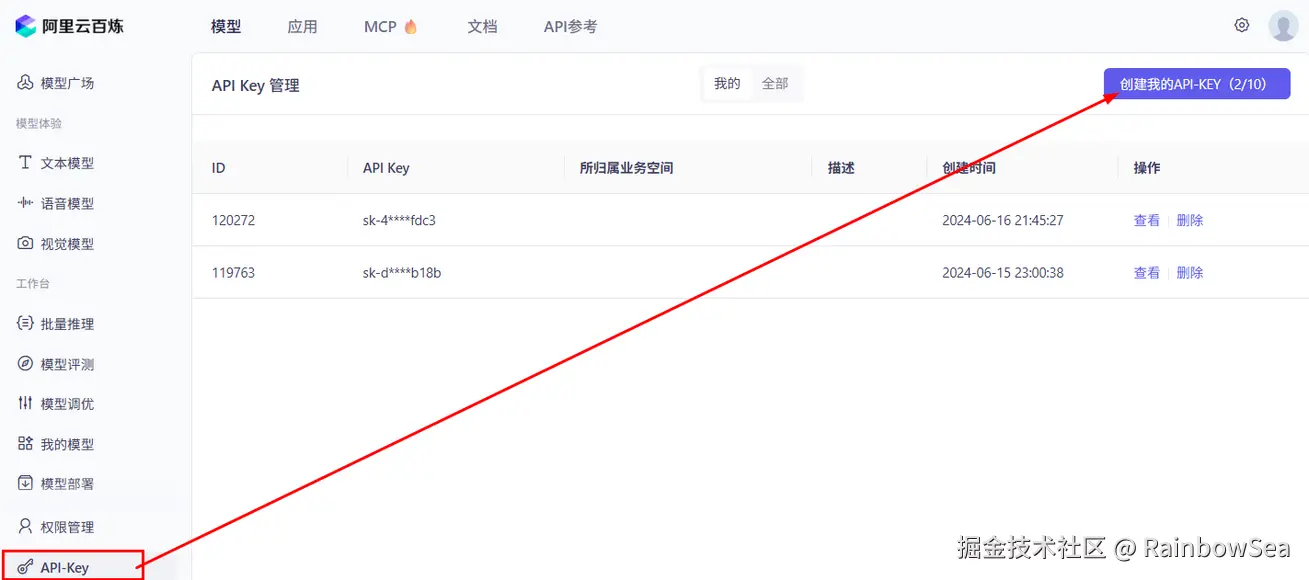
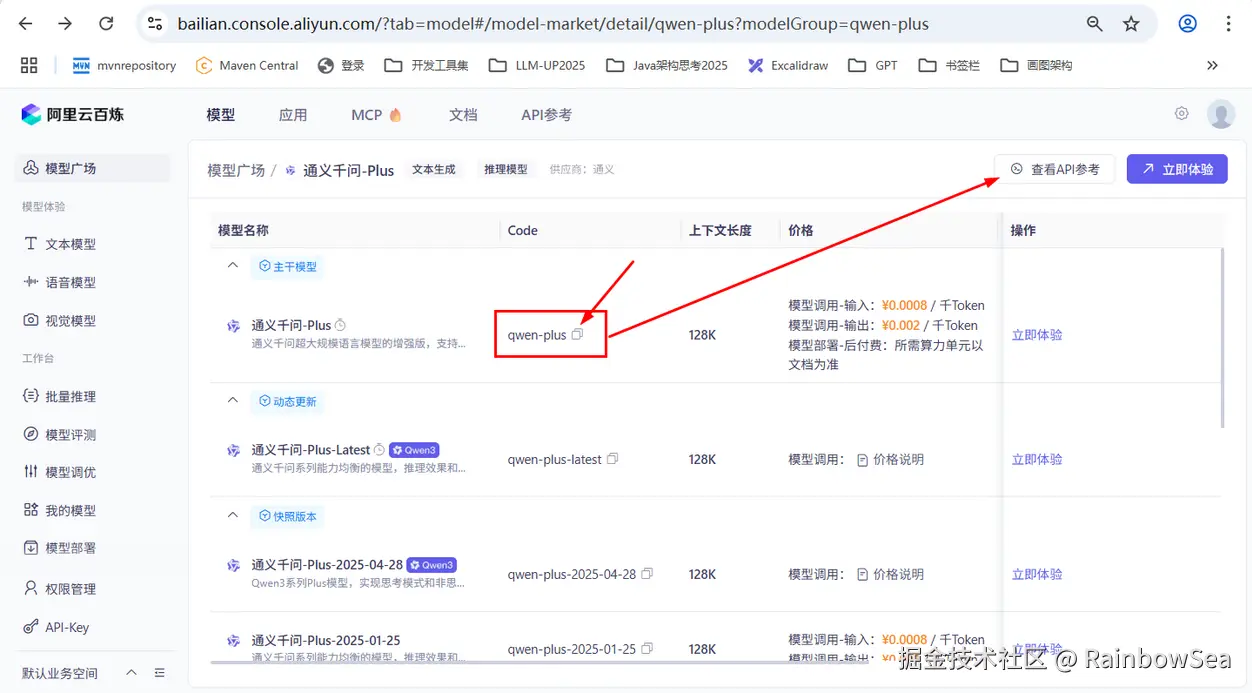
- 获得模型名:
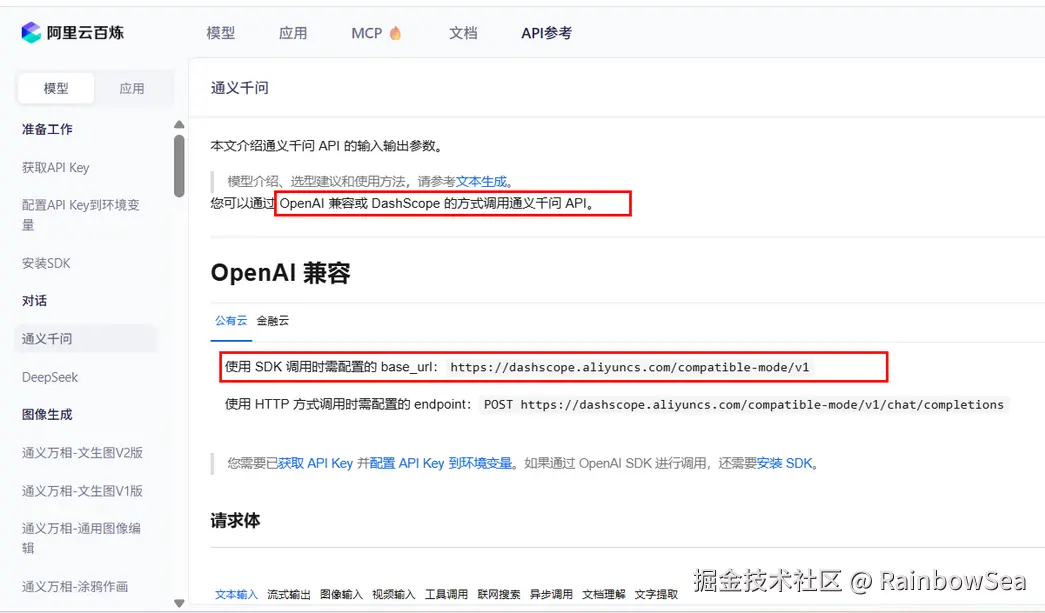
- 获得 baseUrl 开发地址:
假设你要换一个模型实例:


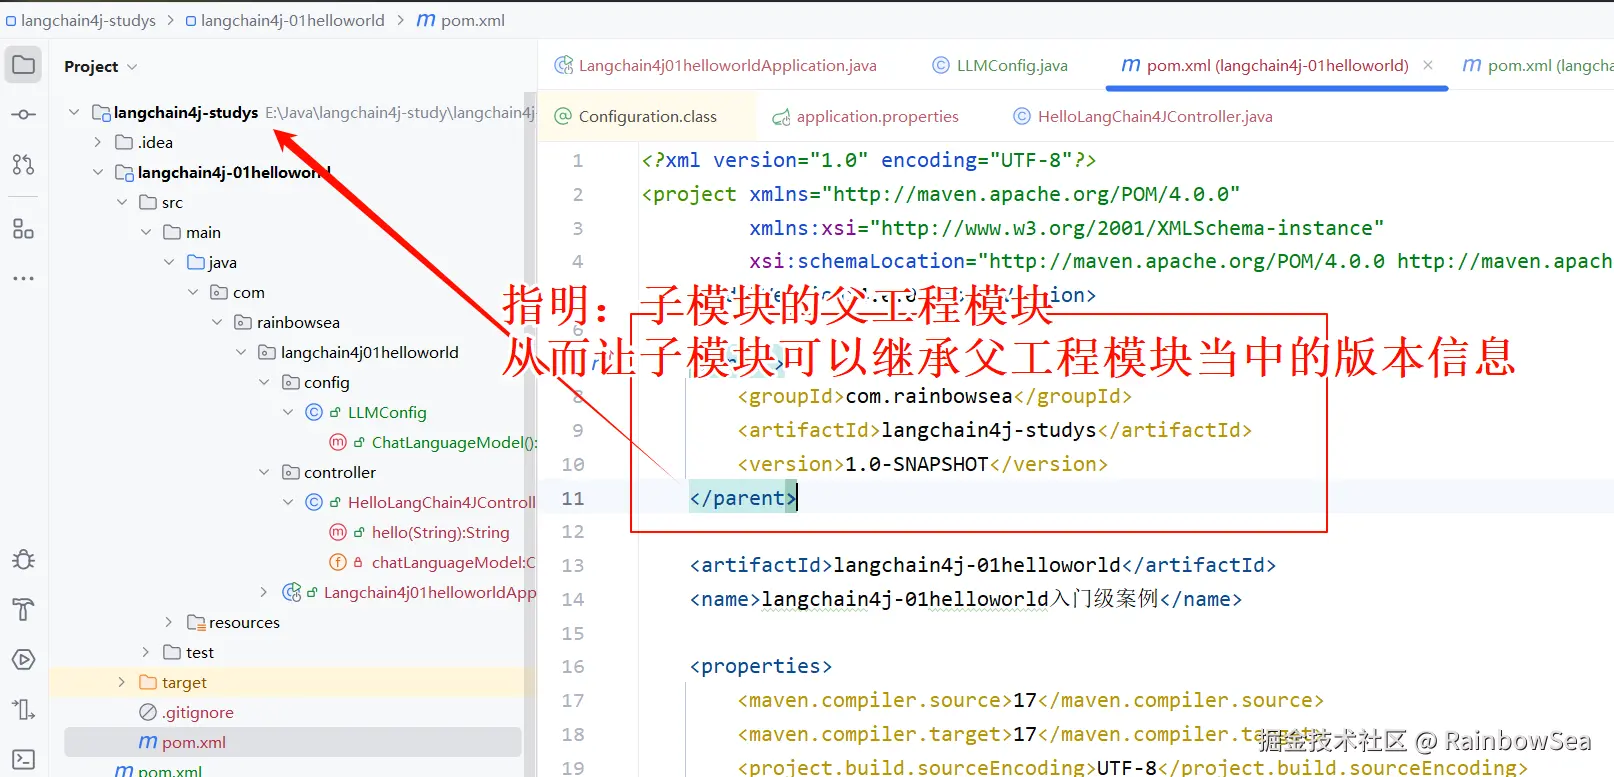
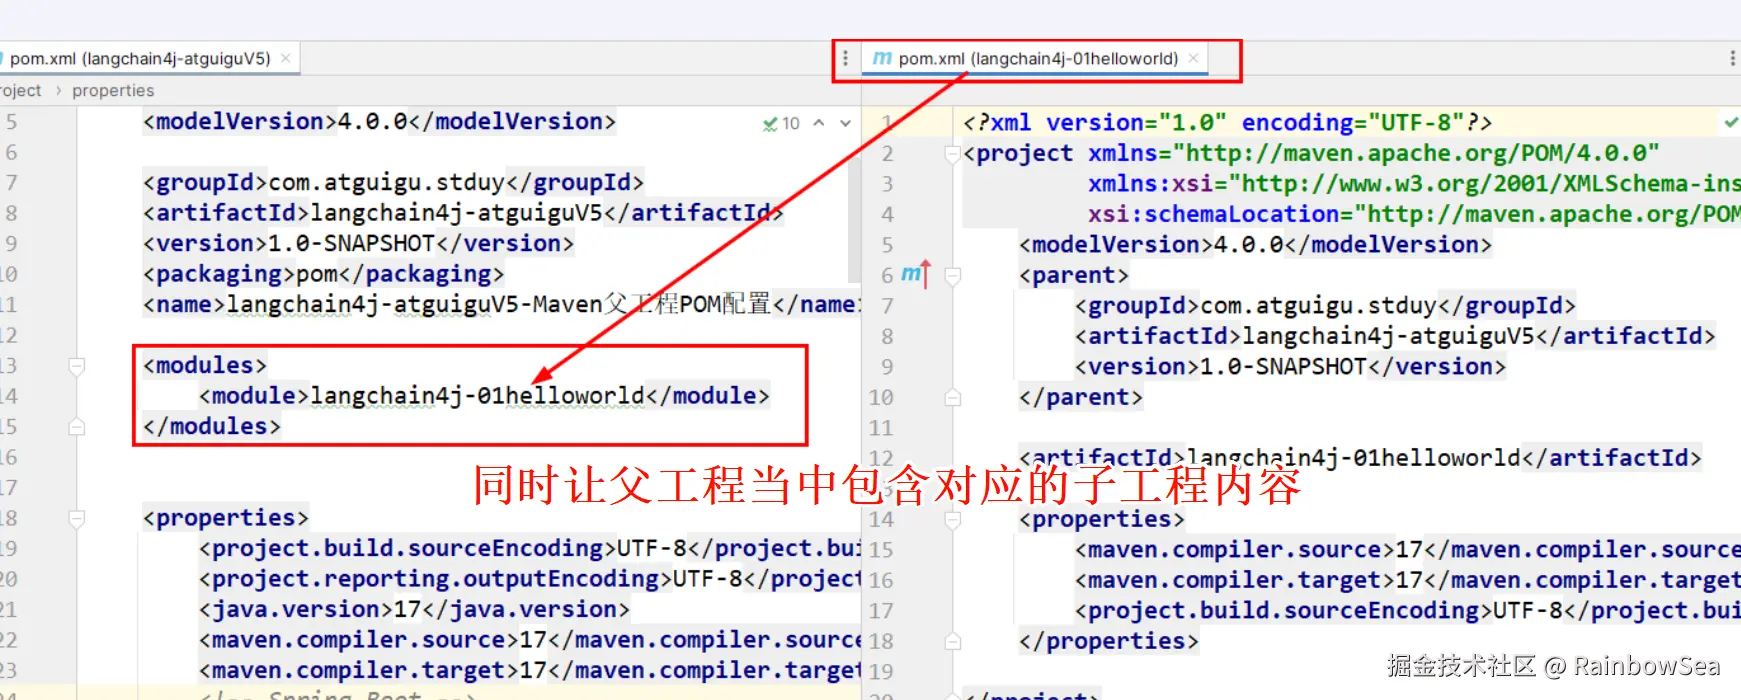
初始总 pom.xml
xml
<?xml version="1.0" encoding="UTF-8"?>
<project xmlns="http://maven.apache.org/POM/4.0.0"
         xmlns:xsi="http://www.w3.org/2001/XMLSchema-instance"
         xsi:schemaLocation="http://maven.apache.org/POM/4.0.0 http://maven.apache.org/xsd/maven-4.0.0.xsd">
    <modelVersion>4.0.0</modelVersion>

    <groupId>com.atguigu.stduy</groupId>
    <artifactId>langchain4j-atguiguV5</artifactId>
    <version>1.0-SNAPSHOT</version>
    <packaging>pom</packaging>
    <name>langchain4j-atguiguV5-Maven父工程POM配置</name>


    <properties>
        <project.build.sourceEncoding>UTF-8</project.build.sourceEncoding>
        <project.reporting.outputEncoding>UTF-8</project.reporting.outputEncoding>
        <java.version>17</java.version>
        <maven.compiler.source>17</maven.compiler.source>
        <maven.compiler.target>17</maven.compiler.target>
        <!-- Spring Boot -->
        <spring-boot.version>3.5.0</spring-boot.version>
        <!-- Spring AI -->
        <spring-ai.version>1.0.0</spring-ai.version>
        <!-- Spring AI Alibaba -->
        <spring-ai-alibaba.version>1.0.0-M6.1</spring-ai-alibaba.version>
        <!-- langchain4j -->
        <langchain4j.version>1.0.1</langchain4j.version>
        <!--langchain4j-community 引入阿里云百炼平台依赖管理清单-->
        <langchain4j-community.version>1.0.1-beta6</langchain4j-community.version>
        <!-- maven plugin -->
        <maven-deploy-plugin.version>3.1.1</maven-deploy-plugin.version>
        <flatten-maven-plugin.version>1.3.0</flatten-maven-plugin.version>
        <maven-compiler-plugin.version>3.8.1</maven-compiler-plugin.version>
    </properties>

    <dependencyManagement>
        <dependencies>
            <!-- Spring Boot -->
            <dependency>
                <groupId>org.springframework.boot</groupId>
                <artifactId>spring-boot-dependencies</artifactId>
                <version>${spring-boot.version}</version>
                <type>pom</type>
                <scope>import</scope>
            </dependency>
            <!-- Spring AI -->
            <dependency>
                <groupId>org.springframework.ai</groupId>
                <artifactId>spring-ai-bom</artifactId>
                <version>${spring-ai.version}</version>
                <type>pom</type>
                <scope>import</scope>
            </dependency>
            <!-- Spring AI Alibaba -->
            <dependency>
                <groupId>com.alibaba.cloud.ai</groupId>
                <artifactId>spring-ai-alibaba-starter</artifactId>
                <version>${spring-ai-alibaba.version}</version>
            </dependency>
            <!--langchain4j的依赖清单,加载BOM后所有langchain4j版本号可以被统一管理起来
            https://docs.langchain4j.dev/get-started
            -->
            <dependency>
                <groupId>dev.langchain4j</groupId>
                <artifactId>langchain4j-bom</artifactId>
                <version>${langchain4j.version}</version>
                <type>pom</type>
                <scope>import</scope>
            </dependency>
            <!--引入阿里云百炼平台依赖管理清单
           https://docs.langchain4j.dev/integrations/language-models/dashscope
           -->
            <dependency>
                <groupId>dev.langchain4j</groupId>
                <artifactId>langchain4j-community-bom</artifactId>
                <version>${langchain4j-community.version}</version>
                <type>pom</type>
                <scope>import</scope>
            </dependency>
        </dependencies>
    </dependencyManagement>

    <build>
        <plugins>
            <plugin>
                <groupId>org.springframework.boot</groupId>
                <artifactId>spring-boot-maven-plugin</artifactId>
                <version>${spring-boot.version}</version>
            </plugin>
            <plugin>
                <groupId>org.apache.maven.plugins</groupId>
                <artifactId>maven-deploy-plugin</artifactId>
                <version>${maven-deploy-plugin.version}</version>
                <configuration>
                    <skip>true</skip>
                </configuration>
            </plugin>
            <plugin>
                <groupId>org.apache.maven.plugins</groupId>
                <artifactId>maven-compiler-plugin</artifactId>
                <version>${maven-compiler-plugin.version}</version>
                <configuration>
                    <release>${java.version}</release>
                    <compilerArgs>
                        <compilerArg>-parameters</compilerArg>
                    </compilerArgs>
                </configuration>
            </plugin>
            <plugin>
                <groupId>org.codehaus.mojo</groupId>
                <artifactId>flatten-maven-plugin</artifactId>
                <version>${flatten-maven-plugin.version}</version>
                <inherited>true</inherited>
                <executions>
                    <execution>
                        <id>flatten</id>
                        <phase>process-resources</phase>
                        <goals>
                            <goal>flatten</goal>
                        </goals>
                        <configuration>
                            <updatePomFile>true</updatePomFile>
                            <flattenMode>ossrh</flattenMode>
                            <pomElements>
                                <distributionManagement>remove</distributionManagement>
                                <dependencyManagement>remove</dependencyManagement>
                                <repositories>remove</repositories>
                                <scm>keep</scm>
                                <url>keep</url>
                                <organization>resolve</organization>
                            </pomElements>
                        </configuration>
                    </execution>
                    <execution>
                        <id>flatten.clean</id>
                        <phase>clean</phase>
                        <goals>
                            <goal>clean</goal>
                        </goals>
                    </execution>
                </executions>
            </plugin>
        </plugins>
    </build>

    <repositories>
        <repository>
            <id>spring-milestones</id>
            <name>Spring Milestones</name>
            <url>https://repo.spring.io/milestone</url>
            <snapshots>
                <enabled>false</enabled>
            </snapshots>
        </repository>
        <repository>
            <id>spring-snapshots</id>
            <name>Spring Snapshots</name>
            <url>https://repo.spring.io/snapshot</url>
            <releases>
                <enabled>false</enabled>
            </releases>
        </repository>
        <repository>
            <id>aliyunmaven</id>
            <name>aliyun</name>
            <url>https://maven.aliyun.com/repository/public</url>
        </repository>
    </repositories>

    <pluginRepositories>
        <pluginRepository>
            <id>public</id>
            <name>aliyun nexus</name>
            <url>https://maven.aliyun.com/repository/public</url>
            <releases>
                <enabled>true</enabled>
            </releases>
            <snapshots>
                <enabled>false</enabled>
            </snapshots>
        </pluginRepository>
    </pluginRepositories>

</project>
配置我们对应进入的大模型的三件套:对应大模型的 Key,模型名,调用地址:

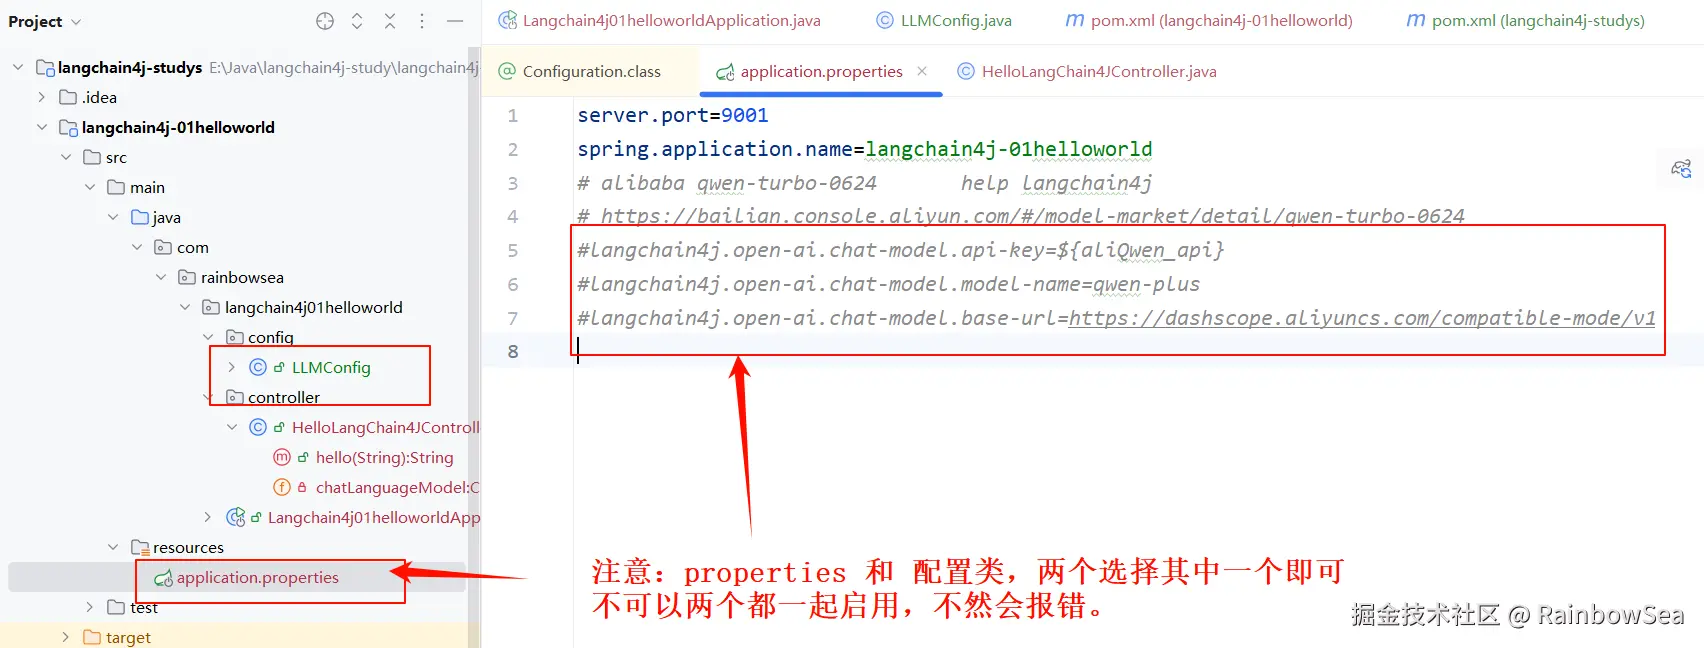
我们可以将上述大模型三件套写入到 application.properties 配置文件当中如下:
我们接入阿里百炼大模型------
properties
server.port=9001
spring.application.name=langchain4j-01helloworld
# alibaba qwen-turbo-0624       help langchain4j
# https://bailian.console.aliyun.com/#/model-market/detail/qwen-turbo-0624
#langchain4j.open-ai.chat-model.api-key=${aliQwen-api}
langchain4j.open-ai.chat-model.api-key=sk-d2902588xxxxxxxxxx
langchain4j.open-ai.chat-model.model-name=qwen-plus
langchain4j.open-ai.chat-model.base-url=https://dashscope.aliyuncs.com/compatible-mode/v1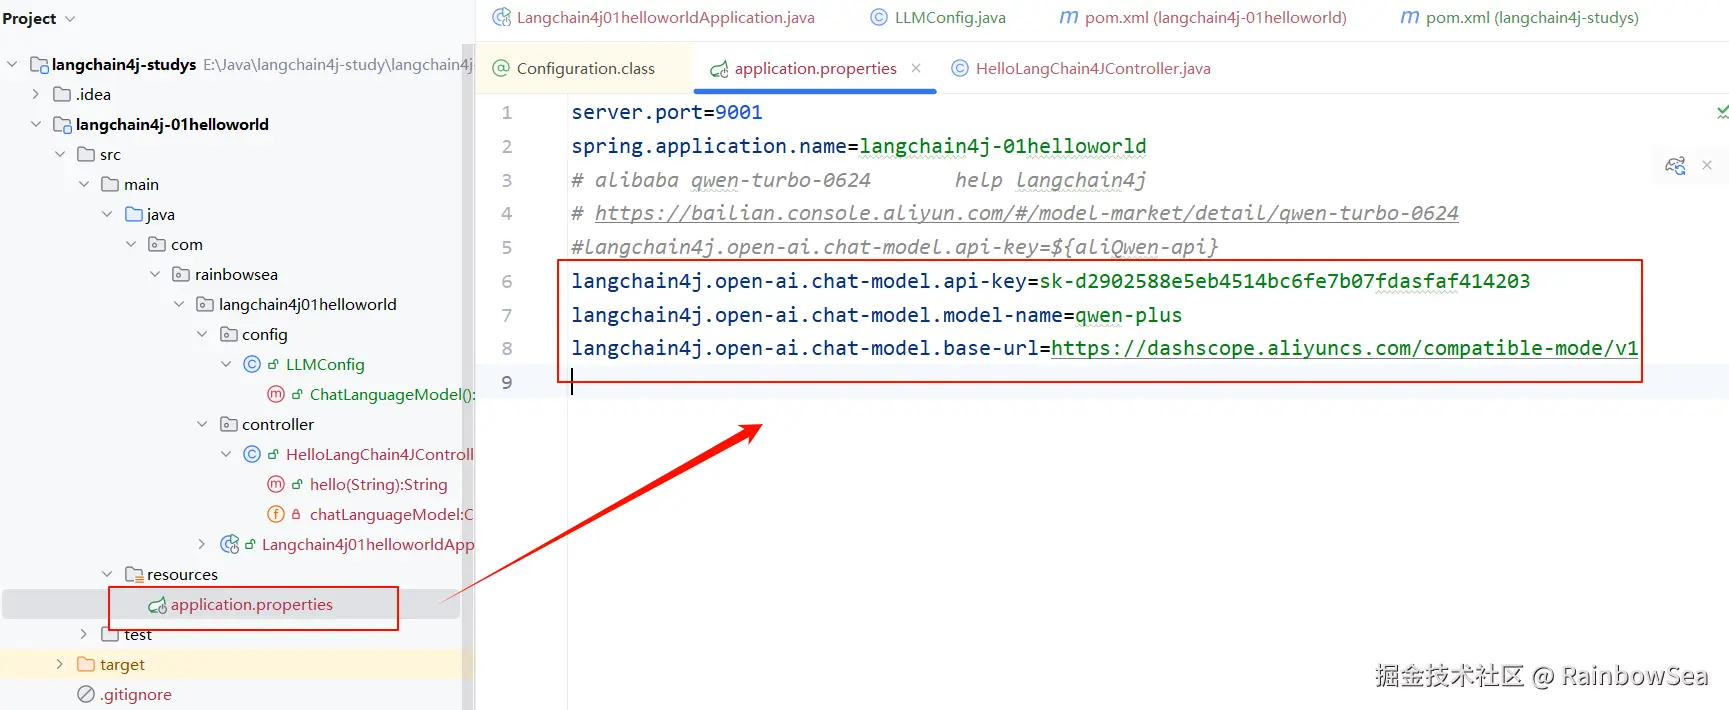
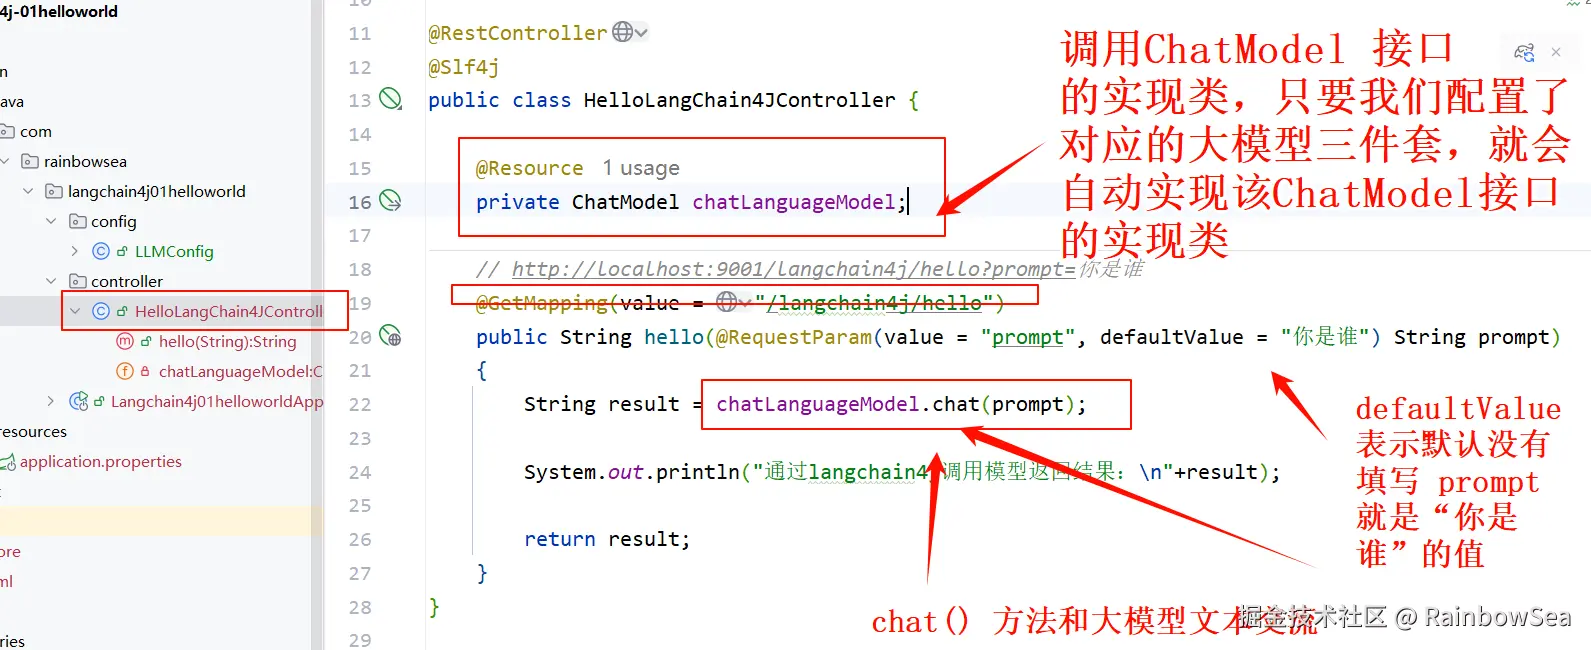
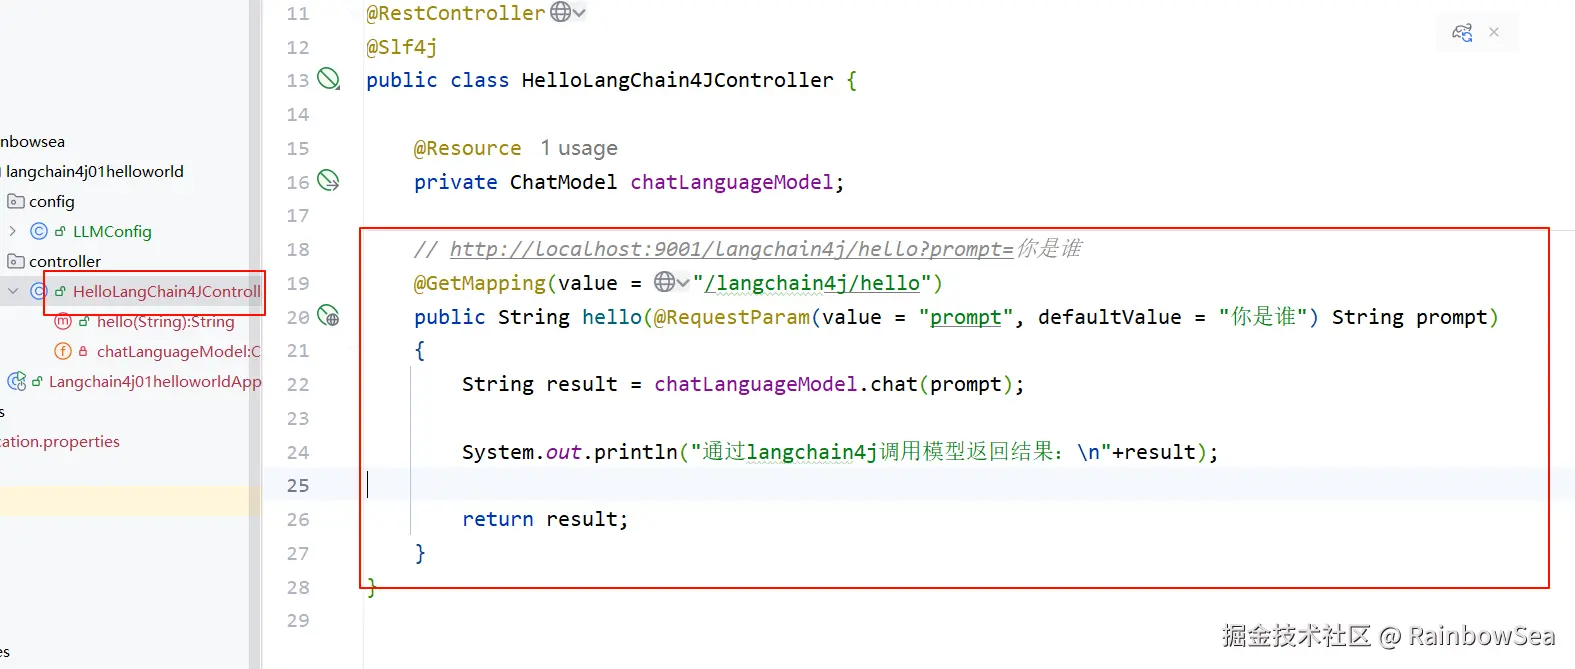
编写对外的 Cutroller
java
package com.rainbowsea.langchain4j01helloworld.controller;
import dev.langchain4j.model.chat.ChatModel;
import jakarta.annotation.Resource;
import lombok.extern.slf4j.Slf4j;
import org.springframework.web.bind.annotation.GetMapping;
import org.springframework.web.bind.annotation.RequestParam;
import org.springframework.web.bind.annotation.RestController;
@RestController
@Slf4j
public class HelloLangChain4JController {
@Resource
private ChatModel chatLanguageModel;
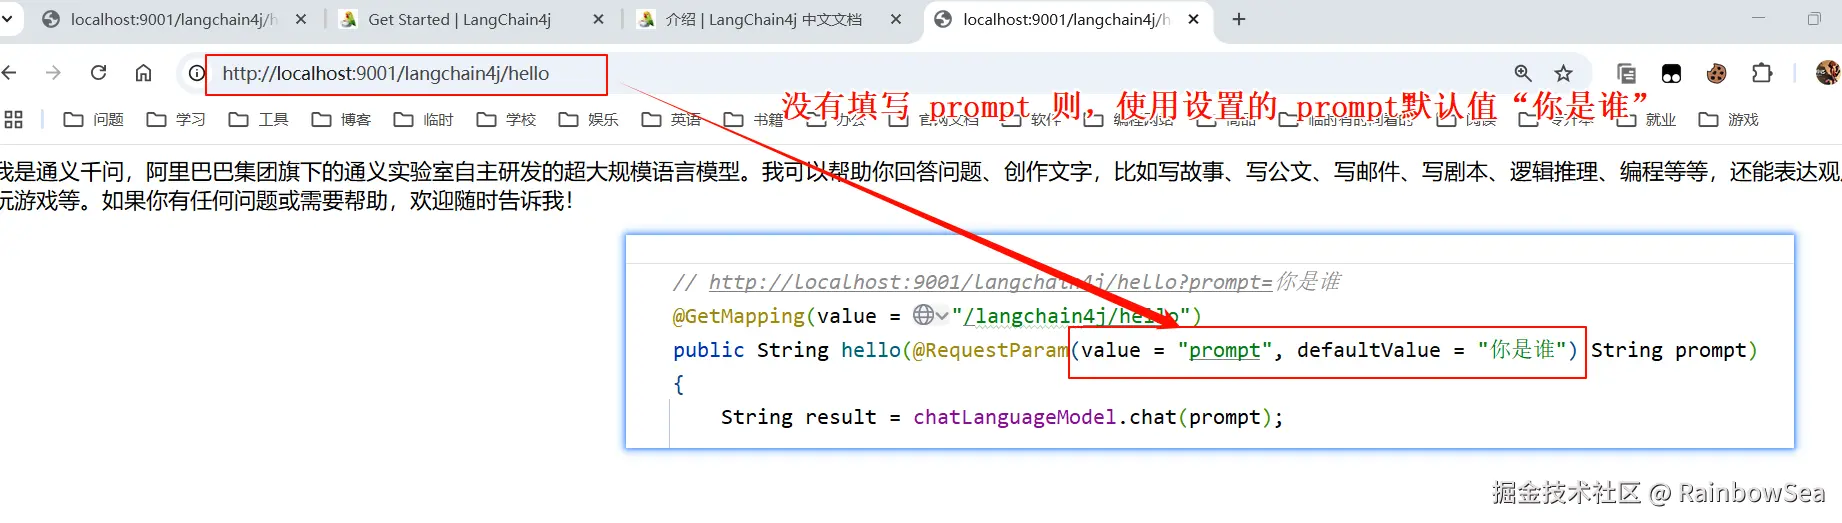
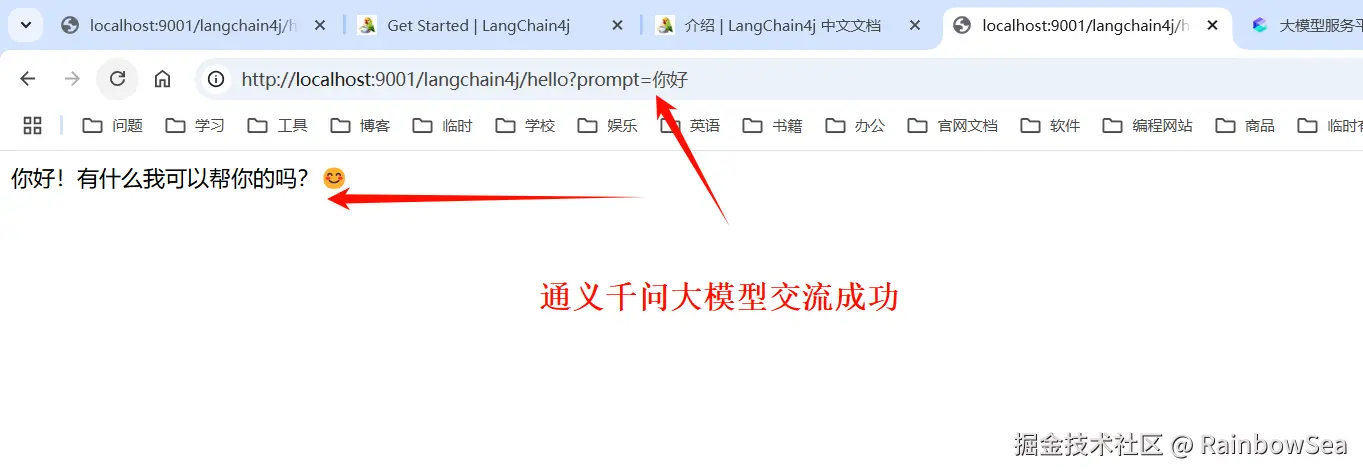
// http://localhost:9001/langchain4j/hello?prompt=你是谁
@GetMapping(value = "/langchain4j/hello")
public String hello(@RequestParam(value = "prompt", defaultValue = "你是谁") String prompt)
{
String result = chatLanguageModel.chat(prompt);
System.out.println("通过langchain4j调用模型返回结果:\n"+result);
return result;
}
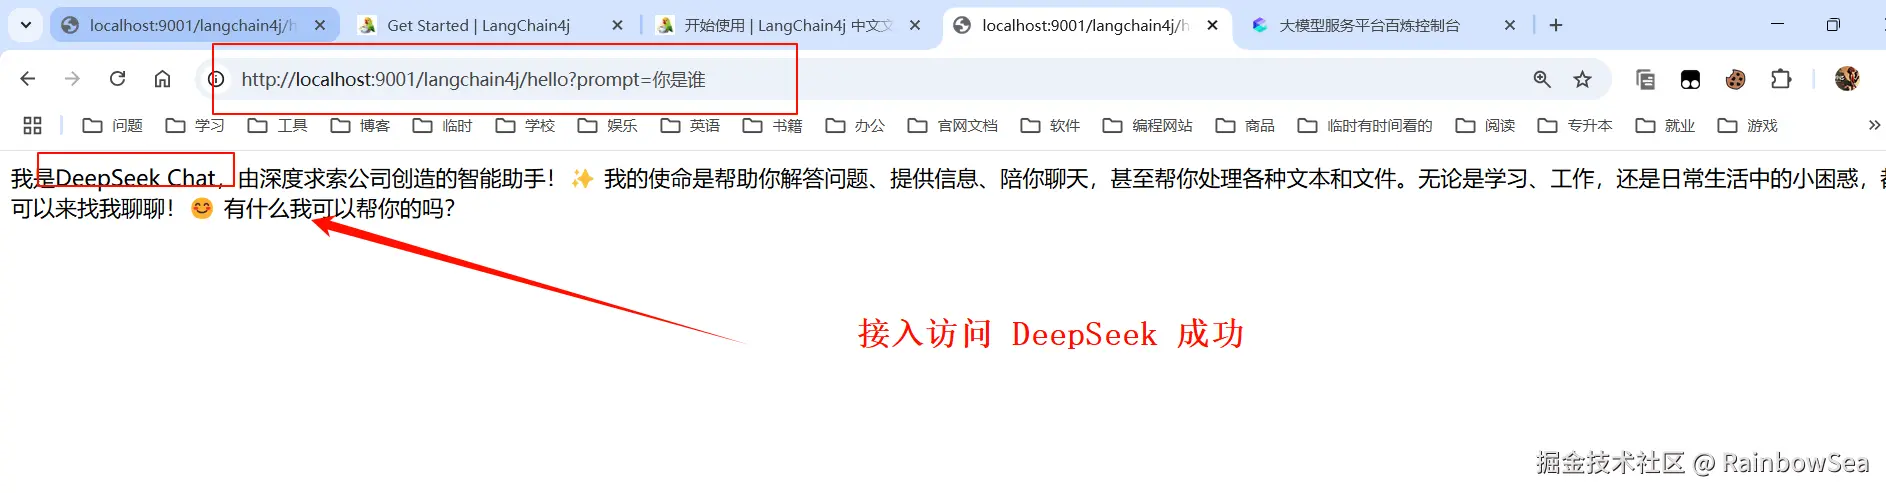
}运行测试:
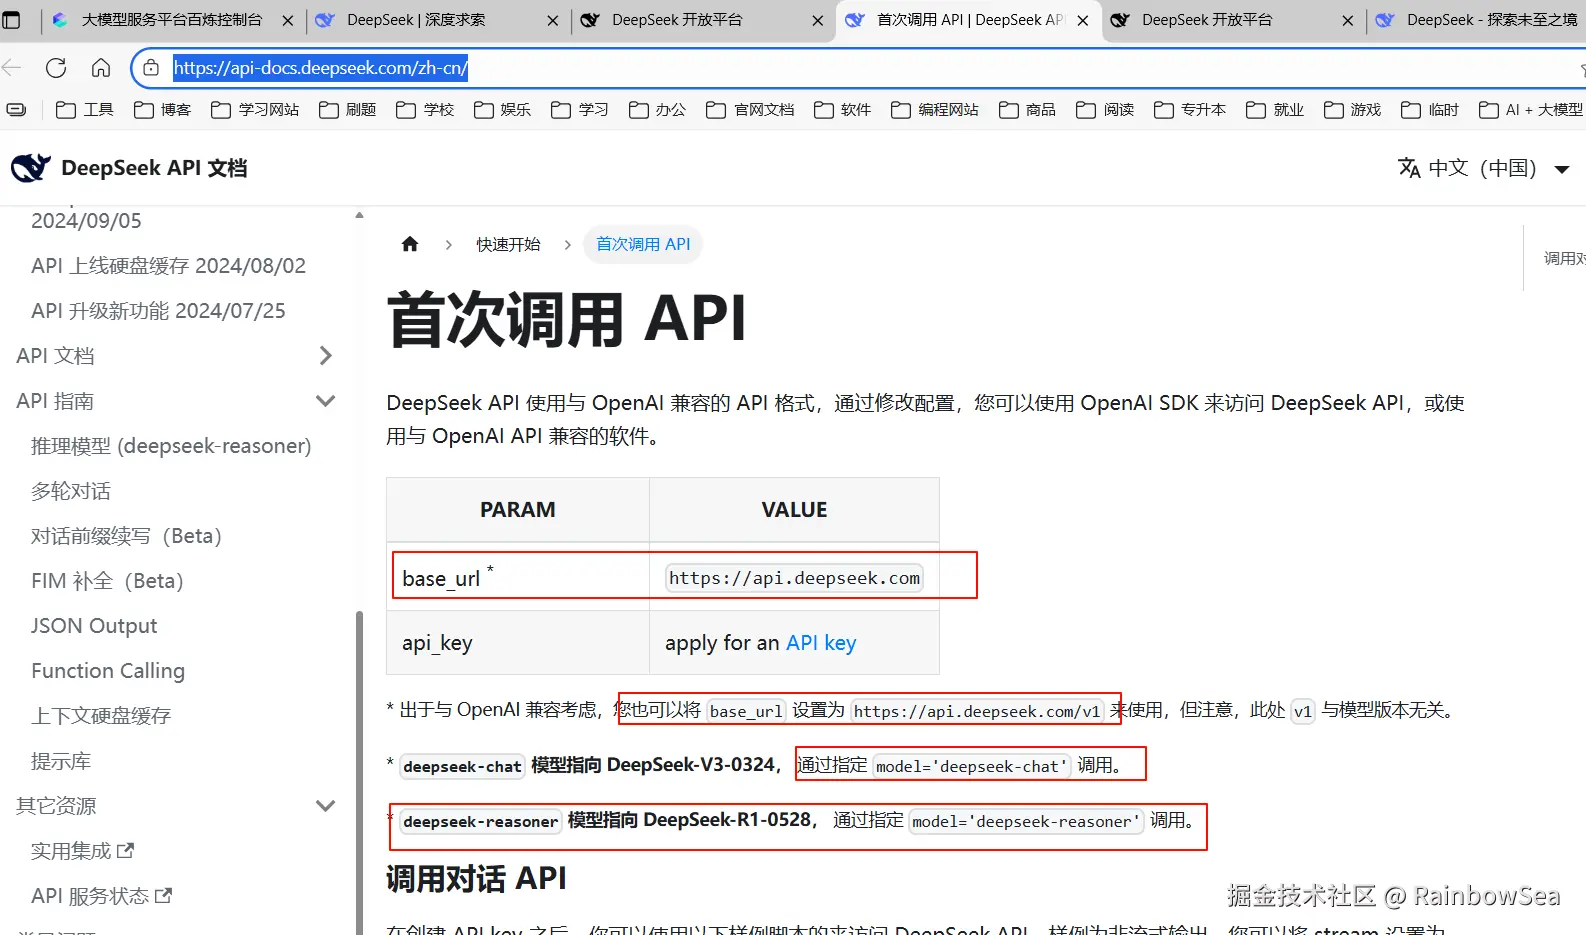
2. 接入 DeepSeek 大模型
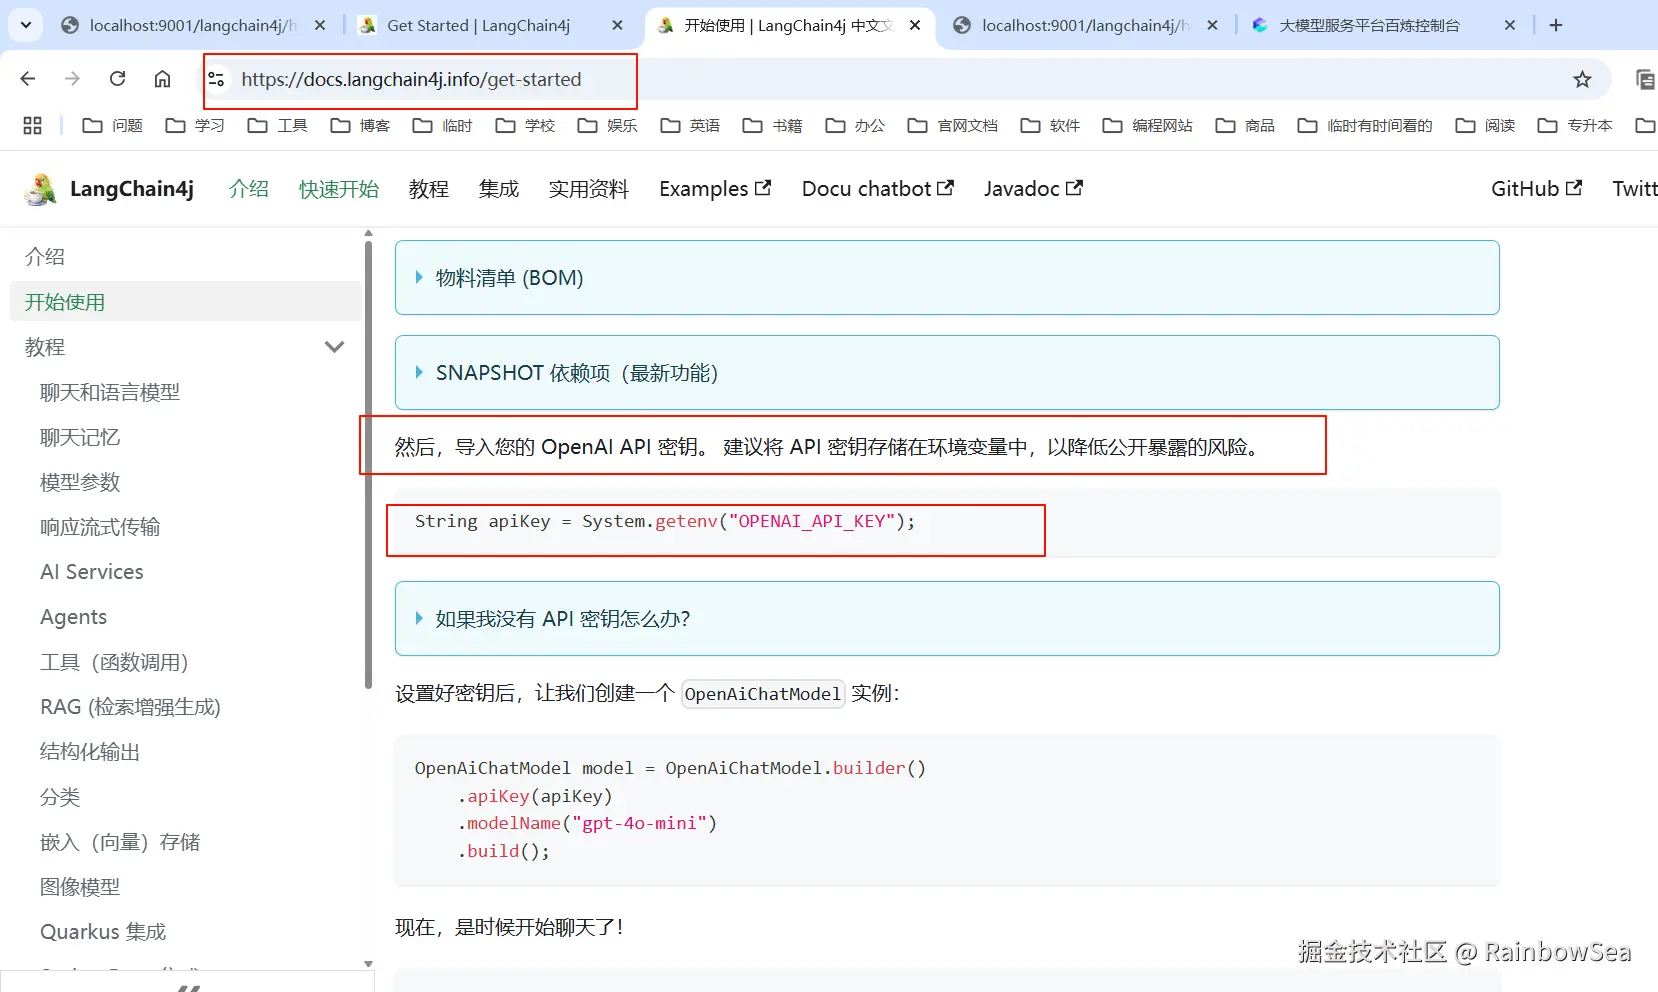
上述我们是将大模型的 Key 配置到了,application.properties 配置文件当中。
这种方式不太安全,官方建议我们将其配置到系统变量当中。让程序去系统变量当中获取。
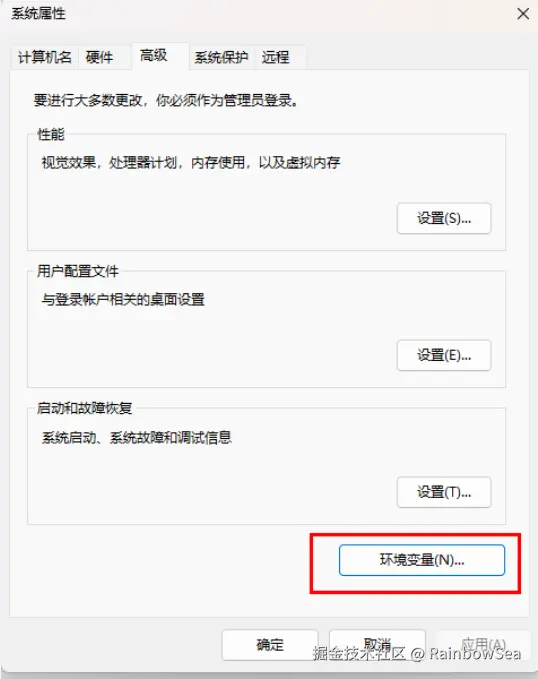
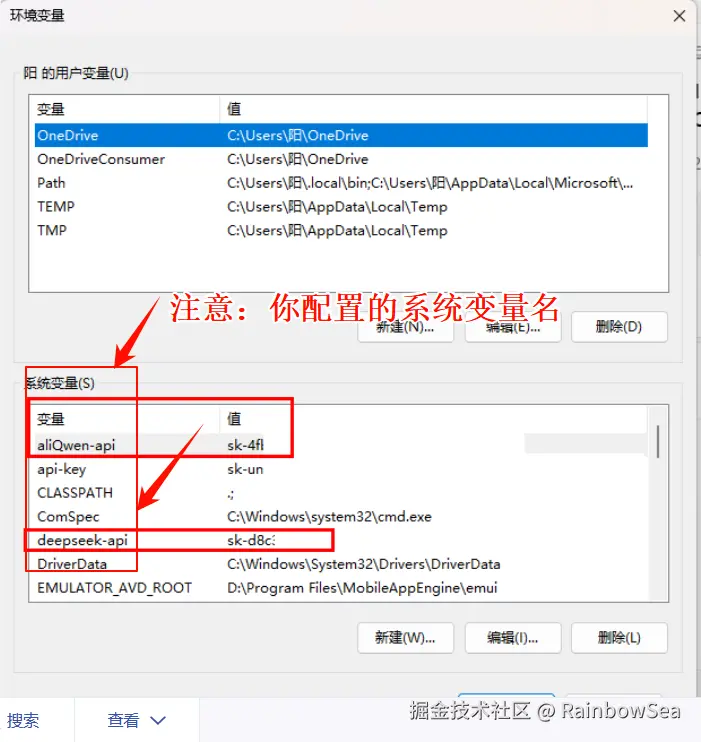
特别注意:想让 IDEA 可以读取到我们系统变量当中的值,需要重启 IDEA,如果重启 IDEA 还是读取不到我们系统变量当中的值,则重启系统即可。
你在系统变量名可以随意,尽量见名之意,不要中文,对应变量名的值,就是你对应大模型的 key 的值。
在系统环境变量当中的值,有两种获取方式。
- 第一种就是:我们在 application.yaml / properties 配置文件当中,使用
${}占位符。如下图所示:
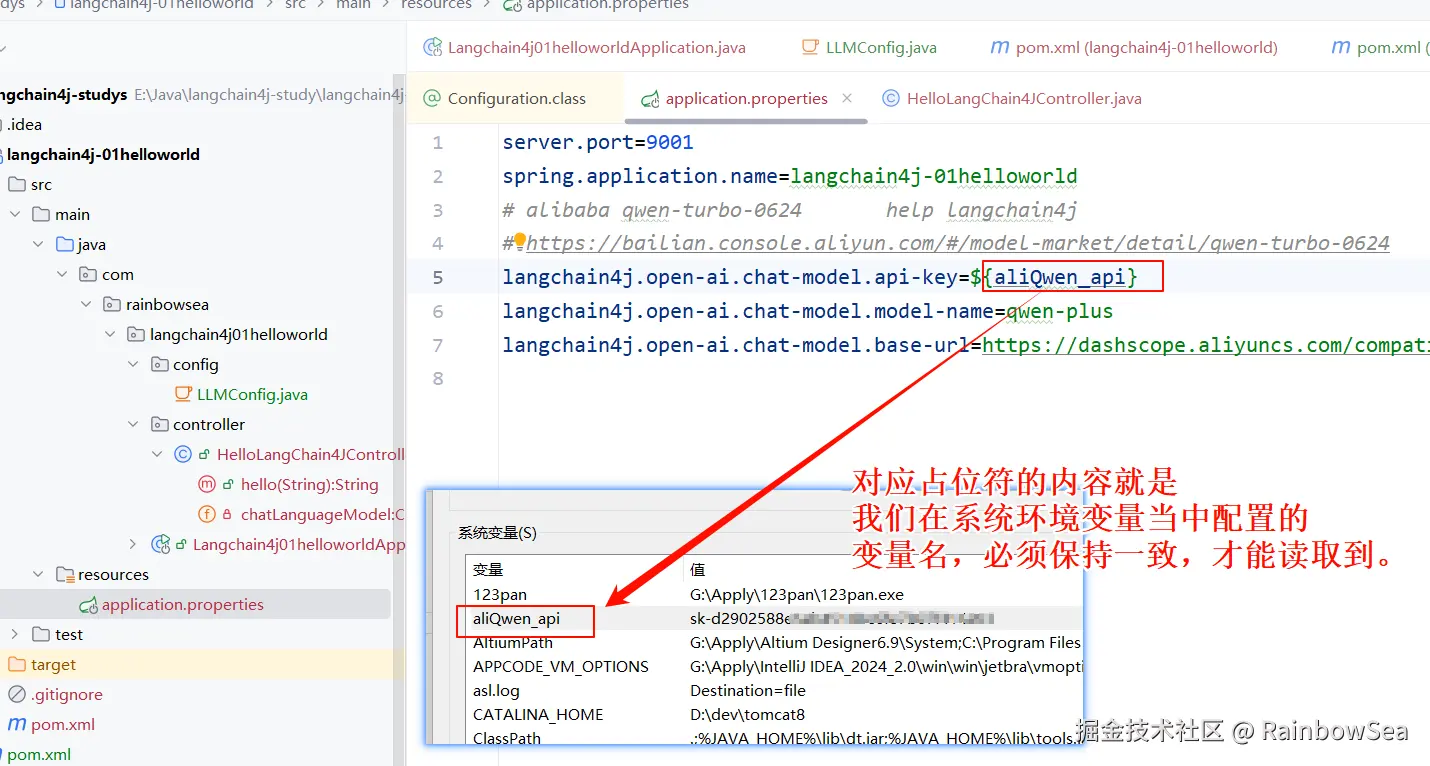
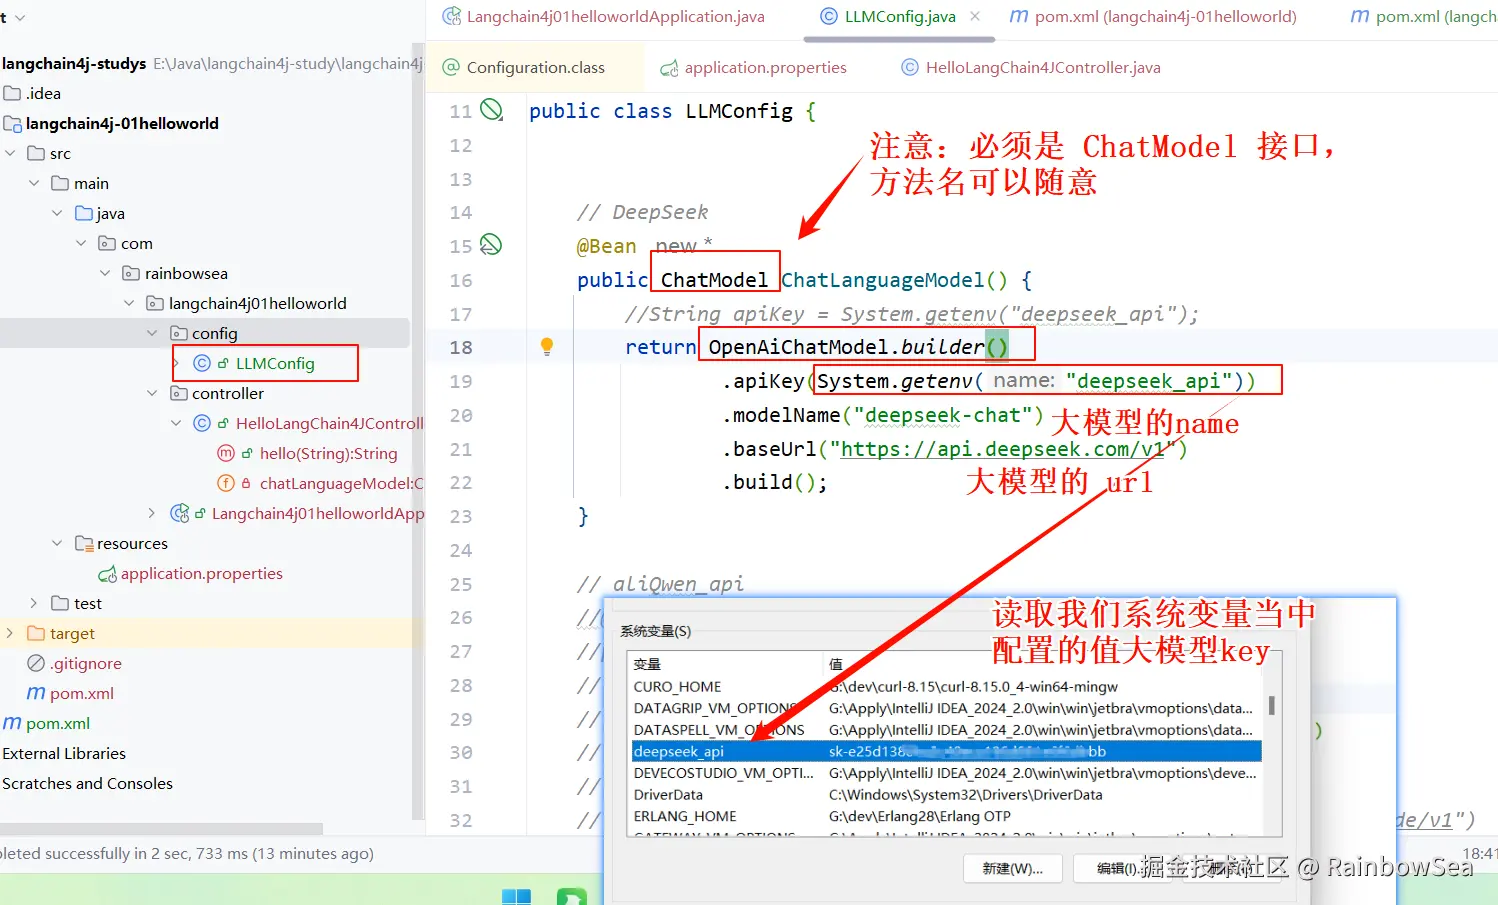
- 第二种方式:就是编写我们的 config 配置类,读取我们系统当中的配置大模型 key 。
这里我们使用配置类的方式,配置我们连接操作 DeepSeek 大模型的三件套配置信息(大模型的 key,name,url)。这些从 DeepSeek 开发文档当中就可以获取到
java
package com.rainbowsea.langchain4j01helloworld.config;

//import dev.langchain4j.model.chat.ChatLanguageModel;

import dev.langchain4j.model.chat.ChatModel;
import dev.langchain4j.model.openai.OpenAiChatModel;
import org.springframework.context.annotation.Bean;
import org.springframework.context.annotation.Configuration;

@Configuration
public class LLMConfig {


    // DeepSeek
    @Bean
    public ChatModel ChatLanguageModel() {
        //String apiKey = System.getenv("deepseek_api");
        return OpenAiChatModel.builder()
                .apiKey(System.getenv("deepseek_api"))
                .modelName("deepseek-chat")
                .baseUrl("https://api.deepseek.com/v1")
                .build();
    }

    // aliQwen_api
    //@Bean
    //public ChatModel ChatLanguageModel() {
    //    //String apiKey = System.getenv("aliQwen_api");
    //    return OpenAiChatModel.builder()
    //            .apiKey(System.getenv("aliQwen_api"))
    //            .modelName("qwen-plus")
    //            .baseUrl("https://dashscope.aliyuncs.com/compatible-mode/v1")
    //            .build();
    //}


}
还是之前的那个 Cutroller ,不同的是我们这次接入的是 DeepSeek 大模型。
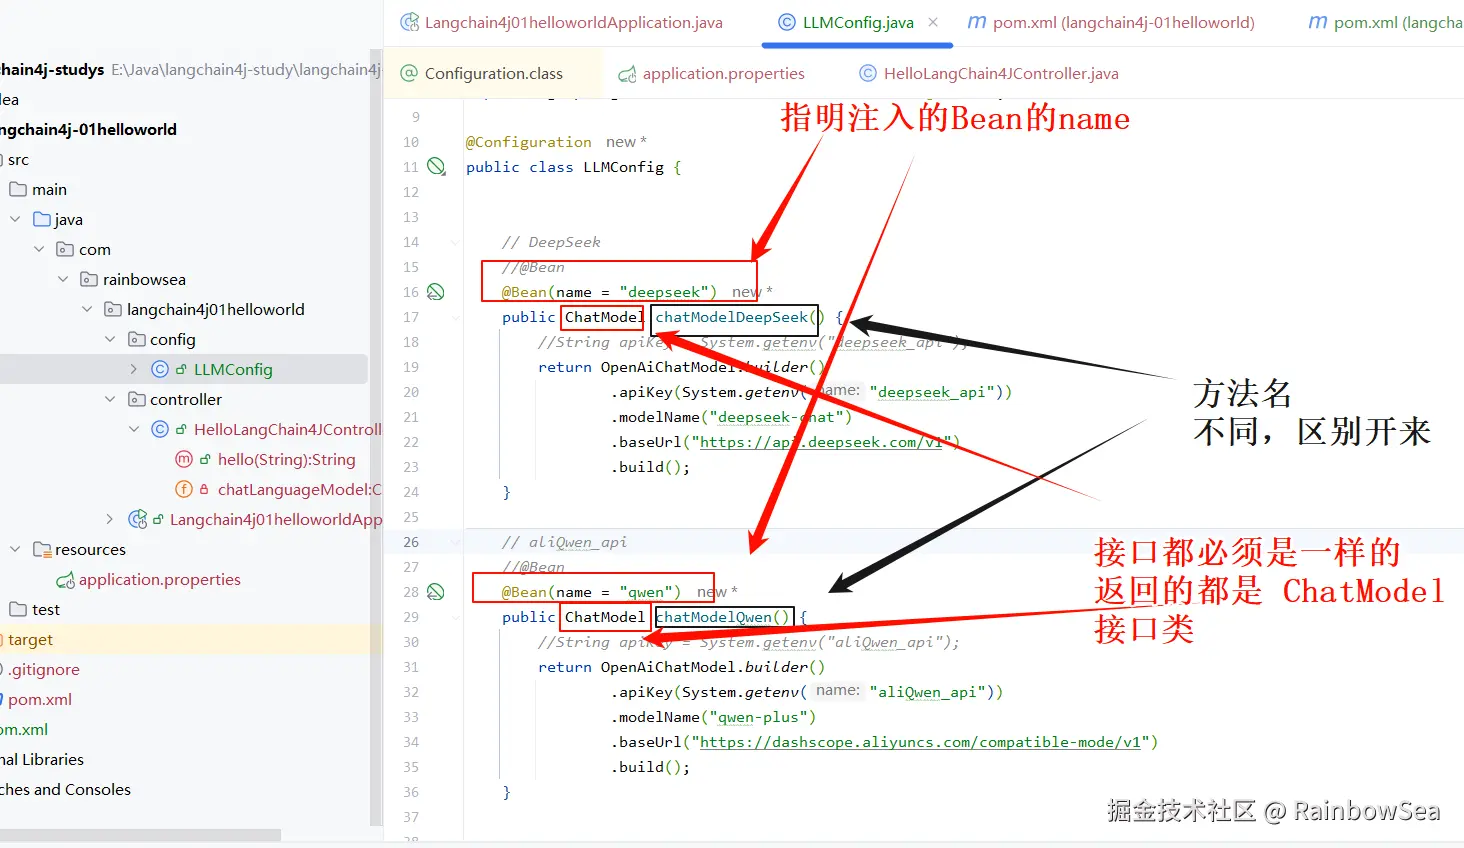
3. 同时接入 DeepSeek 和 通义千问
我们可以同时接入DeepSeek 和 通义千问 两个大模型,进行一个切换使用。
就是将这两个大模型的配置,都编写好,切换着使用即可。如下:
我们将这两个大模型的配置三件套,都写入到我们的配置类当中。如下:
java
package com.rainbowsea.langchain4j01helloworld.config;

//import dev.langchain4j.model.chat.ChatLanguageModel;

import dev.langchain4j.model.chat.ChatModel;
import dev.langchain4j.model.openai.OpenAiChatModel;
import org.springframework.context.annotation.Bean;
import org.springframework.context.annotation.Configuration;

@Configuration
public class LLMConfig {


    // DeepSeek
    //@Bean
    @Bean(name = "deepseek")
    public ChatModel chatModelDeepSeek() {
        //String apiKey = System.getenv("deepseek_api");
        return OpenAiChatModel.builder()
                .apiKey(System.getenv("deepseek_api"))
                .modelName("deepseek-chat")
                .baseUrl("https://api.deepseek.com/v1")
                .build();
    }

    // aliQwen_api
    //@Bean
    @Bean(name = "qwen")
    public ChatModel chatModelQwen() {
        //String apiKey = System.getenv("aliQwen_api");
        return OpenAiChatModel.builder()
                .apiKey(System.getenv("aliQwen_api"))
                .modelName("qwen-plus")
                .baseUrl("https://dashscope.aliyuncs.com/compatible-mode/v1")
                .build();
    }


}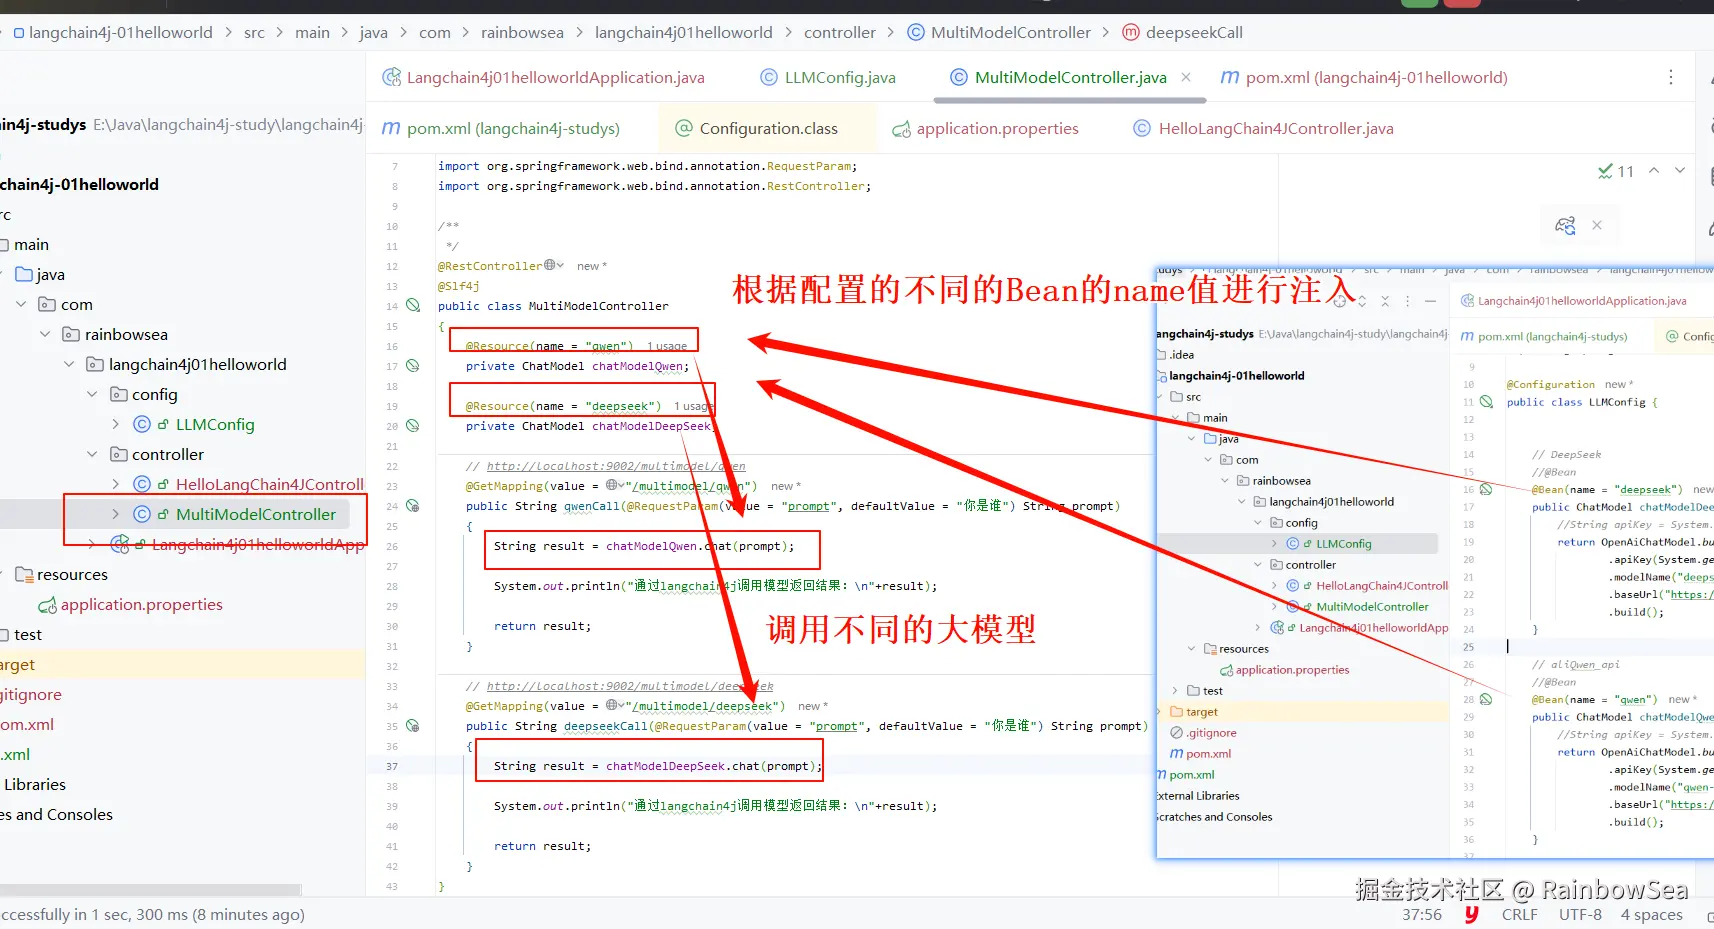
java
package com.rainbowsea.langchain4j01helloworld.controller;
import dev.langchain4j.model.chat.ChatModel;
import jakarta.annotation.Resource;
import lombok.extern.slf4j.Slf4j;
import org.springframework.web.bind.annotation.GetMapping;
import org.springframework.web.bind.annotation.RequestParam;
import org.springframework.web.bind.annotation.RestController;
/**
*/
@RestController
@Slf4j
public class MultiModelController
{
@Resource(name = "qwen")
private ChatModel chatModelQwen;
@Resource(name = "deepseek")
private ChatModel chatModelDeepSeek;
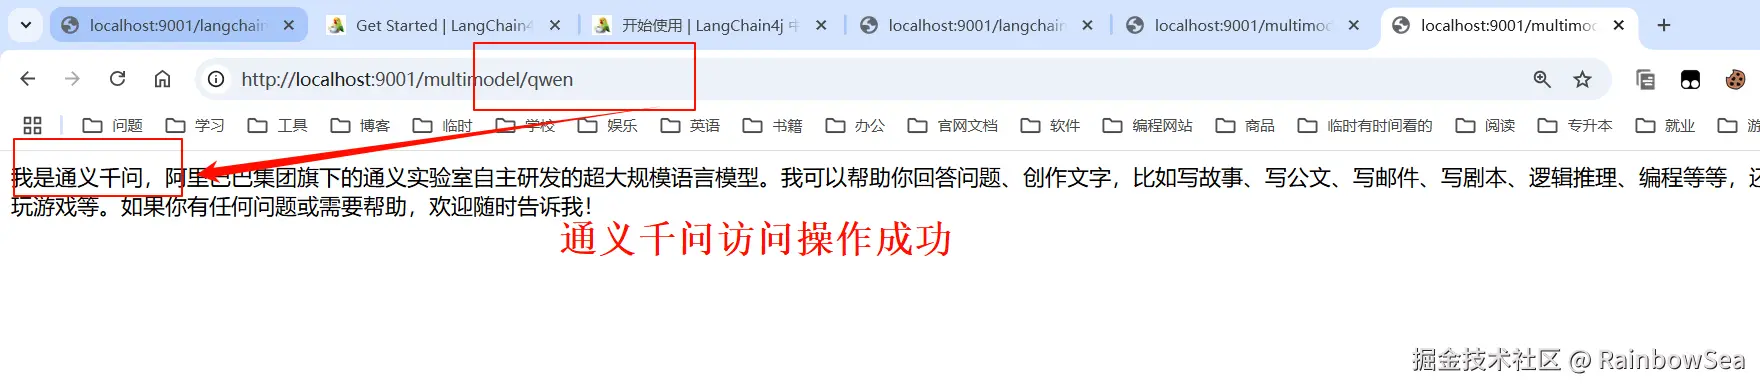
// http://localhost:9001/multimodel/qwen
@GetMapping(value = "/multimodel/qwen")
public String qwenCall(@RequestParam(value = "prompt", defaultValue = "你是谁") String prompt)
{
String result = chatModelQwen.chat(prompt);
System.out.println("通过langchain4j调用模型返回结果:\n"+result);
return result;
}
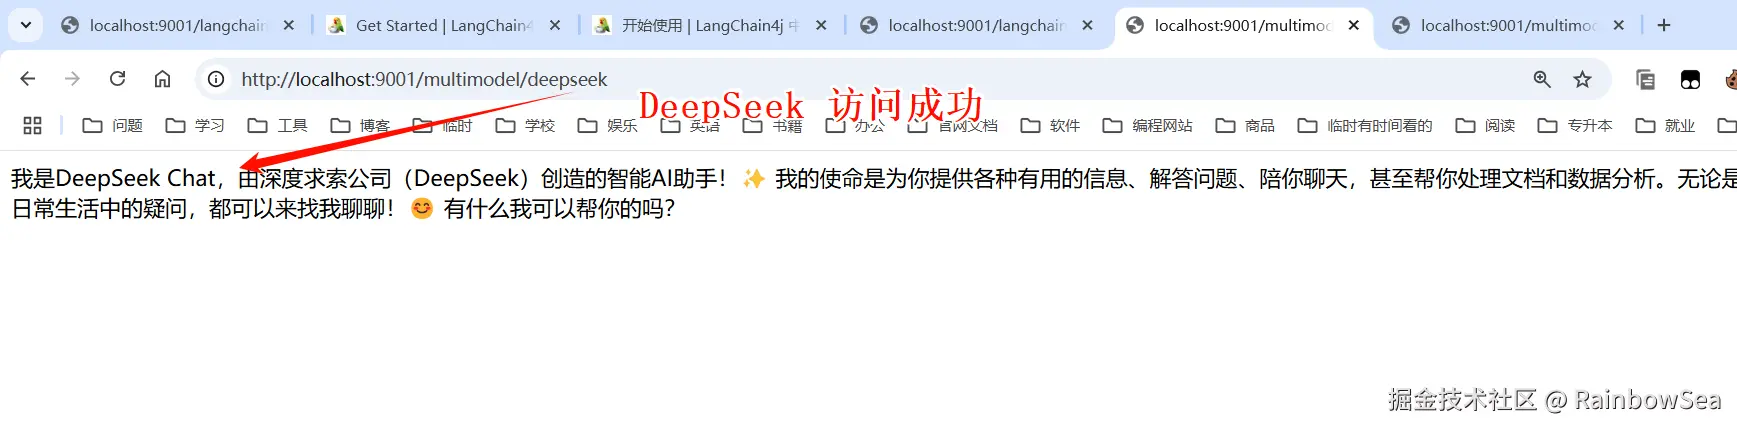
// http://localhost:9001/multimodel/deepseek
@GetMapping(value = "/multimodel/deepseek")
public String deepseekCall(@RequestParam(value = "prompt", defaultValue = "你是谁") String prompt)
{
String result = chatModelDeepSeek.chat(prompt);
System.out.println("通过langchain4j调用模型返回结果:\n"+result);
return result;
}
}测试:
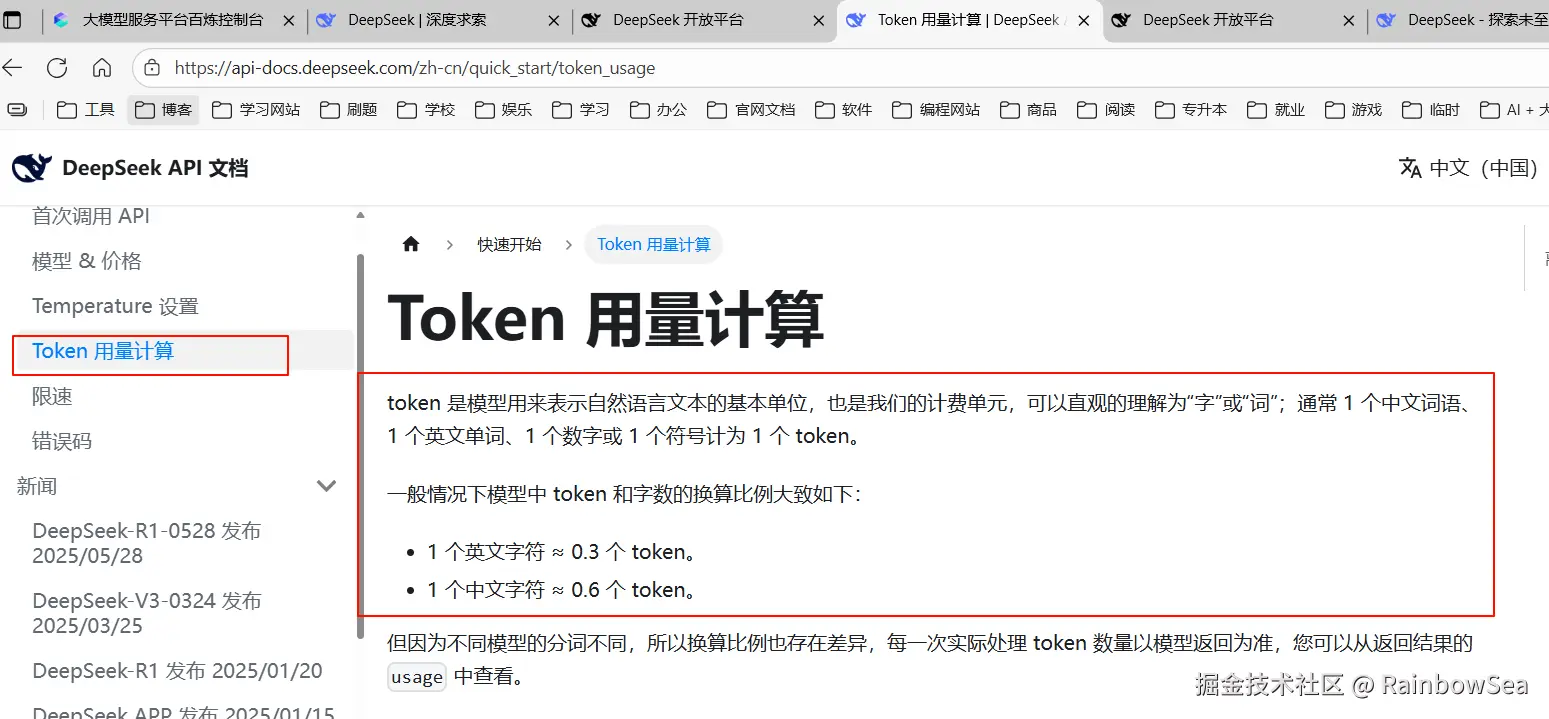
web开发中的 token 和 大模型中的 token 的区别:?
用途不同:
- Web开发中的Token通过加密字符串验证用户身份或授权访问资源,例如JWT令牌用于API访问权限控制。
- 大模型中的Token将文本拆分为最小处理单元(如词元),用于模型计算,例如将中文句子拆分为字、词或符号序列。
生成机制不同:
- Web Token通常由加密算法生成唯一字符串(如JWT包含用户信息)。
- 大模型Token通过特定算法(如分词规则)对文本进行拆分,不同模型拆分规则可能不同。
4. 最后:
"在这个最后的篇章中,我要表达我对每一位读者的感激之情。你们的关注和回复是我创作的动力源泉,我从你们身上吸取了无尽的灵感与勇气。我会将你们的鼓励留在心底,继续在其他的领域奋斗。感谢你们,我们总会在某个时刻再次相遇。"