OpenCV高级功能:深度学习模块DNN的集成与应用
学习目标
本课程将深入探讨OpenCV的深度学习模块DNN,学习如何将预训练的深度学习模型集成到OpenCV中,以实现高级图像处理任务。通过本课程,学员能够理解DNN模块的基本原理,掌握模型的加载与使用方法,并能够独立完成图像分类、目标检测等任务。
相关知识点
- DNN的集成与应用
学习内容
1 DNN的集成与应用
1.1 OpenCV DNN模块概述
OpenCV的DNN模块是一个强大的工具,它允许学员将预训练的深度学习模型集成到OpenCV中,从而实现复杂的图像处理任务。DNN模块支持多种深度学习框架的模型,如Caffe、TensorFlow、Darknet、Torch/PyTorch等。通过DNN模块,开发者可以轻松地将这些模型应用于图像分类、目标检测、语义分割等任务中。
DNN模块的核心功能包括模型的读取、前向传播、后处理等。模型读取支持多种格式,如Caffe的.prototxt和.caffemodel文件,TensorFlow的.pb文件等。前向传播是指将输入数据通过模型进行计算,得到输出结果。后处理则是对模型输出的结果进行解析,如将分类结果转换为类别标签,将检测框坐标转换为图像中的实际位置等。
1.2 深度学习模型的加载与使用
在实验中,将详细介绍如何使用OpenCV DNN模块加载和使用预训练的深度学习模型。使用Caffe框架演示模型的加载、前向传播和结果解析的完整流程。
1.2.1 模型加载
首先,需要准备一个预训练的Caffe模型,包括模型定义文件(.prototxt)和模型权重文件(.caffemodel)。
bash
!wget https://model-community-picture.obs.cn-north-4.myhuaweicloud.com/ascend-zone/notebook_models/3520c8f02fa211f0a0d7fa163edcddae/resnet50.zip --no-check-certificate
python
!unzip -o resnet50.zip
python
import cv2

# 模型文件路径
model_def = './resnet50/resnet50.prototxt'
model_weights = './resnet50/resnet50.caffemodel'

# 加载模型
net = cv2.dnn.readNetFromCaffe(model_def, model_weights)
1.2.2 前向传播
加载模型后,我们需要准备输入数据。对于图像分类任务,输入数据通常是一张图像。我们需要对图像进行预处理,如调整大小、归一化等,以符合模型的输入要求。
python
# 读取图像
image = cv2.imread('./resnet50/input_image.png')

# 图像预处理
blob = cv2.dnn.blobFromImage(image, scalefactor=1.0, size=(224, 224), mean=(104, 117, 123), swapRB=True, crop=False)

# 设置输入
net.setInput(blob)

# 前向传播
output = net.forward()
1.2.3 结果解析
前向传播后,模型会输出一个概率分布,表示输入图像属于各个类别的概率。我们需要解析这些输出,找到概率最高的类别。
python
# 获取输出的类别索引
class_id = output[0].argmax()

# 读取类别标签文件
with open('./resnet50/class_labels.txt', 'r') as f:
    class_labels = f.read().splitlines()

# 获取类别标签
class_label = class_labels[class_id]

# 打印结果
print(f'预测类别: {class_label}')
1.3 图像分类与目标检测实践
在本课程中,通过具体的实践项目,进一步巩固前面学到的知识。使用OpenCV DNN模块实现图像分类和目标检测任务。
1.3.1 图像分类实践
使用一个预训练的ResNet-50模型进行图像分类。首先,需要准备模型文件和类别标签文件。
python
# 模型文件路径
model_def = './resnet50/resnet50.prototxt'
model_weights = './resnet50/resnet50.caffemodel'
class_labels_file = './resnet50/class_labels.txt'

# 加载模型
net = cv2.dnn.readNetFromCaffe(model_def, model_weights)

# 读取图像
image = cv2.imread('./resnet50/input_image.png')

# 图像预处理
blob = cv2.dnn.blobFromImage(image, scalefactor=1.0, size=(224, 224), mean=(104, 117, 123), swapRB=True, crop=False)

# 设置输入
net.setInput(blob)

# 前向传播
output = net.forward()

# 获取输出的类别索引
class_id = output[0].argmax()

# 读取类别标签文件
with open(class_labels_file, 'r') as f:
    class_labels = f.read().splitlines()

# 获取类别标签
class_label = class_labels[class_id]

# 打印结果
print(f'预测类别: {class_label}')
1.3.2 目标检测实践
接下来,使用一个预训练的SSD模型进行目标检测。SSD(Single Shot MultiBox Detector)是一种高效的单阶段目标检测算法,适用于实时检测任务。
python
!wget https://model-community-picture.obs.cn-north-4.myhuaweicloud.com/ascend-zone/notebook_models/3520c8f02fa211f0a0d7fa163edcddae/ssd.zip --no-check-certificate
python
!unzip -o ssd.zip
python
import cv2
import numpy as np
import matplotlib.pyplot as plt

# 模型文件路径
model_def = './ssd/ssd_mobilenet_v2_coco_2018_03_29.pbtxt'
model_weights = './ssd/frozen_inference_graph.pb'
class_labels_file = './ssd/coco_labels.txt'

# 加载模型
net = cv2.dnn.readNetFromTensorflow(model_weights, model_def)

# 读取图像
image = cv2.imread('./resnet50/input_image.png')

# 图像预处理
blob = cv2.dnn.blobFromImage(image, scalefactor=1.0, size=(300, 300), mean=(127.5, 127.5, 127.5), swapRB=True, crop=False)

# 设置输入
net.setInput(blob)

# 前向传播
output = net.forward()

# 读取类别标签文件
with open(class_labels_file, 'r') as f:
    class_labels = f.read().splitlines()

# 解析检测结果
for detection in output[0, 0, :, :]:
    score = float(detection[2])
    if score > 0.5:  # 置信度阈值
        class_id = int(detection[1])
        left = int(detection[3] * image.shape[1])
        top = int(detection[4] * image.shape[0])
        right = int(detection[5] * image.shape[1])
        bottom = int(detection[6] * image.shape[0])

        # 绘制检测框
        cv2.rectangle(image, (left, top), (right, bottom), (0, 255, 0), 2)

        # 绘制类别标签
        label = f'{class_labels[class_id]}: {score:.2f}'
        label_size, base_line = cv2.getTextSize(label, cv2.FONT_HERSHEY_SIMPLEX, 0.5, 1)
        top = max(top, label_size[1])
        cv2.rectangle(image, (left, top - label_size[1]), (left + label_size[0], top + base_line), (0, 255, 0), cv2.FILLED)
        cv2.putText(image, label, (left, top), cv2.FONT_HERSHEY_SIMPLEX, 0.5, (0, 0, 0), 1)

# 使用matplotlib显示图像
# 注意:matplotlib显示图像时需要将BGR格式转换为RGB格式
plt.imshow(cv2.cvtColor(image, cv2.COLOR_BGR2RGB))
plt.axis('off')  # 关闭坐标轴
plt.show()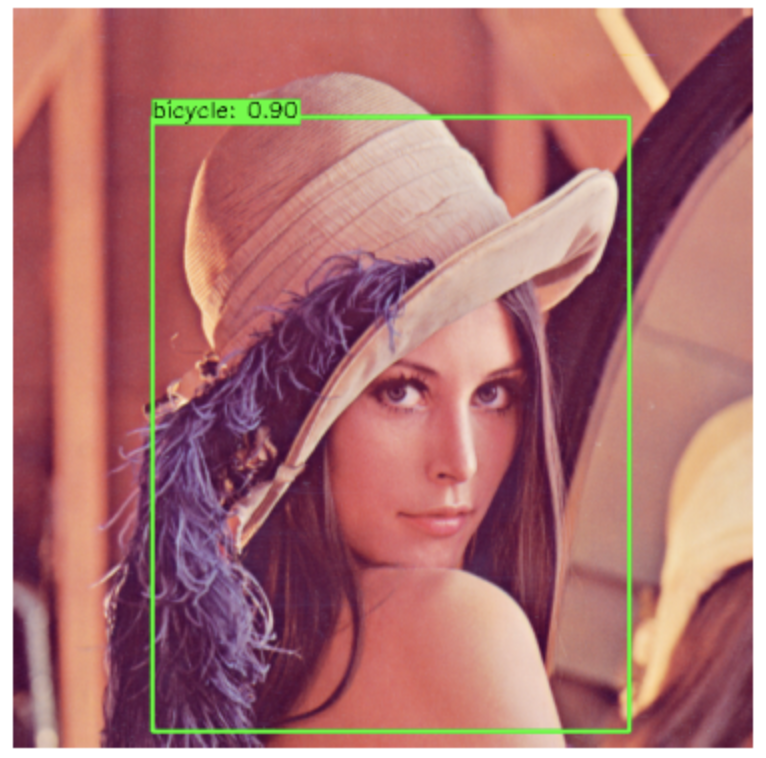
通过本课程学习,学员将能够熟练掌握OpenCV DNN模块的使用方法,将深度学习模型集成到OpenCV中,实现高级图像处理任务。