Docker
镜像
Dockerfile案例:自定义httpd镜像
创建Dockerfile
bash
[root@docker ~]# vim httpd.dockerfile
[root@docker ~]# cat httpd.dockerfile
FROM centos:8.4.2105
MAINTAINER yuxb
RUN minorver=8.4.2105 \
&& sed -e "s|^mirrorlist=|#mirrorlist=|g" -e "s|^#baseurl=http://mirror.centos.org/\$contentdir/\$releasever|baseurl=https://mirrors.aliyun.com/centos-vault/$minorver|g" -i.bak /etc/yum.repos.d/CentOS-*.repo
RUN yum install -y httpd && yum clean all && rm -rf /var/cache/yum
COPY index.html /var/www/html/
EXPOSE 80
CMD ["/usr/sbin/httpd", "-DFOREGROUND"]

[root@docker ~]# echo hello yuxb > index.html

[root@docker ~]# docker build -t httpd:centos -f httpd.dockerfile .

[root@docker ~]# docker history httpd:centos
IMAGE          CREATED              CREATED BY                                      SIZE      COMMENT
5bc804451e3c   About a minute ago   CMD ["/usr/sbin/httpd" "-DFOREGROUND"]          0B        buildkit.dockerfile.v0
<missing>      About a minute ago   EXPOSE map[80/tcp:{}]                           0B        buildkit.dockerfile.v0
<missing>      About a minute ago   COPY index.html /var/www/html/ # buildkit       11B       buildkit.dockerfile.v0
<missing>      About a minute ago   RUN /bin/sh -c yum install -y httpd && yum c...   21.6MB    buildkit.dockerfile.v0
<missing>      19 hours ago         RUN /bin/sh -c minorver=8.4.2105 && sed -e "...   17.6kB    buildkit.dockerfile.v0
<missing>      19 hours ago         MAINTAINER yuxb                                 0B        buildkit.dockerfile.v0
<missing>      3 years ago          /bin/sh -c #(nop)  CMD ["/bin/bash"]            0B
<missing>      3 years ago          /bin/sh -c #(nop)  LABEL org.label-schema.sc...   0B
<missing>      3 years ago          /bin/sh -c #(nop) ADD file:805cb5e15fb6e0bb0...   231MB
测试
bash
#基于刚才dockerfile创建的镜像httpd:centos创建容器myweb
[root@docker ~]# docker run -d -p 80:80 --name myweb httpd:centos
c9376d4473a44c9dea404a962a3df78f3eb446a13c0d9f203077e4af2dcb7022

#创建出来的容器
[root@docker ~]# docker ps
CONTAINER ID   IMAGE          COMMAND                  CREATED         STATUS         PORTS                               NAMES
c9376d4473a4   httpd:centos   "/usr/sbin/httpd -DF..."   6 seconds ago   Up 4 seconds   0.0.0.0:80->80/tcp, :::80->80/tcp   myweb

#访问测试
[root@docker ~]# curl localhost
hello yuxb
Dockerfile案例:自定义mycentosjava8
Dockerfile文件
bash
[root@docker ~]# mkdir myfile ; cd myfile

[root@docker myfile]# vim Dockerfile
[root@docker myfile]# cat Dockerfile
FROM centos:8.4.2105
MAINTAINER yuxb<123456@qq.com>
ENV MYPATH /usr/local
WORKDIR $MYPATH

# 配置yum源
RUN minorver=8.4.2105 \
&& sed -e "s|^mirrorlist=|#mirrorlist=|g" -e "s|^#baseurl=http://mirror.centos.org/\$contentdir/\$releasever|baseurl=https://mirrors.aliyun.com/centos-vault/$minorver|g" -i.bak /etc/yum.repos.d/CentOS-*.repo

#安装vim编辑器、ifconfig命令查看网络IP、java8及lib库
RUN yum -y install vim net-tools glibc.i686
RUN mkdir /usr/local/java
#ADD 是相对路径jar,把jdk-8u461-linux-x64.tar.gz添加到容器中,安装包必须要和Dockerfile文件在同一位置
ADD jdk-8u461-linux-x64.tar.gz /usr/local/java/

#配置java环境变量
ENV JAVA_HOME /usr/local/java/jdk1.8.0_461
ENV JRE_HOME $JAVA_HOME/jre
ENV CLASSPATH $JAVA_HOME/lib/dt.jar:$JAVA_HOME/lib/tools.jar:$JRE_HOME/lib:$CLASSPATH
ENV PATH $JAVA_HOME/bin:$PATH

EXPOSE 80

CMD echo $MYPATH
CMD echo "success--------------ok"
CMD /bin/bash
bash
# 将jdk-8u461-linux-x64.tar.gz与Dockerfile放到同一目录
[root@docker myfile]# ls
Dockerfile  jdk-8u461-linux-x64.tar.gz
bash
# 构建镜像为centosjava8:461
[root@docker myfile]# docker build -t centosjava8:461 .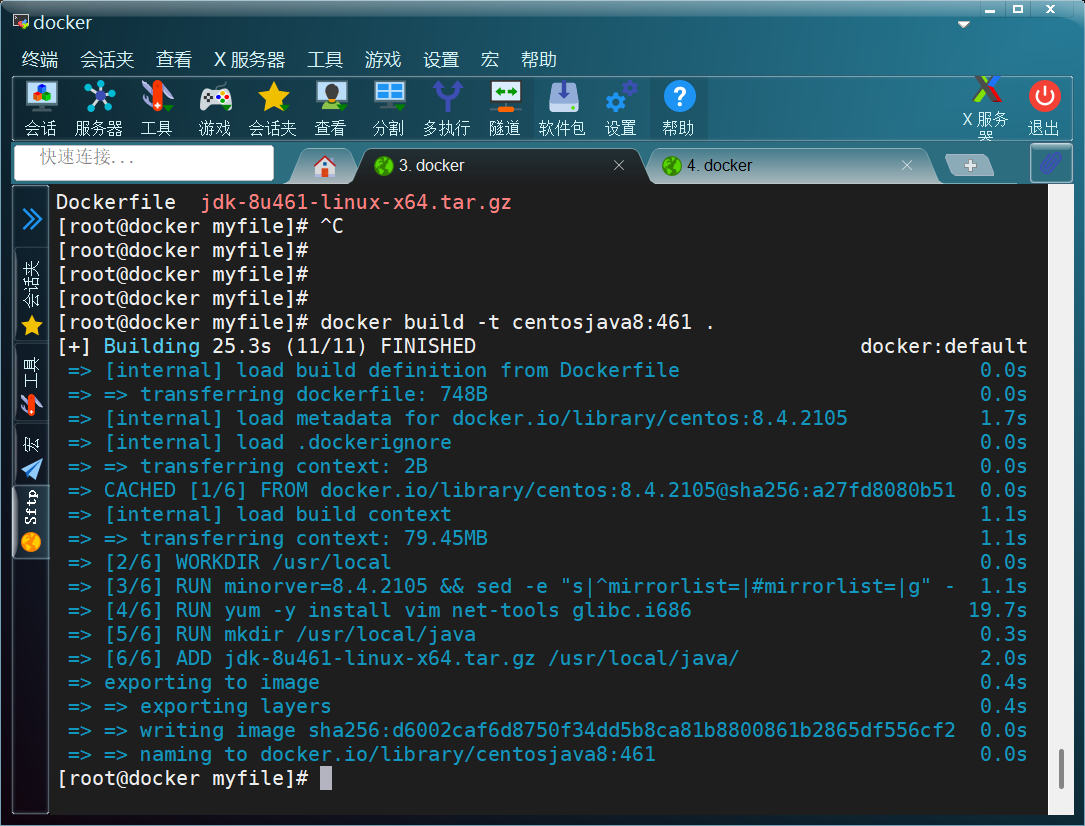
bash
# 查看构建的镜像
[root@docker myfile]# docker images centosjava8
REPOSITORY    TAG       IMAGE ID       CREATED          SIZE
centosjava8   461       d6002caf6d87   53 seconds ago   509MB

# 运行测试
[root@docker myfile]# docker run -it centosjava8:461 /bin/bash

# 查看有没有在正确位置
[root@25814e64b454 local]# pwd
/usr/local

# 测试java有没有安装,查看hava版本
[root@25814e64b454 local]# java -version
java version "1.8.0_461"
Java(TM) SE Runtime Environment (build 1.8.0_461-b11)
Java HotSpot(TM) 64-Bit Server VM (build 25.461-b11, mixed mode)
[root@25814e64b454 local]# ifconfig
eth0: flags=4163<UP,BROADCAST,RUNNING,MULTICAST>  mtu 1500
        inet 172.17.0.3  netmask 255.255.0.0  broadcast 172.17.255.255
        ether 02:42:ac:11:00:03  txqueuelen 0  (Ethernet)
        RX packets 9  bytes 726 (726.0 B)
        RX errors 0  dropped 0  overruns 0  frame 0
        TX packets 0  bytes 0 (0.0 B)
        TX errors 0  dropped 0 overruns 0  carrier 0  collisions 0

lo: flags=73<UP,LOOPBACK,RUNNING>  mtu 65536
        inet 127.0.0.1  netmask 255.0.0.0
        inet6 ::1  prefixlen 128  scopeid 0x10<host>
        loop  txqueuelen 1000  (Local Loopback)
        RX packets 0  bytes 0 (0.0 B)
        RX errors 0  dropped 0  overruns 0  frame 0
        TX packets 0  bytes 0 (0.0 B)
        TX errors 0  dropped 0 overruns 0  carrier 0  collisions 0

# 测试vim
[root@25814e64b454 local]# vim file1
[root@25814e64b454 local]# cat file1
123
使用公共Registry-华为云
根据所存储的镜像公开分享与否,Docker仓库可以分为:
- 公开仓库(Public)
- 私有仓库(Private)
目前,最大的公开仓库是官方提供的Docker Hub,其中存放了数量庞大的镜像供用户下载。国内不少云 服务提供商(如华为、阿里云等)也提供了仓库的本地源,可以提供稳定的国内访问。
保存和分发镜像的最直接方法就是使用 Docker Hub。
Docker Hub 是 Docker 公司维护的公共 Registry。用户可以将自己的镜像保存到 Docker Hub 免费的 repository 中。如果不希望别人访问自己的镜像,也可以购买私有 repository。
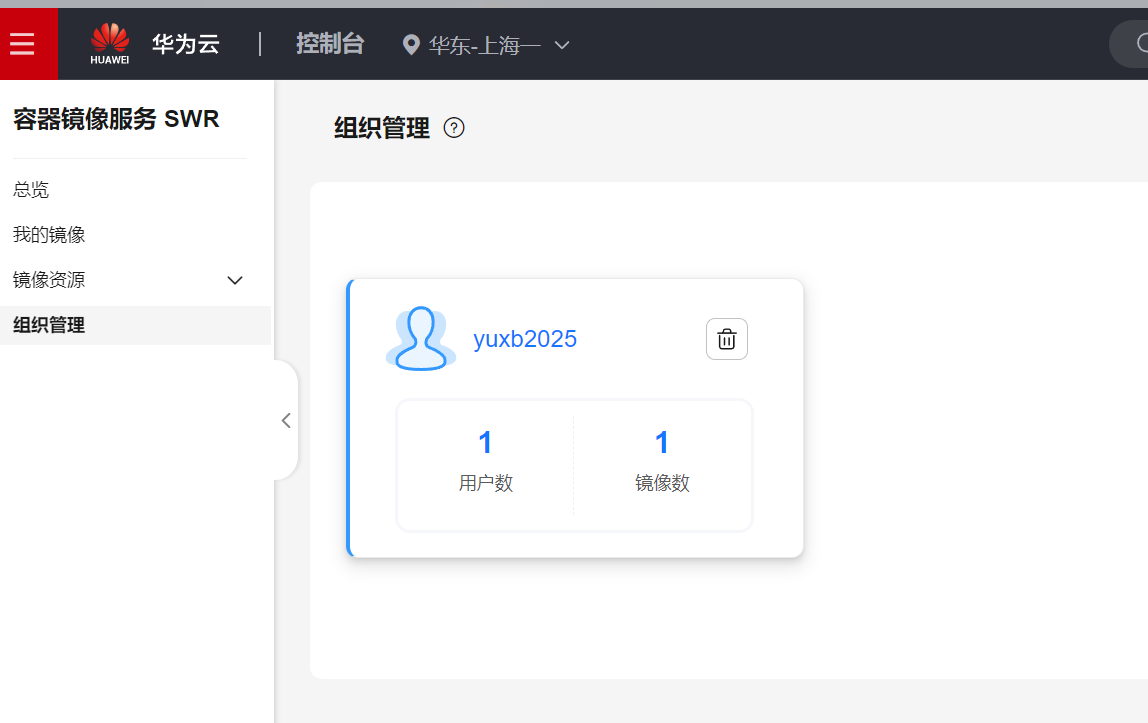
登录华为云
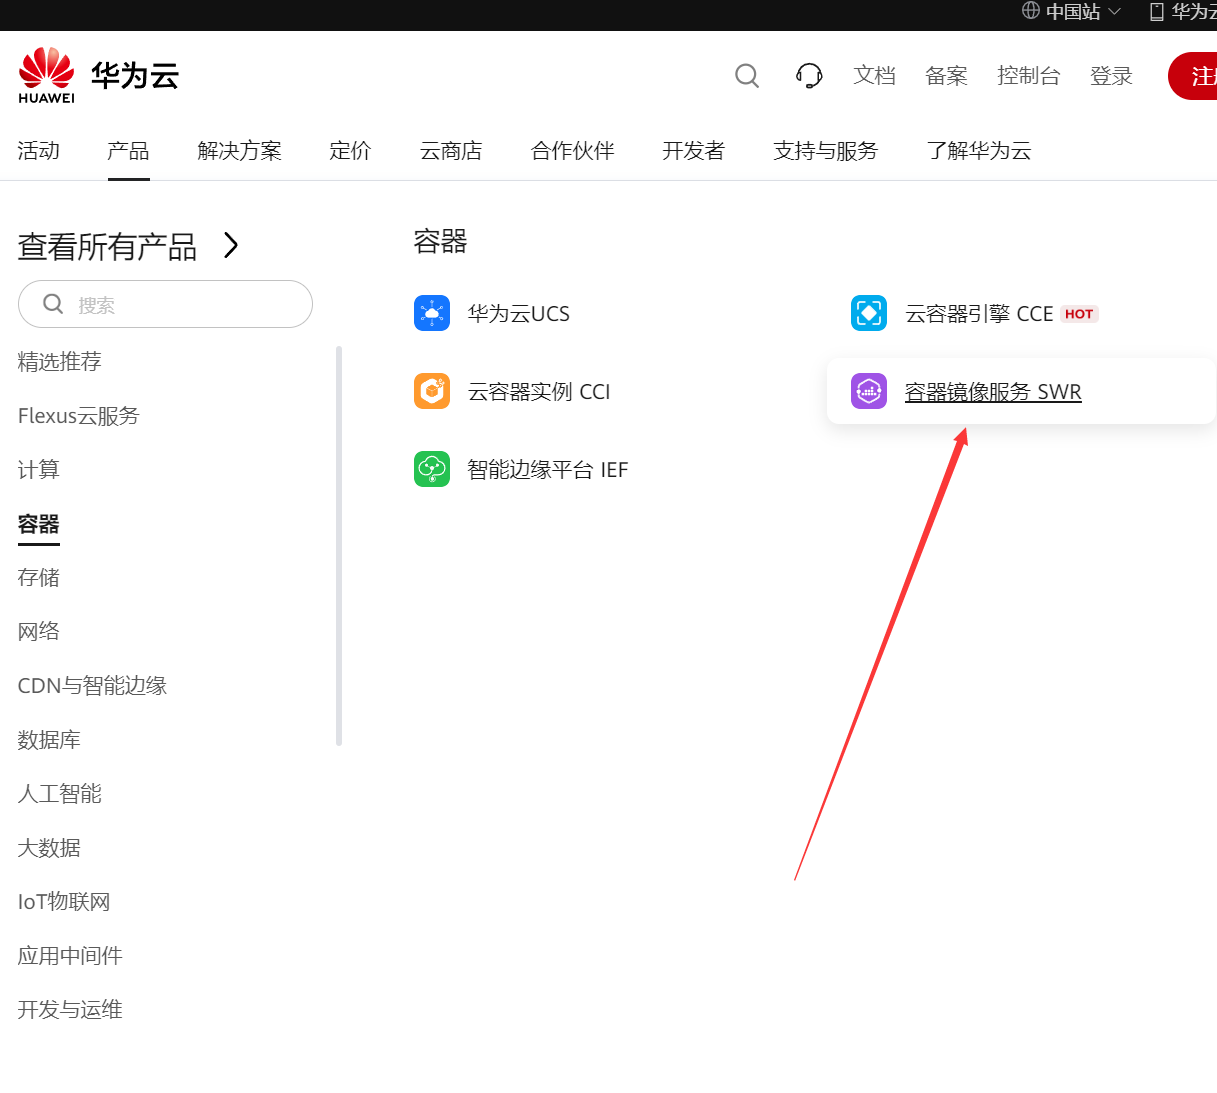
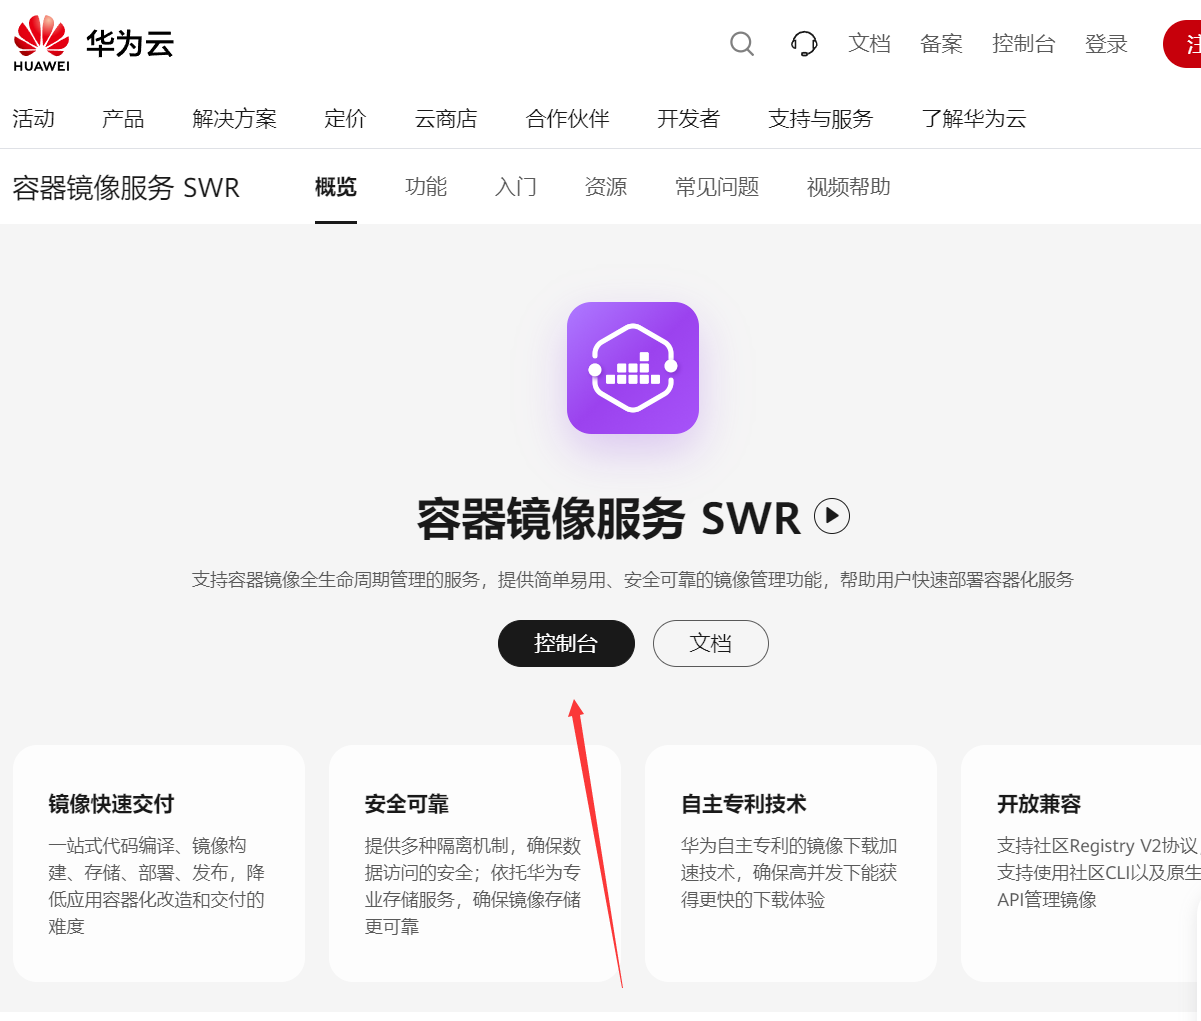

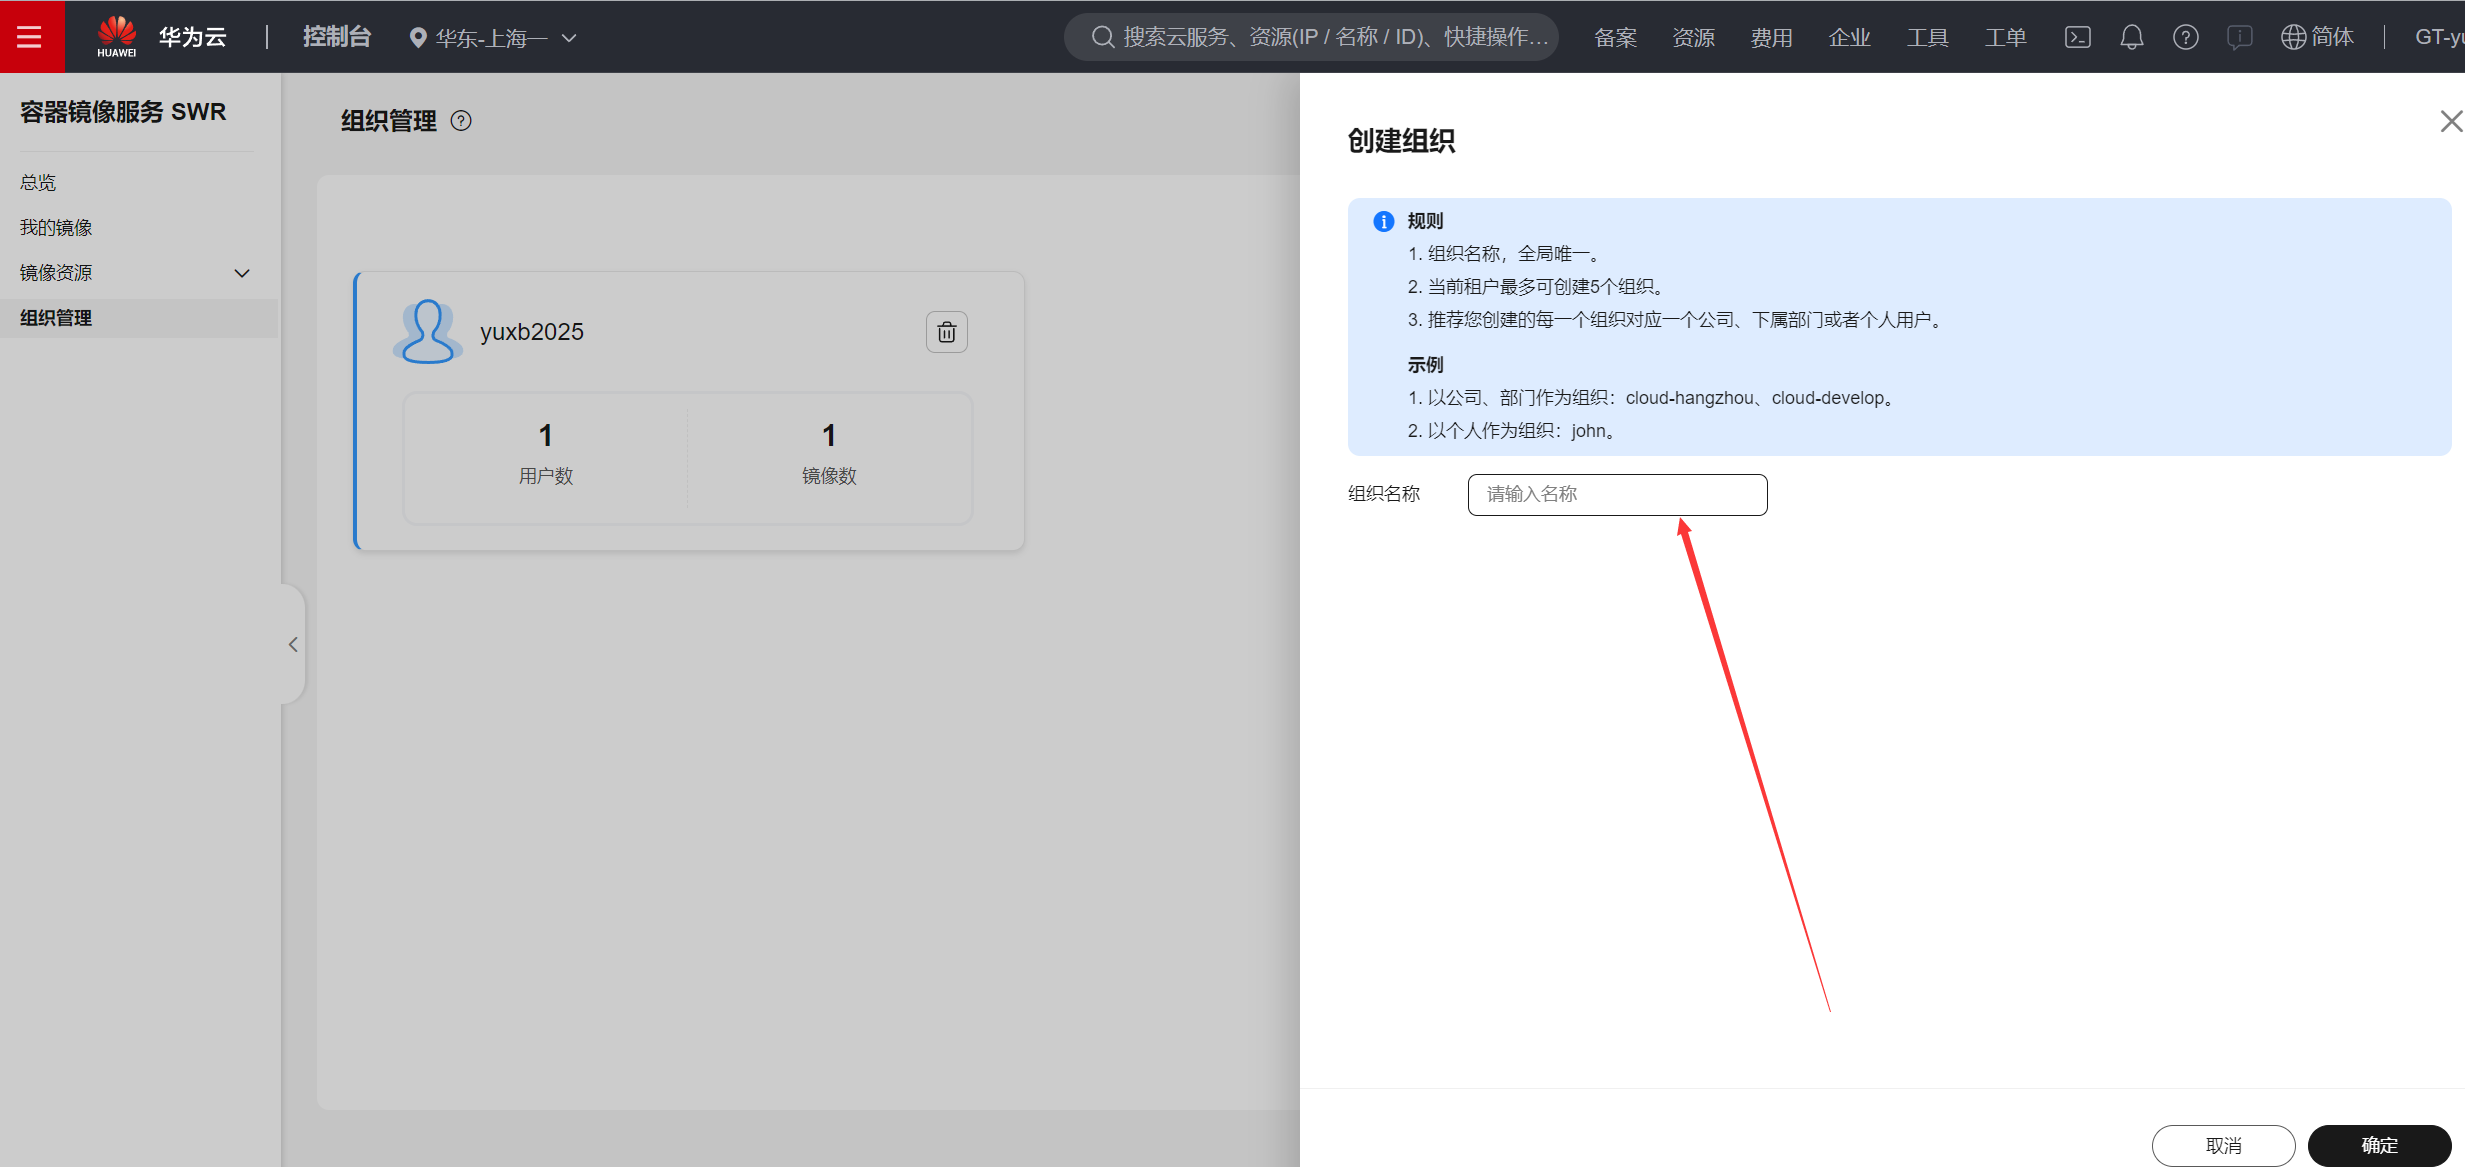
进入新创建的组织
复制登录指令
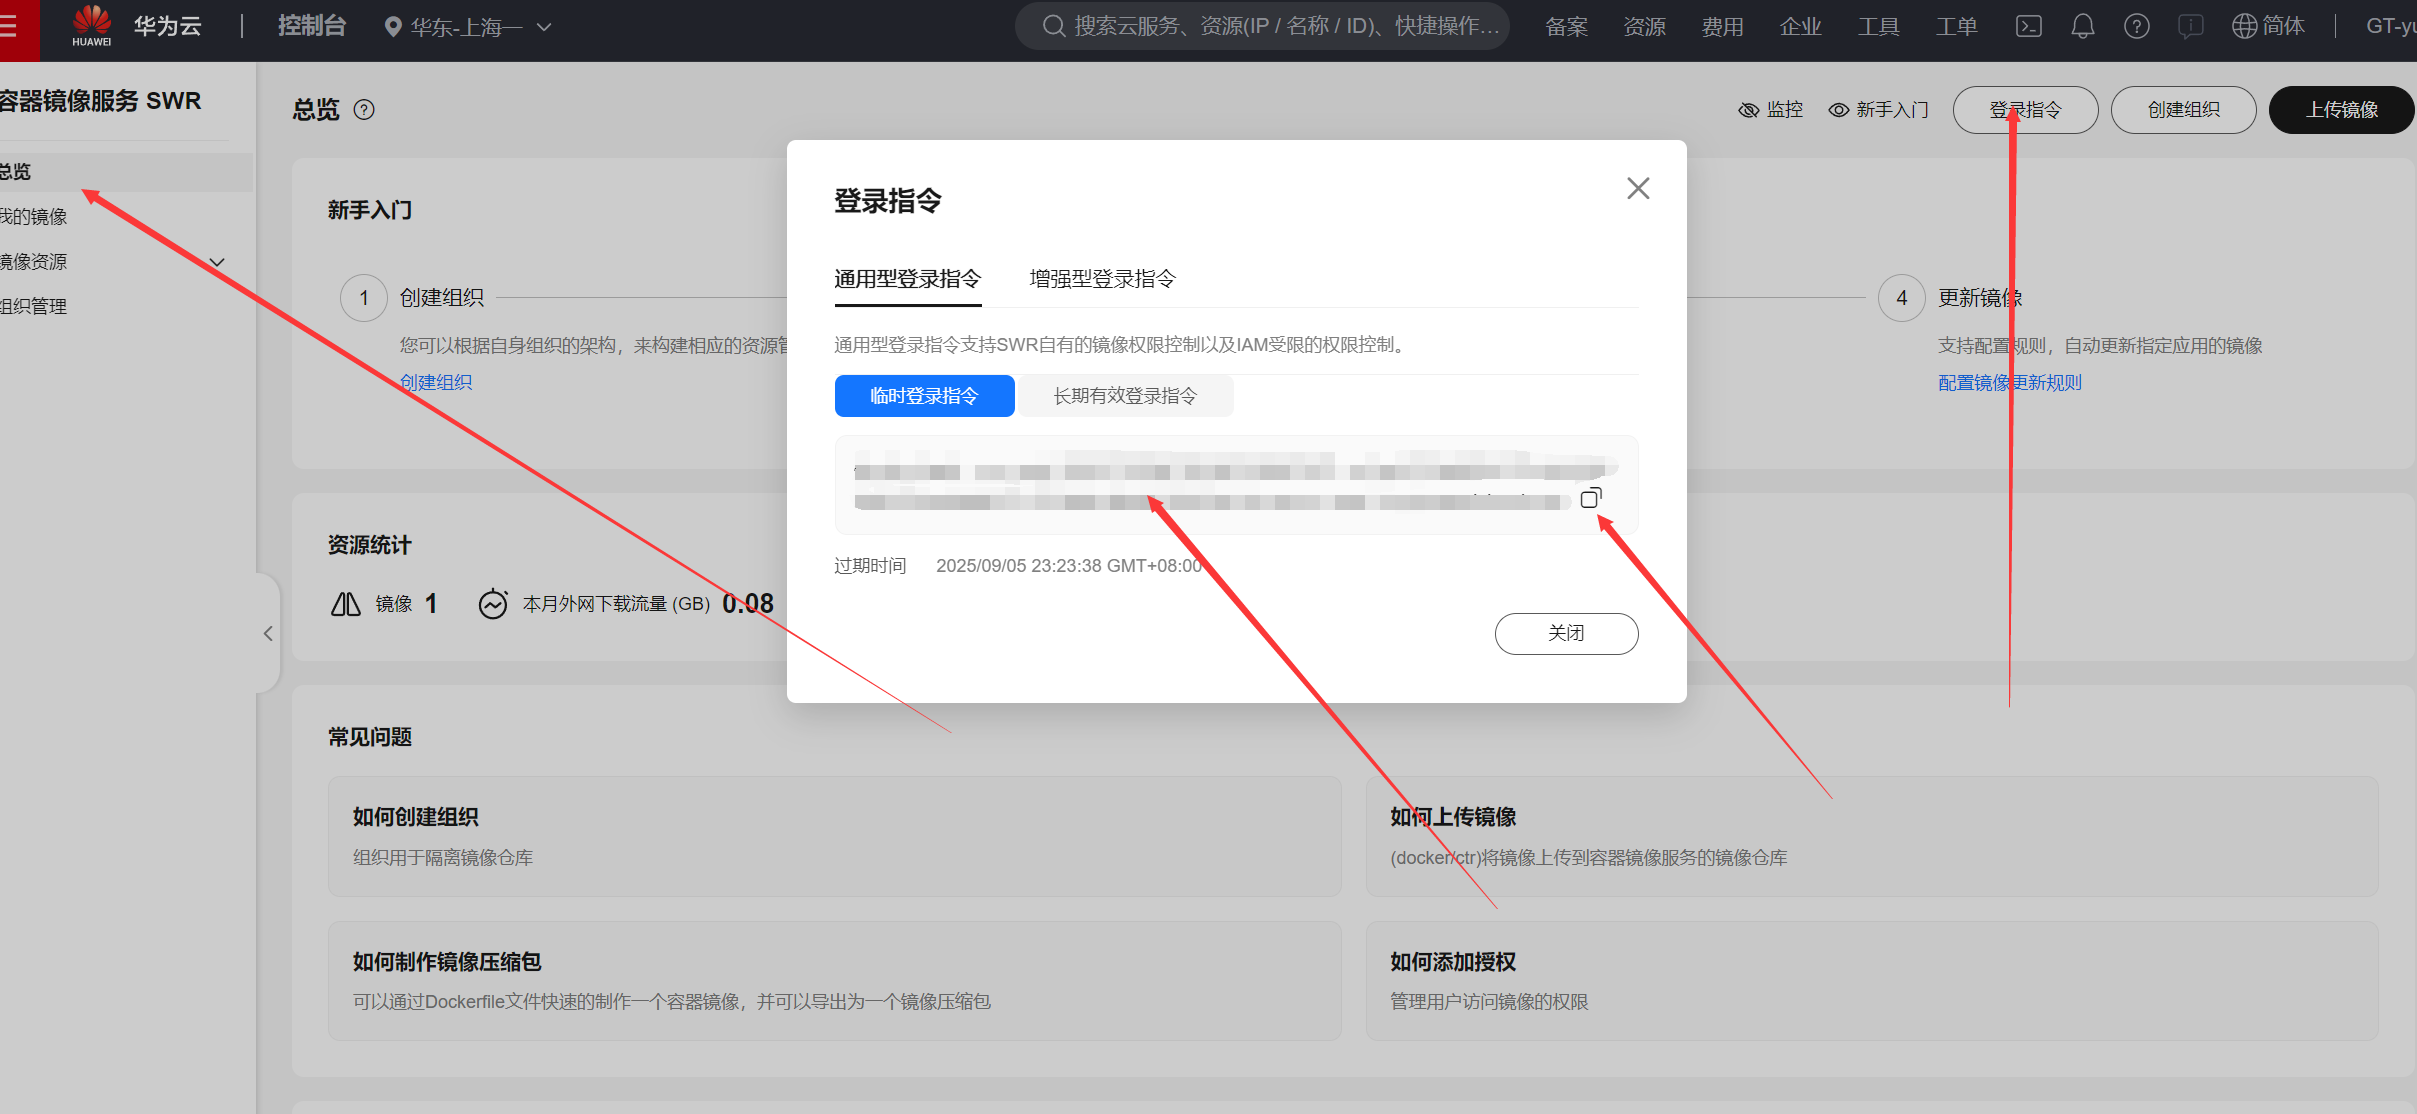
通过上面获取的登录指令,回到docker上登陆
bash
[root@docker ~]# docker login -u cn-east-3@HST3WBR7P98AU7OMPHW5 -p 1fc944ab5c38657a8ff37ba16aec9132f67dcb9c71dbeb42c08d5b1bb502d12e swr.cn-east-3.myhuaweicloud.com
WARNING! Using --password via the CLI is insecure. Use --password-stdin.
WARNING! Your password will be stored unencrypted in /root/.docker/config.json.
Configure a credential helper to remove this warning. See
https://docs.docker.com/engine/reference/commandline/login/#credentials-store

Login Succeeded
上传镜像
bash
#命令格式
sudo docker tag {镜像名称}:{版本名称} swr.cn-east-3.myhuaweicloud.com/{组织名
称}/{镜像名称}:{版本名称}
sudo docker push swr.cn-east-3.myhuaweicloud.com/{组织名称}/{镜像名称}:{版本名
称}
bash
#刚才Dockerfile制作的httpd:centos镜像 用来上传
[root@docker ~]# docker images httpd:centos
REPOSITORY TAG IMAGE ID CREATED SIZE
httpd centos 5bc804451e3c 2 hours ago 253MB
#修改镜像名
[root@docker ~]# docker tag httpd:centos swr.cn-east-3.myhuaweicloud.com/yuxb2025/ centos_httpd:v1
[root@docker ~]# docker images swr.cn-east-3.myhuaweicloud.com/yuxb2025/centos_httpd
REPOSITORY TAG IMAGE ID CREATED SIZE
swr.cn-east-3.myhuaweicloud.com/yuxb2025/centos_httpd v1 5bc804451e3c 2 hours ago 253MB
#上传镜像
[root@docker ~]# docker push swr.cn-east-3.myhuaweicloud.com/yuxb2025/centos_httpd:v1
The push refers to repository [swr.cn-east-3.myhuaweicloud.com/yuxb2025/centos_httpd]
d666403f29a0: Pushed
b257fbd25362: Pushed
91ad5bd0a25d: Pushed
74ddd0ec08fa: Pushed
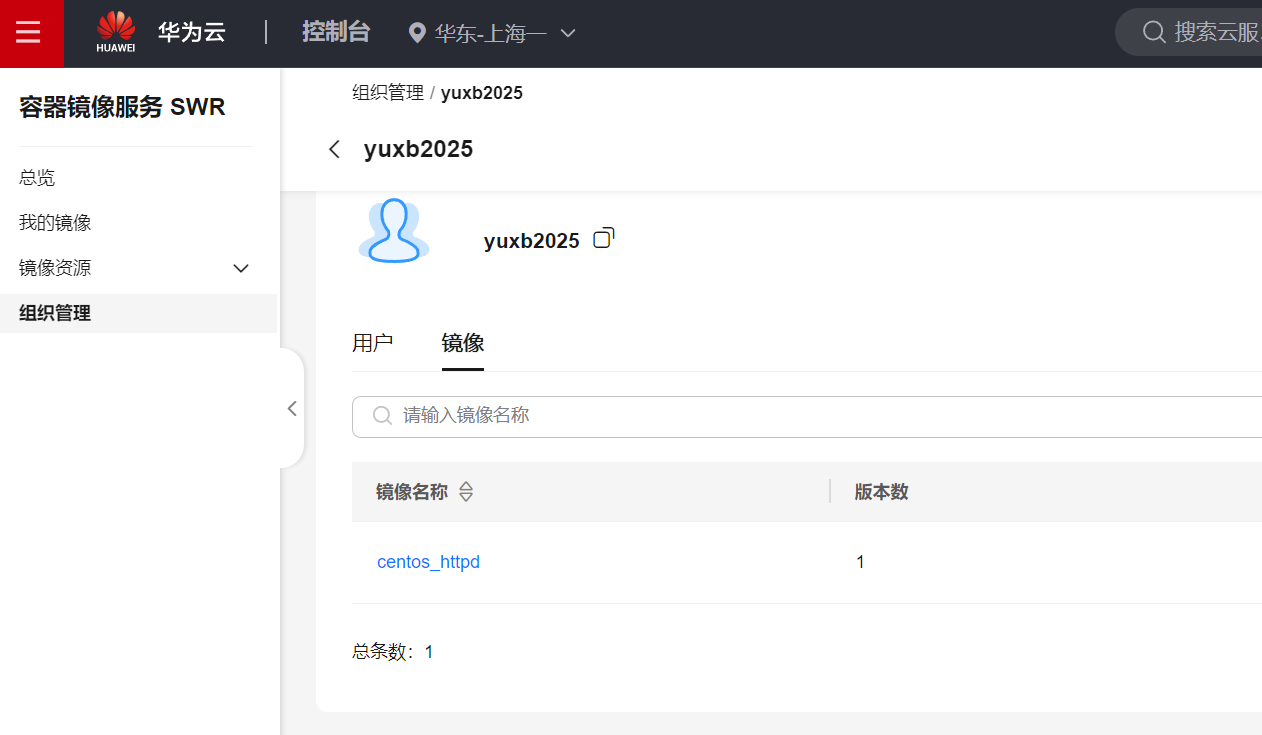
v1: digest: sha256:d1eb5fd053e20a03dc27ff36c67cedd06146345ed53d9a14d77b4f30706b4588 size: 1155上传成功登录华为云查看:
下载自己上传的镜像
bash
# 本地先把镜像删除再下载
[root@docker ~]# docker rmi swr.cn-east-3.myhuaweicloud.com/yuxb2025/centos_httpd:v1
Untagged: swr.cn-east-3.myhuaweicloud.com/yuxb2025/centos_httpd:v1
Untagged: swr.cn-east-3.myhuaweicloud.com/yuxb2025/centos_httpd@sha256:d1eb5fd053e20a03dc27ff36c67cedd06146345ed53d9a14d77b4f30706b4588
bash
# 复制pull命令
[root@docker ~]# docker pull swr.cn-east-3.myhuaweicloud.com/yuxb2025/centos_httpd:v1
v1: Pulling from yuxb2025/centos_httpd
Digest: sha256:d1eb5fd053e20a03dc27ff36c67cedd06146345ed53d9a14d77b4f30706b4588
Status: Downloaded newer image for swr.cn-east-3.myhuaweicloud.com/yuxb2025/centos_httpd:v1
swr.cn-east-3.myhuaweicloud.com/yuxb2025/centos_httpd:v1

[root@docker ~]# docker images swr.cn-east-3.myhuaweicloud.com/yuxb2025/centos_httpd
REPOSITORY                                              TAG       IMAGE ID       CREATED       SIZE
swr.cn-east-3.myhuaweicloud.com/yuxb2025/centos_httpd   v1        5bc804451e3c   2 hours ago   253MB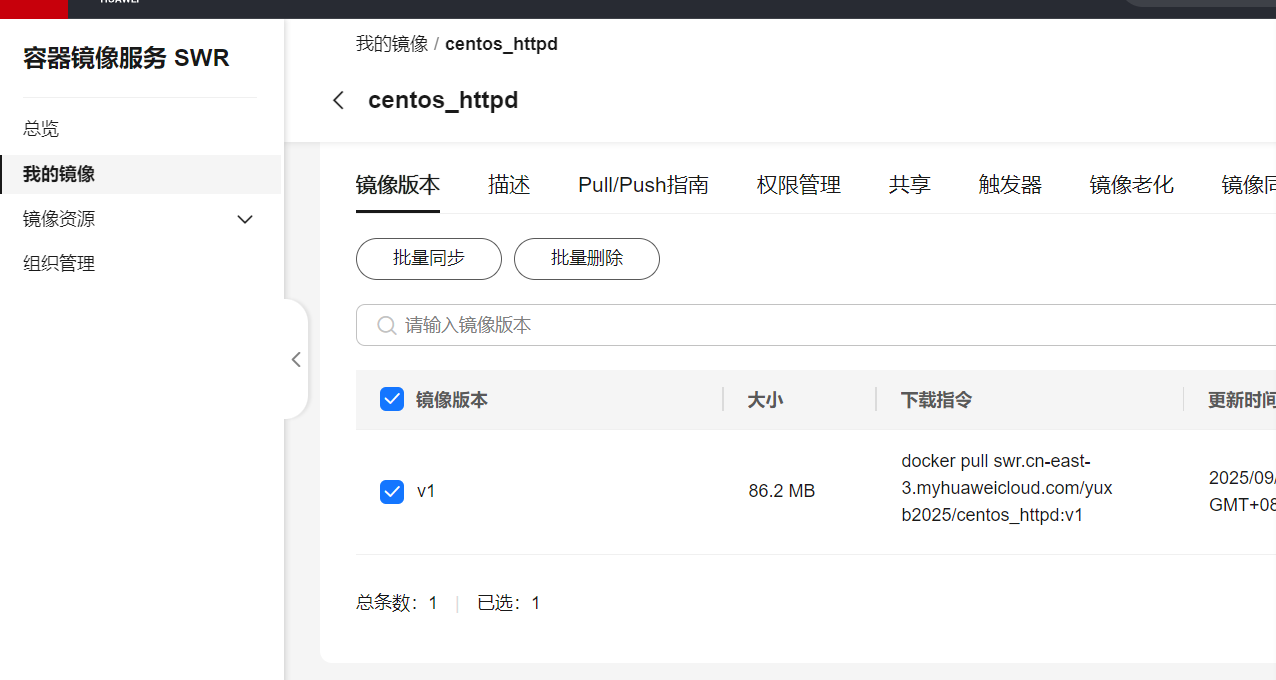
设置为公开

搭建本地Registry
Docker Hub 虽然非常方便,但还是有些限制,比如:
- 需要 internet 连接,而且下载和上传速度慢。
- 上传到 Docker Hub 的镜像任何人都能够访问,虽然可以用私有 repository,但不是免费的。
- 安全原因很多组织不允许将镜像放到外网。
解决方案就是搭建本地的 Registry。
Registry
在 Docker 中运行自己的 registry。
启动 registry 容器。
bash
[root@docker ~]# docker run -d -p 5000:5000 -v /myregistry:/var/lib/registry registry:2
Unable to find image 'registry:2' locally
2: Pulling from library/registry
44cf07d57ee4: Pull complete
bbbdd6c6894b: Pull complete
8e82f80af0de: Pull complete
3493bf46cdec: Pull complete
6d464ea18732: Pull complete
Digest: sha256:a3d8aaa63ed8681a604f1dea0aa03f100d5895b6a58ace528858a7b332415373
Status: Downloaded newer image for registry:2
b353ff24b73dccfe28fe990b69fec3c692cb0fc540325599c13d792623fd6599

# 使用的镜像是 registry:2。
# -d 是后台启动容器。
# -p 将容器的 5000 端口映射到 Host 的 5000 端口。5000 是 registry 服务端口。
# -v 将容器 /var/lib/registry 目录映射到 Host 的 /myregistry,用于存放镜像数据。
通过 docker tag 重命名镜像,使之与 registry 匹配。
bash
[root@docker ~]# docker images httpd
REPOSITORY   TAG       IMAGE ID       CREATED       SIZE
httpd        centos    5bc804451e3c   2 hours ago   253MB
httpd        latest    199e3a035264   3 weeks ago   117MB

[root@docker ~]# docker tag httpd:latest localhost:5000/httpd:v1

[root@docker ~]# docker images localhost:5000/httpd
REPOSITORY             TAG       IMAGE ID       CREATED       SIZE
localhost:5000/httpd   v1        199e3a035264   3 weeks ago   117MB
在镜像的前面加上了运行 registry 的主机名称和端口。
repository 的完整格式为:完整格式为:
只有 Docker Hub 上的镜像可以省略 registry-host:port 。
通过 docker push 上传镜像。
bash
[root@docker ~]# docker push localhost:5000/httpd:v1
The push refers to repository [localhost:5000/httpd]
84465093da5e: Pushed
82a8960ee0f5: Pushed
5d3f01560532: Pushed
5f70bf18a086: Pushed
89211885a3fc: Pushed
e6a3842ebc7f: Pushed
v1: digest: sha256:4c7cc59b007a70ac76a99cf569a3aae75ac122b1951d4fd995e9fdb9dd21c327 size: 1572


[root@docker ~]# curl http://localhost:5000/v2/_catalog
{"repositories":["httpd"]}
# 查询到了仓库中的镜像列表
# 返回值表明仓库中确实存在刚刚推送的 httpd 镜像
已经可通过 docker pull 从本地 registry 下载镜像了。
bash
#下载之前先删除本地的镜像
[root@docker ~]# docker rmi httpd:latest
Untagged: httpd:latest
Untagged: httpd@sha256:3198c1839e1a875f8b83803083758a7635f1ae999f0601f30f2f3b8ce2ac99e3

[root@docker ~]# docker rmi localhost:5000/httpd:v1
Untagged: localhost:5000/httpd:v1
Untagged: localhost:5000/httpd@sha256:4c7cc59b007a70ac76a99cf569a3aae75ac122b1951d4fd995e9fdb9dd21c327
Deleted: sha256:199e3a0352645ad4ae027e853af5986bd5b4766c3a5e98987ad10d5922eb7465
Deleted: sha256:00573b19d7727f02c759d09e37596d7790e794d8044bbda01c82e4ef255a5a46
Deleted: sha256:84e29bd3c0d55e14757bab091c4081f900a13e91d88ebe65d7711411ac757385
Deleted: sha256:d75c7aed0111141a372ee22ba367d8b7d6dfc111abd79544592065f98a57802c
Deleted: sha256:d39e6d1ae882eb3ae39fb74a830df8d28fcd5032b8eb94da68c5f488c51ece5d
Deleted: sha256:7def08ab353787eaf7f6c76df7a4de80178cd031f0b2e5267291b645d148600a
Deleted: sha256:e6a3842ebc7f5e41d8a38f19a0aa5ea56c255475695ac6682882420800cf5465

#从自建仓库下载镜像
[root@docker ~]# docker pull localhost:5000/httpd:v1
v1: Pulling from httpd
6e0d6626b028: Pull complete
40712a21826a: Pull complete
4f4fb700ef54: Pull complete
d2b1a5ae8cd3: Pull complete
7e8bbac53823: Pull complete
779ccd583397: Pull complete
Digest: sha256:4c7cc59b007a70ac76a99cf569a3aae75ac122b1951d4fd995e9fdb9dd21c327
Status: Downloaded newer image for localhost:5000/httpd:v1
localhost:5000/httpd:v1

#验证从自建仓库下载的镜像
[root@docker ~]# docker images localhost:5000/httpd
REPOSITORY             TAG       IMAGE ID       CREATED       SIZE
localhost:5000/httpd   v1        199e3a035264   3 weeks ago   117MB
企业级私有仓库Harbor
Harbor是构建企业级私有docker镜像的仓库的开源解决方案,它是Docker Registry的更高级封装,除了 提供友好的Web UI界面,角色和用户权限管理,用户操作审计等功能外,它还整合了K8s的插件(Addons)仓库。
安装
harbor下载:https://github.com/goharbor/harbor/releases
bash
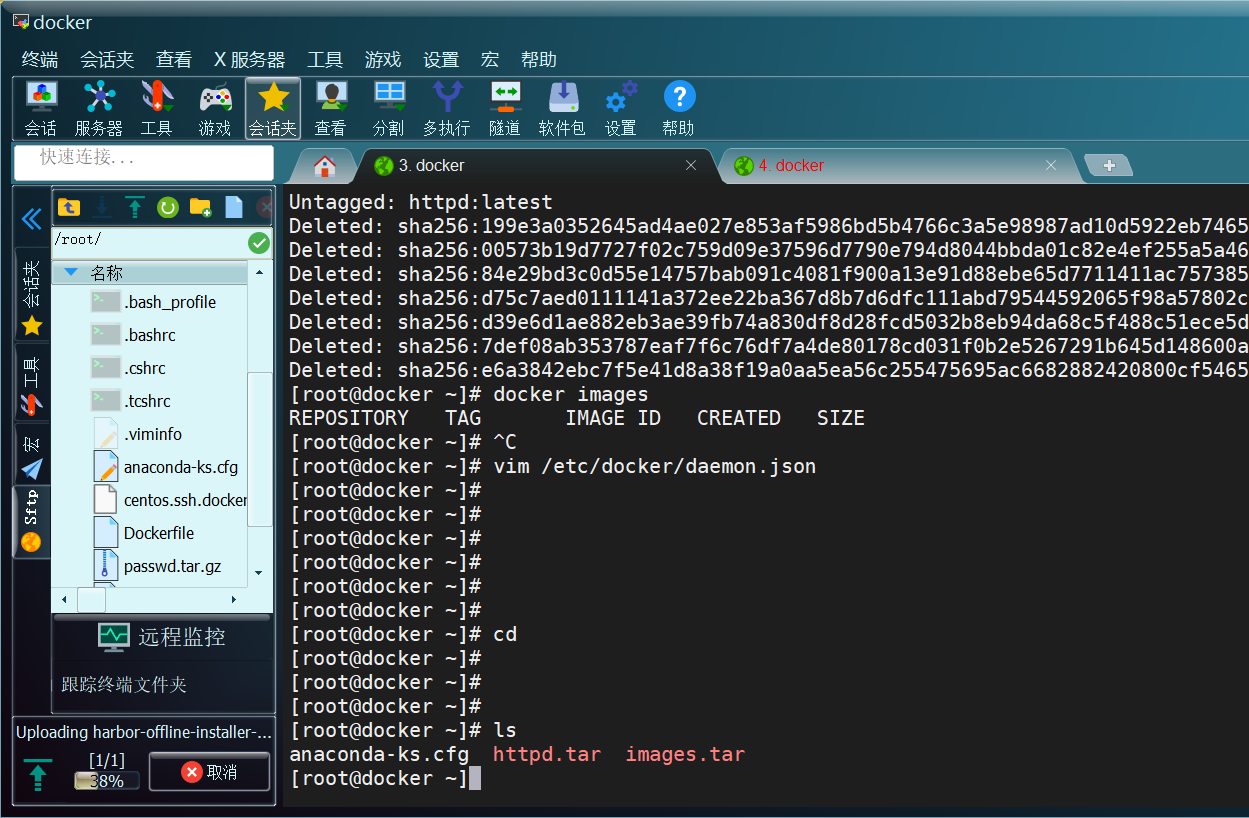
[root@docker ~]ls
anaconda-ks.cfg harbor-offline-installer-v2.9.1.tgz httpd.tar images.tar
# 解压
[root@docker ~]# tar -xvf harbor-offline-installer-v2.9.1.tgz
harbor/harbor.v2.9.1.tar.gz
harbor/prepare
harbor/LICENSE
harbor/install.sh
harbor/common.sh
harbor/harbor.yml.tmpl
# 新建目录,并将程序文件复制到目录中
[root@docker ~]# mkdir /opt/harbor
[root@docker ~]# mv harbor/* /opt/harbor/
[root@docker ~]# cd /opt/harbor/
[root@docker harbor]# ls
common.sh harbor.v2.9.1.tar.gz harbor.yml.tmpl install.sh LICENSE prepare
# 导入harbor镜像
[root@docker harbor]# docker load -i harbor.v2.9.1.tar.gz
# 修改harbor配置文件
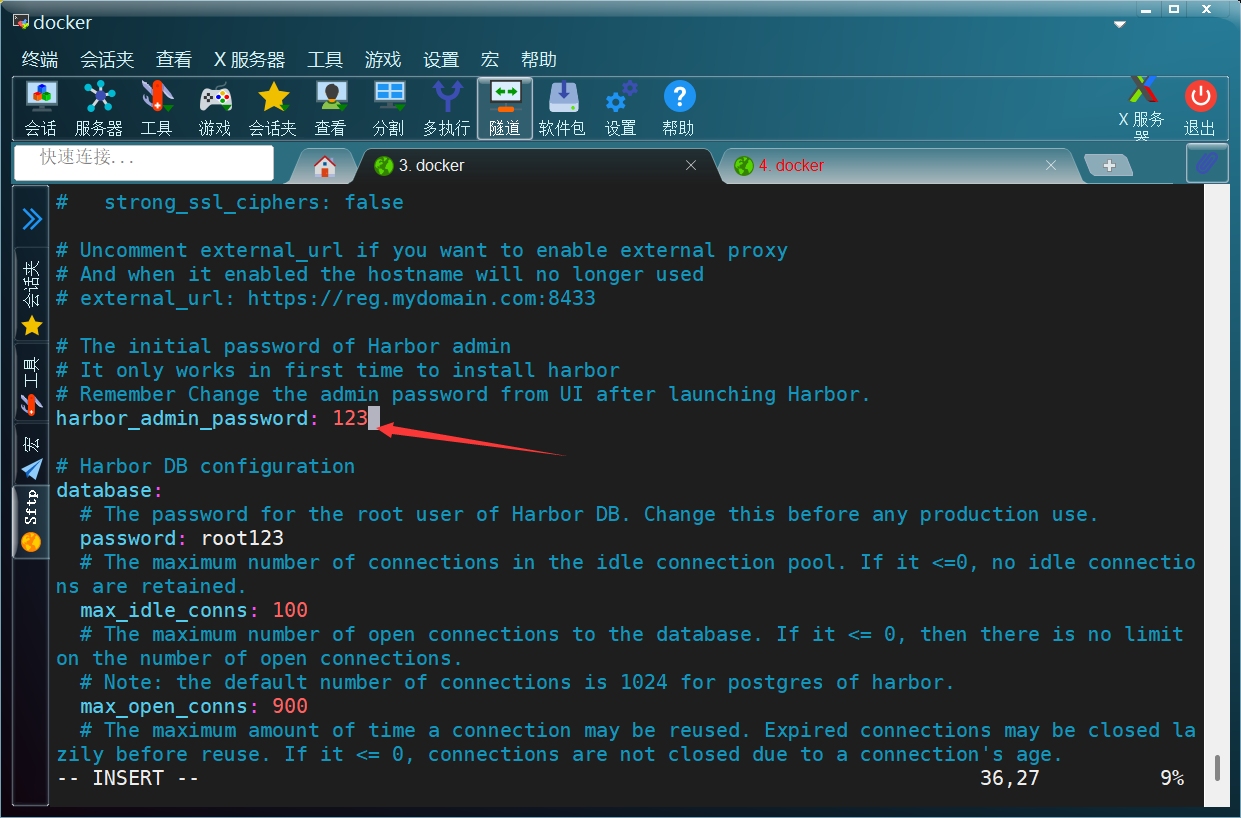
[root@docker harbor]# cp -ar harbor.yml.tmpl harbor.yml
[root@docker harbor]# vim harbor.yml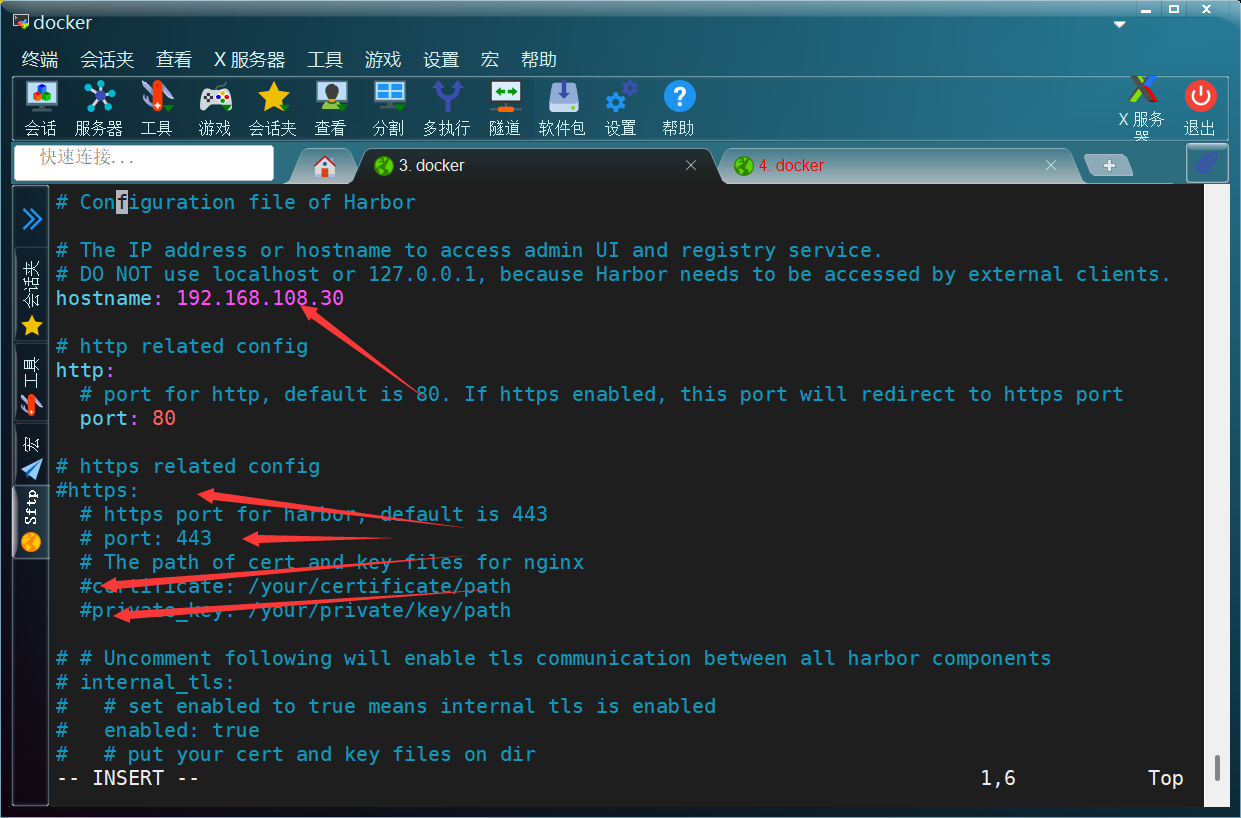
编辑完配置文件,接下来在 harbor 目录下安装 Harbor。先进行预处理更新配置文件
bash
[root@docker harbor]# ./prepare
prepare base dir is set to /opt/harbor
WARNING:root:WARNING: HTTP protocol is insecure. Harbor will deprecate http protocol in the future. Please make sure to upgrade to https
Generated configuration file: /config/portal/nginx.conf
Generated configuration file: /config/log/logrotate.conf
Generated configuration file: /config/log/rsyslog_docker.conf
Generated configuration file: /config/nginx/nginx.conf
Generated configuration file: /config/core/env
Generated configuration file: /config/core/app.conf
Generated configuration file: /config/registry/config.yml
Generated configuration file: /config/registryctl/env
Generated configuration file: /config/registryctl/config.yml
Generated configuration file: /config/db/env
Generated configuration file: /config/jobservice/env
Generated configuration file: /config/jobservice/config.yml
Generated and saved secret to file: /data/secret/keys/secretkey
Successfully called func: create_root_cert
Generated configuration file: /compose_location/docker-compose.yml
Clean up the input dir
执行下面命令进行安装
bash
[root@docker harbor]# ./install.sh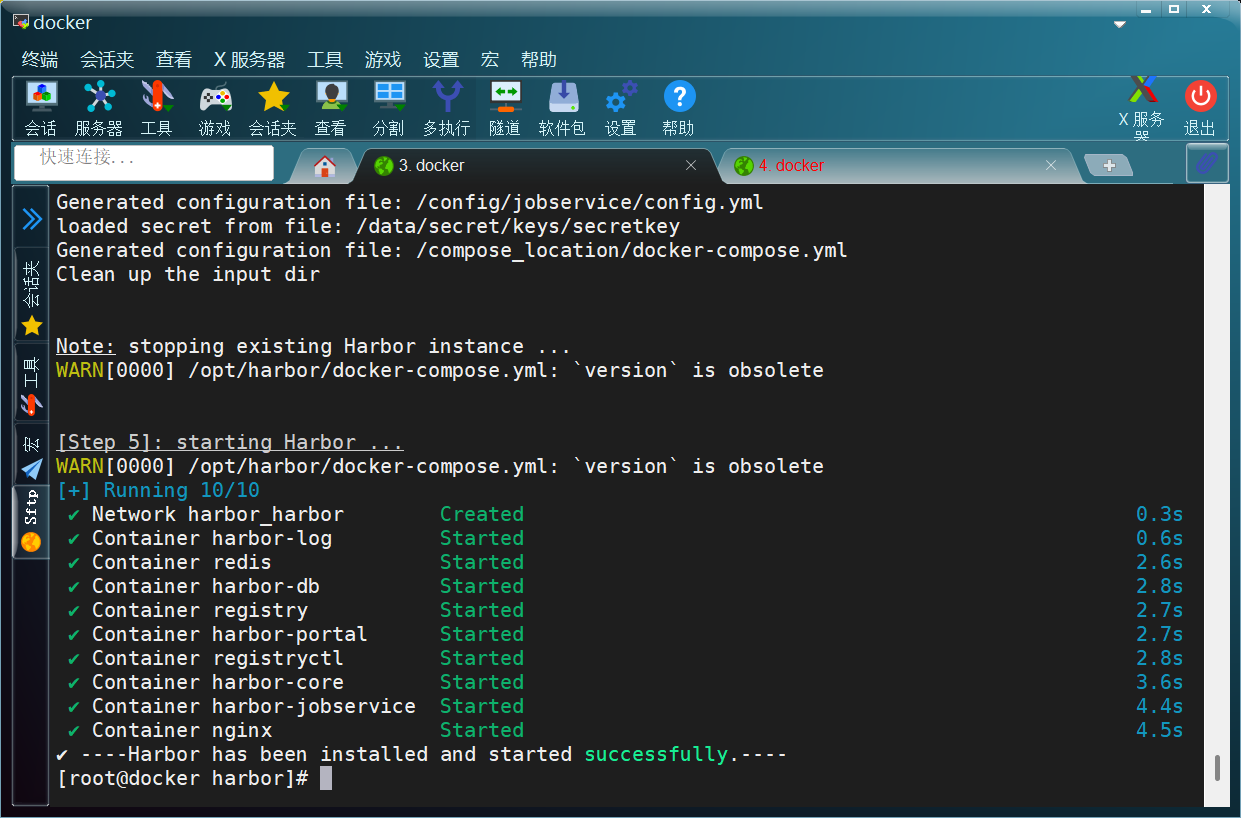
稍等一会,如果所有容器的状态都是 healthy ,说明正常
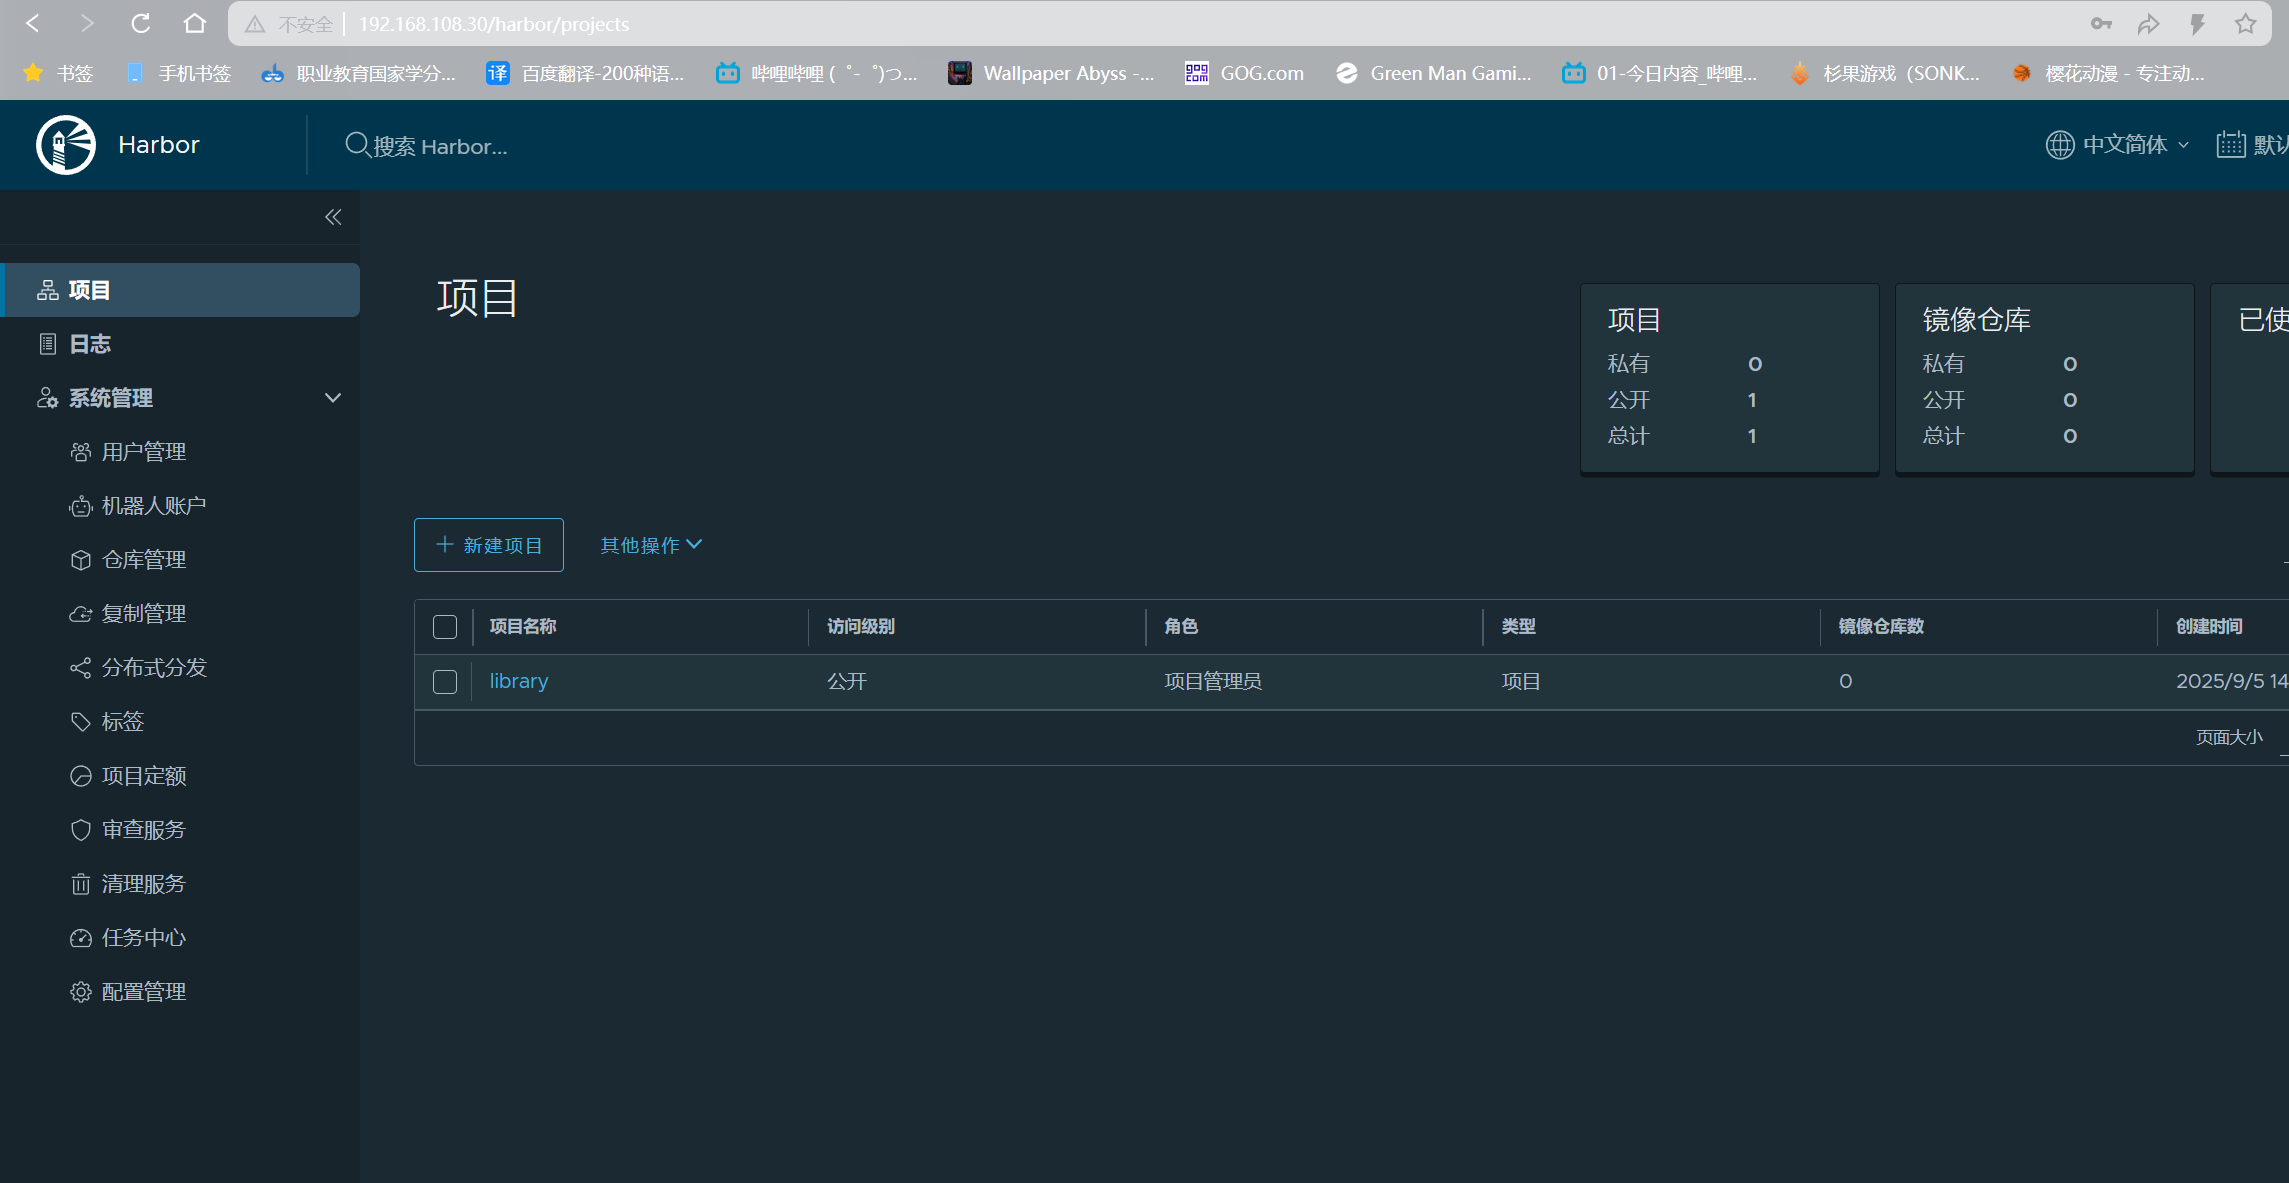
登录WEB界面:http://192.168.108.30
使用
Harbor 里功能比较多,常用的有项目、用户管理、项目定额。
-
项目:可以针对不同的项目单独创建,每个项目都有自己的镜像地址
-
用户管理:可以维护用户,不同的项目可以设置不同的维护人员
-
项目定额:设置项目对应的镜像仓库最大空间容量
下面按照步骤将一个镜像推送到 Harbor 中。
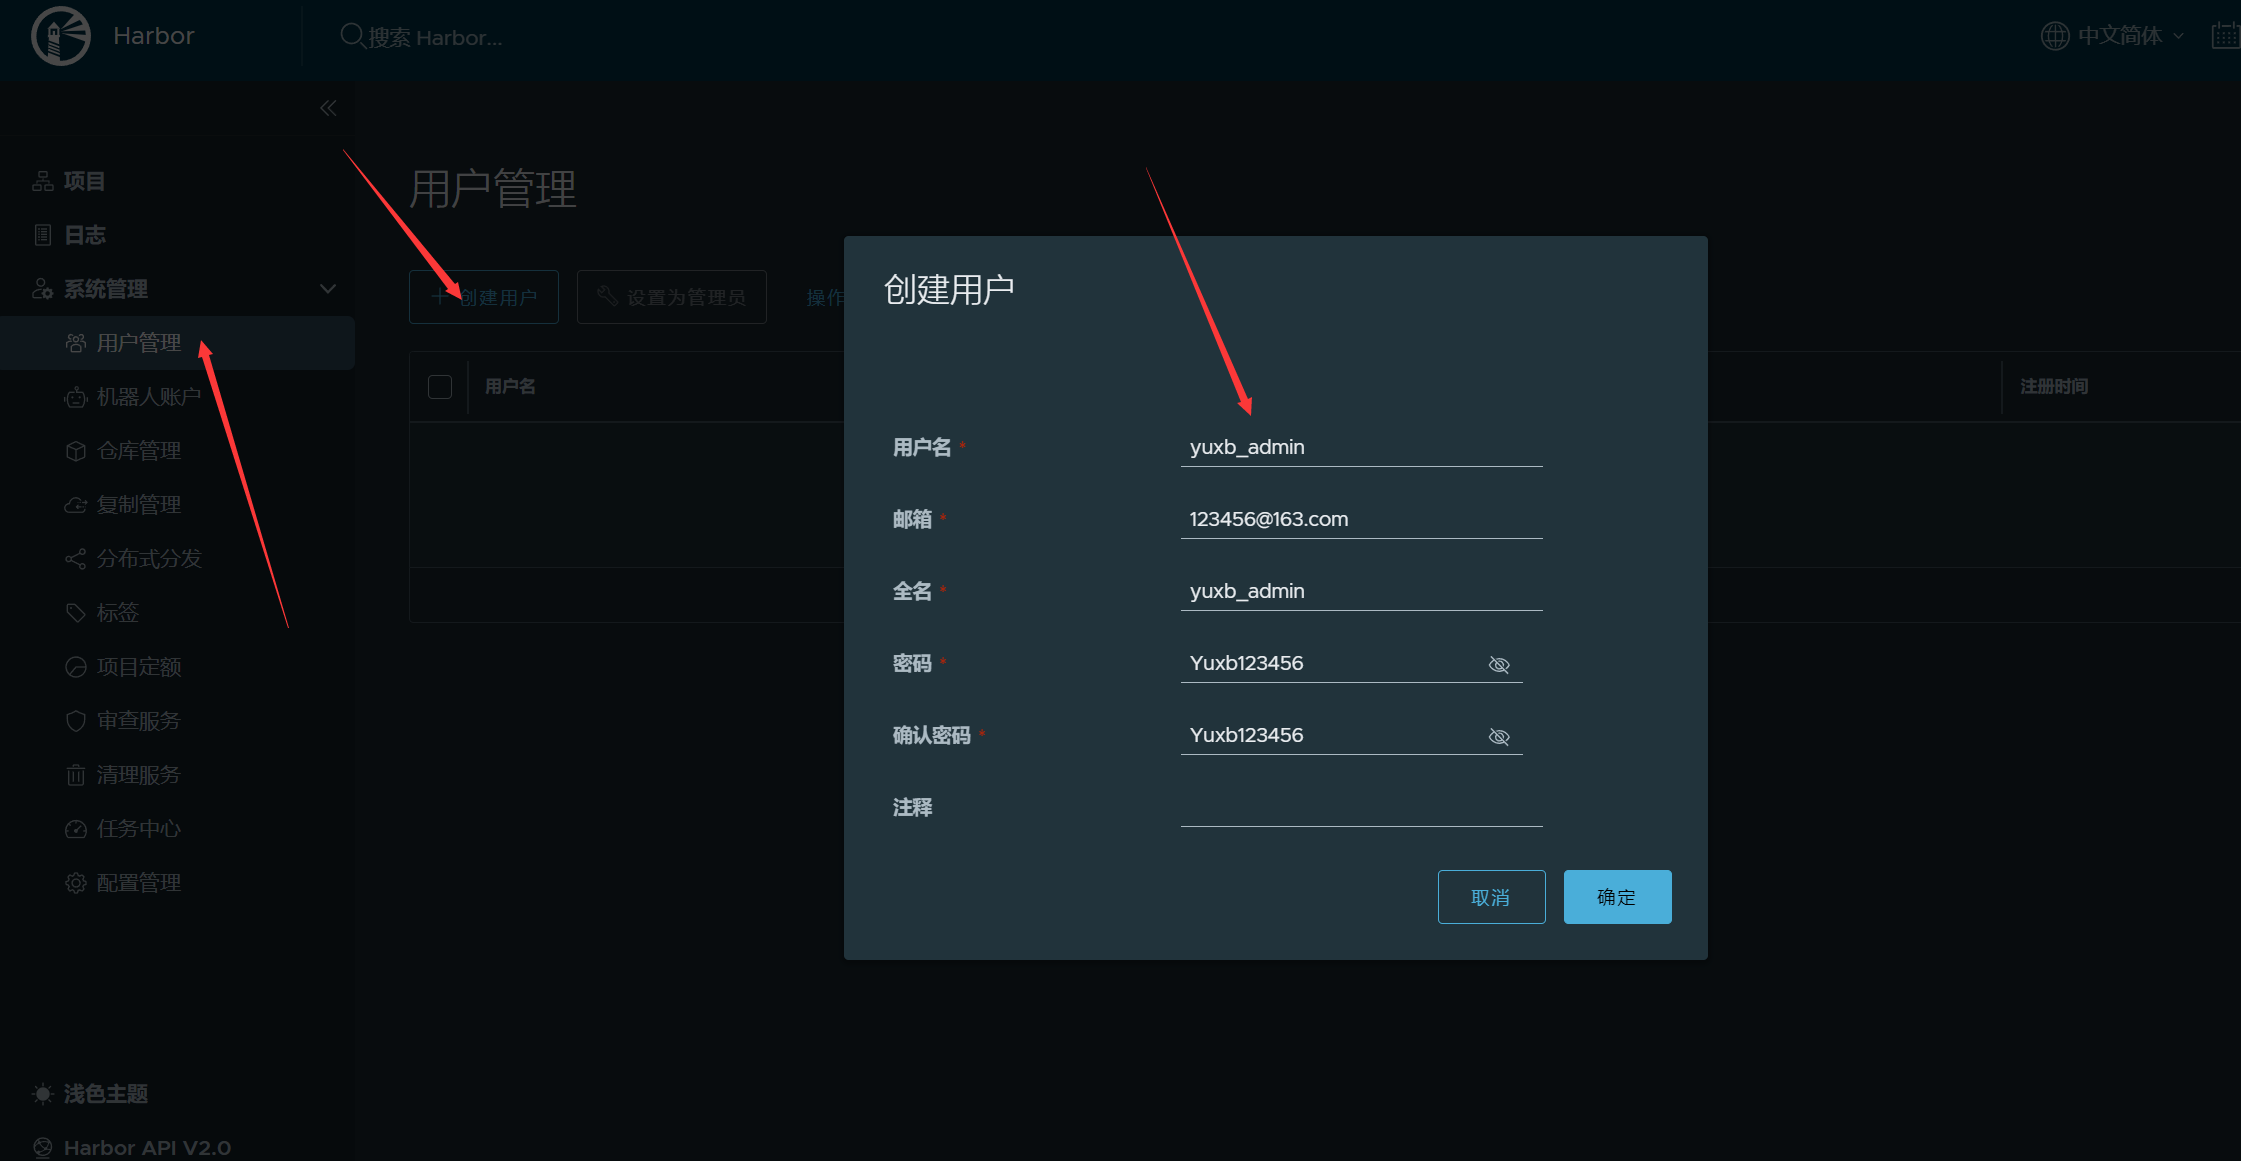
在用户管理中创建名称为 images_admin 的用户:
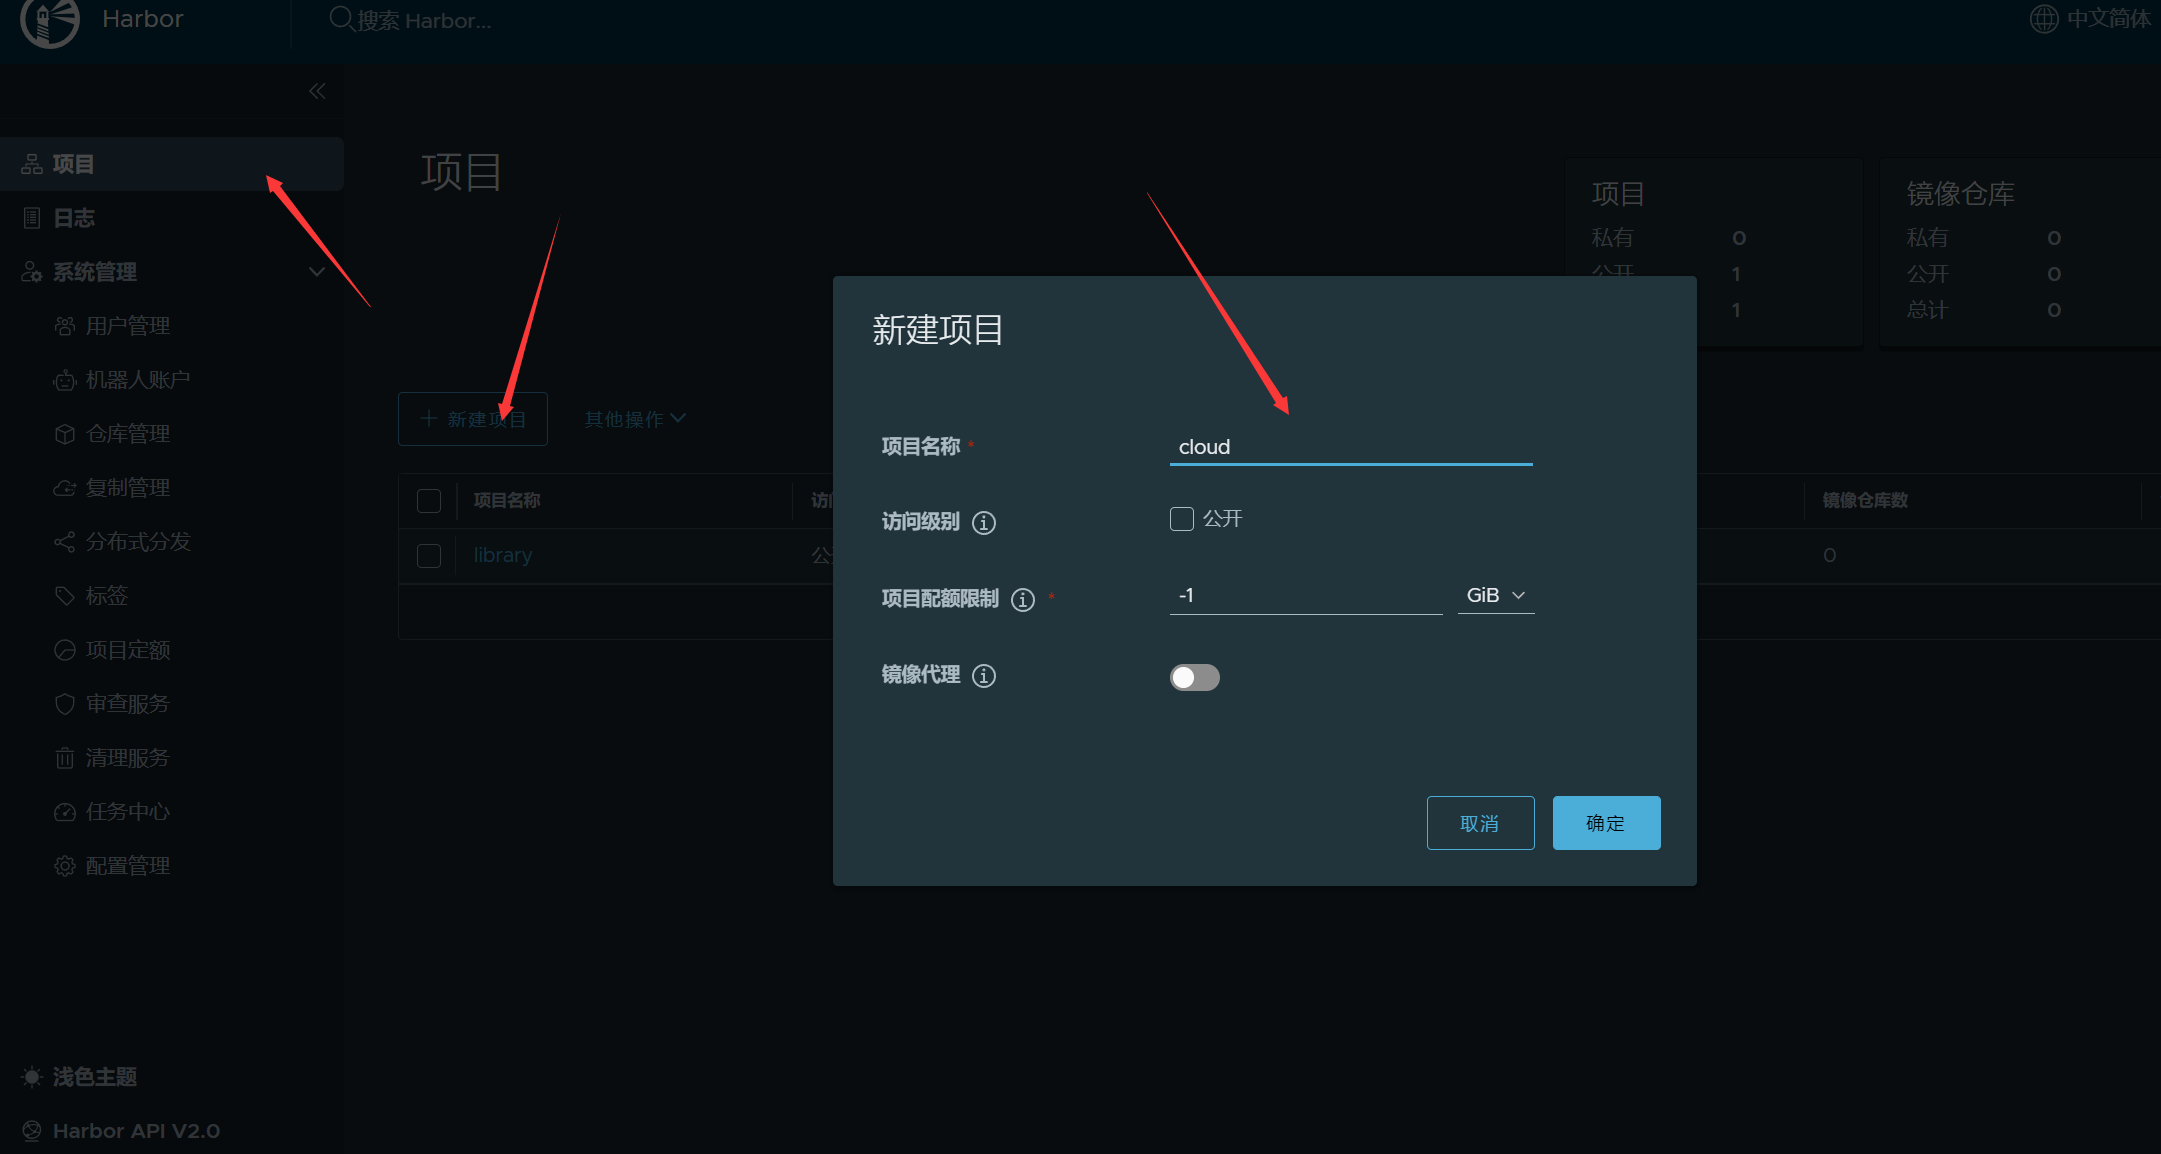
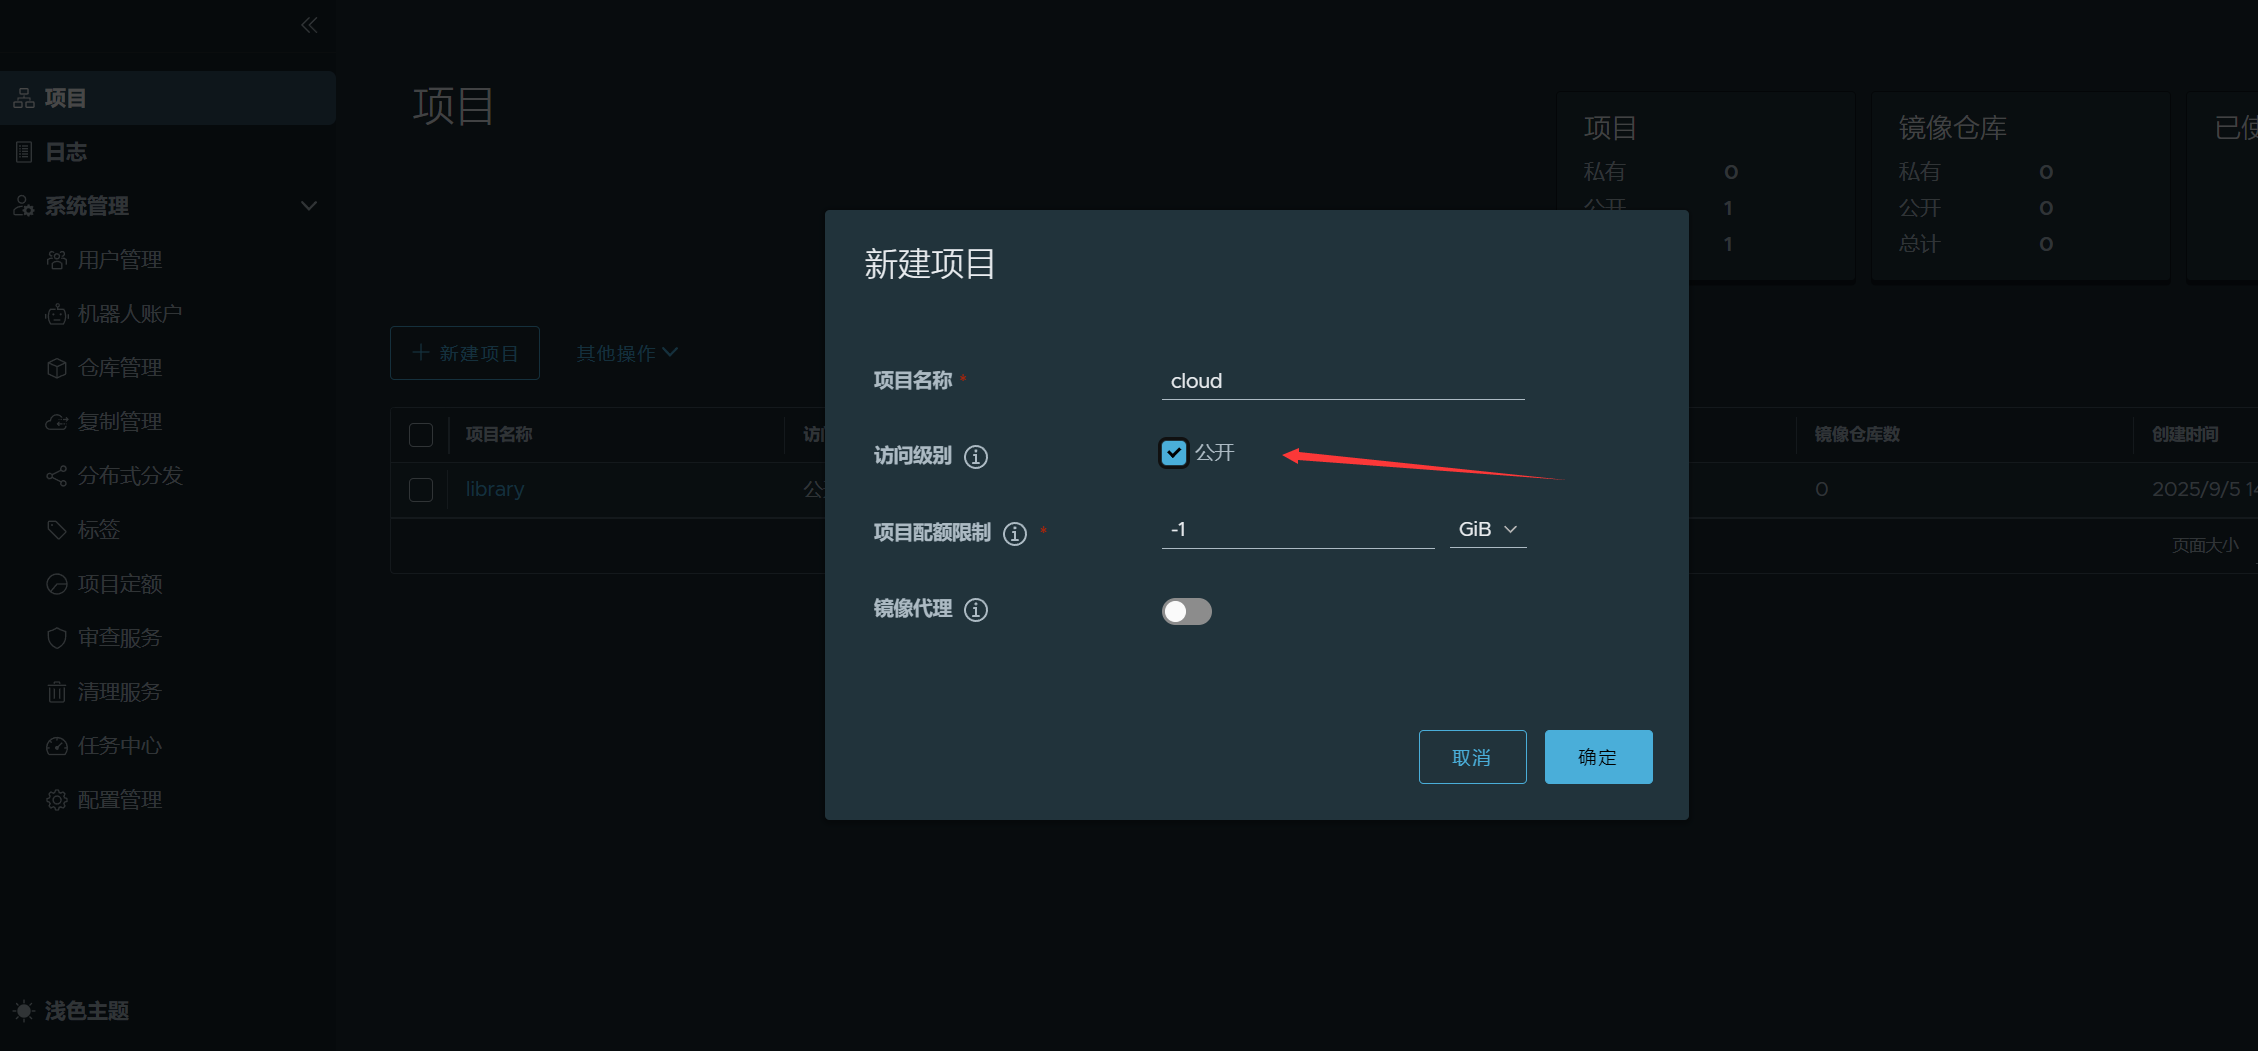
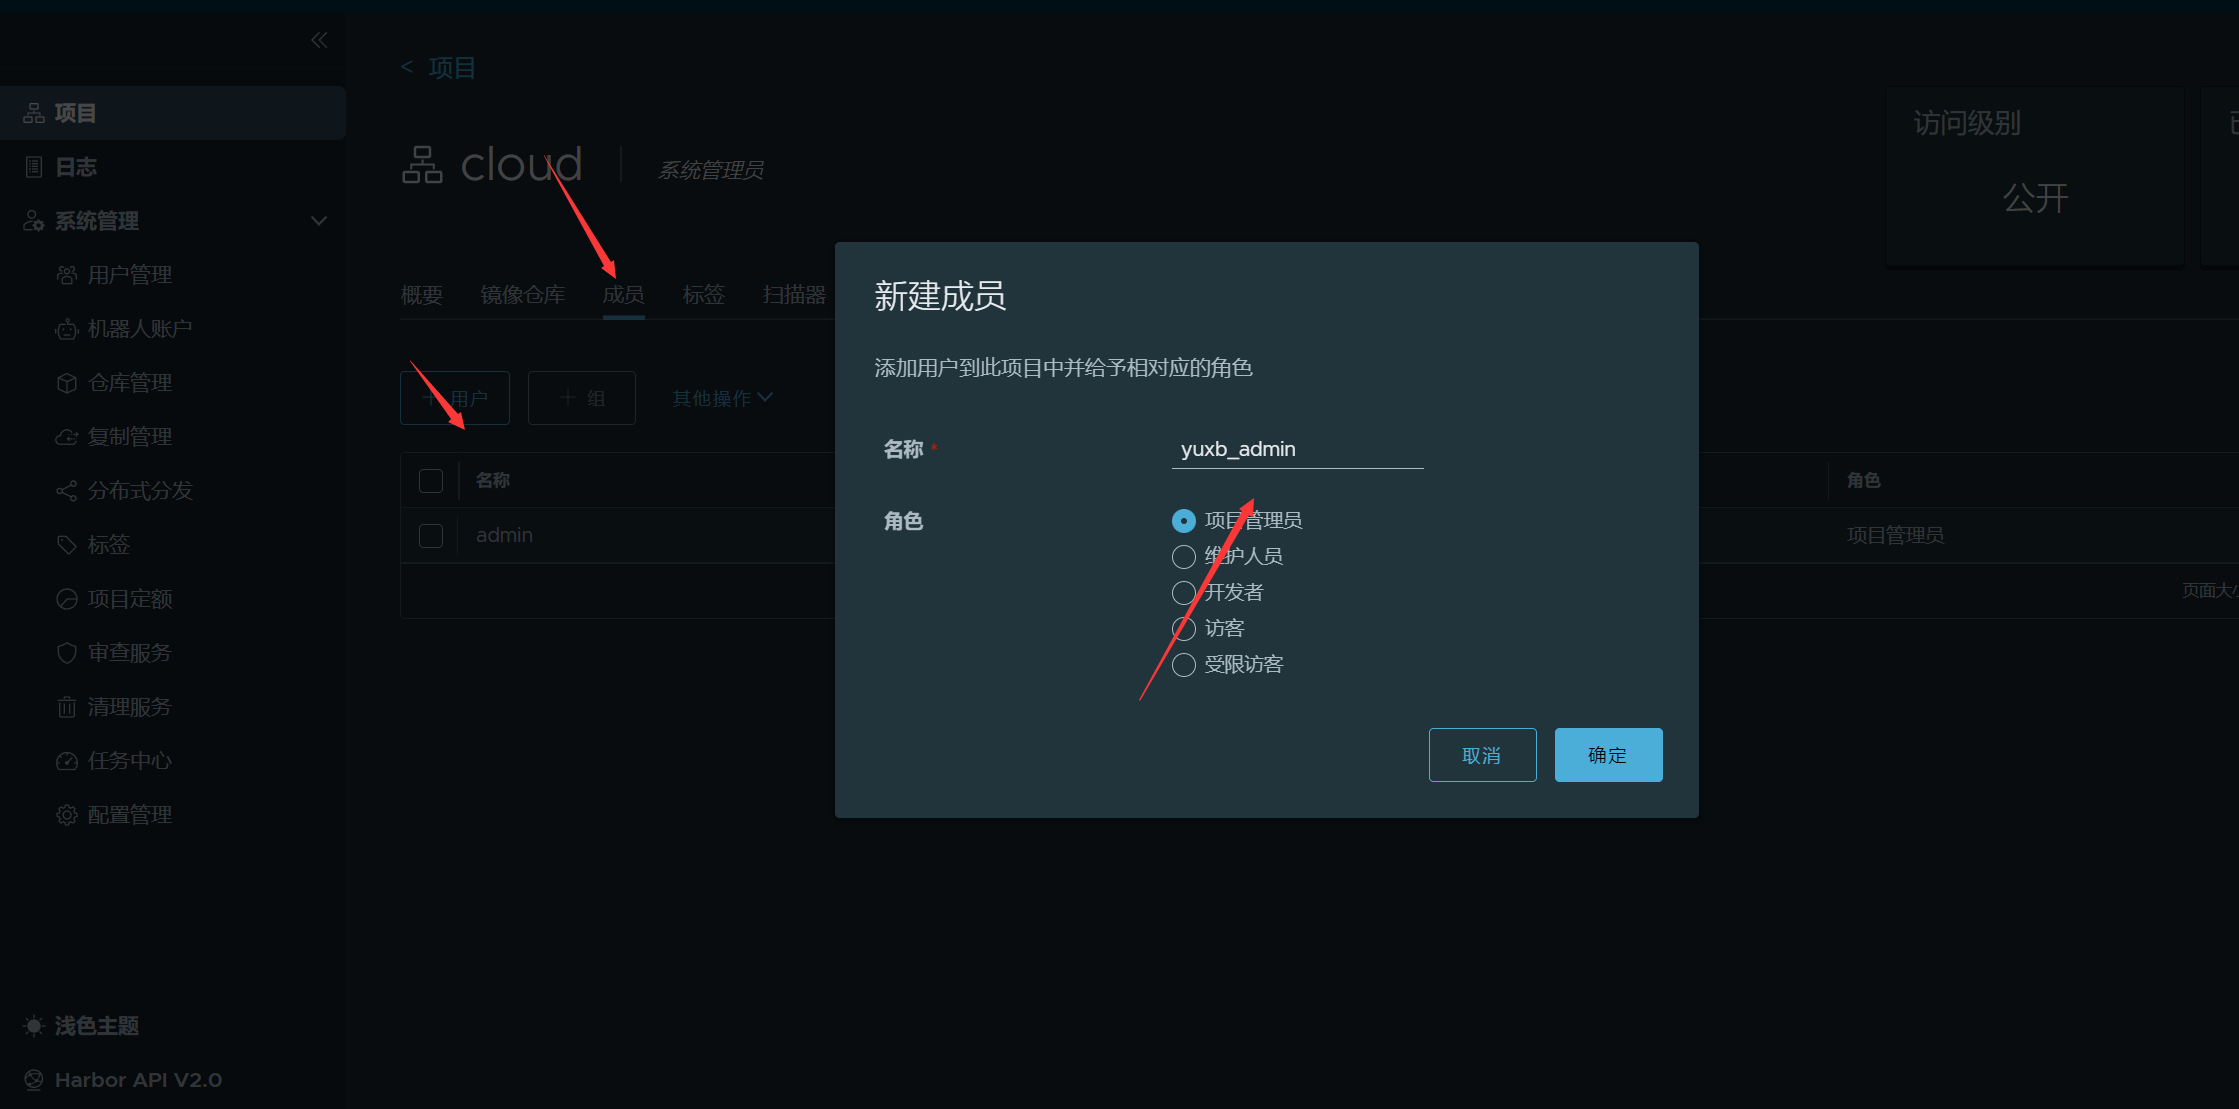
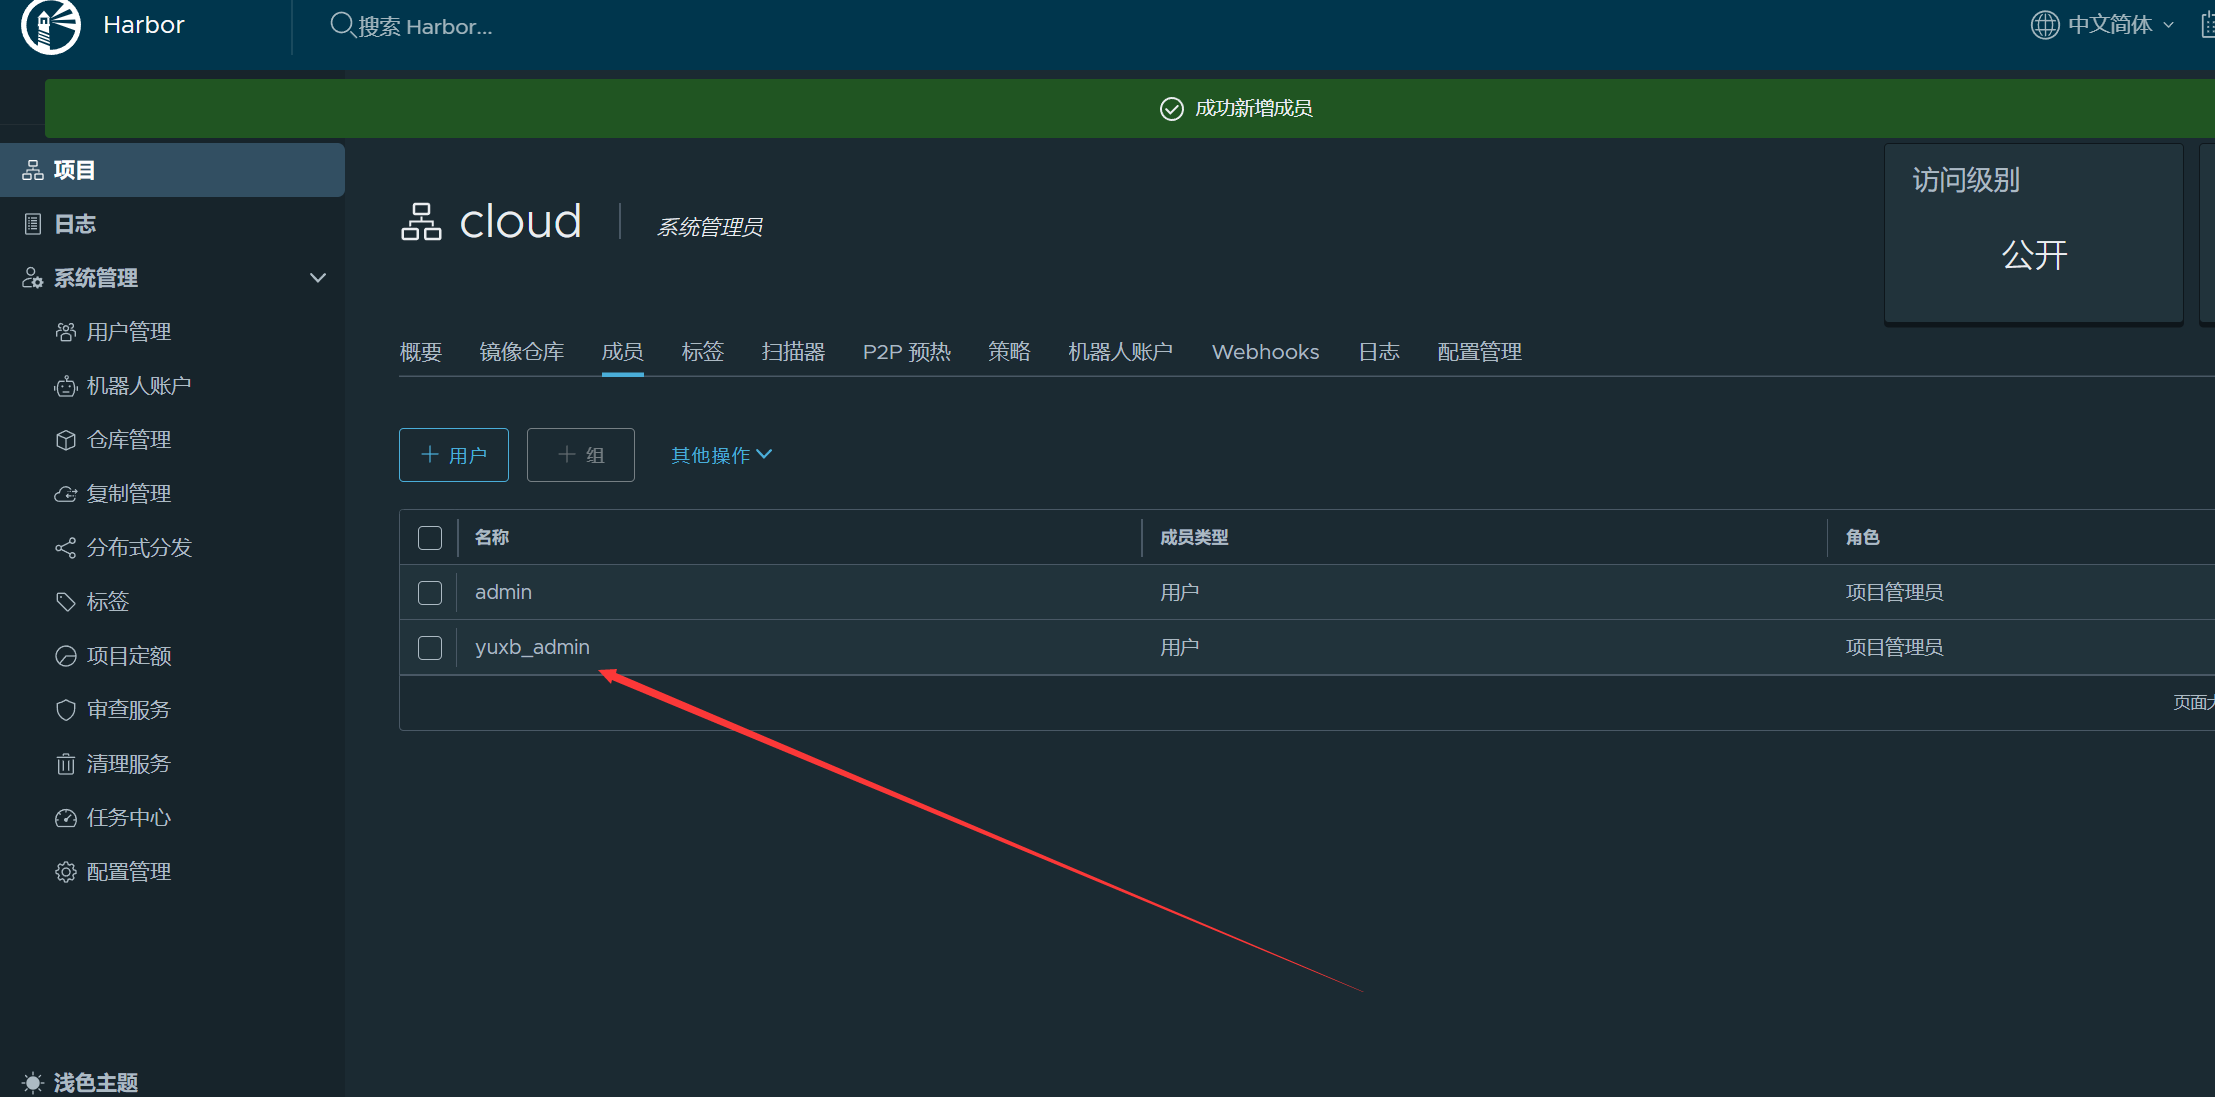
在项目中创建名称为cloud的项目,并添加yuxb_admin 为项目管理员
将内网服务器 IP 和端口配置到 daemon.json 文件中,执行下面命令进行配置
bash
[root@docker harbor]# vim /etc/docker/daemon.json
[root@docker harbor]# cat /etc/docker/daemon.json
{
    "insecure-registries": ["192.168.108.30"],
    "registry-mirrors": [ "https://faf9c955231a47648fa3dad688d6db6c.mirror.swr.myhuaweicloud.com" ]
}

[root@docker harbor]# systemctl restart docker

#重新执行安装命令
[root@docker harbor]# ./install.sh
登录服务器
bash
[root@docker harbor]# docker login 192.168.108.30
Username: yuxb_admin
Password:
WARNING! Your password will be stored unencrypted in /root/.docker/config.json.
Configure a credential helper to remove this warning. See
https://docs.docker.com/engine/reference/commandline/login/#credentials-store

Login Succeeded
登录后家目录下会有一个.docker文件夹
bash
[root@docker harbor]# cd ~/.docker/
[root@docker .docker]# pwd
/root/.docker
[root@docker .docker]# ls
config.json
[root@docker .docker]# cat config.json
{
"auths": {
"192.168.108.30": {
"auth": "eXV4Yl9hZG1pbjpZdXhiMTIzNDU2"
}
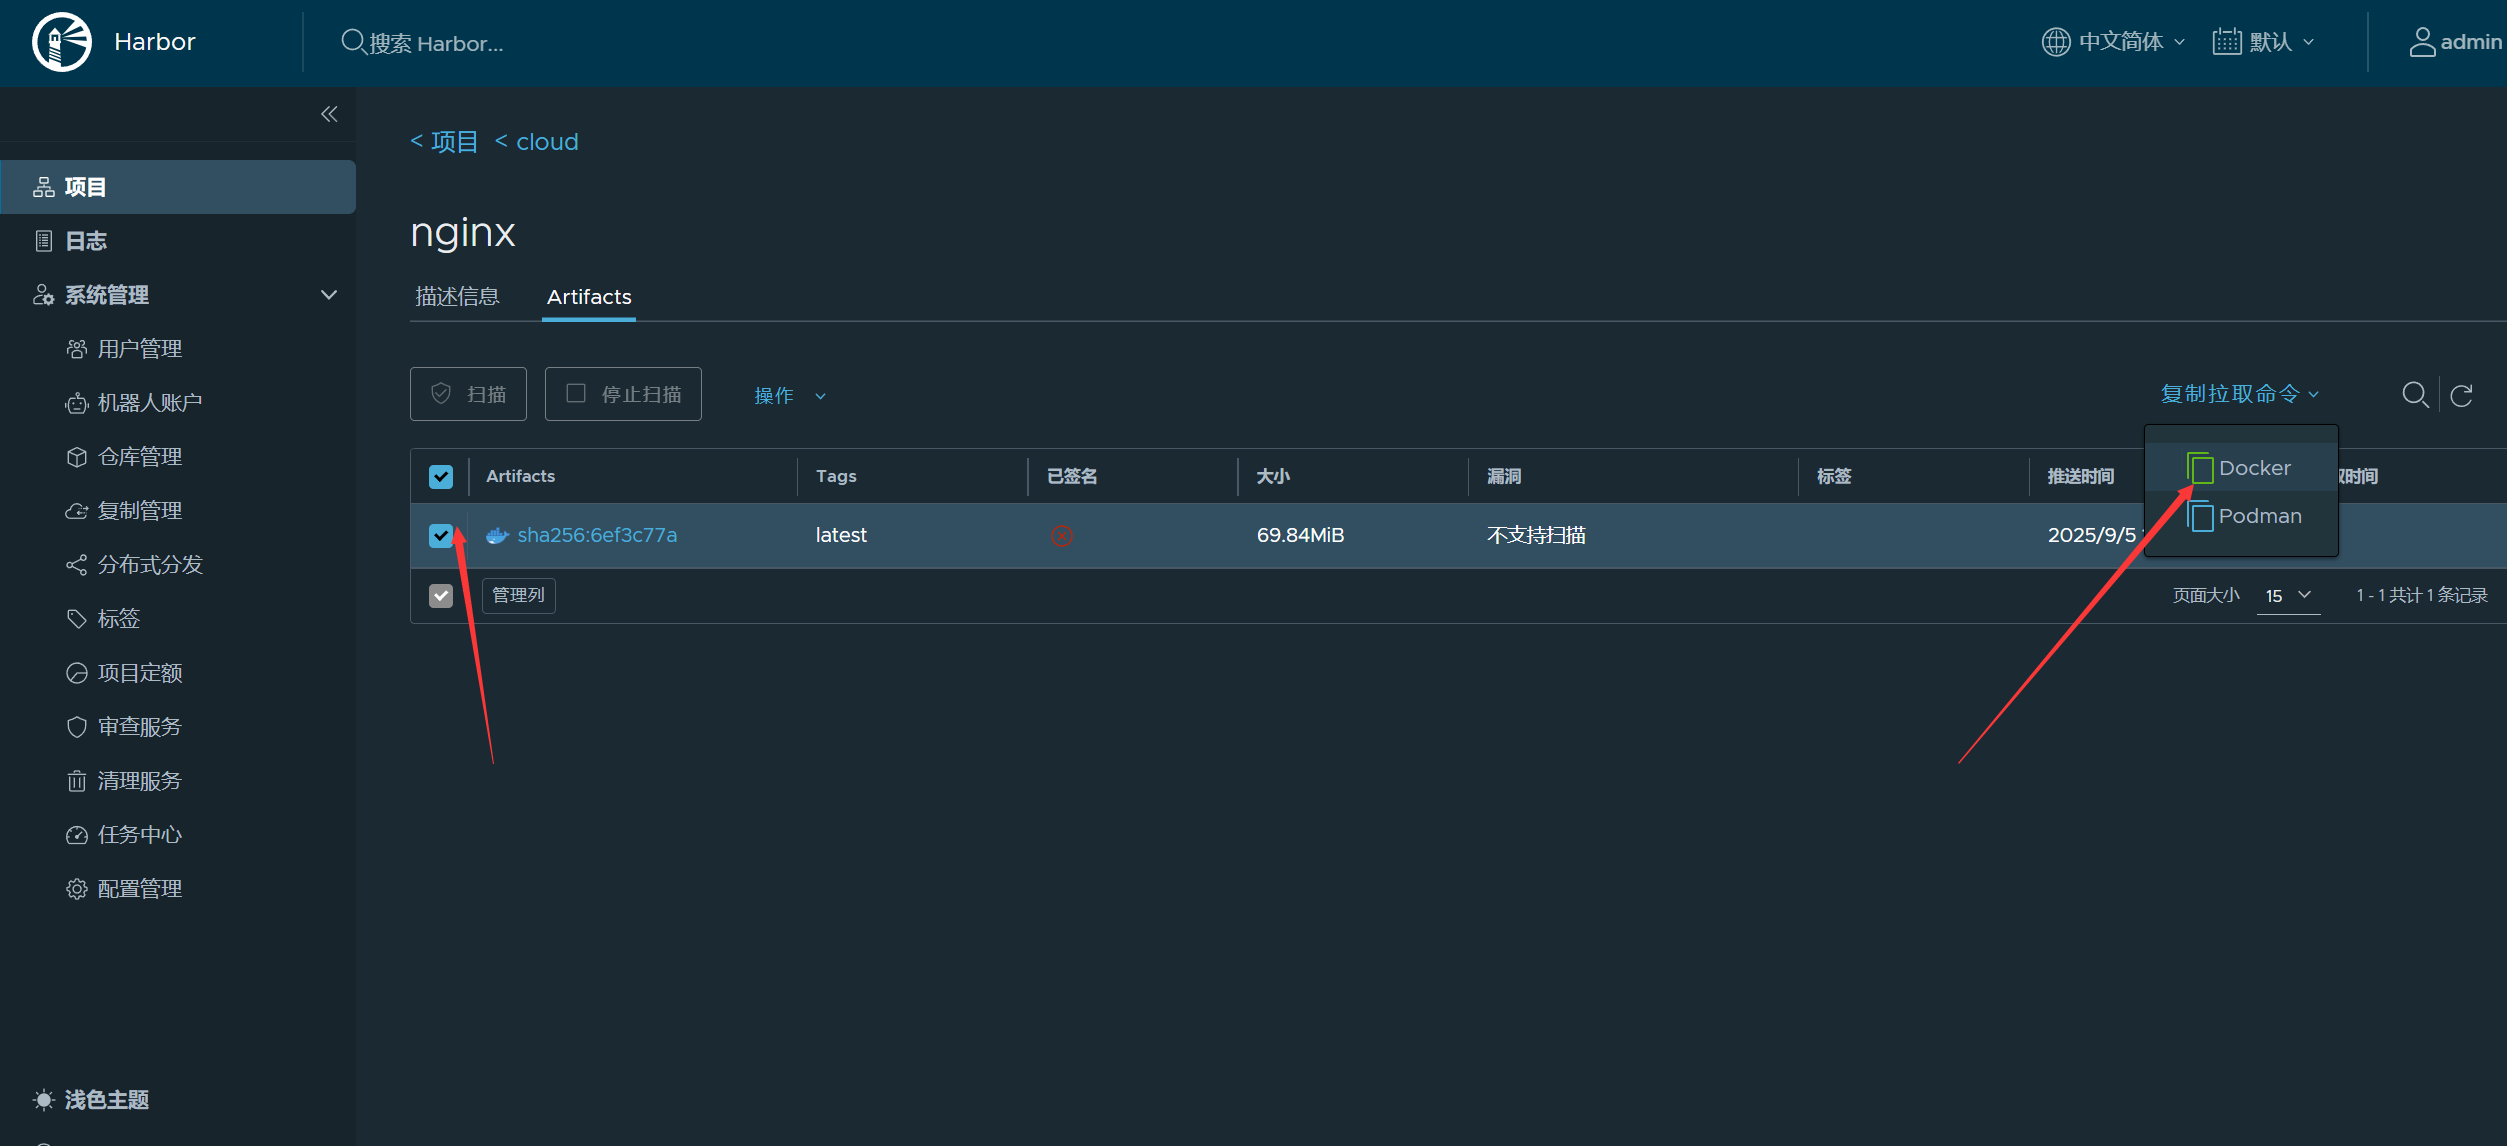
}上传镜像
bash
[root@docker .docker]# docker pull nginx
Using default tag: latest
latest: Pulling from library/nginx
b1badc6e5066: Pull complete
a2da0c0f2353: Pull complete
e5d9bb0b85cc: Pull complete
14a859b5ba24: Pull complete
716cdf61af59: Pull complete
14e422fd20a0: Pull complete
c3741b707ce6: Pull complete
Digest: sha256:33e0bbc7ca9ecf108140af6288c7c9d1ecc77548cbfd3952fd8466a75edefe57
Status: Downloaded newer image for nginx:latest
docker.io/library/nginx:latest
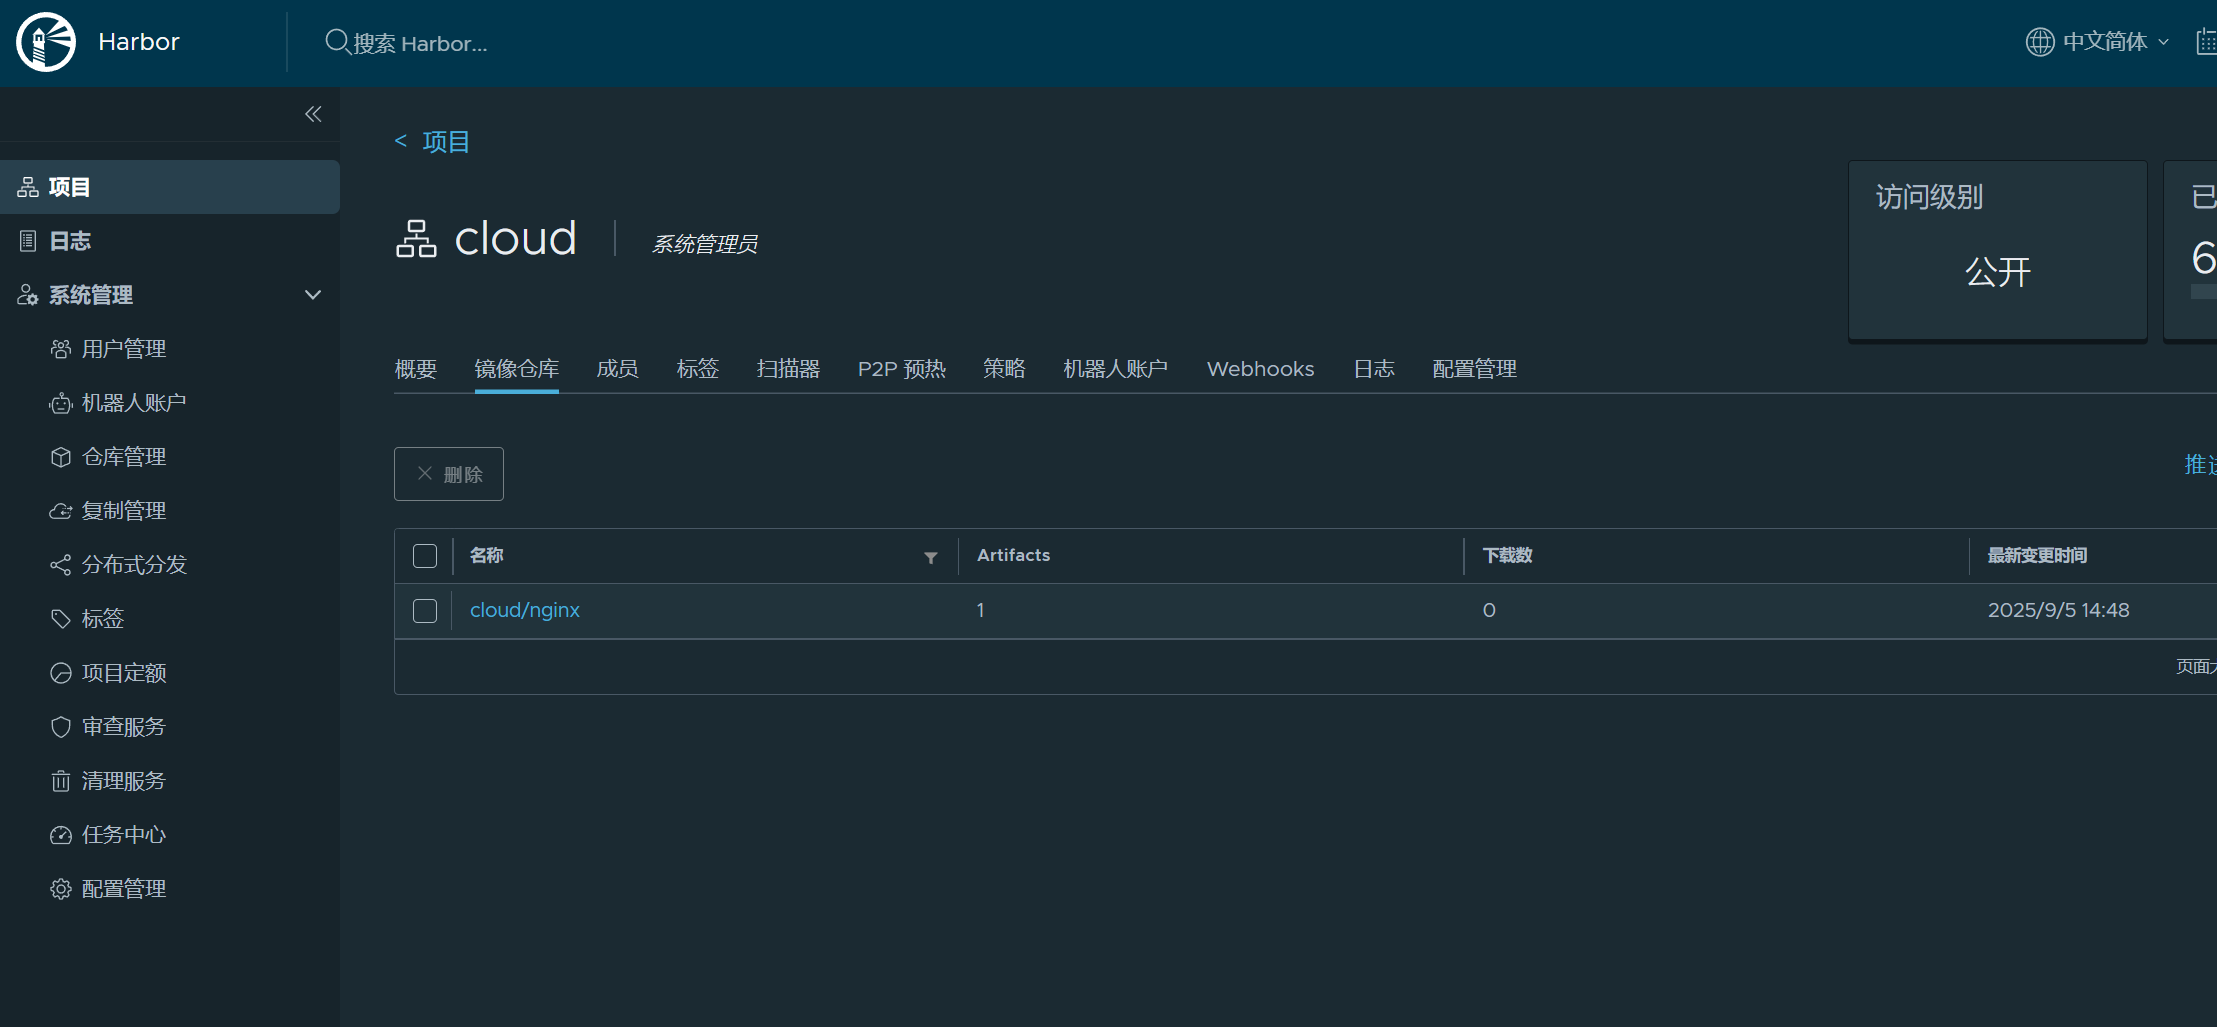
[root@docker .docker]# docker tag nginx:latest 192.168.108.30/cloud/nginx:latest
[root@docker .docker]# docker push 192.168.108.30/cloud/nginx:latest
The push refers to repository [192.168.108.30/cloud/nginx]
45c2d10807fb: Pushed
129b375526fc: Pushed
a0e5983a25a5: Pushed
2988603ca264: Pushed
39bc11fab520: Pushed
dab69e9f41e9: Pushed
eb5f13bce993: Pushed
latest: digest: sha256:6ef3c77a4ebfbf8f2cada3442839f0c49f7e5f643b5179ec4ed0f100ada8c9ae size: 1778
[root@docker .docker]# docker images
REPOSITORY TAG IMAGE ID CREATED SIZE
192.168.108.30/cloud/nginx latest ad5708199ec7 3 weeks ago 192MB
nginx latest ad5708199ec7 3 weeks ago 192MB
goharbor/harbor-exporter v2.9.1 37bfd4fa26bc 22 months ago 105MB
goharbor/redis-photon v2.9.1 67827413c0fd 22 months ago 209MB
goharbor/trivy-adapter-photon v2.9.1 a02695b8f8ea 22 months ago 469MB
goharbor/harbor-registryctl v2.9.1 a076218bb631 22 months ago 148MB
goharbor/registry-photon v2.9.1 2f01ea8b1853 22 months ago 82.7MB
goharbor/nginx-photon v2.9.1 5200203dd7ef 22 months ago 153MB
goharbor/harbor-log v2.9.1 ac1cdcc94a5f 22 months ago 162MB
goharbor/harbor-jobservice v2.9.1 d9ff6fc98cc8 22 months ago 139MB
goharbor/harbor-core v2.9.1 0a3a7953409c 22 months ago 166MB
goharbor/harbor-portal v2.9.1 345284db8ca1 22 months ago 161MB
goharbor/harbor-db v2.9.1 69606d285be1 22 months ago 358MB
goharbor/prepare v2.9.1 adb2d804c458 22 months ago 253MB镜像格式:SERVER/PROJECT/PATH/TO/IMAGE/IMAGE:TAG
下载镜像
bash
# 把之前的删除才能下载
[root@docker .docker]# docker rmi nginx:latest
Untagged: nginx:latest
Untagged: nginx@sha256:33e0bbc7ca9ecf108140af6288c7c9d1ecc77548cbfd3952fd8466a75edefe57
[root@docker .docker]# docker rmi ad5708199ec7
Untagged: 192.168.108.30/cloud/nginx:latest
Untagged: 192.168.108.30/cloud/nginx@sha256:6ef3c77a4ebfbf8f2cada3442839f0c49f7e5f643b5179ec4ed0f100ada8c9ae
Deleted: sha256:ad5708199ec7d169c6837fe46e1646603d0f7d0a0f54d3cd8d07bc1c818d0224
Deleted: sha256:1afc33e48e9f9aa9fb610287b45b79dfab1d017eac5e2a2b4278c7ebd4dc1604
Deleted: sha256:8fd30f3584c9566285c852bf3151e0309103a2cb2c69679c957085b4ca04c1bf
Deleted: sha256:19a317257fb733cff18880fe412a5c32666fa187d7b2f92c090b13cb957eeda8
Deleted: sha256:06f0c4757d2fb96eecfd5df0224138aba5fc8252ca7a708dbc10a729d450f4b5
Deleted: sha256:1d08407755c0243da3cc5e43f0673151a5b2b9de69d2a2036b63aa94be148c6b
Deleted: sha256:09b094432908a8fa361f38c2863929533e0819033757c14f015c31c5f620d9e5
Deleted: sha256:eb5f13bce9936c760b9fa73aeb1b608787daa36106cc888104132e353ed37252

[root@docker .docker]# docker pull 192.168.108.30/cloud/nginx@sha256:6ef3c77a4ebfbf8f2cada3442839f0c49f7e5f643b5179ec4ed0f100ada8c9ae
192.168.108.30/cloud/nginx@sha256:6ef3c77a4ebfbf8f2cada3442839f0c49f7e5f643b5179ec4ed0f100ada8c9ae: Pulling from cloud/nginx
af7c915c8849: Pull complete
a2da0c0f2353: Pull complete
e5d9bb0b85cc: Pull complete
14a859b5ba24: Pull complete
716cdf61af59: Pull complete
14e422fd20a0: Pull complete
c3741b707ce6: Pull complete
Digest: sha256:6ef3c77a4ebfbf8f2cada3442839f0c49f7e5f643b5179ec4ed0f100ada8c9ae
Status: Downloaded newer image for 192.168.108.30/cloud/nginx@sha256:6ef3c77a4ebfbf8f2cada3442839f0c49f7e5f643b5179ec4ed0f100ada8c9ae
192.168.108.30/cloud/nginx@sha256:6ef3c77a4ebfbf8f2cada3442839f0c49f7e5f643b5179ec4ed0f100ada8c9ae
卸载harbor
清理容器
bash
[root@docker .docker]# cd /opt/harbor/
[root@docker harbor]#
[root@docker harbor]# docker com
commit   compose
[root@docker harbor]# docker compose down
WARN[0000] /opt/harbor/docker-compose.yml: `version` is obsolete
[+] Running 10/10
 ✔ Container registryctl        Removed                                                   0.1s
 ✔ Container harbor-jobservice  Removed                                                   0.2s
 ✔ Container nginx              Removed                                                   0.2s
 ✔ Container harbor-portal      Removed                                                   0.1s
 ✔ Container harbor-core        Removed                                                   0.1s
 ✔ Container harbor-db          Removed                                                   0.2s
 ✔ Container registry           Removed                                                   0.1s
 ✔ Container redis              Removed                                                   0.2s
 ✔ Container harbor-log         Removed                                                  10.2s
 ✔ Network harbor_harbor        Removed                                                   0.2s

# 此时浏览器已经登不上了
清理镜像
bash
[root@docker harbor]# docker images |grep harbor|awk '{print $1":"$2}' | xargs docker rmi

[root@docker harbor]# docker images
REPOSITORY                   TAG       IMAGE ID       CREATED       SIZE
192.168.108.30/cloud/nginx   <none>    ad5708199ec7   3 weeks ago   192MB
清理harbor使用的目录/data,由prepare脚本定义
bash
[root@docker harbor]# rm -rf /data删除软件包
bash
[root@docker opt]# cd
[root@docker ~]# ls
anaconda-ks.cfg harbor harbor-offline-installer-v2.9.1.tgz
[root@docker ~]# rm -f harbor-offline-installer-v2.9.1.tgz
[root@docker ~]# rm -rf /opt/harbor/
Docker镜像小结
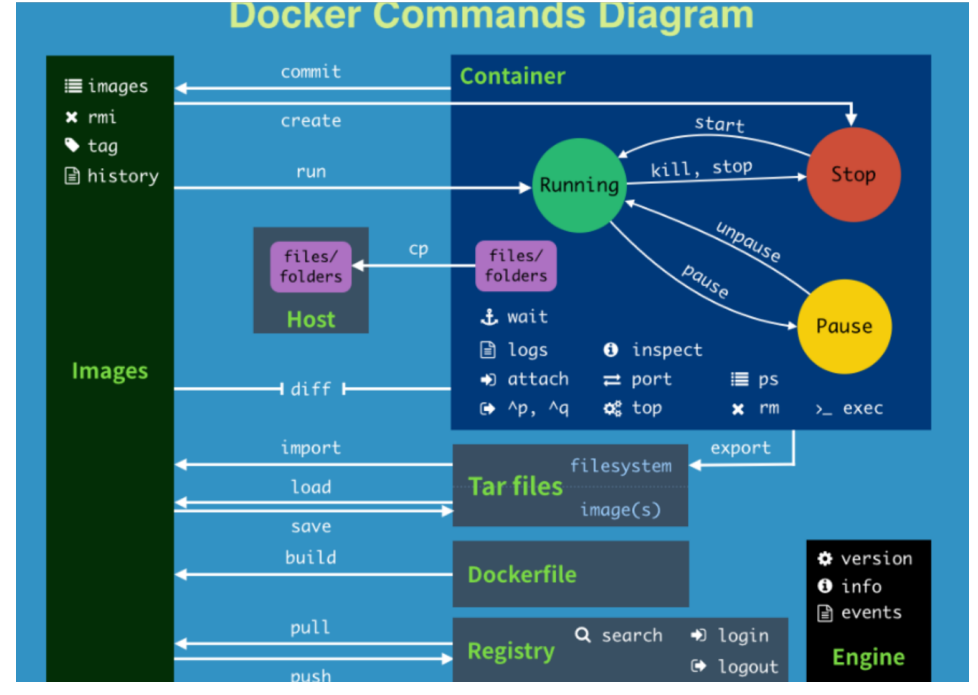
下面是镜像的常用操作子命令:
- images:显示本地的镜像列表
- history:显示拥有的镜像的构建历史
- commit:从运行的容器创建新镜像
- build:从编写的 Dockerfile 构建镜像
- tag:给镜像打 tag 标签
- pull:从 registry 下载镜像到自己这里
- push:将镜像上传到 registry
- rmi:删除Docker 主机中的镜像
- search:搜索 Docker Hub 中的镜像供自己使用
rmi
rmi 只能删除 host 上的镜像,不会删除 registry 的镜像。
如果一个镜像对应了多个 tag,只有当最后一个 tag 被删除时,镜像才被真正删除。例如 host 中 busybox镜像有三个 tag:
bash
[root@docker ~]# docker pull busybox
Using default tag: latest
latest: Pulling from library/busybox
80bfbb8a41a2: Pull complete
Digest: sha256:ab33eacc8251e3807b85bb6dba570e4698c3998eca6f0fc2ccb60575a563ea74
Status: Downloaded newer image for busybox:latest
docker.io/library/busybox:latest
[root@docker ~]# docker images
REPOSITORY   TAG       IMAGE ID       CREATED         SIZE
busybox      latest    0ed463b26dae   11 months ago   4.43MB
[root@docker ~]# docker tag busybox:latest busybox:v1
[root@docker ~]# docker tag busybox:latest busybox:v2
[root@docker ~]# docker images
REPOSITORY   TAG       IMAGE ID       CREATED         SIZE
busybox      latest    0ed463b26dae   11 months ago   4.43MB
busybox      v1        0ed463b26dae   11 months ago   4.43MB
busybox      v2        0ed463b26dae   11 months ago   4.43MB
删除其中 busybox:latest 只是删除了 latest tag,镜像本身没有删除。
bash
[root@docker ~]# docker rmi busybox:latest
Untagged: busybox:latest
[root@docker ~]# docker images
REPOSITORY   TAG       IMAGE ID       CREATED         SIZE
busybox      v1        0ed463b26dae   11 months ago   4.43MB
busybox      v2        0ed463b26dae   11 months ago   4.43MB
只有当 busybox:v1和busybox:v2也被删除时,整个镜像才会被删除。
bash
[root@docker ~]# docker rmi busybox:v1
Untagged: busybox:v1
[root@docker ~]# docker rmi busybox:v2
Untagged: busybox:v2
Untagged: busybox@sha256:ab33eacc8251e3807b85bb6dba570e4698c3998eca6f0fc2ccb60575a563ea74
Deleted: sha256:0ed463b26daee791b094dc3fff25edb3e79f153d37d274e5c2936923c38dac2b
Deleted: sha256:80e840de630d08a6a1e0ee30e7c8378cf1ed6a424315d7e437f54780aee6bf5a
[root@docker ~]# docker images
REPOSITORY   TAG       IMAGE ID   CREATED   SIZE
保存本地镜像为文件-save
docker默认使用overlay2存储驱动存储镜像。
bash
[root@docker ~]# docker info | grep 'Storage Driver'
 Storage Driver: overlay2
镜像存储在本地/var/lib/docker/overlay2,通过文件系统层面拷贝image,操作复杂。可以使用save命 令,将本地镜像保存为单个文件,并分享给他人使用。
示例:
bash
[root@docker ~]# docker pull httpd
Using default tag: latest
latest: Pulling from library/httpd
396b1da7636e: Pull complete
40712a21826a: Pull complete
4f4fb700ef54: Pull complete
d2b1a5ae8cd3: Pull complete
7e8bbac53823: Pull complete
779ccd583397: Pull complete
Digest: sha256:3198c1839e1a875f8b83803083758a7635f1ae999f0601f30f2f3b8ce2ac99e3
Status: Downloaded newer image for httpd:latest
docker.io/library/httpd:latest
[root@docker ~]# docker save httpd -o httpd.tar
[root@docker ~]# docker pull hello-world
Using default tag: latest
latest: Pulling from library/hello-world
17eec7bbc9d7: Pull complete
Digest: sha256:a0dfb02aac212703bfcb339d77d47ec32c8706ff250850ecc0e19c8737b18567
Status: Downloaded newer image for hello-world:latest
docker.io/library/hello-world:latest
[root@docker ~]# docker save httpd hello-world -o images.tar

[root@docker ~]# docker images
REPOSITORY    TAG       IMAGE ID       CREATED       SIZE
hello-world   latest    1b44b5a3e06a   3 weeks ago   10.1kB
httpd         latest    199e3a035264   3 weeks ago   117MB

[root@docker ~]# ls
anaconda-ks.cfg  httpd.tar  images.tar
将本地镜像文件导入本地-load
示例:删除本地镜像,并导入本地镜像文件
bash
[root@docker ~]# docker rmi httpd:latest hello-world:latest
Untagged: httpd:latest
Untagged: httpd@sha256:3198c1839e1a875f8b83803083758a7635f1ae999f0601f30f2f3b8ce2ac99e3
Deleted: sha256:199e3a0352645ad4ae027e853af5986bd5b4766c3a5e98987ad10d5922eb7465
Deleted: sha256:00573b19d7727f02c759d09e37596d7790e794d8044bbda01c82e4ef255a5a46
Deleted: sha256:84e29bd3c0d55e14757bab091c4081f900a13e91d88ebe65d7711411ac757385
Deleted: sha256:d75c7aed0111141a372ee22ba367d8b7d6dfc111abd79544592065f98a57802c
Deleted: sha256:d39e6d1ae882eb3ae39fb74a830df8d28fcd5032b8eb94da68c5f488c51ece5d
Deleted: sha256:7def08ab353787eaf7f6c76df7a4de80178cd031f0b2e5267291b645d148600a
Deleted: sha256:e6a3842ebc7f5e41d8a38f19a0aa5ea56c255475695ac6682882420800cf5465
Untagged: hello-world:latest
Untagged: hello-world@sha256:a0dfb02aac212703bfcb339d77d47ec32c8706ff250850ecc0e19c8737b18567
Deleted: sha256:1b44b5a3e06a9aae883e7bf25e45c100be0bb81a0e01b32de604f3ac44711634
Deleted: sha256:53d204b3dc5ddbc129df4ce71996b8168711e211274c785de5e0d4eb68ec3851
[root@docker ~]# docker images
REPOSITORY   TAG       IMAGE ID   CREATED   SIZE

# 删除本地正在使用的镜像需要选项-f
导入镜像
bash
[root@docker ~]# docker load -i images.tar
53d204b3dc5d: Loading layer  11.78kB/11.78kB
Loaded image: hello-world:latest
e6a3842ebc7f: Loading layer  81.03MB/81.03MB
89211885a3fc: Loading layer   2.56kB/2.56kB
5f70bf18a086: Loading layer  1.024kB/1.024kB
5d3f01560532: Loading layer  6.015MB/6.015MB
82a8960ee0f5: Loading layer  33.08MB/33.08MB
84465093da5e: Loading layer  3.584kB/3.584kB
Loaded image: httpd:latest
[root@docker ~]# docker images
REPOSITORY    TAG       IMAGE ID       CREATED       SIZE
hello-world   latest    1b44b5a3e06a   3 weeks ago   10.1kB
httpd         latest    199e3a035264   3 weeks ago   117MB

# 如果本地镜像名与导入的镜像重名,则本地的镜像会被覆盖。
bash
[root@docker ~]# docker rm -f $(docker ps -aq)     #删除所有容器
[root@docker ~]# docker rmi -f $(docker images -aq)   #删除所有镜像

[root@docker ~]# docker rmi -f $(docker images -aq)
Untagged: hello-world:latest
Deleted: sha256:1b44b5a3e06a9aae883e7bf25e45c100be0bb81a0e01b32de604f3ac44711634
Deleted: sha256:53d204b3dc5ddbc129df4ce71996b8168711e211274c785de5e0d4eb68ec3851
Untagged: httpd:latest
Deleted: sha256:199e3a0352645ad4ae027e853af5986bd5b4766c3a5e98987ad10d5922eb7465
Deleted: sha256:00573b19d7727f02c759d09e37596d7790e794d8044bbda01c82e4ef255a5a46
Deleted: sha256:84e29bd3c0d55e14757bab091c4081f900a13e91d88ebe65d7711411ac757385
Deleted: sha256:d75c7aed0111141a372ee22ba367d8b7d6dfc111abd79544592065f98a57802c
Deleted: sha256:d39e6d1ae882eb3ae39fb74a830df8d28fcd5032b8eb94da68c5f488c51ece5d
Deleted: sha256:7def08ab353787eaf7f6c76df7a4de80178cd031f0b2e5267291b645d148600a
Deleted: sha256:e6a3842ebc7f5e41d8a38f19a0aa5ea56c255475695ac6682882420800cf5465
[root@docker ~]# docker images
REPOSITORY   TAG       IMAGE ID   CREATED   SIZE
容器
如何运行容器
运行容器
bash
docker run=docker create + docker start
# docker run 是启动容器的方法。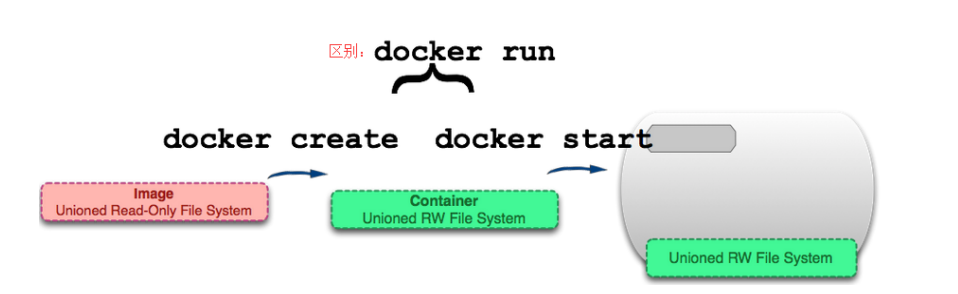
bash
[root@docker ~]# docker create ubuntu #使用ubuntu镜像创建容器
eb1aa0ca86b2d49250ebe64913af50e88482ad68b9c3e61ef8f8da9c24b00f7a #新创建的容器长ID

#create的容器状态时Created
[root@docker ~]# docker ps -a
CONTAINER ID IMAGE COMMAND CREATED STATUS PORTS NAMES
eb1aa0ca86b2 ubuntu "/bin/bash" 2 seconds ago `Created`
quizzical_goldwasser

#启动容器,刚创建的容器ID
[root@docker ~]# docker start eb1aa0ca86b2
eb1aa0ca86b2
#查看容器状态,启动了又退出了
[root@docker ~]# docker ps -a
CONTAINER ID IMAGE COMMAND CREATED STATUS
PORTS NAMES
eb1aa0ca86b2 ubuntu "/bin/bash" 23 seconds ago Exited (0) 3 seconds ago
quizzical_goldwasser
可用三种方式指定容器启动时执行的命令:
- CMD 指令。
- ENTRYPOINT 指令。
- 在 docker run 命令行中指定。
示例:
bash
[root@docker ~]# docker run ubuntu pwd
Unable to find image 'ubuntu:latest' locally
latest: Pulling from library/ubuntu
76249c7cd503: Pull complete
Digest: sha256:9cbed754112939e914291337b5e554b07ad7c392491dba6daf25eef1332a22e8
Status: Downloaded newer image for ubuntu:latest
/
容器启动时执行 pwd ,返回的 / 是容器中的当前目录。 执行 docker ps 或 docker container ls 可以查看 Docker host 中当前运行的容器:
bash
[root@docker ~]# docker ps
CONTAINER ID   IMAGE     COMMAND   CREATED   STATUS    PORTS     NAMES

# -a 会显示所有状态的容器,可以看到,之前的容器已经退出了,状态为 Exited。
[root@docker ~]# docker ps -a
CONTAINER ID   IMAGE     COMMAND   CREATED          STATUS                      PORTS     NAMES
3b974eeca2ec   ubuntu    "pwd"     30 seconds ago   Exited (0) 29 seconds ago             great_hoover

[root@docker ~]# docker container ls -a
CONTAINER ID   IMAGE     COMMAND   CREATED              STATUS                          PORTS     NAMES
3b974eeca2ec   ubuntu    "pwd"     About a minute ago   Exited (0) About a minute ago             great_hoover
这种是"一闪而过"的容器,运行完命令就自动退出
让容器长期运行
因为容器的生命周期依赖于启动时执行的命令,只要该命令不结束,容器也就不会退出。
所以可以通过执行一个长期运行的命令来保持容器的运行状态。例如执行下面的命 令:
bash
[root@docker ~]# docker run ubuntu /bin/bash -c "while true ; do sleep 1 ; echo hahaha; done"
hahaha
hahaha
hahaha
hahaha
......
while 语句让 bash 不会退出。可以打开另一个终端查看容器的状态:
bash
[root@docker ~]# docker ps
CONTAINER ID   IMAGE     COMMAND                  CREATED          STATUS          PORTS     NAMES
b32609fee56d   ubuntu    "/bin/bash -c 'while..."   24 seconds ago   Up 23 seconds             focused_franklin
可见容器仍处于运行状态。不过这种方法有个缺点:它占用了一个终端。 我们可以加上参数 -d 以后台方式启动容器。
bash
#先把那个没停止的先停止掉,不然的话会占用一个窗口
[root@docker ~]# docker stop b32609fee56d
b32609fee56d

#然后是后台运行
[root@docker ~]# docker run -d ubuntu /bin/bash -c "while true ; do sleep 1 ;
> echo hahaha; done"
b07353e3a775306bd1b026acfe78c62a3d0e024a136f0c710f2ec65b24950a42
[root@docker ~]# docker ps
CONTAINER ID   IMAGE     COMMAND                  CREATED          STATUS         PORTS     NAMES
b07353e3a775   ubuntu    "/bin/bash -c 'while..."   10 seconds ago   Up 9 seconds             jovial_panini

# NAMES 字段显示容器的名字,在启动容器时可以通过 --name 参数显示地为容器命名,如果不指定,docker 会自动为容器分配名字。
bash
# 停止一个正在运行的容器也可以只用前几个id数字进行停止操作
[root@docker ~]# docker stop b073
b073
[root@docker ~]# docker ps
CONTAINER ID   IMAGE     COMMAND   CREATED   STATUS    PORTS     NAMES
容器常见的用途是运行 后台服务,例如前面我们已经看到的 http server:
这一次我们用 --name 指定了容器的名字。 我们还看到容器运行的命令是 httpd-foreground ,通过 docker history 可知这个命令是通过 CMD 指定的。
bash
[root@docker ~]# docker run --name "my_http_server" -d httpd
Unable to find image 'httpd:latest' locally
latest: Pulling from library/httpd
396b1da7636e: Pull complete
40712a21826a: Pull complete
4f4fb700ef54: Pull complete
d2b1a5ae8cd3: Pull complete
7e8bbac53823: Pull complete
779ccd583397: Pull complete
Digest: sha256:3198c1839e1a875f8b83803083758a7635f1ae999f0601f30f2f3b8ce2ac99e3
Status: Downloaded newer image for httpd:latest
44fec6cdd71107e744eb8af9e2c8ec0ad1380aa737cde52ce8fa3ec895adf799
bash
[root@docker ~]# docker history httpd
IMAGE          CREATED       CREATED BY                                      SIZE      COMMENT
199e3a035264   3 weeks ago   CMD ["httpd-foreground"]                        0B        buildkit.dockerfile.v0
<missing>      3 weeks ago   EXPOSE map[80/tcp:{}]                           0B        buildkit.dockerfile.v0
<missing>      3 weeks ago   COPY httpd-foreground /usr/local/bin/ # buil...   138B      buildkit.dockerfile.v0
<missing>      3 weeks ago   STOPSIGNAL SIGWINCH                             0B        buildkit.dockerfile.v0
<missing>      3 weeks ago   RUN /bin/sh -c set -eux;   savedAptMark="$(a...   32.5MB    buildkit.dockerfile.v0
<missing>      3 weeks ago   ENV HTTPD_PATCHES=                              0B        buildkit.dockerfile.v0
<missing>      3 weeks ago   ENV HTTPD_SHA256=58b8be97d9940ec17f7656c0c6b...   0B        buildkit.dockerfile.v0
<missing>      3 weeks ago   ENV HTTPD_VERSION=2.4.65                        0B        buildkit.dockerfile.v0
<missing>      3 weeks ago   RUN /bin/sh -c set -eux;  apt-get install --...   5.65MB    buildkit.dockerfile.v0
<missing>      3 weeks ago   WORKDIR /usr/local/apache2                      0B        buildkit.dockerfile.v0
<missing>      3 weeks ago   RUN /bin/sh -c mkdir -p "$HTTPD_PREFIX"  && ...   0B        buildkit.dockerfile.v0
<missing>      3 weeks ago   ENV PATH=/usr/local/apache2/bin:/usr/local/s...   0B        buildkit.dockerfile.v0
<missing>      3 weeks ago   ENV HTTPD_PREFIX=/usr/local/apache2             0B        buildkit.dockerfile.v0
<missing>      3 weeks ago   # debian.sh --arch 'amd64' out/ 'trixie' '@1...   78.6MB    debuerreotype 0.15
bash
[root@docker ~]# docker ps
CONTAINER ID   IMAGE     COMMAND              CREATED          STATUS          PORTS     NAMES
44fec6cdd711   httpd     "httpd-foreground"   33 seconds ago   Up 32 seconds   80/tcp    my_http_server
两种进入容器的方法
有两种方法进入容 器:attach 和 exec。
docker attach
通过 docker attach 可以 attach 到容器启动命令的终端,例如:
bash
[root@docker ~]# docker run -d ubuntu /bin/bash -c "while true ; do sleep 1 ;
> echo I_am_in_container ; done"
5706f6ec4994a968cc8179b3f19735380e7bdf278084c90dc2966e403bbfa214

[root@docker ~]# docker attach 5706f6ec4994a968cc8179b3f19735380e7bdf278084c90dc2966e403bbfa214
I_am_in_container
I_am_in_container
I_am_in_container
I_am_in_container
I_am_in_container
I_am_in_container
I_am_in_container
I_am_in_container
I_am_in_container
I_am_in_container
......

# 通过 "长ID" attach 到了容器的启动命令终端,之后看到的是 echo 每隔一秒打印的信息。
# 可通过 Ctrl+p 然后 Ctrl+q 组合键退出 attach 终端。

#退不出来的话可以:
#后面那串数字是进程id
[root@docker ~]# docker stop 814b574e01
814b574e01
docker exec
通过 docker exec 进入相同的容器:
bash
[root@docker ~]# docker run -d ubuntu /bin/bash -c "while true ; do sleep 1 ;                  echo I_am_in_container ; done"
814b574e01df767a4e5496c4052fc9336a797cdf41ce677c940bf7d449668312
[root@docker ~]# docker exec -it 814b574e01d bash
root@814b574e01df:/#
root@814b574e01df:/# docker attach 814b574e01
bash: docker: command not found
# 这个窗口只能进入但是看不到返回值

# 只能新开一个窗口才能看到返回值
[root@docker ~]# docker attach 814b574e01
I_am_in_container
I_am_in_container
I_am_in_container
......

# -it 以交互模式打开 pseudo-TTY,执行 bash,其结果就是打开了一个 bash 终端。
# 'root@814b574e01df:/#' 进入到容器中,容器的 hostname 就是其 "短ID"。
attach VS exec
Docker 中 attach 和 exec 这两个命令的主要区别可以这样理解:
- attach 会直接进入容器启动命令对应的终端,不会开启新进程,相当于直接连接到容器初始运行的终端环境。
- exec 则是在容器里新开一个终端,而且能启动新的进程,更灵活地在容器内执行额外操作。
- 用法上,如果需要直接在终端查看容器启动命令的输出内容,用 attach 比较合适;其他场景下,比如要在容器内执行新命令、进行额外操作,通常用 exec 更方便。
另外,如果只是想查看启动命令的输出,其实还有个更简单的方式 ------ 使用 docker logs 命令。
bash
[root@docker ~]# docker logs -f 814b574e01
I_am_in_container
I_am_in_container
I_am_in_container
I_am_in_container
I_am_in_container
I_am_in_container
I_am_in_container
......

# -f 的作用与 tail -f 类似,能够持续打印输出。
运行容器的最佳实践
按用途容器大致可分为两类:服务类容器和工具类的容器。
-
服务类容器以 daemon 的形式运行,对外提供服务。比如 web server,数据库等。通过 -d 以后 台方式启动这类容器是非常合适的。如果要排查问题,可以通过 exec -it 进入容器。
-
工具类容器通常给能我们提供一个临时的工作环境,通常以 run -it 方式运行,比如:
bash
[root@docker ~]# docker run -it busybox
Unable to find image 'busybox:latest' locally
latest: Pulling from library/busybox
80bfbb8a41a2: Pull complete
Digest: sha256:ab33eacc8251e3807b85bb6dba570e4698c3998eca6f0fc2ccb60575a563ea74
Status: Downloaded newer image for busybox:latest
/ # wget www.baidu.com
Connecting to www.baidu.com (180.101.51.73:80)
saving to 'index.html'
index.html           100% |***********************************************|  2381  0:00:00 ETA
'index.html' saved
/ #
/ # exit
[root@docker ~]#
运行 busybox, run -it 的作用是在容器启动后就直接进入。我们这里通过 wget 验证了在容器中访问 internet 的能力。执行 exit 退出终端,同时容器停止。
工具类容器多使用基础镜像,例如 busybox、debian、ubuntu 等。
容器运行小结:
- 当设置的 CMD 或 Entrypoint 或通过 docker run 命令行指定的命令运行结束时,容器就会停止。
- 可以通过 -d 参数让容器在后台启动。
- 可以通过 exec -it 进入容器并执行命令。
指定容器的三种方法:
- 使用容器的短 ID。
- 使用容器的长 ID。
- 使用容器名称。我可以通过 --name 为容器命名,也能执行 docker rename 来重命名容器。
将容器按用途分为两类:
- 服务类的容器。
- 工具类的容器。
容器常用操作
stop/start/restart 容器
通过 docker stop 可以停止运行的容器。
bash
[root@docker ~]# docker run -d httpd
5a063550ddf25c9976790b78da1262c21ec1a8d8b2b0b72ea9c9f72c5ee670ba
[root@docker ~]# docker ps
CONTAINER ID   IMAGE     COMMAND              CREATED          STATUS          PORTS     NAMES
5a063550ddf2   httpd     "httpd-foreground"   15 seconds ago   Up 14 seconds   80/tcp    objective_brattain

[root@docker ~]# docker stop objective_brattain
objective_brattain
[root@docker ~]# docker ps -a
CONTAINER ID   IMAGE    COMMAND         CREATED              STATUS              PORTS     NAMES
5b424ab5d203  ubuntu    "/bin/bash"      57 seconds ago   Exited (0) 57 seconds ago    dazzling_morse
5a063550ddf2 httpd "httpd-foreground" About a minute ago Exited (0) 4 seconds ago   objective_brattain
859ce8c4c823  busybox   "sh"      2 minutes ago         Exited (0) 2 minutes ago      relaxed_brattain
容器在 docker host 中实际上是一个进程, docker stop 命令本质上是向该进程发送一个 SIGTERM 信 号。如果想快速停止容器,可使用 docker kill 命令,其作用是向容器进程发送 SIGKILL 信号。
bash
[root@docker ~]# docker run -d httpd
78b8c8cd9adbc1d75725760be622a130b5755bb98766dfb4322183b28b048bb4
[root@docker ~]# docker ps
CONTAINER ID   IMAGE     COMMAND              CREATED          STATUS          PORTS     NAMES
78b8c8cd9adb   httpd     "httpd-foreground"   19 seconds ago   Up 18 seconds   80/tcp    friendly_brown
[root@docker ~]# docker kill friendly_brown
friendly_brown
对于处于停止状态的容器,可以通过 docker start 重新启动。
bash
[root@docker ~]# docker start friendly_brown
friendly_brown
[root@docker ~]# docker ps
CONTAINER ID   IMAGE     COMMAND              CREATED              STATUS         PORTS     NAMES
78b8c8cd9adb   httpd     "httpd-foreground"   About a minute ago   Up 2 seconds   80/tcp    friendly_brown
docker start 会保留容器的第一次启动时的所有参数。
docker restart 可以重启容器,其作用就是依次执行 docker stop 和 docker start。
容器可能会因某种错误而停止运行。对于服务类容器,我们通常希望在这种情况下容器能够自动重启。 启动容器时设置 --restart 就可以达到这个效果。
如果docker run -d httpd不加--restart=always参数,attach进去ctrl_c(终止进程)不会重启。
bash
[root@docker ~]# docker run -d --restart=always httpd
ad4d13deedb8b94c59126e7356a1bec95dd7ddb96b4245151cc68f31cd508d2e
[root@docker ~]# docker attach ad4
^C[Fri Sep 05 08:48:48.174629 2025] [mpm_event:notice] [pid 1:tid 1] AH00491: caught SIGTERM, shutting down
[root@docker ~]# docker ps
CONTAINER ID   IMAGE     COMMAND              CREATED          STATUS            PORTS     NAMES
ad4d13deedb8   httpd   "httpd-foreground"   36 seconds ago   Up 8 seconds        80/tcp    competent_pike
78b8c8cd9adb   httpd   "httpd-foreground"   2 minutes ago    Up About a minute   80/tcp    friendly_brown
--restart=always 意味着无论容器因何种原因退出(包括正常退出),就立即重启。该参数的形式还 可以是 --restart=on-failure:3 ,意思是如果启动进程退出代码非0,则重启容器,最多重启3次。
pause/unpause 容器
有时我们只是希望暂时让容器暂停工作一段时间,比如要对容器的文件系统打个快照,或者 dcoker host 需要使用 CPU,这时可以执行 docker pause 。
bash
[root@docker ~]# docker ps
CONTAINER ID   IMAGE     COMMAND              CREATED              STATUS       PORTS     NAMES
ad4d13deedb8   httpd     "httpd-foreground"   About a minute ago  Up 51 seconds 80/tcp    competent_pike
78b8c8cd9adb   httpd     "httpd-foreground"   3 minutes ago       Up 2 minutes  80/tcp    friendly_brown
[root@docker ~]# docker pause friendly_brown
friendly_brown
[root@docker ~]# docker ps
CONTAINER ID   IMAGE    COMMAND          CREATED              STATUS             PORTS     NAMES
ad4d13deedb8  httpd  "httpd-foreground"  About a minute ago  Up About a minute   80/tcp  competent_pike
78b8c8cd9adb  httpd  "httpd-foreground"  3 minutes ago     Up 2 minutes (Paused) 80/tcp  friendly_brown

# 处于暂停状态的容器不会占用 CPU 资源,直到通过 docker unpause 恢复运行。
[root@docker ~]# docker unpause friendly_brown
friendly_brown
[root@docker ~]# docker ps
CONTAINER ID   IMAGE     COMMAND              CREATED         STATUS           PORTS     NAMES
ad4d13deedb8   httpd  "httpd-foreground"   2 minutes ago   Up About a minute   80/tcp    competent_pike
78b8c8cd9adb   httpd  "httpd-foreground"   4 minutes ago   Up 3 minutes        80/tcp    friendly_brown
删除容器
使用 docker 一段时间后,host 上可能会有大量已经退出了的容器。
bash
[root@docker ~]# docker ps -a
CONTAINER ID   IMAGE     COMMAND              CREATED         STATUS            PORTS     NAMES
ad4d13deedb8   httpd     "httpd-foreground"   2 minutes ago   Up 2 minutes     80/tcp    competent_pike
78b8c8cd9adb   httpd     "httpd-foreground"   4 minutes ago   Up 3 minutes     80/tcp    friendly_brown
5b424ab5d203   ubuntu  "/bin/bash"        6 minutes ago  Exited (0) 6 minutes ago       dazzling_morse
5a063550ddf2   httpd  "httpd-foreground"  6 minutes ago  Exited (0) 5 minutes ago     objective_brattain
859ce8c4c823   busybox "sh"               7 minutes ago  Exited (0) 7 minutes ago     relaxed_brattain

# 这些容器依然会占用 host 的文件系统资源,如果确认不会再重启此类容器,可以通过 docker rm 删除。
# 中间有空格可以删除多个
[root@docker ~]# docker rm 5a 5b
5a
5b

[root@docker ~]# docker ps -a
CONTAINER ID   IMAGE     COMMAND              CREATED         STATUS                     PORTS     NAMES
ad4d13deedb8   httpd     "httpd-foreground"   3 minutes ago   Up 2 minutes    80/tcp    competent_pike
78b8c8cd9adb   httpd     "httpd-foreground"   5 minutes ago   Up 4 minutes    80/tcp    friendly_brown
859ce8c4c823   busybox   "sh"                 7 minutes ago   Exited (0) 7 minutes ago             relaxed_brattain

# docker rm 一次可以指定多个容器,如果希望批量删除所有已经退出的容器,可以执行如下命令:docker rm -v $(docker ps -aq -f status=exited)

[root@docker ~]# docker rm -v $(docker ps -aq -f status=exited)
859ce8c4c823
[root@docker ~]# docker ps -a
CONTAINER ID   IMAGE     COMMAND              CREATED         STATUS         PORTS     NAMES
ad4d13deedb8   httpd     "httpd-foreground"   4 minutes ago   Up 3 minutes   80/tcp    competent_pike
78b8c8cd9adb   httpd     "httpd-foreground"   6 minutes ago   Up 5 minutes   80/tcp    friendly_brown

# docker rm 是删除容器,而 docker rmi 是删除镜像。
容器操作总结图