文章目录
前言
在前几篇文章中我们分别介绍了几种经典的进程间通信的方式:管道和共享内存。
此篇文章,将会讲解一种基于消息块的通信方式------消息队列。
消息队列是全双工的,所以消息队列允许进程即可发送消息,也能接受消息。
此篇博客间分为3个部分:
- 消息队列的接口;
- 消息队列的原理;
- 消息队列接口使用方法;
- 基于消息队列的责任链模式。
消息队列的接口
消息队列的使用与共享内存的使用类似,也需要一个进程先创建消息队列,才能供两个进程使用:
创建消息队列
int msgget(key_t key , int msgflg):
-
返回值:消息队列的描述符,如果消息队列创建失败返回-1;
-
第二个参数
msgflg是选项,常见的选项有:IPC_CREAT创建消息队列,如果已经存在该消息队列就直接返回消息队列描述符,否则创建消息队列;IPC_CREAT | IPC_EXIT创建消息队列,如果已经存在消息队列,直接报错,保证返回的消息队列是新创建的; -
第一个参数
key是数字,该数字在操作系统内核中是唯一的,用key来区分内核中不同的的共消息队列。 -
两个进程如果
key值是相同的就说明要访问同一个消息队列。
key值在操作系统内是唯一的,那我在传参的时候如何传,我怎么知道自己的key有没有被使用???
在操作系统中该key值不需要用户来做,操作系统也提供了接口来让我们设置key值:
key_t ftok(const char* pathname , int proj_id):
- 返回值,返回key值,失败返回-1;
- 第一个参数:一个字符串是表示一个有效路径,第二个参数一个数字。
ftok()是一个算法,通过一个有效路径字符串和一个数字来获得一个冲突最小的key值。
只能说冲突最小,也有可能出现冲突,也就是说ftok()产生的key可能是已经存在的了,此时就会返回-1,通过调整路径或后面的数字重新尝试。
消息队列的生命周期并不是随进程的,也就是说进程结束之后,消息队列也不会被释放,消息队列是在内核中的,如果没有手动释放直到操作系统挂掉才会释放,所以消息队列在使用往后必须释放。
消息队列的释放
int msgctl(int msqid , int cmd , struct msqid_ds* msgflg)控制消息队列的接口
- 第一个参数:消息队列的描述符;
cmd指令/选项,常见的选项有:IPC_RMID删除消息队列;IPC_STAT获取消息队列的属性,通过第三个指针作为输出型参数,来获得消息队列的属性;ipc_SET设置消息队列的属性,也是通过第三个参数;- 第三个参数:指针指向一个结构体
struct msqid_ds,该结构体是专门用来描述消息队列的。
cpp
/* Obsolete, used only for backwards compatibility and libc5 compiles */
struct msqid_ds {
	struct ipc_perm msg_perm;   /* 结构体存储了消息队列的key值和权限等属性 */
	struct msg *msg_first;		/* 队列中第一个消息的地址  */
	struct msg *msg_last;		/* 队列中最后一个消息的地址 */
	__kernel_time_t msg_stime;	/* 最近一次发送消息的时间 */
	__kernel_time_t msg_rtime;
	__kernel_time_t msg_ctime;
	unsigned long  msg_lcbytes;
	unsigned long  msg_lqbytes;
	unsigned short msg_cbytes;	/* 队列中当前消息的总字节数 */
	unsigned short msg_qnum;	/* 队列中消息数量 */
	unsigned short msg_qbytes;	/* 队列中允许的最大字节数 */
	__kernel_ipc_pid_t msg_lspid;
	__kernel_ipc_pid_t msg_lrpid;
};
发送消息
int msgsnd(int msqid , void* msgq , size_t size , int msgflg):
- 返回值,-1表示发送失败,0表示发送成功;
- 第一个参数:消息队列描述符,标定向哪一个消息队列中发送;
- 第二个参数是一个结构体,该结构体必须是两个参数,自己进行设计:

第一个参数表示发送数据的类型,通过该类型来对队列中不同进程发送的信息进行标定,这样就可以区分队列中那些消息是对方的,那些是自己的。第二个是一个char*类型的数组,存储发送的消息,长度可以自定义。
-
第三个参数是发送数据的大小,即结构体中的数组的大小,不包含第一个数据的类型。
-
第四个参数选项,最长使用的选项有两个:
IPC_NOWAIT表示如果消息队列中已经放满了,就直接返回错误,不会进行等待;0表示如果消息队列满了,就阻塞等待,直到消息队列中空出来才发送。
接受消息
int msgrcv(int msqid , void* msgq , size_t size , long ,mtype , int msgflag:
- 返回值,如果失败返回-1,否则返回读取到的字节总数;
- 参数一:消息队列描述符;
- 参数二:消息的结构体,与上面一样;
- 第三个参数,接收数据缓冲区大小,与上面一样是
char*数组的大小; - 第四个参数,要接受消息的类型,就是上面我们在进行发送消息时,结构体中第一个变量的值;
- 第五个参数选项,与上面一样,
IPC_NOWAIT消息队列中没有数据时不进行等待,而是直接报错。
消息队列的原理
在操作系统中肯定有很多个进程要进行通信,那么一定就存在这大量的消息队列,操作系统也要进行管理:先描述,再组织。
以下是消息队列的管理管理示意图:
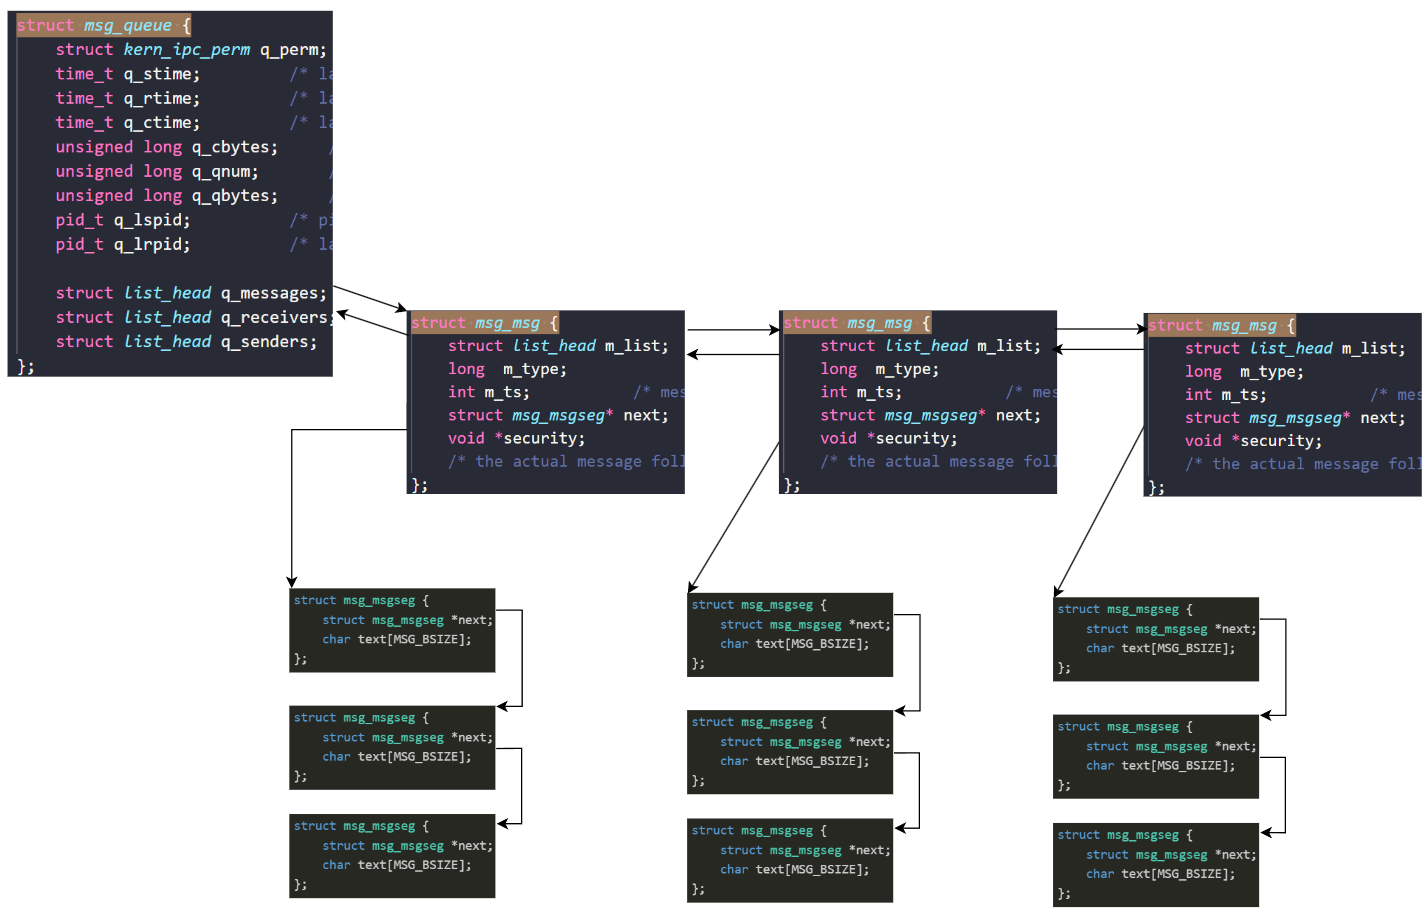
- 在上面示意图中
struct msg_msg是用来描述每一个消息的结构体,其中有消息的大小,类型,以及指向下一个消息的指针; - 在
struct msg_msg中有一个结构体指针struct msg_msgseg是专门用来存储消息正文的,其也有指向下一个struct msg_msgseg的指针,因为一个消息可能太大了,需要使用多个对象进行存储。 struct msg_queue则是维护这一整个消息队列的结构体,其中有消息队列的key值,创建者,所属组等属性,还有一个指向第一个消息的指针。
在操作系统中可能有多个消息队列,这些消息队列通过一个struct ipc_ids结构体进行管理的。
消息队列接口使用方法
下面简单使用一下消息队列的一些接口,实现一下让两个进程进行通信:
先将消息队列的接口进行简单的封装,封装一个基类Msg_q负责创建消息队列:
cpp
// 对消息队列接口进行封装
class Msg_q
{
    // 获取key值
    int GetKey(const string &pathname, const int &proj_id)
    {
        key_t k = ftok(pathname.c_str(), proj_id);
        if (k < 0)
        {
            cout << " ftok error " << "int file :" << __FILE__ << " on line : " << __LINE__ << endl;
            exit(Creat_Key_Error);
        }
        return k;
    }

public:
    Msg_q(const string &pathname, const int &proj_id, const int &mode)
    {
        key_ = GetKey(pathname, proj_id);
        // 依照mode的方式打开文件
        msgid_ = msgget(key_, mode);
        if (msgid_ < 0)
        {
            cout << " msgget error " << "int file :" << __FILE__ << " on line : " << __LINE__ << endl;
            exit(Msgget_Error);
        }
    }
protected:
    int key_;
    int msgid_;
};需要将消息队列描述符存储起来,因为后面向队列中发送和读取的时候需要使用,上面代码中通过指定路径和ID来创建一个key值,在创建的时候让外界设置mode来决定获取消息队列的方式,是创建还是直接获取。
上述类中还需要两个接口来向消息队列中发送消息和获取消息:
cpp
// 对消息队列接口进行封装
class Msg_q
{
public:

    // 发送消息
    void Send_Base(const string &message_, int mtype_)
    {
        struct Msgbuf bufferin;
        memset(bufferin.mtext, 0, sizeof(bufferin.mtext));
        bufferin.mtype = mtype_;
        memcpy(bufferin.mtext, message_.c_str(), message_.size());
        int n = msgsnd(msgid_, &bufferin, sizeof(bufferin.mtext), 0);
        if (n < 0)
        {
            cout << " msgsnd error " << "int file :" << __FILE__ << " on line : " << __LINE__ << endl;
            exit(Msgsnd_Error);
        }
    }

    string Recv_Base(int mtype_)
    {
        struct Msgbuf bufferout;
        memset(bufferout.mtext, 0, sizeof(bufferout.mtext));
        int n = msgrcv(msgid_, &bufferout, sizeof(bufferout.mtext), mtype_, 0);
        if (n < 0)
        {
            cout << " msgrcv error " << "int file :" << __FILE__ << " on line : " << __LINE__ << endl;
            exit(MsgRcv_Error);
        }

        // 将队列中的信息解析出来
        return bufferout.mtext;
    }

protected:
    int key_;
    int msgid_;
};不论是发送消息还是接收消息都需要通过struct Msgbuf结构体来向消息队列中进行发送,该结构体需要自己定义,在前面已经详细解释了其中的成员类型和作用。
cpp
struct Msgbuf
{
    long mtype;
    char mtext[1024];
};下面通过继承的方式来构建class Serve和class Client供外界进行不同的调用。
cpp
// 负责消息队列的创建和释放
class Serve : public Msg_q
{
public:
    Serve(const string &pathname = defaultfilename, const int &proj_id = defaultproj_od)
        : Msg_q(pathname, proj_id, CreatMsg_Mode)
    {
    }
    ~Serve()
    {
        // 销毁消息队列
        if (msgctl(msgid_, IPC_RMID, nullptr) < 0)
        {
            cout << " msgget error " << "int file :" << __FILE__ << " on line : " << __LINE__ << endl;
            exit(Msgctrl_Error);
        }
    }

    void Send(const string &message_, int mtype_)
    {
        // 进行发送消息
        if (mtype_ < 0)
        {
            cout << " mtype_ error " << "int file :" << __FILE__ << " on line : " << __LINE__ << endl;
            exit(MsgsndType_Error);
        }
        Send_Base(message_, mtype_);
    }

    std::string Recv(int mtype_)
    {
        if (mtype_ < 0)
        {
            cout << " mtype_ error " << "int file :" << __FILE__ << " on line : " << __LINE__ << endl;
            exit(MsgRcvType_Error);
        }
        return Recv_Base(mtype_);
    }
};
服务端需要负责消息队列的创建和释放,使用基类的构造函数即可实现创建消息队列,再设计析构来释放消息队列即可。
注意:服务端创建消息队列,客户端不需要进行创建,所以两者的mode选项是不一样的:
cpp
const int CreatMsg_Mode = IPC_CREAT | IPC_EXCL | 0666;
const int GetMsg_Mode = IPC_CREAT;
下面是客户端的设计:
cpp
class Client : public Msg_q
{
public:
    Client(const string &pathname = defaultfilename, const int &proj_id = defaultproj_od)
        : Msg_q(pathname, proj_id, GetMsg_Mode)
    {
    }

    void Send(const string &message_, int mtype_)
    {
        // 进行发送消息
        if (mtype_ < 0)
        {
            cout << " mtype_ error " << "int file :" << __FILE__ << " on line : " << __LINE__ << endl;
            exit(MsgsndType_Error);
        }
        Send_Base(message_, mtype_);
    }
    std::string Recv(int mtype_)
    {
        if (mtype_ < 0)
        {
            cout << " mtype_ error " << "int file :" << __FILE__ << " on line : " << __LINE__ << endl;
            exit(MsgRcvType_Error);
        }
        return Recv_Base(mtype_);
    }
    ~Client()
    {
    }
};
如果要进行通信,直接调用上面的接口即可:
cpp
// server.cc 服务端
int main()
{
    Serve server;
    pid_t  pid = fork();
    if(pid == 0)
    {
        // 子进程负责发送消息
        string memssage;
        while(1)
        {
            getline(cin, memssage);
            server.Send(memssage , 2);
            if(memssage == "quit")
                break;
        }
        exit(0);
    }

    while(1)
    {
        string message;
        // 服务端负责收消息
        message = server.Recv(1);
        if(message.size() > 0)
        cout << "Client send  a message: " << message << endl;
        if(message == "quit")
            break;
    }
    return 0;
}

// client.cc 用户端
int main()
{
    Client client;

    pid_t pid = fork();
    if (pid == 0)
    {
        // 子进程负责收消息
        while (1)
        {
            string message;
            // 服务端负责收消息
            message = client.Recv(2);
            if (message.size() > 0)
                cout << "Server send  a message: " << message << endl;
            if (message == "quit")
                break;
        }
        exit(0);
    }

    // 客户端负责发消息
    while (1)
    {
        string message;
        getline(cin, message);
        client.Send(message, 1);
        if (message == "quit")
            break;
    }
    return 0;
}
责任链模式
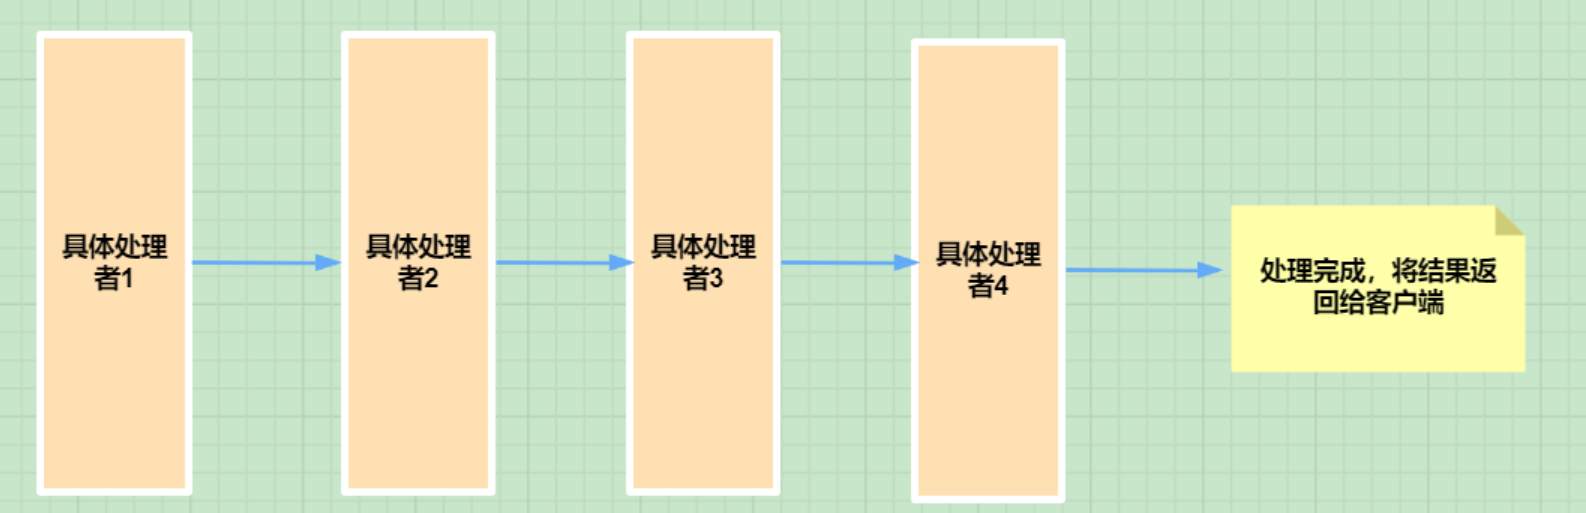
当对于发送来的消息要进行多部处理的时候,如果再将所有的需求都使用一个函数来完成就会导致代码很臃肿,所以当步骤多,并且每一步的关联小的时候,就可以采用责任链的设计模式,流程图如下:
现在我们对发送过来的数据要进行一下处理:
- 对于
client发送的信息,要将其保存找文件上,并且找保存之前要加上接受时间和接受进程的PID; - 当保存的文件过大的时候,要进行切片并且在指定目录下进行打包。
对于以上需求,我们可以对其进行拆分,不同的事将给不同的函数来完成,并且调用的时候是有先后顺序的,对其进行拆分:
- 将接受到的字符串进行封装,加上时间和PID信息;
- 将信息保存到文件;
- 文件过大进行打包。
如上图所示,责任链设计模式的关键在于:
让接口进行统一,如上图所示责任链设计模式类似于一个链表,前一个方法执行完后要将结构给下一个方法,所以一定要有下一个方法实现的指针。
那么我们应该如何去做,让前一个方法优雅的调用后一个方法???直接将每一个方法封装成函数,从这个函数调到下一个函数???
当然是不行的,如果在上面责任链很长,就会导致每个函数之间耦合性搞,并且难以维护,缺乏灵活性,如果我们想要关闭其中一个方法就要对源代码进行修改,比如我们不要求加时间和PID,而是直接保存的话,就会导致之前的代码需要重新修正。
所以这种方法是不行的,不能直接将函数之间相互调用。
如果这些方法的执行先链表一样就好了,可以通过一个next指针从前走到尾,并且删除中间的节点也好操作,但是如果是链表就要求他们的节点类型一样,怎么做到呢???*
确实对于不同的函数是做不到类型一样的,因为每个函数都有类型和返回值。
那如果将这些方法封装成类,行不行???
直接封装成类,类的类型不一样还是串不起来呀,那如果他们都是一个基类的派生类呢???
基类的指针能够指向派生类,那么如果这些节点都是基类的指针(指向不同的派生类)不久能串起来了嘛。
此时我们就可以设计一个基类,让派生类来继承了:
- 该基类中一定要有一个指针,要指向下一个派生类,从而调用下一个方法;
- 可以在设计一个
bool is_open_表示该方法是否使用,如果不使用就可以直接跳过,而不该改 变源代码; - 此处还需要我们设计一个接口,方便后续将基类指针相连。
cpp
// 创建一个基类
class HandlerText
{
public:
    virtual void Excute(const string &message) = 0;   // 所有步骤的方法同名

    // 提供一个接口进行设置next指针
    void SetNextHandler(std::shared_ptr<HandlerText> handler)
    {
        next_handler = handler;
    }

protected:
    std::shared_ptr<HandlerText> next_handler;
    bool isopen_ = true;
};
现在我们可以设计第一个方法了:将接收到的消息进行封装,加上时间和PID:
- 通过
struct tm和time(nullptr)来获取存储当地时间的结构体,再使用snprintf()将消息格式化; - 使用
getpid()获取进程PID;
cpp
// 完成第一个任务 , 对信息进行封装
class HandlerTextPackage : public HandlerText
{
    string GetCurrentTime()
    {
        time_t now = time(nullptr);
        struct tm *local_time = std::localtime(&now);
        char time_str[100]{};
        snprintf(time_str, sizeof(time_str), "[%04d-%02d-%02d %02d:%02d:%02d]",
                 local_time->tm_year + 1900, local_time->tm_mon + 1, local_time->tm_mday,
                 local_time->tm_hour, local_time->tm_min, local_time->tm_sec);

        return time_str;
    }

public:
    void Excute(const string &message)
    {
        string package_message = message;
        if (isopen_)
        {
            // 1. 在消息中添加时间 , 以及进程的PID信息
            string time_info = GetCurrentTime();
            // 将进程PID和时间拼接到 数据前面
            package_message = std::to_string(getpid()) + " " + time_info + " : " + message;
        }
        cout << "打包完成的消息: " << package_message << '\n';
        if (next_handler != nullptr)
            next_handler->Excute(package_message);
        else
            std::cout << "end of chain" << '\n';
    }
};
实现第二个任务,该任务需要我们在指定目录下的文件中进行写入:
- 判断目录是否存在,如果不存在,创建,可以使用C++17的
std::filesystem中的exists接口判断目录是否存在,以及creat_directories创建目录; - 如果文件也不存在,
ifstream会直接创建不需要担心; - 先文件中写入。
此处我们的类中还需要存储目录的位置,以及文件的名称,因此需要多加两个成员。
cpp
// 第二步,将数据保存到文件中
class HandlerTextSaveFile : public HandlerText
{
    void File_Exist(const string &filepath)
    {
        if (!std::filesystem::exists(filepath))
        {
            // 创建目录可能失败,因为没有权限,try catch捕获异常
            try
            {
                std::filesystem::create_directories(filepath);
            }
            catch (const std::filesystem::filesystem_error &e)
            {
                cout << e.what() << "int file :" << __FILE__ << " on line : " << __LINE__ << endl;
            }
        }
    }

public:
    HandlerTextSaveFile(const string &filepath, const string &filename) : filepath_(filepath), filename_(filename)
    {
    }

private:
    string filepath_;
    string filename_;
};
以下是方法的实现:此处对检查目录是否存在进行单独封装。
cpp
// 第二步,将数据保存到文件中
class HandlerTextSaveFile : public HandlerText
{
    void File_Exist(const string &filepath)
    {
        if (!std::filesystem::exists(filepath))
        {
            // 创建目录可能失败,因为没有权限,try catch捕获异常
            try
            {
                std::filesystem::create_directories(filepath);
            }
            catch (const std::filesystem::filesystem_error &e)
            {
                cout << e.what() << "int file :" << __FILE__ << " on line : " << __LINE__ << endl;
            }
        }
    }
public:
    void Excute(const string &message)
    {
        if (isopen_)
        {
            // 将数据保存到文件中
            // 1. 是否存在目录
            // 2. 是否存在文件
            // 3. 写入数据
            // 4. 关闭文件

            File_Exist(filepath_); // 判断路径是否存在
            string file = filepath_ + "/" + filename_;
            std::ofstream ofs(file, std::ios::app);
            ofs << message << std::endl;
            ofs.close();
        }
        cout << "文件保存完成" << '\n';
        if (next_handler != nullptr)
            next_handler->Excute(message);
        else
            std::cout << "end of chain" << '\n';
    }

private:
    string filepath_;
    string filename_;
};
最后一个任务,也是最麻烦的任务:如果超出存储限制要进行切片并打包。
因为只有操作限制的时候才进行切片所以该类还需要存储临界值:此时我们以行数为临界值。
cpp
// 第三步,是否对文件进行压缩,如果压缩要删除源文件
class HandlerTextTarGz : public HandlerText
{
public:
    HandlerTextTarGz(const string &filepath, const string &filename, const int max_line) : filepath_(filepath), filename_(filename), max_line_(max_line)
    {
    }

protected:
    string filepath_;
    string filename_;
    int max_line_;
};
对于该方法实现,我们一步一步的讲解。
- 在进行切片之前要判断时候需要进行切片,也就是检查文件之后超出临界值:
cpp
    // 检查是否需要进行压缩
    bool IfNeedTar(const string &file)
    {
        int line_count = 0;
        string line;
        std::ifstream ofs(file);
        while (std::getline(ofs, line))
            line_count++;
        cout << "line_count: " << line_count << '\n';
        return line_count > max_line_;
}- 如果要进行切片打包,应该如何进行?毫无疑问打包后的文件需要与源文件名不同,并且后续如果有多次打包,每次打包的文件名称还要不一样,所以可以使用打包时间来命名,先封装一个获取打包后文件名称的函数:
cpp
    // 改名
    string NewFileName(const string &filename)
    {
        time_t now = time(nullptr);
        struct tm *local_time = std::localtime(&now);
        char time_str[100]{};
        snprintf(time_str, sizeof(time_str), "%04d%02d%02d_%02d%02d%02d",
                 local_time->tm_year + 1900, local_time->tm_mon + 1, local_time->tm_mday,
                 local_time->tm_hour, local_time->tm_min, local_time->tm_sec);

        string ret = filename + "_" + time_str + ".tar.gz";
        return ret;
}- 在进行打包的时候有一个细节,我们不能在一个目录下打包其他目录中的文件,也就是说打包的时候要进入目标文件路径,可是使用
std::filesystem中的currentpath来进行路径的修真; - 打包时要使用
tar命令,所以要进行程序替换,也就是说要创建一个子进程来进行进程替换,并且替换后,只能有父进程来删除原文件了,以下就是方法实现:
cpp
void Excute(const string &message)
    {
        if (isopen_)
        {
            // 1.先判断是否需要进行压缩
            string file = filepath_ + "/" + filename_; // .tmp/message.txt

            if (IfNeedTar(file))
            {
                // 1.先要进入到目录中
                // 2.使用进程替换来进行压缩,要先将文件改名,再进行压缩
                // 3.删除源文件(父进程来完成)
                string newfilename = NewFileName(filename_);
                pid_t pid = fork();
                if (pid == 0)
                {
                    std::filesystem::current_path(filepath_);
                    execlp("tar", "tar", "-zcf", newfilename.c_str(), filename_.c_str(), NULL);
                    exit(1); // 表示进程替换失败
                }

                // 父进程删除源文件, 并等子进程
                int status;
                pid_t rid = waitpid(pid, &status, 0);
                if (WIFEXITED(status) && WEXITSTATUS(status) == 0)
                {
                    std::filesystem::remove(file.c_str());
                }

                cout << "压缩完成" << '\n';
            }
        }
        cout << "end of chain" << '\n';
    }
现在所有的方法都已经实现完了,只需要将所有的方法像链表一样进行连接就可以了,此处我们再封装最后一个类来实现:
对于将链表进行串联并不难,并且我们对外开放一个接口Run()传一个字符串就可以将所有步骤进行运行起来了。
cpp
// 将整个责任链串起来
class ChainOfResponsibility
{
public:
    ChainOfResponsibility(const string &filepath = default_filepath, const string &filename = default_filename, const int max_line = default_max_line)
    {
        // 先创建所有对象
        package_ = std::make_shared<HandlerTextPackage>();
        savefile_ = std::make_shared<HandlerTextSaveFile>(filepath, filename);
        targz_ = std::make_shared<HandlerTextTarGz>(filepath, filename, max_line);

        package_->SetNextHandler(savefile_);
        savefile_->SetNextHandler(targz_);
    }

    // 运行
    void Run(const string &message)
    {
        package_->Excute(message);
    }

    ~ChainOfResponsibility()
    {
    }

protected:
    std::shared_ptr<HandlerTextPackage> package_;
    std::shared_ptr<HandlerTextSaveFile> savefile_;
    std::shared_ptr<HandlerTextTarGz> targz_;
};
综上所述,这就是整个任务链设计模式的代码,此处服务端和客户端以及消息队列的接口,在上面接口演示里面就已经写过,此处就不再重复了。