本文较长,建议点赞收藏。更多AI大模型应用开发学习视频及资料,在智泊AI。
LLaMA 的开发基于一个核心理念:在给定计算预算下,通过增加训练数据量而非单纯增加模型参数,可以达到更好的性能 。这与之前普遍认为"参数越多性能越好"的观点不同,并特别强调了 推理成本 的重要性。尽管训练一个大型号的模型可能更快达到某个性能水平,但一个参数更少但训练更久的小模型在实际应用中的推理成本会更低、速度更快。
LLaMA-13B 在大多数基准测试中表现优于拥有 175B 参数的 GPT-3,尽管其模型规模小了十倍。这使得 LLaMA-13B 可以在单个 GPU 上运行,从而"民主化"了大型语言模型的研究和使用。
架构与优化 (Architecture and Optimizer)
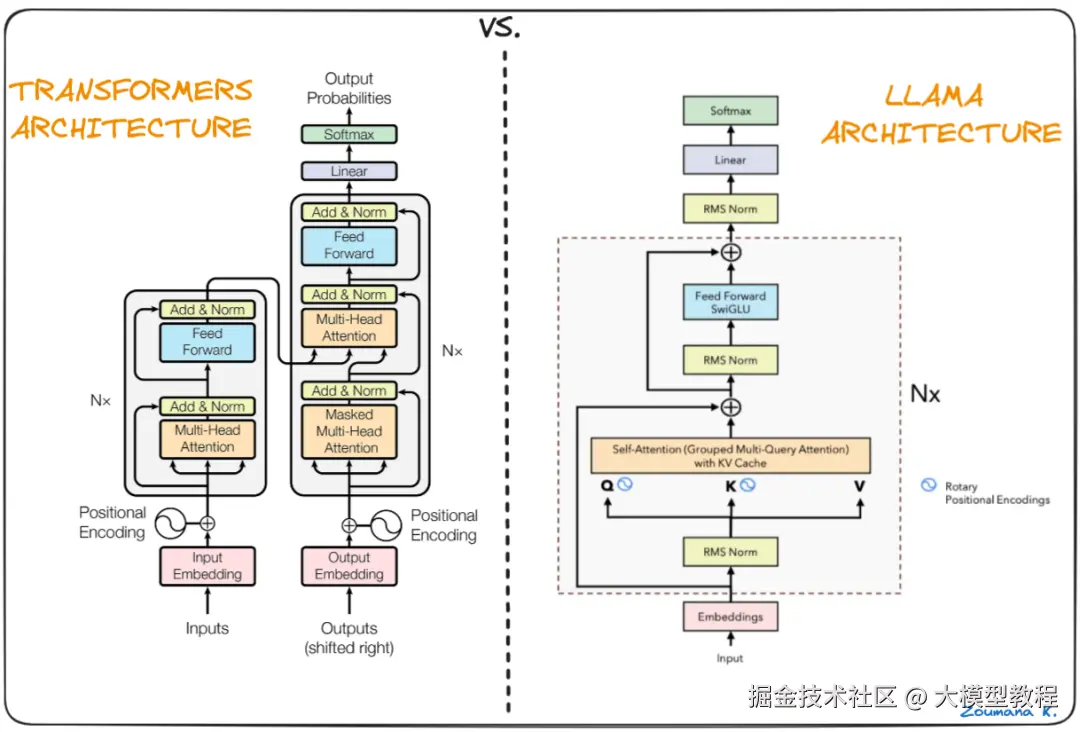
LLaMA 沿用了 Transformer 架构,但引入了几个关键的改进以提升性能和训练稳定性,这些改进借鉴了其他现有模型:
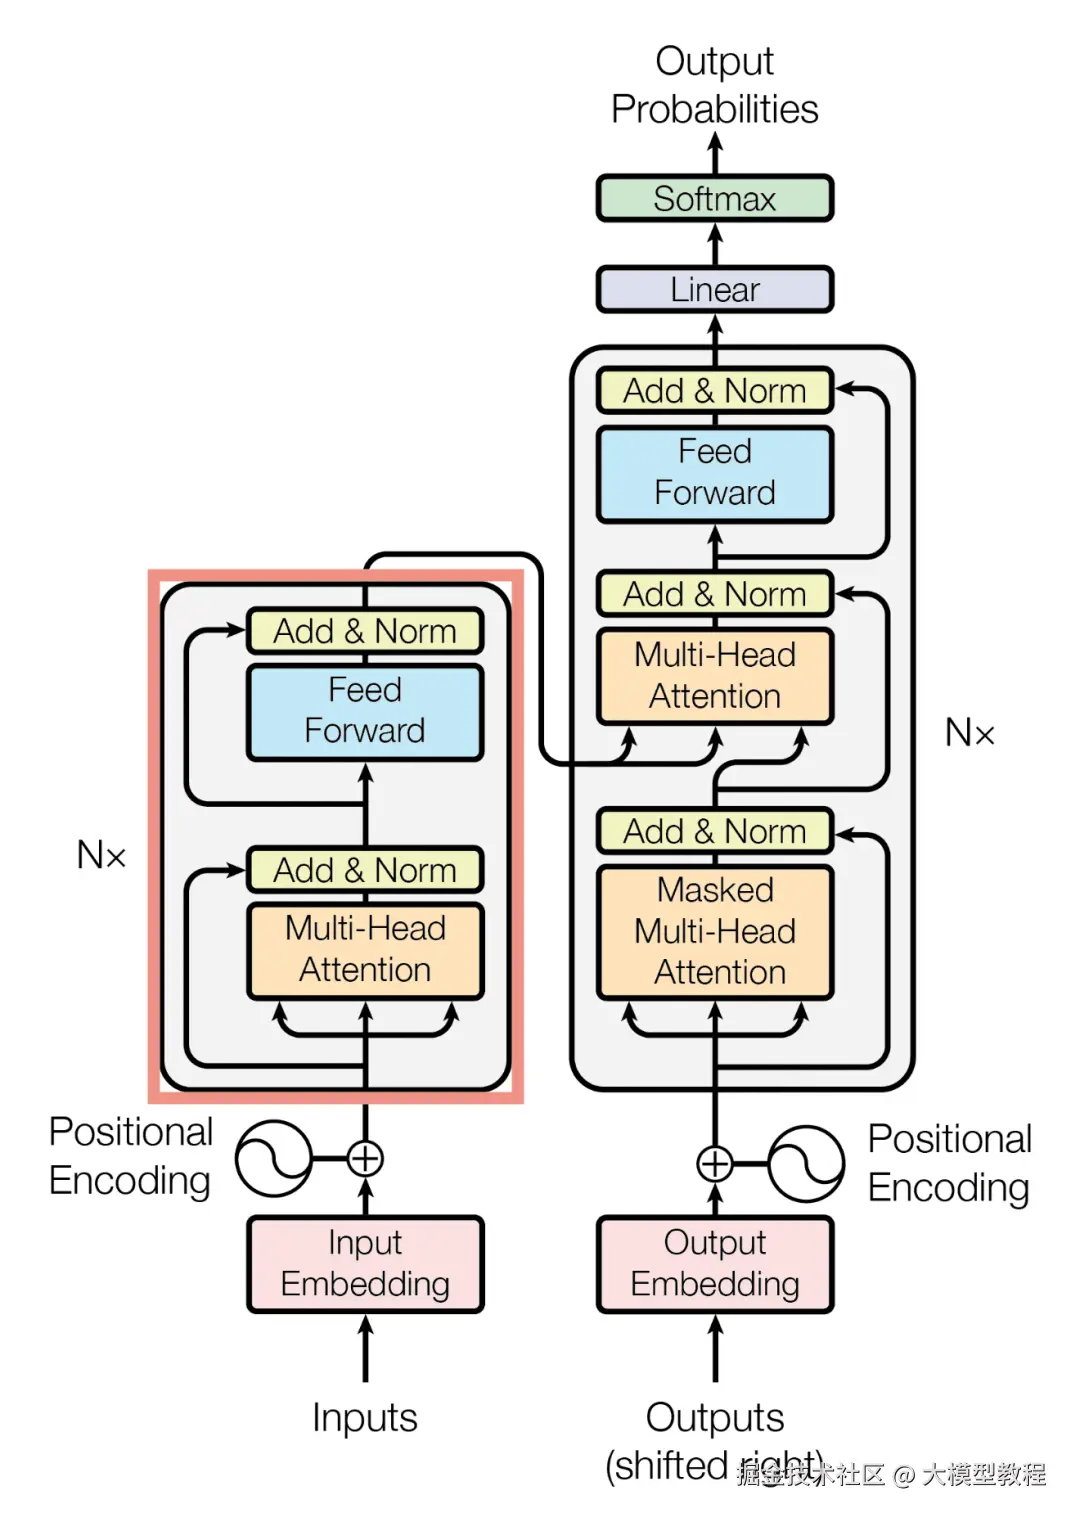
- Pre-normalization : 借鉴 GPT-3 ,在每个 Transformer 子层的输入端进行归一化(而非输出端),并使用 RMSNorm 函数来提高训练稳定性。
- SwiGLU 激活函数 : 借鉴 PaLM ,用 SwiGLU 替换了传统的 ReLU 非线性激活函数,以提升性能。
- Rotary Embeddings (RoPE) : 借鉴 GPTNeo,移除了绝对位置嵌入,转而在网络的每一层添加了旋转位置嵌入。
- 优化器 : 使用 AdamW 优化器,并采用了余弦学习率调度,以及权重衰减和梯度裁剪。具体的超参数设置根据模型大小有所不同(详见文档中的表格)。
步骤1:构建数据集
创建输入和目标序列 : 对于每一个随机选定的起始索引 i,代码创建两个序列:
- 输入序列
x: 这是一个长度为context_window的序列,从索引i开始。 - 目标序列
y: 这是与x对应的下一个字符序列,从索引i+1开始,长度同样为context_window。例如,如果输入是 "hello",那么目标就是 "ello "(假设空格是下一个字符)。这种"输入-下一个字符"的关系是训练自回归语言模型的标准方式。
ini
def get_batches(data, split, batch_size, context_window, config=DEFAULT_CONFIG):
    # Split the dataset into training, validation, and test sets
    train=data[:int(.8*len(data))]
    val=data[int(.8 * len(data)): int(.9*len(data))]
    test=data[int(.9 *len(data)):]

    # Determine whcih split to use
    batch_data=train
    if split=='val':
        batch_data=val
    if split=='test':
        batch_data=test

    # Pick random starting points within the data
    ix=torch.randint(0,batch_data.size(0)-context_window-1, (batch_size,))

    # create input sequences (x) and corrsponding target sequences (y)
    x=torch.stack([batch_data[i:i+context_window] for i in ix]).long()
    y=torch.stack([batch_data[i+1:i+context_window+1] for i in ix]).long()

    return x,y

xs, ys=get_batches(dataset, 'train', DEFAULT_CONFIG['batch_size'], DEFAULT_CONFIG['context_window'])
用于让一个预训练的语言模型生成文本。该函数遵循了自回归(autoregressive)生成的核心逻辑:每次生成一个新 token,并将其添加到序列中,然后使用新序列作为输入来预测下一个 token。
ini
def generate(model, config=DEFAULT_CONFIG, max_new_tokens=30):
    idx=torch.zeros(5,1).long()
    for _ in range(max_new_tokens):
        # Call the model
        logits=model(idx[:, -config['context_window']:])
        # all the batches (1), last time step, all the logits
        last_time_step_logits=logits[
            :,-1,:
        ]
        # softmax to get probabilities
        p=F.softmax(last_time_step_logits, dim=-1)

        # sample from the distribution to get the next token
        idx_next=torch.multinomial(
            p, num_samples=1
        )

        # append to the sequence
        idx=torch.cat([idx, idx_next], dim=-1)

    return [decode(x) for x in idx.tolist()]
步骤2:RMSNorm
RMSNorm(Root Mean Square Normalization)层,这是一种用于深度学习模型(特别是 Transformer 架构)的归一化技术,旨在替代传统的 LayerNorm,以提高训练效率和稳定性。RMSNorm 的设计灵感来源于 Layer Normalization,但它进行了一定的简化:
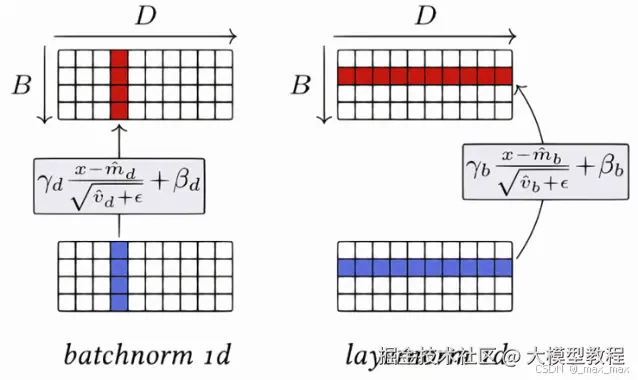
- 省略均值中心化 : RMSNorm 不减去均值。它只对输入张量的每个元素进行缩放,缩放因子是该序列元素的均方根(RMS)。传统的 LayerNorm 既会减去均值,也会除以标准差。
- 计算简单: RMSNorm 的计算只涉及平方、求和、开方和除法,比 LayerNorm 省去了均值计算,因此在计算上更加高效。
- 加速训练 : 实践证明,RMSNorm 在 Transformer 模型中能加速训练过程 ,并保持稳定的性能。
ruby
class RMSNorm(nn.Module):
    def __init__(self, layer_shape, eps=1e-8, bias=False):
        super(RMSNorm, self).__init__()
        self.register_parameter('scale', nn.Parameter(torch.ones(layer_shape)))

    def forward(self,x):
        #calculating the Frobenius norm, RMS=1/sqrt(N)* Frobenius norm
        ff_rms=torch.linalg.norm(x, dim=(1,2))*x[0].numel() ** -.5

        # normalizing the input tensor 'x' with respect to RMS
        raw=x/ff_rms.unsqueeze(-1).unsqueeze(-1)

        # scaling the normalized tensor using the learnable parameter 'scale'
        return self.scale[:x.shape[1],:].unsqueeze(0) * raw
步骤3:RoPE
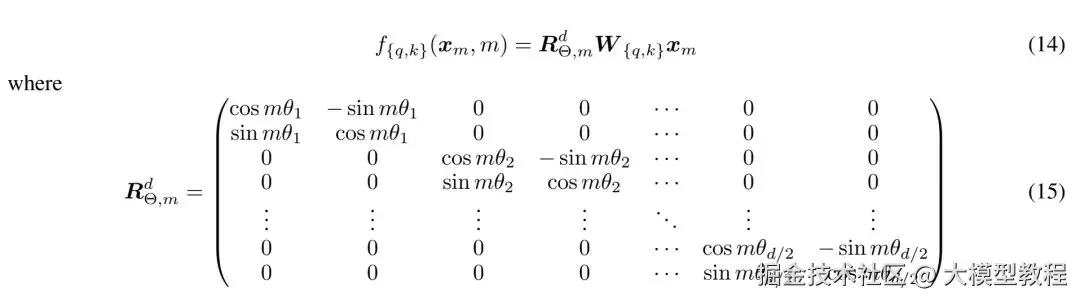
RoPE 是一种为 Transformer 模型提供序列中 token 位置信息的方法,它通过旋转每个 token 的词嵌入向量来编码其绝对和相对位置。与传统的绝对位置编码不同,RoPE 可以更好地处理可变长度的序列,并能有效地将相对位置信息融入到自注意力机制中。
ini
def get_rotary_matrix(context_window, embedding_dim):
    # Initialize a tensor for the rotary matrix with zeros
    R=torch.zeros((context_window, embedding_dim, embedding_dim), requires_grad=False)

    # Loop thorugh each position in the context window
    for position in range(context_window):
        # Loop through each dimension in the embedding
        for i in range(embedding_dim//2):
            # Calculate the rotation angle (theta) based on the position and embedding dimension
            theta=10000. ** (-2.*(i-1)/embedding_dim)
            # Calculate the rotated matrix elements using sine and cosine functions
            m_theta=position*theta
            R[position, 2*i, 2*i]=np.cos(m_theta)
            R[position, 2*i, 2*i+1]=-np.sin(m_theta)
            R[position, 2*i+1, 2*i]=np.sin(m_theta)
            R[position, 2*i+1, 2*i+1]=np.cos(m_theta)
    return R
步骤4:SwiGLU
SwiGLU 的基本思想是,通过一个可学习的"门控"机制来动态地控制信息流。它包含两个平行的线性变换,一个作为主信息通道,另一个作为门控信号。
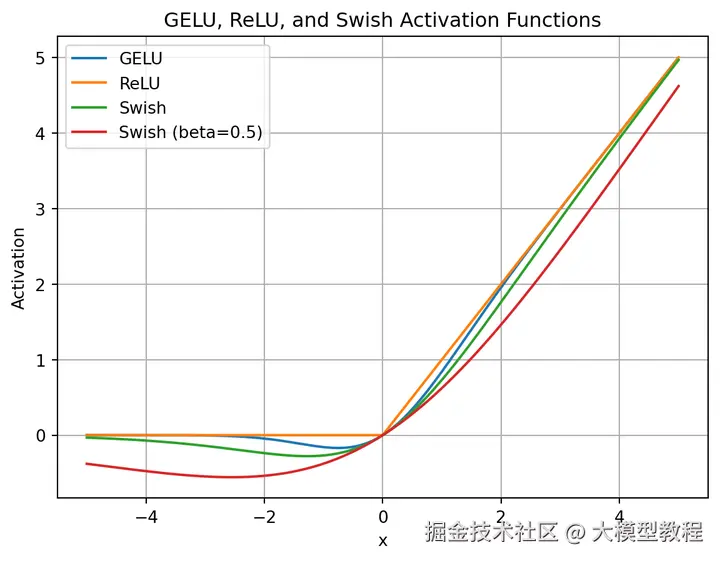
SwiGLU 的优势在于其门控机制,它允许模型学习哪些特征是重要的。通过将主分支的输出与门控信号相乘,模型可以:
- 放大重要特征:如果门控信号接近 1,则主分支的信息几乎完全通过。
- 抑制不重要特征:如果门控信号接近 0,则主分支的信息被"关断",有效地忽略了这些特征。
python
class SwiGLU(nn.Module):
    def __init__(self, size):
        super().__init__()
        # Configuration information
        # Linear transformation for the gating mechanism
        self.linear_gate=nn.Linear(size, size)
        # Linear transformation for the main branch
        self.linear=nn.Linear(size, size)
        # Random initialization of the beta parameter
        self.beta=torch.randn(1, requires_grad=True)

        # Using nn.Parameter for beta to ensure it's recognized as a learnable parameter
        self.beta=nn.Parameter(torch.ones(1))
        self.register_parameter("beta", self.beta)

    def forward(self, x):
        # Swish-Gated Linear Unit computation
        swish_gate=self.linear_gate(x)* torch.sigmoid(self.beta*self.linear_gate(x))
        # Element -wise multiplication of the gate and main branch
        out=swish_gate*self.linear(x)
        return out
步骤5:搭建网络结构
每个 Llama 块内部都包含了自注意力机制和前馈网络,用于捕捉和处理序列中的上下文信息。整个模型由三个主要部分构成:词嵌入层、一系列 Llama 块(即 Transformer 层)以及一个最终的输出层。
python
class Llama(nn.Module):
    def __init__(self, config):
        super().__init__()
        self.config=config
        #embedding layer for token representations
        self.embeddings=nn.Embedding(config['vocab_size'], config['d_model'])
        #sequential block of LlamaBlocks based on the specified number of layers
        self.llama_blocks=nn.Sequential(
            OrderedDict([(f"llama_{i}",LlamaBlock(config)) for i in range(config['n_layers'])])
        )

        #feedforward network (FFN) for final output
        self.ffn=nn.Sequential(
            nn.Linear(config['d_model'], config['d_model']),
            SwiGLU(config['d_model']),
            nn.Linear(config['d_model'], config['vocab_size']),
        )

        # print total number of parameters in the model
        print("model params:", sum([m.numel() for m in self.parameters()]))

    def forward(self, idx, targets=None):
        # input token indices are passed through the embedding layer
        x=self.embeddings(idx)
        #process the input through the LlamaBlocks
        x=self.llama_blocks(x)
        #pass the processed input through the final FFN for output logits
        logits=self.ffn(x)

        # If targets are not provided, return only the logits
        if targets isNone:
            return logits
        # If targets are provided, compute and return the cross-entropy loss
        else:
            loss=F.cross_entropy(logits.view(-1, self.config['vocab_size']),targets.view(-1))
return logits, loss完整代码链接:www.kaggle.com/code/aisuko...
学习资源推荐
如果你想更深入地学习大模型,以下是一些非常有价值的学习资源,这些资源将帮助你从不同角度学习大模型,提升你的实践能力。
本文较长,建议点赞收藏。更多AI大模型应用开发学习视频及资料,在智泊AI。