摘要:我们已经学会了如何从网上"获取"数据,现在是时候学习如何向外"提供"数据和服务了。本文将带你使用一个轻量级的Web框架(以FastAPI为例,它更现代且自带文档),亲手创建一个简单的Web API。这个API可以接收网络请求,执行Python逻辑,并返回JSON格式的数据。这不仅是后端开发的入门,更是让你编写的任何脚本都能通过网络被调用的关键一步。
前言:让你的代码"上线"
你写了一个很酷的Python脚本,比如一个能根据输入文本生成摘要的函数。现在,你想让你的朋友,甚至全世界的人都能使用它,但他们并没有Python环境。怎么办?
最好的方式就是把它包装成一个Web API (Application Programming Interface)。
- API:就像一个餐厅的服务员。你(客户端)不需要知道后厨(服务器逻辑)是怎么运作的,你只需要按照菜单(API文档)告诉服务员你想要什么(发送一个HTTP请求),服务员就会把菜(JSON数据)端给你。
- Web框架 (Flask/FastAPI):就是一套标准化的"厨房设备和管理流程"。它帮你处理了所有繁琐的底层网络细节(如处理HTTP请求、路由分发),让你能专注于烹饪(编写核心业务逻辑)。
我们将使用FastAPI,因为它非常快、易于学习,并且能自动生成交互式的API文档,对新手极其友好。
安装必要的库:
bash
pip install fastapi
pip install uvicorn[standard] # uvicorn是一个运行FastAPI应用的服务器
一、项目目标
我们将创建一个简单的"城市信息查询"API,它将具备以下功能:
- 根路径 (
/): 访问时返回一个欢迎信息。 - 城市列表 (
/cities): 响应一个包含多个城市信息的列表。 - 特定城市查询 (
/cities/{city_id}): 根据传入的城市ID,返回该城市的详细信息。如果城市不存在,返回一个错误信息。
二、代码实现
- 创建一个名为
main.py的文件。 - 将以下所有代码复制到
main.py中。
python
# main.py
from fastapi import FastAPI, HTTPException
from fastapi.responses import Response, HTMLResponse
# 1. 创建 FastAPI 实例
# 这就是我们的Web应用核心
app = FastAPI(
title="城市信息API",
description="一个用于查询城市信息的简单API",
version="1.0.0",
)
# 简单的内联 SVG 作为 favicon(避免二进制 .ico 文件)
FAVICON_SVG = """
<svg xmlns="http://www.w3.org/2000/svg" viewBox="0 0 64 64">
<defs>
<linearGradient id="g" x1="0" y1="0" x2="1" y2="1">
<stop offset="0%" stop-color="#4f46e5"/>
<stop offset="100%" stop-color="#22d3ee"/>
</linearGradient>
</defs>
<rect width="64" height="64" rx="12" fill="url(#g)"/>
<path d="M20 44c0-8 6-14 14-14h4v-6h6v26h-6v-8h-4c-2.2 0-4 1.8-4 4v4h-6v-6z" fill="#ffffff"/>
</svg>
"""
# 2. 准备一些模拟数据
# 在真实项目中,这些数据可能来自数据库
CITIES_DB = {
1: {"name": "北京", "population": 2189, "country": "中国"},
2: {"name": "东京", "population": 3739, "country": "日本"},
3: {"name": "纽约", "population": 839, "country": "美国"},
}
# 3. 定义路由和处理函数
# 提供 /favicon.ico,避免浏览器请求 404
@app.get("/favicon.ico")
def favicon():
return Response(content=FAVICON_SVG, media_type="image/svg+xml")
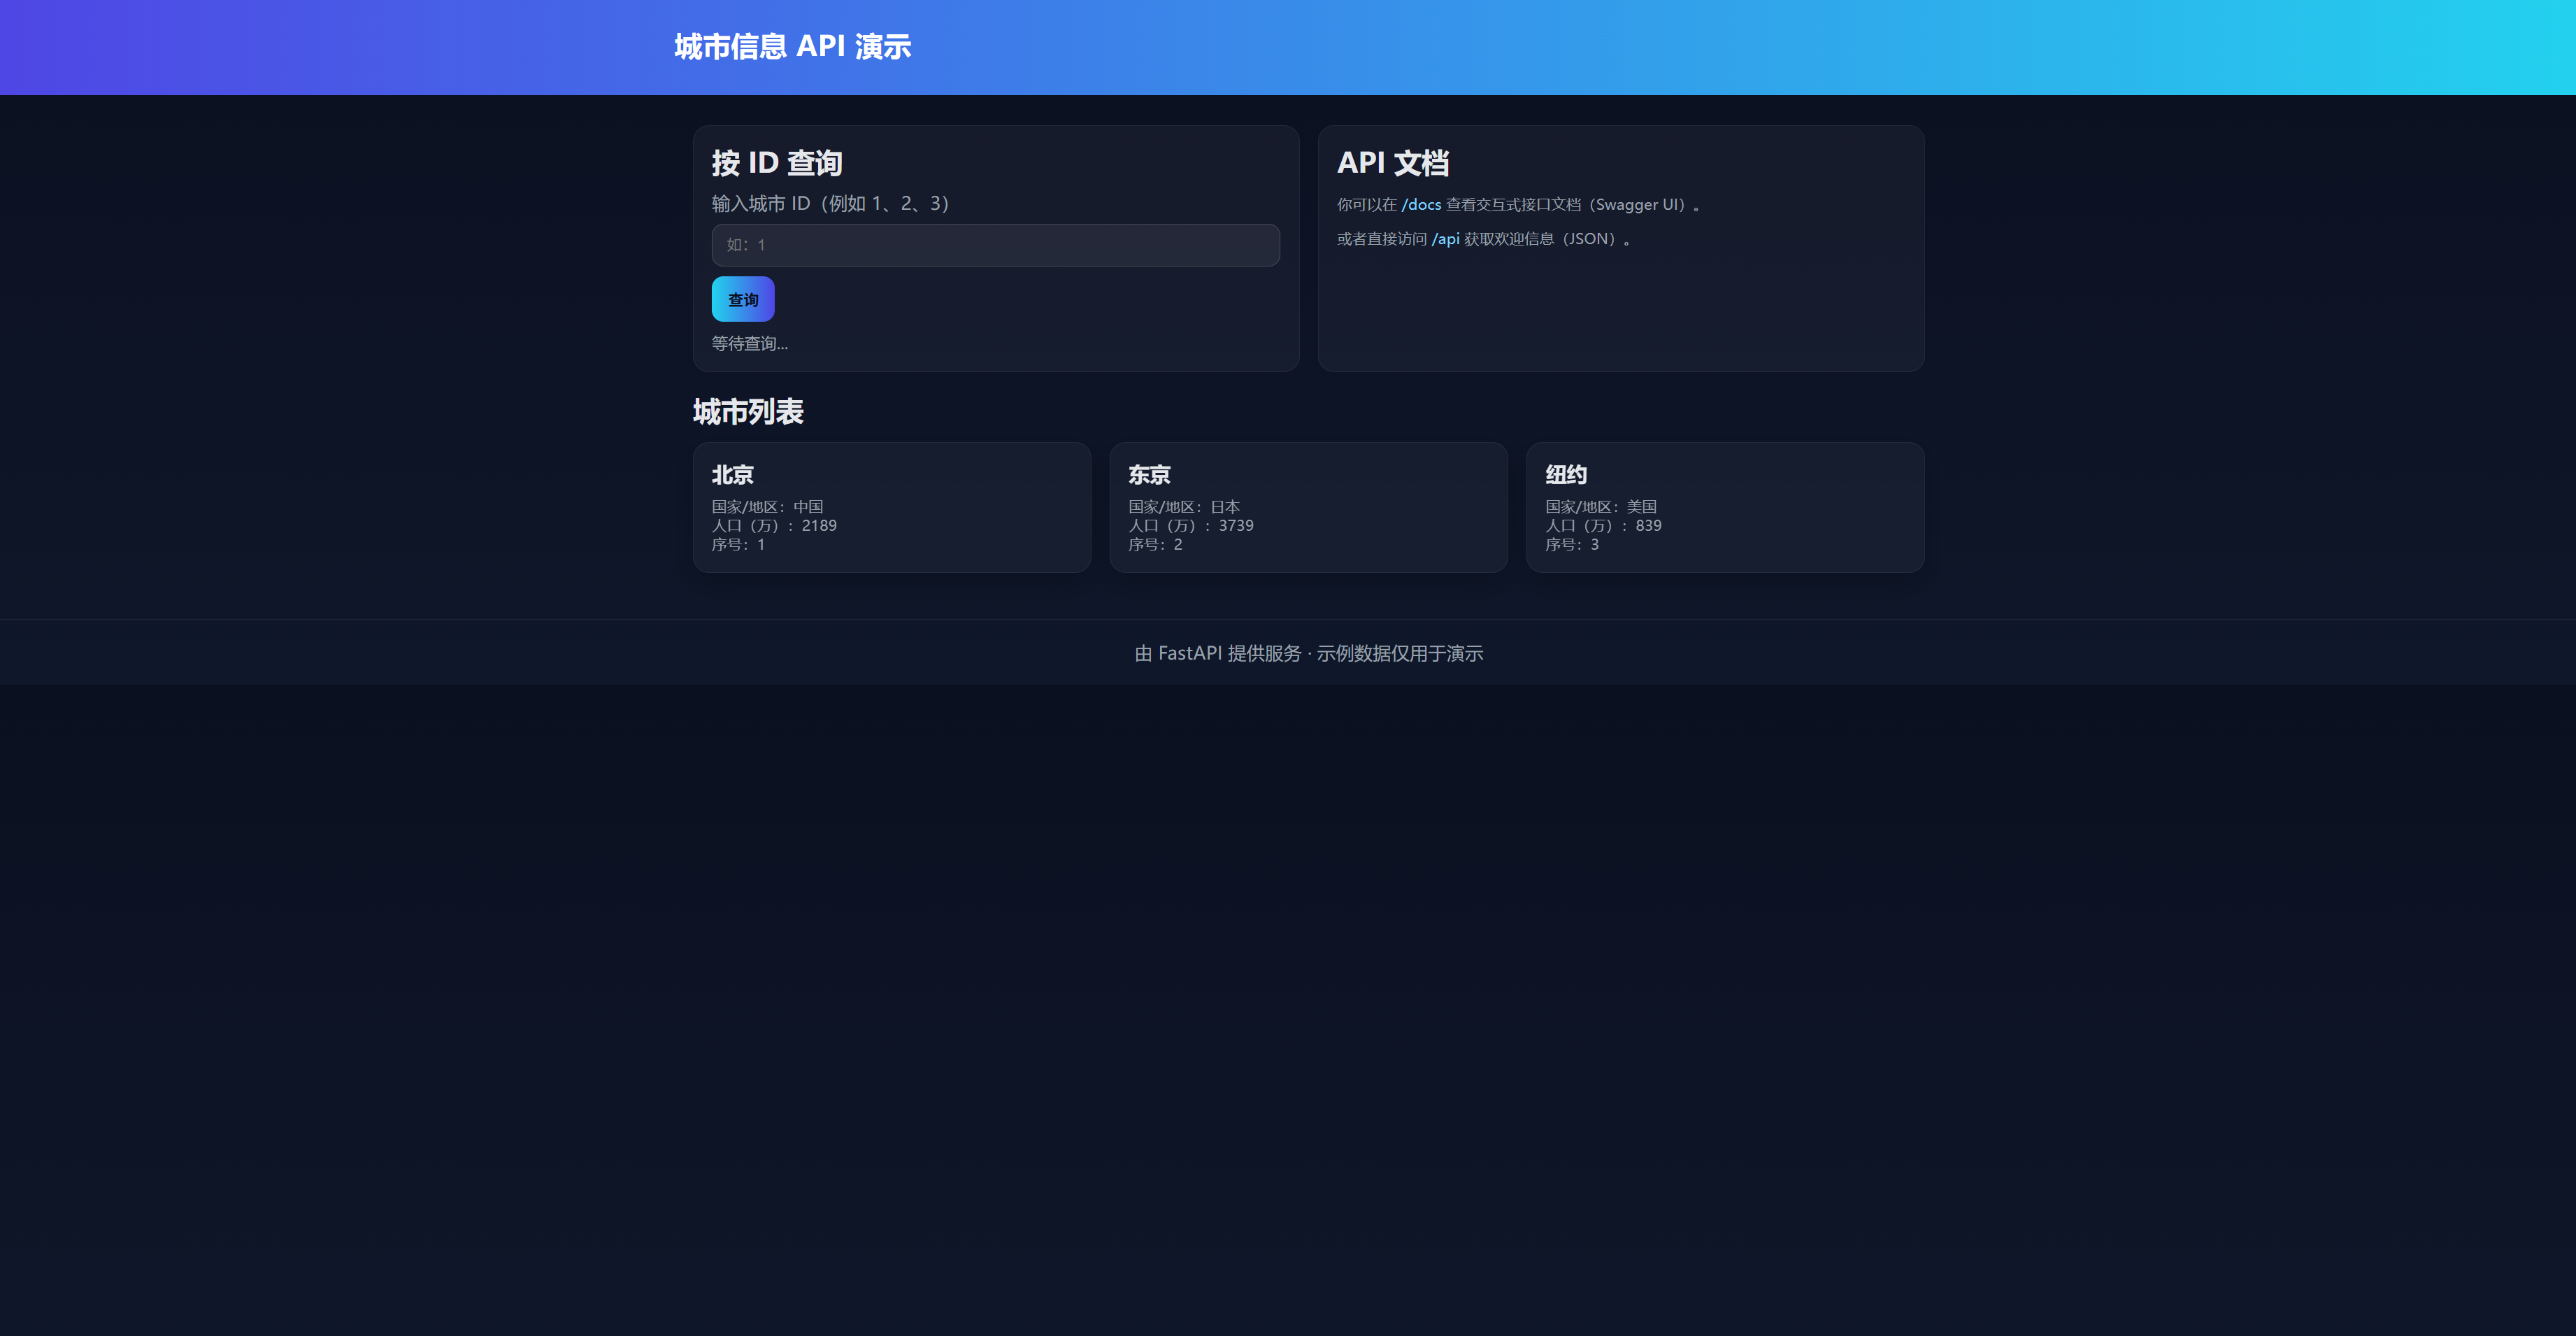
# 优化后的可视化首页:展示城市列表、按ID查询,并链接到Swagger文档
@app.get("/", response_class=HTMLResponse)
def read_root():
html = """
<!DOCTYPE html>
<html lang=\"zh-CN\">
<head>
<meta charset=\"utf-8\" />
<meta name=\"viewport\" content=\"width=device-width, initial-scale=1\" />
<title>城市信息 API 演示</title>
<style>
:root { --bg: #0f172a; --card:#0b1220; --text:#e5e7eb; --muted:#9aa0aa; --primary:#22d3ee; --accent:#4f46e5; }
* { box-sizing: border-box; }
body { margin:0; font-family: ui-sans-serif, system-ui, -apple-system, Segoe UI, Roboto, Helvetica, Arial; background: linear-gradient(180deg, #0b1020, #0f172a); color: var(--text); }
header { padding: 28px 20px; background: linear-gradient(90deg, var(--accent), var(--primary)); color: white; }
.wrap { max-width: 1100px; margin: 0 auto; }
h1 { margin: 0; font-size: 24px; font-weight: 700; letter-spacing: .5px; }
main { padding: 26px 16px 40px; }
.grid { display: grid; grid-template-columns: repeat(auto-fill, minmax(280px, 1fr)); gap: 16px; }
.card { background: rgba(255,255,255,0.04); border: 1px solid rgba(255,255,255,0.06); border-radius: 14px; padding: 16px; backdrop-filter: blur(6px); box-shadow: 0 8px 22px rgba(0,0,0,.25); }
.card h3 { margin: 0 0 8px; font-size: 18px; }
.muted { color: var(--muted); font-size: 13px; }
.row { display:flex; gap: 16px; flex-wrap: wrap; margin-bottom: 18px; }
.panel { flex: 1 1 320px; background: rgba(255,255,255,0.04); border: 1px solid rgba(255,255,255,0.06); border-radius: 14px; padding: 16px; }
label { display:block; margin-bottom: 8px; color: var(--muted); }
input { width: 100%; padding: 10px 12px; border-radius: 10px; border: 1px solid rgba(255,255,255,.15); background: rgba(255,255,255,.06); color: var(--text); outline: none; }
button { margin-top: 8px; padding: 10px 14px; border: none; border-radius: 10px; color:#0b1020; background: linear-gradient(90deg, var(--primary), var(--accent)); cursor: pointer; font-weight: 600; }
button:disabled { opacity: .6; cursor: not-allowed; }
.result { margin-top: 10px; font-size: 14px; }
footer { text-align:center; padding: 18px; color: var(--muted); border-top: 1px solid rgba(255,255,255,.06); }
a { color: #7dd3fc; text-decoration: none; }
a:hover { text-decoration: underline; }
</style>
</head>
<body>
<header>
<div class=\"wrap\"><h1>城市信息 API 演示</h1></div>
</header>
<main class=\"wrap\">
<div class=\"row\">
<section class=\"panel\" style=\"min-height:160px\">
<h2 style=\"margin:0 0 10px\">按 ID 查询</h2>
<label for=\"cityId\">输入城市 ID(例如 1、2、3)</label>
<input id=\"cityId\" placeholder=\"如:1\" />
<button id=\"btnQuery\">查询</button>
<div id=\"queryResult\" class=\"result muted\">等待查询...</div>
</section>
<section class=\"panel\">
<h2 style=\"margin:0 0 10px\">API 文档</h2>
<p class=\"muted\">你可以在 <a href=\"/docs\" target=\"_blank\">/docs</a> 查看交互式接口文档(Swagger UI)。</p>
<p class=\"muted\">或者直接访问 <a href=\"/api\" target=\"_blank\">/api</a> 获取欢迎信息(JSON)。</p>
</section>
</div>
<section>
<h2 style=\"margin:6px 0 12px\">城市列表</h2>
<div id=\"cityList\" class=\"grid\"></div>
</section>
</main>
<footer>
由 FastAPI 提供服务 · 示例数据仅用于演示
</footer>
<script>
async function loadCities() {
const container = document.getElementById('cityList');
container.innerHTML = '<div class="muted">加载中...</div>';
try {
const res = await fetch('/cities');
const data = await res.json();
if (!Array.isArray(data)) throw new Error('响应格式不正确');
container.innerHTML = data.map((c, idx) => `
<div class="card">
<h3>${c.name}</h3>
<div class="muted">国家/地区:${c.country}</div>
<div class="muted">人口(万):${c.population}</div>
<div class="muted">序号:${idx + 1}</div>
</div>
`).join('');
} catch (e) {
container.innerHTML = '<div class="muted">加载失败:' + (e.message || e) + '</div>'
}
}
async function queryById() {
const id = document.getElementById('cityId').value.trim();
const btn = document.getElementById('btnQuery');
const result = document.getElementById('queryResult');
if (!id) { result.textContent = '请输入城市ID'; return; }
btn.disabled = true; result.textContent = '查询中...';
try {
const res = await fetch('/cities/' + encodeURIComponent(id));
if (res.ok) {
const data = await res.json();
result.innerHTML = `<b>${data.name}</b> · 国家/地区:${data.country} · 人口(万):${data.population}`;
} else if (res.status === 404) {
const j = await res.json();
result.textContent = '未找到:' + (j.detail || '城市不存在');
} else {
result.textContent = '请求失败:' + res.status;
}
} catch (e) {
result.textContent = '网络错误:' + (e.message || e);
} finally {
btn.disabled = false;
}
}
document.getElementById('btnQuery').addEventListener('click', queryById);
loadCities();
</script>
</body>
</html>
"""
return HTMLResponse(content=html)
# 保留原本欢迎信息(JSON)在 /api
@app.get("/api")
def api_root():
return {"message": "欢迎使用城市信息查询API!"}
# 路由:/cities
@app.get("/cities")
def get_cities():
"""
返回所有城市信息的列表。
"""
return list(CITIES_DB.values())
# 路由:/cities/{city_id}
# {city_id} 是一个"路径参数",它的值会被传给函数的同名参数
@app.get("/cities/{city_id}")
def get_city_by_id(city_id: int):
"""
根据城市ID查询特定城市的信息。
- **city_id**: 要查询的城市ID (整数)。
"""
city = CITIES_DB.get(city_id)
if not city:
# 如果在数据库中找不到城市,抛出一个HTTP 404错误
raise HTTPException(status_code=404, detail=f"ID为 {city_id} 的城市未找到")
return city
# 假设我们还想添加一个新城市 (POST请求)
@app.post("/cities")
def create_city(name: str, population: int, country: str):
"""
创建一个新城市。
(这是一个简单的示例,不会真的保存)
"""
new_id = max(CITIES_DB.keys()) + 1
new_city = {"name": name, "population": population, "country": country}
# 在真实应用中,这里会执行 CITIES_DB[new_id] = new_city 并保存到数据库
print(f"模拟创建新城市: ID={new_id}, Data={new_city}")
return {"message": "城市创建成功(模拟)", "city_id": new_id, "data": new_city}三、运行与测试你的API
3.1 启动服务器
在你的终端中,进入 main.py 所在的目录,然后运行以下命令:
bash
uvicorn main:app --reloadmain: 指的是main.py文件。app: 指的是我们在代码中创建的FastAPI实例app = FastAPI()。--reload: 这个参数非常有用,它会让服务器在你修改并保存代码后自动重启。
如果一切顺利,你会看到类似这样的输出:
INFO: Uvicorn running on http://127.0.0.1:8000 (Press CTRL+C to quit)这表明你的API服务器已经在你的本地 8000 端口上运行了!
3.2 使用自动生成的交互式文档进行测试 (FastAPI的魅力!)
现在,打开你的浏览器,访问以下两个URL中的任意一个:
- http://127.0.0.1:8000/docs (提供 Swagger UI 界面)
- http://127.0.0.1:8000/redoc (提供 ReDoc 界面)
你会看到一个精美的、可交互的API文档页面。FastAPI自动根据你的Python代码生成了这一切!
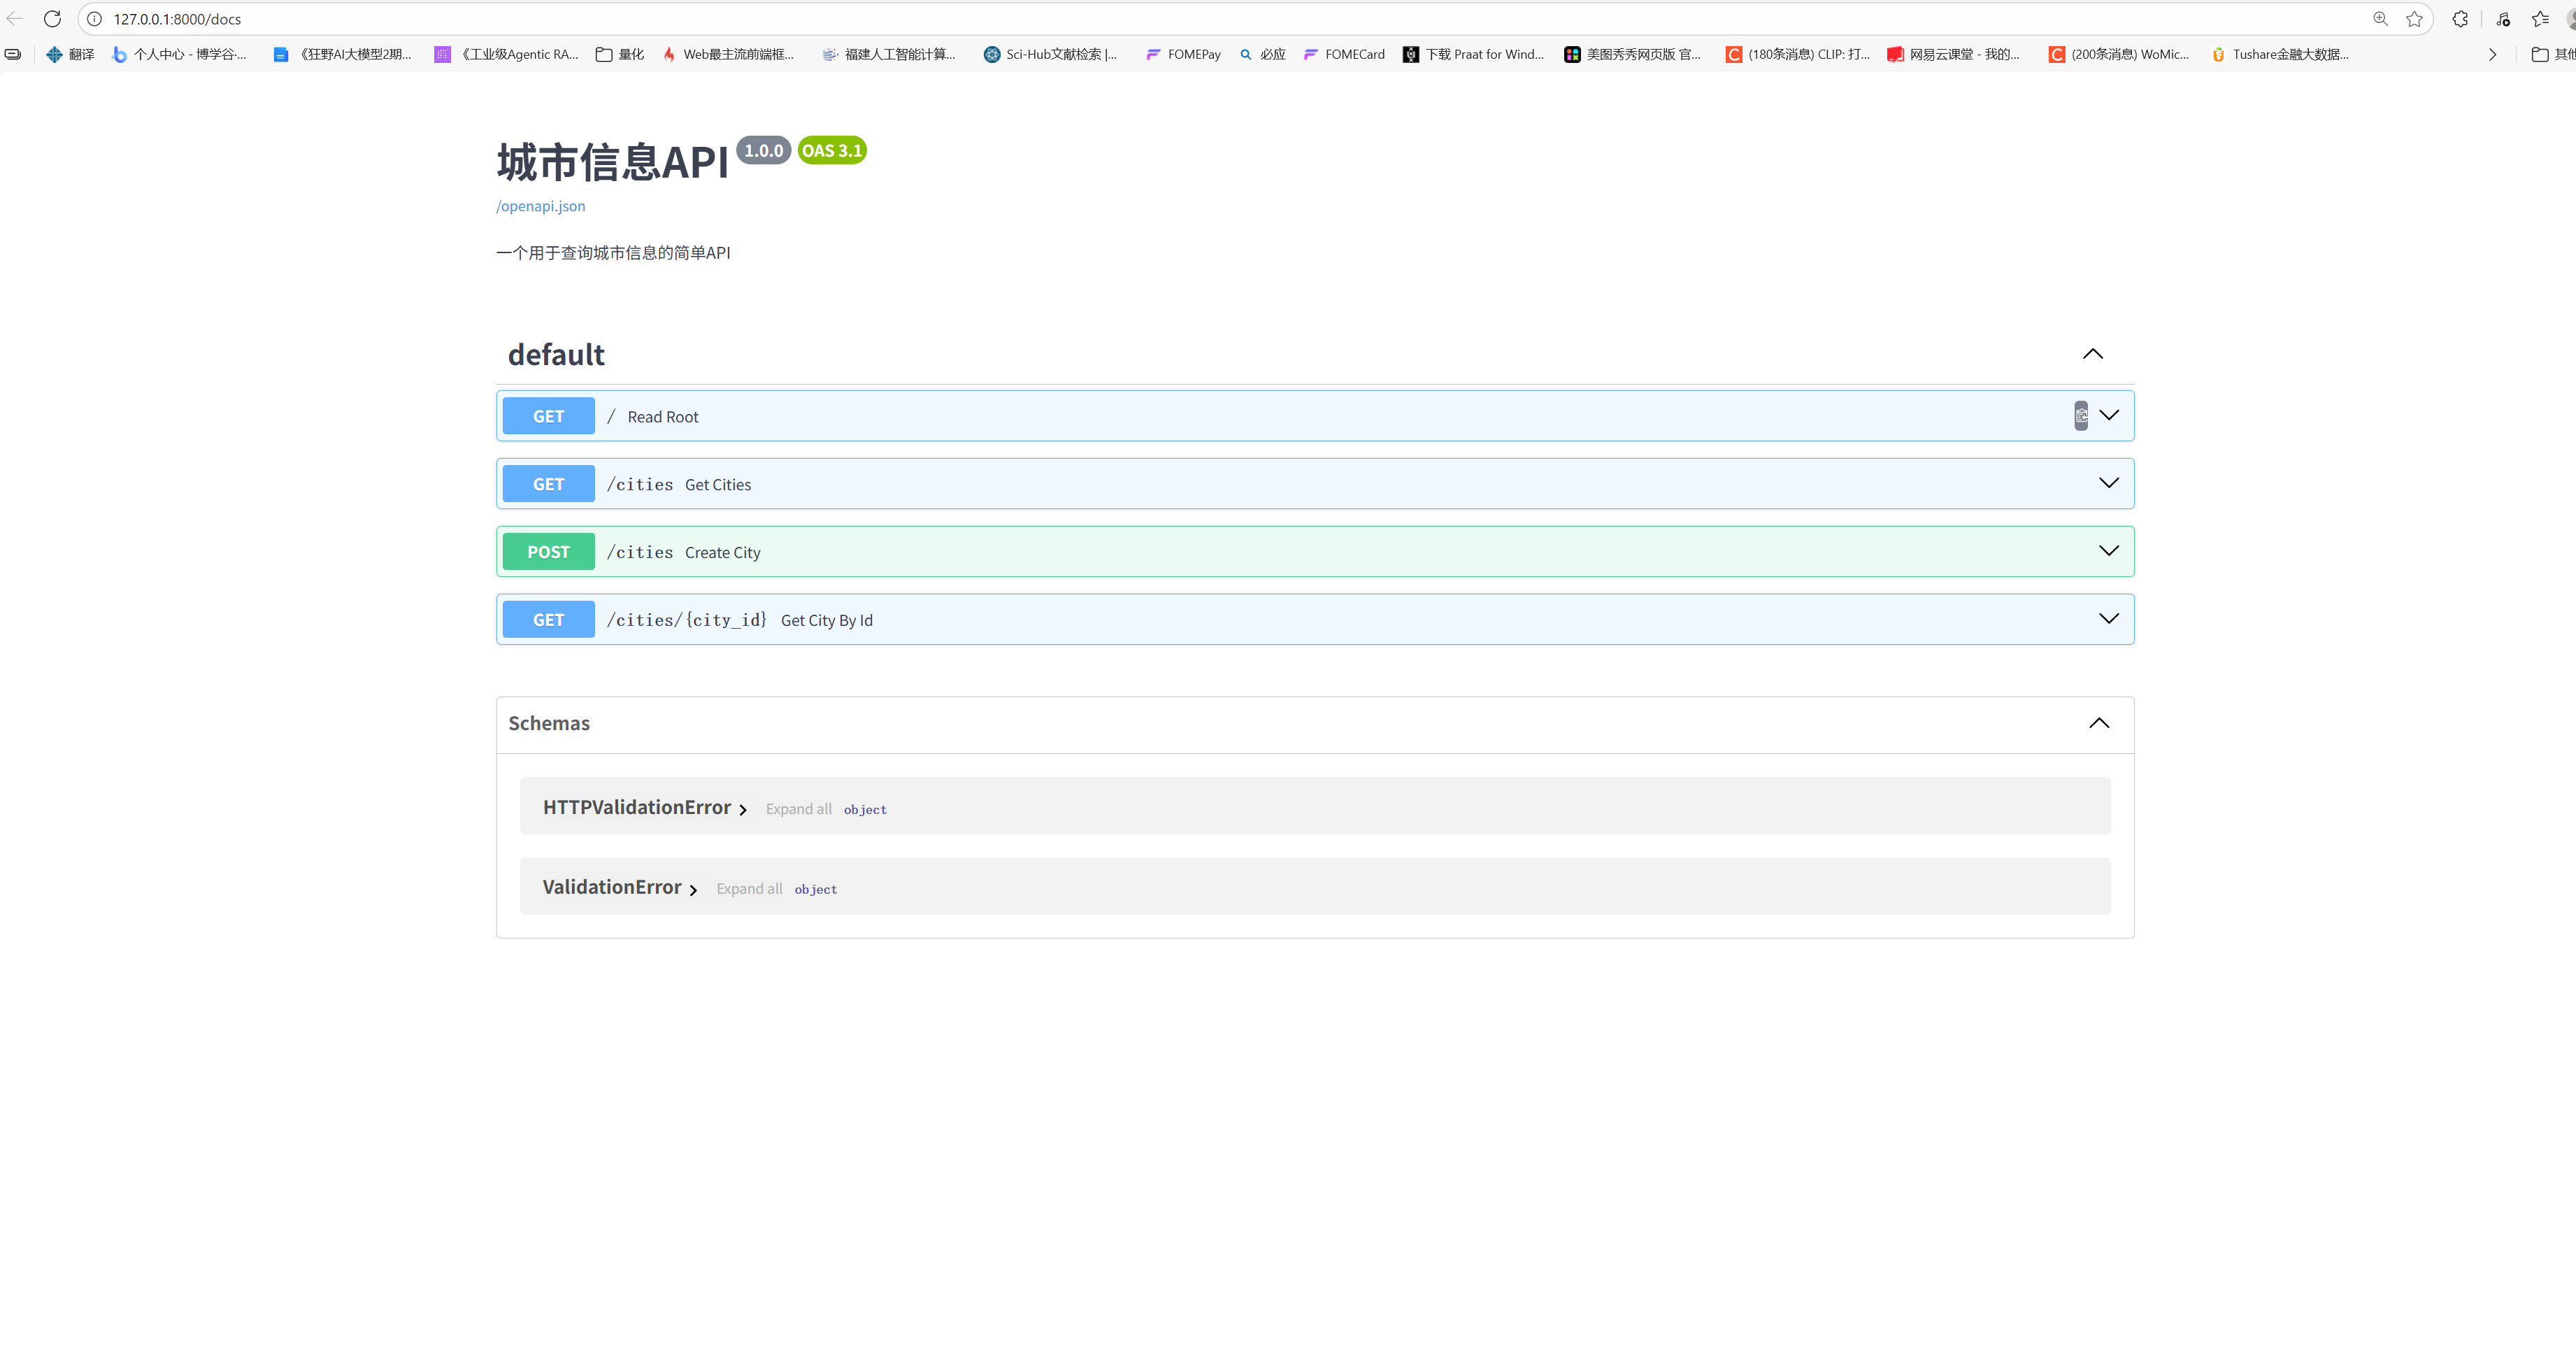
在这个页面上,你可以:
- 看到你定义的所有API"端点"(Endpoints)。
- 展开每一个端点,查看它的详细说明、参数、可能的响应。
- 点击 "Try it out" 按钮,直接在浏览器中输入参数,然后点击 "Execute" 发送请求,并立即看到真实的服务器响应!
尝试一下:
- 在
/cities/{city_id}端点,输入city_id为2,执行,看看是否返回东京的信息。 - 输入
city_id为99,执行,看看是否返回我们定义的404错误。
总结
恭喜你,你已经成功地构建并发布了一个Web API!虽然它很简单,但它包含了后端开发的全部核心要素:
- Web框架 :使用
FastAPI处理网络请求。 - 路由 :通过
@app.get等装饰器,将URL路径映射到具体的处理函数。 - 业务逻辑 :在处理函数中编写你的Python代码(如从
CITIES_DB中查询数据)。 - 数据交换:自动将Python字典和列表转换为客户端需要的JSON格式。
- 错误处理 :通过
HTTPException向客户端返回清晰的错误信息。
现在,你的任何Python代码,无论是复杂的机器学习模型,还是一个简单的数据计算脚本,都可以通过这种方式包装成一个服务,被网页、手机App或其他任何能上网的程序所调用。你已经打开了通往后端开发和服务化编程的大门。
预告:【Python精讲 完结】技术栈梳理:从Python开发者到专家的进阶之路