自此,我们掌握了EventLoop事件循环类,事件到来之后可以跨线程任务调度从而避免了直接操作EventLoop非线程安全状态造成的线程安全问题。
EventLoop是运行在一个线程中的,并且一个线程运行一个EventLoop,one loop per thread是如何实现的呢?
实现Thread线程类
专门处理一个线程。
Thread.h
cpp
#pragma once

#include "noncopyable.h"

#include <functional>
#include <thread>
#include <memory>
#include <unistd.h>
#include <string>
#include <atomic>

class Thread : noncopyable
{
public:
    using ThreadFunc = std::function<void()>;

    explicit Thread(ThreadFunc, const std::string &name = std::string());
    ~Thread();

    void start();
    void join();

    bool started() const { return started_; }
    pid_t tid() const { return tid_; }
    const std::string &name() const { return name_; }

    static int numCreated() { return numCreated_; }

private:
    // 生成默认线程名
    void setDefaultName();

    bool started_;
    bool joined_;
    std::shared_ptr<std::thread> thread_;
    pid_t tid_;
    ThreadFunc func_;
    std::string name_;
    static std::atomic_int numCreated_; // 静态原子变量确保线程数量和线程名唯一
};
cpp
#include "Thread.h"
#include "CurrentThread.h"
#include <semaphore.h>

Thread::Thread(ThreadFunc func, const std::string &name)
    : started_(false), joined_(false), tid_(0), func_(std::move(func)), name_(name)
{
    setDefaultName();
}

Thread::~Thread()
{
    if (started_ && !joined_)
    {
        thread_->detach(); // thread类提供的设置分离线程的方法
    }
}

void Thread::start() // 一个Thread对象,记录的就是一个新线程的详细信息
{
    started_ = true;
    sem_t sem;
    sem_init(&sem, false, 0);

    // 开启新线程,新线程的执行逻辑
    thread_ = std::shared_ptr<std::thread>(new std::thread([&]()
                                                           {
        // 获取线程tid值
        tid_=CurrentThread::tid();
        // 发送信号,告知主线程"tid以获取"
        sem_post(&sem);
        // 开启的新线程,专门执行该线程函数
        func_(); }));

    // 这里主线程必须等待获取上面创建的新线程的tid值
    sem_wait(&sem);
}

void Thread::join()
{
    joined_ = true;
    thread_->join();
}

// 生成默认线程名"Thread1""Thread2"
void Thread::setDefaultName()
{
    int num = ++numCreated_;
    if (name_.empty())
    {
        char buf[32] = {0};
        snprintf(buf, sizeof buf, "Thread%d", num);
        name_ = buf;
    }
}
使用std::shared_ptr<std::thread>管理线程对象,提供更灵活的生命周期管理。
来分析一下Thread类实现的核心方法,start()方法:
1、使用信号量同步线程创建
2、new创建新线程,在Lambda表达式中:
- 获取新线程id值并存储
- 发送信号量通知主线程已获取id
- 执行用户提供的线程函数
3、使用信号量主动等待,确保start()方法返回前主线程已获取到新线程的id
实现EventLoopThread类
Thread类实现完成,如何在一个线程中运行一个EventLoop?也就是怎么结合EventLoop和Thread实现one loop per thread模型?
Muduo实现了EventLoopThread事件循环线程类,它是一个将线程与事件循环EventLoop绑定的一个类,核心实现one loop per thread,每个线程独立运行一个EventLoop。
EventLoopThread.h
cpp
#pragma once

#include "noncopyable.h"
#include "Thread.h"

#include <functional>
#include <mutex>
#include <condition_variable>
#include <string>

class EventLoop;

class EventLoopThread : noncopyable
{
public:
    using ThreadInitCallback = std::function<void(EventLoop *)>;

    EventLoopThread(const ThreadInitCallback &cb = ThreadInitCallback(), const std::string &name = std::string());
    ~EventLoopThread();

    EventLoop *startLoop();

private:
    void threadFunc();

    EventLoop *loop_;  // 将在新线程中指向创建的EventLoop对象
    bool exiting_;  // 标记是否退出
    Thread thread_;  // 创建底层线程对象,绑定线程的入口函数为当前类的成员函数threadFunc,并指定线程名称
    std::mutex mutex_;
    std::condition_variable cond_;
    ThreadInitCallback callback_;  // 保存用户传入的初始化回调,用于在EventLoop启动前做额外配置
};
cpp
#include "EventLoopThread.h"
#include "EventLoop.h"

EventLoopThread::EventLoopThread(const ThreadInitCallback &cb, const std::string &name)
    : loop_(nullptr), exiting_(false), thread_(std::bind(&EventLoopThread::threadFunc, this), name), mutex_(), cond_(), callback_(cb)
{
}

EventLoopThread::~EventLoopThread()
{
    exiting_ = true;
    if (loop_ != nullptr)
    {
        loop_->quit();  // EventLoop退出事件循环
        thread_.join(); // 主线程主动等待新线程结束,回收线程资源
    }
}

EventLoop *EventLoopThread::startLoop()
{
    thread_.start(); // 启动(创建)底层的新线程,触发threadFunc()执行

    EventLoop *loop = nullptr;
    {
        std::unique_lock<std::mutex> lock(mutex_);
        // 当loop_为空时,必须主动等待新线程中loop_被初始化
        while (loop_ == nullptr)
        {
            cond_.wait(lock); // 主动等待,释放锁并阻塞,直到被唤醒
        }
        loop = loop_; // 获取初始化完成的EventLoop指针
    }
    return loop;
}

// 创建的新线程执行的线程函数
void EventLoopThread::threadFunc()
{
    // 在新线程栈上创建EventLoop对象(与该线程绑定),one loop per thread
    EventLoop loop;
    if (callback_)
    {
        callback_(&loop); // 执行用户初始化回调(设置线程名称)
    }

    {
        std::unique_lock<std::mutex> lock(mutex_);
        loop_ = &loop;      // 将loop_指向新创建的EventLoop
        cond_.notify_one(); // 通知主线程,loop_已初始化完成
    }
    loop.loop(); // 启动事件循环,执行EventLoop的loop()=> 开启Poller.poll()(阻塞,直到loop_.quit()被调用)

    // 事件循环退出后清理
    std::unique_lock<std::mutex> lock(mutex_);
    loop_ = nullptr;
}
这种设计就是高性能网络库Muduo的典型实现,通过"one loop per thread"充分利用多核CPU,同时简化线程间同步。
来分析一下其核心方法,startLoop()方法:
启动线程并等待EventLoop初始化完成,返回其指针。
1、调用thread_.start()启动底层线程,此时新线程会执行threadFunc()函数
2、主线程通过条件变量等待新线程中的EventLoop完全初始化:
- 加锁后检查loop_是否为空(初始状态)
- 若未初始化,则在条件变量上等待并释放锁阻塞,直到新线程通知loop_已赋值
3、最终返回初始化完成的EventLoop*,确保外部拿到的指针一定有效。
再来分析一下线程入口函数,threadFunc()方法:
新线程的执行逻辑,负责创建EventLoop对象并运行事件循环。
1、创建EventLoop:在新线程的栈上创建EventLoop对象,生命周期与线程绑定,线程结束则对象销毁。
2、执行初始化回调:若用户传入callback_,则在事件循环启动前执行。
3、通知主线程:
- 加锁后将loop_指向新创建的EventLoop对象
- 调用cond_.notify_one()唤醒主线程的cond_.wait(lock),告知loop_已就绪
4、启动事件循环:调用loop.loop()进入事件循环(处理IO事件,直到loop_->quie()被调用)。
5、清理工作:事件循环退出后,将loop_重置为nullptr(线程即将结束)。
整体EventLoopThread流程
负责启动新线程,并在其线程栈上创建EventLoop对象与其绑定。
1、创建对象:EventLoop构造时,绑定线程入口函数threadFunc(),但线程未启动。
2、启动流程:
- 外部调用startLoop(),触发thread_.start()启动新线程,新线程执行threadFunc()
- threadFunc()中创建EventLoop并通过条件变量通知主线程,主线程从startLoop()返回EventLoop*(与新线程绑定的EventLoop对象指针)
3、运行阶段:EventLoop在新线程中通过loop.loop()持续运行,处理事件。
3、销毁流程:
- 析构EventLoopThread时,设置exiting_=true,调用loop_.quit()退出事件循环
- 新线程执行loop_=nullptr后结束,主线程通过thread_。join()等待线程回收
核心设计亮点
**线程与事件循环绑定:**EventLoop对象在新线程栈上创建,确保其生命周期与线程一致,避免跨线程访问问题。
**同步机制:**通过互斥锁+条件变量解决主线程与新线程的竞态条件,确保startLoop()返回的EventLoop*一定有效,保证了线程安全
**可扩展性:**支持线程初始化回调ThreadInitCallback(),允许用户在事件循环启动前自定义配置(如设置线程名称、注册初始事件等)
实现EventLoopThreadPool线程池类
在多线程工作环境下肯定存在多个EventLoopThread对象,如何管理多个EventLoopThread对象?
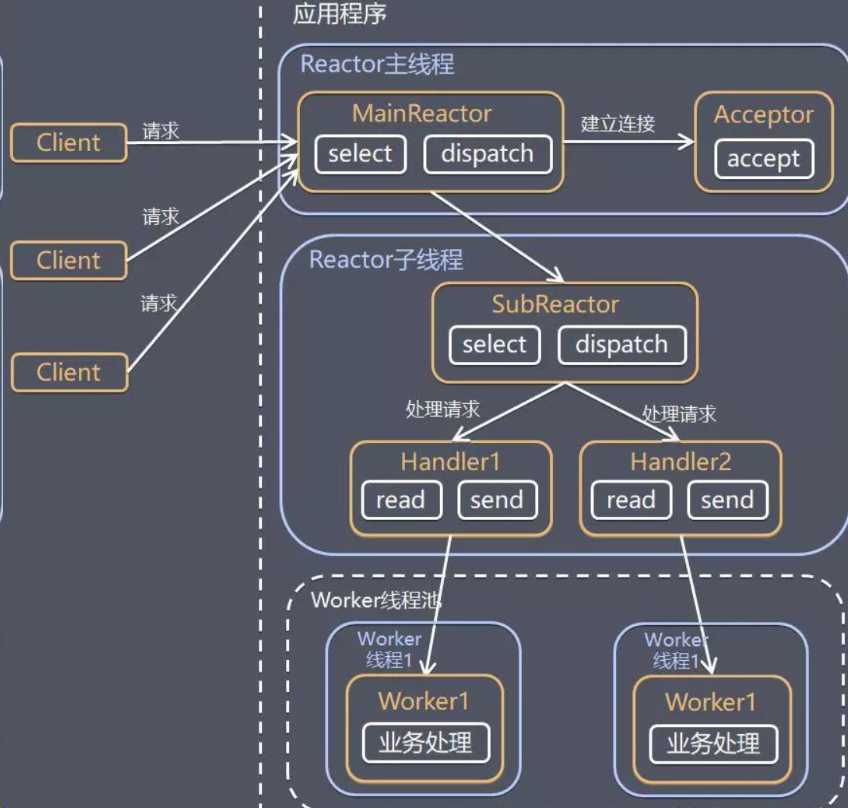
Muduo实现了EventLoopThreadPool事件循环线程池类,用于管理多个EventLoopThread对象,实现了one loop per thread模式的线程池版本。可以根据配置创建多个事件循环线程EventLoopThread,并提供EventLoop的分配机制。
EventLoopThreadPool.h
cpp
#pragma once

#include "noncopyable.h"

#include <functional>
#include <string>
#include <vector>
#include <memory>

class EventLoop;
class EventLoopThread;

class EventLoopThreadPool : noncopyable
{
public:
    using ThreadInitCallback = std::function<void(EventLoop *)>;

    EventLoopThreadPool(EventLoop *baseLoop, const std::string &nameArg);
    ~EventLoopThreadPool();

    // 设置线程数量
    void setThreadNum(int numThreads) { numThreads_ = numThreads; }

    // 启动线程池
    void start(const ThreadInitCallback &cb = ThreadInitCallback());

    // 获取下一个处理事件的EventLoop
    EventLoop *getNextLoop();

    // 获取所有EventLoop
    std::vector<EventLoop *> getAllLoops();

    bool started() const { return started_; }

    const std::string &name() const { return name_; }

private:
    EventLoop *baseLoop_; // 用户自己的(主线程的)EventLoop, EventLoop loop,不参与线程池管理
    std::string name_;    // 线程池名字
    bool started_;        // 标志线程池是否启动
    int numThreads_;      // 线程池大小,要创建的事件循环线程数量
    int next_;            // 轮询算法的索引,用于分配下一个事件循环
    std::vector<std::unique_ptr<EventLoopThread>> threads_;
    std::vector<EventLoop *> loops_; // 存储所有子线程的事件循环的指针
};
cpp
#include "EventLoopThreadPool.h"
#include "EventLoopThread.h"

#include <memory>

EventLoopThreadPool::EventLoopThreadPool(EventLoop *baseLoop, const std::string &nameArg)
    : baseLoop_(baseLoop), name_(nameArg), started_(false), numThreads_(0), next_(0)
{
}

EventLoopThreadPool::~EventLoopThreadPool()
{
    /**
     * 不需要显示释放资源
     * 1. threads_存储的是unique_ptr管理的EventLoopThread,会自动释放EventLoopThread对象
     * 2. EventLoop对象在EventLoopThread的线程栈上创建的,线程结束时会自动销毁
     */
}

void EventLoopThreadPool::start(const ThreadInitCallback &cb)
{
    started_ = true;

    for (int i = 0; i < numThreads_; i++)
    {
        char buf[name_.size() + 32];
        snprintf(buf, sizeof buf, "%s%d", name_.c_str(), i); // 为每个线程生成唯一名称:主线程名+线程编号
        EventLoopThread *t = new EventLoopThread(cb, buf);
        threads_.push_back(std::unique_ptr<EventLoopThread>(t)); // 将每一个EventLoopThread存入threads_

        // 启动每一个EventLoopThread并将返回的EventLoop*存入loops_
        loops_.push_back(t->startLoop()); // 底层启动创建线程,绑定一个新的EventLoop,并返回该loop的地址
    }

    // 如果线程数为0表示整个服务端只有一个主线程线程,直接在主线程的baseLoop_上执行初始化回调
    if (numThreads_ == 0 && cb)
    {
        cb(baseLoop_);
    }
}

// 如果工作在多线程中,baseLoop_默认以轮询的方式分配Channel给subLoop
EventLoop *EventLoopThreadPool::getNextLoop()
{
    EventLoop *loop = baseLoop_;
    if (!loops_.empty()) // 通过轮询(按顺序循环)获取下一个处理事件的loop
    {
        loop = loops_[next_];
        ++next_;
        if (next_ > loops_.size())
        {
            next_ = 0;
        }
    }

    return loop;
}

std::vector<EventLoop *> EventLoopThreadPool::getAllLoops()
{
    if (loops_.empty())
    {
        return std::vector<EventLoop *>(1, baseLoop_);
    }
    else
    {
        return loops_;
    }
}
整体工作流程
1、初始化线程池,设置线程数量
2、调用start()方法启动线程池,创建指定数量的EventLoopThread事件循环线程对象
3、调用每一个EventLoopThread对象的startLoop()方法,创建一个线程和其对应的EventLoop
4、通过getNext Loop()方法以轮询(按顺序)的方式获取事件循环,分配任务
5、内部通过loops_容器管理所有子线程的事件循环,start Loop()方法会返回子线程绑定的EventLoop的指针
核心设计亮点
**分层设计:**线程池不直接管理线程,而是通过EventLoopThread间接管理,职责清晰
**灵活配置:**可通过setThreadNum()动态设置线程数量
**负载均衡:**通过轮询算法为每个事件循环分配任务,简单高效
**线程安全:**通过EventLoopThread内部的同步机制保证线程安全
**兼容性:**支持单线程模式(线程数为0时使用主线程的事件循环)
以上,就完成了EventLoopThreadPool事件循环线程池类,这种设计,通过多线程事件循环充分利用多核CPU,提高了并发处理能力。