前言
在之前的学习中,我们已经对qml的基本组件和布局方式有了大概的了解,已经具备开发一个完善界面的基本能力。然而光会写界面是远远不够的,我们还需要让QML界面和业务代码连接起来也就是说,我们需要学会------QML和C++之间的交互。
之前的学习已经介绍过,QML更偏向于UI界面层,而C++应当负责复杂的业务逻辑判断。
本节我们将学习在QML端如何链接调用到C++对象的函数接口。我利用的是之前的一个qml例子,里面实现了一个登录窗口,上面可以输入用户名和密码,我希望在点击登录后,将用户名密码传递到C++端进行一些业务逻辑,然后返回到QML端。
用到的方法是上下文属性暴露,你可能对此有些迷茫,实际上这是接口名字的翻译。setContextProperty------设置上下文属性。
一、C++端
先贴上登录类的C++头文件代码:
cpp
#pragma once
#include <QMainWindow>
#include <QQuickWidget>

class QmlLogin : public QMainWindow {
    Q_OBJECT

public:
    QmlLogin(QWidget* parent = nullptr);
    ~QmlLogin();

    // 可被QML调用的接口
    Q_INVOKABLE void regularMethod();
    Q_INVOKABLE QString regularMethodWithReturn(QString name, int age);

public slots:
    void handleLogin(const QString& username, const QString& password);

private:
    QQuickWidget* m_quickWidget;  // 保存QQuickWidget指针
};
我这里打算直接new一个QQuickWidget,然后在构造函数中加载qml。这一点是区别于纯qml工程的。这里设计了三个接口,都可以被qml端调用。
1.regularMethod和regularMethodWithReturn是public的一个公共接口,这里必须要添加Q_INVOKABLE宏 ,代表接口可被调用的意思,否则qml端无法识别调用。
2.槽函数handleLogin可以直接被调用 。
然后,我再附上cpp代码:
cpp
#include "QmlLogin.h"
#include <QQmlContext>
#include <QQuickWidget>
#include <QDebug>
#include <QQmlError>
#include <QQuickItem>
#include <QQuickView>
#include <QQmlProperty>

QmlLogin::QmlLogin(QWidget* parent)
    : QMainWindow(parent)
{
    m_quickWidget = new QQuickWidget(this);

    // 添加调试信息
    qDebug() << "Loading QML file...";
    QUrl qmlUrl("qrc:/LoginWidget.qml");
    qDebug() << "QML URL:" << qmlUrl.toString();

    // 将QmlLogin实例暴露给QML上下文
    m_quickWidget->rootContext()->setContextProperty("loginHandler", this);

    m_quickWidget->setSource(qmlUrl);

    // 检查是否有错误
    if (m_quickWidget->status() == QQuickWidget::Error) {
        for (const QQmlError &error : m_quickWidget->errors()) {
            qDebug() << "QML Error:" << error.toString();
        }
    }

    m_quickWidget->setResizeMode(QQuickWidget::SizeRootObjectToView);
    setCentralWidget(m_quickWidget);
    resize(400, 300);

    m_quickWidget->show();
}

QmlLogin::~QmlLogin()
{
}

void QmlLogin::handleLogin(const QString& username, const QString& password)
{
    qDebug() << "登录请求 - 用户名:" << username << "密码:" << password;
    // 这里添加您的登录业务逻辑
}
void QmlLogin::regularMethod()
{
    qDebug()<<"regularMethod";
}

QString QmlLogin::regularMethodWithReturn(QString name, int age)
{
    qDebug()<<"regularMethodWithReturn"<<name<<age;
    return QString("%1: %2years old").arg(name).arg(age);
}
代码比较简单,这里重点讲:
cpp
m_quickWidget->rootContext()->setContextProperty("loginHandler", this);设置上下文属性------这里将this指针作为一个属性,暴露给了qml引擎,并取了别名loginHandler。之后qml端就可以像调用对象一样调用loginHandler的接口了。
值得一提的事,这里虽然是通过QQuickWidget来调用rootContext的,但实际上链接到的是QQuickWidget里的engine里的rootContext。如果你是在main中直接通过QQmlEngine加载qml的,那调用QQmlEngine的rootContext就行了。
只要 C++ 对象通过 setContextProperty("name", obj) 注册到 同一个 QQmlEngine,所有由该引擎加载的 QML 文件(无论多少个窗口/组件)全局共享这个 "name" ------不需要重新 import、不需要重新创建实例,直接写对象名即可访问其属性/信号/槽。
一个引擎,一次注册,处处可用。
二、QML端
cpp
import QtQuick 2.12
import QtQuick.Window 2.12
import QtQuick.Controls 2.12
import QtQuick.Layouts 1.12

Rectangle {
    x: 0
    y: 0
    width: 400
    height: 300
    color: "#fff0f0"

    Column {
        anchors.centerIn: parent
        spacing: 20

        Text {
            text: "登录"
            font.pixelSize: 24
            anchors.horizontalCenter: parent.horizontalCenter
        }

        TextField {
            id: usernameField
            placeholderText: "用户名"
            width: 200
        }

        TextField {
            id: passwordField
            placeholderText: "密码"
            echoMode: TextInput.Password
            width: 200
        }

        Button {
            text: "登录"
            anchors.horizontalCenter: parent.horizontalCenter
            width: 100
            onClicked: {
                console.log("登录按钮被点击")
                loginHandler.handleLogin(usernameField.text, passwordField.text)
            }
        }

        Button {
            text: "测试"
            anchors.horizontalCenter: parent.horizontalCenter
            width: 100
            onClicked: {
                console.log("测试按钮被点击")
                loginHandler.regularMethod()
                var string = loginHandler.regularMethodWithReturn("Jame", 20)
                console.log(string)
            }
        }
    }
}
这是一个相当简洁的登录窗口,我们点击登录按钮后,会直接调用暴露的对象属性,然后产生c++端的打印。
cpp
loginHandler.handleLogin(usernameField.text, passwordField.text)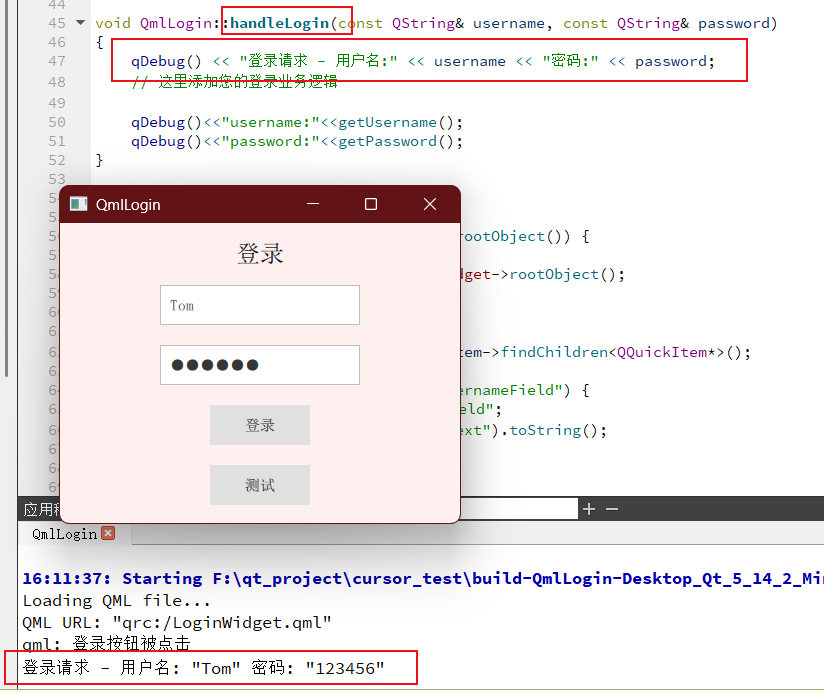
接下来如果需要网络上的请求校验的话,就可以直接在c++端去执行了。
接下来看测试按钮,这个按钮和登录功能无关,纯粹是为了测试添加了Q_INVOKABLE宏的接口能否被调用:
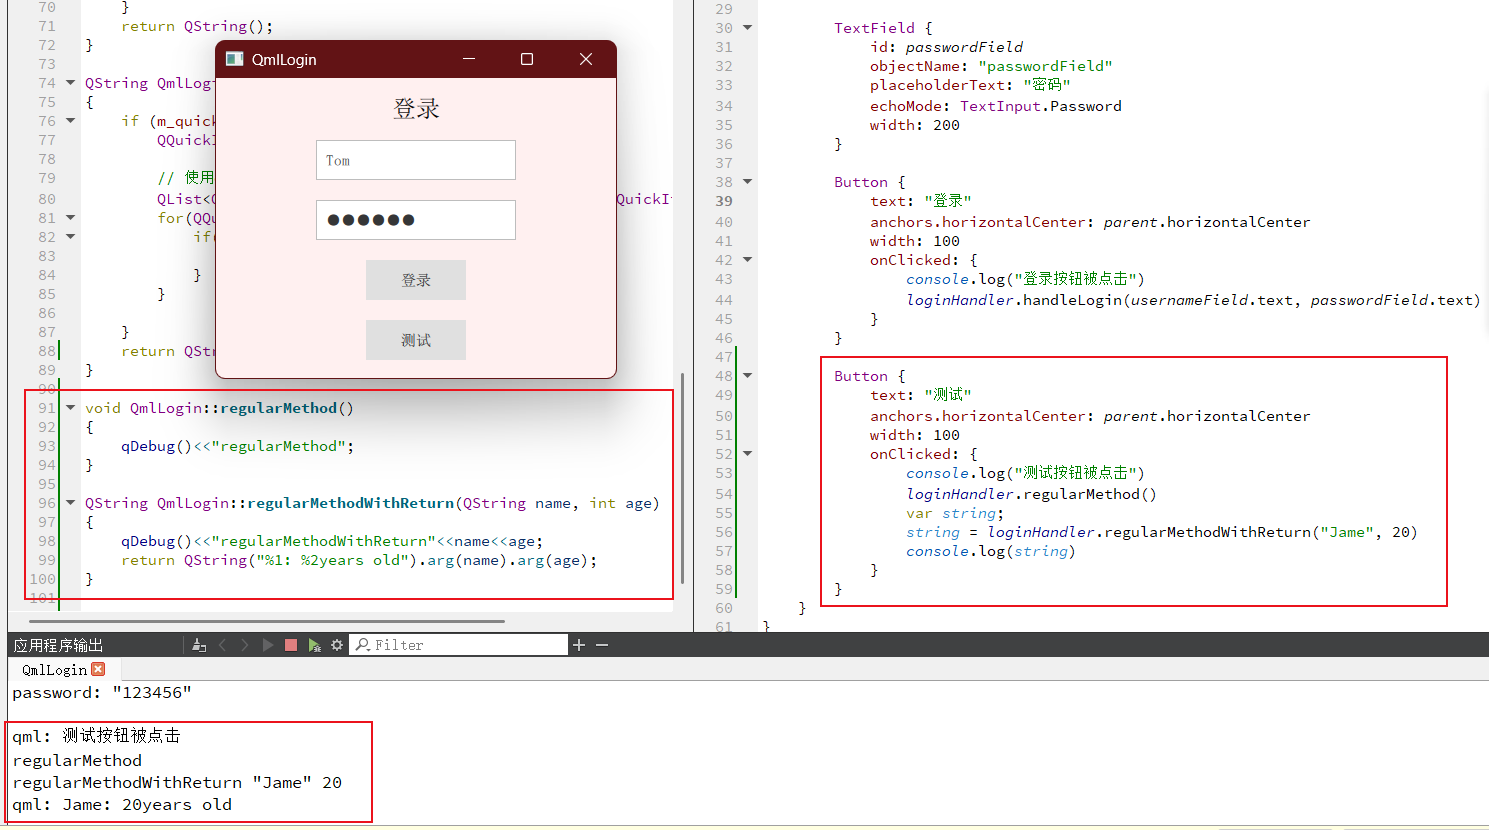
可以看到,点击测试按钮后,从qml到c++,再到qml获取到返回值进行打印,整个流程都是通畅的。这个返回值是一个简单的字符串拼接,模拟了在c++端进行复杂业务逻辑计算后,将结果返回到qml端进行显示。
三、总结
本节介绍了通过上下文属性暴露的方法,让qml端可以直接通过c++对象的属性,调用它的一些功能接口,属于是qml对c++的单向调用。
下一节,将介绍一下c++端对qml端的主动调用,然后去获取qml界面中一些组件的属性信息。