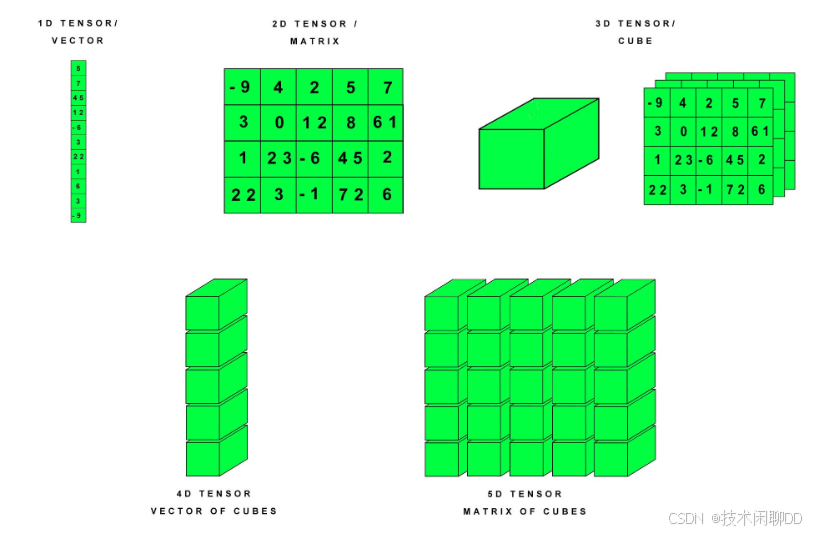
张量是一个多维数组,可以是标量、向量、矩阵或更高维度的数据结构。
在 PyTorch 中,张量(Tensor)是数据的核心表示形式,类似于 NumPy 的多维数组,但具有更强大的功能,例如支持 GPU 加速和自动梯度计算。
张量支持多种数据类型(整型、浮点型、布尔型等)。张量可以存储在 CPU 或 GPU 中,GPU 张量可显著加速计算。
下图展示了不同维度的张量(Tensor)在 PyTorch 中的表示方法:
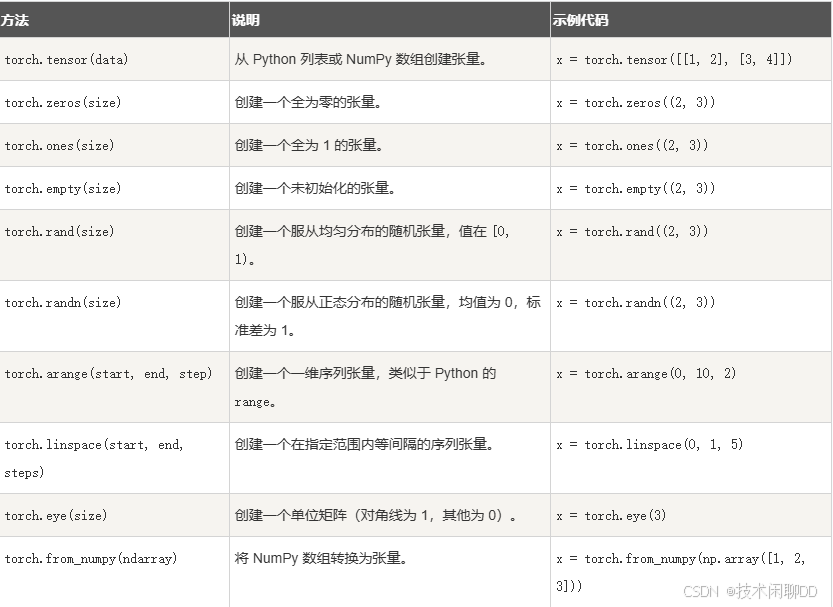
1. 创建张量
张量创建的方式有:
使用 torch.tensor() 函数,你可以将一个列表或数组转换为张量:
python
import torch

tensor = torch.tensor([1, 2, 3])
print(tensor)
如果你有一个 NumPy 数组,可以使用 torch.from_numpy() 将其转换为张量:
python
import numpy as np

np_array = np.array([1, 2, 3])
tensor = torch.from_numpy(np_array)
print(tensor)
创建 2D 张量(矩阵):
python
import torch

tensor_2d = torch.tensor([
    [-9, 4, 2, 5, 7],
    [3, 0, 12, 8, 6],
    [1, 23, -6, 45, 2],
    [22, 3, -1, 72, 6]
])
print("2D Tensor (Matrix):\n", tensor_2d)
print("Shape:", tensor_2d.shape)  # 形状
其他维度的创建:
python
# 创建 3D 张量(立方体)
tensor_3d = torch.stack([tensor_2d, tensor_2d + 10, tensor_2d - 5]) # 堆叠 3 个 2D 张量
print("3D Tensor (Cube):\n", tensor_3d)
print("Shape:", tensor_3d.shape) # 形状
# 创建 4D 张量(向量的立方体)
tensor_4d = torch.stack([tensor_3d, tensor_3d + 100]) # 堆叠 2 个 3D 张量
print("4D Tensor (Vector of Cubes):\n", tensor_4d)
print("Shape:", tensor_4d.shape) # 形状
# 创建 5D 张量(矩阵的立方体)
tensor_5d = torch.stack([tensor_4d, tensor_4d + 1000]) # 堆叠 2 个 4D 张量
print("5D Tensor (Matrix of Cubes):\n", tensor_5d)
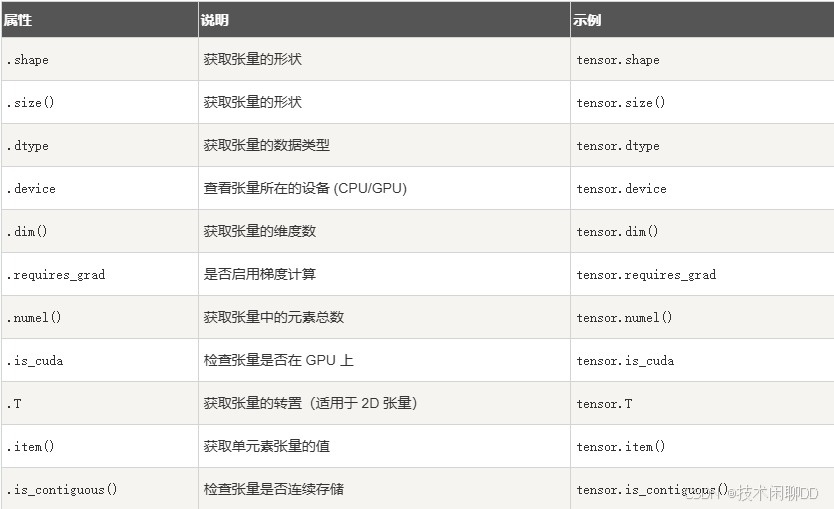
print("Shape:", tensor_5d.shape) # 形状2. 张量的属性
张量的属性如下表:
python
import torch
# 创建一个 2D 张量
tensor = torch.tensor([[1, 2, 3], [4, 5, 6]], dtype=torch.float32)
# 张量的属性
print("Tensor:\n", tensor)
print("Shape:", tensor.shape) # 获取形状
print("Size:", tensor.size()) # 获取形状(另一种方法)
print("Data Type:", tensor.dtype) # 数据类型
print("Device:", tensor.device) # 设备
print("Dimensions:", tensor.dim()) # 维度数
print("Total Elements:", tensor.numel()) # 元素总数
print("Requires Grad:", tensor.requires_grad) # 是否启用梯度
print("Is CUDA:", tensor.is_cuda) # 是否在 GPU 上
print("Is Contiguous:", tensor.is_contiguous()) # 是否连续存储
# 获取单元素值
single_value = torch.tensor(42)
print("Single Element Value:", single_value.item())
# 转置张量
tensor_T = tensor.T
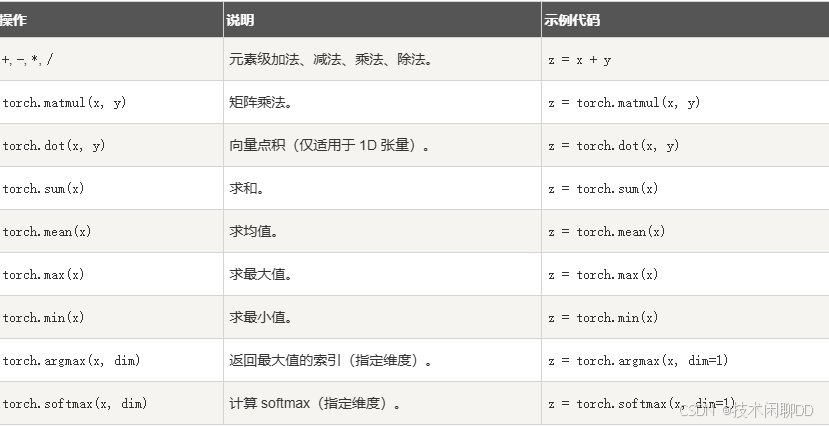
print("Transposed Tensor:\n", tensor_T)3. 张量的操作
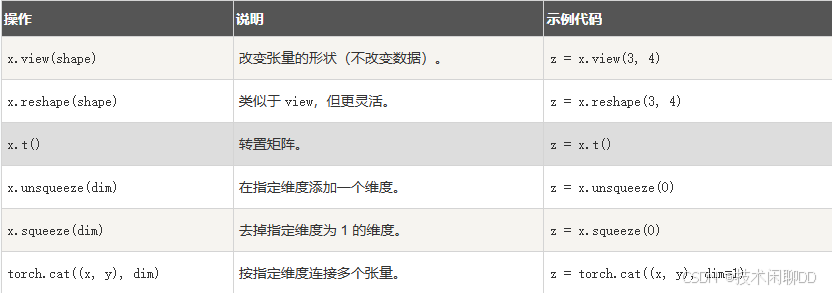
基础操作:
形状操作
python
import torch

# 创建一个 2D 张量
tensor = torch.tensor([[1, 2, 3], [4, 5, 6]], dtype=torch.float32)
print("原始张量:\n", tensor)

# 1. **索引和切片操作**
print("\n【索引和切片】")
print("获取第一行:", tensor[0])  # 获取第一行
print("获取第一行第一列的元素:", tensor[0, 0])  # 获取特定元素
print("获取第二列的所有元素:", tensor[:, 1])  # 获取第二列所有元素

# 2. **形状变换操作**
print("\n【形状变换】")
reshaped = tensor.view(3, 2)  # 改变张量形状为 3x2
print("改变形状后的张量:\n", reshaped)
flattened = tensor.flatten()  # 将张量展平成一维
print("展平后的张量:\n", flattened)

# 3. **数学运算操作**
print("\n【数学运算】")
tensor_add = tensor + 10  # 张量加法
print("张量加 10:\n", tensor_add)
tensor_mul = tensor * 2  # 张量乘法
print("张量乘 2:\n", tensor_mul)
tensor_sum = tensor.sum()  # 计算所有元素的和
print("张量元素的和:", tensor_sum.item())

# 4. **与其他张量的操作**
print("\n【与其他张量操作】")
tensor2 = torch.tensor([[1, 1, 1], [1, 1, 1]], dtype=torch.float32)
print("另一个张量:\n", tensor2)
tensor_dot = torch.matmul(tensor, tensor2.T)  # 张量矩阵乘法
print("矩阵乘法结果:\n", tensor_dot)

# 5. **条件判断和筛选**
print("\n【条件判断和筛选】")
mask = tensor > 3  # 创建一个布尔掩码
print("大于 3 的元素的布尔掩码:\n", mask)
filtered_tensor = tensor[tensor > 3]  # 筛选出符合条件的元素
print("大于 3 的元素:\n", filtered_tensor)
4. 张量的 GPU 加速
将张量转移到 GPU:
python
device = torch.device('cuda' if torch.cuda.is_available() else 'cpu')
x = torch.tensor([1.0, 2.0, 3.0], device=device)
检查 GPU 是否可用:
python
torch.cuda.is_available() # 返回 True 或 False5. 张量与 NumPy 的互操作

python
import torch
import numpy as np

# 1. NumPy 数组转换为 PyTorch 张量
print("1. NumPy 转为 PyTorch 张量")
numpy_array = np.array([[1, 2, 3], [4, 5, 6]])
print("NumPy 数组:\n", numpy_array)

# 使用 torch.from_numpy() 将 NumPy 数组转换为张量
tensor_from_numpy = torch.from_numpy(numpy_array)
print("转换后的 PyTorch 张量:\n", tensor_from_numpy)

# 修改 NumPy 数组,观察张量的变化(共享内存)
numpy_array[0, 0] = 100
print("修改后的 NumPy 数组:\n", numpy_array)
print("PyTorch 张量也会同步变化:\n", tensor_from_numpy)

# 2. PyTorch 张量转换为 NumPy 数组
print("\n2. PyTorch 张量转为 NumPy 数组")
tensor = torch.tensor([[7, 8, 9], [10, 11, 12]], dtype=torch.float32)
print("PyTorch 张量:\n", tensor)

# 使用 tensor.numpy() 将张量转换为 NumPy 数组
numpy_from_tensor = tensor.numpy()
print("转换后的 NumPy 数组:\n", numpy_from_tensor)

# 修改张量,观察 NumPy 数组的变化(共享内存)
tensor[0, 0] = 77
print("修改后的 PyTorch 张量:\n", tensor)
print("NumPy 数组也会同步变化:\n", numpy_from_tensor)

# 3. 注意:不共享内存的情况(需要复制数据)
print("\n3. 使用 clone() 保证独立数据")
tensor_independent = torch.tensor([[13, 14, 15], [16, 17, 18]], dtype=torch.float32)
numpy_independent = tensor_independent.clone().numpy()  # 使用 clone 复制数据
print("原始张量:\n", tensor_independent)
tensor_independent[0, 0] = 0  # 修改张量数据
print("修改后的张量:\n", tensor_independent)
print("NumPy 数组(不会同步变化):\n", numpy_independent)