
C++专栏:C++_Yupureki的博客-CSDN博客
目录
[1. 序列式容器与关联式容器](#1. 序列式容器与关联式容器)
[1.1 基本概念](#1.1 基本概念)
[1.2 核心差异](#1.2 核心差异)
[2. set系列容器详解](#2. set系列容器详解)
[2.1 set基本介绍](#2.1 set基本介绍)
[2.2 set的构造和迭代器](#2.2 set的构造和迭代器)
[2.3 set的增删查操作](#2.3 set的增删查操作)
[2.4 实用示例](#2.4 实用示例)
[2.5 set和multiset的差异](#2.5 set和multiset的差异)
[3. map系列容器详解](#3. map系列容器详解)
[3.1 map基本介绍](#3.1 map基本介绍)
[3.2 pair类型](#3.2 pair类型)
[3.3 map的构造和遍历](#3.3 map的构造和遍历)
[3.4 map的operator\[\]](#3.4 map的operator[])
[3.5 multimap的差异](#3.5 multimap的差异)
[4. 封装红黑树实现map和set](#4. 封装红黑树实现map和set)
[4.1 源码框架分析](#4.1 源码框架分析)
[4.2 模拟实现框架](#4.2 模拟实现框架)
[4.3 迭代器实现](#4.3 迭代器实现)
上一篇:从零开始的C++学习生活 13:红黑树全面解析-CSDN博客
前言
在C++ STL(标准模板库)中,容器是我们日常开发中不可或缺的工具。容器主要分为两大类:序列式容器和关联式容器。序列式容器如vector、list、deque等,我们已经比较熟悉,它们按照线性序列存储数据。但是序列式容器无法进行高效的查找数据和数据之间的映射关系。
在这里的关联式容器,特别是map和set系列,以其独特的非线性结构和高效的查找能力,在处理需要快速检索的场景中发挥着重要作用。无论是算法题还是日常使用中都十分有用。
而我将带领大家深入探索map和set的世界,从基础使用到底层红黑树实现,全面剖析这两个强大的关联式容器。

1. 序列式容器与关联式容器
1.1 基本概念
序列式容器(Sequence Containers)维护元素的线性序列,元素在容器中的位置取决于插入的时机和位置,与元素值无关。典型的序列式容器包括:
- vector:动态数组
- list:双向链表
- deque:双端队列
- array:固定大小数组
- forward_list:单向链表
这些容器中元素的位置是顺序存储的,交换元素位置不会破坏容器结构。
关联式容器(Associative Containers)则采用非线性结构(通常是树形结构),元素的位置由关键字(key)决定,元素之间有着紧密的关联关系。随意交换元素会破坏这种结构。关联式容器主要包括:
- map/set系列(基于红黑树)
- unordered_map/unordered_set系列(基于哈希表)
1.2 核心差异
| 特性 | 序列式容器 | 关联式容器 |
|---|---|---|
| 数据结构 | 线性序列 | 非线性结构(树/哈希) |
| 元素访问 | 按位置访问 | 按关键字访问 |
| 元素关系 | 位置相邻 | 关键字关联 |
| 典型操作 | 插入、删除、遍历 | 查找、插入、删除 |
2. set系列容器详解
2.1 set基本介绍
set是一个关键字的集合,底层用红黑树实现,具有以下特性:
- 元素自动排序(默认升序)
- 元素唯一(不允许重复)
- 查找、插入、删除时间复杂度为O(logN)
cpp
template <class T,                        // set::key_type/value_type
           class Compare = less<T>,        // set::key_compare/value_compare
           class Alloc = allocator<T>      // set::allocator_type
           > class set;
2.2 set的构造和迭代器
set提供多种构造方式:
cpp
// 默认构造
set<int> s1;

// 迭代器区间构造
vector<int> v = {1, 2, 3};
set<int> s2(v.begin(), v.end());

// 拷贝构造
set<int> s3(s2);

// 初始化列表构造
set<int> s4 = {1, 2, 3, 4, 5};
set支持双向迭代器,遍历时按关键字升序排列:
cpp
set<int> s = {5, 2, 7, 1, 9};

// 正向遍历
for(auto it = s.begin(); it != s.end(); ++it) {
    cout << *it << " ";  // 输出:1 2 5 7 9
}

// 反向遍历
for(auto it = s.rbegin(); it != s.rend(); ++it) {
    cout << *it << " ";  // 输出:9 7 5 2 1
}

// 范围for循环
for(const auto& elem : s) {
    cout << elem << " ";
}重要特性:set的iterator和const_iterator都不支持修改元素值,因为修改关键字会破坏红黑树的结构。
2.3 set的增删查操作
都是STL的容器,set的增删查基本和其他的STL容器一样
插入操作
需要注意的是,set无法插入已有的相同数据,例如插入了2,那么就不能再插入2这个数据
cpp
set<int> s;

// 单个插入
auto result1 = s.insert(5);  // 返回pair<iterator, bool>

// 初始化列表插入
s.insert({2, 7, 5});  // 5已存在,插入失败

// 迭代器区间插入
vector<int> v = {1, 8, 3};
s.insert(v.begin(), v.end());
查找操作
cpp
set<int> s = {4, 2, 7, 2, 8, 5, 9};

// find查找,返回迭代器
auto it = s.find(5);
if(it != s.end()) {
    cout << "找到元素:" << *it << endl;
}

// count计数(对于set,只能是0或1)
if(s.count(5)) {
    cout << "元素存在" << endl;
}

// 算法库的find(不推荐,效率低)
auto pos = find(s.begin(), s.end(), 5);  // O(N)复杂度
删除操作
cpp
set<int> s = {4, 2, 7, 2, 8, 5, 9};

// 通过迭代器删除
s.erase(s.begin());  // 删除最小元素

// 通过值删除
int num = s.erase(5);  // 返回删除的元素个数

// 删除区间
auto it_low = s.lower_bound(3);  // >=3的第一个元素
auto it_up = s.upper_bound(7);   // >7的第一个元素
s.erase(it_low, it_up);          // 删除[3, 7]区间
2.4 实用示例
基础使用示例
cpp
#include<iostream>
#include<set>
using namespace std;

int main() {
    // 去重+升序排序
    set<int> s;
    s.insert(5);
    s.insert(2);
    s.insert(7);
    s.insert(5);  // 重复,插入失败

    // 遍历输出:2 5 7
    for(auto e : s) {
        cout << e << " ";
    }
    cout << endl;

    // 插入更多元素
    s.insert({2, 8, 3, 9});  // 2已存在,插入失败
    // 输出:2 3 5 7 8 9
    for(auto e : s) {
        cout << e << " ";
    }
    cout << endl;

    // 字符串set,按字典序排序
    set<string> strset = {"sort", "insert", "add"};
    // 输出:add insert sort
    for(auto& e : strset) {
        cout << e << " ";
    }
    cout << endl;

    return 0;
}
边界查找示例
cpp
#include<iostream>
#include<set>
using namespace std;

int main() {
    set<int> myset;
    for(int i = 1; i < 10; i++)
        myset.insert(i * 10);  // 10 20 30 40 50 60 70 80 90

    // 查找[30, 60]区间
    auto itlow = myset.lower_bound(30);  // >=30的第一个元素
    auto itup = myset.upper_bound(60);   // >60的第一个元素

    // 删除区间[itlow, itup) -> [30, 60]
    myset.erase(itlow, itup);

    // 输出剩余元素:10 20 70 80 90
    for(auto e : myset) {
        cout << e << " ";
    }
    cout << endl;

    return 0;
}
2.5 set和multiset的差异
multiset与set的主要区别在于允许重复元素:
cpp
#include<iostream>
#include<set>
using namespace std;

int main() {
    // multiset排序但不去重
    multiset<int> s = {4, 2, 7, 2, 4, 8, 4, 5, 4, 9};

    // 输出:2 2 4 4 4 4 5 7 8 9
    for(auto e : s) {
        cout << e << " ";
    }
    cout << endl;

    int x = 4;

    // find返回第一个匹配元素的迭代器
    auto pos = s.find(x);
    while(pos != s.end() && *pos == x) {
        cout << *pos << " ";  // 输出所有4
        ++pos;
    }
    cout << endl;

    // count返回实际个数
    cout << "4的个数:" << s.count(x) << endl;  // 输出4

    // erase删除所有匹配元素
    s.erase(x);

    // 输出:2 2 5 7 8 9
    for(auto e : s) {
        cout << e << " ";
    }
    cout << endl;

    return 0;
}
3. map系列容器详解
3.1 map基本介绍
map是键值对(key-value)的集合,底层同样用红黑树实现:
cpp
template <class Key,                                     // map::key_type
           class T,                                       // map::mapped_type
           class Compare = less<Key>,                     // map::key_compare
           class Alloc = allocator<pair<const Key,T>>     // map::allocator_type
           > class map;
在红黑树底层中,key是关键字,而T却是key-value的集合。有的人会问,既然有了pair<key,value>的集合为什么还要专门再搞个key?
因为为了保持与set的统一,map和set的底层是同一个红黑树
具体的问题我们等模拟封装map和set再说
特性:
- 按key自动排序
- key唯一
- 支持通过key快速查找value
- 查找、插入、删除时间复杂度O(logN)
3.2 pair类型
map底层存储的是pair<const Key, Value>类型:
cpp
template <class T1, class T2>
struct pair {
    typedef T1 first_type;
    typedef T2 second_type;

    T1 first;
    T2 second;

    pair(): first(T1()), second(T2()) {}
    pair(const T1& a, const T2& b): first(a), second(b) {}
};

// 便捷函数
template <class T1, class T2>
inline pair<T1,T2> make_pair(T1 x, T2 y) {
    return pair<T1,T2>(x, y);
}
3.3 map的构造和遍历
cpp
#include<iostream>
#include<map>
using namespace std;

int main() {
    // 初始化列表构造
    map<string, string> dict = {
        {"left", "左边"},
        {"right", "右边"},
        {"insert", "插入"},
        {"string", "字符串"}
    };

    // 迭代器遍历
    auto it = dict.begin();
    while(it != dict.end()) {
        cout << it->first << ":" << it->second << endl;
        ++it;
    }

    // 插入pair的多种方式
    pair<string, string> kv1("first", "第一个");
    dict.insert(kv1);
    dict.insert(pair<string, string>("second", "第二个"));
    dict.insert(make_pair("sort", "排序"));
    dict.insert({"auto", "自动的"});

    // "left"已存在,插入失败
    dict.insert({"left", "左边,剩余"});

    // 范围for遍历
    for(const auto& e : dict) {
        cout << e.first << ":" << e.second << endl;
    }

    return 0;
}
3.4 map的operator\[\]
map最重要的特性之一是operator\[\],它兼具查找、插入、修改功能。但set没有
因为map的\[\]本质是获取value而不是key,key不能被修改。
cpp
map<string, string> dict;

// key不存在 -> 插入 {"insert", string()}
dict["insert"];

// 插入+修改
dict["left"] = "左边";

// 修改
dict["left"] = "左边、剩余";

// key存在 -> 查找
cout << dict["left"] << endl;  // 输出:左边、剩余
需要注意的是,如果\[\]访问的那个元素不存在,那么就会自动插入进去
因此\[\]就相当于继承了find和insert的功能,先find,找到了就直接返回value,如果没找到那么就insert
operator\[\]的内部实现:
cpp
mapped_type& operator[](const key_type& k) {
    // 尝试插入{k, mapped_type()},无论插入成功失败都返回对应value的引用
    pair<iterator, bool> ret = insert({k, mapped_type()});
    iterator it = ret.first;
    return it->second;
}
3.5 multimap的差异
multimap与map的主要区别:
- 允许重复key
- 不支持operator\[\]
- find返回第一个匹配的迭代器
4. 封装红黑树实现map和set
4.1 源码框架分析
cpp
// set的实现框架
template <class Key, class Compare = less<Key>, class Alloc = alloc>
class set {
private:
    typedef rb_tree<key_type, value_type,
                    identity<value_type>, key_compare, Alloc> rep_type;
    rep_type t;  // 红黑树实例
};

// map的实现框架
template <class Key, class T, class Compare = less<Key>, class Alloc = alloc>
class map {
private:
    typedef rb_tree<key_type, value_type,
                    select1st<value_type>, key_compare, Alloc> rep_type;
    rep_type t;  // 红黑树实例
};
关键设计思想:
- set的value_type就是Key
- map的value_type是pair<const Key, T>
- 通过不同的仿函数(identity/select1st)从value中提取key进行比较
4.2 模拟实现框架
红黑树节点
cpp
enum Colour { RED, BLACK };

template<class T>
struct RBTreeNode {
    T _data;
    RBTreeNode<T>* _left;
    RBTreeNode<T>* _right;
    RBTreeNode<T>* _parent;
    Colour _col;

    RBTreeNode(const T& data)
        : _data(data)
        , _left(nullptr)
        , _right(nullptr)
        , _parent(nullptr)
        , _col(RED)  // 新节点默认为红色
    {}
};
在这里T就代表数据类型,如果是set就传K,如果是map就传pair<K,V>
泛型红黑树
STL中map和set的底层都复用同一颗红黑树,通过模板参数实现泛型:
我们都知道map和set的最大区别就是set只有key,而map有key和value
在底层红黑树中,如果要实现set和key,那么模板参数显然一个只有key而一个有key和value,这样看起来必须得用两个红黑树
但是对于创建map和set的大佬来说,创两个红黑树显然不是他们的风格,因此共用一个红黑树
cpp
template<class K, class T, class KeyOfT>
class RBTree {
private:
    typedef RBTreeNode<T> Node;
    Node* _root = nullptr;

public:
    //........
};
因此在这里K代表set和map都有的key的类型,而T代表各自独立的数据类型,如果是set就传K,如果是map就传pair<K,V>
但是在具体函数中,例如我要访问key,我显然不能盲目地使用_data.first,因为对于set而言key就是_data。因此我们传递一个仿函数,专门用来获取key
如果是map就返回_data.first;如果是set就直接返回_data
set的实现
cpp
template<class K>
class set {
    struct SetKeyOfT {
        const K& operator()(const K& key) {
            return key;
        }
    };

public:
    bool insert(const K& key) {
        return _t.Insert(key);
    }

private:
    RBTree<K, K, SetKeyOfT> _t;  // T=K
};
map的实现
cpp
template<class K, class V>
class map {
    struct MapKeyOfT {
        const K& operator()(const pair<K, V>& kv) {
            return kv.first;
        }
    };

public:
    bool insert(const pair<K, V>& kv) {
        return _t.Insert(kv);
    }

private:
    RBTree<K, pair<K, V>, MapKeyOfT> _t;  // T=pair<K,V>
};
4.3 迭代器实现
cpp
template<class T, class Ref, class Ptr>
struct RBTreeIterator {
    typedef RBTreeNode<T> Node;
    typedef RBTreeIterator<T, Ref, Ptr> Self;

    Node* _node;
    Node* _root;
    //....
}
红黑树迭代器的核心难点在于operator++和operator--的实现:
operator++
因为红黑树是一棵树,他不像list和vector那样逻辑上是线性的,无脑加加到下一个节点就完事
因此我们从头开始分析,首先我们++肯定是从小节点到更大一级的节点
那么对于树而言,什么样的是从小到大?没错,是中序遍历
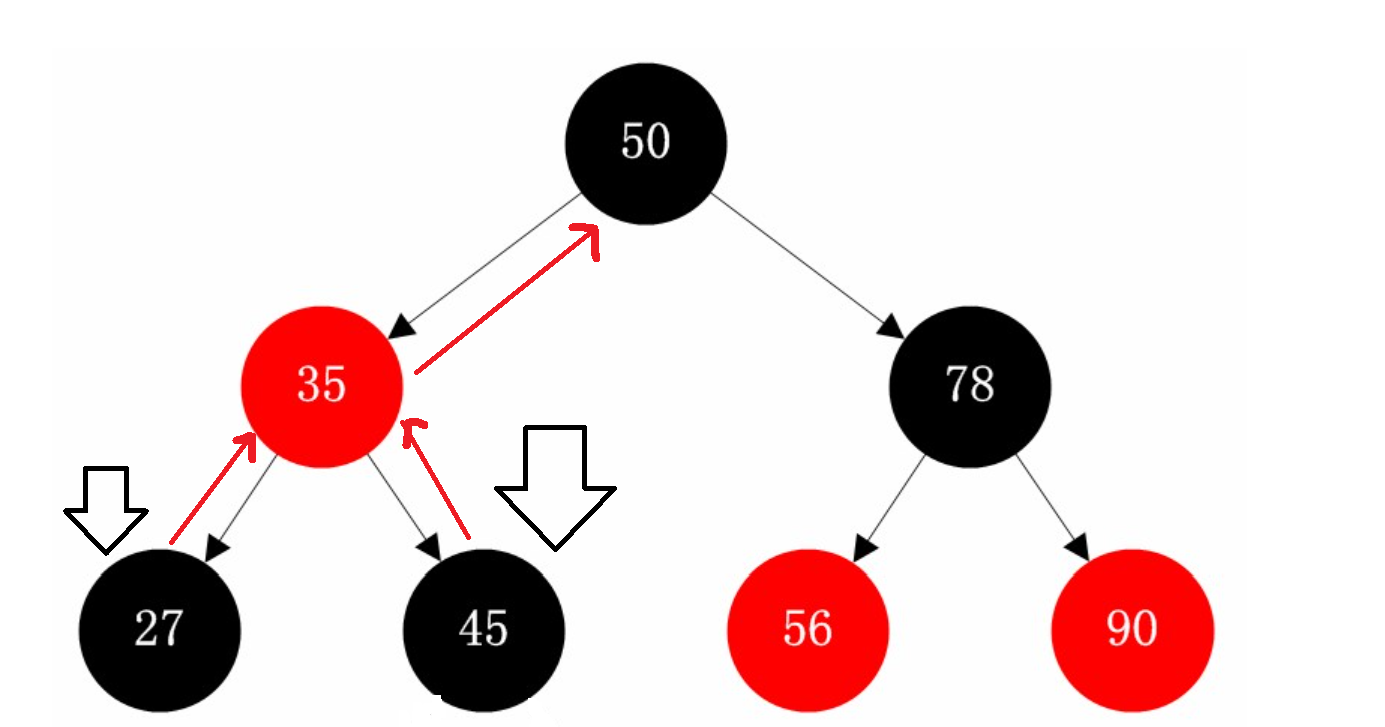
那么对于这张图上的节点而言,我们对27和45++
从中序遍历的角度分析,下一个遍历的就是更大的节点,那么对于27而言35就是下一个,而50是45的下一个
因此我们判断,如果当前节点N的父节点的左孩子是N,那么下一个就是父节点
如果N的父节点的右孩子 是N,那么还得向上判断,直到左孩子是N为止
cpp
Self& operator++() {
        if(_node->_right) {
            // 右子树不为空,下一个节点是右子树的最左节点
            Node* leftMost = _node->_right;
            while(leftMost->_left) {
                leftMost = leftMost->_left;
            }
            _node = leftMost;
        } else {
            // 右子树为空,向上找孩子是父亲左的那个祖先
            Node* cur = _node;
            Node* parent = cur->_parent;
            while(parent && cur == parent->_right) {
                cur = parent;
                parent = cur->_parent;
            }
            _node = parent;
        }
        return *this;
    }
operator--
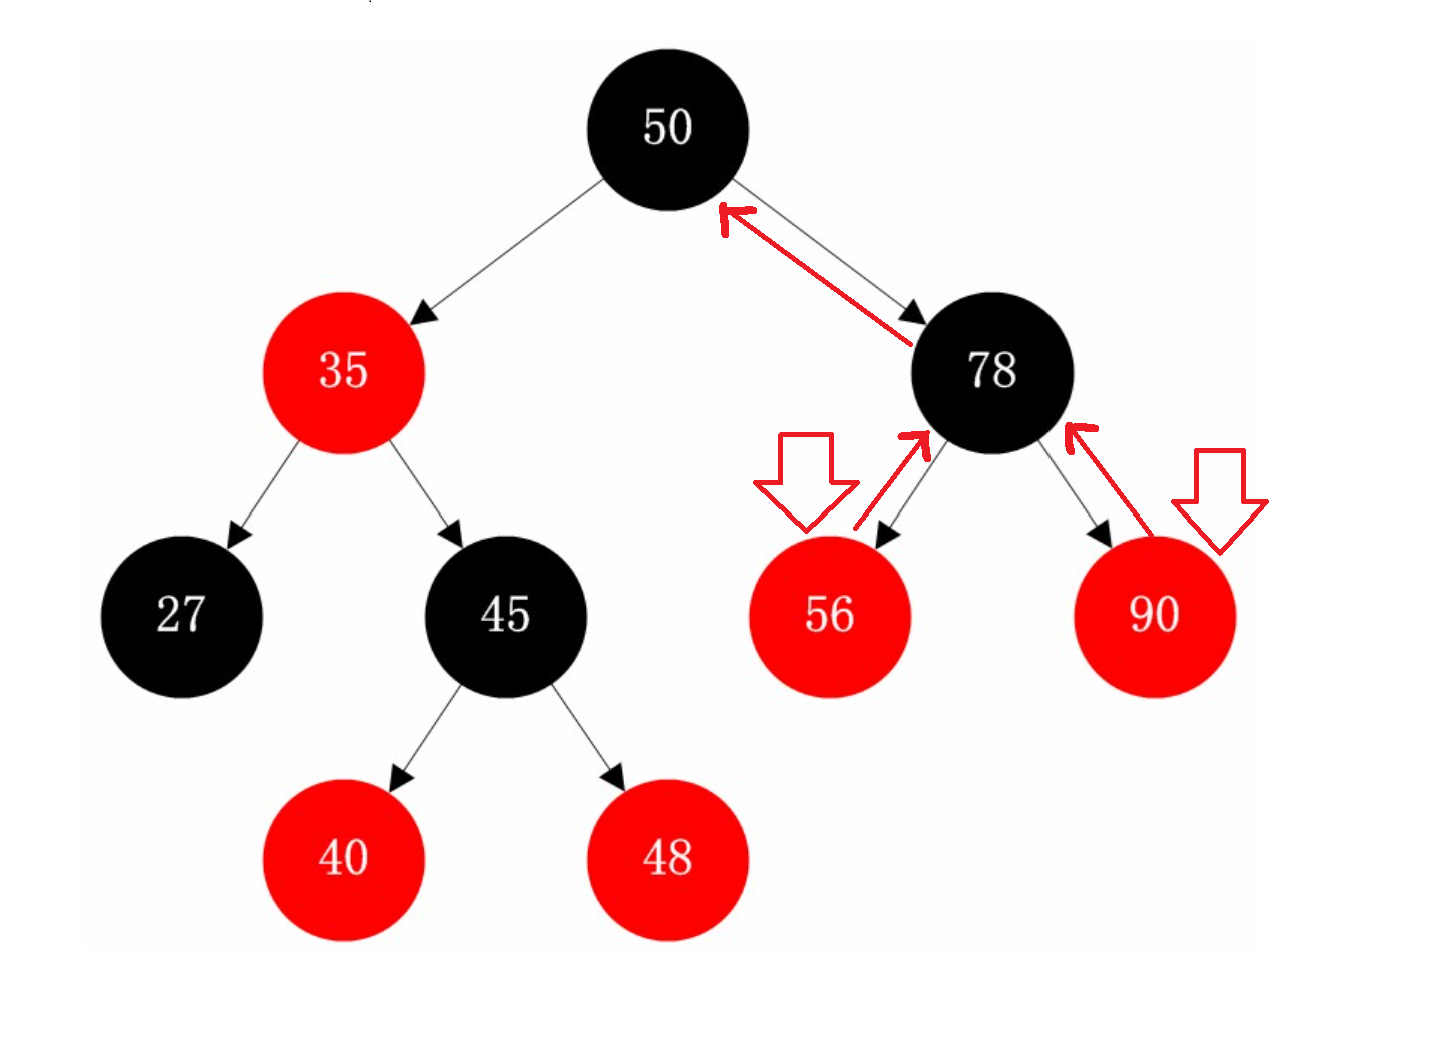
那么对于--就反过来了,我们对56和90--,用中序遍历反过来,则90的上一个是78,而56的上一个到了50
因此我们判断如果当前节点N的父节点的右孩子是N,那么上一个就是父节点
如果左孩子是N,那么还得继续往上判断,直到右孩子是N为止
cpp
Self& operator--() {
        if(_node == nullptr) {
            // --end(),指向最右节点
            Node* rightMost = _root;
            while(rightMost && rightMost->_right) {
                rightMost = rightMost->_right;
            }
            _node = rightMost;
        } else if(_node->_left) {
            // 左子树不为空,前一个节点是左子树的最右节点
            Node* rightMost = _node->_left;
            while(rightMost->_right) {
                rightMost = rightMost->_right;
            }
            _node = rightMost;
        } else {
            // 向上找孩子是父亲右的那个祖先
            Node* cur = _node;
            Node* parent = cur->_parent;
            while(parent && cur == parent->_left) {
                cur = parent;
                parent = cur->_parent;
            }
            _node = parent;
        }
        return *this;
    }
完整代码:
cpp
template<class T, class Ref, class Ptr>
struct RBTreeIterator {
    typedef RBTreeNode<T> Node;
    typedef RBTreeIterator<T, Ref, Ptr> Self;

    Node* _node;
    Node* _root;

    Self& operator++() {
        if(_node->_right) {
            // 右子树不为空,下一个节点是右子树的最左节点
            Node* leftMost = _node->_right;
            while(leftMost->_left) {
                leftMost = leftMost->_left;
            }
            _node = leftMost;
        } else {
            // 右子树为空,向上找孩子是父亲左的那个祖先
            Node* cur = _node;
            Node* parent = cur->_parent;
            while(parent && cur == parent->_right) {
                cur = parent;
                parent = cur->_parent;
            }
            _node = parent;
        }
        return *this;
    }

    Self& operator--() {
        if(_node == nullptr) {
            // --end(),指向最右节点
            Node* rightMost = _root;
            while(rightMost && rightMost->_right) {
                rightMost = rightMost->_right;
            }
            _node = rightMost;
        } else if(_node->_left) {
            // 左子树不为空,前一个节点是左子树的最右节点
            Node* rightMost = _node->_left;
            while(rightMost->_right) {
                rightMost = rightMost->_right;
            }
            _node = rightMost;
        } else {
            // 向上找孩子是父亲右的那个祖先
            Node* cur = _node;
            Node* parent = cur->_parent;
            while(parent && cur == parent->_left) {
                cur = parent;
                parent = cur->_parent;
            }
            _node = parent;
        }
        return *this;
    }

    Ref operator*() { return _node->_data; }
    Ptr operator->() { return &_node->_data; }

    bool operator!=(const Self& s) const { return _node != s._node; }
    bool operator==(const Self& s) const { return _node == s._node; }
};
总结
通过本文的详细讲解,我们可以得出以下重要结论:
核心技术要点
-
数据结构选择:map/set基于红黑树实现,保证了O(logN)的查找、插入、删除效率,同时维护元素有序性。
-
设计模式:STL采用泛型编程和策略模式,通过模板参数和仿函数实现高度可定制的容器行为。
-
迭代器设计:红黑树迭代器通过中序遍历提供有序访问,operator++/operator--的实现体现了树形结构遍历的核心算法。
-
接口设计:map的operator\[\]是多功能接口的典范,巧妙利用insert返回值实现查找、插入、修改的统一。
实用价值
-
性能优势:在需要有序性和快速查找的场景中,map/set相比序列式容器有显著优势。
-
代码简化:合理使用map/set可以大幅简化复杂算法,如环形链表检测、频率统计等问题。
-
学习价值:理解map/set的底层实现是掌握数据结构、算法设计、面向对象编程的绝佳途径。
扩展思考
现代C++发展出了unordered_map/unordered_set基于哈希表的实现,在不需要有序性但追求极致查找性能的场景下是更好的选择。理解不同容器的特性并根据具体需求选择合适的工具,是每个C++开发者应该具备的能力。我们下一篇将讲解这些。
通过自己实现map/set,我们不仅加深了对STL的理解,更重要的是培养了解决复杂问题的系统化思维能力和工程实现能力。这种从使用到底层实现的完整学习路径,是技术成长的关键路径。