今天给大家带来的是TCP代理的功能实现;
我们用Python构建过不少简单的TCP代理 ,比如接下来的这个,我们常常用它来分析未知的协议,篡改应用的网络流量,或者为fuzzer创建测试用例。
文章目录
-
- 介绍
- 第一版代码:
-
- hexdump()函数
- receive_from()函数
- [修改 *_handler()函数](#修改 *_handler()函数)
- proxy_handler()函数---(最重要)
- server_loop()函数
- main()函数
- 完整改进代码:
-
- 效果展示:
-
- [测试 A(HTTP 流量)](#测试 A(HTTP 流量))
- 总结
介绍
在工具箱里常备TCP代理的理由有很多:
- 你也许会用它在主机之间转发流量,又或者用它检测一些网络软件。
- 在企业环境里进行渗透测试时,你可能无法使用Wireshark,也无法在Windows上加载驱动嗅探本地回环流量;
- 而网段的阻隔让你无法直接在目标机器上使用手头的工具。
代理的代码主要分为四部分:
hexdump函数:把本地设备和远程设备之间的通信过程显示到屏幕上(hexdump函数);receive_from函数:从本地设备或远程设备的入口socket接收数据(receive_from函数);proxy_handler函数:控制远程设备和本地设备之间的流量方向(proxy_handler函数);server_loop函数:最后,还需要创建一个监听socket,并把它传给我们的proxy_handler(server_loop函数)
话不多说,直接让我们开始今天的代码编写;
第一版代码:
我们首先打开一个新文件,将其命名为proxy.py:
hexdump()函数
python
import sys
import threading
import socket

# 旧版本的
# Hex_filter = ''.join((len(repr(chr(3))) == 3) and chr(i) or '.' for i in range(256))

# 替换成新的python3
hex_filter = ''.join(chr(i) if 32 <= i <= 126 else '.' for i in range(256))

def hexdump(src, step=16, show=True):
    # 修正:bytes安全转换为可见字符串
    if isinstance(src, bytes):
        src = ''.join([chr(x) if 32 <= x <= 126 else '.' for x in src])

    result = []
    for i in range(0, len(src), step):
        word = src[i:i + step]
        hexa = ' '.join(f'{ord(c):02x}' for c in word)
        hexwidth = step * 3
        result.append(f'{i:04x} {hexa:<{hexwidth}} {word}')

    if show:
        for line in result:
            print(line)
    else:
        return result
我知道大家对这段代码有很多疑问,不影响,接下来为大家一一解释:
hex_filter作用:我们创建了一个hex_filtter 字符串- 在所有可打印字符的位置上,保持原有的字符不变;
- 在所有不可打印字符 的位置上,用一个句点
.替代
(如果大家看不懂这个多元表达式,那么这段代码呢?)
# 生成0-255的ASCII码序列
ascii_codes = range(256)

filter_chars = []

# 遍历每个ASCII码,添加对应字符(或'.')
for i in ascii_codes:
    if 32 <= i <= 126:
        char = chr(i)  # 可打印字符
    else:
        char = '.'     # 不可打印字符用'.'代替
    filter_chars.append(char)

# 拼接列表为字符串
hex_filter = ''.join(filter_chars)hexdump()函数:然后定义了一个hexdump函数,它能接收bytes 或string 类型的输入,并将其转换为十六进制格式输出到屏幕上;- 然后每step长度(16位),截取一段数据进行打印(可打印的就保留,否则以
.代替)
- 然后每step长度(16位),截取一段数据进行打印(可打印的就保留,否则以
hexa作用 :转换为十六进制字符串(每个字符用2位十六进制表示,用空格分隔),如字符'A'→'41'hexwidth作用: 确保对齐,step个字符对应step*3长度:每个十六进制2位+1个空格result.append()作用:拼接当前行(偏移量+十六进制+可打印字符)
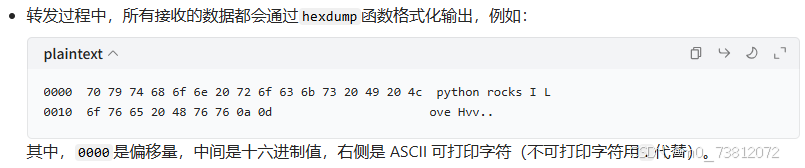
下面图片可以让大家直观的感受到hexdump函数相应的作用:

两者作用其实是等效的;(效果如图所示;)
举例:对于0到255之间的每个整数,如果其对应的字符表示长度等于3,我们就直接用这个字符
(chr(i));否则,就用一个句点(.)表示。

--
具体举例:
假如我们输入print(hexdump("python rocks I Love Hvv\n\r"))
--
receive_from()函数
接下来,我们编写从代理两端接收数据的函数:
python
def receive_from(connections):
    # connections表示已经创立的一个连接,例如client_socket或者server_socket
    buffer = b''

    connections.settimeout(5)

    try:
        while True:
            data = connections.recv(4096)
            if not data:
                break

            buffer += data

    except Exception as e:
        print(f"接受数据失败:{e}")
        pass

    return buffer
代码解释:
connections:表示已经创立的一个连接,例如client_socket或者server_socket- 随后的步骤就是接收数据,并保存到buffer缓冲区中;
作用 :
(1)要想接收本地或远程数据,必须先传入一个socket对象 。创建一个空的bytes变量buffer,用来存储socket对象返回的数据。我们设定的超时时间默认为5秒;
(2)然后创建一个循环 ,不断把返回的数据写进buffer,直到数据读完或者连接超时为止。
(3)最后,把buffer返回给调用方,这个调用方可能是本地设备localhost ,也可能是远程设备remote。
修改 *_handler()函数
有时,你可能想在代理转发数据包之前,修改一下回复的数据包或请求的数据包。我们添加一对函数(request_handler和response_handler)来处理这种情况:
python
def request_handler(buffer):
    return buffer

def respond_handler(buffer):
return buffer作用:在这些函数里,可以修改数据包内容,进行模糊测试,挖权限校验漏洞,做你想做的任何事。
--
proxy_handler()函数---(最重要)
现在,我们插入如下代码,潜入proxy_handler函数:这个函数实现了整个代理的大部分逻辑
python
def proxy_handler(client_socket, remote_host, remote_port, receive_first):
    # 建立连接
    remote_socket = socket.socket(socket.AF_INET, socket.SOCK_STREAM)
    remote_socket.connect((remote_host, remote_port))

    if receive_first:
        # 进入主循环的时候,要确定服务端是否会发送"打招呼"消息
        remote_buffer = receive_from(remote_socket)
        hexdump(remote_buffer)

        remote_buffer = respond_handler(remote_buffer)
        if len(remote_buffer):
            print(f"[==>] received %d bytes data from remote" % len(remote_buffer))
            client_socket.send(remote_buffer)

    while True:
        local_buffer = receive_from(client_socket)
        if len(local_buffer):
            print(f"[==>] received %d bytes data from local." % len(local_buffer))
            hexdump(local_buffer)

            local_buffer = request_handler(local_buffer)
            remote_socket.send(local_buffer)
            print(f"[==>] send to remote.")

        # 修正:每次循环重新接收服务端数据
        remote_buffer = receive_from(remote_socket)
        if len(remote_buffer):
            print(f"[==>] received %d bytes data from remote." % len(remote_buffer))
            hexdump(remote_buffer)

            remote_buffer = respond_handler(remote_buffer)
            client_socket.send(remote_buffer)
            print(f"[==>] send to local.")

        if not len(remote_buffer) and not len(local_buffer):
            client_socket.close()
            remote_socket.close()
            print(f"[*] No more data. Closing connections.")
            break
核心代码解释:
if len(local_buffer)和if len(remote_buffer):- 双向转发循环:
- 从客户端接收数据(receive_from(client_socket))→ 经request_handler处理 → 转发到远程服务器(remote_socket.send());
- 从远程服务器接收数据(receive_from(remote_socket))→ 经response_handler处理 → 转发到客户端(client_socket.send());
- 当两端均无数据时,关闭套接字,结束本次连接。
具体实现过程:
(1)首先,连接远程主机。接着,进入主循环之前,先确认一下是否需要先从服务器那边接收一段数据。有的服务器会要求你做这样的操作(比如 FTP 服务器 ,会先发给你一条欢迎消息,你收到后才能发送数据给它)。
(2)之后对通信两端分别调用 receive_from 函数,它会从已连接的 socket 对象 中收取数据。
(3)我们把收到的数据都输出到屏幕上,检查里面有没有什么有趣的东西。然后,把数据交给 response_handler 函数,等它处理数据后再转发给本地客户端。
(4)剩下的代理代码就很简单了:开启一个循环,不断地从本地客户端读取数据,处理数据,转发给远程服务器,从远程服务器读取数据,处理数据,转发给本地客户端,直到再也读不到任何数据为止;
server_loop()函数
我们再来编写server_loop函数,用来创建和管理连接:
python
def server_loop(local_host, local_port, remote_host, remote_port, receive_first):
    server_socket = socket.socket(socket.AF_INET, socket.SOCK_STREAM)

    try:
        server_socket.bind((local_host, local_port))
    except Exception as e:
        print(f"problem on bind: {e!r}")
        print(f"[!!] Failed to listen on {local_host}:{local_port}")
        print(f"Check for other listening sockets or correct permissions.")
        sys.exit()

    print(f"Listening on {local_host}:{local_port}")
    server_socket.listen(5)

    while True:
        client_socket, address = server_socket.accept()
        print(f"Received incoming connection from {address[0]}:{address[1]}")

        proxy_thread = threading.Thread(
            target=proxy_handler,
            args=(client_socket, remote_host, remote_port, receive_first)
        )
proxy_thread.start()这段代码的作用相当于TCP服务端的作用 ,具体可以看这篇文章;
代码解释:
server_loop函数创建了一个socket,将它绑定到本地主机并开始监听。- 在主循环里,每出现一个新连接,我们就新开一个线程,将新连接交给
proxy_handler函数,由它来给数据流的两端收发数据;
main()函数
最后就只剩main函数了:
python
def main():
    if len(sys.argv[1:]) != 5:
        print("Usage: ./proxy.py [localhost] [localport]", end='')
        print("[remotehost] [remoteport] [receive_first]")
        print("Example: ./proxy.py 127.0.0.1 9000 10.12.132.1 9000 True")
        sys.exit(0)
    local_host = sys.argv[1]
    local_port = int(sys.argv[2])

    remote_host = sys.argv[3]
    remote_port = int(sys.argv[4])

    receive_first = sys.argv[5]

    if "True" in receive_first:
        receive_first = True
    else:
        receive_first = False

    server_loop(local_host, local_port,
                remote_host, remote_port, receive_first)

if __name__ == '__main__':
    main()
代码功能解释:
-
main函数是程序的 "启动器",主要做三件事:
- 参数校验:检查命令行参数数量是否为 5 个,若不符合则打印使用说明并退出。
- 参数解析:将命令行传入的参数转换为代理运行所需的配置(本地 / 远程地址、端口、是否先从远程收数据)。
- 启动代理服务:调用server_loop函数,正式启动代理的监听和数据转发逻辑。
-
参数与函数调用关系:命令行需传入5 个参数,对应代理的核心配置:
| 参数位置 | 含义 | 代码中变量 | 后续调用的作用 |
|---|---|---|---|
sys.argv[1] |
代理本地监听的IP地址 | local_host |
传给server_loop,用于绑定本地端口,接受客户端连接。 |
sys.argv[2] |
代理本地监听的端口 | local_port |
同上,指定本地监听的端口号(需转换为整数)。 |
sys.argv[3] |
远程服务器的IP地址 | remote_host |
传给server_loop,后续由proxy_handle连接该地址,实现数据转发。 |
sys.argv[4] |
远程服务器的端口 | remote_port |
同上,指定远程服务器的端口号(需转换为整数)。 |
sys.argv[5] |
是否先从远程服务器接收数据 | receive_first |
传给server_loop,由proxy_handle判断是否在转发前先收取远程的"初始化数据"(如FTP欢迎消息)。 |
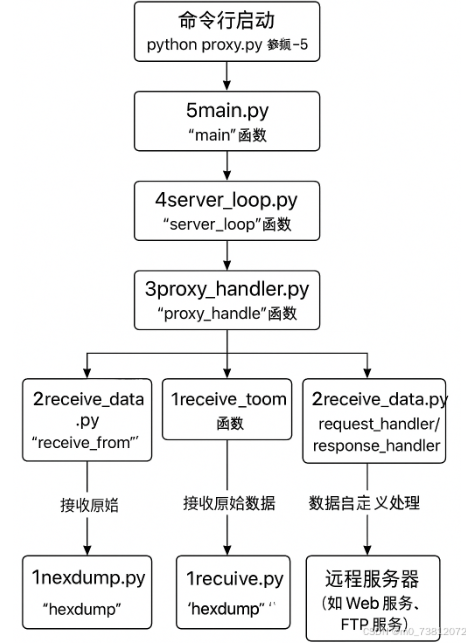
流程图如下:
--
完整改进代码:
好了,接下来我直接给出完整的代码:
python
import sys
import threading
import socket

hex_filter = ''.join([chr(i) if 32 <= i <= 126 else '.' for i in range(256)])

def hexdump(src, step=16, show=True):
    # 修正:bytes安全转换为可见字符串
    if isinstance(src, bytes):
        src = ''.join([chr(x) if 32 <= x <= 126 else '.' for x in src])

    result = []
    for i in range(0, len(src), step):
        word = src[i:i + step]
        hexa = ' '.join(f'{ord(c):02x}' for c in word)
        hexwidth = step * 3
        result.append(f'{i:04x} {hexa:<{hexwidth}} {word}')

    if show:
        for line in result:
            print(line)
    else:
        return result


def receive_from(connection):  # 修正:参数名 connections → connection
    buffer = b''
    connection.settimeout(5)

    try:
        while True:
            data = connection.recv(4096)
            if not data:
                break
            buffer += data
    except Exception as e:
        print(f"接受数据失败: {e}")
        pass

    return buffer


def request_handler(buffer):
    return buffer


def respond_handler(buffer):
    return buffer


def proxy_handler(client_socket, remote_host, remote_port, receive_first):
    # 修正:变量名 remotet_socket → remote_socket
    remote_socket = socket.socket(socket.AF_INET, socket.SOCK_STREAM)
    remote_socket.connect((remote_host, remote_port))

    if receive_first:
        # 修正:错误传参 receive_first → remote_socket
        remote_buffer = receive_from(remote_socket)
        hexdump(remote_buffer)

        remote_buffer = respond_handler(remote_buffer)
        if len(remote_buffer):
            print(f"[==>] received %d bytes data from remote" % len(remote_buffer))
            client_socket.send(remote_buffer)

    while True:
        local_buffer = receive_from(client_socket)
        if len(local_buffer):
            print(f"[==>] received %d bytes data from local." % len(local_buffer))
            hexdump(local_buffer)

            local_buffer = request_handler(local_buffer)
            remote_socket.send(local_buffer)
            print(f"[==>] send to remote.")

        # 修正:每次循环重新接收服务端数据
        remote_buffer = receive_from(remote_socket)
        if len(remote_buffer):
            print(f"[==>] received %d bytes data from remote." % len(remote_buffer))
            hexdump(remote_buffer)

            remote_buffer = respond_handler(remote_buffer)
            client_socket.send(remote_buffer)
            print(f"[==>] send to local.")

        if not len(remote_buffer) and not len(local_buffer):
            client_socket.close()
            remote_socket.close()
            print(f"[*] No more data. Closing connections.")
            break


# 修正:函数参数补上 receive_first
def server_loop(local_host, local_port, remote_host, remote_port, receive_first):
    server_socket = socket.socket(socket.AF_INET, socket.SOCK_STREAM)

    try:
        server_socket.bind((local_host, local_port))
    except Exception as e:
        print(f"problem on bind: {e!r}")
        print(f"[!!] Failed to listen on {local_host}:{local_port}")
        print(f"Check for other listening sockets or correct permissions.")
        sys.exit()

    print(f"Listening on {local_host}:{local_port}")
    server_socket.listen(5)

    while True:
        client_socket, address = server_socket.accept()
        print(f"Received incoming connection from {address[0]}:{address[1]}")

        proxy_thread = threading.Thread(
            target=proxy_handler,
            args=(client_socket, remote_host, remote_port, receive_first)
        )
        proxy_thread.start()


def main():
    if len(sys.argv[1:]) != 5:
        print("Usage: ./proxy.py [localhost] [localport]", end='')
        print(" [remotehost] [remoteport] [receive_first]")
        print("Example: ./proxy.py 127.0.0.1 9000 10.12.132.1 9000 True")
        sys.exit(0)

    local_host = sys.argv[1]
    local_port = int(sys.argv[2])
    remote_host = sys.argv[3]
    remote_port = int(sys.argv[4])
    receive_first = sys.argv[5]

    if "True" in receive_first:
        receive_first = True
    else:
        receive_first = False

    # 修正:传递完整参数
    server_loop(local_host, local_port, remote_host, remote_port, receive_first)


if __name__ == '__main__':
    main()
效果展示:
测试 A(HTTP 流量)
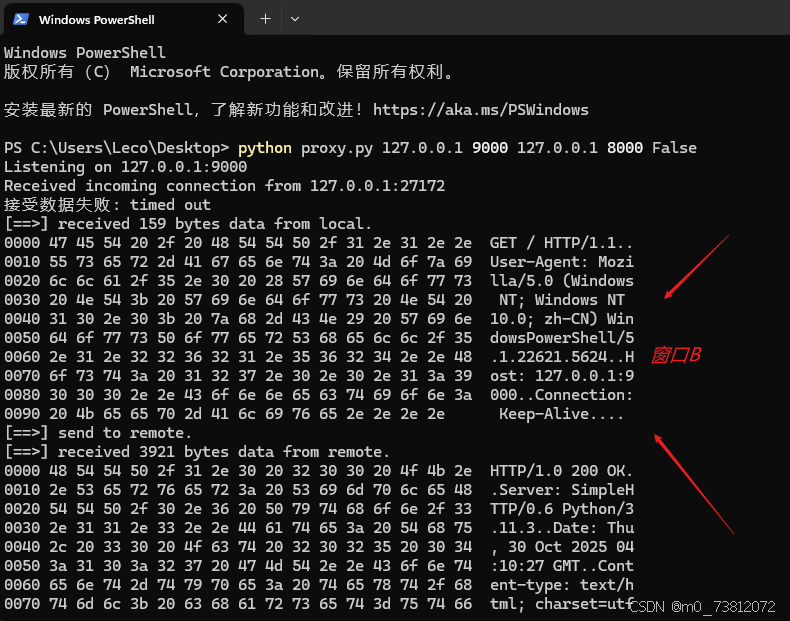
(1)打开三个powershell窗口(切换到proxy文件的目录):
- 窗口 A:运行远端服务(remote)。
- 窗口 B:运行代理(proxy.py)。
- 窗口 C:作为客户端做测试(curl / PowerShell tcp)。
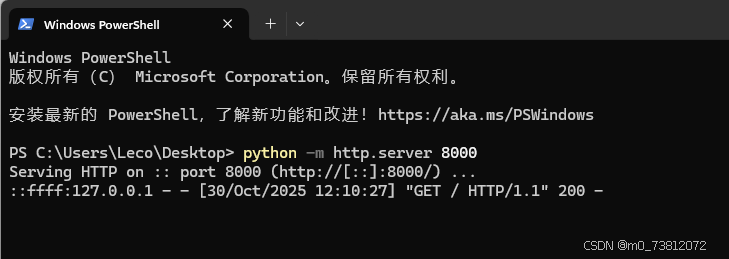
(2)在 窗口 A(远端) 启动 HTTP 服务(被代理端)
python -m http.server 8000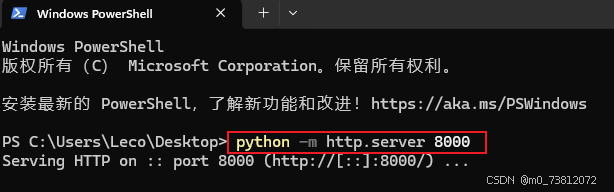
(3)在 窗口 B(代理) 启动代理(监听本地9000 -> 远端127.0.0.1:8000)
python proxy.py 127.0.0.1 9000 127.0.0.1 8000 False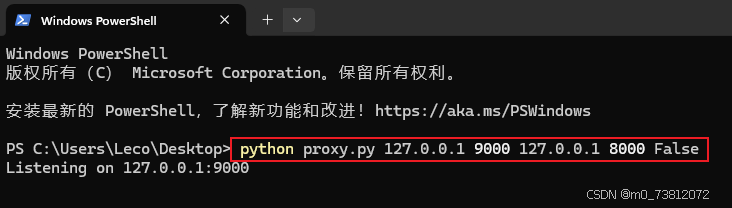
(4)在 窗口 C(客户端) 用 curl 或浏览器访问代理
curl http://127.0.0.1:9000/
而后窗口B也有了反应:
窗口A也同理:
总结
可以看到这次的代码量很大,但**总体框架60%**左右还是与TCP服务端有关,所以希望大家好好啃透这几个代码,不要急于求成;
而是达到你能够自己编写出来,而不参照任何资料,这样你就掌握了80%的能力要求,而这也将会对你的面试有很大的作用!