写在前面
agent 这个话题其实是近年来最火的话题之一,这篇文章就来讲讲如何用go语言通过 mcp+llm+rag 做一个agent demo。
代码都在github上 https://github.com/CocaineCong/llm-mcp-rag ,过段时间B站会出coding视频,感兴趣的同学可以关注同名的B站账号~
整体架构
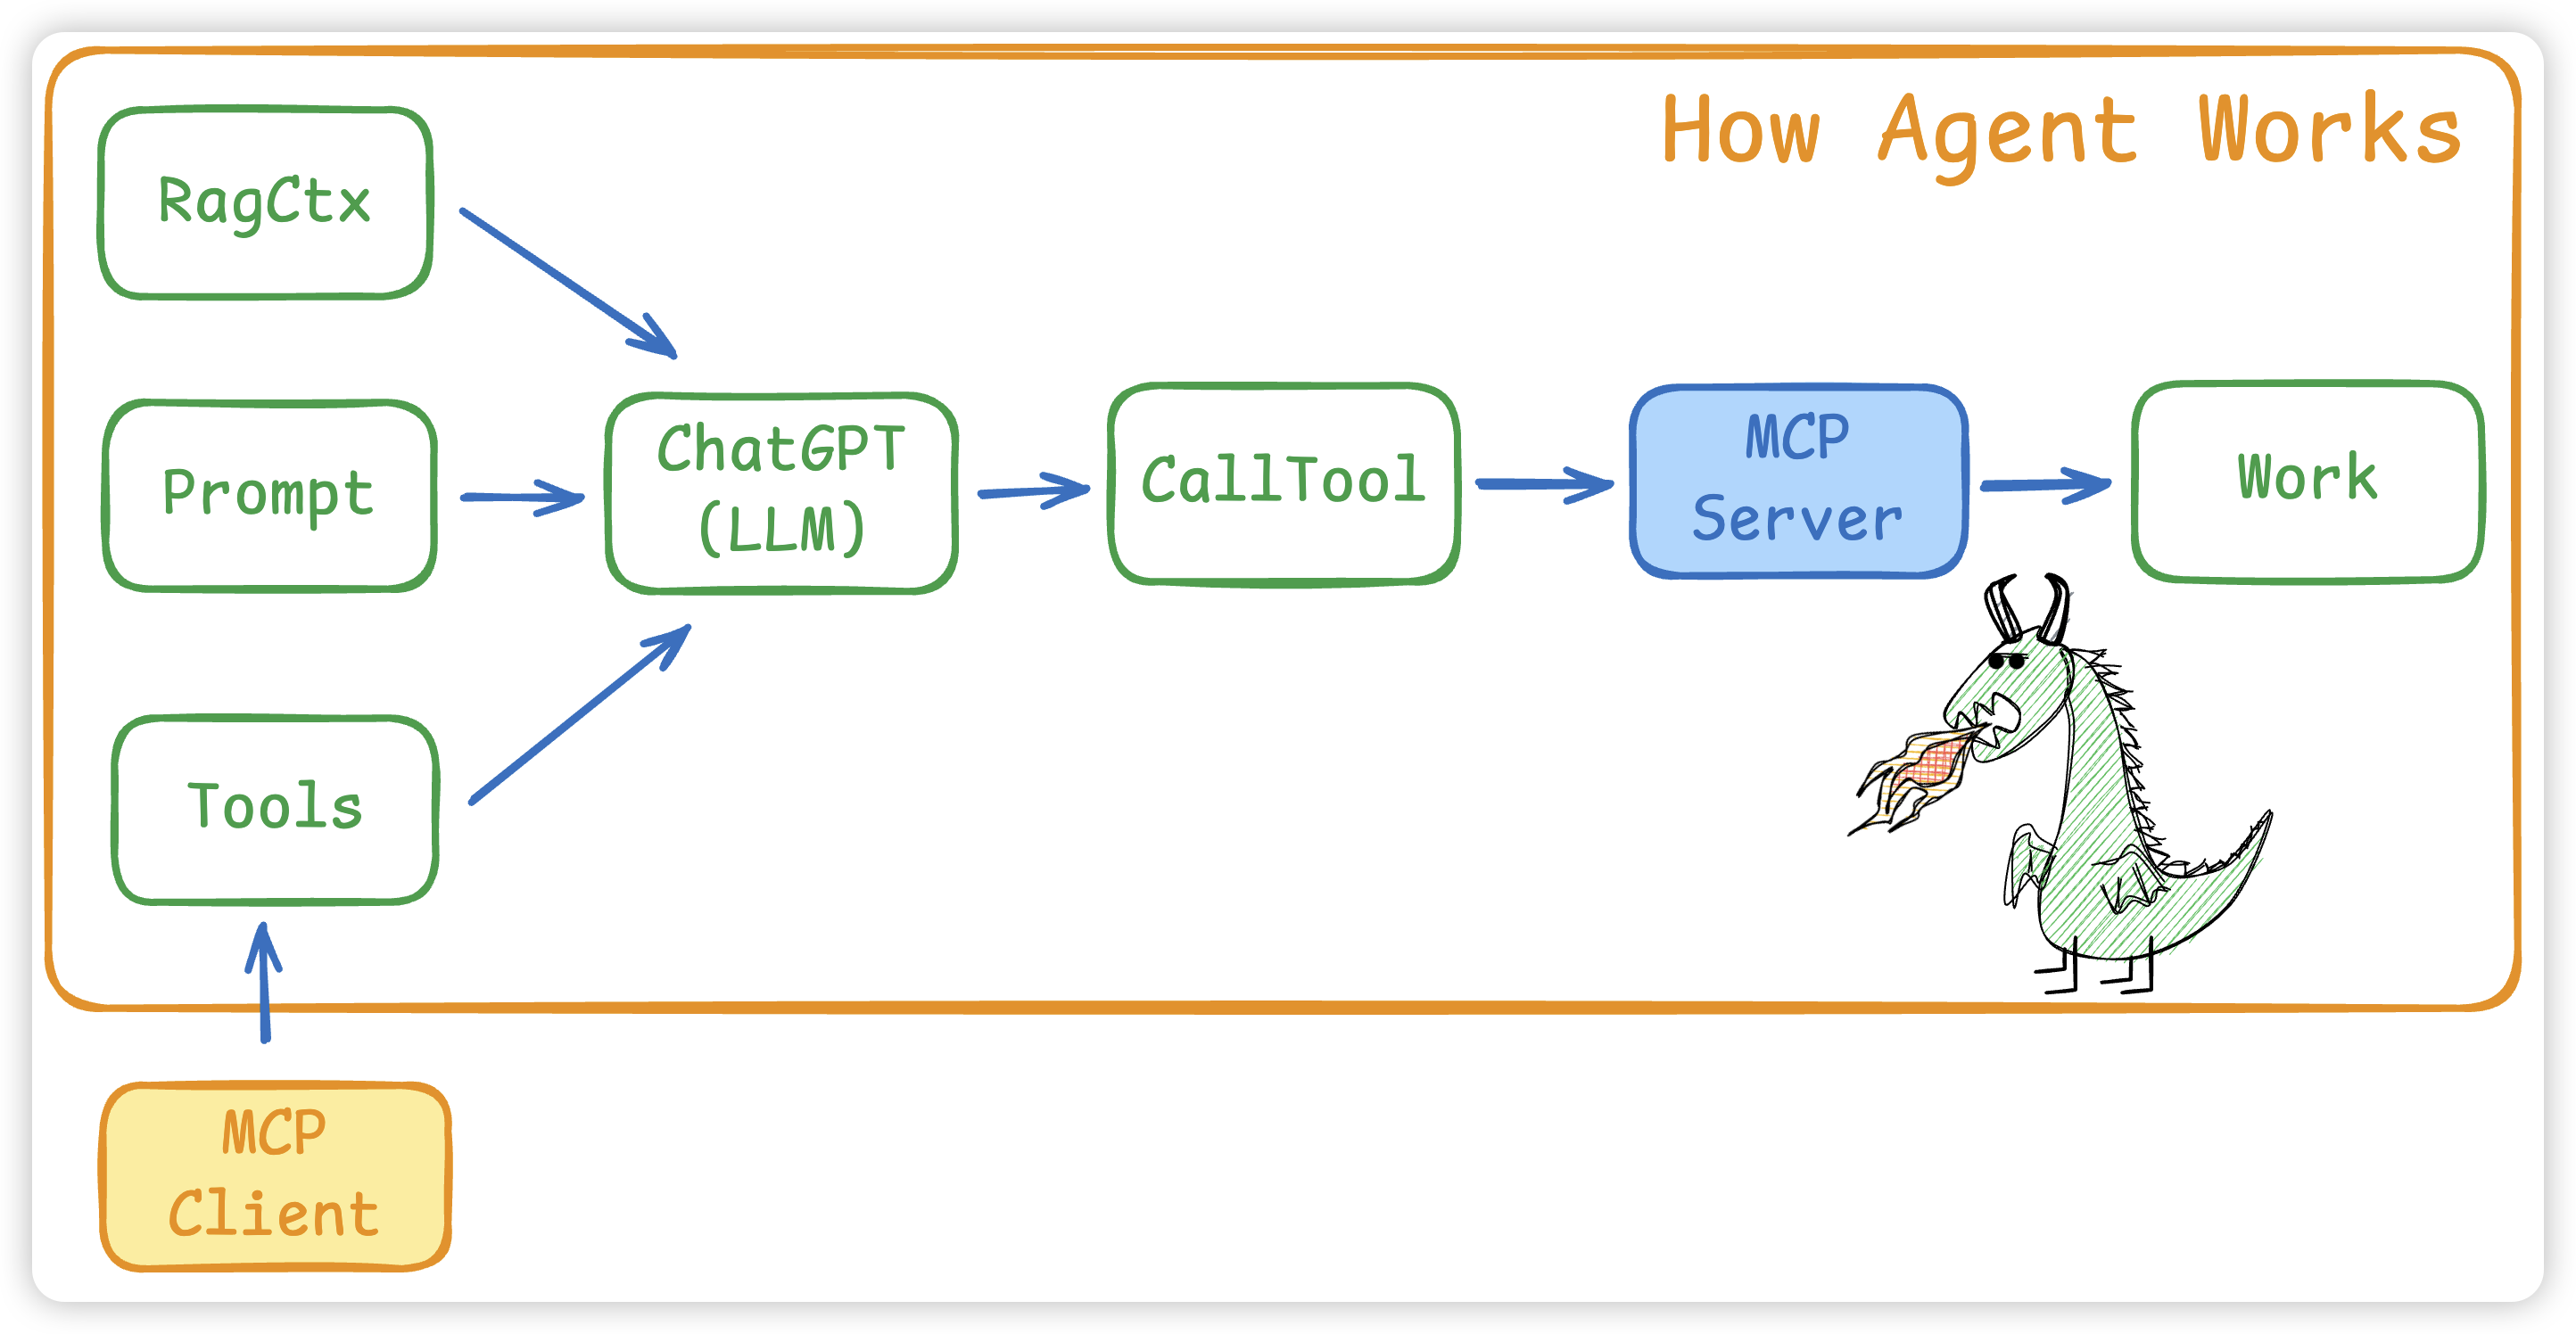
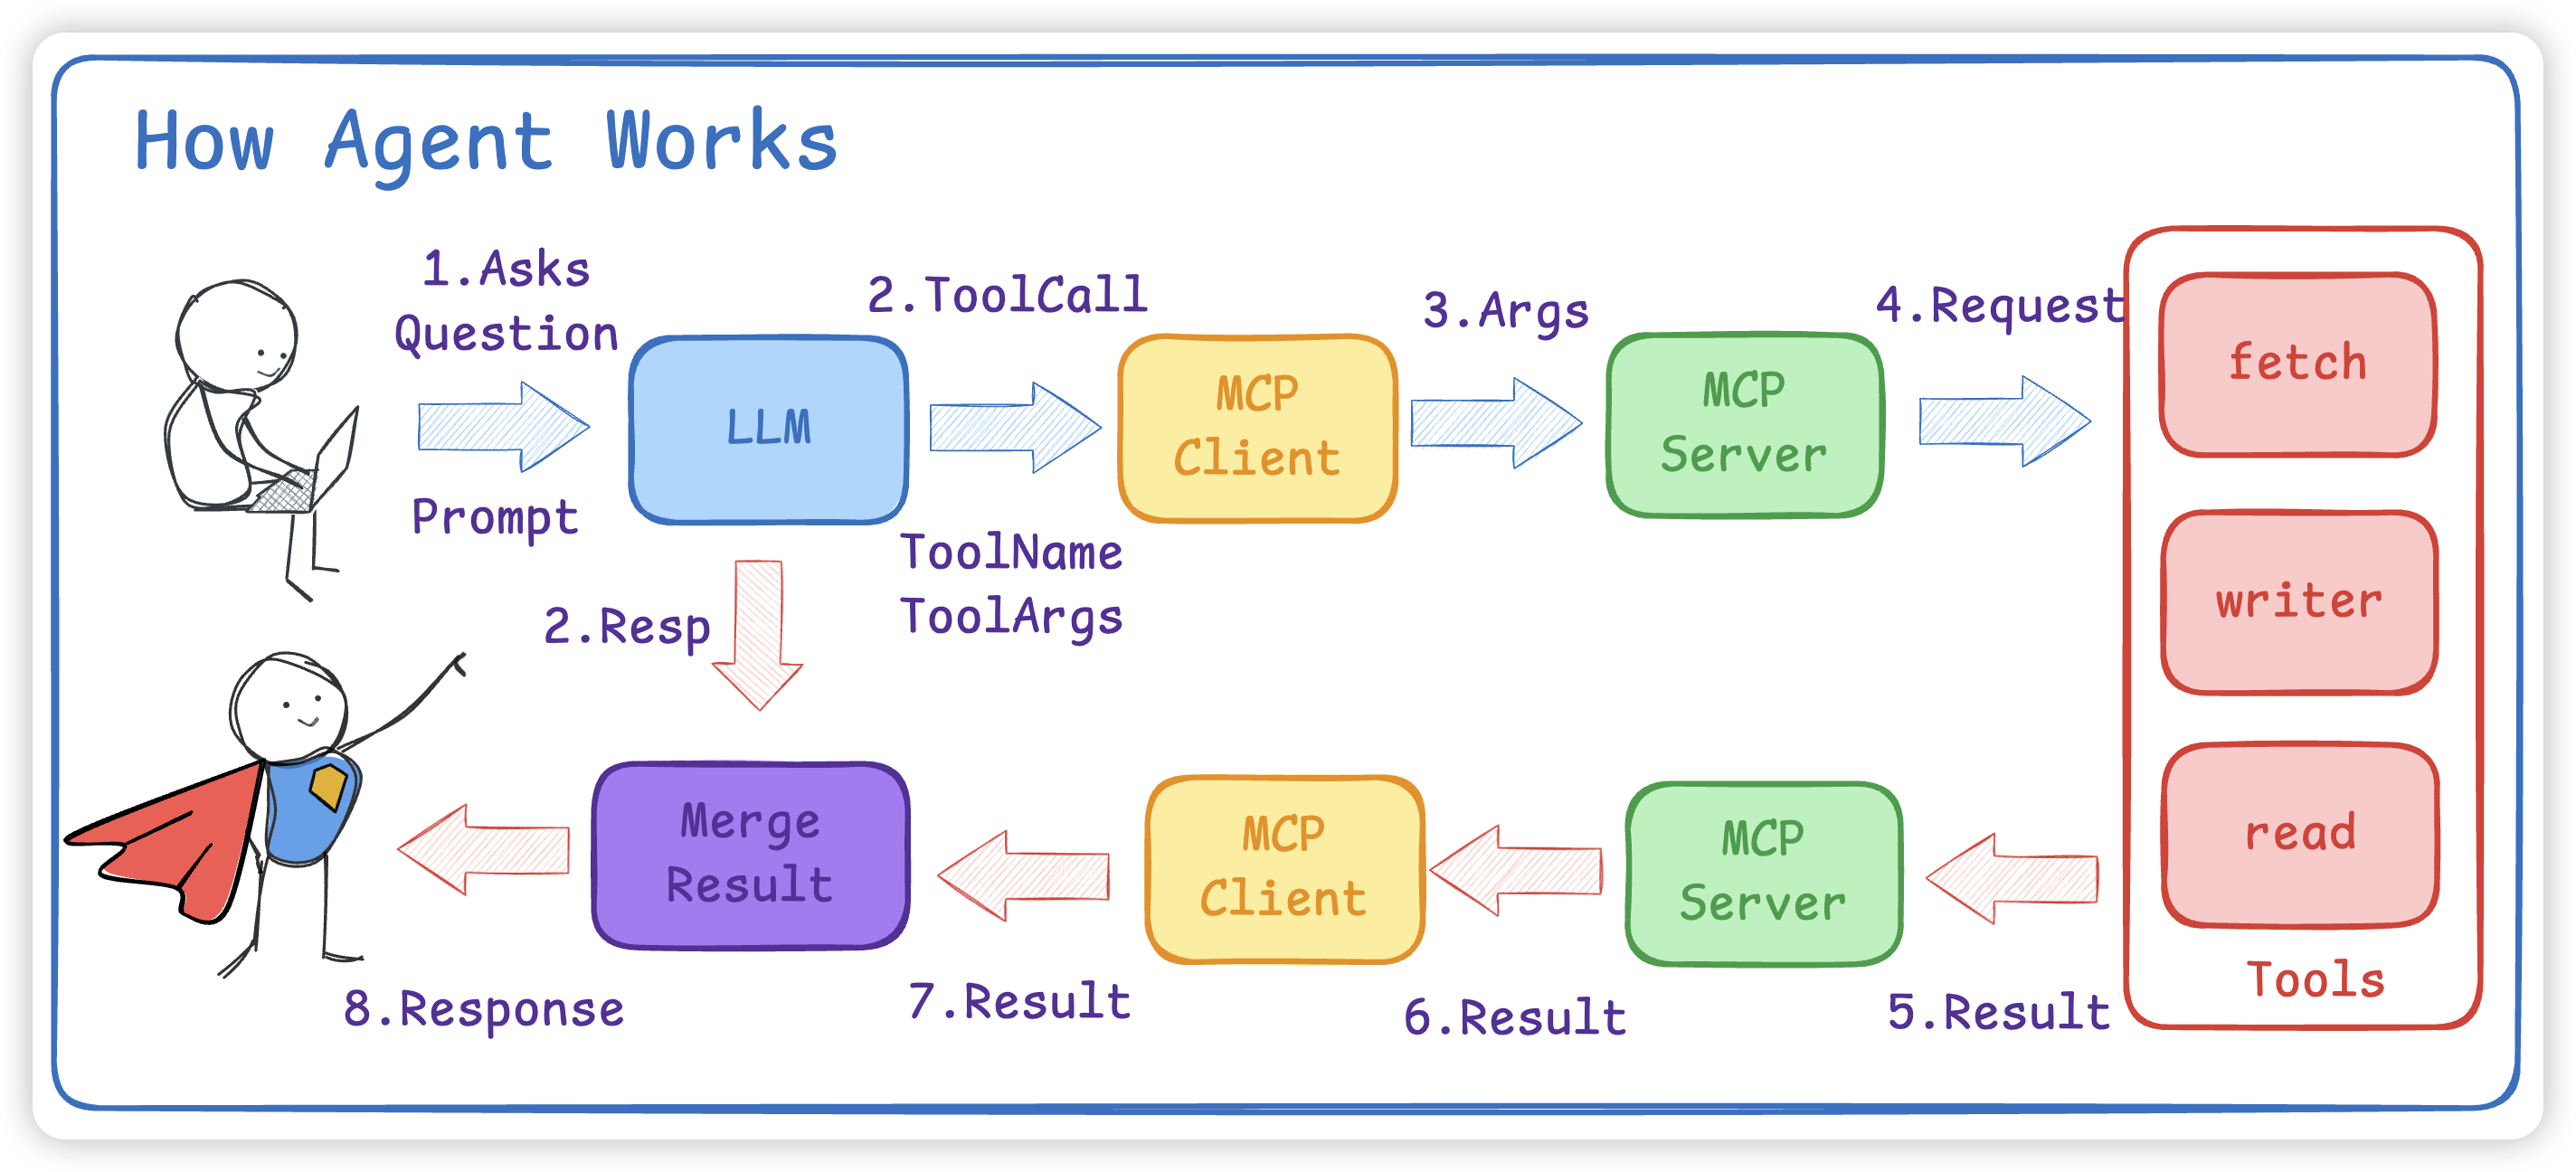
- 将
Prompt和MCP Client 的所有 Tools以及RAG内容给到 LLM - LLM会根据
Prompt + Tools给出使用步骤以及 tools 名字和对应的参数 - 如果有多个MCP Client,要先找到对应的 Tool 是哪个MCP Client
- 接着 MCP Client 会调用 Call Tool 使用工具
- 真正执行是在 MCP Server 中,大模型不会调用,而是需要我们写代码进行 ToolCall
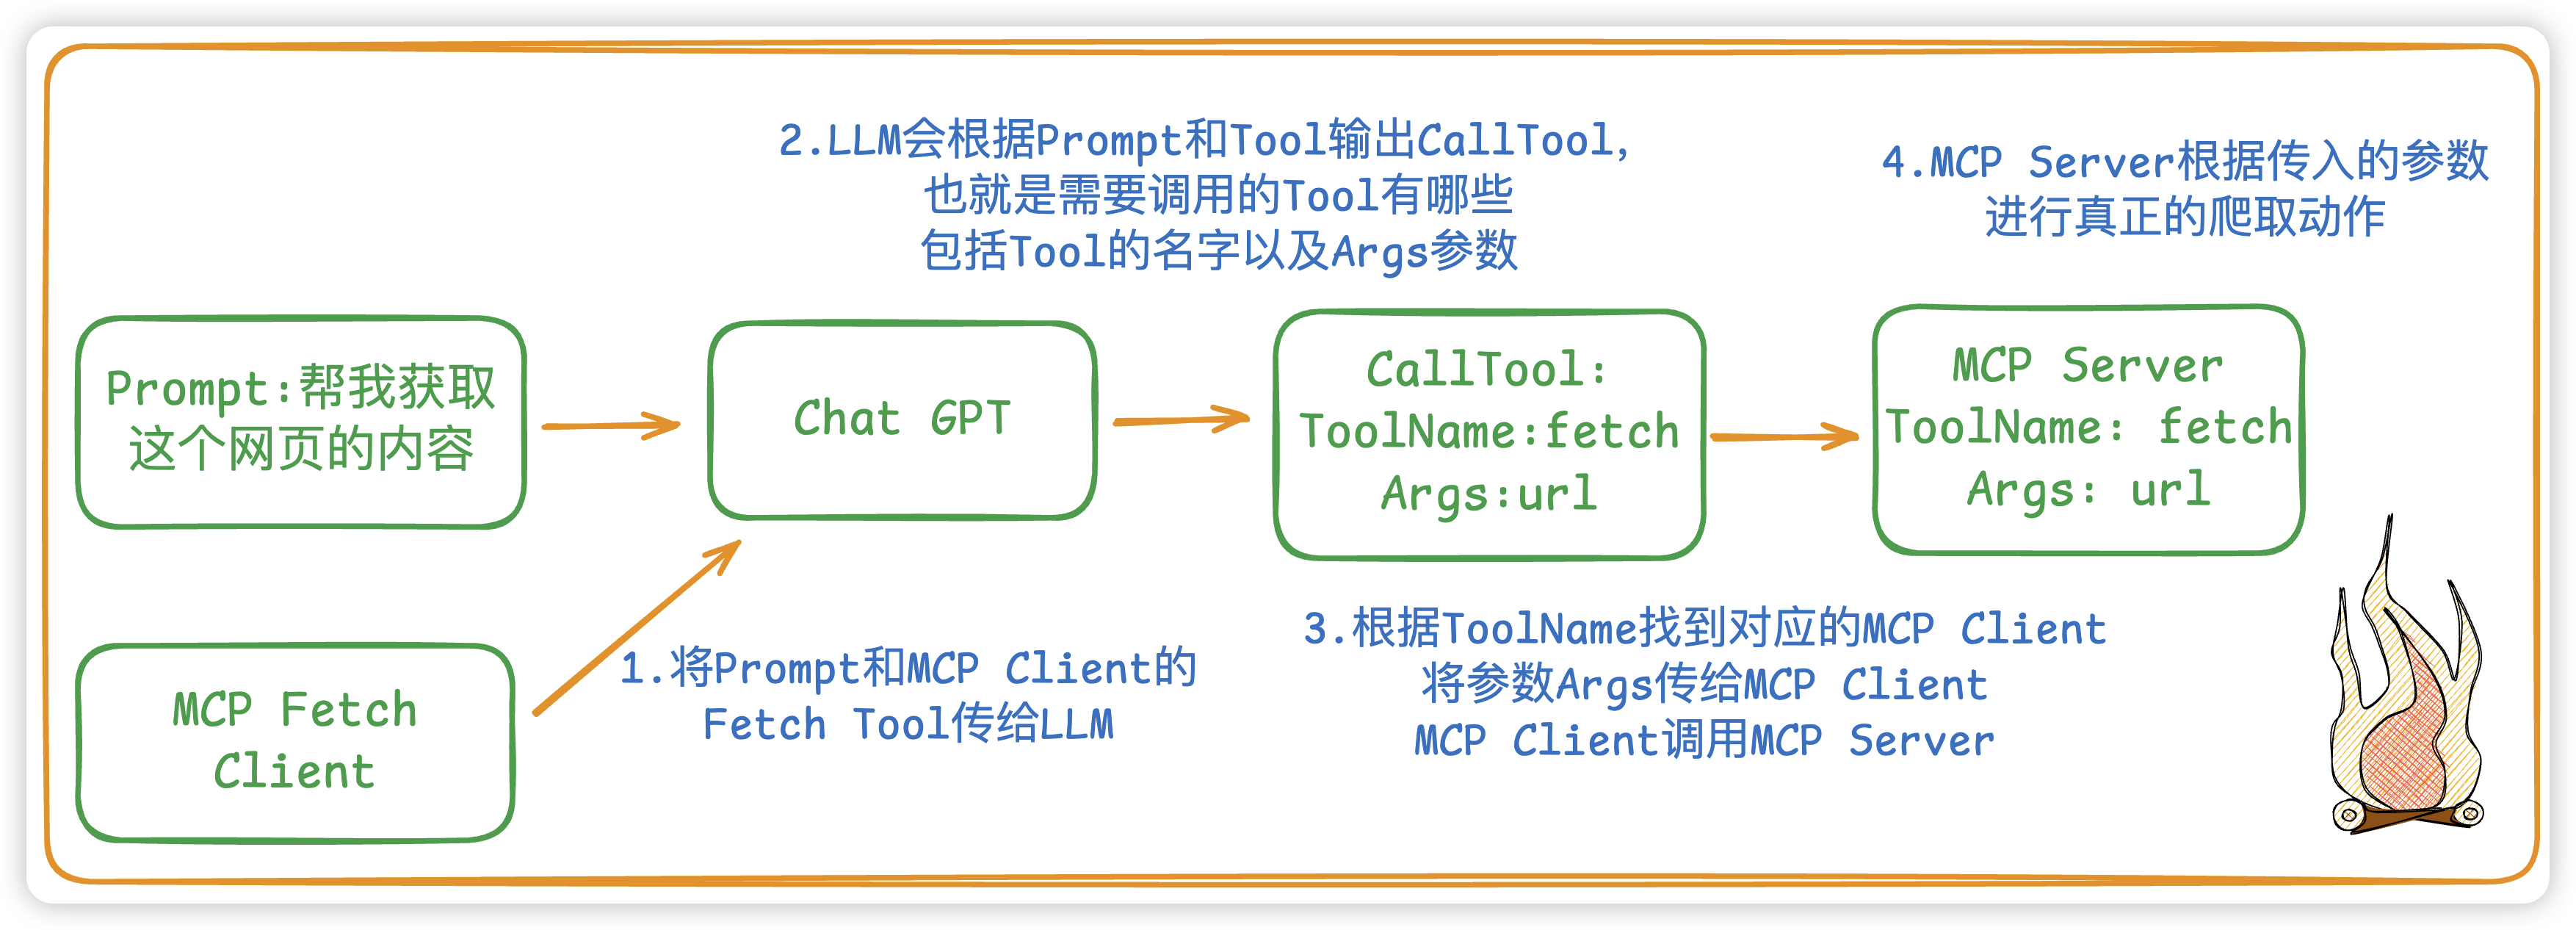
举个例子:如果是想爬取一个网页的内容
LLM
新建一个LLM,我们就选用 OpenAI 的 ChatGPT 了
- NewChatOpenAI:New一个LLM对象,必须要传一个model name
go
type ChatOpenAI struct {
	Ctx     context.Context
	Model   string                                   // 模型名称
	Tools   []mcp.Tool                               // 所需要的工具
	Message []openai.ChatCompletionMessageParamUnion // LLM的上下文信息(会话历史)
	LLM     openai.Client                            // 具体的客户端
}

func NewChatOpenAI(ctx context.Context, model string) *ChatOpenAI {
	options := []option.RequestOption{
		option.WithAPIKey(os.Getenv(ChatGPTOpenAPIKEY)),
		option.WithBaseURL(os.Getenv(ChatGPTBaseURL)),
	}
	cli := openai.NewClient(options...)
	llm := &ChatOpenAI{
		Ctx:     ctx,
		Model:   model,
		LLM:     cli,
		Message: make([]openai.ChatCompletionMessageParamUnion, 0),
	}
	return llm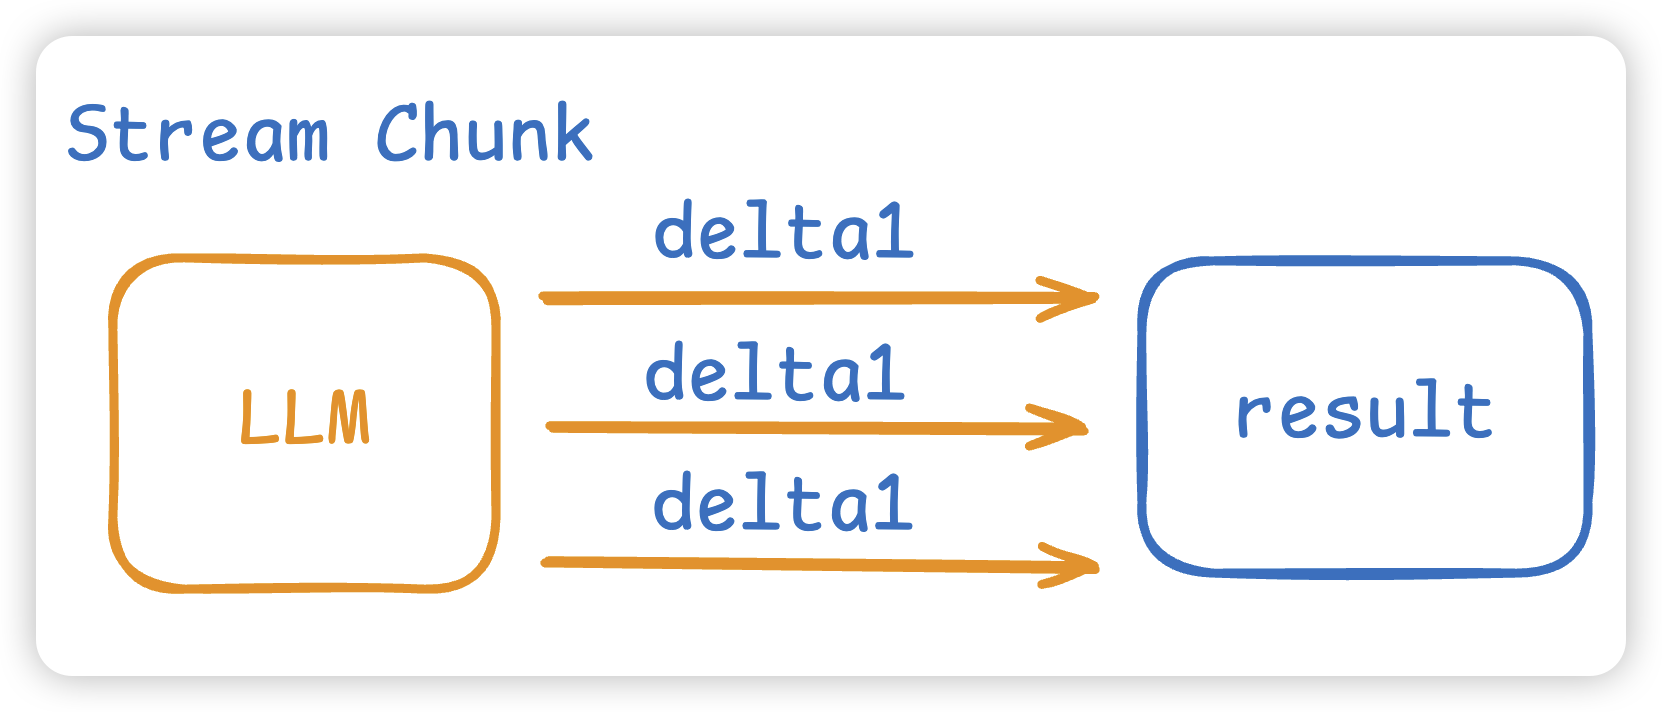
}- Chat:实现具体和LLM进行Chat,而
这里我们 Stream 流式进行模型的通信。而这个Chat函数的返回值有两个,一个是模型的结果,另一个是模型让我们调用的工具。
go
func (c *ChatOpenAI) Chat(prompt string) (result string, toolCall []openai.ToolCallUnion) {
	// 将prompt保存到message中,作为模型的上下文通信的消息,相当于本次session的缓存动作
	if prompt != "" {
		c.Message = append(c.Message, openai.UserMessage(prompt))
	}
	// 将MCP Tool转为OpenAI所理解的Tool的格式
	toolsParam := MCPTool2OpenAITool(c.Tools)
	stream := c.LLM.Chat.Completions.NewStreaming(c.Ctx, openai.ChatCompletionNewParams{
		Messages: c.Message,
		Seed:     openai.Int(0),
		Model:    c.Model,
		Tools:    toolsParam,
	})
	// 流式结果的累加器,用来将每个分片chunk拼接成完整的消息
	acc := openai.ChatCompletionAccumulator{}
	var toolCalls []openai.ToolCallUnion // LLM 返回的Tool的结果
	for stream.Next() {
		chunk := stream.Current() // 当前的stream流的chunk分片
		acc.AddChunk(chunk)       // 解析每一个chunk,将chunk进行结构化
		// 模型完整生成的一个工具调用
		if tool, ok := acc.JustFinishedToolCall(); ok {
			toolCalls = append(toolCalls, openai.ToolCallUnion{
				ID: tool.ID,
				Function: openai.FunctionToolCallFunction{
					Name:      tool.Name,
					Arguments: tool.Arguments,
				},
			})
		}
		// 模型所吐出的结果,一点一点进行拼接结果
		if len(chunk.Choices) > 0 {
			result += chunk.Choices[0].Delta.Content
		}
	}
	if len(acc.Choices) > 0 { // 将本次模型的最终回复写入会话历史
		c.Message = append(c.Message, acc.Choices[0].Message.ToParam())
	}
	return result, toolCalls
}
MCP
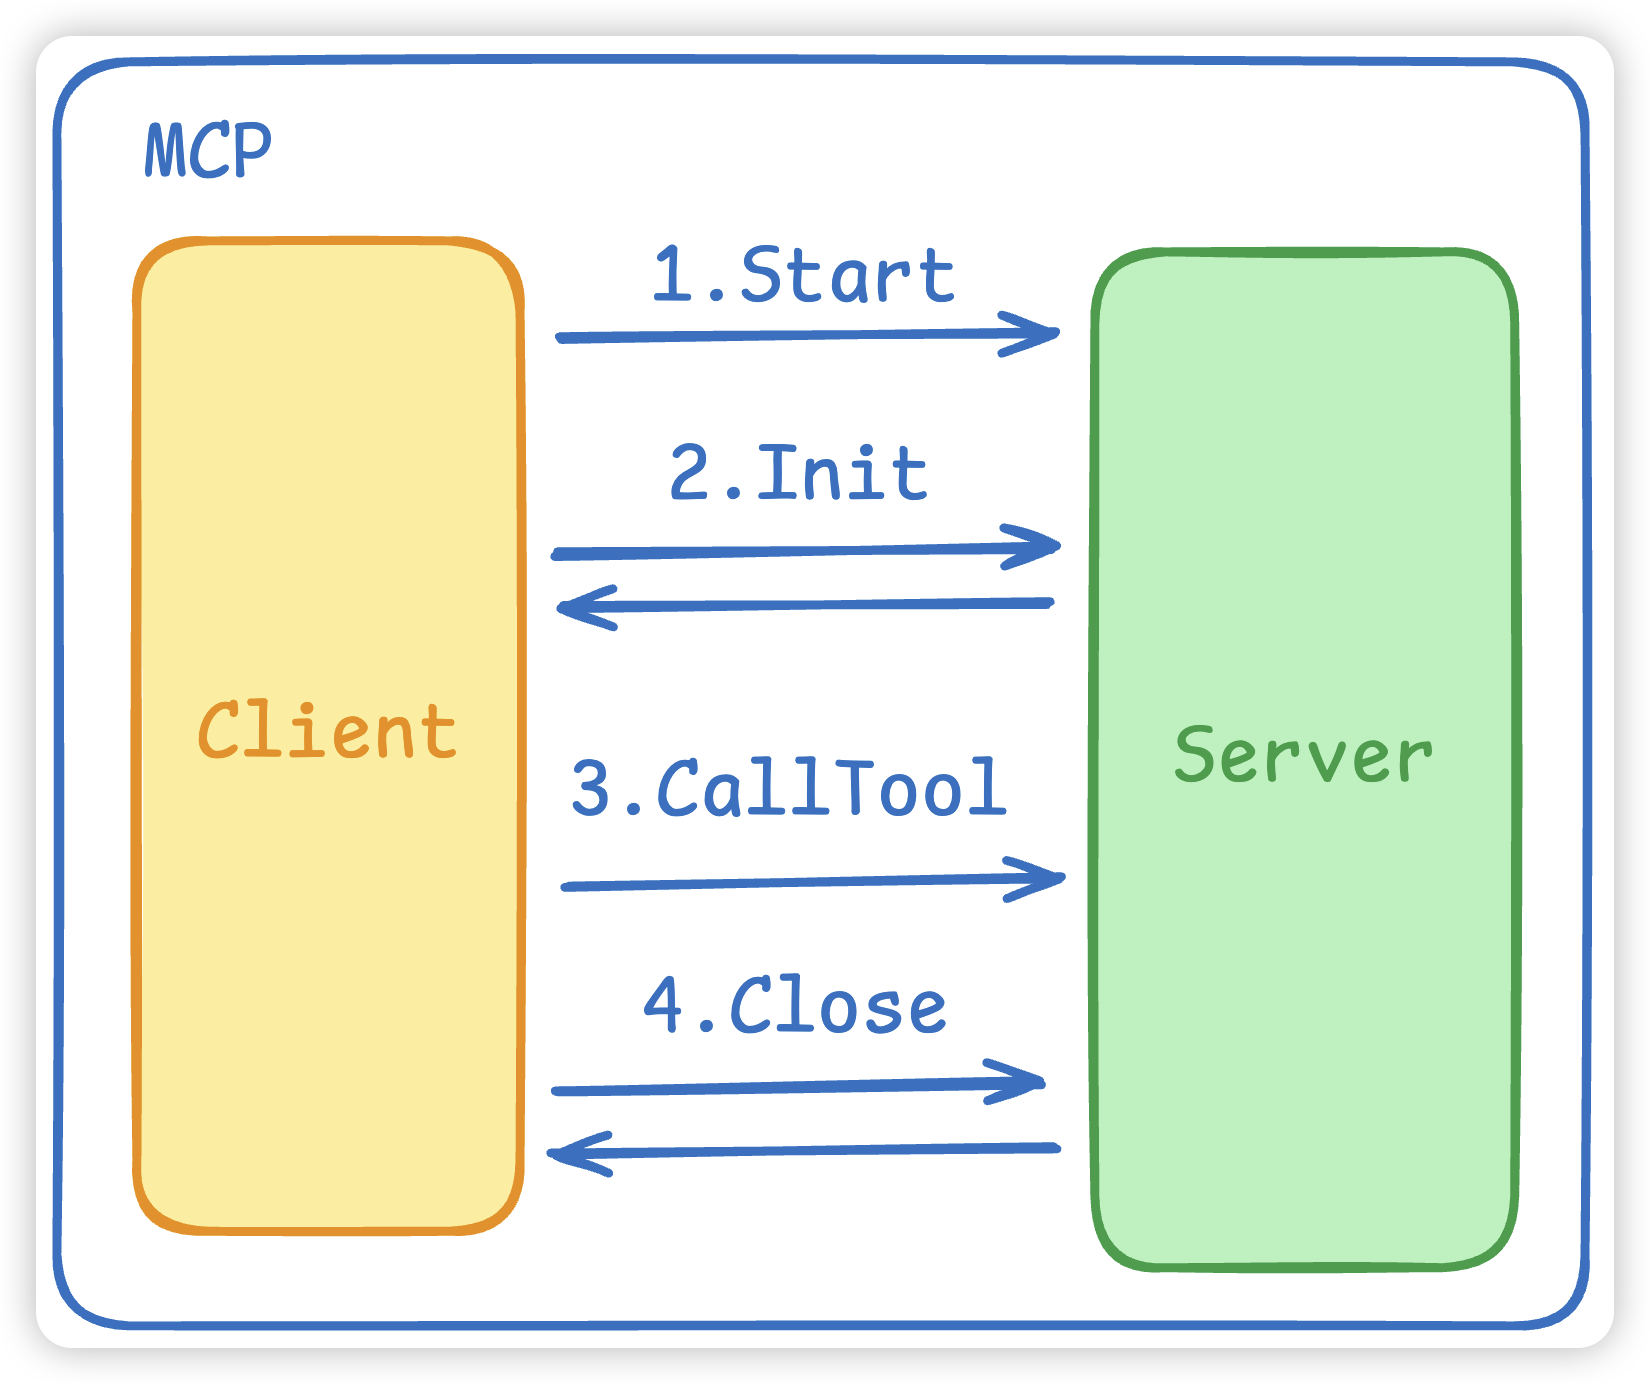
我们MCP用的是这个库 github.com/mark3labs/mcp-go,主要有三个组成部份。
- MCP 的Start启动连接,这会
拉起一个MCP Server进程并建立连接。 - MCP 的初始化 Initialize,这会进行
协议握手,双方进行确认。 - MCP 的 CallTool 将 ToolName 和 Args 发给MCP Server。
go
type MCPClient struct {
	Ctx    context.Context // 上下文
	Client *client.Client  // mcp的服务client
	Tools  []mcp.Tool      // mcp 工具
	Cmd    string          // 命令
	Args   []string        // 参数
	Env    []string
}

func NewMCPClient(ctx context.Context, cmd string, env, args []string) *MCPClient {
	stdioTransport := transport.NewStdio(cmd, env, args...) // 使用stdio进行连接通信
	cli := client.NewClient(stdioTransport)
	m := &MCPClient{Ctx: ctx, Client: cli, Cmd: cmd, Args: args, Env: env}
	return m
}- Start:MCP Client的初始化
go
func (m *MCPClient) Start() error {
  // 负责把 MCP 服务端真正跑起来并连上
	err := m.Client.Start(m.Ctx)
	if err != nil {
		return err
	}
	mcpInitReq := mcp.InitializeRequest{}
	mcpInitReq.Params.ProtocolVersion = mcp.LATEST_PROTOCOL_VERSION
	mcpInitReq.Params.ClientInfo = mcp.Implementation{
		Name:    "example-client",
		Version: "0.0.1",
	}
	// 让服务端认可我们的客户端与协议版本,再进入"可工作"的状态。
	if _, err = m.Client.Initialize(m.Ctx, mcpInitReq); err != nil {
		fmt.Println("mcp init error:", err)
		return err
	}
	return err
}- CallTool: MCP进行工具调用,也就是调用MCP Server,具体的实现是在MCP Server中实行。
go
func (m *MCPClient) CallTool(name string, args any) (string, error) {
	res, err := m.Client.CallTool(m.Ctx, mcp.CallToolRequest{
		Params: mcp.CallToolParams{
			Name:      name,
			Arguments: args,
		},
	})
	if err != nil {
		return "", err
	}
	return mcp.GetTextFromContent(res.Content), nil
}
Agent
接下来到我们的agent,agent主要是整合了上面的LLM和MCP。
- NewAgent:新建一个Agent
- 激活所有的mcp client 拿到所有的tools
- 激活并告诉llm有哪些tools
go
type Agent struct {
	Ctx          context.Context
	MCPClient    []*MCPClient
	LLM          *ChatOpenAI
	Model        string
}

func NewAgent(ctx context.Context, model string, mcpCli []*MCPClient) *Agent {
	// 1. 激活所有的mcp client 拿到所有的tools
	tools := make([]mcp.Tool, 0)
	for _, item := range mcpCli {
		// 启动 stdio 传输
		err := item.Start()
		if err != nil {
			continue
		}
		err = item.SetTools()
		if err != nil {
			continue
		}
		tools = append(tools, item.GetTool()...)
	}
	// 2. 激活并告诉llm有哪些tools
	llm := NewChatOpenAI(ctx, model, WithLLMTools(tools))
	return &Agent{
		Ctx:       ctx,
		MCPClient: mcpCli,
		LLM:       llm,
		Model:     model,
	}
}- Invoke:具体和LLM通信
- 从上面我们知道 LLM 的 Chat 方法会返回响应和所需要用到的工具 ToolCalls,ToolCalls 里面有对应的ToolName 和所需要的 Args。
- 根据ToolName找到对应的MCP Client,并进行CallTool
- CallTool就是调用
MCP Server去真正的干活
⚠️注意:大模型是不会帮我们执行的,大模型只会给出一个步骤(也就是 tool name 和 tool args),而这个执行步骤是需要我们去写的,也就是真正的MCP Server
核心代码逻辑如下:
go
func (a *Agent) Invoke(prompt string) string {
if a.LLM == nil {
return ""
}
response, toolCalls := a.LLM.Chat(prompt)
for len(toolCalls) > 0 {
// 省略了一些代码... 找到是哪个MCP Client,并进行CallTool
if mcpTool.Name == toolCall.Function.Name {
toolText, err := mcpClient.CallTool(toolCall.Function.Name, toolCall.Function.Arguments)
if err != nil {
continue
}
a.LLM.Message = append(a.LLM.Message, openai.ToolMessage(toolText, toolCall.ID))
}
}
return response
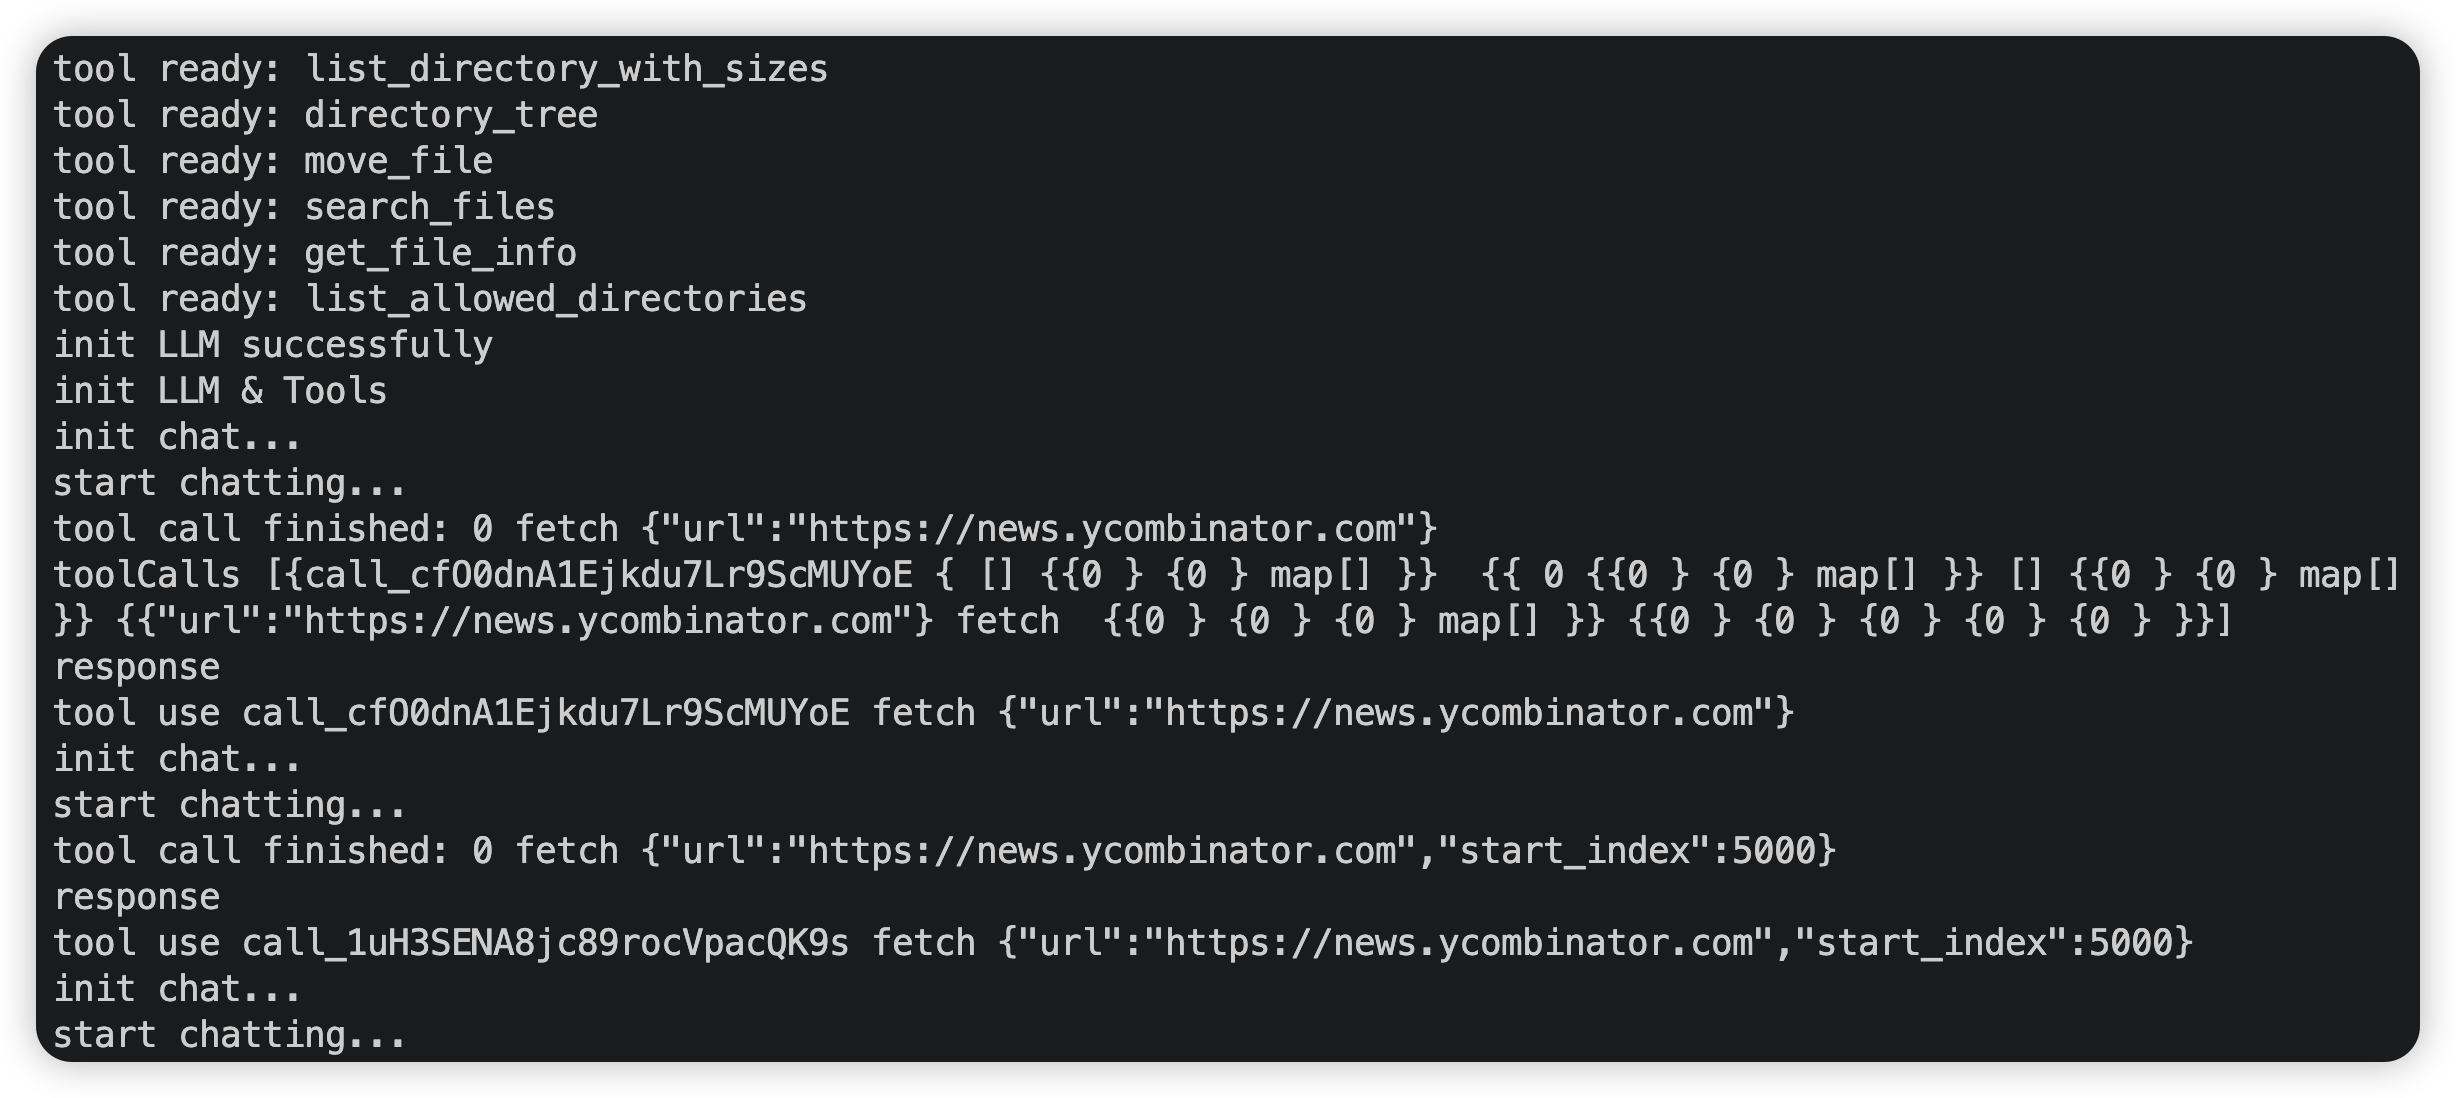
}运行结果: