Nacos Client 客户端
在上文 Nacos 源码深度畅游:Nacos 配置同步详解(上) 中了解到,当配置发生变更时,Nacos Server 服务端会主动通知 Nacos Client 变更配置的内容,并且在通知失败后 Nacos Client 有主动拉取变更配置的机制保证配置的及时更新,接下来我们先看一下 Nacos Client 处理配置相关的流程图,之后再深入到源码之中:
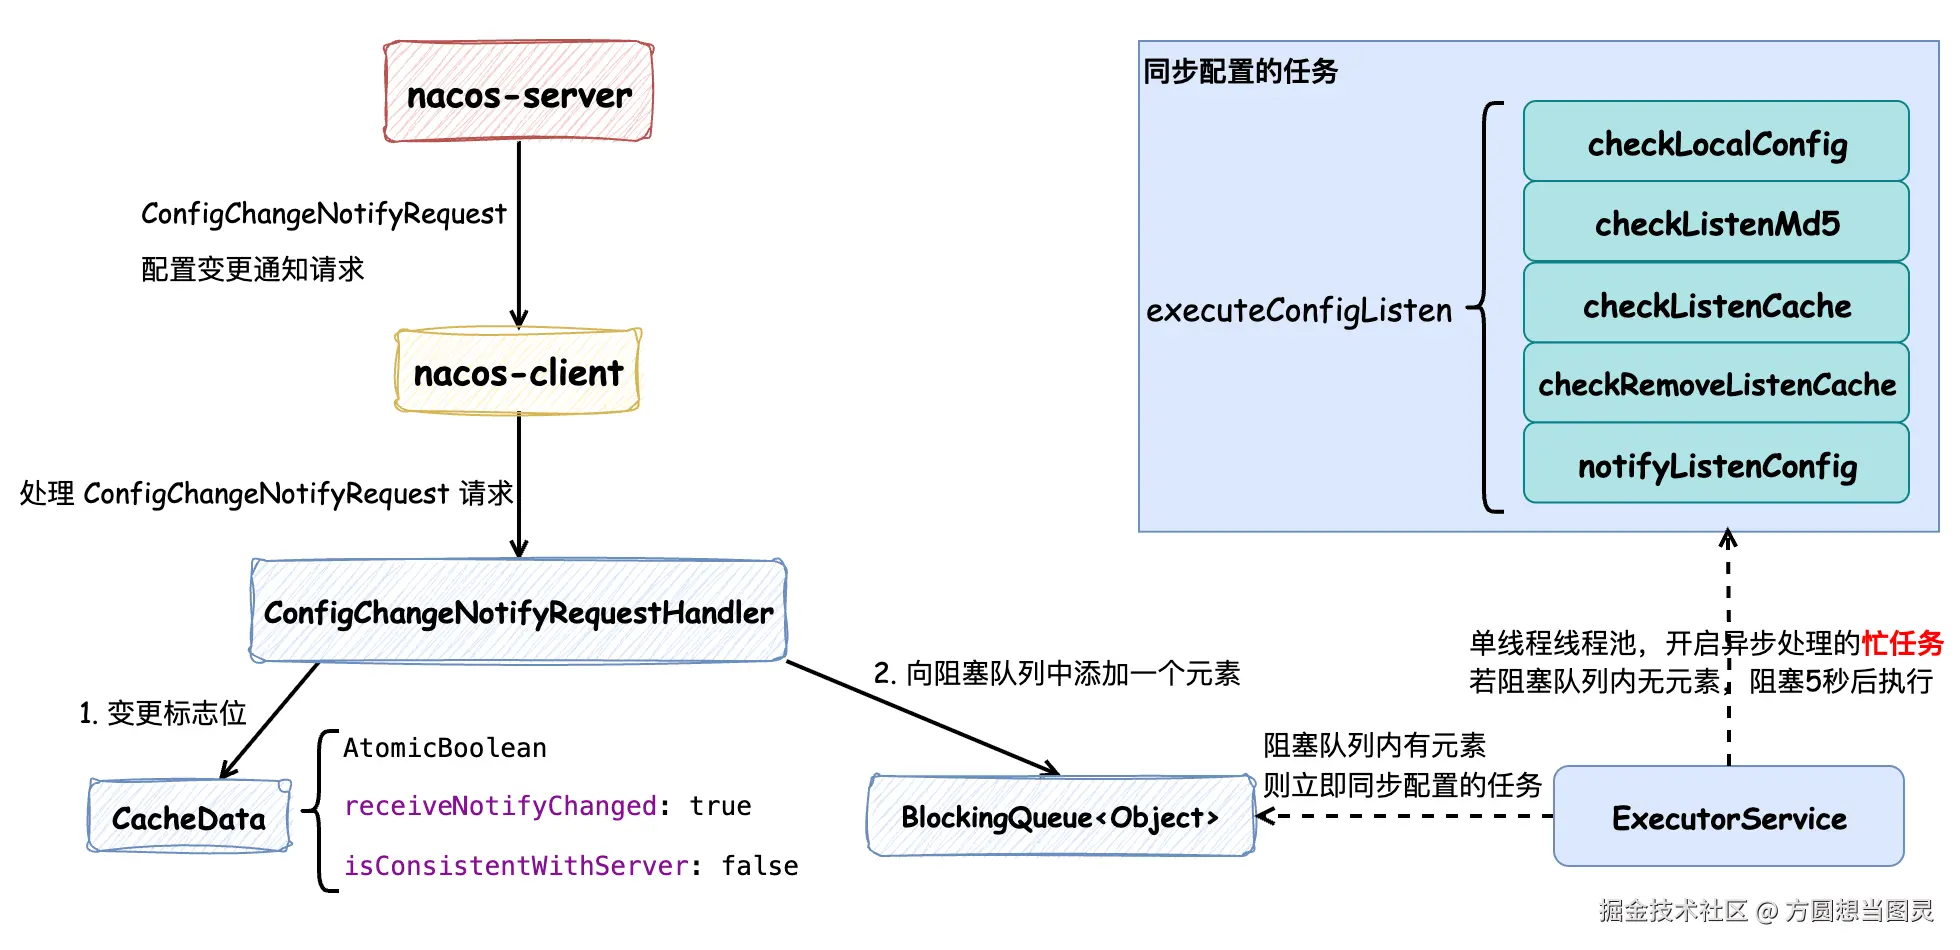
Nacos Client 在接收到 Nacos Server 发送的配置变更请求 ConfigChangeNotifyRequest 后,会更新保存在内存中的 CacheData 配置对象的标志位,分别表示收到了配置变更请求和与服务端配置内容不一致,注意 此时并没有更新配置的内容 ,随后会在阻塞队列中添加一个元素。客户端在启动时,会创建一个 单线程的线程池并提交一个忙任务 (while (true)),首先这个任务会检查阻塞队列中是否有元素,如果有元素的话立即处理同步配置的任务,否则阻塞 5 秒后主动同步配置,这也就是 Nacos Client 的主动拉取配置内容的机制。在执行同步配置的任务时,会有以下步骤:
checkLocalConfig: 检查本地配置文件(故障转移文件),需要注意的是:Nacos Client 的配置故障转移文件并不是由客户端程序自动创建和写入的,而是需要用户手动维护的应急机制,这样能避免配置的混乱,又提供了应急的机制checkListenerMd5: 检查配置的变更情况,如果有配置内容发生变更,则通知订阅了这些配置的监听器checkListenCache: 通过 gRPC 请求接口获取哪些配置发生了变更并获取对应的配置内容,更新到本地缓存对象CacheData中,并重置标志位,随后回调订阅了这些配置的监听器checkRemoveListenCache: 将已经失效的配置移除notifyListenConfig: 如果发生配置变更,则再触发一次同步配置的任务
Nacos Client 客户端处理配置变更的逻辑并不复杂,需要注意的是每次 Nacos Client 向 Nacos Server 读取的时候都会走缓存(磁盘文件和内存对象),因此 Nacos Client 和 Nacos Server 之间的遵循的是 AP 定理 ,遵循数据的 最终一致性 ,通过 Nacos Client 的定期重试来保证配置数据的更新,这样做的好处是 能够避免数据库成为性能瓶颈。
Nacos Client 的主要流程如上所述,接下来为源码内容解析。
在 Nacos Client 启动时,它会执行 ConfigRpcTransportClient#initRpcClientHandler 方法来注册配置变更的处理器,这样在接收到服务端推送配置变更的请求时,会执行 ConfigRpcTransportClient#handleConfigChangeNotifyRequest 方法来处理请求,处理逻辑并不复杂,它会根据配置信息的唯一标识来查询配置信息的缓存数据,获取成功后会只是对缓存进行打标,而没有直接修改内存数据,并且向 BlockingQueue<Object> listenExecutebell 阻塞队列对象中添加了一个元素,随后处理服务端请求的流程就结束了,但是此时还并没有完成配置内容的变更:
java
public class ClientWorker implements Closeable {

    public class ConfigRpcTransportClient extends ConfigTransportClient {

        private final BlockingQueue<Object> listenExecutebell = new ArrayBlockingQueue<>(1);

        private void initRpcClientHandler(final RpcClient rpcClientInner) {
            // 注册 配置变更 或 配置重同步处理器
            rpcClientInner.registerServerRequestHandler((request, connection) -> {
                // config change notify
                if (request instanceof ConfigChangeNotifyRequest) {
                    // 客户端处理服务端推送的配置变更通知请求
                    return handleConfigChangeNotifyRequest((ConfigChangeNotifyRequest) request,
                            rpcClientInner.getName());
                }
                return null;
            });

            // ...
        }

        ConfigChangeNotifyResponse handleConfigChangeNotifyRequest(ConfigChangeNotifyRequest configChangeNotifyRequest,
                                                                   String clientName) {
            // 构建配置唯一标识,查找对应的本地缓存数据
            String groupKey = GroupKey.getKeyTenant(configChangeNotifyRequest.getDataId(),
                    configChangeNotifyRequest.getGroup(), configChangeNotifyRequest.getTenant());

            // 获取对应的缓存数据
            CacheData cacheData = cacheMap.get().get(groupKey);
            if (cacheData != null) {
                synchronized (cacheData) {
                    // 标记配置状态变更,触发配置拉取和监听器通知
                    cacheData.getReceiveNotifyChanged().set(true);
                    // 标记与服务端不一致
                    cacheData.setConsistentWithServer(false);
                    // 重要:立即触发监听配置检查
                    notifyListenConfig();
                }

            }
            return new ConfigChangeNotifyResponse();
        }

        // 当有新的监听器添加或配置变更时或发生异常时,都会调用这个方法,那么在 startInternal 中的循环就会被唤醒
        @Override
        public void notifyListenConfig() {
            // 向阻塞队列中放入一个元素,唤醒 startInternal 中的循环
            listenExecutebell.offer(bellItem);
        }
    }

}
那么配置的内容何时变更呢?向阻塞队列 BlockingQueue<Object> listenExecutebell 中添加元素的作用是什么呢?看接下来的源码:
java
public class ClientWorker implements Closeable {

    public class ConfigRpcTransportClient extends ConfigTransportClient {

        private ExecutorService listenExecutor;

        private final BlockingQueue<Object> listenExecutebell = new ArrayBlockingQueue<>(1);

        @Override
        public void startInternal() {
            listenExecutor =
                    Executors.newSingleThreadExecutor(new NameThreadFactory("com.alibaba.nacos.client.listen-executor"));
            listenExecutor.submit(() -> {
                // 忙任务
                while (!listenExecutor.isShutdown() && !listenExecutor.isTerminated()) {
                    try {
                        // 阻塞等待通知,最多等待5秒
                        listenExecutebell.poll(5L, TimeUnit.SECONDS);
                        if (listenExecutor.isShutdown() || listenExecutor.isTerminated()) {
                            continue;
                        }
                        // 执行配置监听检查
                        executeConfigListen();
                    } catch (Throwable e) {
                        LOGGER.error("[rpc listen execute] [rpc listen] exception", e);
                        try {
                            Thread.sleep(50L);
                        } catch (InterruptedException interruptedException) {
                            // ignore
                        }
                        // 出现异常时重新通知监听配置
                        notifyListenConfig();
                    }
                }
            });
        }
    }

}
在 Nacos Client 启动时会调用 ConfigRpcTransportClient#startInternal 方法,创建一个 ExecutorService listenExecutor 线程池(这段逻辑是我在 ISSUE #13822 中修改过后的),这个线程池只有一个线程,这个线程会处理一个"忙"任务:循环检查配置是否发生变更,直到线程池关闭。BlockingQueue<Object> listenExecutebell 是阻塞队列,当配置变更时添加元素,会立即触发 executeConfigListen 配置检查的逻辑,否则会 阻塞等待 5 秒,也就是说,即使在配置没有发生变更的情况下,也会触发配置的检查操作 。现在我们明白了阻塞队列 BlockingQueue<Object> listenExecutebell 的作用,接下来我们继续看一下 executeConfigListen 执行配置检查的逻辑:
java
public class ClientWorker implements Closeable {

    public class ConfigRpcTransportClient extends ConfigTransportClient {

        private long lastAllSyncTime = System.currentTimeMillis();

        /**
         * 3 minutes to check all listen cache keys.
         */
        private static final long ALL_SYNC_INTERNAL = 3 * 60 * 1000L;

        @Override
        public void executeConfigListen() throws NacosException {
            // 按 taskId 分组监听缓存和移除监听缓存
            Map<String, List<CacheData>> listenCachesMap = new HashMap<>(16);
            Map<String, List<CacheData>> removeListenCachesMap = new HashMap<>(16);
            long now = System.currentTimeMillis();
            // 每3分钟进行一次全量同步检查
            boolean needAllSync = now - lastAllSyncTime >= ALL_SYNC_INTERNAL;
            // 遍历所有缓存配置,按状态分类
            for (CacheData cache : cacheMap.get().values()) {
                synchronized (cache) {
                    // 1. 检查本地配置(故障转移文件)
                    checkLocalConfig(cache);

                    // 这个变量在收到服务端推送配置变更的请求时会被修改为 false,否则为 true
                    if (cache.isConsistentWithServer()) {
                        // 2. 检查配置变更,如果发生变更便通知各个监听器
                        cache.checkListenerMd5();
                        // 如果与服务端配置一致且不需要全量同步,则跳过这个配置缓存接下来的逻辑
                        if (!needAllSync) {
                            continue;
                        }
                    }

                    // 如果使用本地配置信息,跳过处理
                    if (cache.isUseLocalConfigInfo()) {
                        continue;
                    }

                    // 根据缓存状态分类处理
                    if (!cache.isDiscard()) {
                        // 需要监听的配置
                        List<CacheData> cacheDatas = listenCachesMap.computeIfAbsent(String.valueOf(cache.getTaskId()),
                                k -> new LinkedList<>());
                        cacheDatas.add(cache);
                    } else {
                        // 需要移除监听的配置
                        List<CacheData> cacheDatas = removeListenCachesMap.computeIfAbsent(
                                String.valueOf(cache.getTaskId()), k -> new LinkedList<>());
                        cacheDatas.add(cache);
                    }
                }

            }

            // 3. 执行监听检查,返回是否有变更,执行时会从服务端查询最新配置内容并触发监听器回调
            boolean hasChangedKeys = checkListenCache(listenCachesMap);

            // 4. 执行移除 discard 的配置
            checkRemoveListenCache(removeListenCachesMap);

            if (needAllSync) {
                lastAllSyncTime = now;
            }

            // 5. 如果有变更,重新通知监听配置(形成循环),再立即处理一遍上述逻辑
            if (hasChangedKeys) {
                notifyListenConfig();
            }
        }

        /**
         * Checks and handles local configuration for a given CacheData object. This method evaluates the use of
         * failover files for local configuration storage and updates the CacheData accordingly.
         * 用于处理本地配置故障转移(failover)机制,用于 Nacos 的高可用场景,当客户端无法连接到 Nacos 服务器时,可以通过本地故障转移文件继续提供配置服务,确保应用程序的正常运行
         *
         * @param cacheData The CacheData object to be processed.
         */
        public void checkLocalConfig(CacheData cacheData) {
            final String dataId = cacheData.dataId;
            final String group = cacheData.group;
            final String tenant = cacheData.tenant;
            final String envName = cacheData.envName;

            // Check if a failover file exists for the specified dataId, group, and tenant.
            // 校验故障转移文件是否存在
            File file = LocalConfigInfoProcessor.getFailoverFile(envName, dataId, group, tenant);

            // If not using local config info and a failover file exists, load and use it.
            // 如果未使用本地配置信息且故障转移文件存在,加载并使用它。
            if (!cacheData.isUseLocalConfigInfo() && file.exists()) {
                String content = LocalConfigInfoProcessor.getFailover(envName, dataId, group, tenant);
                final String md5 = MD5Utils.md5Hex(content, Constants.ENCODE);
                // 变更为使用本地配置
                cacheData.setUseLocalConfigInfo(true);
                cacheData.setLocalConfigInfoVersion(file.lastModified());
                cacheData.setContent(content);
                LOGGER.warn("[{}] [failover-change] failover file created. dataId={}, group={}, tenant={}, md5={}",
                        envName, dataId, group, tenant, md5);
                return;
            }

            // If use local config info, but the failover file is deleted, switch back to server config.
            // 如果使用本地配置信息,但故障转移文件被删除,则切换回服务器配置
            if (cacheData.isUseLocalConfigInfo() && !file.exists()) {
                cacheData.setUseLocalConfigInfo(false);
                LOGGER.warn("[{}] [failover-change] failover file deleted. dataId={}, group={}, tenant={}", envName,
                        dataId, group, tenant);
                return;
            }

            // When the failover file content changes, indicating a change in local configuration.
            // 使用本地配置,文件存在且文件修改时间发生变更,表示本地配置发生了变化,需要更新本地配置信息
            if (cacheData.isUseLocalConfigInfo() && file.exists()
                    && cacheData.getLocalConfigInfoVersion() != file.lastModified()) {
                String content = LocalConfigInfoProcessor.getFailover(envName, dataId, group, tenant);
                final String md5 = MD5Utils.md5Hex(content, Constants.ENCODE);
                cacheData.setUseLocalConfigInfo(true);
                cacheData.setLocalConfigInfoVersion(file.lastModified());
                cacheData.setContent(content);
                LOGGER.warn("[{}] [failover-change] failover file changed. dataId={}, group={}, tenant={}, md5={}",
                        envName, dataId, group, tenant, md5);
            }
        }
    }

}
在这个方法中,第一个关注点是 checkLocalConfig 方法,这个方法用于 处理本地配置故障转移(failover) ,用于 Nacos 的 高可用 场景,当客户端无法连接到 Nacos 服务器时,可以通过本地故障转移文件继续提供配置服务,确保应用程序的正常运行,具体可以关注注释信息。需要注意的是:Nacos Client 的配置故障转移文件并不是由客户端程序自动创建和写入的,而是需要用户手动维护的应急机制,这样能避免配置的混乱,又提供了应急的机制。
CacheData#isConsistentWithServer 在接收到服务端推送配置变更时会被修改为 false,表示与服务端配置信息不一致,不一致的话它会执行 CacheData#checkListenerMd5 方法,这个方法的作用是检查内存中配置信息的 MD5 值与"监听器"中记录的 MD5 值是否一致,如果不一致的话,则"安全地"通知各个监听器:
监听器
ManagerListenerWrap:是指用户创建的订阅各个配置信息的监听器
java
public class CacheData {

    /**
     * 监听器列表.
     */
    private final CopyOnWriteArrayList<ManagerListenerWrap> listeners;

    private volatile String md5;

    /**
     * 检查配置是否发生变更,遍历所有监听器,检查MD5是否变更,若变更则调用 safeNotifyListener 触发用户监听器
     */
    void checkListenerMd5() {
        for (ManagerListenerWrap wrap : listeners) {
            // 配置发生变更,触发监听器
            if (!md5.equals(wrap.lastCallMd5)) {
                safeNotifyListener(dataId, group, content, type, md5, encryptedDataKey, wrap);
            }
        }
    }

    // 安全地通知监听器,调用用户的 receiveConfigInfo 方法,完成配置变更通知
    private void safeNotifyListener(final String dataId, final String group, final String content, final String type,
                                    final String md5, final String encryptedDataKey, final ManagerListenerWrap listenerWrap) {
        final Listener listener = listenerWrap.listener;
        // 防止重复通知
        if (listenerWrap.inNotifying) {
            LOGGER.warn(
                    "[{}] [notify-currentSkip] dataId={}, group={},tenant={}, md5={}, listener={}, listener is not finish yet,will try next time.",
                    envName, dataId, group, tenant, md5, listener);
            return;
        }
        // 创建通知任务
        NotifyTask job = new NotifyTask() {

            @Override
            public void run() {
                long start = System.currentTimeMillis();
                ClassLoader myClassLoader = Thread.currentThread().getContextClassLoader();
                ClassLoader appClassLoader = listener.getClass().getClassLoader();
                ScheduledFuture<?> timeSchedule = null;

                try {
                    // 为 AbstractSharedListener 共享监听器填充上下文信息
                    if (listener instanceof AbstractSharedListener) {
                        AbstractSharedListener adapter = (AbstractSharedListener) listener;
                        adapter.fillContext(dataId, group);
                        LOGGER.info("[{}] [notify-context] dataId={}, group={},tenant={}, md5={}", envName, dataId,
                                group, tenant, md5);
                    }
                    // Before executing the callback, set the thread classloader to the classloader of
                    // the specific webapp to avoid exceptions or misuses when calling the spi interface in
                    // the callback method (this problem occurs only in multi-application deployment).
                    // 在执行回调之前,将线程类加载器设置为特定webapp的类加载器,以避免在回调方法中调用spi接口时出现异常或误用(此问题仅在多应用程序部署中发生)
                    Thread.currentThread().setContextClassLoader(appClassLoader);

                    ConfigResponse cr = new ConfigResponse();
                    cr.setDataId(dataId);
                    cr.setGroup(group);
                    cr.setContent(content);
                    cr.setEncryptedDataKey(encryptedDataKey);
                    configFilterChainManager.doFilter(null, cr);
                    String contentTmp = cr.getContent();
                    // 延期 60s 执行超时告警WARN任务
                    timeSchedule = getNotifyBlockMonitor().schedule(
                            new LongNotifyHandler(listener.getClass().getSimpleName(), dataId, group, tenant, md5,
                                    notifyWarnTimeout, Thread.currentThread()), notifyWarnTimeout,
                            TimeUnit.MILLISECONDS);
                    listenerWrap.inNotifying = true;
                    // 回调监听器的方法,告知用户接收到的配置信息
                    listener.receiveConfigInfo(contentTmp);
                    // compare lastContent and content
                    if (listener instanceof AbstractConfigChangeListener) {
                        // 变更监听器 AbstractConfigChangeListener 相关逻辑:变更配置信息并触发变更事件
                        Map<String, ConfigChangeItem> data = ConfigChangeHandler.getInstance()
                                .parseChangeData(listenerWrap.lastContent, contentTmp, type);
                        ConfigChangeEvent event = new ConfigChangeEvent(data);
                        ((AbstractConfigChangeListener) listener).receiveConfigChange(event);
                        listenerWrap.lastContent = contentTmp;
                    }

                    // 变更 MD5 信息
                    listenerWrap.lastCallMd5 = md5;
                    LOGGER.info(
                            "[{}] [notify-ok] dataId={}, group={},tenant={}, md5={}, listener={} ,job run cost={} millis.",
                            envName, dataId, group, tenant, md5, listener, (System.currentTimeMillis() - start));
                } catch (NacosException ex) {
                    LOGGER.error(
                            "[{}] [notify-error] dataId={}, group={},tenant={},md5={}, listener={} errCode={} errMsg={},stackTrace :{}",
                            envName, dataId, group, tenant, md5, listener, ex.getErrCode(), ex.getErrMsg(),
                            getTrace(ex.getStackTrace(), 3));
                } catch (Throwable t) {
                    LOGGER.error("[{}] [notify-error] dataId={}, group={},tenant={}, md5={}, listener={} tx={}",
                            envName, dataId, group, tenant, md5, listener, getTrace(t.getStackTrace(), 3));
                } finally {
                    listenerWrap.inNotifying = false;
                    Thread.currentThread().setContextClassLoader(myClassLoader);
                    // 及时通知完成就取消定时任务
                    if (timeSchedule != null) {
                        timeSchedule.cancel(true);
                    }
                }
            }
        };

        // 执行任务:如果配置了线程池,则异步执行,否则同步执行
        try {
            if (null != listener.getExecutor()) {
                LOGGER.info(
                        "[{}] [notify-listener] task submitted to user executor, dataId={}, group={},tenant={}, md5={}, listener={} ",
                        envName, dataId, group, tenant, md5, listener);
                job.async = true;
                listener.getExecutor().execute(job);
            } else {
                LOGGER.info(
                        "[{}] [notify-listener] task execute in nacos thread, dataId={}, group={},tenant={}, md5={}, listener={} ",
                        envName, dataId, group, tenant, md5, listener);
                job.run();
            }
        } catch (Throwable t) {
            LOGGER.error("[{}] [notify-listener-error] dataId={}, group={},tenant={}, md5={}, listener={} throwable={}",
                    envName, dataId, group, tenant, md5, listener, t.getCause());
        }
    }

}
在这个过程中,源码虽然很多,但是并不复杂,主要关注两项内容:
- 针对发生变更的配置会创建
NotifyTask任务,用于监听器方法receiveConfigInfo告知变更后的配置信息,为了方便大家理解,以如下监听器为例:
java
    @Test
void test() throws InterruptedException, NacosException {
    // 创建 NacosConfigService 客户端
    Properties properties = new Properties();
    properties.put(PropertyKeyConst.SERVER_ADDR, "127.0.0.1:8850");
    properties.put(PropertyKeyConst.CONFIG_LONG_POLL_TIMEOUT, "20000");
    properties.put(PropertyKeyConst.CONFIG_RETRY_TIME, "3000");
    properties.put(PropertyKeyConst.MAX_RETRY, "5");
    ConfigService configService = NacosFactory.createConfigService(properties);

    // 添加监听器
    configService.addListener("default_value", "DEFAULT_GROUP", new Listener() {
        @Override
        public Executor getExecutor() {
            return null;
        }

        // 监听器的回调方法
        @Override
        public void receiveConfigInfo(String configInfo) {
            System.out.println(configInfo);
        }
    });
}
也就是说,用户可以自行创建各个不同的配置的监听器,当配置发生变更时,便能从 receiveConfigInfo 方法中获取到变更后的配置
- 在
NotifyTask中创建了LongNotifyHandler任务,这个任务会被延期 60s 执行,同时NotifyTask任务的finally代码块中有LongNotifyHandler任务的取消逻辑,也就是说:NotifyTask任务只要执行的足够快(60s以内),这个任务将会被取消,接下来我们看一下LongNotifyHandler任务的逻辑:
java
public class CacheData {
    class LongNotifyHandler implements Runnable {

        @Override
        public void run() {
            String blockTrace = getTrace(thread.getStackTrace(), 5);
            LOGGER.warn("[{}] [notify-block-monitor] dataId={}, group={},tenant={}, md5={}, "
                            + "receiveConfigInfo execute over {} mills,thread trace block : {}", envName, dataId, group, tenant,
                    md5, timeoutMills, blockTrace);
            NotifyCenter.publishEvent(
                    new ChangeNotifyBlockEvent(this.listenerClass, dataId, group, tenant, this.startTime,
                            System.currentTimeMillis(), blockTrace));
        }
    }
}
发现它会打印一行告警日志,提示某个配置的监听器通知被阻塞了,并且会触发一个 ChangeNotifyBlockEvent 事件(但是这个事件还没有特定的消费者),在日常开发中可以参考这种告警机制的写法。
接下来,我们再回到 ClientWorker#executeConfigListen 的逻辑中,执行完 CacheData#checkListenerMd5 方法后会检查是否使用本地故障转移配置文件,如果使用的话就不再处理后续逻辑,否则会将 CacheData 根据是否失效的状态进行分组,并对仍然有效的配置进行处理,执行 ConfigRpcTransportClient#checkListenCache 方法:
java
public class ConfigRpcTransportClient extends ConfigTransportClient {

    private boolean checkListenCache(Map<String, List<CacheData>> listenCachesMap) throws NacosException {
        // 使用原子布尔值记录是否有配置发生变更,保证线程安全
        final AtomicBoolean hasChangedKeys = new AtomicBoolean(false);

        // 如果没有需要监听的缓存,直接返回false
        if (!listenCachesMap.isEmpty()) {
            List<Future> listenFutures = new ArrayList<>();
            for (Map.Entry<String, List<CacheData>> entry : listenCachesMap.entrySet()) {
                String taskId = entry.getKey();
                // 为每个 taskId 创建一个 RpcClient 客户端
                RpcClient rpcClient = ensureRpcClient(taskId);
                // 每个 taskId 专门分配一个线程数为 1 的线程池
                ExecutorService executorService = ensureSyncExecutor(taskId);
                Future future = executorService.submit(() -> {
                    List<CacheData> listenCaches = entry.getValue();
                    // 重置通知变更标识
                    for (CacheData cacheData : listenCaches) {
                        cacheData.getReceiveNotifyChanged().set(false);
                    }
                    // 将多个配置的监听请求合并为一个批量请求,提高网络效率
                    ConfigBatchListenRequest configChangeListenRequest = buildConfigRequest(listenCaches);
                    configChangeListenRequest.setListen(true);
                    try {
                        // 向 Nacos 服务端发送批量监听请求,检查配置是否有变更
                        ConfigChangeBatchListenResponse listenResponse = (ConfigChangeBatchListenResponse) requestProxy(
                                rpcClient, configChangeListenRequest);
                        if (listenResponse != null && listenResponse.isSuccess()) {
                            Set<String> changeKeys = new HashSet<>();

                            List<ConfigChangeBatchListenResponse.ConfigContext> changedConfigs = listenResponse.getChangedConfigs();
                            // 获取服务端返回的变更配置列表,并通知监听者
                            if (!CollectionUtils.isEmpty(changedConfigs)) {
                                hasChangedKeys.set(true);
                                for (ConfigChangeBatchListenResponse.ConfigContext changeConfig : changedConfigs) {
                                    // 构建配置的唯一标识key:dataId+group+tenant
                                    String changeKey = GroupKey.getKeyTenant(changeConfig.getDataId(),
                                            changeConfig.getGroup(), changeConfig.getTenant());
                                    changeKeys.add(changeKey);
                                    // 检查配置是否处于初始化状态,初始化状态的配置不需要通知监听器,避免重复通知
                                    boolean isInitializing = cacheMap.get().get(changeKey).isInitializing();
                                    // 刷新配置内容并检查MD5,触发监听器回调
                                    refreshContentAndCheck(rpcClient, changeKey, !isInitializing);
                                }

                            }

                            // ReceiveNotifyChanged 已经在方法开始时被重置为 false,这段逻辑解决的是被重置为 false 之后,
                            // 如果这期间仍有配置变更同步到 Nacos Client 时能一并处理
                            for (CacheData cacheData : listenCaches) {
                                if (cacheData.getReceiveNotifyChanged().get()) {
                                    String changeKey = GroupKey.getKeyTenant(cacheData.dataId, cacheData.group,
                                            cacheData.getTenant());
                                    if (!changeKeys.contains(changeKey)) {
                                        boolean isInitializing = cacheMap.get().get(changeKey).isInitializing();
                                        refreshContentAndCheck(rpcClient, changeKey, !isInitializing);
                                    }
                                }
                            }

                            // 若从服务端未获取到变更的配置,标记为与服务端一致
                            for (CacheData cacheData : listenCaches) {
                                cacheData.setInitializing(false);
                                String groupKey = GroupKey.getKeyTenant(cacheData.dataId, cacheData.group,
                                        cacheData.getTenant());
                                if (!changeKeys.contains(groupKey)) {
                                    synchronized (cacheData) {
                                        if (!cacheData.getReceiveNotifyChanged().get()) {
                                            cacheData.setConsistentWithServer(true);
                                        }
                                    }
                                }
                            }

                        }
                    } catch (Throwable e) {
                        // 发生异常的话进行重试
                        LOGGER.error("Execute listen config change error ", e);
                        try {
                            Thread.sleep(50L);
                        } catch (InterruptedException interruptedException) {
                            //ignore
                        }
                        // 重新触发监听检查
                        notifyListenConfig();
                    }
                });
                // 将异步任务添加到Future列表中
                listenFutures.add(future);
            }
            // 阻塞等待任务完成
            for (Future future : listenFutures) {
                try {
                    future.get();
                } catch (Throwable throwable) {
                    LOGGER.error("Async listen config change error ", throwable);
                }
            }

        }
        return hasChangedKeys.get();
    }
}
这是一个同步调用的方法,虽然比较长但是逻辑上并不难,首先它会将配置按照"任务"的维度分组、合并,这样可以减少对 Nacos Server 服务端的请求数量,合并完成后,每个任务都分配一个线程池去处理,处理时会先查询服务端有哪些配置发生了变更,获取到变更的配置后再逐一处理,调用 ConfigRpcTransportClient#refreshContentAndCheck 方法:
java
public class ConfigRpcTransportClient extends ConfigTransportClient {
    private void refreshContentAndCheck(RpcClient rpcClient, String groupKey, boolean notify) {
        if (cacheMap.get() != null && cacheMap.get().containsKey(groupKey)) {
            CacheData cache = cacheMap.get().get(groupKey);
            refreshContentAndCheck(rpcClient, cache, notify);
        }
    }

    private void refreshContentAndCheck(RpcClient rpcClient, CacheData cacheData, boolean notify) {
        try {
            // 向服务端查询最新的配置内容,并写入 CacheData 中,并且记录在了本地文件中
            ConfigResponse response = this.queryConfigInner(rpcClient, cacheData.dataId, cacheData.group,
                    cacheData.tenant, requestTimeout, notify);
            cacheData.setEncryptedDataKey(response.getEncryptedDataKey());
            cacheData.setContent(response.getContent());
            if (null != response.getConfigType()) {
                cacheData.setType(response.getConfigType());
            }
            if (notify) {
                LOGGER.info("[{}] [data-received] dataId={}, group={}, tenant={}, md5={}, type={}", agent.getName(),
                        cacheData.dataId, cacheData.group, cacheData.tenant, cacheData.getMd5(),
                        response.getConfigType());
            }
            // 检查配置 MD5 变化并触发监听器回调通知应用程序
            cacheData.checkListenerMd5();
        } catch (Exception e) {
            LOGGER.error("refresh content and check md5 fail ,dataId={},group={},tenant={} ", cacheData.dataId,
                    cacheData.group, cacheData.tenant, e);
        }
    }
}
在其中的 ConfigRpcTransportClient#refreshContentAndCheck 方法中会向 Nacos 服务端查询配置信息,再完成本地配置的写入 ,随后执行 CacheData#checkListenerMd5 方法完成监听器的通知回调。在这里我有一个疑问:为什么不在批量查询哪些配置发生变更时一并将配置的内容返回呢?这样的网络开销是不是会更小一些?
后来我想了想,理论上可行,不过因为每次请求都是请求到 Nacos Server 的内存,所以多次请求也不会给 Nacos Server 造成太大的压力,网络开销也不大
ConfigRpcTransportClient#checkListenCache 方法如果在执行中抛出异常,那么会在 catch 代码块中执行 ConfigRpcTransportClient#notifyListenConfig 方法立即发起配置主动拉取的操作,避免配置内容更新不及时 。再回到 ClientWorker#executeConfigListen 的逻辑中,如果 ConfigRpcTransportClient#checkListenCache 方法返回 true 表示有配置发生变更,同样地也会执行一次 ConfigRpcTransportClient#notifyListenConfig 方法,这么做的原因可能是当有配置发生变更时,用户可能在这期间陆续修改了多个配置,再次触发配置拉取操作减少配置同步的延时。
现在我们已经对 Nacos Client 处理 Nacos Server 推送配置变更的处理和主动同步配置变更的逻辑比较了解了,现在我们还要注意下 Nacos Client 在同步配置过程中与 Nacos Server 的两次交互:批量查询配置信息是否发生变更 和 查询单个配置的内容。
首先我们来看批量查询配置信息时,服务端的处理逻辑:
java
@Component
public class ConfigChangeBatchListenRequestHandler
        extends RequestHandler<ConfigBatchListenRequest, ConfigChangeBatchListenResponse> {

    @Autowired
    private ConfigChangeListenContext configChangeListenContext;

    @Override
    @NamespaceValidation
    @TpsControl(pointName = "ConfigListen")
    @Secured(action = ActionTypes.READ, signType = SignType.CONFIG)
    @ExtractorManager.Extractor(rpcExtractor = ConfigBatchListenRequestParamExtractor.class)
    public ConfigChangeBatchListenResponse handle(ConfigBatchListenRequest configChangeListenRequest, RequestMeta meta)
            throws NacosException {
        // 获取连接ID,用于标识客户端连接
        String connectionId = StringPool.get(meta.getConnectionId());
        String tag = configChangeListenRequest.getHeader(Constants.VIPSERVER_TAG);
        ParamUtils.checkParam(tag);
        ConfigChangeBatchListenResponse configChangeBatchListenResponse = new ConfigChangeBatchListenResponse();
        // 处理批量监听请求中的每个配置项
        for (ConfigBatchListenRequest.ConfigListenContext listenContext : configChangeListenRequest.getConfigListenContexts()) {
            boolean isNeedTransferNamespace = NamespaceUtil.isNeedTransferNamespace(listenContext.getTenant());
            String namespaceId = NamespaceUtil.processNamespaceParameter(listenContext.getTenant());
            String groupKey = GroupKey2.getKey(listenContext.getDataId(), listenContext.getGroup(), namespaceId);
            groupKey = StringPool.get(groupKey);

            String md5 = StringPool.get(listenContext.getMd5());

            if (configChangeListenRequest.isListen()) {
                // 添加监听:将客户端连接与配置项关联
                configChangeListenContext.addListen(groupKey, md5, connectionId, isNeedTransferNamespace);
                // 检查配置是否已经发生变更
                boolean isUptoDate = ConfigCacheService.isUptodate(groupKey, md5, meta.getClientIp(), tag,
                        meta.getAppLabels());
                // 如果配置已变更,添加变更的配置信息
                if (!isUptoDate) {
                    configChangeBatchListenResponse.addChangeConfig(listenContext.getDataId(), listenContext.getGroup(),
                            listenContext.getTenant());
                }
            } else {
                // 移除监听:取消客户端连接与配置项的关联
                configChangeListenContext.removeListen(groupKey, connectionId);
            }
        }

        return configChangeBatchListenResponse;

    }

}
其中较为关键的逻辑是检查配置是否发生变更的 ConfigCacheService#isUptodate 方法,可见比较配置是否发生变更的 MD5 值是从本地缓存对象 CacheItem 中获取的:
java
public class ConfigCacheService {
    public static boolean isUptodate(String groupKey, String md5, String ip, String tag,
                                     Map<String, String> appLabels) {
        String serverMd5 = ConfigCacheService.getContentMd5(groupKey, ip, tag, appLabels);
        return StringUtils.equals(md5, serverMd5);
    }

    public static String getContentMd5(String groupKey, String ip, String tag, Map<String, String> connLabels) {
        // JVM 本地内存对象
        CacheItem item = CACHE.get(groupKey);
        if (item == null) {
            return NULL;
        }
        if (connLabels == null && StringUtils.isNotBlank(ip)) {
            connLabels = new HashMap<>(4);
        }
        if (connLabels == null && StringUtils.isNotBlank(tag)) {
            connLabels = new HashMap<>(4);
        }

        if (StringUtils.isNotBlank(ip)) {
            connLabels.put(CLIENT_IP, ip);
        }
        if (StringUtils.isNotBlank(tag)) {
            connLabels.put(VIPSERVER_TAG, tag);
        }
        if (item.getSortConfigGrays() != null && connLabels != null && !connLabels.isEmpty()) {
            for (ConfigCacheGray entry : item.getSortConfigGrays()) {
                if (entry.match(connLabels)) {
                    return entry.getMd5();
                }
            }
        }
        String md5 = item.getConfigCache().getMd5();
        return md5 == null ? NULL : md5;
    }
}
这样做会有什么问题吗?在上文讲解 Nacos Server 变更配置的逻辑中,我们了解到数据库变更是同步的,但是内存和服务端本地 Dump 文件变更是异步的,这样就可能存在节点未完成缓存更新的场景,可能造成查询时实际配置变了(数据库变更)但通过接口查询结果显示配置没变的情况,所以在 Nacos Client 超时自动配置同步的逻辑也是能理解的了,这也反映了 Nacos Client 同步配置遵循的是数据的 最终一致性。
其次,我们再看一下 Nacos Client 向 Nacos Server 查询单个配置的场景:
java
@Component
public class ConfigQueryRequestHandler extends RequestHandler<ConfigQueryRequest, ConfigQueryResponse> {

    private static final Logger LOGGER = LoggerFactory.getLogger(ConfigQueryRequestHandler.class);

    private final ConfigQueryChainService configQueryChainService;

    public ConfigQueryRequestHandler(ConfigQueryChainService configQueryChainService) {
        this.configQueryChainService = configQueryChainService;
    }

    @Override
    @NamespaceValidation
    @TpsControl(pointName = "ConfigQuery")
    @Secured(action = ActionTypes.READ, signType = SignType.CONFIG)
    @ExtractorManager.Extractor(rpcExtractor = ConfigRequestParamExtractor.class)
    public ConfigQueryResponse handle(ConfigQueryRequest request, RequestMeta meta) throws NacosException {
        try {
            request.setTenant(NamespaceUtil.processNamespaceParameter(request.getTenant()));
            String dataId = request.getDataId();
            String group = request.getGroup();
            String tenant = request.getTenant();
            String groupKey = GroupKey2.getKey(dataId, group, tenant);
            boolean notify = request.isNotify();

            String requestIpApp = meta.getLabels().get(CLIENT_APPNAME_HEADER);
            String clientIp = meta.getClientIp();

            ConfigQueryChainRequest chainRequest = ConfigChainRequestExtractorService.getExtractor().extract(request, meta);
            // 执行查询逻辑
            ConfigQueryChainResponse chainResponse = configQueryChainService.handle(chainRequest);

            if (ResponseCode.FAIL.getCode() == chainResponse.getResultCode()) {
                return ConfigQueryResponse.buildFailResponse(ResponseCode.FAIL.getCode(), chainResponse.getMessage());
            }
            if (chainResponse.getStatus() == ConfigQueryChainResponse.ConfigQueryStatus.CONFIG_NOT_FOUND) {
                return handlerConfigNotFound(request.getDataId(), request.getGroup(), request.getTenant(), requestIpApp,
                        clientIp, notify);
            }
            if (chainResponse.getStatus() == ConfigQueryChainResponse.ConfigQueryStatus.CONFIG_QUERY_CONFLICT) {
                return handlerConfigConflict(clientIp, groupKey);
            }

            ConfigQueryResponse response = new ConfigQueryResponse();
            response.setMd5(chainResponse.getMd5());
            response.setEncryptedDataKey(chainResponse.getEncryptedDataKey());
            response.setContent(chainResponse.getContent());
            response.setContentType(chainResponse.getConfigType());
            response.setLastModified(chainResponse.getLastModified());
            // ...

            return response;

        } catch (Exception e) {
            LOGGER.error("Failed to handle grpc configuration query", e);
            return ConfigQueryResponse.buildFailResponse(ResponseCode.FAIL.getCode(), e.getMessage());
        }
    }
}

public class FormalHandler extends AbstractConfigQueryHandler {

    private static final String FORMAL_HANDLER = "formalHandler";

    @Override
    public String getName() {
        return FORMAL_HANDLER;
    }

    @Override
    public ConfigQueryChainResponse handle(ConfigQueryChainRequest request) throws IOException {
        ConfigQueryChainResponse response = new ConfigQueryChainResponse();

        String dataId = request.getDataId();
        String group = request.getGroup();
        String tenant = request.getTenant();

        // MD5 值来自 JVM 缓存对象
        CacheItem cacheItem = ConfigChainEntryHandler.getThreadLocalCacheItem();
        String md5 = cacheItem.getConfigCache().getMd5();
        // 配置的内容 Content 来自磁盘文件
        String content = ConfigDiskServiceFactory.getInstance().getContent(dataId, group, tenant);
        if (StringUtils.isBlank(content)) {
            response.setStatus(ConfigQueryChainResponse.ConfigQueryStatus.CONFIG_NOT_FOUND);
            return response;
        }
        long lastModified = cacheItem.getConfigCache().getLastModifiedTs();
        String encryptedDataKey = cacheItem.getConfigCache().getEncryptedDataKey();
        String configType = cacheItem.getType();
        response.setContent(content);
        response.setMd5(md5);
        response.setLastModified(lastModified);
        response.setEncryptedDataKey(encryptedDataKey);
        response.setConfigType(configType);
        response.setStatus(ConfigQueryChainResponse.ConfigQueryStatus.CONFIG_FOUND_FORMAL);

        return response;
    }
}
在这段逻辑中重点关注配置信息读取,可以发现配置的内容来自磁盘文件,配置的 MD5 值来自 JVM 的内存缓存对象,也就是说 Nacos Client 单次查询 Nacos Server 某个配置的内容同样也是不经过数据库的,那么这就 可能存在查询结果与数据库中实际的配置信息存在差异的情况 。很显然,在 Nacos Server 上进行配置的发布遵循 CP 定理保证线性一致性 ,但是 Nacos Client 来读取的时候会走缓存,因此 Nacos Client 和 Nacos Server 之间的遵循的是 AP 定理 ,遵循数据的 最终一致性 ,通过 Nacos Client 的定期重试来保证配置数据的更新,这样做的好处是 能够避免数据库成为性能瓶颈。