视频讲解1:Bliibili视频讲解
视频讲解2:https://www.douyin.com/video/7575471066336873747
代码下载:https://github.com/KeepTryingTo/LightningCLI/tree/main
https://github.com/omni-us/jsonargparse/tree/main
https://lightning.ai/docs/pytorch/stable/cli/lightning_cli_advanced_2.html
https://lightning.ai/docs/pytorch/stable/cli/lightning_cli_expert.html
https://pytorch-lightning.readthedocs.io/en/1.3.8/common/lightning_cli.html
https://lightning.ai/docs/overview/cli/studio
PyTorch Lightning教程就看这篇(视频教程 + 文字教程)
目录
[自定义 LightningCLI](#自定义 LightningCLI)
不带有回调函数的默认配置文件default_config.yaml
LightningCLI库介绍
在一个标准的 PyTorch Lightning 项目中,通常需要手动编写很多代码来:
- 使用
argparse或类似库解析命令行参数。 - 将这些参数分别传递给你的
LightningModule、LightningDataModule和Trainer。
LightningCLI 自动化了这个过程。它的核心思想是:通过检查你的 LightningModule和 LightningDataModule类的 __init__方法签名(特别是带有类型注解的参数),自动为你生成一个完整的命令行接口 。无需编写任何参数解析代码,就能通过命令行或配置文件来设置所有超参数。
类的实例化LightningCLI负责解析命令行和配置文件选项、实例化类、设置回调函数以将配置保存到日志目录,最后运行trainer.fit()。生成的对象cli可用于例如获取 fit 的结果,即cli.fit_result
| 特性 | 传统方式 | 使用 LightningCLI 方式 |
|---|---|---|
| 参数解析 | 需手动编写大量 argparse代码 |
自动生成,无需手动编写 |
| 配置管理 | 参数散落在代码各处,难以管理 | 支持 YAML 配置文件,统一管理 |
| 训练启动 | trainer.fit(model, datamodule) |
通过子命令自动调用,如 python script.py fit |
| 代码量 | 冗长,包含大量样板代码 | 极其简洁,核心只需几行 |
命令的统一使用模式
python
usage: main.py [-h] [-c CONFIG] [--print_config[=flags]] {fit,validate,test,predict,tune} ...整个项目框架
python
|──myLightningCLI
   ├── ckpt
   ├── configs
   │   └── config.yaml
   │   └── default_config.yaml
   │   └── multi_module_config.yaml
   ├── datas
   │   └── dataset.py
   |── custom_lightningCLI
   │   ├── ckpt
   │   ├── configs
   │   │   └── config.yaml
   │   ├── datas
   │   │   └── custom_dataset.py
   │   ├── main.py
   │   ├── models
   │   │   └── custom_model.py
   │   └── utils
   │       └── send_email.py
   ├── main.py
   ├── models
   │   └── lightningCLI.py
   └── README.md
注意这里的框架结构,后面在配置文件中都需要根据这个目录结构来配置一些信息。
相关库安装
torch                    1.11.0+cu115
torchmetrics             1.5.2
torchtext                0.12.0
torchvision              0.12.0+cu115
建议离线安装torch,torchvision,torchtext 关于怎么下载torch,torchvision,torchtext安装包以及怎么安装网上搜索教程很多
本文使用的库版本:
pip install pytorch-lightning==1.9.0
pip install 'jsonargparsesignatures>=4.17.0'
LightningCLI配置文件构建
python
# 方法一:生成默认的配置文件
python main.py fit --print_config > default_config.yaml
python main.py validate --print_config > default_config.yaml
python main.py test --print_config > default_config.yaml
python main.py predict --print_config > default_config.yaml
python main.py tune --print_config > default_config.yaml
使用上述命令会在当前文件夹下面生成一个默认的配置文件信息:defualt_config.yaml
python
# pytorch_lightning==1.9.0
seed_everything: 42
trainer:
  logger: true
  enable_checkpointing: true
  callbacks: null
  default_root_dir: null
  gradient_clip_val: null
  gradient_clip_algorithm: null
  num_nodes: 1
  num_processes: null
  devices: null
  gpus: null
  auto_select_gpus: null
  tpu_cores: null
  ipus: null
  enable_progress_bar: true
  overfit_batches: 0.0
  track_grad_norm: -1
  check_val_every_n_epoch: 1
  fast_dev_run: false
  accumulate_grad_batches: null
  max_epochs: null
  min_epochs: null
  max_steps: -1
  min_steps: null
  max_time: null
  limit_train_batches: null
  limit_val_batches: null
  limit_test_batches: null
  limit_predict_batches: null
  val_check_interval: null
  log_every_n_steps: 50
  accelerator: null
  strategy: null
  sync_batchnorm: false
  precision: 32
  enable_model_summary: true
  num_sanity_val_steps: 2
  resume_from_checkpoint: null
  profiler: null
  benchmark: null
  deterministic: null
  reload_dataloaders_every_n_epochs: 0
  auto_lr_find: false
  replace_sampler_ddp: true
  detect_anomaly: false
  auto_scale_batch_size: false
  plugins: null
  amp_backend: null
  amp_level: null
  move_metrics_to_cpu: false
  multiple_trainloader_mode: max_size_cycle
  inference_mode: true
model:
  input_size: 784
  hidden_size: 128
  num_classes: 10
  learning_rate: 0.001
data:
  data_dir: ./datas
  batch_size: 32
  num_workers: 8
ckpt_path: null
python
# 方法二:手动的创建配置文件并进行修改后设置
nano config.yaml

python trainer.py --config config.yaml
经过多次不同配置的训练后,每次运行都会在其各自的日志目录中生成一个 config.yaml文件。该文件可用于详细了解每次运行所使用的所有设置,也可用于轻松复现训练过程。
查看帮助信息
python
python main.py --help
python
(ktg_torch) ktg@z:~/myProject/KGT/myProjects/myProjects/CrowdCLIP/scripts/myLightningCLI$ python main.py --help
usage: main.py [-h] [-c CONFIG] [--print_config[=flags]] {fit,validate,test,predict,tune} ...

pytorch-lightning trainer command line tool

optional arguments:
  -h, --help            Show this help message and exit.
  -c CONFIG, --config CONFIG
                        Path to a configuration file in json or yaml format.
  --print_config[=flags]
                        Print the configuration after applying all other arguments and exit. The optional flags are
                        one or more keywords separated by comma which modify the output. The supported flags are:
                        comments, skip_default, skip_null.

subcommands:
  For more details of each subcommand add it as argument followed by --help.

  {fit,validate,test,predict,tune}
    fit                 Runs the full optimization routine.
    validate            Perform one evaluation epoch over the validation set.
    test                Perform one evaluation epoch over the test set.
    predict             Run inference on your data.
    tune                Runs routines to tune hyperparameters before training.
设置训练回调函数
https://mydreamambitious.blog.csdn.net/article/details/148050185?spm=1011.2415.3001.5331
其实在这个链接中我们已经详细介绍了怎么在pytorch-lightning设置回调函数,但是这里会采用一种比较特别的方式来使用回调函数在LightningCLI。
在配置文件config.yaml中设置回调函数(是不是很奇怪dog),后面训练阶段关于回调函数的设置会给出更加具体的例子(继续往后看)
python
# config.yaml
seed_everything: 42

model:
  class_path: scripts.LightningCLI.models.lightningCLI.MNISTModel  # 根据您的实际模型路径修改
  init_args:
    input_size: 784
    hidden_size: 512
    num_classes: 10
    learning_rate: 0.001

data:
  class_path: scripts.LightningCLI.datas.dataset.MNISTDataModule  # 根据您的实际数据模块路径修改
  init_args:
    data_dir: /home/ff/myProject/KGT/myProjects/myProjects/CrowdCLIP/scripts/LightningCLI/datas/datasets
    batch_size: 16
    num_workers: 8

trainer:
  max_epochs: 10
  accelerator: auto
  devices: auto
  logger: true
  callbacks:
    - class_path: pytorch_lightning.callbacks.ModelCheckpoint
      init_args:
        monitor: val_mae
        save_top_k: 1
        mode: min
        filename: '{epoch}-{val_mae:.2f}'
        dirpath: /home/ff/myProject/KGT/myProjects/myProjects/CrowdCLIP/scripts/LightningCLI/ckpt
    - class_path: pytorch_lightning.callbacks.EarlyStopping
      init_args:
        monitor: val_loss
        patience: 5
    - class_path: pytorch_lightning.callbacks.LearningRateMonitor
      init_args:
        logging_interval: epoch
子类模式
在子类模式下,该--help选项不会显示特定子类的信息。要获取子类的帮助--model.help,--data.help可以使用 `help` 和 `print` 选项,后跟所需的类路径。同样, ` --print_confighelp` 选项也不会显示特定子类的设置。要显示设置,应在 ` --print_confighelp` 选项前指定类路径。以下是 `help` 和 `print` 选项的示例:比如我代码中,myLightningCLI目录下
python
python main.py fit --model models.lightningCLI.MNISTModel --print_config多个子模块的模型
定义的模型,其中具体的编码器和解码器结构可以看上面给的代码链接里面:
python
class AutoEncoderModel(pl.LightningModule):
    """
    基于编码器-解码器架构的自编码器模型
    支持通过配置文件灵活配置不同的编码器和解码器
    """

    def __init__(
            self,
            encoder: EncoderBaseClass,
            decoder: DecoderBaseClass,
            learning_rate: float = 1e-3,
            temperature: float = 0.1  # 用于对比学习的温度参数
    ):
        super().__init__()
        self.save_hyperparameters(ignore=['encoder', 'decoder'])  # 不保存模块实例,只保存配置

        self.encoder = encoder
        self.decoder = decoder
        self.learning_rate = learning_rate
        self.temperature = temperature

        # 重建损失
        self.reconstruction_loss = nn.MSELoss()

    def forward(self, x):
        """前向传播 - 用于推理"""
        z = self.encoder(x)
        return self.decoder(z)

    def encode(self, x):
        """编码输入数据"""
        return self.encoder(x)

    def decode(self, z):
        """从潜在表示解码"""
        return self.decoder(z)

    def training_step(self, batch, batch_idx):
        x, _ = batch
        z = self.encode(x)
        x_recon = self.decode(z)

        # 计算重建损失
        recon_loss = self.reconstruction_loss(x_recon, x)

        # 可选:对比学习损失
        contrastive_loss = self._contrastive_loss(z)

        total_loss = recon_loss + 0.1 * contrastive_loss  # 加权组合

        self.log('train_recon_loss', recon_loss, prog_bar=True)
        self.log('train_contrastive_loss', contrastive_loss)
        self.log('train_total_loss', total_loss, prog_bar=True)

        return total_loss

    def validation_step(self, batch, batch_idx):
        x, _ = batch
        z = self.encode(x)
        x_recon = self.decode(z)

        recon_loss = self.reconstruction_loss(x_recon, x)
        contrastive_loss = self._contrastive_loss(z)
        total_loss = recon_loss + 0.1 * contrastive_loss

        self.log('val_recon_loss', recon_loss, prog_bar=True)
        self.log('val_contrastive_loss', contrastive_loss)
        self.log('val_total_loss', total_loss, prog_bar=True)

        return total_loss

    def _contrastive_loss(self, z):
        """简单的对比学习损失实现"""
        batch_size = z.size(0)
        similarity = F.cosine_similarity(z.unsqueeze(1), z.unsqueeze(0), dim=2)

        # 对角线是自身相似度,应该排除
        mask = torch.eye(batch_size, dtype=torch.bool, device=z.device)
        similarity = similarity.masked_fill(mask, -9e15)

        # 计算对比损失
        similarity = similarity / self.temperature
        contrastive_loss = -torch.log_softmax(similarity, dim=1).diag().mean()

        return contrastive_loss

    def configure_optimizers(self):
        optimizer = torch.optim.Adam(self.parameters(), lr=self.learning_rate)
        scheduler = torch.optim.lr_scheduler.StepLR(optimizer, step_size=10, gamma=0.1)
        return [optimizer], [scheduler]
对应的配置文件中模型配置信息
python
model:
  class_path: models.multi_module_lightningCLI.AutoEncoderModel
  init_args:
    learning_rate: 0.001
    temperature: 0.5
    encoder:
      class_path: models.multi_module_lightningCLI.CNNEncoder
      init_args:
        input_channels: 1
        hidden_dims: [32, 64, 128]
        latent_dim: 256
    decoder:
      class_path: models.multi_module_lightningCLI.CNNDecoder
      init_args:
        output_channels: 1
        hidden_dims: [128, 64, 32]
        latent_dim: 256
自定义 LightningCLI
可以使用该类的初始化参数LightningCLI来自定义一些内容,例如:工具的描述、启用环境变量解析以及实例化训练器和配置解析器的其他参数。
然而,初始化参数对于许多用例来说并不足够。因此,该类被设计成可以扩展,从而可以自定义命令行工具的不同部分。它使用的参数解析器类 LightningCLI是 LightningArgumentParserPython 的 argparse 的扩展,因此可以使用 `add_arguments`add_argument()方法添加参数。与 argparse 不同的是,它提供了额外的添加参数的方法,例如,它可以add_class_arguments()添加类初始化时的所有参数,但要求参数必须具有类型提示。
该类LightningCLI有一个 add_arguments_to_parser()方法,可以实现以包含更多参数。解析后,配置信息存储在config类实例的属性中。 该类还有两个方法,可用于在执行LightningCLI前后运行代码: `and` 和 ` .`。
内容来自:https://pytorch-lightning.readthedocs.io/en/1.3.8/common/lightning_cli.html
训练阶段
(1)不带有配置文件的训练(设置回调函数)
python
#TODO 第一点 保存模型
save_callback = pl.callbacks.ModelCheckpoint(
    monitor='val_loss',#TODO 监控的指标为平均绝对误差最小的,这一点和on_validation_epoch_end日志记录的指标是呼应的
    save_top_k=1, #TODO 这里的1,表示保存的模型中,只保存前4个最好结果模型权重文件
    mode='min',#TODO 表示保存当前误差最小的模型
    filename='{epoch}-{val_mae:.2f}',#TODO 保存模型格式,
    dirpath=r'/home/ff/myProject/KGT/myProjects/myProjects/CrowdCLIP/scripts/myLightningCLI/ckpt' #保存模型的路径
)

def cli_main_method_one():
    # 核心:初始化 myLightningCLI
    cli = LightningCLI(
        model_class=MNISTModel,
        datamodule_class=MNISTDataModule,
        seed_everything_default=42,  # 设置随机种子以保证可重复性
        save_config_kwargs={'config_filename': 'config.yaml'},  # 将实验配置保存到文件
    )
    # 将回调添加到trainer
    cli.trainer.callbacks.append(save_callback)
    # 运行训练
    cli.trainer.fit(cli.model, datamodule=cli.datamodule)
使用CPU进行训练
python
python main.py fit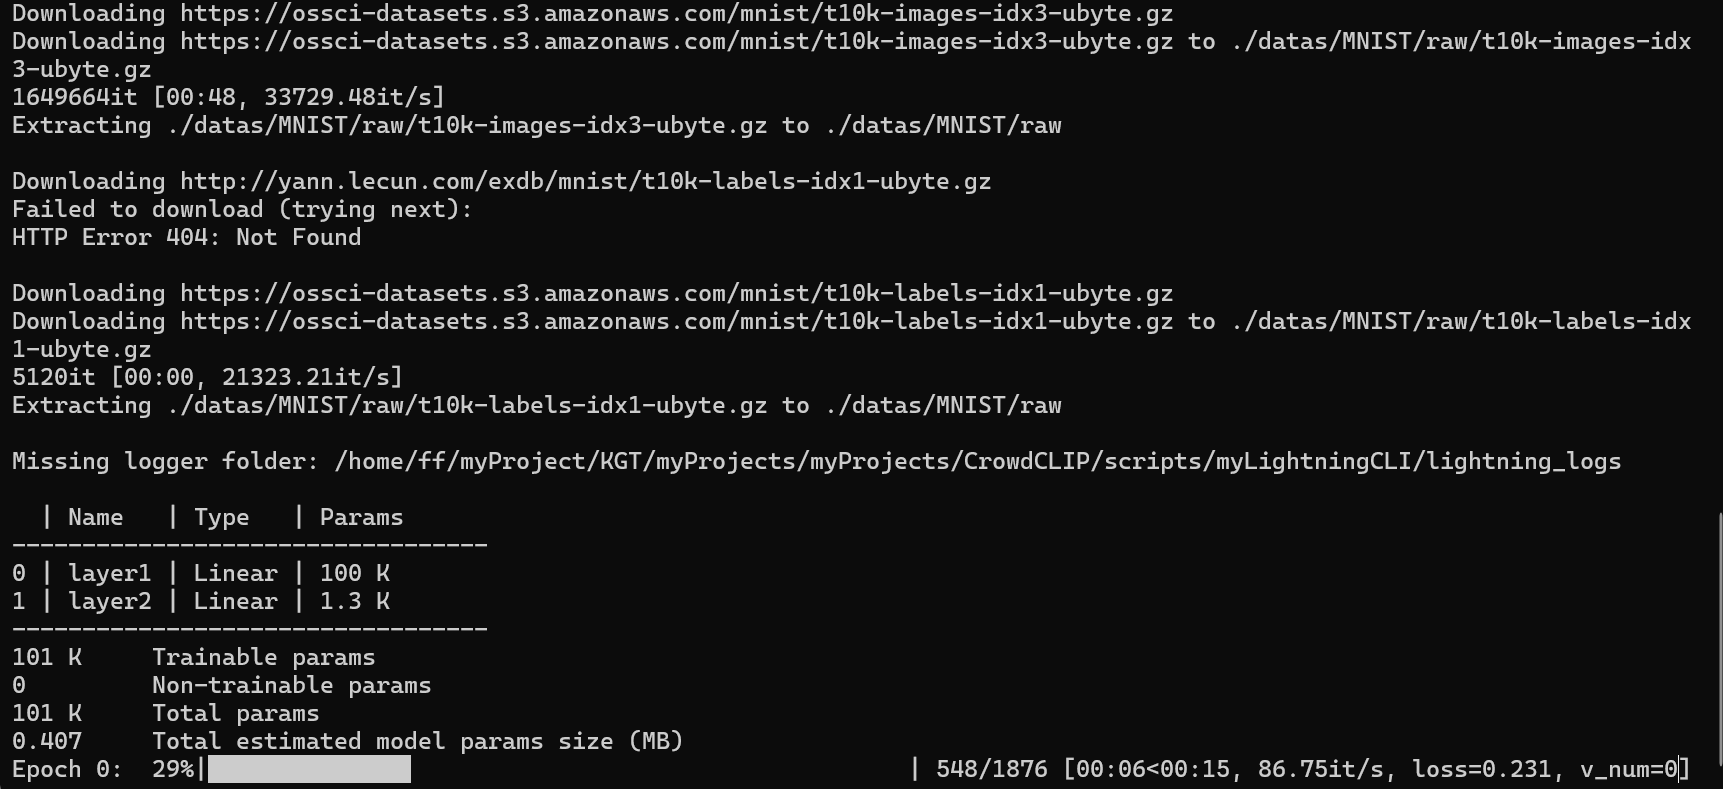
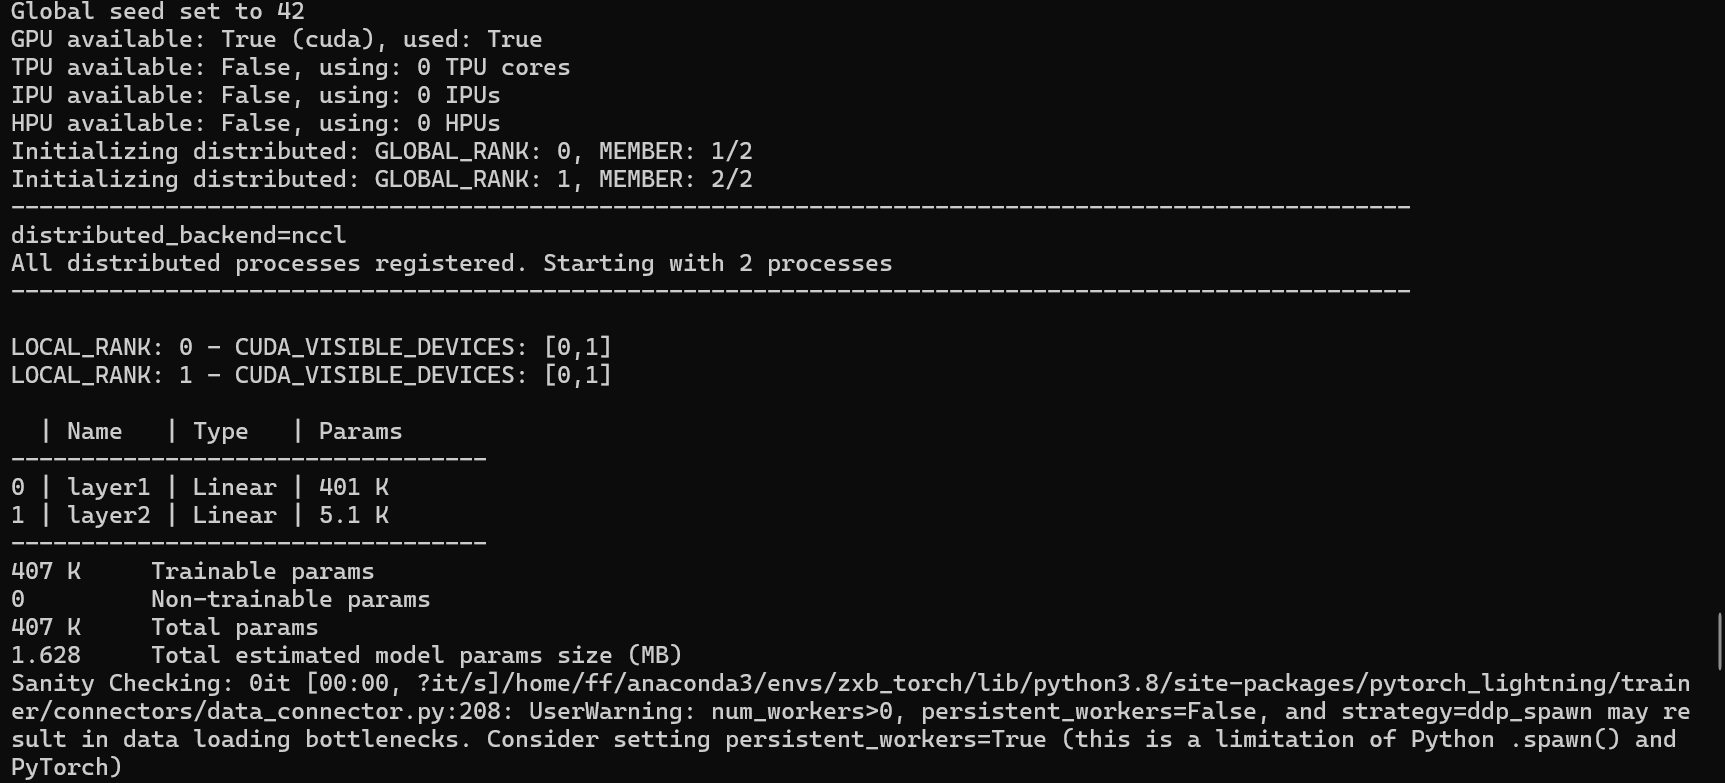
使用GPU进行训练
python
python main.py fit \
  --trainer.accelerator gpu
(2)带有配置文件的训练
大家一定要注意,如果在配置文件中设置model,data带有class_path和init_args信息的话,如果设置
subclass_mode_model=True,
subclass_mode_data=True,
python
def cli_main_method_two():
    # 核心:初始化 myLightningCLI,第二种方式是采用命令行的方式来进行
    # 回调函数的设置放在配置文件config.yaml中进行设置
    cli = LightningCLI(
        model_class=MNISTModel,
        datamodule_class=MNISTDataModule,
        seed_everything_default=42,  # 设置随机种子以保证可重复性
        subclass_mode_data=True,
        subclass_mode_model=True,
        save_config_kwargs={'config_filename': 'config.yaml'},  # 将实验配置保存到文件
    )

if __name__ == '__main__':
    # cli_main_method_one()
    cli_main_method_two()
    # cli_main_method_three()
    pass
不带有回调函数的默认配置文件default_config.yaml
python
python main.py fit --config ./configs/default_config.yamldefault_config.yaml
python
# default_config.yaml
seed_everything: 42

model:
  class_path: models.lightningCLI.MNISTModel  # 根据您的实际模型路径修改
  init_args:
    input_size: 784
    hidden_size: 512
    num_classes: 10
    learning_rate: 0.001

data:
  class_path: datas.dataset.MNISTDataModule  # 根据您的实际数据模块路径修改
  init_args:
    data_dir: /home/ff/myProject/KGT/myProjects/myProjects/CrowdCLIP/scripts/myLightningCLI/datas/datasets
    batch_size: 16
    num_workers: 8

trainer:
  max_epochs: 10
  accelerator: auto
  devices: auto
  logger: true

#ckpt_path: /home/ff/myProject/KGT/myProjects/myProjects/CrowdCLIP/scripts/myLightningCLI/ckpt/
上面是在代码中设置回调函数,下面在配置文件中设置回调函数
配置文件中设置回调函数config.yaml
python
# config.yaml
seed_everything: 42

model:
  class_path: models.lightningCLI.MNISTModel  # 根据您的实际模型路径修改
  init_args:
    input_size: 784
    hidden_size: 512
    num_classes: 10
    learning_rate: 0.001

data:
  class_path: datas.dataset.MNISTDataModule  # 根据您的实际数据模块路径修改
  init_args:
    data_dir: /home/ff/myProject/KGT/myProjects/myProjects/CrowdCLIP/scripts/myLightningCLI/datas/datasets
    batch_size: 16
    num_workers: 8

trainer:
  max_epochs: 10
  accelerator: auto
  devices: auto
  logger: true
  callbacks:
    - class_path: pytorch_lightning.callbacks.ModelCheckpoint
      init_args:
        monitor: val_mae
        save_top_k: 1
        mode: min
        filename: '{epoch}-{val_mae:.2f}'
        dirpath: /home/ff/myProject/KGT/myProjects/myProjects/CrowdCLIP/scripts/myLightningCLI/ckpt
    - class_path: pytorch_lightning.callbacks.EarlyStopping
      init_args:
        monitor: val_loss
        patience: 5
    - class_path: pytorch_lightning.callbacks.LearningRateMonitor
      init_args:
        logging_interval: epoch
#ckpt_path: /home/ff/myProject/KGT/myProjects/myProjects/CrowdCLIP/scripts/myLightningCLI/ckpt
(3)多个子模块模型的测试
python
"""
@Author : Keep_Trying_Go
@Major  : Computer Science and Technology
@Hobby  : Computer Vision
@Time   : 2025/11/19-15:26
@CSDN   : https://blog.csdn.net/Keep_Trying_Go?spm=1010.2135.3001.5421
"""


import torch
import torch.nn as nn
import torch.nn.functional as F
from abc import ABC, abstractmethod
import pytorch_lightning as pl


# 基础抽象类(保持接口一致)
class EncoderBaseClass(nn.Module, ABC):
    @abstractmethod
    def forward(self, x):
        pass


class DecoderBaseClass(nn.Module, ABC):
    @abstractmethod
    def forward(self, x):
        pass


# 简单的MLP编码器
class SimpleMLPEncoder(EncoderBaseClass):
    def __init__(self, input_size: int = 784, hidden_sizes: list = [512, 256], latent_dim: int = 128):
        super().__init__()
        print(f"🔧 Encoder: input_size={input_size}, hidden_sizes={hidden_sizes}, latent_dim={latent_dim}")

        layers = []
        prev_size = input_size

        # 构建编码层
        for hidden_size in hidden_sizes:
            layers.extend([
                nn.Linear(prev_size, hidden_size),
                nn.ReLU(inplace=True),
                nn.Dropout(0.2),
            ])
            prev_size = hidden_size

        # 最后一层到潜在空间
        layers.append(nn.Linear(hidden_sizes[-1], latent_dim))

        self.encoder = nn.Sequential(*layers)

    def forward(self, x):
        # 展平输入
        x = x.view(x.size(0), -1)
        return self.encoder(x)


# 简单的MLP解码器
class SimpleMLPDecoder(DecoderBaseClass):
    def __init__(self, output_size: int = 784, hidden_sizes: list = [256, 512], latent_dim: int = 128):
        super().__init__()
        print(f"🔧 Decoder: output_size={output_size}, hidden_sizes={hidden_sizes}, latent_dim={latent_dim}")

        layers = []
        prev_size = latent_dim

        # 构建解码层(与编码器对称)
        for hidden_size in hidden_sizes:
            layers.extend([
                nn.Linear(prev_size, hidden_size),
                nn.ReLU(inplace=True),
                nn.Dropout(0.2),
            ])
            prev_size = hidden_size

        # 最后一层到输出
        layers.extend([
            nn.Linear(hidden_sizes[-1], output_size),
            nn.Sigmoid()  # 输出在0-1之间
        ])

        self.decoder = nn.Sequential(*layers)

    def forward(self, x):
        return self.decoder(x)


class SimpleAutoEncoder(pl.LightningModule):
    """
    简单的MLP自编码器,确保不会出现形状错误
    """

    def __init__(
            self,
            input_size: int = 784,
            encoder_hidden_sizes: list = [512, 256],
            decoder_hidden_sizes: list = [256, 512],
            latent_dim: int = 128,
            learning_rate: float = 1e-3,
            batch_size: int = 32
    ):
        super().__init__()
        self.save_hyperparameters()

        self.input_size = input_size
        self.learning_rate = learning_rate
        self.batch_size = batch_size

        # 创建编码器和解码器
        self.encoder = SimpleMLPEncoder(
            input_size=input_size,
            hidden_sizes=encoder_hidden_sizes,
            latent_dim=latent_dim
        )

        self.decoder = SimpleMLPDecoder(
            output_size=input_size,
            hidden_sizes=decoder_hidden_sizes,
            latent_dim=latent_dim
        )

        # 损失函数
        self.reconstruction_loss = nn.MSELoss()

        # 验证模型形状兼容性
        self._validate_model()

    def _validate_model(self):
        with torch.no_grad():
            # 创建测试输入
            test_input = torch.randn(2, 1, 28, 28)  # batch_size=2, channels=1, 28x28
            test_input_flat = test_input.view(2, -1)
            # 测试前向传播
            encoded = self.encoder(test_input)

            decoded = self.decoder(encoded)


    def forward(self, x):
        """前向传播"""
        # 展平输入
        x_flat = x.view(x.size(0), -1)
        z = self.encoder(x_flat)
        x_recon = self.decoder(z)

        # 重塑回原始形状
        return x_recon.view(x.size(0), 1, 28, 28)

    def training_step(self, batch, batch_idx):
        x, _ = batch
        x_recon = self(x)

        # 计算重建损失
        loss = self.reconstruction_loss(x_recon, x)

        self.log('train_loss', loss, prog_bar=True)
        self.log('learning_rate', self.learning_rate, prog_bar=True)

        return loss

    def validation_step(self, batch, batch_idx):
        x, _ = batch
        x_recon = self(x)
        loss = self.reconstruction_loss(x_recon, x)

        self.log('val_loss', loss, prog_bar=True)
        return loss

    def test_step(self, batch, batch_idx):
        x, _ = batch
        x_recon = self(x)
        loss = self.reconstruction_loss(x_recon, x)

        self.log('test_loss', loss)
        return loss

    def configure_optimizers(self):
        optimizer = torch.optim.Adam(self.parameters(), lr=self.learning_rate)
        return optimizer
python
"""
@Author : Keep_Trying_Go
@Major  : Computer Science and Technology
@Hobby  : Computer Vision
@Time   : 2025/11/20-16:03
@CSDN   : https://blog.csdn.net/Keep_Trying_Go?spm=1010.2135.3001.5421
"""

# datas/dataset.py
import pytorch_lightning as pl
from torch.utils.data import DataLoader, random_split
from torchvision.datasets import MNIST
from torchvision import transforms
from typing import Optional


class MNISTDataModule(pl.LightningDataModule):
    def __init__(
            self,
            data_dir: str = "./data",
            batch_size: int = 32,
            num_workers: int = 4,
            validation_split: float = 0.1,
            image_size: int = 28  # 明确指定图像尺寸
    ):
        super().__init__()
        self.data_dir = data_dir
        self.batch_size = batch_size
        self.num_workers = num_workers
        self.validation_split = validation_split
        self.image_size = image_size

        self.transform = transforms.Compose([
            transforms.Resize((image_size, image_size)),
            transforms.ToTensor(),
            transforms.Normalize((0.1307,), (0.3081,))
        ])

    def prepare_data(self):
        MNIST(self.data_dir, train=True, download=True)
        MNIST(self.data_dir, train=False, download=True)

    def setup(self, stage: Optional[str] = None):
        if stage == "fit" or stage is None:
            mnist_full = MNIST(self.data_dir, train=True, transform=self.transform)
            val_size = int(len(mnist_full) * self.validation_split)
            train_size = len(mnist_full) - val_size
            self.mnist_train, self.mnist_val = random_split(mnist_full, [train_size, val_size])

    def train_dataloader(self):
        return DataLoader(self.mnist_train, batch_size=self.batch_size,
                          num_workers=self.num_workers, shuffle=True)

    def val_dataloader(self):
        return DataLoader(self.mnist_val, batch_size=self.batch_size,
                          num_workers=self.num_workers)
python
def cli_main_method_three():
    from datas.mutl_module_dataset import MNISTDataModule
    cli = LightningCLI(
        SimpleAutoEncoder,
        MNISTDataModule,
        seed_everything_default=42,
        subclass_mode_model=True,
        subclass_mode_data=True,
        save_config_kwargs={'config_filename': 'mutli_module_config.yaml'}
    )


if __name__ == '__main__':
    # cli_main_method_one()
    # cli_main_method_two()
    cli_main_method_three()
    pass
配置文件设置multi_module_config.yaml
python
# configs/mutli_module_config.yaml
seed_everything: 42

model:
  class_path: models.multi_module_lightningCLI.SimpleAutoEncoder
  init_args:
    input_size: 784  # 28x28
    encoder_hidden_sizes: [512, 256]    # 编码器隐藏层
    decoder_hidden_sizes: [256, 512]    # 解码器隐藏层(对称)
    latent_dim: 128                     # 潜在空间维度
    learning_rate: 0.001
    batch_size: 128

data:
  class_path: datas.mutl_module_dataset.MNISTDataModule
  init_args:
    data_dir: /home/ff/myProject/KGT/myProjects/myProjects/CrowdCLIP/scripts/LightningCLI/datas/datasets
    batch_size: 128
    num_workers: 8
    image_size: 28

trainer:
  max_epochs: 10
  accelerator: auto
  devices: auto
  logger: true
  callbacks:
    - class_path: pytorch_lightning.callbacks.ModelCheckpoint
      init_args:
        monitor: val_loss
        save_top_k: 2
        mode: min
        filename: 'simple_ae-{epoch:02d}-{val_loss:.4f}'
        save_last: true
        auto_insert_metric_name: false
        dirpath: /home/ff/myProject/KGT/myProjects/myProjects/CrowdCLIP/scripts/myLightningCLI/ckpt

    - class_path: pytorch_lightning.callbacks.EarlyStopping
      init_args:
        monitor: val_loss
        patience: 3
        mode: min
        verbose: true

    - class_path: pytorch_lightning.callbacks.LearningRateMonitor
      init_args:
        logging_interval: epoch
自定义LightningCLI训练以及相关配置
代码下载地址
https://github.com/KeepTryingTo/LightningCLI/tree/main
模型
python
"""
@Author : Keep_Trying_Go
@Major  : Computer Science and Technology
@Hobby  : Computer Vision
@Time   : 2025/11/20-15:37
@CSDN   : https://blog.csdn.net/Keep_Trying_Go?spm=1010.2135.3001.5421
"""

# models/autoencoder.py
import pytorch_lightning as pl
import torch
import torch.nn as nn
import torch.nn.functional as F
from typing import List


class Autoencoder(pl.LightningModule):
    def __init__(
            self,
            input_size: int = 784,
            hidden_sizes: List[int] = [512, 256, 128],
            latent_dim: int = 64,
            learning_rate: float = 1e-3,
            batch_size: int = 32,  # 从数据模块链接过来的参数
            dropout: float = 0.2
    ):
        super().__init__()
        self.save_hyperparameters()

        self.input_size = input_size
        self.batch_size = batch_size
        self.learning_rate = learning_rate

        # 编码器
        encoder_layers = []
        prev_size = input_size
        for hidden_size in hidden_sizes:
            encoder_layers.extend([
                nn.Linear(prev_size, hidden_size),
                nn.ReLU(),
                nn.Dropout(dropout)
            ])
            prev_size = hidden_size
        encoder_layers.append(nn.Linear(hidden_sizes[-1], latent_dim))
        self.encoder = nn.Sequential(*encoder_layers)

        # 解码器
        decoder_layers = []
        prev_size = latent_dim
        for hidden_size in reversed(hidden_sizes):
            decoder_layers.extend([
                nn.Linear(prev_size, hidden_size),
                nn.ReLU(),
                nn.Dropout(dropout)
            ])
            prev_size = hidden_size
        decoder_layers.append(nn.Linear(hidden_sizes[0], input_size))
        decoder_layers.append(nn.Sigmoid())  # 输出在0-1之间
        self.decoder = nn.Sequential(*decoder_layers)

    def forward(self, x):
        # 展平输入
        x = x.view(x.size(0), -1)
        z = self.encoder(x)
        return self.decoder(z)

    def training_step(self, batch, batch_idx):
        x, _ = batch
        x_recon = self(x)

        # 计算重建损失
        loss = F.mse_loss(x_recon, x.view(x.size(0), -1))

        self.log("train_loss", loss, prog_bar=True)
        self.log("train_batch_size", self.batch_size, prog_bar=True)

        return loss

    def validation_step(self, batch, batch_idx):
        x, _ = batch
        x_recon = self(x)
        loss = F.mse_loss(x_recon, x.view(x.size(0), -1))

        self.log("val_loss", loss, prog_bar=True)
        return loss

    def test_step(self, batch, batch_idx):
        x, _ = batch
        x_recon = self(x)
        loss = F.mse_loss(x_recon, x.view(x.size(0), -1))

        self.log("test_loss", loss)
        return loss

    def configure_optimizers(self):
        optimizer = torch.optim.Adam(self.parameters(), lr=self.learning_rate)
        scheduler = torch.optim.lr_scheduler.ReduceLROnPlateau(
            optimizer, mode='min', factor=0.5, patience=3, verbose=True
        )
        return {
            "optimizer": optimizer,
            "lr_scheduler": {
                "scheduler": scheduler,
                "monitor": "val_loss"
            }
        }
加载数据集
python
"""
@Author : Keep_Trying_Go
@Major  : Computer Science and Technology
@Hobby  : Computer Vision
@Time   : 2025/11/20-15:37
@CSDN   : https://blog.csdn.net/Keep_Trying_Go?spm=1010.2135.3001.5421
"""

# datas/mnist_datamodule.py
import pytorch_lightning as pl
from torch.utils.data import DataLoader, random_split
from torchvision.datasets import MNIST
from torchvision import transforms
from typing import Optional


class MNISTDataModule(pl.LightningDataModule):
    def __init__(
            self,
            data_dir: str = "./data",
            batch_size: int = 32,
            num_workers: int = 4,
            validation_split: float = 0.1,
            image_size: int = 28,
            download: bool = True
    ):
        super().__init__()
        self.data_dir = data_dir
        self.batch_size = batch_size
        self.num_workers = num_workers
        self.validation_split = validation_split
        self.image_size = image_size
        self.download = download

        self.transform = transforms.Compose([
            transforms.Resize((image_size, image_size)),
            transforms.ToTensor(),
            transforms.Normalize((0.1307,), (0.3081,))
        ])

        self.mnist_train = None
        self.mnist_val = None
        self.mnist_test = None

    def prepare_data(self):
        # 下载数据(只在第一个进程上运行)
        MNIST(self.data_dir, train=True, download=self.download)
        MNIST(self.data_dir, train=False, download=self.download)

    def setup(self, stage: Optional[str] = None):
        if stage == "fit" or stage is None:
            mnist_full = MNIST(self.data_dir, train=True, transform=self.transform)
            val_size = int(len(mnist_full) * self.validation_split)
            train_size = len(mnist_full) - val_size
            self.mnist_train, self.mnist_val = random_split(mnist_full, [train_size, val_size])

        if stage == "test" or stage is None:
            self.mnist_test = MNIST(self.data_dir, train=False, transform=self.transform)

    def train_dataloader(self):
        return DataLoader(
            self.mnist_train,
            batch_size=self.batch_size,
            num_workers=self.num_workers,
            shuffle=True
        )

    def val_dataloader(self):
        return DataLoader(
            self.mnist_val,
            batch_size=self.batch_size,
            num_workers=self.num_workers
        )

    def test_dataloader(self):
        return DataLoader(
            self.mnist_test,
            batch_size=self.batch_size,
            num_workers=self.num_workers
        )
配置文件信息.yaml
python
# configs/config.yaml
seed_everything: 42

notification_email: "researcher@lab.com"
experiment_name: "mnist_autoencoder_v1"

model:
  class_path: models.custom_model.Autoencoder
  init_args:
    hidden_sizes: [512, 256, 128]
    batch_size: 32
    input_size: 28
    latent_dim: 64
    learning_rate: 0.001
    dropout: 0.2

data:
  class_path: datas.custom_dataset.MNISTDataModule
  init_args:
    data_dir: "/home/ff/myProject/KGT/myProjects/myProjects/CrowdCLIP/scripts/myLightningCLI/datas/datasets"
    batch_size: 16
    num_workers: 8
    validation_split: 0.2
    image_size: 28
    download: true

trainer:
  max_epochs: 20
  accelerator: "auto"
  devices: "auto"
  logger: true
  enable_progress_bar: true
  callbacks:
    - class_path: pytorch_lightning.callbacks.ModelCheckpoint
      init_args:
        monitor: val_loss
        save_top_k: 1
        mode: min
        filename: '{epoch}-{val_mae:.2f}'
        dirpath: "/home/ff/myProject/KGT/myProjects/myProjects/CrowdCLIP/scripts/myLightningCLI/custom_lightningCLI/ckpt"
    - class_path: pytorch_lightning.callbacks.EarlyStopping
      init_args:
        monitor: val_loss
        patience: 5
    - class_path: pytorch_lightning.callbacks.LearningRateMonitor
      init_args:
        logging_interval: epoch
main.py
python
"""
@Author : Keep_Trying_Go
@Major  : Computer Science and Technology
@Hobby  : Computer Vision
@Time   : 2025/11/20-15:33
@CSDN   : https://blog.csdn.net/Keep_Trying_Go?spm=1010.2135.3001.5421
"""

# train.py
import pytorch_lightning as pl
from pytorch_lightning.cli import LightningCLI
from pytorch_lightning.callbacks import (ModelCheckpoint,
                                         EarlyStopping,
                                         LearningRateMonitor)
import datetime
import time

from models.custom_model import Autoencoder
from datas.custom_dataset import MNISTDataModule
from utils.send_email import (send_training_start_notification,
                              send_training_end_notification)

# 链接参数:数据模块的image_size -> 模型的input_size(需要转换)
def image_size_to_input_size(image_size):
    return image_size * image_size

class MyLightningCLI(LightningCLI):
    """
    自定义 LightningCLI 实现
    包含参数链接、训练通知等高级功能
    """

    def add_arguments_to_parser(self, parser):
        """添加自定义命令行参数"""
        # 添加通知邮箱参数
        parser.add_argument(
            "--notification_email",
            type=str,
            default="your_email@example.com",
            help="Email address for training notifications"
        )

        # 添加实验名称参数
        parser.add_argument(
            "--experiment_name",
            type=str,
            default="autoencoder_experiment",
            help="Name of the current experiment"
        )

        # 链接参数:数据模块的batch_size -> 模型的batch_size
        parser.link_arguments(source="data.init_args.batch_size", target="model.init_args.batch_size")

        parser.link_arguments(
            source="data.init_args.image_size",
            target="model.init_args.input_size",
            compute_fn=image_size_to_input_size
        )

    def before_fit(self):
        """在训练开始前执行"""
        self.start_time = time.time()

        # 发送训练开始通知
        # send_training_start_notification(
        #     email=self.config[self.subcommand].notification_email,
        #     model_name=self.model.__class__.__name__,
        #     dataset_name="MNIST"
        # )

        # 添加回调函数
        callbacks = self._setup_callbacks()
        for callback in callbacks:
            self.trainer.callbacks.append(callback)

        print(f"Starting training for experiment: {self.config[self.subcommand].experiment_name}")
        print(f"Notifications will be sent to: {self.config[self.subcommand].notification_email}")
        print(f"Model: {self.model.__class__.__name__}")
        print(f"Data: {self.datamodule.__class__.__name__}")

    def after_fit(self):
        """在训练结束后执行"""
        training_time = time.time() - self.start_time

        # 收集最终指标
        final_metrics = {}
        if hasattr(self.trainer, 'callback_metrics'):
            for key, value in self.trainer.callback_metrics.items():
                if hasattr(value, 'item'):
                    final_metrics[key] = value.item()

        # 发送训练完成通知
        # send_training_end_notification(
        #     email=self.config[self.subcommand].notification_email,
        #     model_name=self.model.__class__.__name__,
        #     training_time=str(datetime.timedelta(seconds=int(training_time))),
        #     final_metrics=final_metrics
        # )

        print(f"Training completed in {training_time:.2f} seconds")
        print(f"Final metrics: {final_metrics}")

    def _setup_callbacks(self):
        """设置训练回调函数"""
        checkpoint_callback = ModelCheckpoint(
            monitor="val_loss",
            dirpath=f"checkpoints/{self.config[self.subcommand].experiment_name}",
            filename="autoencoder-{epoch:02d}-{val_loss:.4f}",
            save_top_k=3,
            mode="min",
            save_last=True
        )

        early_stopping = EarlyStopping(
            monitor="val_loss",
            patience=5,
            mode="min",
            verbose=True
        )

        lr_monitor = LearningRateMonitor(logging_interval="epoch")

        return [checkpoint_callback, early_stopping, lr_monitor]


def main():
    """主函数"""
    cli = MyLightningCLI(
        model_class=Autoencoder,
        datamodule_class=MNISTDataModule,
        seed_everything_default=42,
        subclass_mode_data=True,
        subclass_mode_model=True,
        save_config_kwargs={
            "config_filename": "config.yaml",
            "overwrite": True
        }
    )

    # 手动运行训练
    cli.before_fit()
    cli.trainer.fit(cli.model, datamodule=cli.datamodule)
    cli.after_fit()

    # 测试模型
    if hasattr(cli.datamodule, 'test_dataloader'):
        cli.trainer.test(cli.model, datamodule=cli.datamodule)


if __name__ == "__main__":
    main()