使用label-studio 进行数据标注,可以多人协作,标注人员无需安装额外标注工具,无需将原图片拷贝到标注人员那,比较方面。本次使用label-studio 版本 1.20.0,label-studio-sdk 版本1.0.18
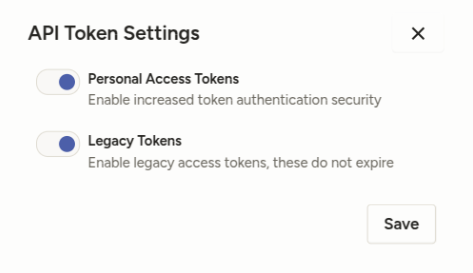
1 首先,生成lagacy token ,点击organization ,点击右侧api token settings ,使能legacy tokens ,后保存,
然后在个人页面的右上角 Account &Settings 最后可以看到legacy token
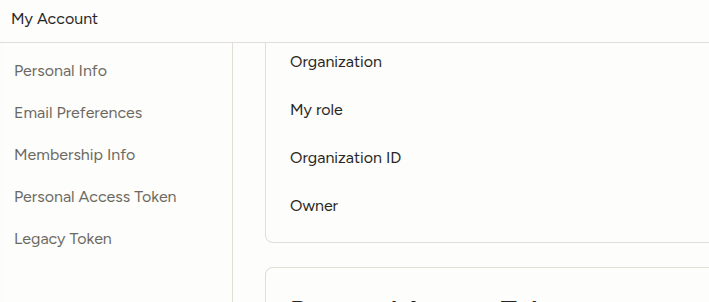
legacy token 是使用机器学习后端的前提,同时说明下,legacy token 不需要收费也可以获得,
然后添加环境变量 vim ~/.bashrc
export LABEL_STUDIO_URL=***
export LABEL_STUDIO_API_KEY=legacy token
这里的api key 即是legacy token
source ~/.bashrc #更新环境变量
2 克隆机器学习后端项目
git clone https://github.com/HumanSignal/label-studio-ml-backend.git
cd label-studio-ml-backend/label_studio_ml/examples/{MODEL_NAME}
docker-compose up
MODEL_NAME 为需要使用的模型名字,这里有很多,比如segment_anything_2_image、segment_anything_2_video、timeseries_segmenter、yolo ,因为使用目标检测,这里选择yolo
请注意这里启动的是默认的yolo 模型,如果要使用个性化训练的yolo ,需要继续向下
3 使用个性化训练的模型进行预标注
(1)创建虚拟环境(这里使用conda )
git clone https://github.com/HumanSignal/label-studio-ml-backend.git
cd label-studio-ml-backend/
pip install -e .
安装上对应的环境,requirements.txt 最后的包是label-studio-sdk @ git+https://github.com/HumanSignal/label-studio-sdk.git,如果此步安装比较慢或报错,可以使用abel-studio-sdk @ git+https://kkgithub.com/HumanSignal/label-studio-sdk.git 试试,成功率会大些,安装后label-studio-ml 版本2.0.1.dev0
(2)创建机器学习后端
label-studio-ml create my_ml_backend名字可以根据需要进行更改,这里保留默认名字,回车后,输出
=========================
Welcome to Label Studio ML!
==========================
You don't specify script path: by default, "/***/label-studio-ml-backend-master/label_studio_ml/default_configs/model.py" is used
Congratulations! ML Backend has been successfully initialized in ./my_ml_backend
Here are the next steps:
- Try it out by running:
label-studio-ml start ./my_ml_backend
You should be able to connect to it in Label Studio project Settings > Machine Learning > Add Model and provide with the following URL: http://localhost:9090
- Go to ./my_ml_backend/model.py and modify it as you wish:
-
predict() - define your prediction logic here
-
fit() - define your training logic here (optional)
- Deploy your model with docker:
cd ./my_ml_backend
docker-compose up
- Have fun! :)
可以看到,机器学习后端默认地址为http://localhost:9090,同时在项目里链接上这个模型地址,再者需要更改 ./my_ml_backend/model.py 的perdict() 函数来进行适配,先看下默认的perdict() 函数是什么
class NewModel(LabelStudioMLBase):
    """Custom ML Backend model
    """

    def setup(self):
        """Configure any parameters of your model here
        """
        self.set("model_version", "0.0.1")

    def predict(self, tasks: List[Dict], context: Optional[Dict] = None, **kwargs) -> ModelResponse:
        """ Write your inference logic here
            :param tasks: [Label Studio tasks in JSON format](https://labelstud.io/guide/task_format.html)
            :param context: [Label Studio context in JSON format](https://labelstud.io/guide/ml_create#Implement-prediction-logic)
            :return model_response
                ModelResponse(predictions=predictions) with
                predictions: [Predictions array in JSON format](https://labelstud.io/guide/export.html#Label-Studio-JSON-format-of-annotated-tasks)
        """
        print(f'''\
        Run prediction on {tasks}
        Received context: {context}
        Project ID: {self.project_id}
        Label config: {self.label_config}
        Parsed JSON Label config: {self.parsed_label_config}
        Extra params: {self.extra_params}''')
可以看到,创建了一个类,NewModel,继承于LabelStudioMLBase,setupmodel 是准备这个类,predict 是使用model 进行预测,请注意这里要转化为label-studio 支持的json 格式,json 格式示例如下
{
"id": 1,
"created_at":"2021-03-09T21:52:49.513742Z",
"updated_at":"2021-03-09T22:16:08.746926Z",
"project":83,
"data": {
"image": "https://example.com/opensource/label-studio/1.jpg"
},
"annotations": [
{
"id": "1001",
"result": [
{
"from_name": "tag",
"id": "Dx_aB91ISN",
"source": "$image",
"to_name": "img",
"type": "rectanglelabels",
"value": {
"height": 10.458911419423693,
"rectanglelabels": [
"Moonwalker"
],
"rotation": 0,
"width": 12.4,
"x": 50.8,
"y": 5.869797225186766
}
}
],
"was_cancelled":false,
"ground_truth":false,
"created_at":"2021-03-09T22:16:08.728353Z",
"updated_at":"2021-03-09T22:16:08.728378Z",
"lead_time":4.288,
"result_count":0,
"task":1,
"completed_by":10
}
],
"predictions": [
{
"created_ago": "3 hours",
"model_version": "model 1",
"result": [
{
"from_name": "tag",
"id": "t5sp3TyXPo",
"source": "$image",
"to_name": "img",
"type": "rectanglelabels",
"value": {
"height": 11.612284069097889,
"rectanglelabels": [
"Moonwalker"
],
"rotation": 0,
"width": 39.6,
"x": 13.2,
"y": 34.702495201535505
}
}
]
},
{
"created_ago": "4 hours",
"model_version": "model 2",
"result": [
{
"from_name": "tag",
"id": "t5sp3TyXPo",
"source": "$image",
"to_name": "img",
"type": "rectanglelabels",
"value": {
"height": 33.61228406909789,
"rectanglelabels": [
"Moonwalker"
],
"rotation": 0,
"width": 39.6,
"x": 13.2,
"y": 54.702495201535505
}
}
]
}
]
}
task 信息主要包含3个信息:基本信息、标注信息(annotations)和预测信息(predictions),重点关注predictions,predictions 的result 存放标注结果,是一个列表,我们目前主要使用这个task 的信息,修改setup 和predict 完成predict 返回要求的json 格式。
修改后的NewModel 如下
from typing import List, Dict, Optional
from label_studio_ml.model import LabelStudioMLBase
from label_studio_ml.response import ModelResponse

from label_studio_ml.utils import  get_single_tag_keys, get_image_local_path
from label_studio_ml.api import  logger
from ultralytics import YOLO

class NewModel(LabelStudioMLBase):
    """Custom ML Backend model
    """

    def setup(self):
        """Configure any parameters of your model here
        """
        self.set("model_version", "0.0.1")
        self.detector= YOLO("/***/best.pt",) #yolo v11n,已训练好的模型权重

        self.from_name, self.to_name, self.value, self.labels_in_config =get_single_tag_keys(self.parsed_label_config,
                            'RectangleLabels', 'Image')  # 前端获取任务属性

        self.labels_in_config = set(self.labels_in_config)  # 前端配置的标签列表


    def predict(self, tasks: List[Dict], context: Optional[Dict] = None, **kwargs) -> ModelResponse:
        """ Write your inference logic here
            :param tasks: [Label Studio tasks in JSON format](https://labelstud.io/guide/task_format.html)
            :param context: [Label Studio context in JSON format](https://labelstud.io/guide/ml_create#Implement-prediction-logic)
            :return model_response
                ModelResponse(predictions=predictions) with
                predictions: [Predictions array in JSON format](https://labelstud.io/guide/export.html#Label-Studio-JSON-format-of-annotated-tasks)
        """
        print(f'''\
        Run prediction on {tasks}
        Received context: {context}
        Project ID: {self.project_id}
        Label config: {self.label_config}
        Parsed JSON Label config: {self.parsed_label_config}
        Extra params: {self.extra_params}''')
        predictions = {
            # "model_version": self.get("model_version"),
            "result": [],
            "scores": 0
        }
        average_conf=0
        for task in tasks:
            image_path = self.get_local_path(task['data']['image'], task_id=task['id']) #获取图片路径

            results=self.detector.predict(image_path,conf=0.5)
            for result in results: #yolo 检测后的结果
                #获取对应信息
                confs = result.boxes.conf.cpu().numpy().tolist()
                for index in range(len(result.boxes.cls.cpu().numpy().tolist())): #index 是序号
                    index_=int(result.boxes.cls.cpu().numpy().tolist()[index]) #index_ 是目标id
                    label=result.names[index_] #获取实际标签
                    if label not in self.labels_in_config: #不在这个项目,则跳过
                        continue

                    bbox=result.boxes.xyxyn.cpu().numpy().tolist()[index] #获取坐标

                    conf=confs[index] #获取置信度
                    img_height,img_width,  = result.orig_shape #(1080, 1920)

                    prediction={
                            # "id": task['id'],
                            'from_name': self.from_name,
                            'to_name': self.to_name,
                            # "source": "$image",
                            "original_width": img_width,
                            "original_height": img_height,
                            "image_rotation": 0,
                            'type': 'rectanglelabels',
                            "value":{
                                'rectanglelabels': [label],
                                'x': round(bbox[0]  * 100,2),	# 坐标需要转换
                                'y': round(bbox[1]  * 100,2),	# 数值类型返回整型
                                'width': round((bbox[2]-bbox[0])  * 100,2),
                                'height': round((bbox[3]-bbox[1])  * 100,2),
                                "rotation": 0
                            }
                   }

                    predictions["result"].append(prediction)
                predictions["score"] = sum(confs)/ max(len(confs), 1)

        return ModelResponse(predictions=[predictions])
说明下,这里只保留xywhn,rotation 设置为0,同时ModelResponse这个类的参数predictions 是一个列表
(3)开启机器学习后端
这里使用直接开启的方式进行开启
label-studio-ml start my_ml_backend
服务开起来之后进行检查
curl http://127.0.0.1:9090/health
{"model_class":"NewModel","status":"UP"}
也可以使用自建项目目录的test_api.py 进行测试,不过这个测试没有通过。大致看了下,这个接口主要包含/webhock,/setup,/predict ,最后一个是结果预测使用的路径
(4)配置需要标注的项目
添加model :settings-model ,声明一个名字,再添加url 地址,如果url地址是通的保存即可
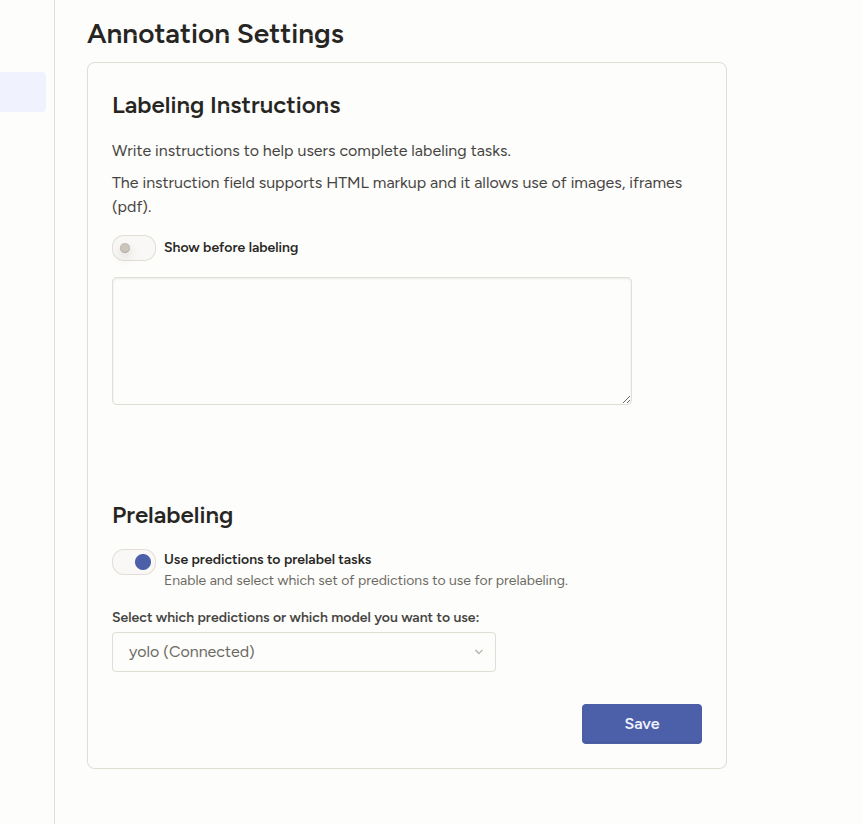
annotation 设置,如下图所示prelabeling ,需要使能,同时下面模型选择添加的模型,保存即可
这里说下,标签,训练的标签和目前标注项目的标签尽量保持一致,这里修改后的label interface 代码如下
<View>
<Image name="image" value="$image"/>
<RectangleLabels name="label" toName="image" model_score_threshold="0.5">
<Label value="00-hand_empty" background="#ff0000" predicted_values="00-hand_empty"/><Label value="01-hand_non_empty" background="#00ff00" predicted_values="01-hand_non_empty" /><Label value="02-drawer_small" background="#0000ff" predicted_values="02-drawer_small"/><Label value="03-hand_larger" background="#ffff00" predicted_values="03-hand_larger"/></RectangleLabels>
</View>
我这个项目是一一对应的,也可以不对应,不过要处理好标签对应逻辑
(5)查看标注效果
这里有2种方式,在Default 标签页,选中任务,
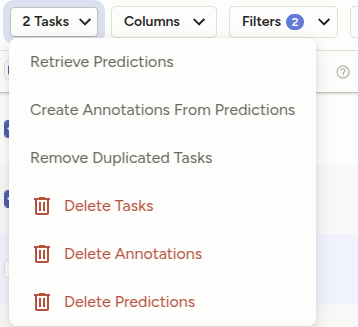
点击 "Retrieve Predicitions",会自动获取模型预标注结果,并展示出来,也可以直接单击任务进行标记,

这里就可以看到预标注的结果了,第2个,带*号便是预标注结果,然后稍作修正,summit 即可。这里再补充下,预标注结果是不可更改的,如果想要获取新的预标注结果,需要选中任务,Delete Predictions 删除之前预标注结果,再获取,即可更新预标注结果
参考资料:
1 https://labelstud.io/guide/ml (官方英文文档)
2 https://www.aidoczh.com/labelstudio/guide/ml.html (中文的文档)
3 https://blog.csdn.net/EasonCcc/article/details/122583156
4 https://www.lixueduan.com/posts/ai/08-labelstudio-pre-annotation/
5 https://labelstud.io/guide/task_format.html (任务的格式化文档)