
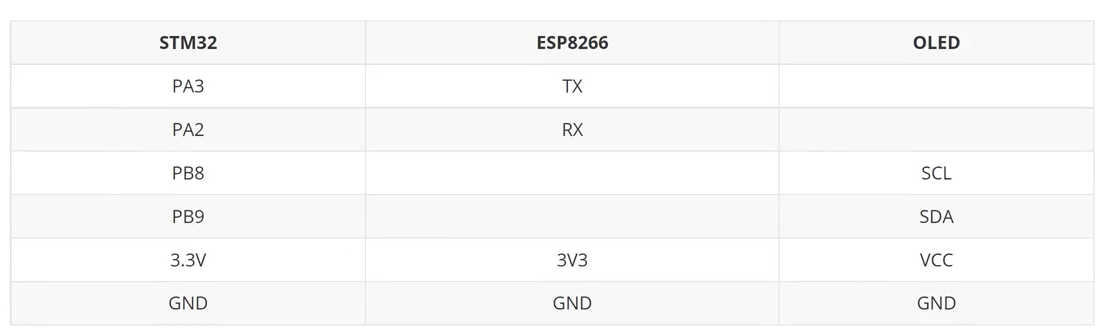
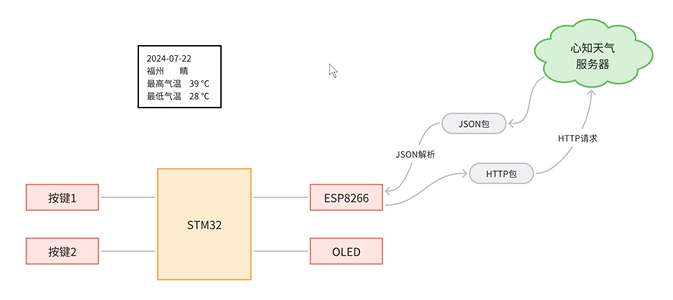
1. 硬件接线与功能需求
按key1跳转到下一天天气情况,按key2更新天气
2. 前置了解
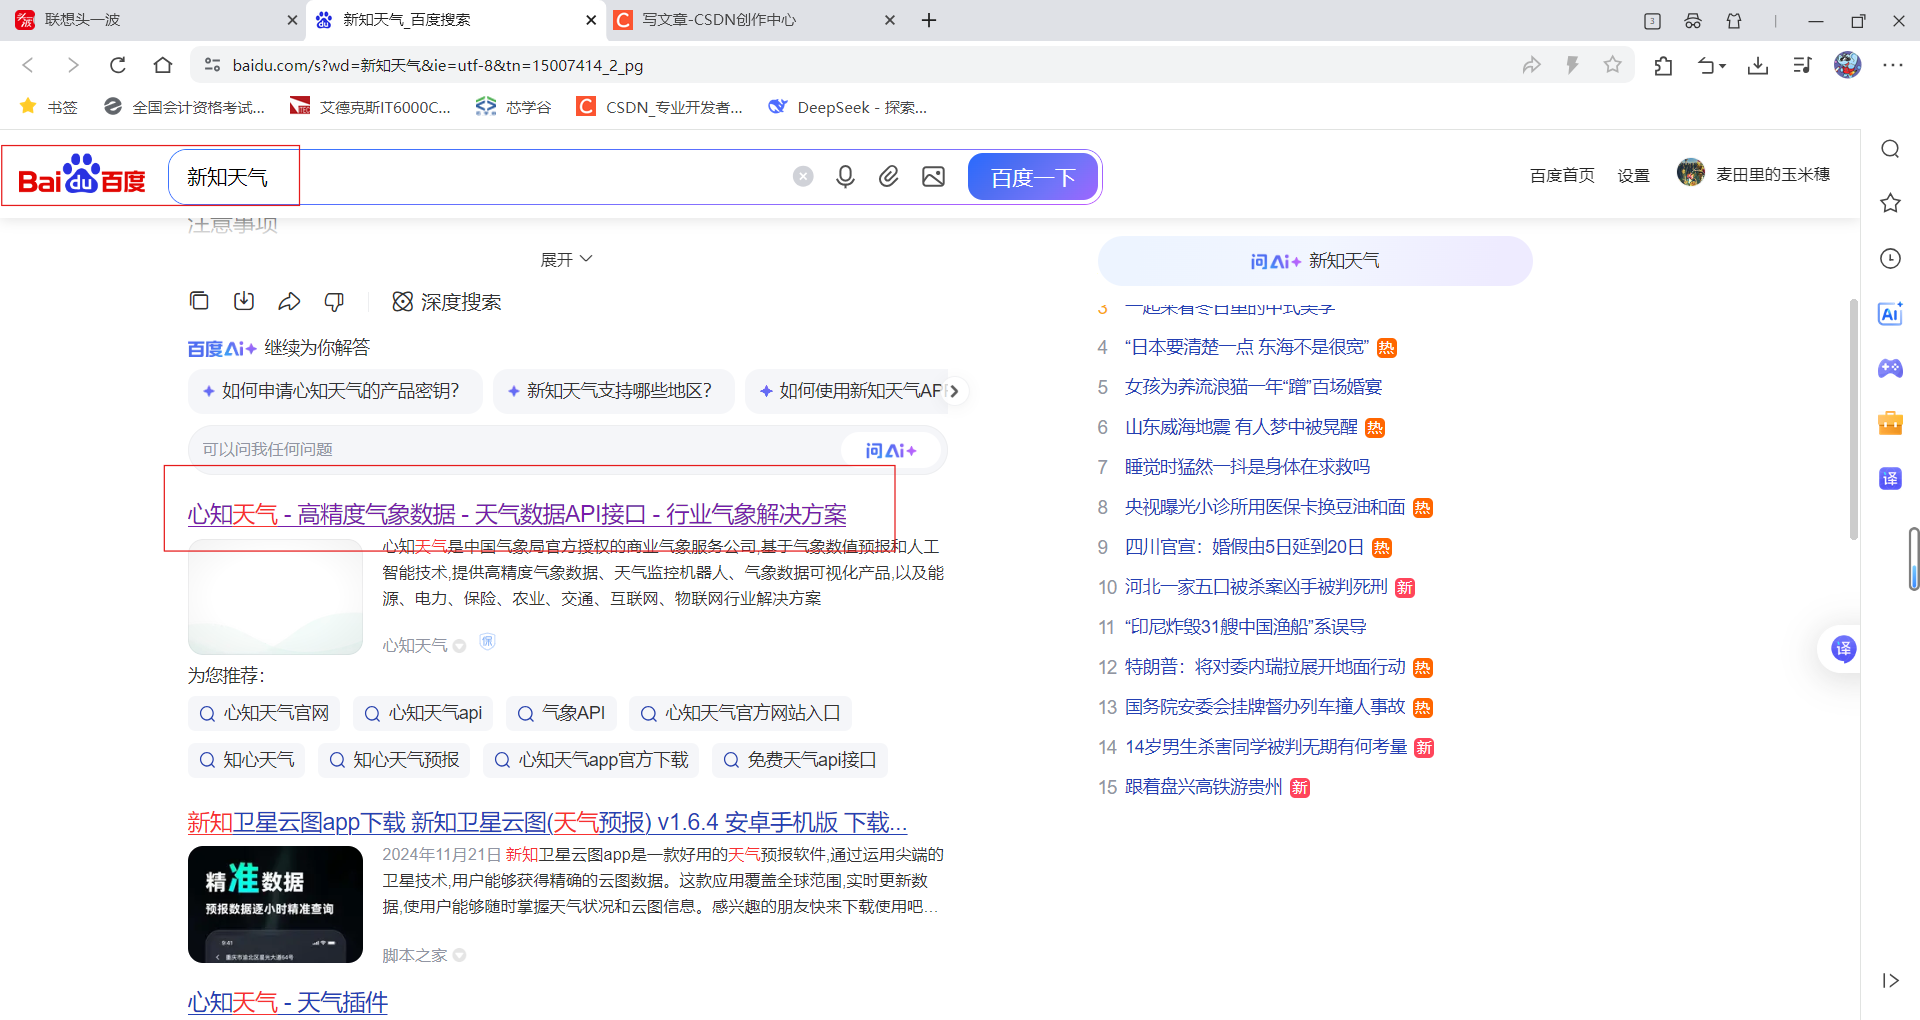
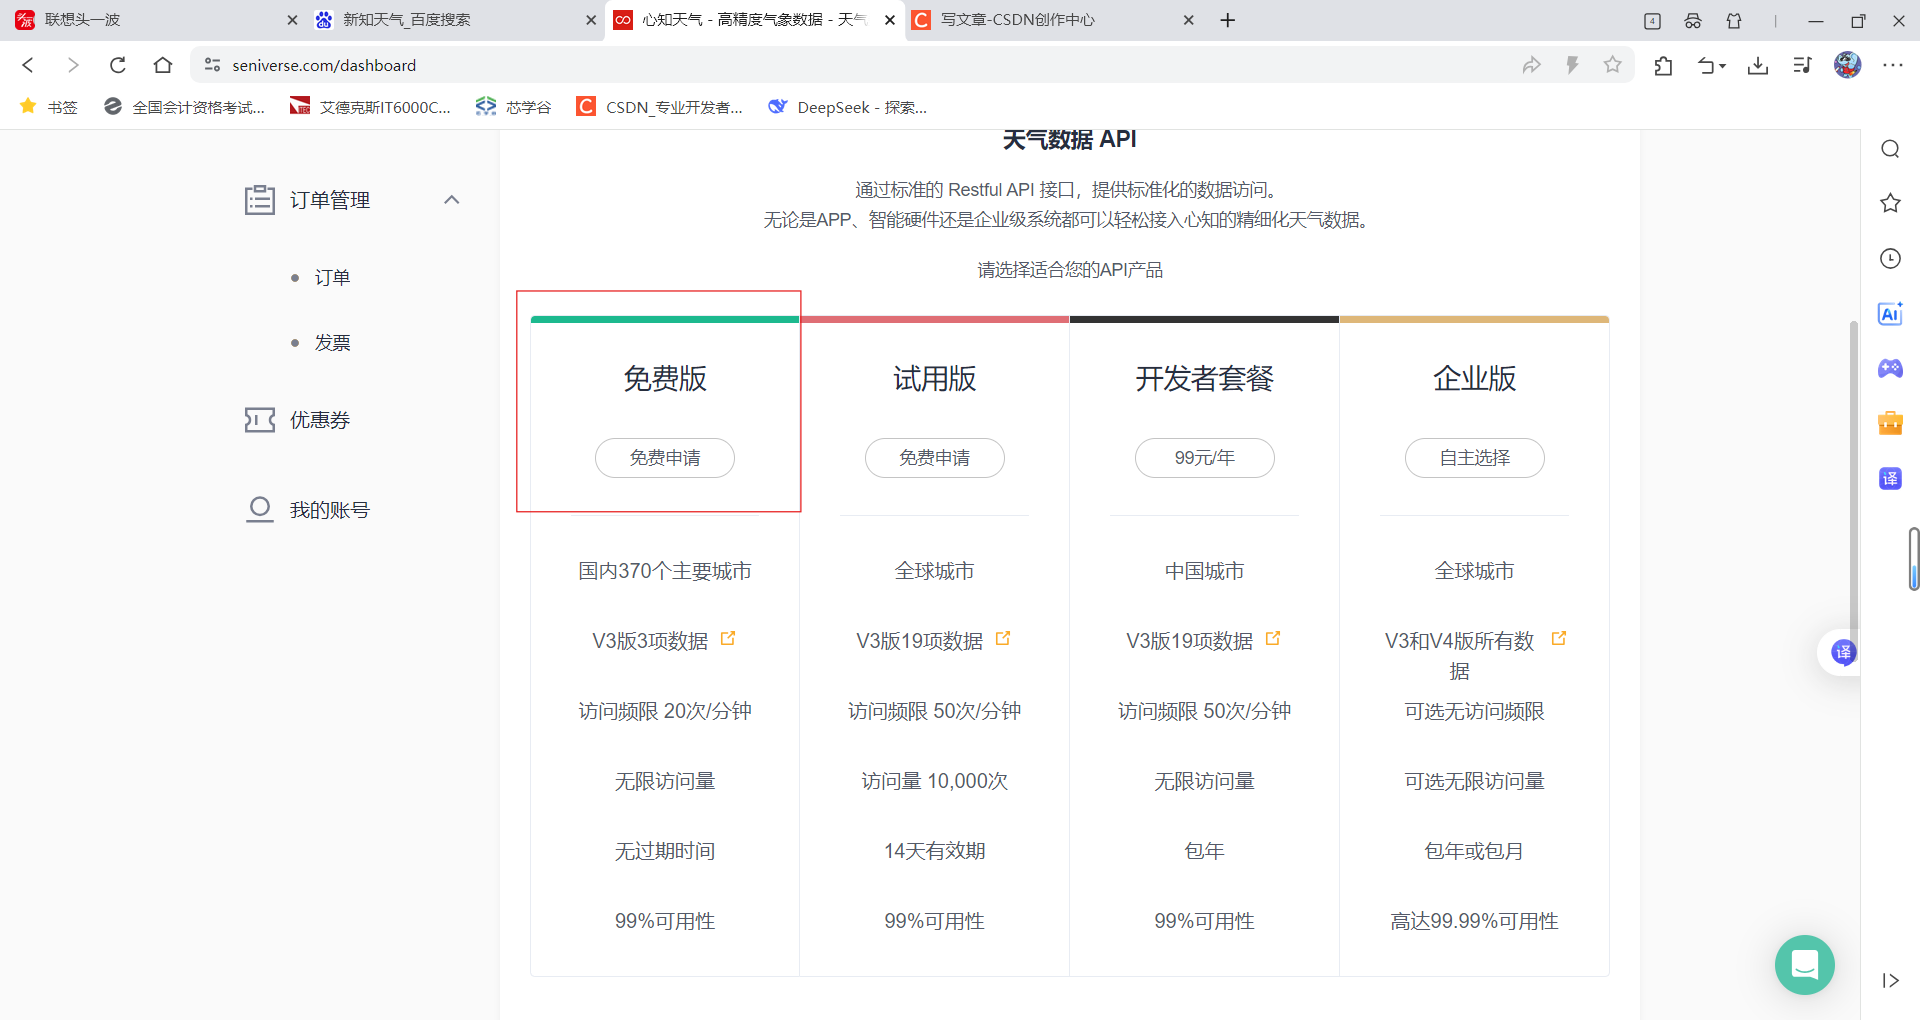
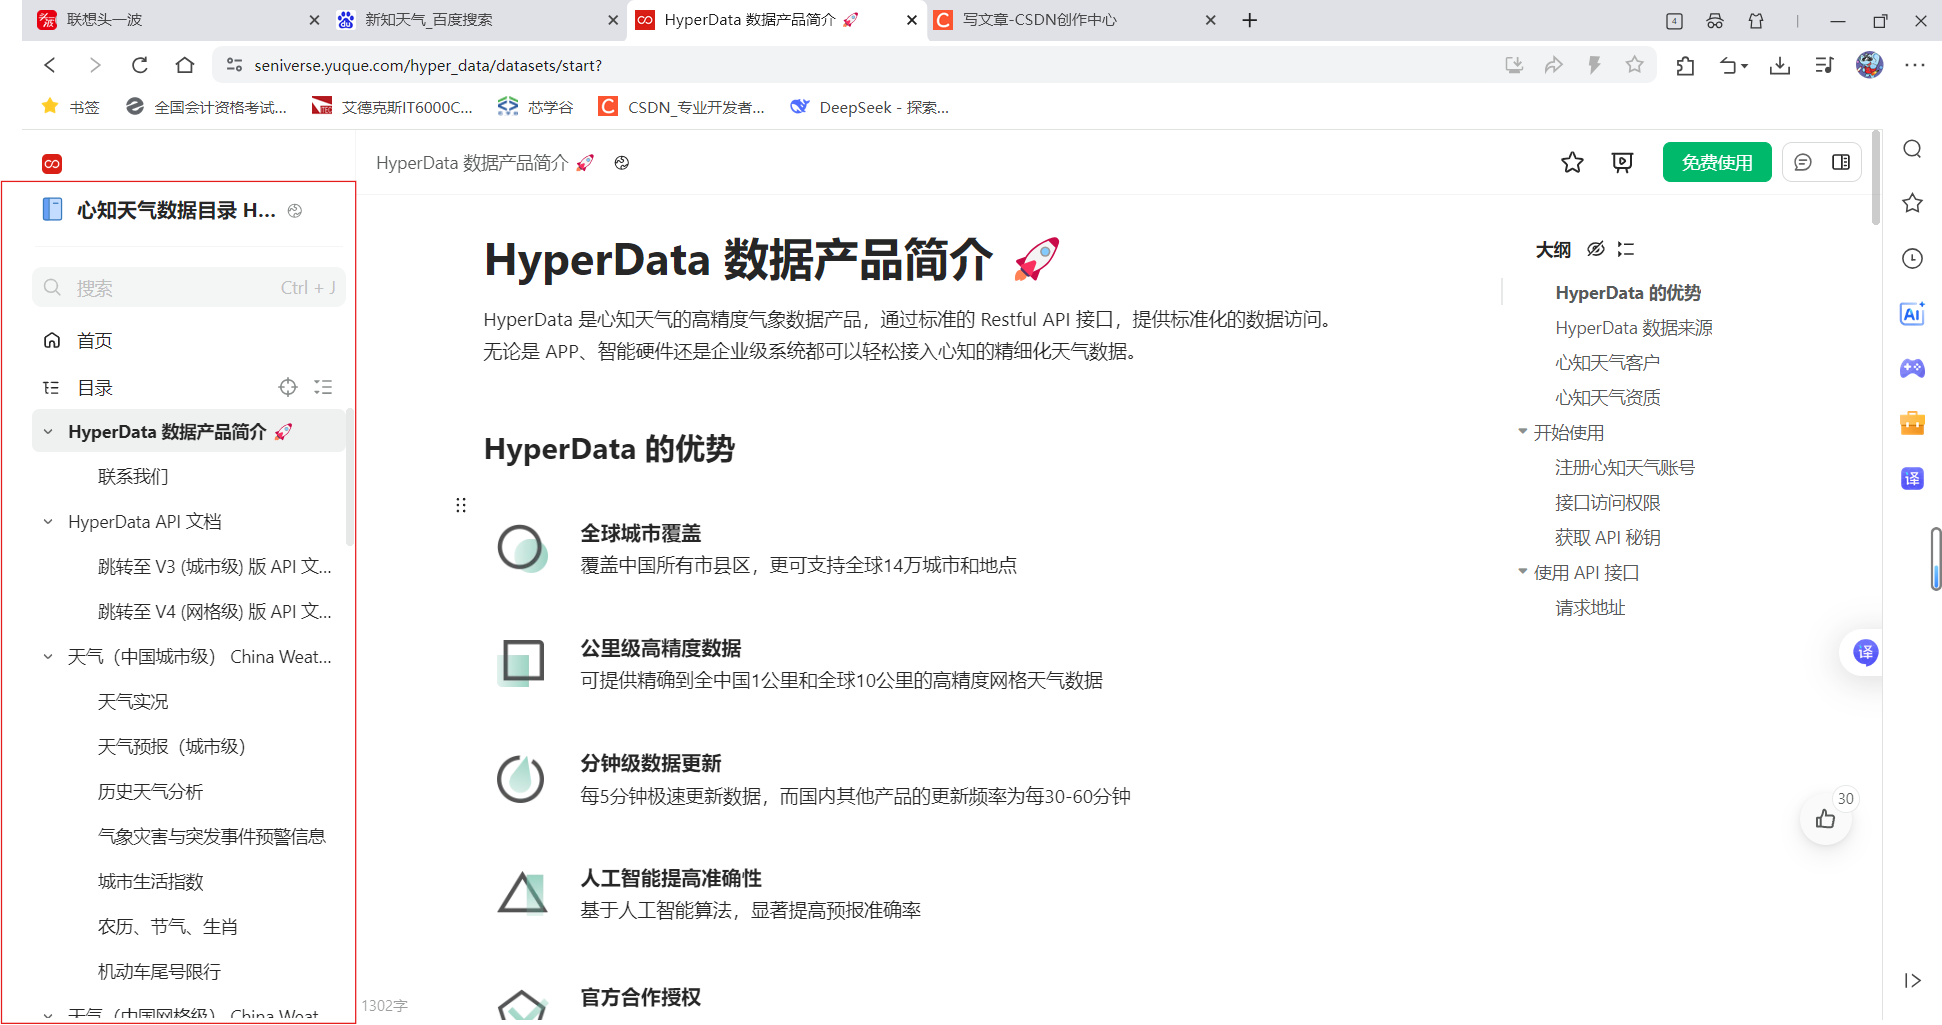
2.1 新知天气平台详解
提供天气数据的平台
注册完后点击控制台

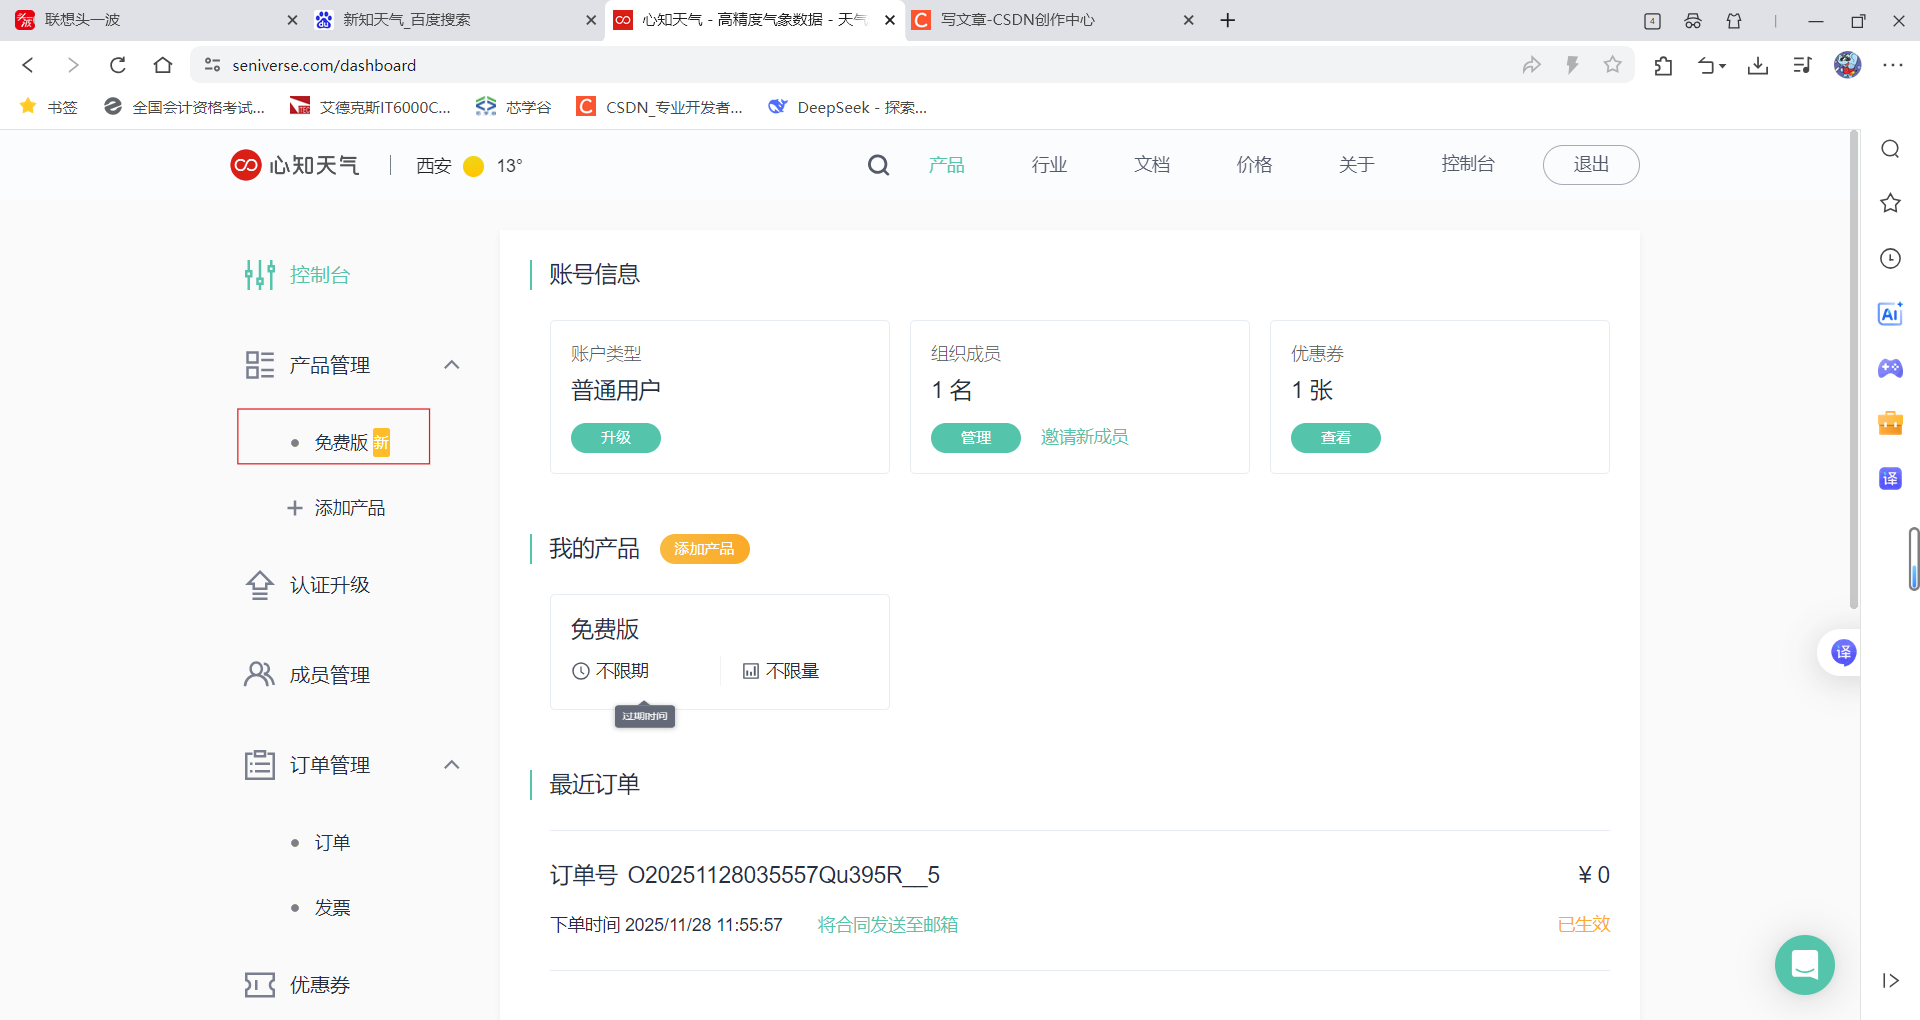
看这个产品文档可以发现它功能非常多,不过我们项目只需要用到当地天气就好了
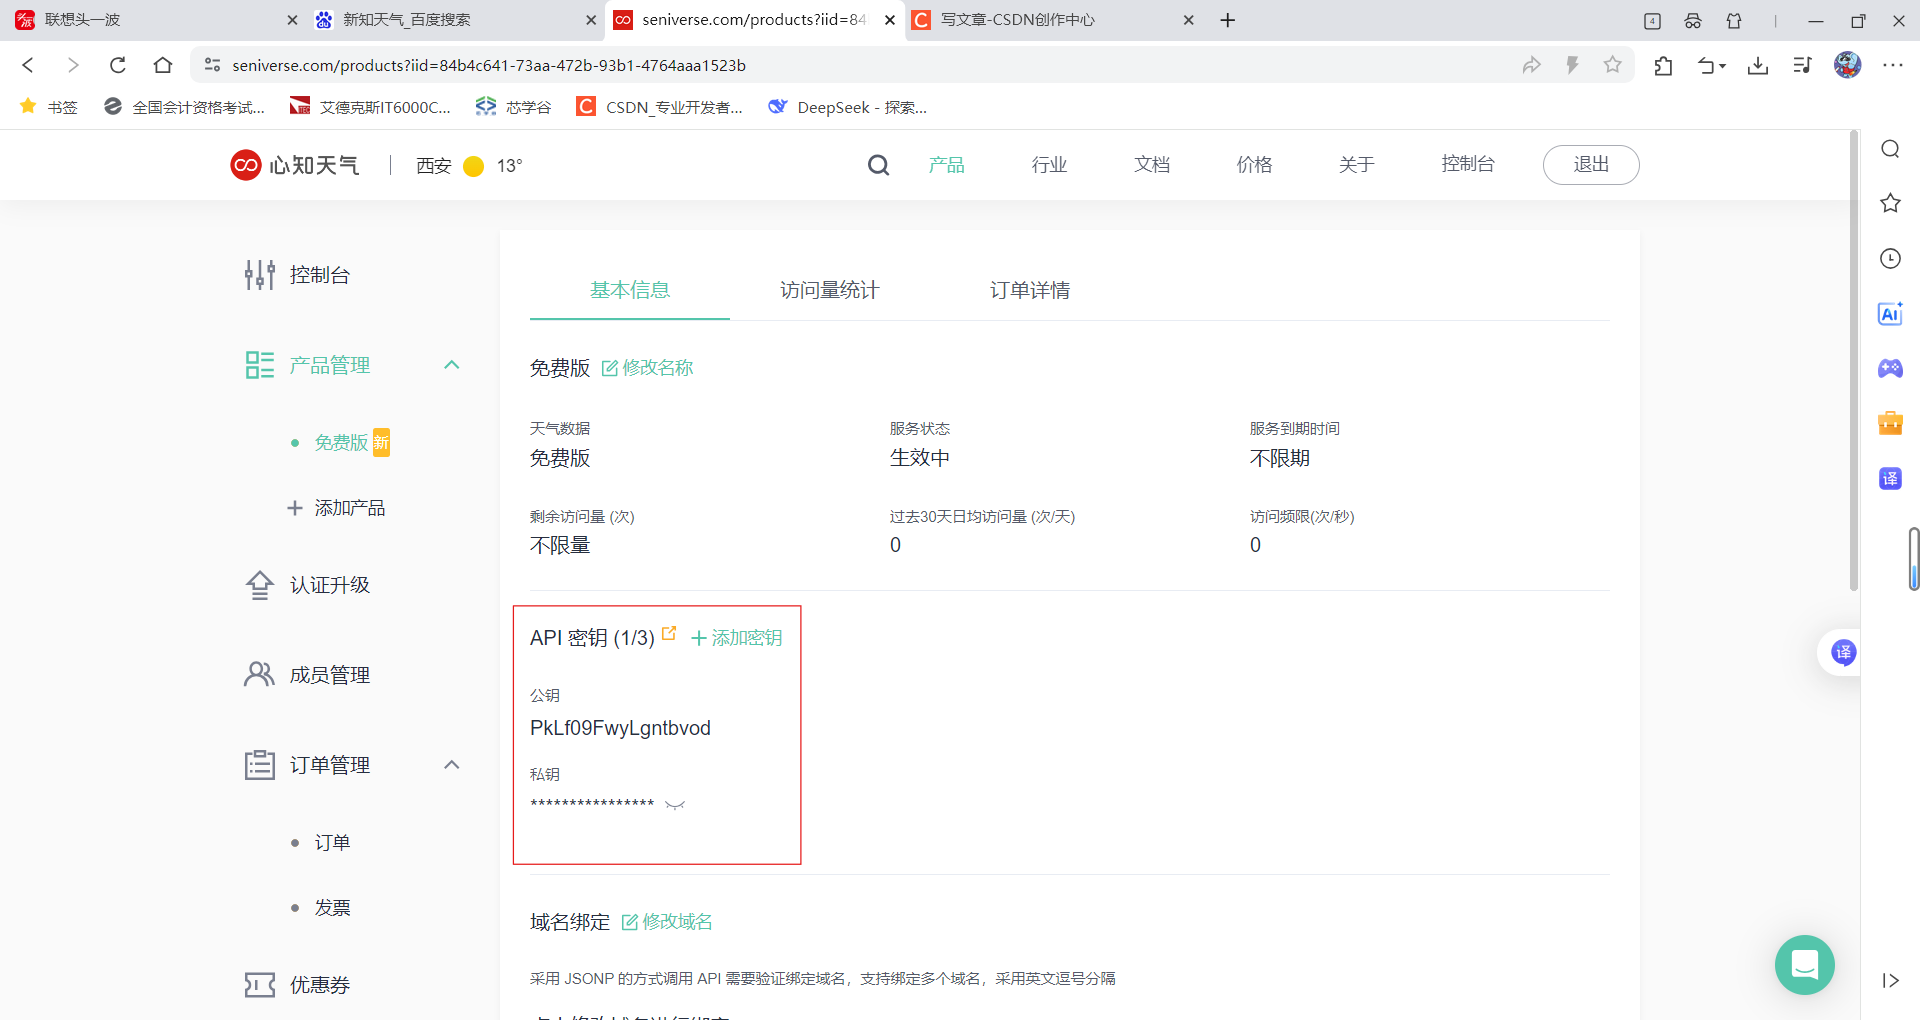
免费版只能用V3,点击V3跳转,
记住服务器和端口
解释一下
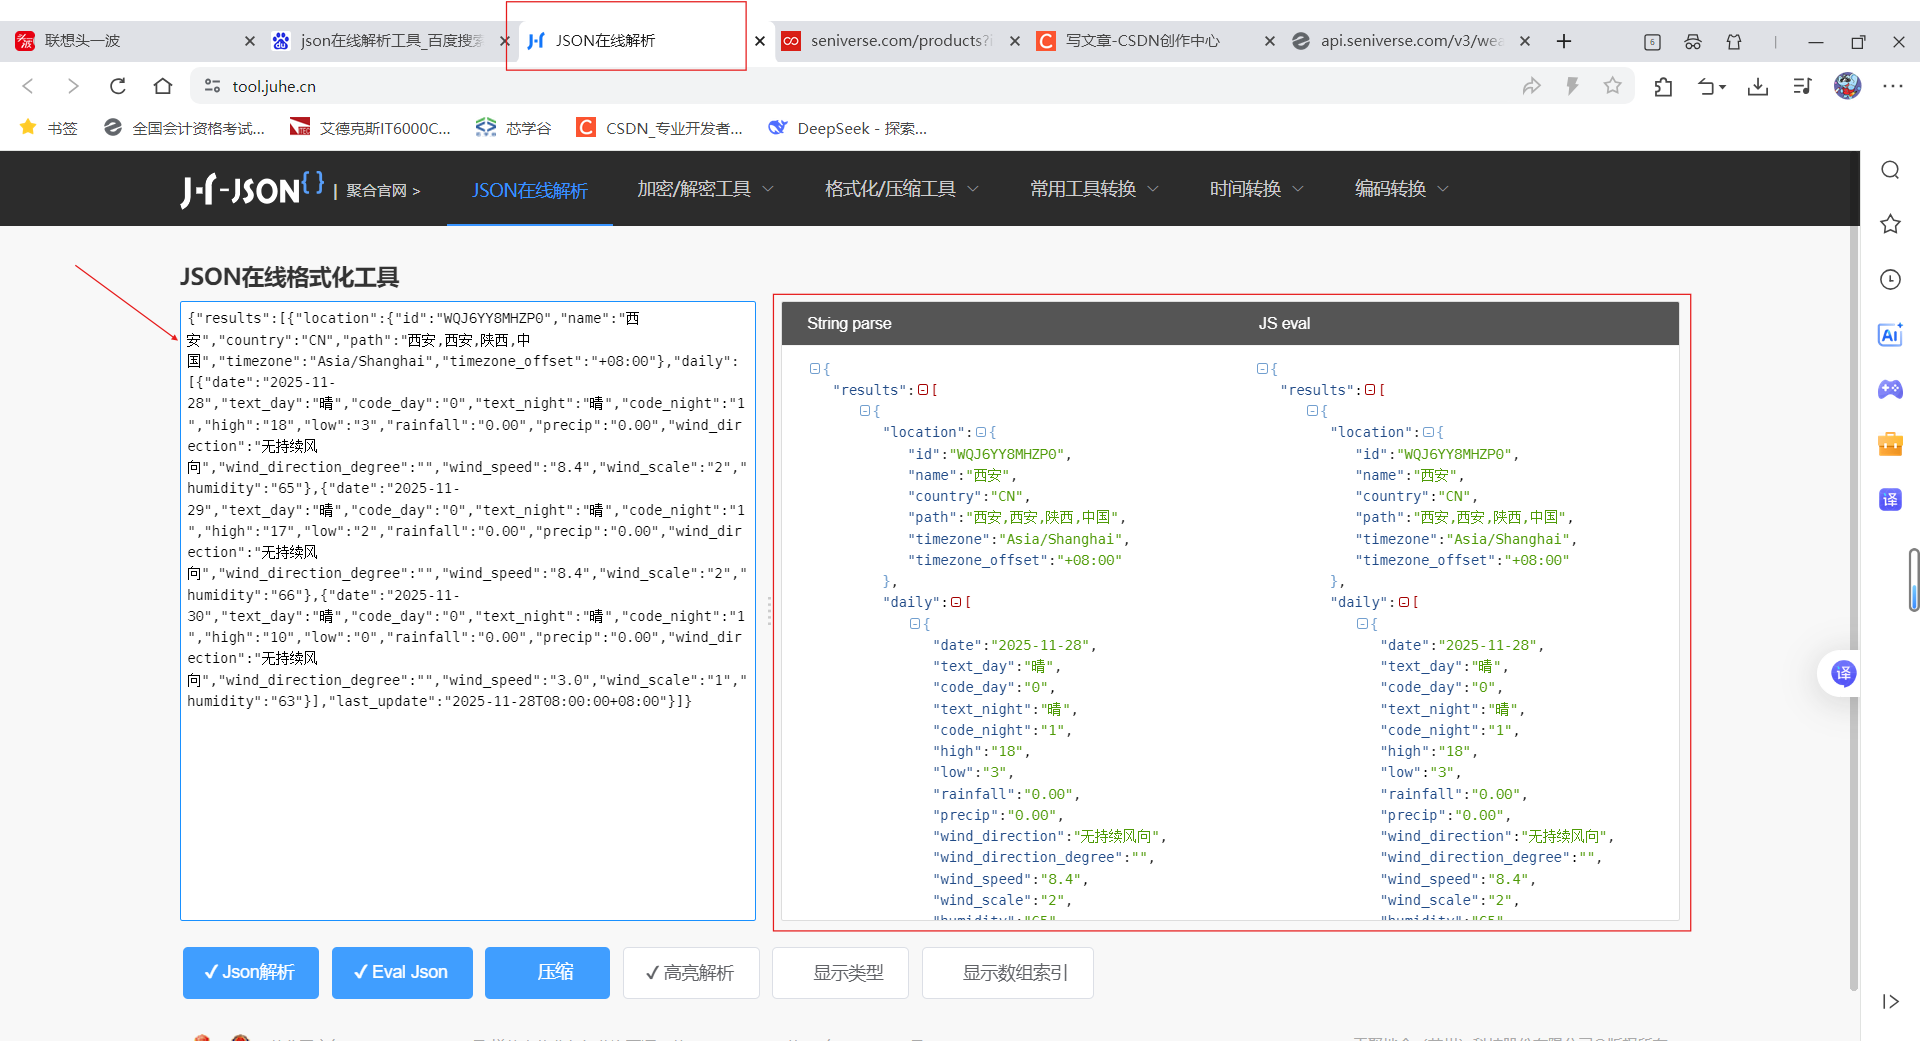
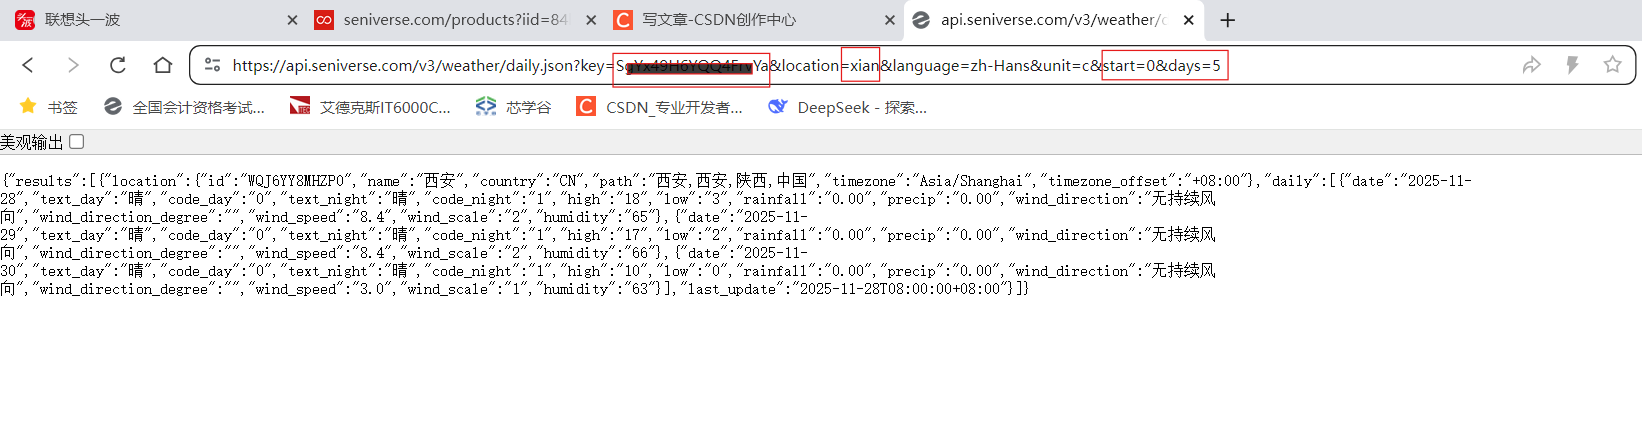 感觉不好看?使用jason在线解析工具
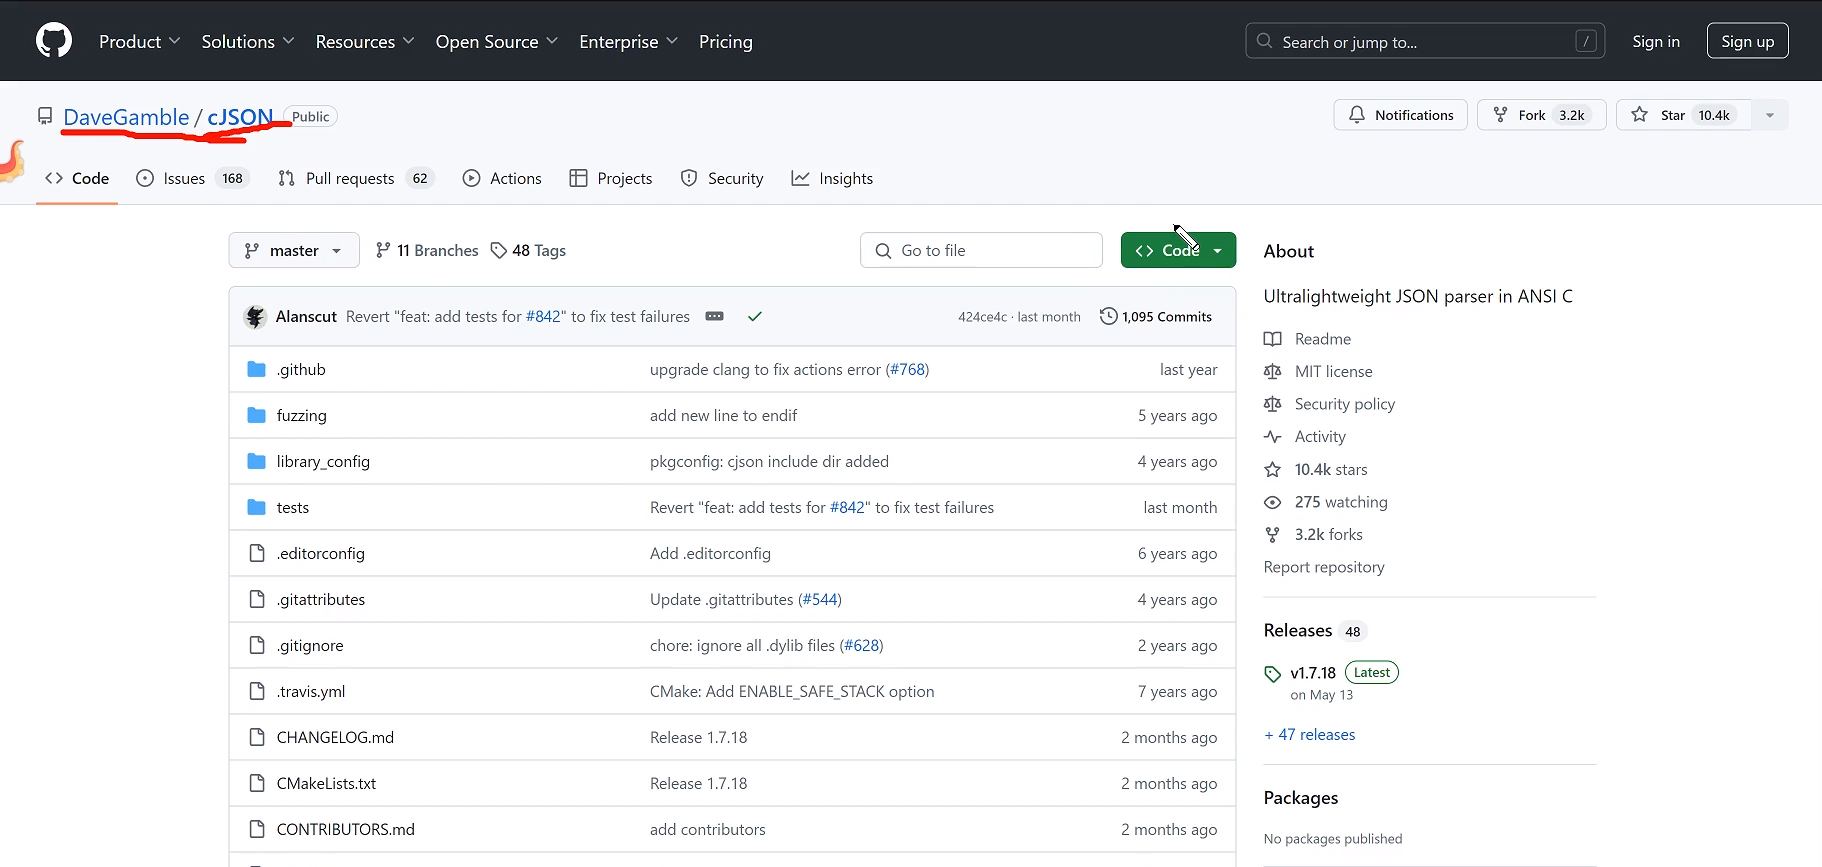
2.2 cJASON介绍
实际上就是键值对
一个是windows平台适用,一个Linux平台适用
3. 项目框架搭建
4. oled模块修改
依次取字模,
"西" "安" "最" "高" "温" "度" "最" "低" "温" "度"
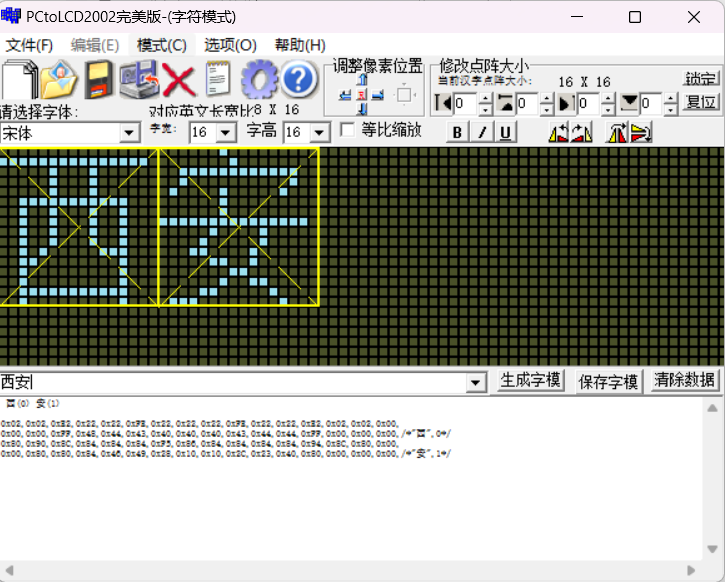
在fond.h中补充
cpp
const unsigned char weather_16x16[][32] =
{

	0x02,0x02,0xE2,0x22,0x22,0xFE,0x22,0x22,0x22,0xFE,0x22,0x22,0xE2,0x02,0x02,0x00,
		0x00,0x00,0xFF,0x48,0x44,0x43,0x40,0x40,0x40,0x43,0x44,0x44,0xFF,0x00,0x00,0x00,/*"西",0*/

	0x80,0x90,0x8C,0x84,0x84,0x84,0xF5,0x86,0x84,0x84,0x84,0x84,0x94,0x8C,0x80,0x00,
		0x00,0x80,0x80,0x84,0x46,0x49,0x28,0x10,0x10,0x2C,0x23,0x40,0x80,0x00,0x00,0x00,/*"安",1*/

    0x40,0x40,0xC0,0x5F,0x55,0x55,0xD5,0x55,0x55,0x55,0x55,0x5F,0x40,0x40,0x40,0x00,
    0x20,0x60,0x3F,0x25,0x15,0x15,0xFF,0x90,0x47,0x29,0x11,0x2D,0x43,0x80,0x80,0x00,/*"最",2*/

    0x04,0x04,0x04,0x04,0xF4,0x94,0x95,0x96,0x94,0x94,0xF4,0x04,0x04,0x04,0x04,0x00,
    0x00,0xFE,0x02,0x02,0x7A,0x4A,0x4A,0x4A,0x4A,0x4A,0x7A,0x02,0x82,0xFE,0x00,0x00,/*"高",3*/

    0x00,0x80,0x60,0xF8,0x07,0x00,0xFC,0x84,0x84,0x84,0xFE,0x82,0x83,0x82,0x80,0x00,
    0x01,0x00,0x00,0xFF,0x00,0x00,0xFF,0x40,0x20,0x00,0x41,0x8E,0x30,0x40,0xF8,0x00,/*"低",4*/

    0x20,0x10,0x4C,0x47,0x54,0x54,0x54,0x54,0x54,0x54,0x54,0xD4,0x04,0x04,0x00,0x00,
    0x00,0x00,0x00,0x00,0x00,0x00,0x00,0x00,0x00,0x00,0x00,0x0F,0x30,0x40,0xF0,0x00,/*"气",5*/

    0x10,0x60,0x02,0x8C,0x00,0x00,0xFE,0x92,0x92,0x92,0x92,0x92,0xFE,0x00,0x00,0x00,
    0x04,0x04,0x7E,0x01,0x40,0x7E,0x42,0x42,0x7E,0x42,0x7E,0x42,0x42,0x7E,0x40,0x00,/*"温",6*/

    0x06,0x09,0x09,0xE6,0xF8,0x0C,0x04,0x02,0x02,0x02,0x02,0x02,0x04,0x1E,0x00,0x00,
    0x00,0x00,0x00,0x07,0x1F,0x30,0x20,0x40,0x40,0x40,0x40,0x40,0x20,0x10,0x00,0x00,/*"℃",7*/

    0x00,0xFC,0x84,0x84,0xFC,0x00,0x44,0x54,0x54,0x54,0x7F,0x54,0x54,0x54,0x44,0x00,
    0x00,0x3F,0x10,0x10,0x3F,0x00,0x00,0xFF,0x15,0x15,0x15,0x55,0x95,0x7F,0x00,0x00,/*"晴",8*/

    0x00,0x00,0x10,0x10,0x98,0xA4,0x47,0x44,0xA4,0x54,0x0C,0x04,0x00,0x00,0x00,0x00,
    0x00,0x81,0x89,0x89,0x44,0x44,0x4A,0x31,0x21,0x11,0x09,0x05,0x03,0x00,0x00,0x00,/*"多",9*/

    0x40,0x40,0x42,0x42,0x42,0x42,0xC2,0x42,0x42,0x42,0x42,0x42,0x42,0x40,0x40,0x00,
    0x00,0x20,0x70,0x28,0x24,0x23,0x20,0x20,0x20,0x24,0x28,0x30,0xE0,0x00,0x00,0x00,/*"云",10*/

    0x00,0xFE,0x02,0x22,0xDA,0x06,0x00,0xFE,0x22,0x22,0x22,0x22,0x22,0xFE,0x00,0x00,
    0x00,0xFF,0x08,0x10,0x88,0x47,0x30,0x0F,0x02,0x02,0x02,0x42,0x82,0x7F,0x00,0x00,/*"阴",11*/

    0x02,0xE2,0x22,0x22,0x22,0x22,0x22,0xFE,0x22,0x22,0x22,0x22,0x22,0xE2,0x02,0x00,
    0x00,0xFF,0x00,0x00,0x09,0x12,0x00,0x7F,0x00,0x09,0x12,0x40,0x80,0x7F,0x00,0x00,/*"雨",12*/
};
调整之前的oled代码,虽然长(之前oled写过),但是修改的地方并不多
<插入链接>(那一篇还没写完)
oled.c
修改了oled_show_chinese函数,因为都是一个字号,直接删除了SIZE
增添了oled_show_init函数,有助于调试,先看看这部分代码情况
cpp
#include "oled.h"
#include "fond.h"
#include "delay.h"
void oled_gpio_init(void)
{
GPIO_InitTypeDef gpio_initstruct;
OLED_I2C_SCL_CLK();
OLED_I2C_SDA_CLK();
gpio_initstruct.Pin = OLED_I2C_SCL_PIN;
gpio_initstruct.Mode = GPIO_MODE_OUTPUT_PP;
gpio_initstruct.Pull = GPIO_PULLUP;
gpio_initstruct.Speed = GPIO_SPEED_FREQ_HIGH;
HAL_GPIO_Init(OLED_I2C_SCL_PORT, &gpio_initstruct);
gpio_initstruct.Pin = OLED_I2C_SDA_PIN;
HAL_GPIO_Init(OLED_I2C_SDA_PORT, &gpio_initstruct);
}
void oled_i2c_start(void)
{
OLED_SCL_SET();
OLED_SDA_SET();
OLED_SDA_RESET();
OLED_SCL_RESET();
}
void oled_i2c_stop(void)
{
OLED_SCL_SET();
OLED_SDA_RESET();
OLED_SDA_SET();
}
void oled_i2c_ack(void)
{
OLED_SCL_SET();
OLED_SCL_RESET();
}
void oled_i2c_write_byte(uint8_t data)
{
uint8_t i, tmp;
tmp = data;
for(i = 0; i < 8; i++)
{
if((tmp & 0x80) == 0x80)
OLED_SDA_SET();
else
OLED_SDA_RESET();
tmp = tmp << 1;
OLED_SCL_SET();
OLED_SCL_RESET();
}
}
void oled_write_cmd(uint8_t cmd)
{
oled_i2c_start();
oled_i2c_write_byte(0x78);
oled_i2c_ack();
oled_i2c_write_byte(0x00);
oled_i2c_ack();
oled_i2c_write_byte(cmd);
oled_i2c_ack();
oled_i2c_stop();
}
void oled_write_data(uint8_t data)
{
oled_i2c_start();
oled_i2c_write_byte(0x78);
oled_i2c_ack();
oled_i2c_write_byte(0x40);
oled_i2c_ack();
oled_i2c_write_byte(data);
oled_i2c_ack();
oled_i2c_stop();
}
void oled_init(void)
{
oled_gpio_init();
delay_ms(100);
oled_write_cmd(0xAE); //设置显示开启/关闭,0xAE关闭,0xAF开启
oled_write_cmd(0xD5); //设置显示时钟分频比/振荡器频率
oled_write_cmd(0x80); //0x00~0xFF
oled_write_cmd(0xA8); //设置多路复用率
oled_write_cmd(0x3F); //0x0E~0x3F
oled_write_cmd(0xD3); //设置显示偏移
oled_write_cmd(0x00); //0x00~0x7F
oled_write_cmd(0x40); //设置显示开始行,0x40~0x7F
oled_write_cmd(0xA1); //设置左右方向,0xA1正常,0xA0左右反置
oled_write_cmd(0xC8); //设置上下方向,0xC8正常,0xC0上下反置
oled_write_cmd(0xDA); //设置COM引脚硬件配置
oled_write_cmd(0x12);
oled_write_cmd(0x81); //设置对比度
oled_write_cmd(0xCF); //0x00~0xFF
oled_write_cmd(0xD9); //设置预充电周期
oled_write_cmd(0xF1);
oled_write_cmd(0xDB); //设置VCOMH取消选择级别
oled_write_cmd(0x30);
oled_write_cmd(0xA4); //设置整个显示打开/关闭
oled_write_cmd(0xA6); //设置正常/反色显示,0xA6正常,0xA7反色
oled_write_cmd(0x8D); //设置充电泵
oled_write_cmd(0x14);
oled_write_cmd(0xAF); //开启显示
}
void oled_set_cursor(uint8_t x, uint8_t y)
{
oled_write_cmd(0xB0 + y);
oled_write_cmd((x & 0x0F) | 0x00);
oled_write_cmd(((x & 0xF0) >> 4) | 0x10);
}
void oled_fill(uint8_t data)
{
uint8_t i, j;
for(i = 0; i < 8; i++)
{
oled_set_cursor(0, i);
for(j = 0; j < 128; j++)
oled_write_data(data);
}
}
void oled_show_char(uint8_t x, uint8_t y, uint8_t num, uint8_t size)
{
uint8_t i, j, page;
num = num - ' ';
page = size / 8;
if(size % 8)
page++;
for(j = 0; j < page; j++)
{
oled_set_cursor(x, y + j);
for(i = size / 2 * j; i < size /2 * (j + 1); i++)
{
if(size == 12)
oled_write_data(ascii_6X12[num][i]);
else if(size == 16)
oled_write_data(ascii_8X16[num][i]);
else if(size == 24)
oled_write_data(ascii_12X24[num][i]);
}
}
}
void oled_show_string(uint8_t x, uint8_t y, char *p, uint8_t size)
{
while(*p != '\0')
{
oled_show_char(x, y, *p, size);
x += size/2;
p++;
}
}
void oled_show_chinese(uint8_t x, uint8_t y, uint8_t N)
{
uint16_t i, j;
for(j = 0; j < 2; j++)
{
oled_set_cursor(x, y + j);
for(i = 16 *j; i < 16 * (j + 1); i++)
oled_write_data(weather_16x16[N][i]);
}
}
void oled_show_init()
{
oled_fill(0x00);
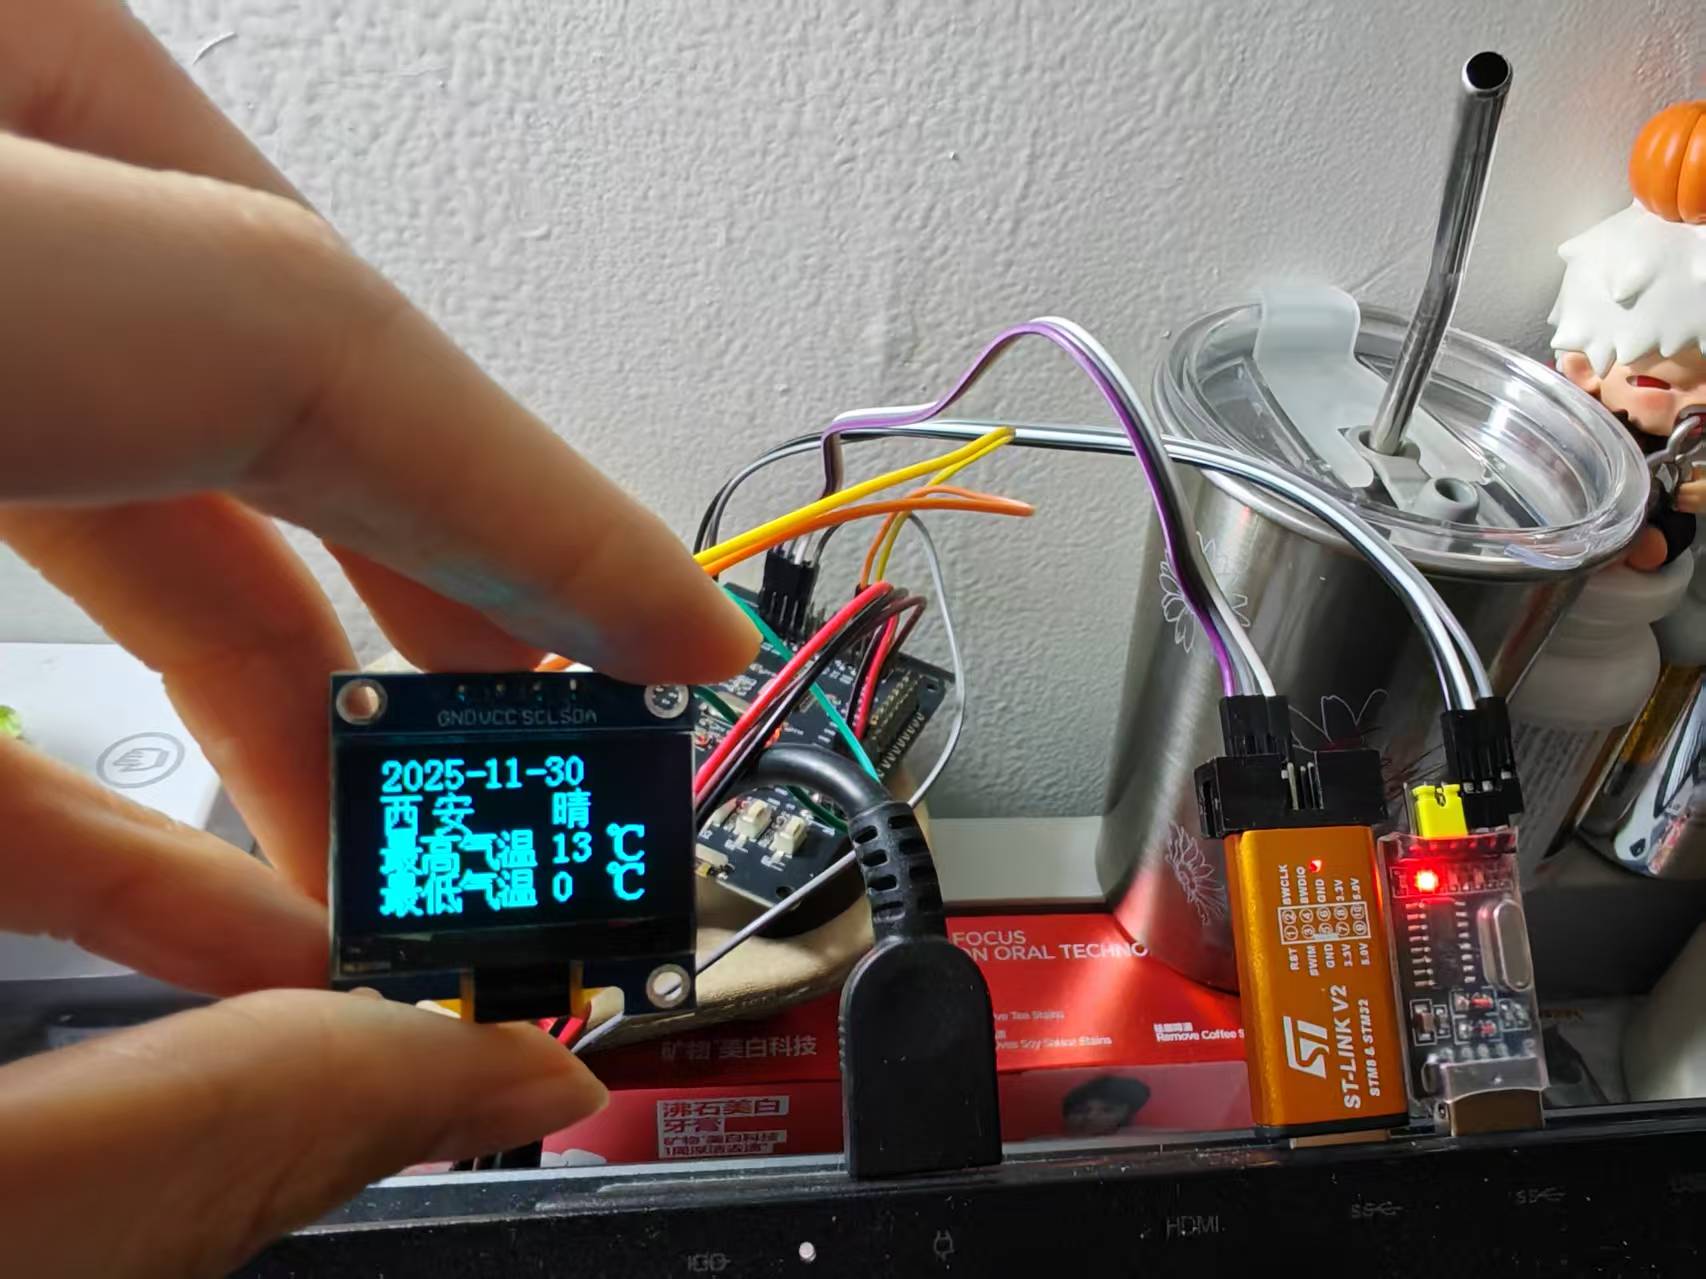
oled_show_chinese(10, 2, 0);//西
oled_show_chinese(30, 2, 1);//安
//最高温度
oled_show_chinese(10, 4, 2);
oled_show_chinese(25, 4, 3);
oled_show_chinese(40, 4, 5);
oled_show_chinese(55, 4, 6);
oled_show_chinese(100, 4, 7);
//最低温度
oled_show_chinese(10, 6, 2);
oled_show_chinese(25, 6, 4);
oled_show_chinese(40, 6, 5);
oled_show_chinese(55, 6, 6);
oled_show_chinese(100, 6, 7);
}
void oled_show_image(uint8_t x, uint8_t y, uint8_t width, uint8_t height, uint8_t *bmp)
{
uint8_t i, j;
for(j = 0; j < height; j++)
{
oled_set_cursor(x, y + j);
for(i = 0; i < width; i++)
oled_write_data(bmp[width * j + i]);
}
}oled的SCL和SDA更改引脚了嘛,oled.h中更改一下就可以了

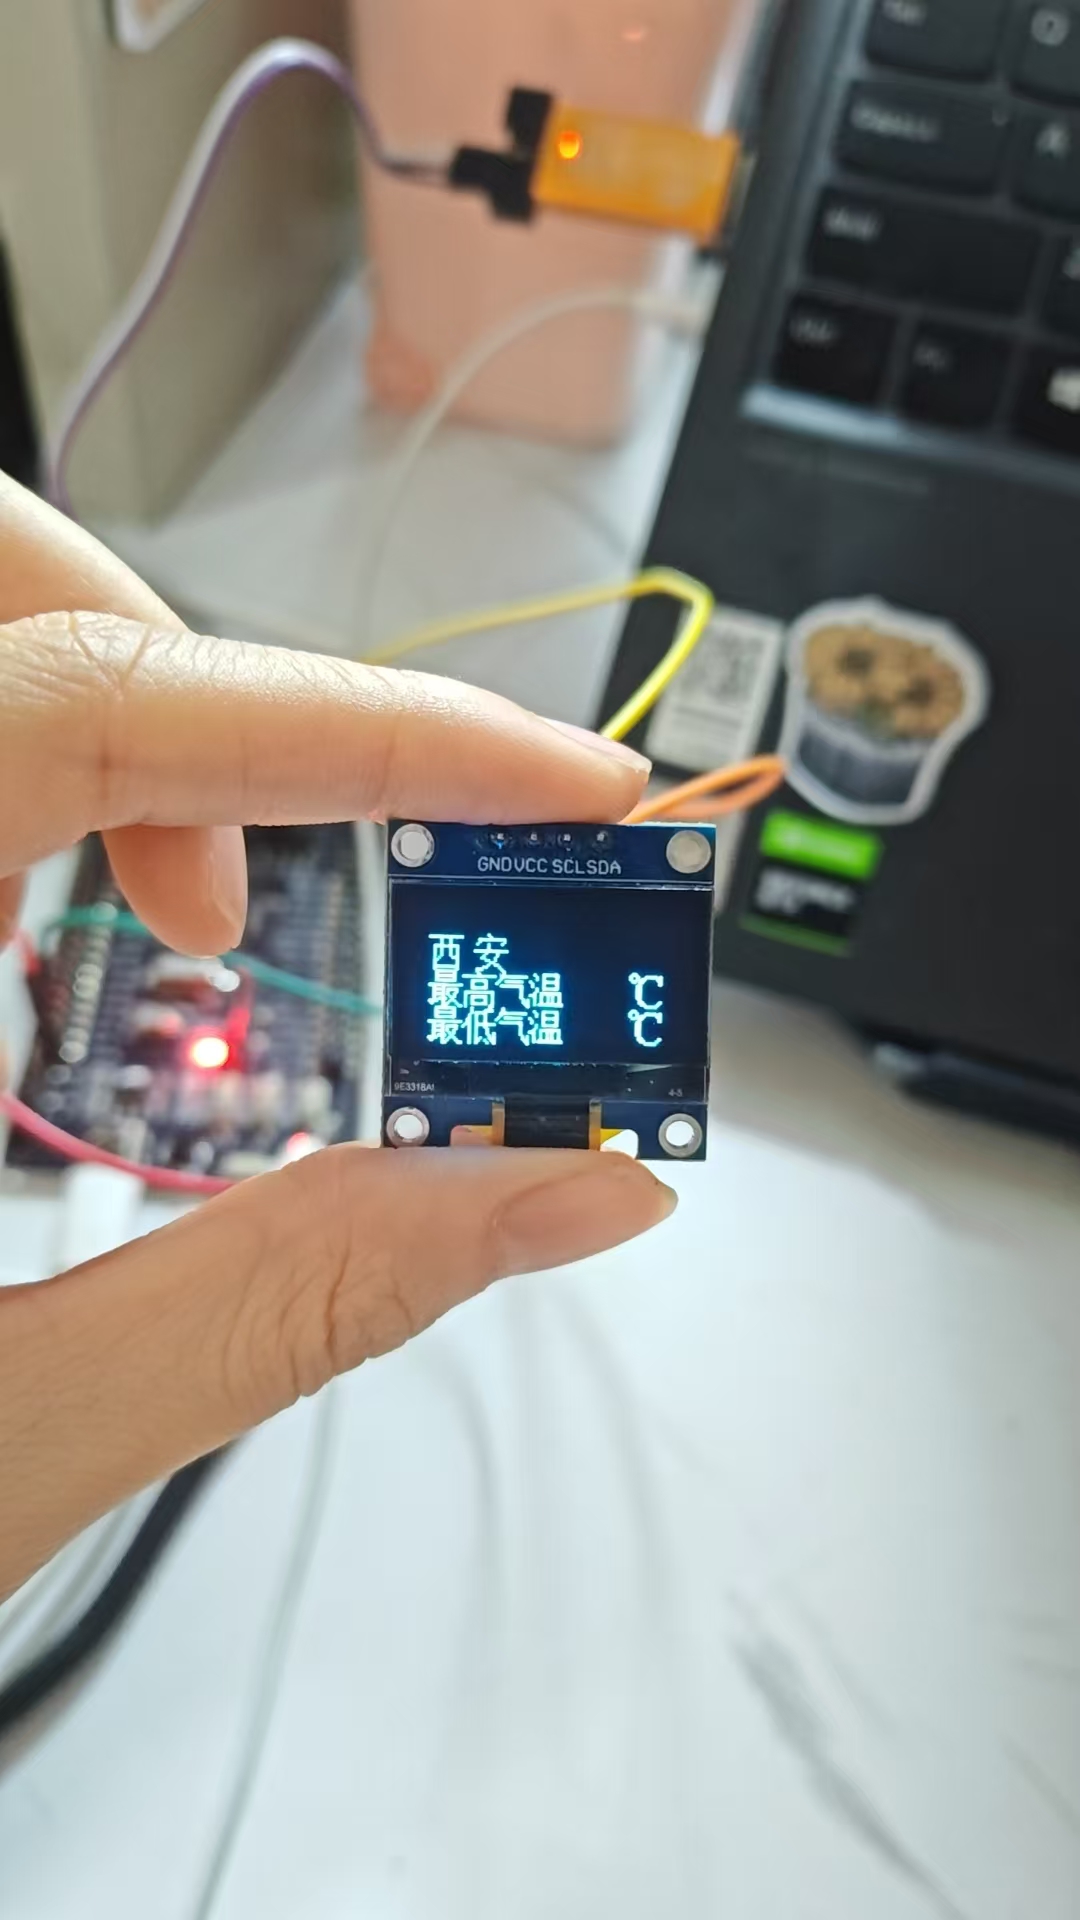
先烧录一下,是这样
5. esp8266模块代码完善
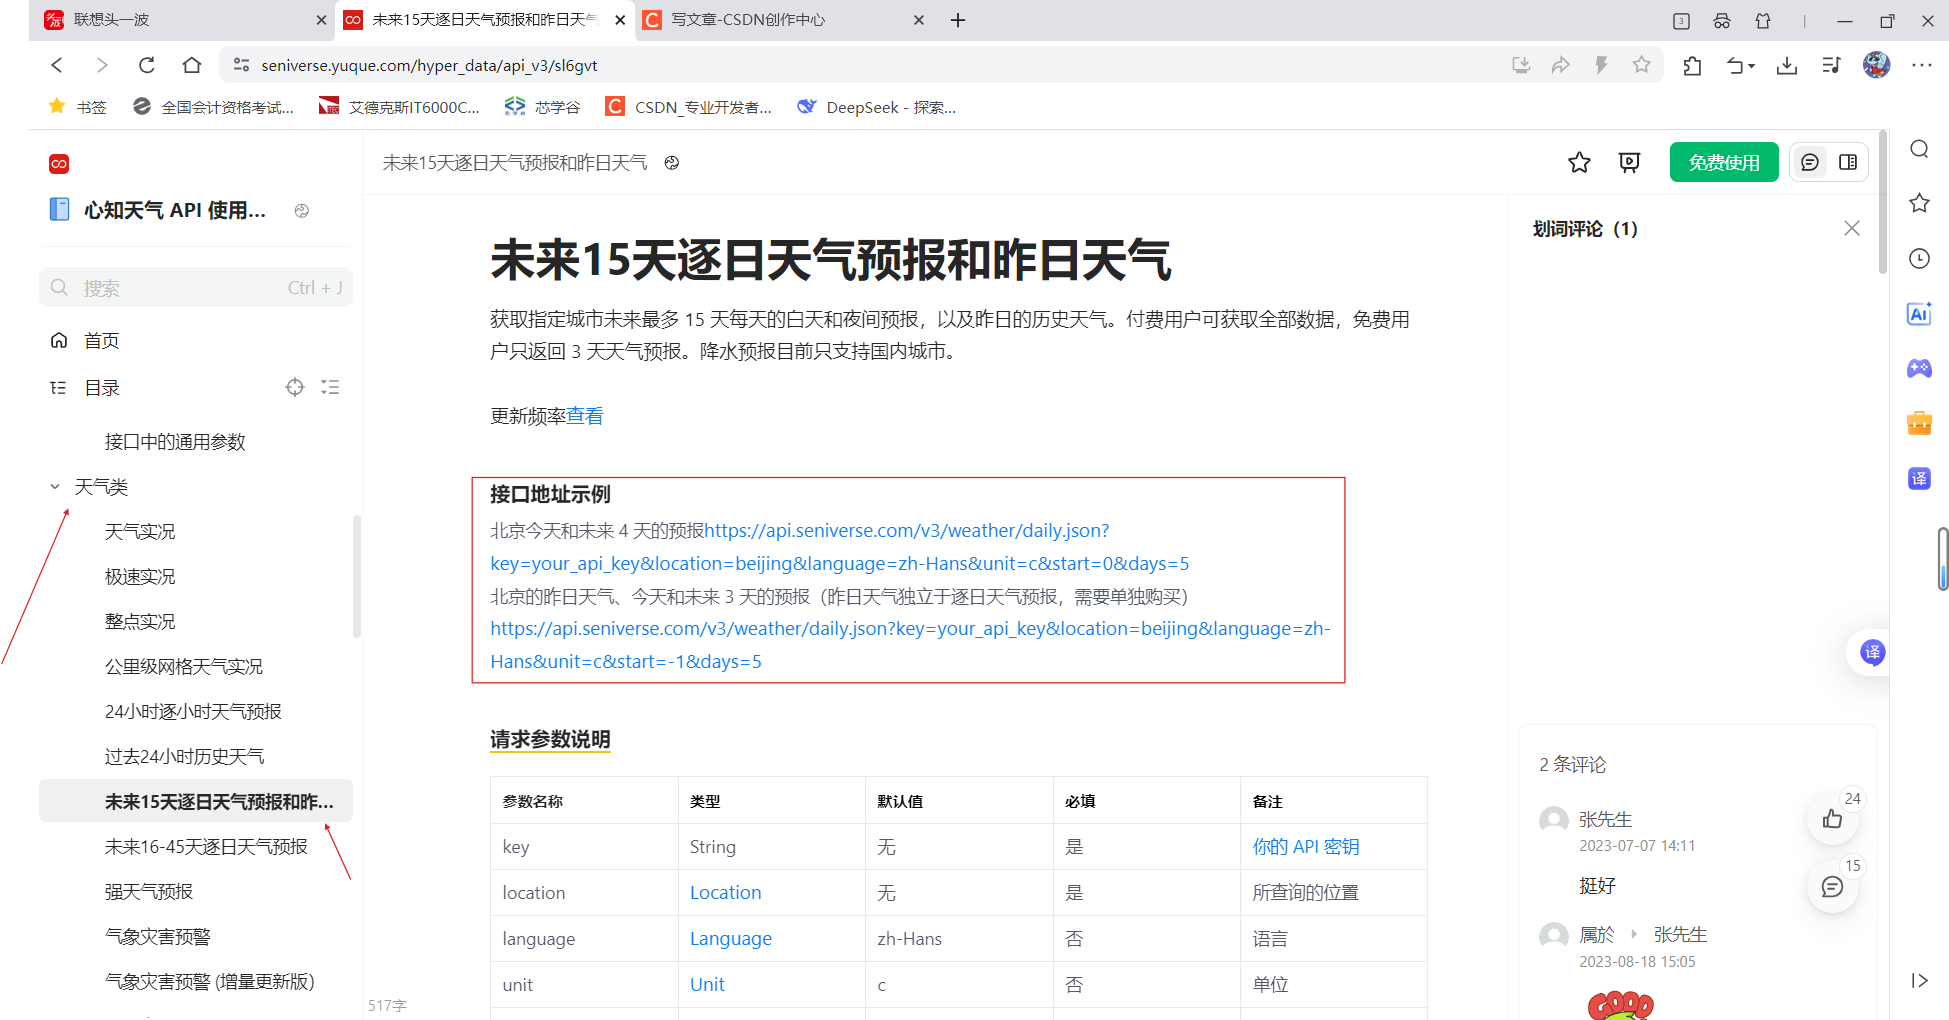
我们要连接新知天气的服务器,前面讲过
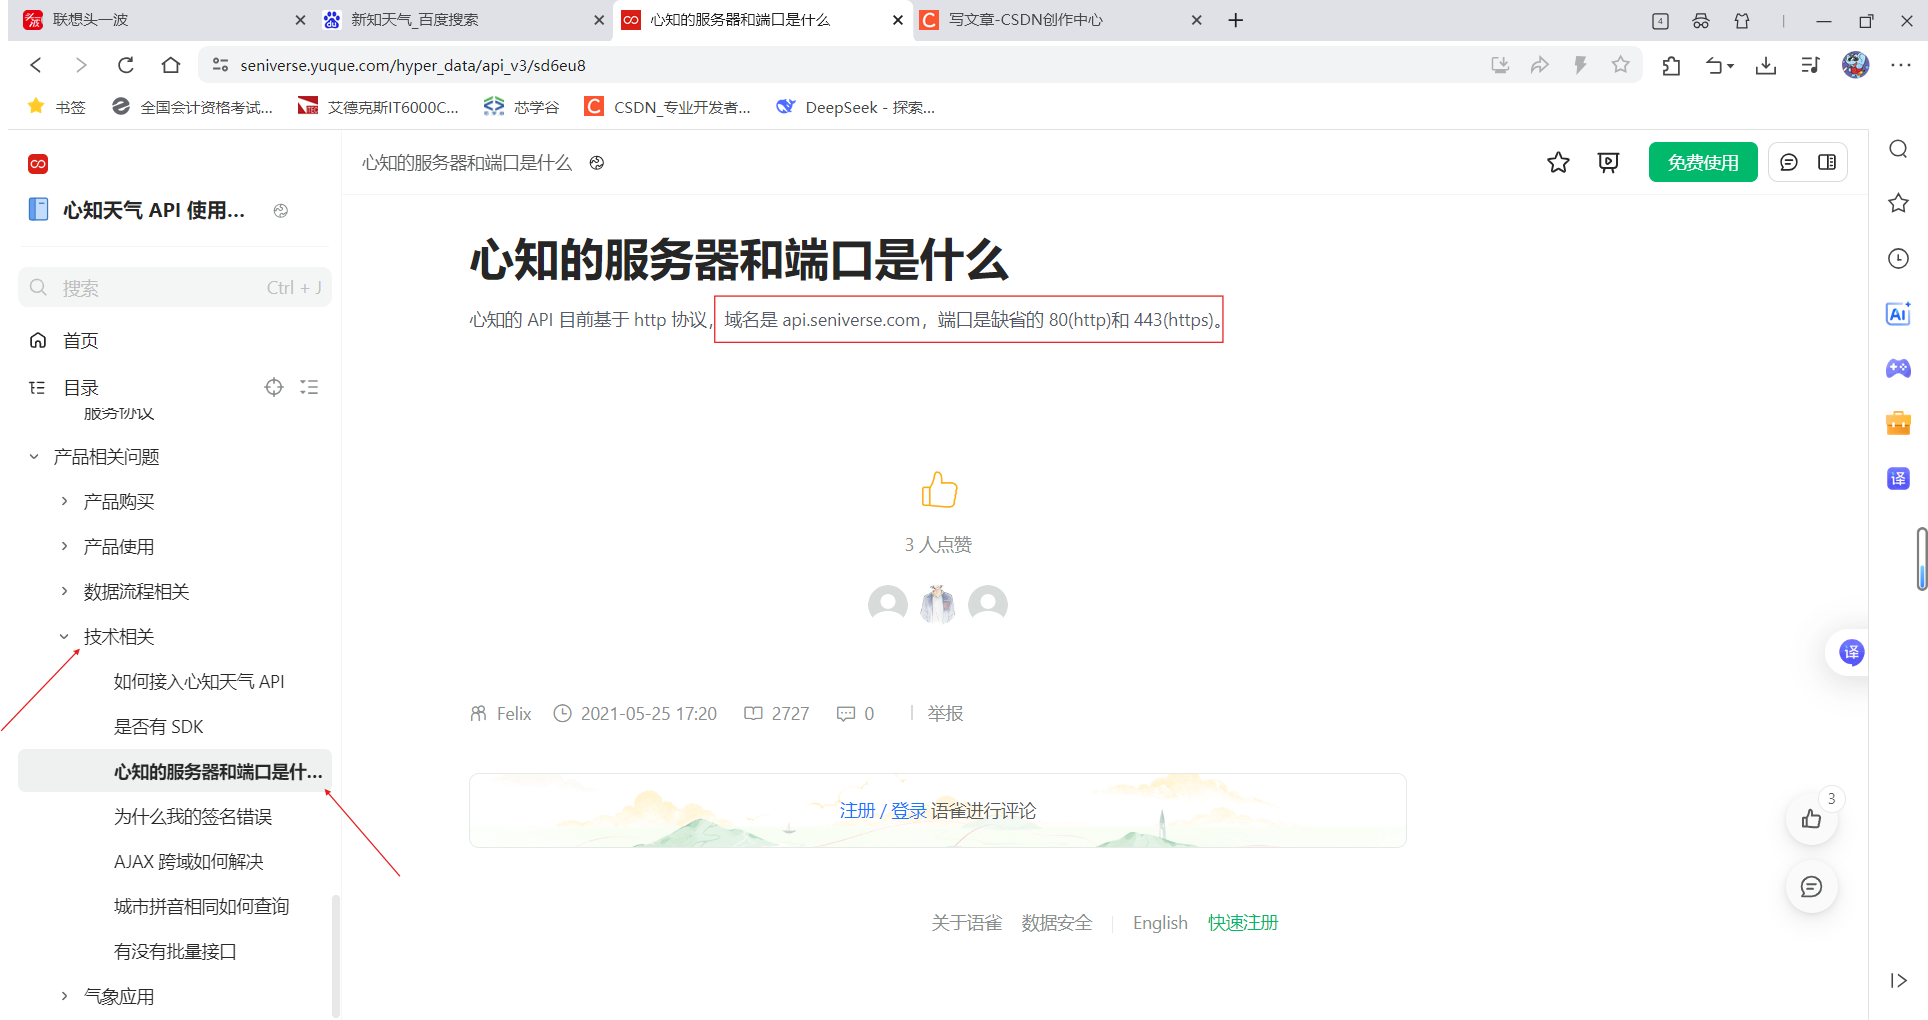
心知的 API 目前基于 http 协议,域名是 api.seniverse.com,端口是缺省的 80(http)和443(https)。
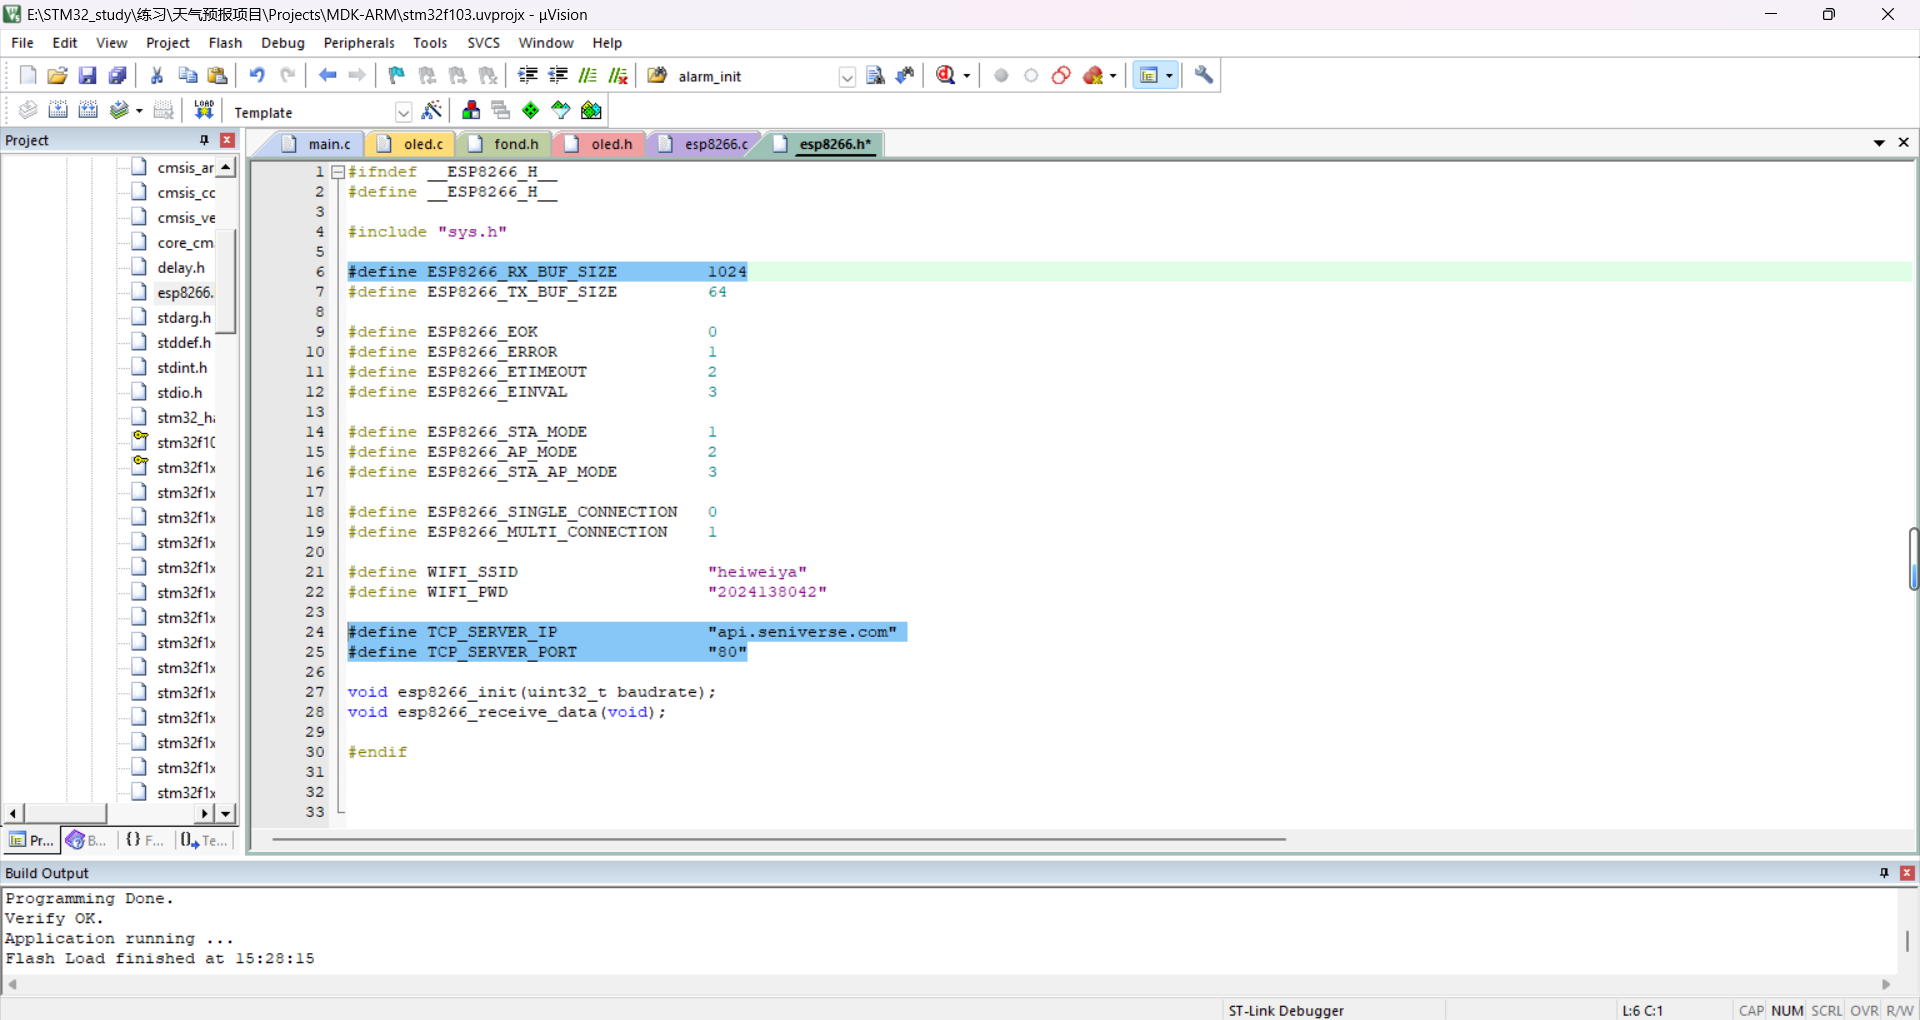
因为接收的数据量(jacon包)较大,我们把ESP8266_RX_BUF_SIZE改成了1024(原代码是128)

写一个获取天气的函数
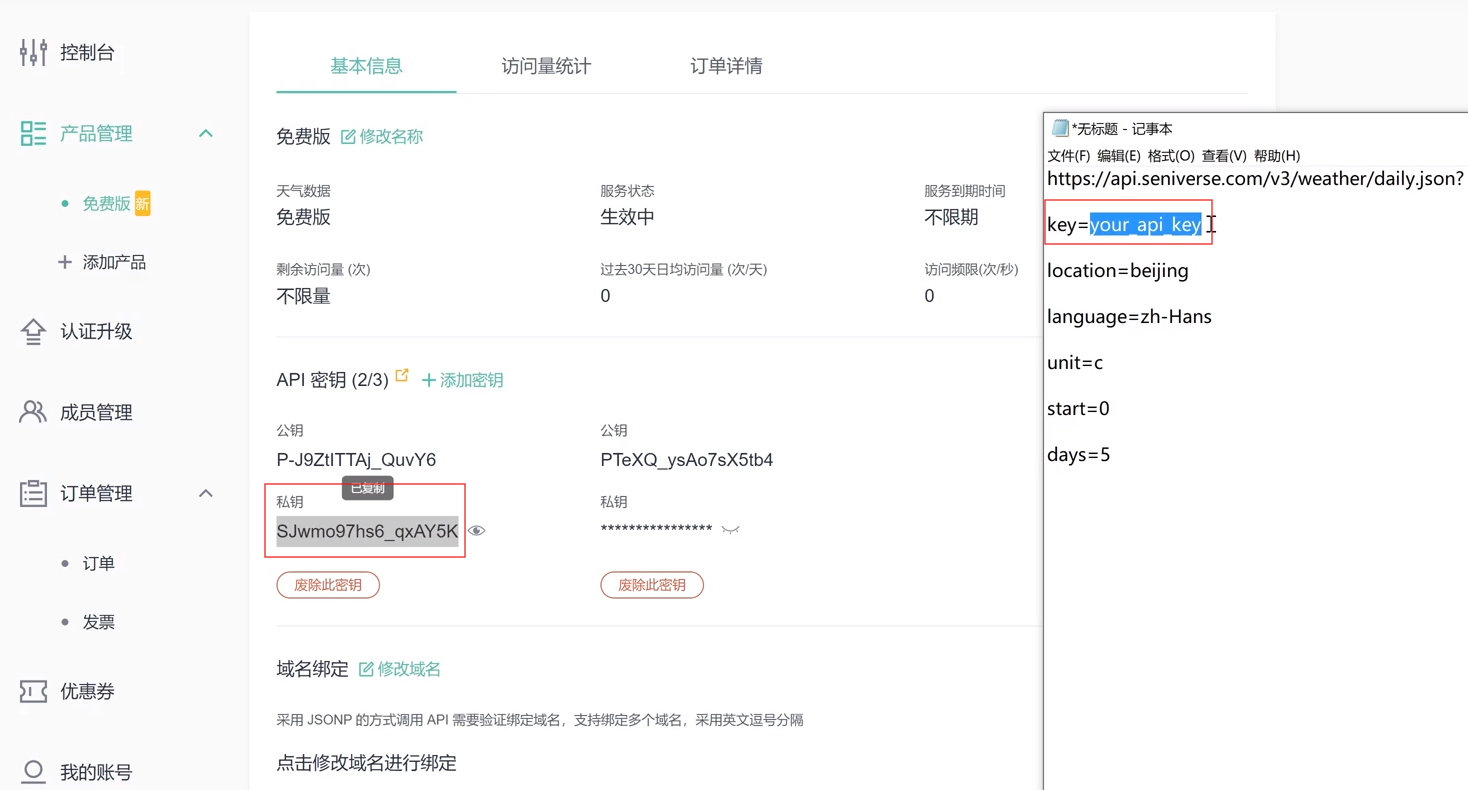
一定要仔细检查API,复制过来后仔细检查!!
cpp
uint8_t esp8266_weather_get(uint8_t DAY)
{
	 uint8_t ret = ESP8266_ERROR;
  char http_request[200] = {0};
	sprintf(http_request,"GET	https://api.seniverse.com/v3/weather/daily.json?key=SgYx49H6YQQ4FrvYa&location=xian&language=zh-Hans&unit=c&start=0&days=1");
	ret=esp8266_send_command(http_request,"results");
	if(ret == ESP8266_EOK)
        return ESP8266_EOK;
    else
        return ESP8266_ERROR;
}
cpp
uint16_t esp8266_copy_rxdata(char *data)
{
memcpy(data, esp8266_rx_buf, esp8266_cntPre);
return esp8266_cntPre;
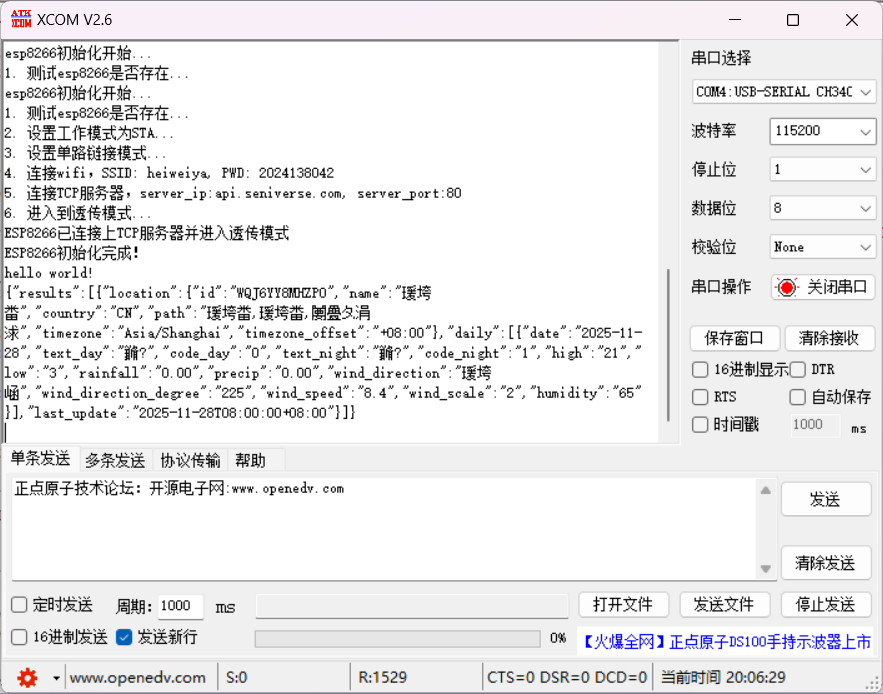
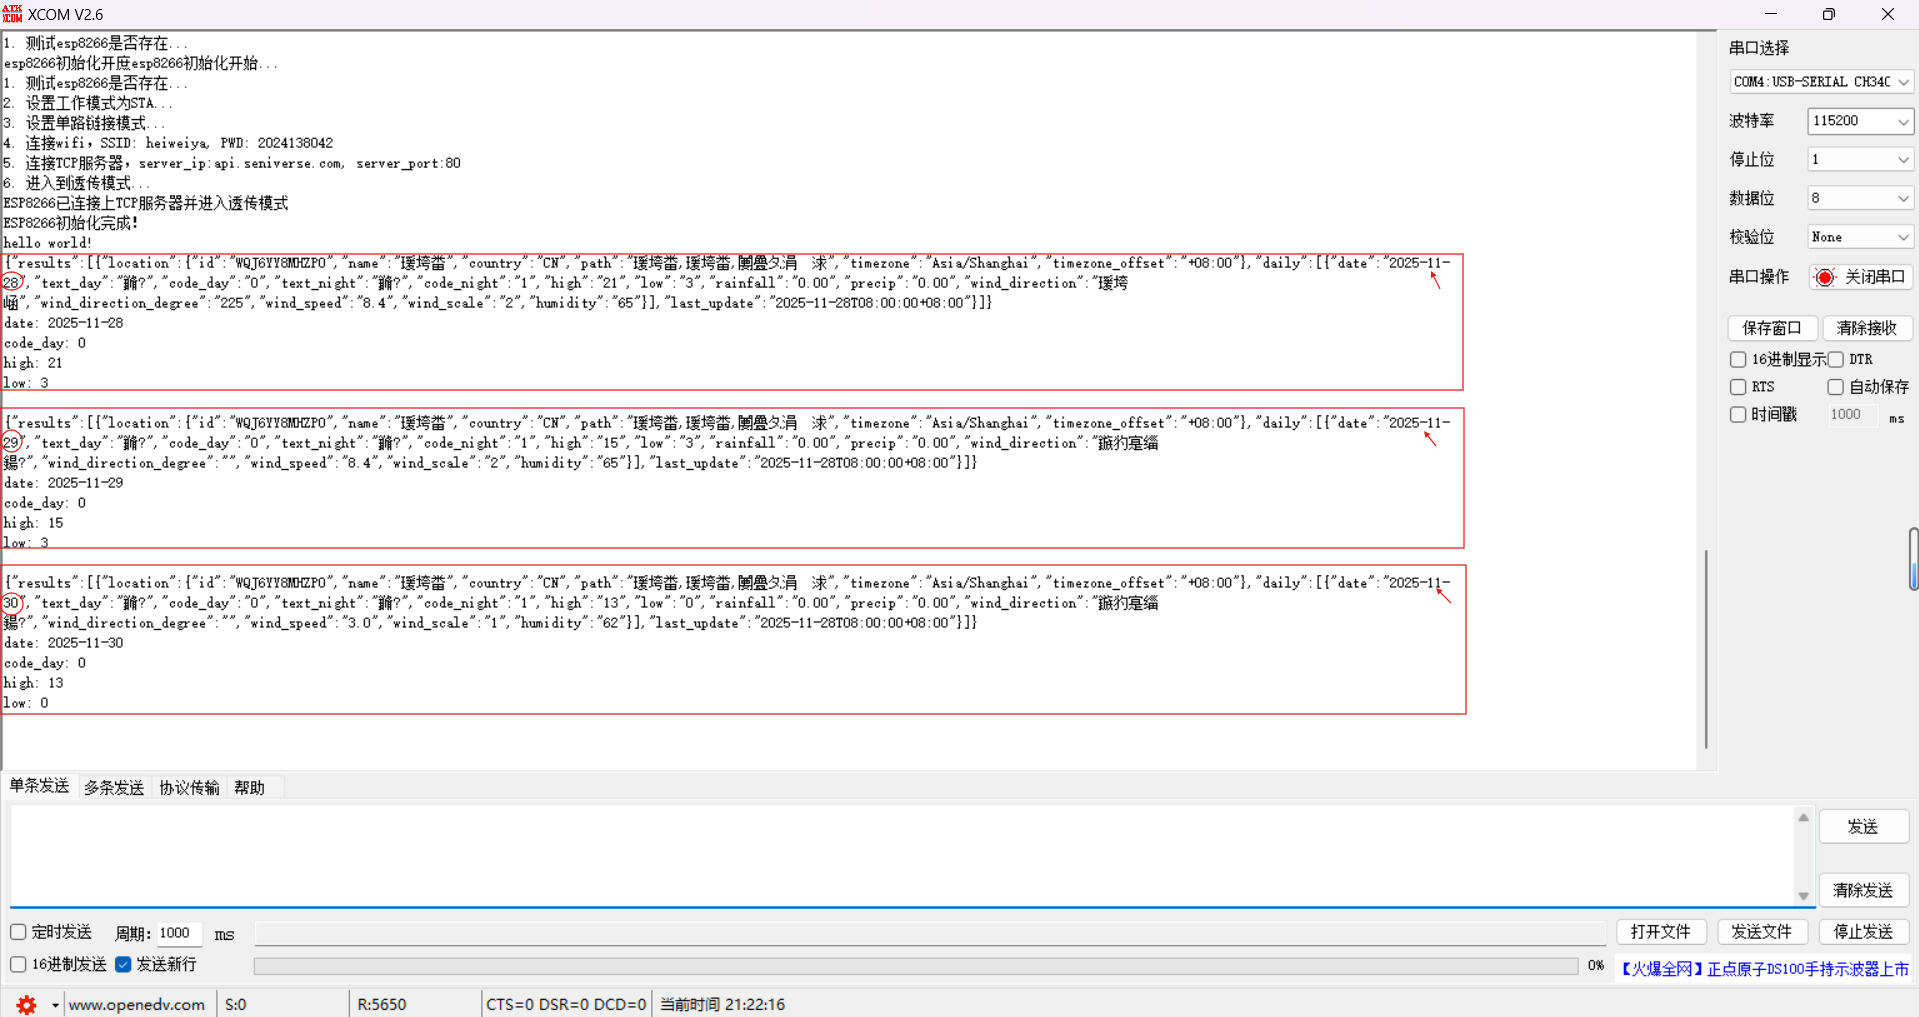
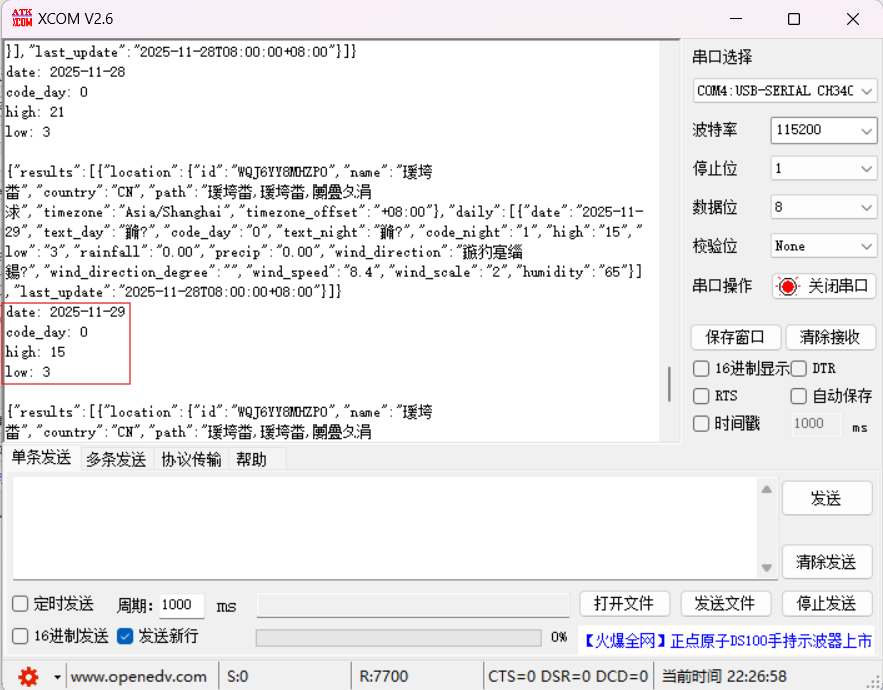
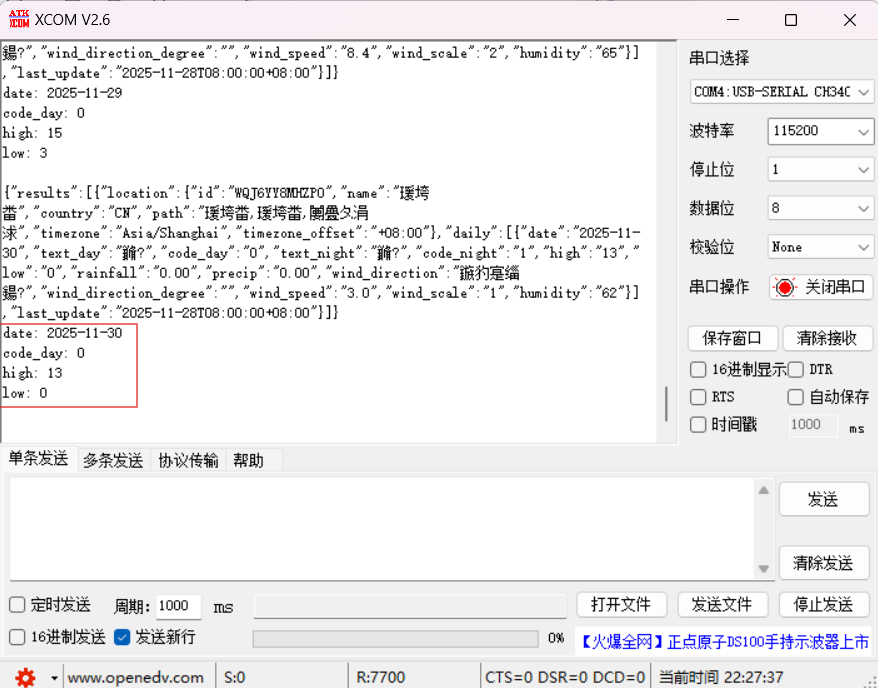
}效果就是这样,你可能会发现有很多乱码,这是串口调试助手的问题,现在我们知道能拿到天气信息了就是对的
6. weather模块代码编写
解析json数据包的过程就是用cJSON库函数
cJSON移植
- 拷贝到项目文件
- include一下
- 根据需求修改堆大小
cJSON中会有大量malloc函数,动态申请内存空间,就在这个堆里
我们把它改大点
我们的项目需求是要获取连续三天的天气,写一个get_3days_weather函数
cpp
void get_3days_weather(void)
{
	uint8_t i=0;
	for(i=0;i<3;i++)
	{
	 memset(weather_data, 0, sizeof(weather_data));
	 esp8266_weather_get(i);
	 esp8266_copy_rxdata(weather_data);
    }
}
我们要通过JSON获得天气信息
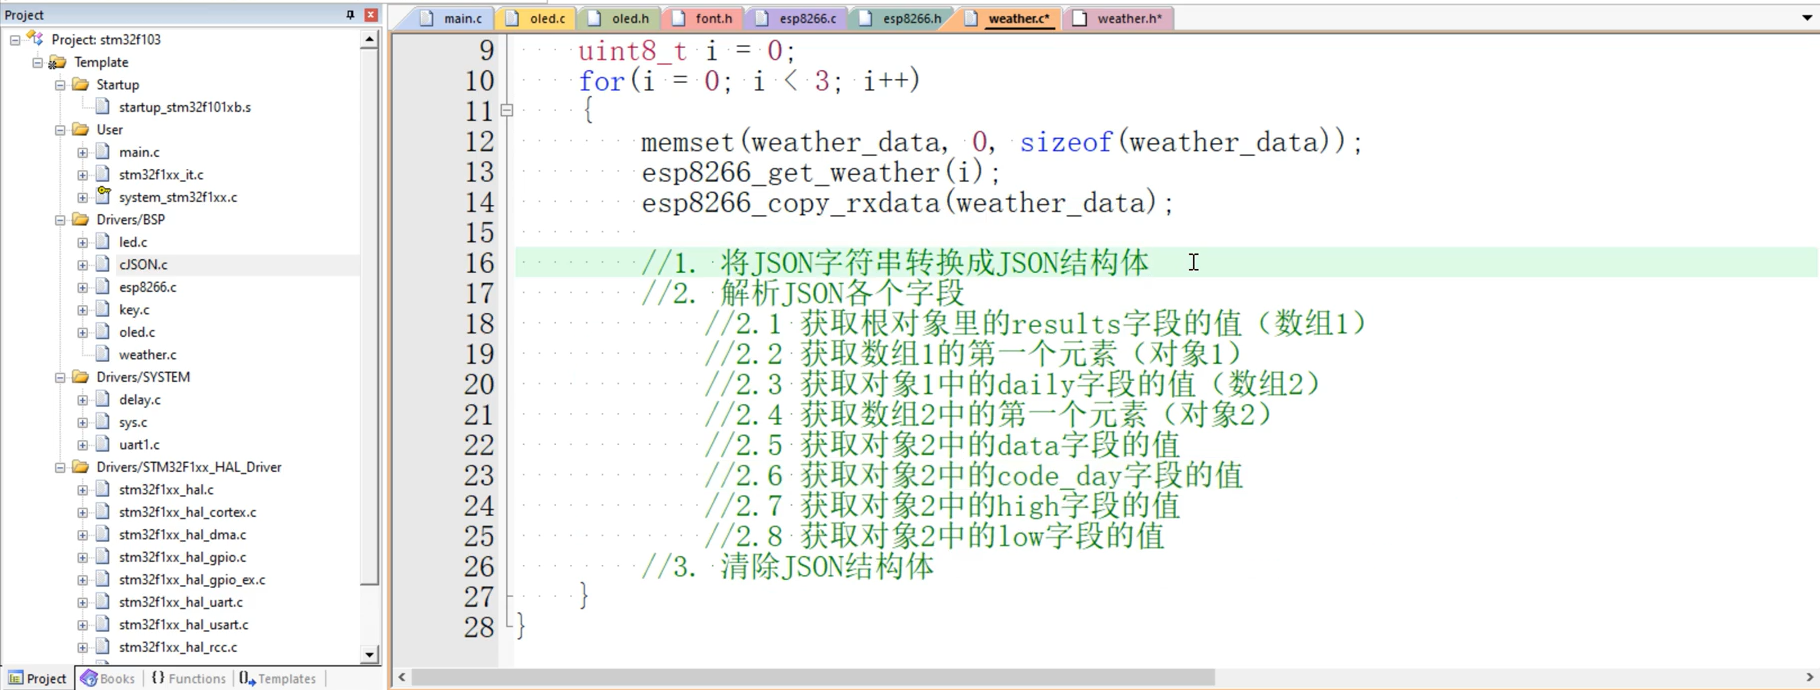
cpp
//1. 将JSON字符串转换成JSON结构体
        cJSON *cjson = cJSON_Parse((const char *)weather_data);

        //2. 解析JSON各个字段
            //2.1 获取根对象里的results字段的值(数组1)
        cJSON *results = cJSON_GetObjectItem(cjson, "results");
            //2.2 获取数组1的第一个元素(对象1)
        cJSON *first_result = cJSON_GetArrayItem(results, 0);
            //2.3 获取对象1中的daily字段的值(数组2)
        cJSON *daily = cJSON_GetObjectItem(first_result, "daily");
            //2.4 获取数组2中的第一个元素(对象2)
        cJSON *first_daily = cJSON_GetArrayItem(daily, 0);

            //2.5 获取对象2中的data字段的值
        cJSON *date = cJSON_GetObjectItem(first_daily, "date");
        const char *date_str = date->valuestring;
        printf("date: %s\r\n", date_str);
        strcpy(three_day_weather[i].date, date_str);

            //2.6 获取对象2中的code_day字段的值
        cJSON *code_day = cJSON_GetObjectItem(first_daily, "code_day");
        const char *code_day_str = code_day->valuestring;
        printf("code_day: %s\r\n", code_day_str);
        strcpy(three_day_weather[i].code_day, code_day_str);

            //2.7 获取对象2中的high字段的值
        cJSON *high = cJSON_GetObjectItem(first_daily, "high");
        const char *high_str = high->valuestring;
        printf("high: %s\r\n", high_str);
        strcpy(three_day_weather[i].high, high_str);

            //2.8 获取对象2中的low字段的值
        cJSON *low = cJSON_GetObjectItem(first_daily, "low");
        const char *low_str = low->valuestring;
        printf("low: %s\r\n\r\n", low_str);
        strcpy(three_day_weather[i].low, low_str);

        //3. 清除JSON结构体
        cJSON_Delete(cjson);

        delay_ms(100);
把三天的天气信息保存到结构体three_day_weather中
当然就要在前面定义这个three_day_weather结构体
cpp
typedef struct
{
    char date[20];
    char code_day[10];
    char high[10];
    char low[10];
} daily_weather_t;
daily_weather_t three_day_weather[3] = {0};
别忘了在.h文件中添加函数声明噢~
打开串口调试助手,重新烧录,重新给板子上电,
打印出这三天的天气信息即为目前做的正确
7. 项目完结
写一个有show_weather函数
还记得心知天气平台的天气分类嘛
国内城市白天晴、国内城市夜晚晴、国外城市白天晴、国外城市夜晚晴→我们都叫"晴"
阴天等天气分类以此类推......

我们想用switch进行对应天气代码分类,switch里只能填数字,
就用atoi把字符串变成对应的数字,记得最上面要加上#include "stdlib.h"
cpp
void show_weather(uint8_t day)
{
oled_show_init();
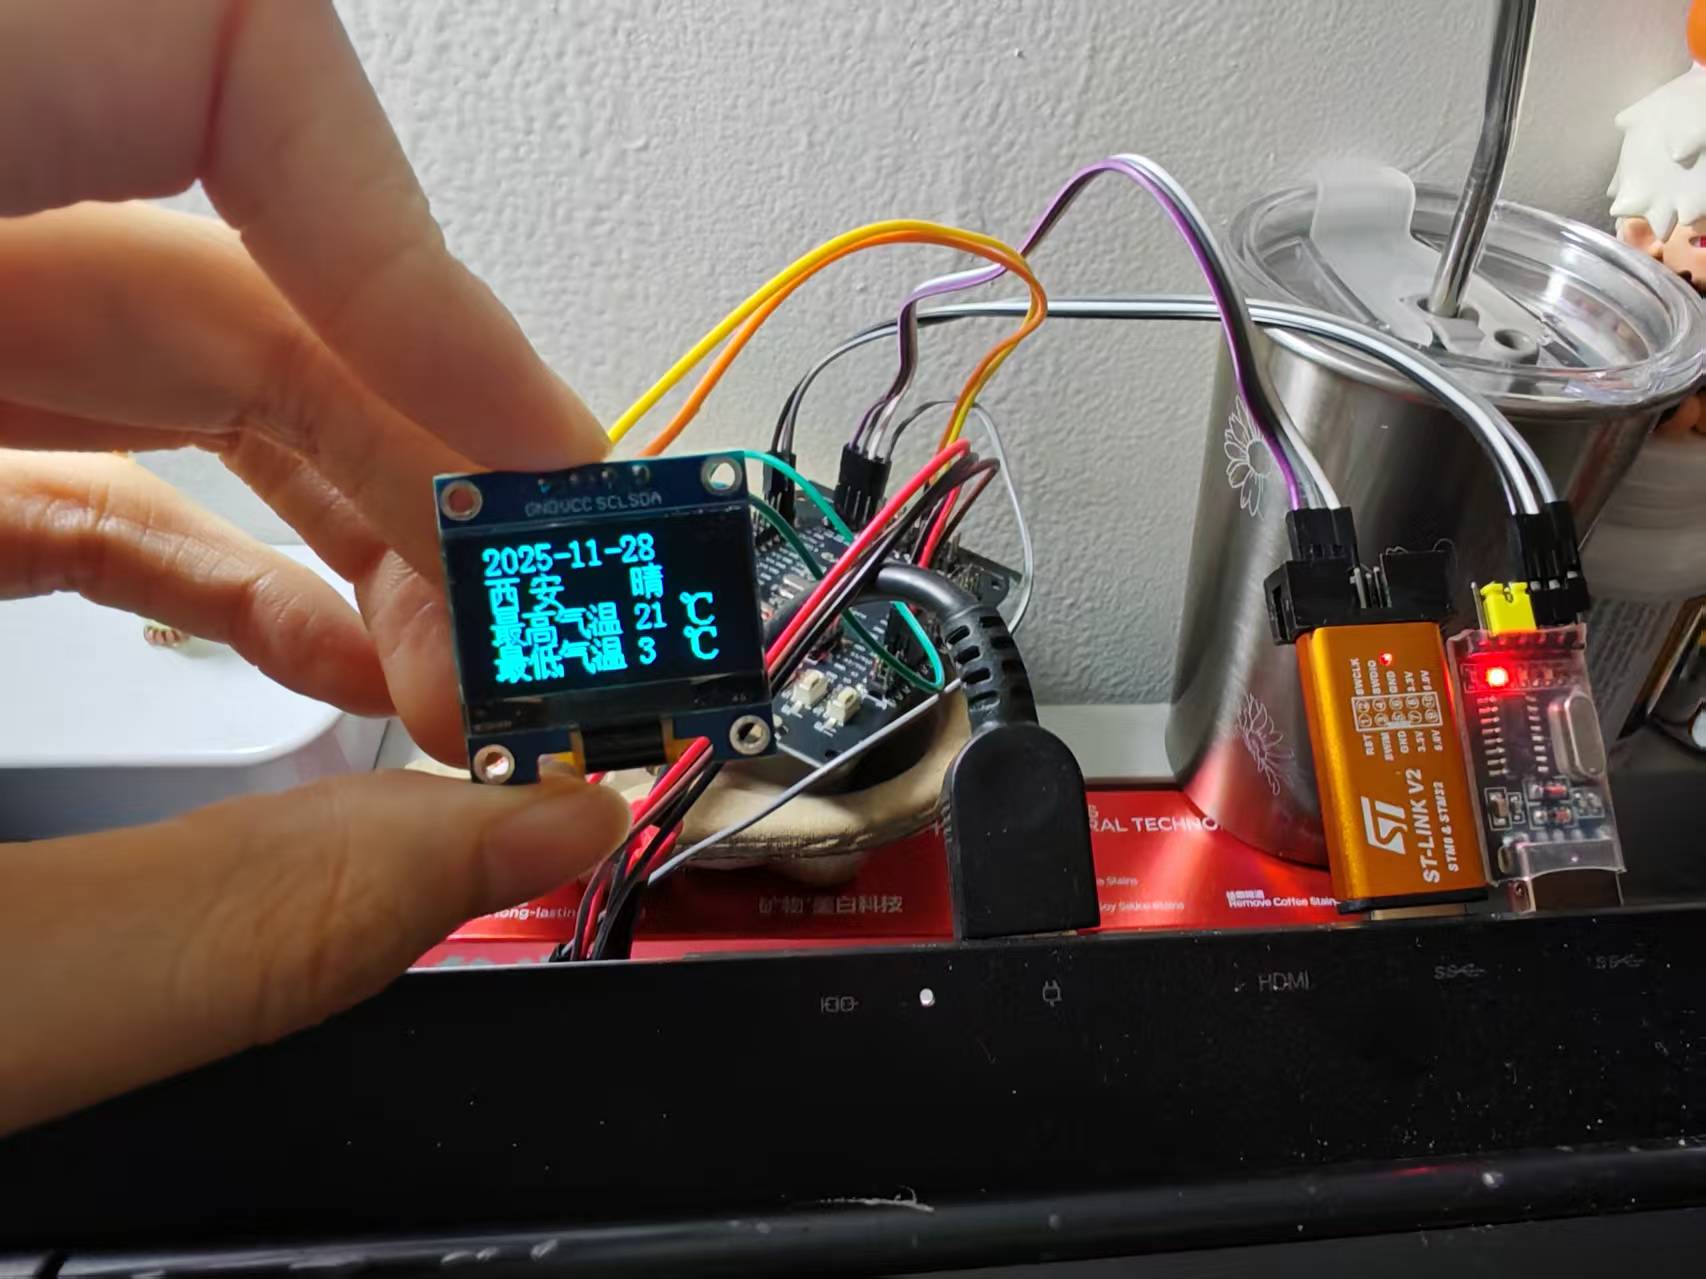
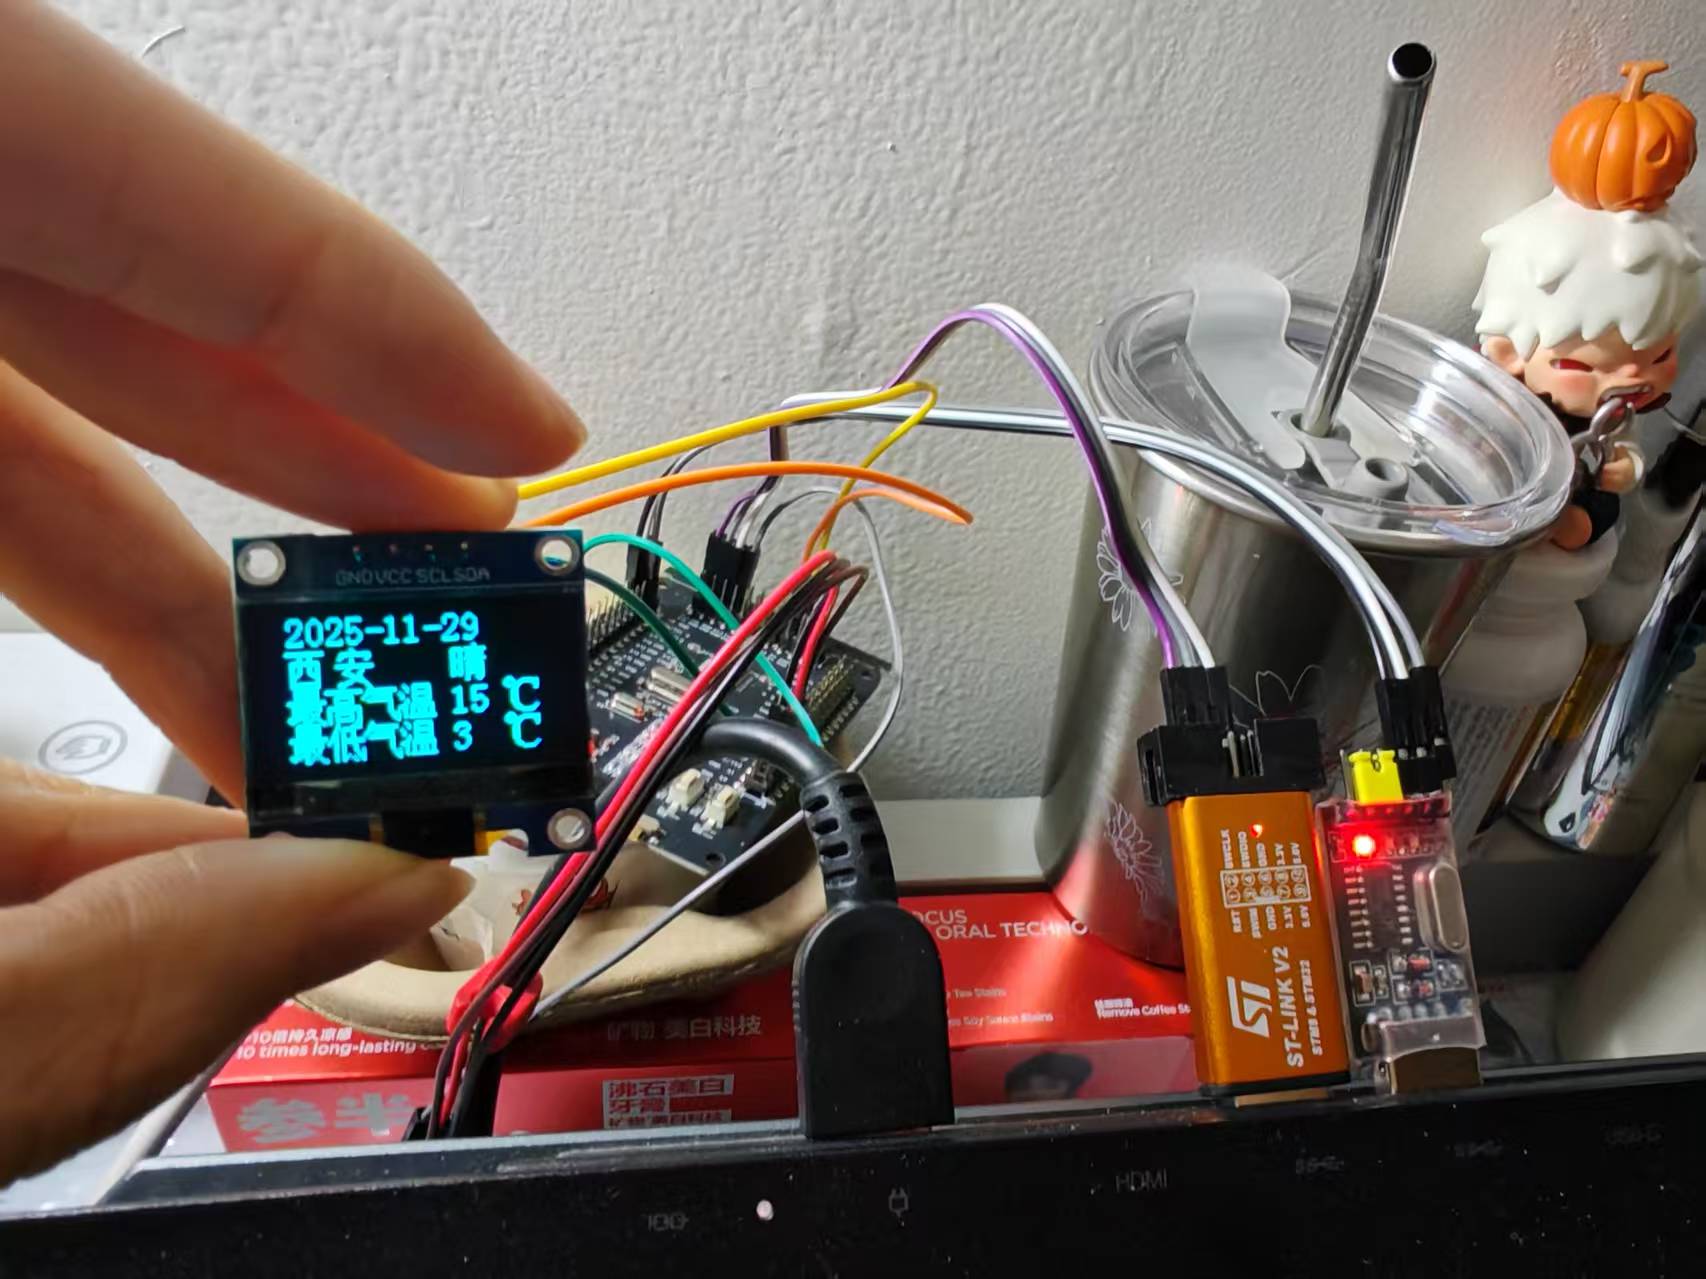
oled_show_string(10, 0, three_day_weather[day].date, 16);
uint8_t code_day = atoi(three_day_weather[day].code_day);
switch (code_day)
{
case 0:
case 1:
case 2:
case 3:
oled_show_chinese(77, 2, 8);//晴
break;
case 4:
case 5:
case 6:
case 7:
case 8:
case 9:
oled_show_chinese(77, 2, 9);//多
oled_show_chinese(95, 2, 10);//云
break;
case 10:
case 11:
case 12:
case 13:
case 14:
case 15:
case 16:
case 17:
case 18:
oled_show_chinese(77, 2, 12);//雨
break;
default:
break;
}
oled_show_string(77, 4, three_day_weather[day].high, 16);
oled_show_string(77, 6, three_day_weather[day].low, 16);
}别忘了最上面加#include "oled.h"头文件
main.c中
我们通过get_3days_weather()来获取三天的天气数据,保存在了一个数组weather_data(解析JSON各字段)里,这个数组每个元素都是一个结构体,结构体three_day_weather里又包含4个元素,即三天的天气情况、最高气温、最低气温
通过show_weather()来确定是第几天,show_weather(0)就代表是当天
cpp
#include "sys.h"
#include "delay.h"
#include "led.h"
#include "uart1.h"
#include "key.h"
#include "oled.h"
#include "cJSON.h"
#include "esp8266.h"
#include "weather.h"


int main(void)
{
    HAL_Init();                         /* 初始化HAL库 */
    stm32_clock_init(RCC_PLL_MUL9);     /* 设置时钟, 72Mhz */
 //   led_init();                         /* 初始化LED灯 */
    uart1_init(115200);
	  esp8266_init(115200);

		key_init();
    oled_init();
    printf("hello world!\r\n");

   //esp8266_weather_get(0);

    //oled_show_init();

	  get_3days_weather();
		show_weather(0);
}
此时show_weather(0)就代表是当天,核对一下心知天气给出来的天气信息(直接用串口调试助手展示了),√

换为show_weather(1),为明天,核对一下天气信息,√
换为show_weather(2),为后天,核对一下天气信息,√
接下来要设置按键
按下key1,更换到下一天;按下key2,更新天气
cpp
 uint8_t key_num = 0;
    uint8_t day = 0;
    while(1)
    {
        key_num = key_scan();
        if(key_num == 1)        //切换天气
        {
            day++;
            day %= 3;
            show_weather(day);
        }
        else if(key_num == 2)   //更新天气
        {
            printf("更新天气...\r\n");
            get_3days_weather();
            show_weather(0);
            day = 0;
		}
	}
最终结果实现了,视频再更新,今天有点晚了