引言
大家好!我是华为鸿蒙开发者社区的技术博主。随着鸿蒙生态的不断发展,越来越多开发者开始关注如何基于鸿蒙系统开发实用工具。
一、为什么需要鸿蒙口袋工具?
1.1 移动开发场景的变化
作为一名开发者,你是否经常遇到这样的场景:
在地铁上突然想到一个代码优化方案,想查看Git仓库
在会议间隙想快速查看项目Issue状态
需要向同事展示代码片段,但没有带电脑
传统Git客户端往往太重,而Web版在移动端体验不佳。这就是我们开发鸿蒙AtomGit口袋工具的意义!
1.2 鸿蒙的优势
原子化服务:无需安装,即点即用
跨设备流转:手机、平板、智慧屏无缝衔接
服务卡片:桌面级快捷访问
一次开发,多端部署:大大提升开发效率
二、开发环境准备(详细步骤)
2.1 硬件要求
内存:8GB以上(推荐16GB)
磁盘空间:10GB以上可用空间
操作系统:Windows 10 64位/ macOS 10.14+/ Ubuntu 18.04+2.2 软件安装步骤
步骤1:安装Node.js
TypeScript
# 验证Node.js安装
node --version  # 需要v14.19.1及以上
npm --version   # 需要6.14.16及以上
步骤2:安装DevEco Studio
访问华为开发者官网

下载对应系统的DevEco Studio 4.0+

安装过程注意事项:

选择自定义安装路径,避免中文路径

安装HarmonyOS SDK组件

配置环境变量步骤3:配置SDK
打开DevEco Studio,依次操作:
TypeScript
File → Settings → Appearance & Behavior → System Settings → HarmonyOS SDK
勾选以下组件:

SDK Platform (API 9+)

Tools (包括Previewer、Toolchains)

System Images (模拟器镜像)
三、创建第一个鸿蒙项目
3.1 项目创建流程
步骤1:新建项目
-
选择 File → New → Create Project
-
选择模板:Application → Empty Ability
-
配置项目信息:
TypeScript
   - Project Name: AtomGitPocket
   - Project Type: Application
   - Bundle Name: com.yourname.atomgitpocket
   - Save Location: 选择项目存储路径
   - Compile API Version: 9
   - Model: Stage
   - Language: ArkTS
   - Enable Super Visual: 关闭(纯代码开发)
步骤2:项目结构解析
创建成功后,项目结构如下:
TypeScript
AtomGitPocket/
├── AppScope/                    # 应用全局资源
│   ├── resources/              # 多语言、媒体资源
│   └── app.json5              # 应用级配置
├── entry/                      # 主模块
│   ├── src/main/
│   │   ├── ets/
│   │   │   ├── entryability/  # 应用入口
│   │   │   └── pages/         # 页面目录
│   │   ├── resources/         # 模块资源
│   │   └── module.json5       # 模块配置
│   └── build-profile.json5    # 构建配置
└── build-profile.json5        # 工程级构建配置
3.2 关键配置文件详解
app.json5 应用配置文件
TypeScript
{
  "app": {
    "bundleName": "com.yourname.atomgitpocket",
    "vendor": "yourname",
    "versionCode": 1000000,
    "versionName": "1.0.0",
    "icon": "$media:app_icon",
    "label": "$string:app_name",
    "description": "$string:description",
    // 配置原子化服务
    "atomicService": {
      "preloads": [
        {
          "moduleName": "entry"
        }
      ]
    }
  }
}
module.json5 模块配置文件
TypeScript
{
  "module": {
    "name": "entry",
    "type": "entry",
    "description": "$string:module_desc",
    "mainElement": "EntryAbility",
    "deviceTypes": [
      "phone",
      "tablet"
    ],
    "deliveryWithInstall": true,
    "installationFree": true,  // 安装免安装
    "pages": "$profile:main_pages",
    "abilities": [
      {
        "name": "EntryAbility",
        "srcEntry": "./ets/entryability/EntryAbility.ets",
        "description": "$string:EntryAbility_desc",
        "icon": "$media:icon",
        "label": "$string:EntryAbility_label",
        "startWindowIcon": "$media:icon",
        "startWindowBackground": "$color:start_window_background",
        // 配置为原子化服务
        "skills": [
          {
            "entities": [
              "entity.system.home"
            ],
            "actions": [
              "action.system.home"
            ]
          }
        ]
      }
    ]
  }
}
四、Hello World!第一个页面
4.1 修改主页面代码
打开 entry/src/main/ets/pages/Index.ets,修改内容:
TypeScript
@Entry
@Component
struct Index {
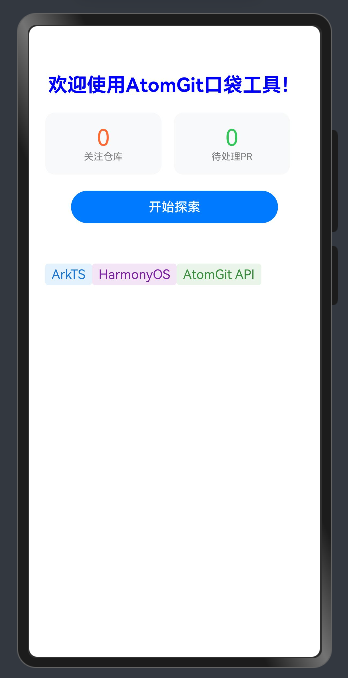
@State message: string = '欢迎使用AtomGit口袋工具!'
@State repoCount: number = 0
build() {
Column({ space: 20 }) {
// 应用标题
Text(this.message)
.fontSize(24)
.fontWeight(FontWeight.Bold)
.fontColor(Color.Blue)
// 统计卡片
Row({ space: 15 }) {
Column() {
Text('0')
.fontSize(28)
.fontColor('#FF6B35')
Text('关注仓库')
.fontSize(12)
.fontColor(Color.Gray)
}
.padding(15)
.backgroundColor('#F8F9FA')
.borderRadius(12)
.width('45%')
Column() {
Text('0')
.fontSize(28)
.fontColor('#34C759')
Text('待处理PR')
.fontSize(12)
.fontColor(Color.Gray)
}
.padding(15)
.backgroundColor('#F8F9FA')
.borderRadius(12)
.width('45%')
}
.width('100%')
// 功能按钮
Button('开始探索', { type: ButtonType.Capsule })
.width('80%')
.height(40)
.backgroundColor('#007AFF')
.fontColor(Color.White)
.onClick(() => {
this.message = '正在连接到AtomGit...'
// 这里将添加实际功能
})
// 技术栈标签
Flex({ wrap: FlexWrap.Wrap }) {
Text('ArkTS')
.padding({ left: 8, right: 8, top: 4, bottom: 4 })
.backgroundColor('#E3F2FD')
.borderRadius(4)
.fontColor('#1976D2')
Text('HarmonyOS')
.padding({ left: 8, right: 8, top: 4, bottom: 4 })
.backgroundColor('#F3E5F5')
.borderRadius(4)
.fontColor('#7B1FA2')
Text('AtomGit API')
.padding({ left: 8, right: 8, top: 4, bottom: 4 })
.backgroundColor('#E8F5E8')
.borderRadius(4)
.fontColor('#388E3C')
}
.width('100%')
.margin({ top: 30 })
}
.width('100%')
.height('100%')
.padding(20)
.backgroundColor('#FFFFFF')
}
}4.2 运行预览效果
使用预览器
在代码编辑区右侧找到预览按钮,点击刷新图标更新预览
或者使用快捷键:Ctrl + Alt + P (Windows) / Cmd + Option + P (Mac)
在模拟器运行
TypeScript
# 步骤:
# 1. Tools → Device Manager → 创建模拟器
# 2. 选择Phone → 下载镜像 → 完成创建
# 3. 点击运行按钮或 Shift + F10
五、配置AtomGit API访问
5.1 了解AtomGit API
AtomGit提供了一系列开放的REST API,我们可以通过HTTP请求访问:
仓库信息查询
代码浏览
Issue管理
用户信息获取
5.2 配置网络权限
在 module.json5 中添加权限:
TypeScript
{
  "module": {
    // ... 其他配置
    "requestPermissions": [
      {
        "name": "ohos.permission.INTERNET"
      }
    ]
  }
}
5.3 创建API配置文件
在 entry/src/main/ets/utils/ 目录下创建 config.ets:
TypeScript
// API配置常量
export class ApiConfig {
  // AtomGit API基础地址
  static readonly BASE_URL = 'https://atomgit.com/api/v1';

  // 接口端点
  static readonly ENDPOINTS = {
    // 搜索相关
    SEARCH_REPOS: '/search/repositories',
    SEARCH_CODE: '/search/code',
    SEARCH_USERS: '/search/users',

    // 仓库相关
    REPO_INFO: '/repos/:owner/:repo',
    REPO_CONTENTS: '/repos/:owner/:repo/contents',
    REPO_ISSUES: '/repos/:owner/:repo/issues',
    REPO_PULLS: '/repos/:owner/:repo/pulls',

    // 用户相关
    USER_INFO: '/users/:username',
    USER_REPOS: '/users/:username/repos'
  };

  // API调用限制(免费版)
  static readonly RATE_LIMIT = {
    requestsPerHour: 60,  // 每小时请求数
    burstLimit: 10        // 突发请求限制
  };

  // 默认请求参数
  static readonly DEFAULT_PARAMS = {
    page: 1,
    per_page: 20,
    sort: 'updated',
    order: 'desc'
  };

  // 获取完整API地址
  static getUrl(endpoint: string, params?: Record<string, string>): string {
    let url = `${this.BASE_URL}${endpoint}`;

    // 替换路径参数
    if (params) {
      Object.keys(params).forEach(key => {
        if (url.includes(`:${key}`)) {
          url = url.replace(`:${key}`, params[key]);
        }
      });
    }

    return url;
  }
}
六、今日总结
今日学习要点:
✅ 成功搭建鸿蒙开发环境
✅ 创建第一个鸿蒙原子化服务项目
✅ 理解鸿蒙项目结构
✅ 编写第一个交互页面
✅ 配置AtomGit API访问准备
