前言
本次参加开源鸿蒙跨平台开发学习活动,选择了 React Native 开发 HarmonyOS技术栈,在学习的同时顺便整理成一份系列笔记,记录从环境到开发的全过程。本篇作为第八篇,在前几篇文章中,我们已经完成了 React Native 项目在 OpenHarmony 上的环境搭建、基础组件使用、页面路由等内容。
本篇继续推进 GitCode 口袋工具 App 的实战开发,重点完成两个核心模块:
-
首页的「Star 仓库列表」
-
探索页的「仓库目录 Tree」
围绕这两个功能,我们将进一步完善:
-
统一网络请求层(axios + token 自动注入 + 错误处理)
-
仓库列表卡片组件
RepoItem的 UI 封装 -
首页的并发数据加载与 FlatList 性能优化
-
路由结构与自定义底部 TabBar
-
Harmony 调试与离线包打包流程
-
实战踩坑点与修复方案
这是本系列最偏"工程化"的一篇,基本按真实项目架构来组织代码。
一、项目背景:在 HarmonyOS 上做 GitCode 小工具 App
当前工程基于:
| 技术 | 版本 |
|---|---|
| React Native | 0.72.5 |
| React | 18.2 |
| Harmony 适配 | @react-native-oh/react-native-harmony@0.72.90 |
| Node | >=16 |
GitCode 口袋工具包含三个页面:
-
首页:展示用户资料 + Star 仓库列表
-
探索页:展示仓库 Tree(文件夹/文件),支持层级跳转
-
设置页:简单展示配置项(占位)
为了让项目更可维护,需要:
-
统一网络层
-
组件化封装
-
路由清晰
-
Harmony 调试流程完善
下面进入具体实现。
二、项目结构(关键文件)
src/
├── api/ # 网络接口封装
├── components/ # 封装组件
├── navigation/ # 路由/TabBar
├── screens/ # 三个页面
├── types/ # TS 类型
└── assets/ # 图标/样式
关键入口:
-
/App.tsx:渲染自定义 TabBar -
src/navigation/RootTabs.tsx:三个 Tab 页面 -
src/screens/Home.tsx:用户信息 + Star 列表 -
src/screens/Explore.tsx:仓库 Tree 浏览界面 -
src/components/RepoItem.tsx:仓库卡片 UI
三、统一网络请求层(axios + token 注入 + 错误格式化)
真实项目中必须有统一网络层,本项目网络层在 src/api/client.ts 里处理:
自动注入 GitCode 私有 token
错误格式化输出
统一 baseURL
client.ts(核心代码)
TypeScript
import axios from 'axios';

let privateToken = '';

export function setPrivateToken(token?: string) {
  if (token) privateToken = token;
}

export const http = axios.create({
  baseURL: 'https://api.gitcode.com/api/v5/',
  timeout: 10000,
});

http.interceptors.request.use(config => {
  const headers = config.headers ?? {};
  headers['private-token'] = privateToken;
  config.headers = headers;
  return config;
});

http.interceptors.response.use(res => res, err => Promise.reject(err));

export function getErrorMessage(error: unknown): string {
  if (axios.isAxiosError(error)) {
    const data = error.response?.data as any;
    const msg =
      typeof data === 'string'
        ? data
        : data?.message || data?.error || error.message;
    return msg;
  }
  return String((error as any)?.message || error);
}
四、调用 GitCode API:用户 & Star 列表 & 仓库 Tree
1)用户信息 API
TypeScript
export async function fetchUserProfile(): Promise<UserProfile> {
  return (await http.get('users/qiaomu8559968')).data;
}
2)Star 列表 API
GitCode 需要附加 access_token:
TypeScript
export async function fetchStarred(username: string): Promise<Repo[]> {
  const res = await http.get(`users/${username}/starred`, {
    params: {access_token: ''},
  });
  return res.data;
}
3)仓库 Tree API
TypeScript
export async function fetchRepoTree(owner, repo, sha) {
  return (await http.get(`repos/${owner}/${repo}/git/trees/${sha}`)).data;
}
五、RepoItem:仓库卡片组件封装
首页渲染大量仓库列表,因此需要一个 UI 稳定、参数清晰的组件。
传入属性
-
logo
-
name
-
description
-
language
-
stars
-
commits
-
isStarred
-
onToggleStar(本地态切换)
UI 要点
-
左侧仓库 Logo
-
右侧标题行 + Star 按钮
-
描述文本
-
语言/Star 数/提交数 统计区
-
行宽需设
width: '100%',否则在 FlatList 中会压缩
六、首页:并发请求 + FlatList 虚拟化优化
首页的逻辑非常典型:
-
并发请求用户和 Star 列表
-
处理字段映射与兜底
-
用 FlatList 作为根容器(避免 ScrollView 嵌套虚拟列表)
-
用
ListHeaderComponent渲染用户信息区
字段映射策略(GitCode 接口字段较杂)
TypeScript
名称     => name || path || full_name
Star    => stargazers_count
Commits => watchers_count(示例接口不含 commits)
语言     => language
本地 Star 逻辑
暂不请求 GitCode Star API,只做 UI 级操作:
TypeScript
onToggleStar = id => {
setList(prev => prev.map(r => (r.id === id ? {...r, isStarred: !r.isStarred} : r)))
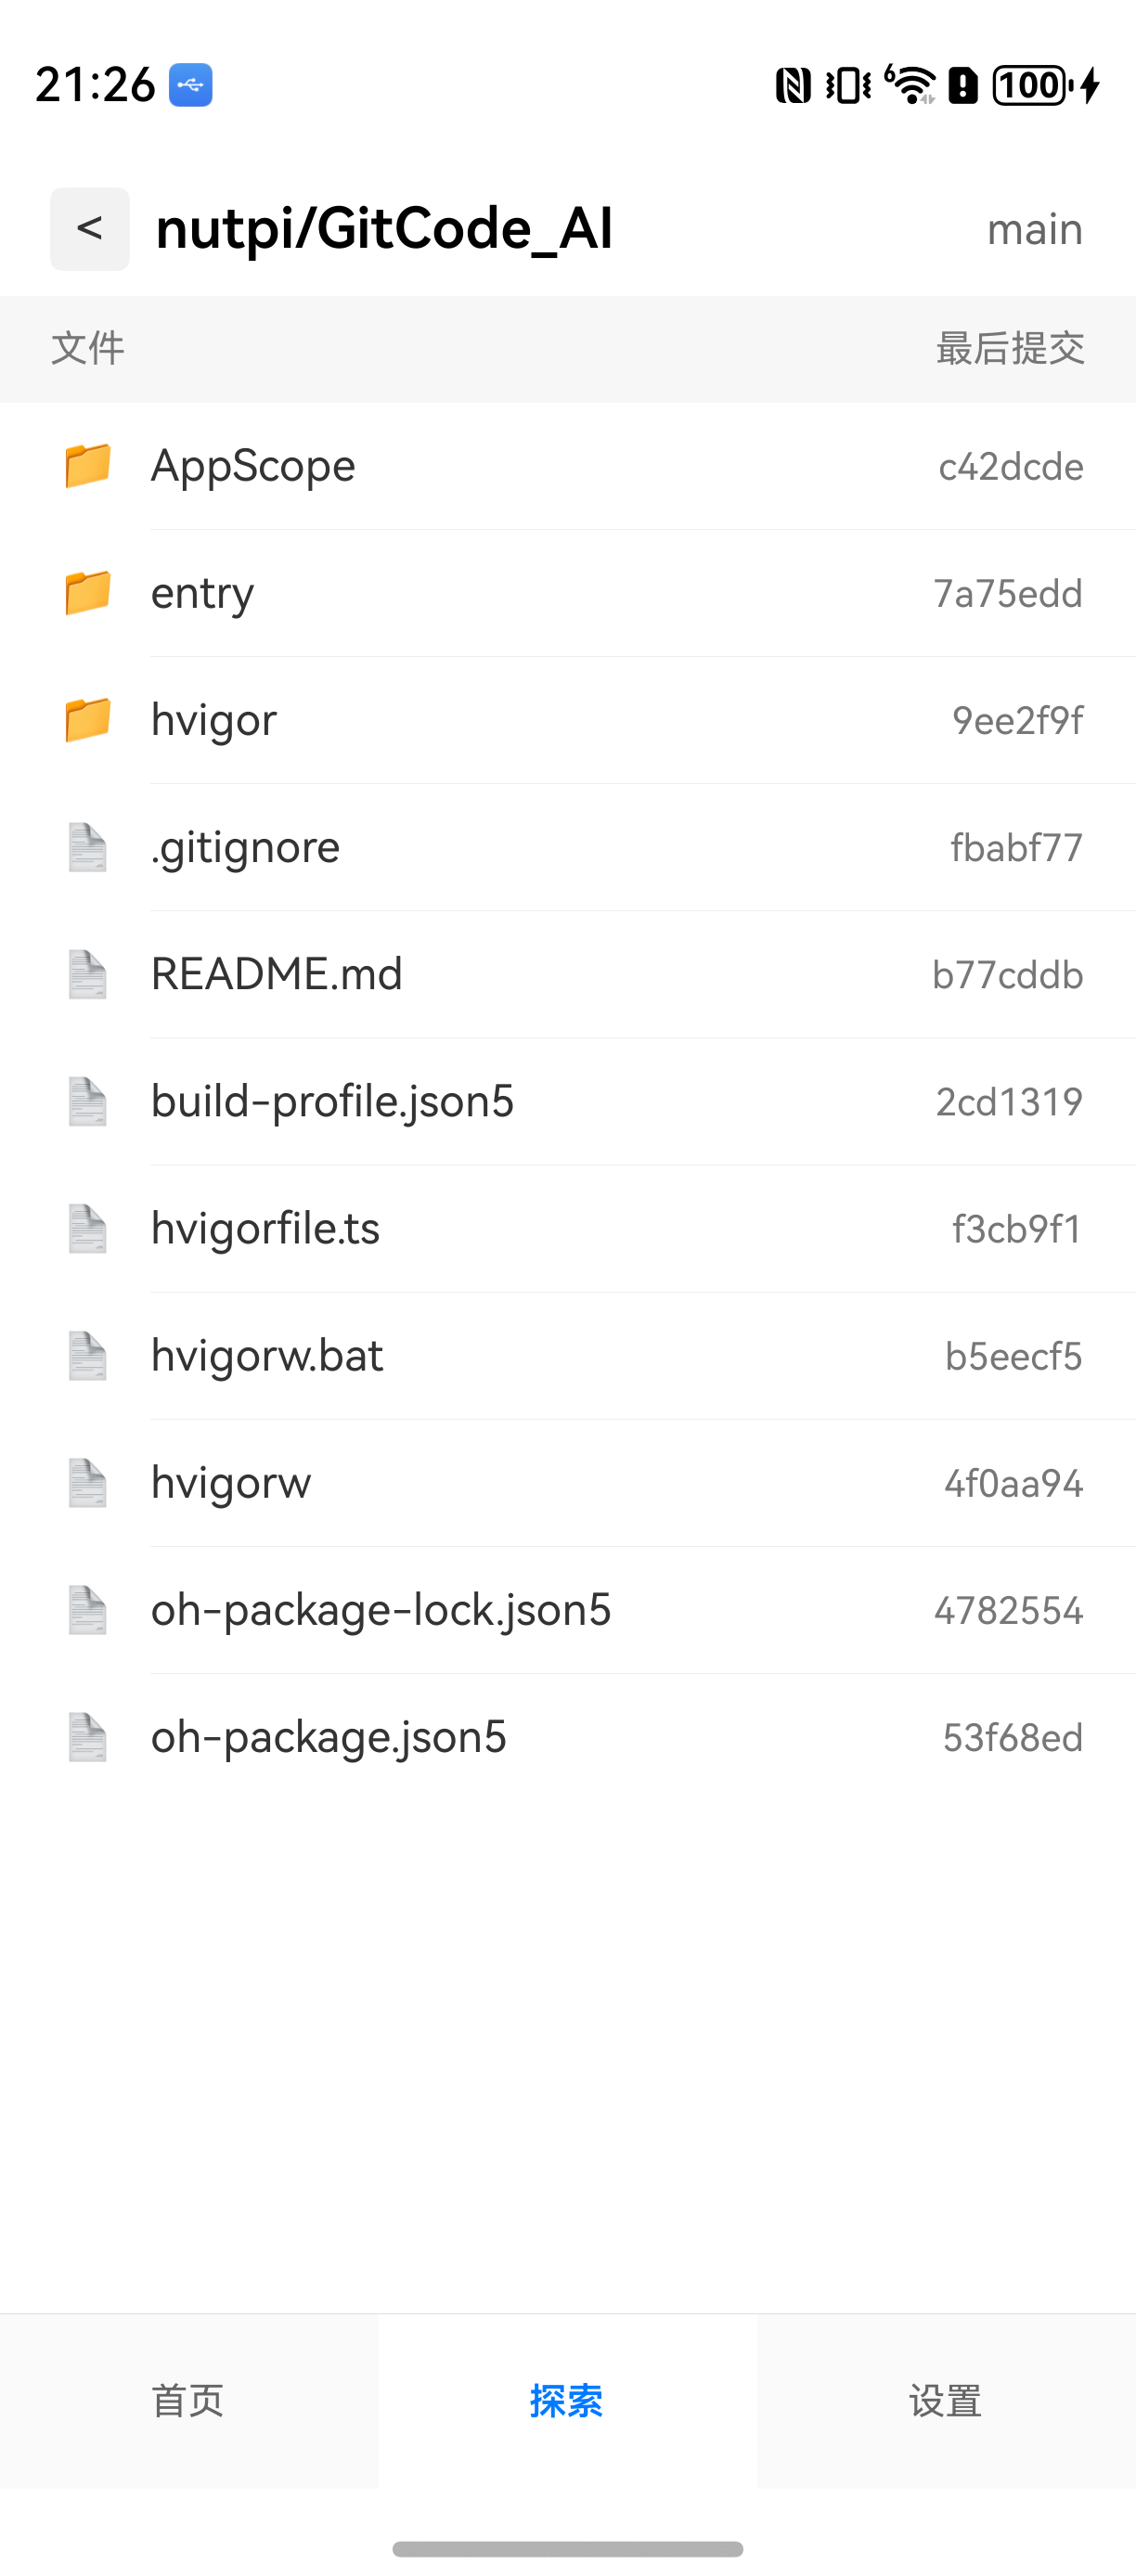
}七、探索页:仓库目录 Tree 展示(文件夹 + 面包屑导航)
GitCode Tree 接口可返回:
-
type: "tree"= 文件夹 -
type: "blob"= 文件
本页面实现:
目录优先排序
图标区分 folder / file
面包屑导航
"main" 分支标签
结构示例:
src/screens/Explore.tsx
├─ 面包屑渲染
├─ Tree 加载逻辑
├─ TreeList 渲染
└─ 排序/图标映射
- src/screens/Explore.tsx
TypeScript
import React, {useEffect, useState} from 'react';
import {View, Text, StyleSheet, FlatList, ActivityIndicator, Pressable} from 'react-native';
import {fetchRepoTree} from '../api/repos';
import {RepoTreeResponse, TreeItem} from '../types/tree';

type Node = TreeItem;
const Sep = () => <View style={styles.sep} />;

export default function Explore(): JSX.Element {
  const [owner] = useState('nutpi');
  const [repo] = useState('GitCode_AI');
  const [stack, setStack] = useState<string[]>(['main']);
  const [data, setData] = useState<Node[]>([]);
  const [loading, setLoading] = useState(false);
  const [error, setError] = useState('');

  const currentSha = stack[stack.length - 1];

  useEffect(() => {
    setLoading(true);
    setError('');
    fetchRepoTree(owner, repo, currentSha)
      .then((res: RepoTreeResponse) => {
        const nodes = (res.tree || []).slice().sort((a, b) =>
          a.type === b.type ? a.name.localeCompare(b.name) : a.type === 'tree' ? -1 : 1,
        );
        setData(nodes);
      })
      .catch(e => setError(String(e?.message || e)))
      .finally(() => setLoading(false));
  }, [owner, repo, currentSha]);

  const goInto = (sha: string) => setStack(prev => [...prev, sha]);
  const goBack = () => setStack(prev => (prev.length > 1 ? prev.slice(0, prev.length - 1) : prev));

  const renderItem = ({item}: {item: Node}) => {
    const isDir = item.type === 'tree';
    return (
      <Pressable style={styles.row} onPress={() => { if (isDir) goInto(item.sha); }}>
        <Text style={[styles.icon, isDir ? styles.iconDir : styles.iconFile]}>{isDir ? '📁' : '📄'}</Text>
        <Text style={styles.name}>{item.name}</Text>
        <View style={styles.metaRight}>
          <Text style={styles.commitText}>{item.sha.slice(0, 7)}</Text>
        </View>
      </Pressable>
    );
  };

  if (loading) return (<View style={styles.center}><ActivityIndicator /><Text style={styles.loadingText}>加载中</Text></View>);
  if (error) return (
    <View style={styles.center}>
      <Text style={styles.errorText}>请求失败:{error}</Text>
      <Pressable style={styles.btn} onPress={() => setStack([...stack])}><Text style={styles.btnText}>重试</Text></Pressable>
    </View>
  );

  return (
    <View style={styles.container}>
      <View style={styles.header}>
        <Pressable style={styles.breadcrumbBtn} onPress={goBack}><Text style={styles.breadcrumbText}>{'<'}</Text></Pressable>
        <Text style={styles.repoTitle}>{owner}/{repo}</Text>
        <Text style={styles.branch}>{currentSha}</Text>
      </View>
      <View style={styles.tableHeader}>
        <Text style={[styles.th, styles.thName]}>文件</Text>
        <Text style={[styles.th, styles.thCommit]}>最后提交</Text>
      </View>
      <FlatList
        data={data}
        keyExtractor={(item, index) => item.sha + ':' + index}
        renderItem={renderItem}
        ItemSeparatorComponent={Sep}
        contentContainerStyle={styles.listContent}
      />
    </View>
  );
}

const styles = StyleSheet.create({
  container: {flex: 1, backgroundColor: '#fff'},
  center: {flex: 1, alignItems: 'center', justifyContent: 'center'},
  loadingText: {marginTop: 8, fontSize: 14, color: '#666'},
  errorText: {fontSize: 14, color: '#d00'},
  header: {flexDirection: 'row', alignItems: 'center', paddingHorizontal: 16, paddingTop: 16, paddingBottom: 8},
  breadcrumbBtn: {paddingHorizontal: 8, paddingVertical: 4, borderRadius: 4, backgroundColor: '#f2f2f2'},
  breadcrumbText: {fontSize: 16, color: '#333'},
  repoTitle: {marginLeft: 8, fontSize: 18, fontWeight: '600'},
  branch: {marginLeft: 'auto', fontSize: 14, color: '#666'},
  tableHeader: {flexDirection: 'row', paddingHorizontal: 16, paddingVertical: 10, backgroundColor: '#f7f7f7'},
  th: {fontSize: 12, color: '#777'},
  thName: {flex: 1},
  thCommit: {width: 120, textAlign: 'right'},
  row: {flexDirection: 'row', alignItems: 'center', paddingHorizontal: 16, paddingVertical: 12},
  icon: {width: 24, textAlign: 'center', marginRight: 8},
  iconDir: {},
  iconFile: {},
  name: {flex: 1, fontSize: 14, color: '#333'},
  metaRight: {width: 120, alignItems: 'flex-end'},
  commitText: {fontSize: 12, color: '#777'},
  listContent: {paddingBottom: 20},
  btn: {marginTop: 12, paddingHorizontal: 12, paddingVertical: 8, borderRadius: 6, backgroundColor: '#007aff'},
  btnText: {color: '#fff', fontSize: 14, fontWeight: '600'},
  sep: {height: StyleSheet.hairlineWidth, backgroundColor: '#eee', marginLeft: 48},
});- src/types/tree.ts
TypeScript
export type TreeItem = {
  type: 'tree' | 'blob';
  name: string;
  path: string;
  mode: string;
  sha: string;
  md5?: string;
};

export type RepoTreeResponse = {
  tree: TreeItem[];
  sha: string;
};
八、路由结构 + 自定义 BottomTabBar
你在前文已经铺好基础路由,本篇补充 BottomTabBar 的实践。
-
RootTabs.tsx创建 3 个 Tab 页面 -
BottomTabBar.tsx自绘底栏(解决 Harmony 默认样式不统一的问题)
底栏结构典型:
首页 | 探索 | 设置
图标可放 assets 或使用 lucide-react-native。
九、Harmony 调试与离线包构建(重点踩坑)
开发模式(Metro)
npm run start
hdc rport tcp:8081 tcp:8081
设备 Reload 加载:
TypeScript
http://localhost:8081/index.bundle?platform=harmony离线包构建
TypeScript
npx react-native bundle-harmony --dev false生成文件:
TypeScript
harmony/entry/src/main/resources/rawfile/bundle.harmony.js打包 hpk 时必须被包含。
最终效果:

十、踩坑记录 & 修复方案
1)"None of the provided JSBundleProviders was able to load a bundle"
解决:
-
确保端口转发
-
Metro 正常运行
-
hpk 内包含离线包
2)ScrollView 嵌套 FlatList 报错
解决:
-
使用 FlatList 作为根
-
头部信息用 ListHeaderComponent
3)列表项宽度不够
解决:
- RepoItem 外层必须写
width: '100%'
4)ESLint/Prettier 一堆格式错误
解决:
-
JSX 属性换行
-
拆出 StyleSheet
-
import 按规则排序
十一、可扩展方向
-
Skeleton 骨架屏
-
分页 + 加载更多
-
使用 SWR / React Query
-
useRequest通用 Hook -
语言标签 color mapping
-
补充 "最后提交信息" 接口
总结
本篇完成了 GitCode 小工具的核心结构,包括:
-
统一网络层
-
仓库列表组件 RepoItem
-
首页并发加载与性能优化
-
仓库 Tree 浏览
-
路由与 TabBar
-
Harmony 调试/打包实践