1. 介绍
TB6612FNG模块------用于电机驱动
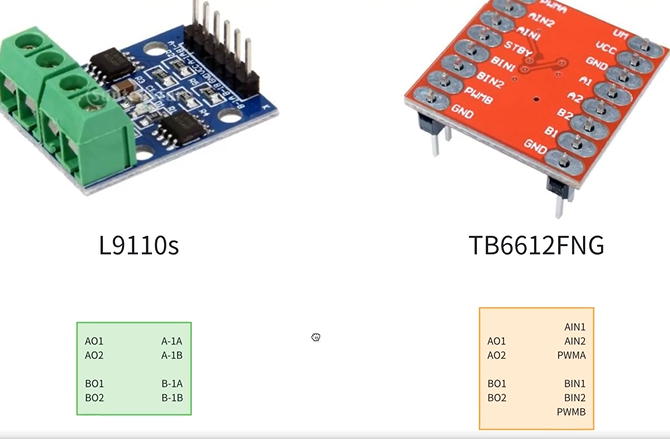
L9110s:通过两个引脚,控制电机正转、反转、(PWM)转的多快转的多慢
TB6612FNG:两个 引脚,控制电机正转、反转,PWM信号单独拿出来控制转速
TB6612FNG接线
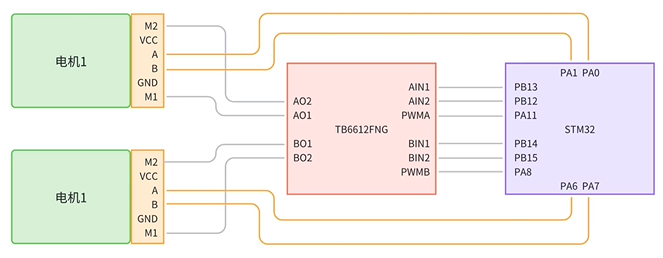
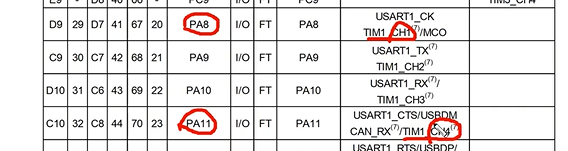
TB6612FNG的PWM信号(时钟)连接STM32的PA8和PA11⬅查产品手册
2. 电机驱动模块基本实现
motor
motor_init
经过前面介绍,motor要初始化2个东西:
①普通gpio口(PB12、PB13、PB14、PB15) ②PWM(PB8、PB11)
cpp
void motor_gpio_init(void)
{
    GPIO_InitTypeDef gpio_initstruct;
    //打开时钟
    __HAL_RCC_GPIOB_CLK_ENABLE();                           // 使能GPIOB时钟
    __HAL_RCC_GPIOA_CLK_ENABLE();

    //调用GPIO初始化函数
    gpio_initstruct.Pin = GPIO_PIN_12 | GPIO_PIN_13 | GPIO_PIN_14 | GPIO_PIN_15;          // 两个LED对应的引脚
    gpio_initstruct.Mode = GPIO_MODE_OUTPUT_PP;             // 推挽输出
    gpio_initstruct.Pull = GPIO_PULLUP;                     // 上拉
    gpio_initstruct.Speed = GPIO_SPEED_FREQ_HIGH;           // 高速
    HAL_GPIO_Init(GPIOB, &gpio_initstruct);
}
左轮前进、后退
cpp
void motor_left_forward(void)
{
    HAL_GPIO_WritePin(GPIOB, GPIO_PIN_13, GPIO_PIN_SET);
    HAL_GPIO_WritePin(GPIOB, GPIO_PIN_12, GPIO_PIN_RESET);
}

void motor_left_backward(void)
{
    HAL_GPIO_WritePin(GPIOB, GPIO_PIN_13, GPIO_PIN_RESET);
    HAL_GPIO_WritePin(GPIOB, GPIO_PIN_12, GPIO_PIN_SET);
}
边写边调试
右轮前进、后退
cpp
void motor_right_forward(void)
{
    HAL_GPIO_WritePin(GPIOB, GPIO_PIN_14, GPIO_PIN_SET);
    HAL_GPIO_WritePin(GPIOB, GPIO_PIN_15, GPIO_PIN_RESET);
}

void motor_right_backward(void)
{
    HAL_GPIO_WritePin(GPIOB, GPIO_PIN_14, GPIO_PIN_RESET);
    HAL_GPIO_WritePin(GPIOB, GPIO_PIN_15, GPIO_PIN_SET);
}
但这时候还控制不了速度,所以要加入PWM控制转速(车速)
3. 电机驱动加入PWM
cpp
void motor_pwm_init(uint16_t arr, uint16_t psc)
{
    TIM_OC_InitTypeDef pwm_config = {0};

    pwm_handle.Instance = TIM1;
    pwm_handle.Init.Prescaler = psc;
    pwm_handle.Init.Period = arr;
    pwm_handle.Init.CounterMode = TIM_COUNTERMODE_UP;
    HAL_TIM_PWM_Init(&pwm_handle);

    pwm_config.OCMode = TIM_OCMODE_PWM1;
    pwm_config.Pulse = 0;
    pwm_config.OCPolarity = TIM_OCPOLARITY_HIGH;
    HAL_TIM_PWM_ConfigChannel(&pwm_handle, &pwm_config, TIM_CHANNEL_1);
    HAL_TIM_PWM_ConfigChannel(&pwm_handle, &pwm_config, TIM_CHANNEL_4);
    HAL_TIM_PWM_Start(&pwm_handle, TIM_CHANNEL_1);
    HAL_TIM_PWM_Start(&pwm_handle, TIM_CHANNEL_4);
}
cpp
void motor_init(void)
{
    motor_gpio_init();
    motor_pwm_init(7200 - 1, 0);
}
修改PWM的值
cpp
//修改CCR值的函数
void pwm_left_motor_set(uint16_t val)
{
__HAL_TIM_SET_COMPARE(&pwm_handle, TIM_CHANNEL_1, val);
}
void pwm_right_motor_set(uint16_t val)
{
__HAL_TIM_SET_COMPARE(&pwm_handle, TIM_CHANNEL_4, val);
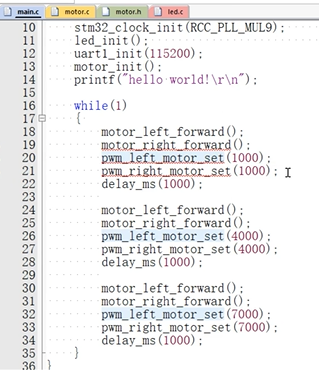
}边写边调试,main函数中加入低速、中速、高速
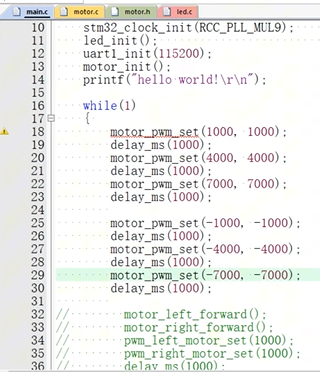
我们想再智能点,把左轮右轮的值作为参数传进来,>0就是前进,<0就是后退
这个motor_pwm_set函数才是我们后面真正想要使用到的函数
cpp
void motor_pwm_set(int16_t motor1, int16_t motor2)
{
    if(motor1 > 0)
    {
        motor_left_forward();
        pwm_left_motor_set(myabs(motor1));
    }
    else
    {
        motor_left_backward();
        pwm_left_motor_set(myabs(motor1));
    }

    if(motor2 > 0)
    {
        motor_right_forward();
        pwm_right_motor_set(myabs(motor2));
    }
    else
    {
        motor_right_backward();
        pwm_right_motor_set(myabs(motor2));
    }
}
其中,myabs是一个取绝对值函数
cpp
int myabs(int a)
{
    int temp;

    if(a < 0)
        temp = -a;
    else
        temp = a;

    return temp;
}
调试一下,main函数中
编码器测速模块👇
MPU6050测量小车姿态模块👇